1
E
L
I
T
E
®
ULTRA WAVETMMicrowave Hood Combination
Use & Ca_°e Guide
Combinacibn
Microondas
de ULTRA WAVE TM
Campana
Guia de uso y cuidado
Models/Modelos
721.64682/721.64683
721.64684/721.64689
\
3828W5A3631
Sears, Roebuck and Co., Hoffman Estates, IL 60179
www.sears.com
Table of
Contents
Microwave Hood
Combination
Warranty
Warranty ...........................................................
2
Sears Service ..................................................
3
Microwave Oven Safety .................................. 4
Getting to Know Your
Microwave Oven .............................................. 7
How your kenmore ULTRA WAVE TM
microwave hood combination works ............... 7
Radio interference .......................................... 7
Testing your microwave oven ......................... 8
Testing your dinnerware or cookware ............ 8
Operating safety precautions .......................... 8
Electrical connection ...................................... 8
Microwave oven features ............................... 9
Control panel features ................................... 10
Using Your Microwave Oven ....................... 12
Audible Signals ............................................. 12
Interrupting Cooking ...................................... 12
Clock .............................................................
12
Child Lock .....................................................
12
Kitchen Timer ................................................
13
Exhaust Fan ..................................................
13
Cooktop Light ................................................
13
Express Defrost ............................................ 13
Add Minute ....................................................
14
Timed Cooking .............................................. 14
Multi-stage Cooking ...................................... 14
Microwave Power Levels .............................. 15
Auto Defrost ..................................................
16
Auto defrost table .......................................... 17
Auto defrost table (Cont.) .............................. 18
Defrosting tips .............................................. 19
Hold Warm ....................................................
19
Sure Simmer ................................................. 20
Using Sensor Cooking .................................. 21
Sensor Cooking ............................................ 21
Potato (Example) .......................................... 21
More/Less ..................................................... 21
Sensor Cooking Table .................................. 22
Auto Cook, Auto Reheat ............................... 23
Auto Cook Table, Auto Reheat Table ........... 24
Melt, Melt Table ............................................ 25
Soften, Soften Table ..................................... 25
Caring for Your Microwave Oven ................. 26
Caring for the filters ....................................... 27
Replacing the cooktop and oven lights ......... 28
Microwave Cooking Tips ............................... 30
Questions and Answers ................................ 32
Troubleshooting
............................................. 33
Service ............................................. Back cover
FULL
ONE-YEAR
MICROWAVE
ON
COMBINATION
For one year from the date of purchase, if this
Kenmore Microwave Hood Combination fails due to
a defect in material or workmanship, Sears will
repair it free of charge.
FULL
FIVE-YEAR
WARRANTY
ON THE
MAGNETRON
For five years from the date of purchase, if the
magnetron in this Kenmore Microwave Hood
Combination fails due to a defect in material or
workmanship, Sears will repair it free of charge.
The above warranty coverage applies only to
Microwave Hood Combinations which are used for
private household purposes.
WARRANTY SERVICE IS AVAILABLE BY
SIMPLY CONTACTING SEARS SERVICE AT
I-8O0-4-MY-HOME ®
This warranty applies only while this product is in
use in the United States.
This warranty gives you specific legal rights, and
you may also have other rights which vary from
state to state.
Sears, Roebuck and Co.,
Dept. 817WA,
Hoffman Estates, IL 60179
For service call:
1-8O0-4-MY-HOME ®
(1-800-469-4663)
Please record your model's information.
Whenever you call to request service for your
appliance, you need to know your complete model
number and serial number. You can find this
information on the model and serial number
label/plate at the upper side of cavity front in your
Microwave oven. Also, record the other information
shown below.
Model Number
Serial Number
Purchase Date
2
WARRANTY
HOOD
Sears Service
Master Protection Agreements
Congratulations on making a smart purchase.
Your new Kenmore _'product is designed and manufactured for years of dependable operation.
But like all products, it may require preventive maintenance or repair from time to time.
That's when having a Master Protection Agreement can save you money and aggravation.
Purchase a Master Protection Agreement now and protect yourself from unexpected hassle
and expense.
The Master Protection Agreement also helps extend the life of your new product. Here's
what's included in the Agreement:
Expert service by our 12,000 professional repair specialists
[_ Unlimited service and no charge for parts and labor on all covered repairs
_Y_ "No-lemon"
guarantee - replacement of your covered product if four or more product failures
occur within twelve months
[_ Product replacement if your covered product can't be fixed
[_ Annual Preventive Maintenance Check at your request- no extra charge
Fast help by phone - phone support from a Sears technician on products requiring in-home
repair, plus convenient repair scheduling
[_ Power surge protection against electrical damage due to power fluctuations
[_ Rental reimbursement
if repair of your covered product takes longer than promised
Once you purchase the Agreement, a simple phone call is all that it takes for you to schedule service.
You can call anytime day or night, or schedule a service appointment online.
Sears has over 12,000 professional repair specialists, who have access to over 4.5 million quality
parts and accessories. That's the kind of professionalism you can count on to help prolong the life of
your new purchase for years to come. Purchase your Master Protection Agreement today!
Some limitations
6655.
Sears
and exclusions apply. For prices and additional information call 1-800-827-
Installation
Service
For Sears professional installation of home appliances, garage door openers, water heaters, and
other major home items, in the U.S.A. call
1-800-4-MY-HOME ®
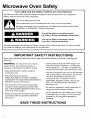
Microwave Oven Safety
Your safety
and the safety
of others are very important.
We have provided many important safety messages in this manual and on your appliance.
Always read and obey all safety messages.
This is the safety alert symbol.
This symbol alerts you to hazards that can kill or hurt you and others.
All safety messages will be preceded by the safety alert symbol and the word
"DANGER" or "WARNING." These words mean:
You will be killed or seriously injured
if you don't follow immediately instructions.
You can be killed or seriously injured
if you don't follow instructions.
All safety messages will identify the hazard, tell you how to reduce the chance of injury, and tell
you what can happen if the instructions are not followed.
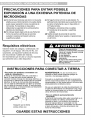
IMPORTANT SAFETY INSTRUCTIONS
When using electrical appliances basic safety precautions should be followed, including the
following:
WARNING:
To reduce the risk of burns,
electric shock, fire, injury to persons, or
exposure to excessive microwave energy:
• Read all instructions before using the
microwave oven.
• Read and follow
"PRECAUTIONS
EXPOSURE TO
ENERGY" found
the specific
TO AVOID POSSIBLE
EXCESSIVE MICROWAVE
in this section.
• Some products such as whole eggs in the
shell and sealed containers - for example,
closed glass jars - are able to explode and
should not be heated in the microwave oven.
• Use the microwave oven only for its intended
use as described in this manual. Do not use
corrosive chemicals or vapors in the
microwave oven. This type of oven is
specifically designed to heat, cook, or dry
food. It is not designed for industrial or
laboratory use.
• The microwave oven must be grounded.
Connect only to properly grounded outlet.
See "GROUNDING INSTRUCTIONS" found
at the end of this section.
• As with any appliance, close supervision is
necessary when used by children.
• Install or locate the microwave oven only in
accordance with the provided installation
instructions.
• Do not operate the microwave oven if it has
a damaged cord or plug, if it is not working
properly, or if it has been damaged or
dropped.
SAVE THESE INSTRUCTIONS
4
IMPORTANT SAFETY INSTRUCTIONS
• The microwaveoven shouldbe servicedonly by
qualifiedservicepersonnel.Callan authorized
servicecompanyfor examination,repair,or
adjustment.
• See door surfacecleaninginstructionsin the "Caring
for Your MicrowaveOven"section.
• To reducethe risk of fire in the oven cavity:
- Do not overceokfood. Carefullyattendthe
microwaveoven when paper,plastic,or other
combustiblematerialsare placedinsidethe oven to
facilitatecooking.
- Removewire twist-tiesfrom paper or plasticbags
before plating bagsin oven.
- If materialsinsidethe oven ignite,keep ovendoor
closed,turn oven off,and disconnectthe power
cord, or shut off powerat the fuse or circuit breaker
panel.
- Do not use the cavity for storage purposes.Donot
leave paper products,cookingutensils,or food in
the cavity when not in use.
• Suitablefor useabove both gasand electriccooking
equipment.
• Intendedto be used aboverangeswith maximum
widthof 36 inches(91 cm).
• CleanVentilatingHoods Frequently- Greaseshould
not be allowedto accumulateon hood or filter.
• Whenflaming foods under the hood,turn the fan on.
• Use care when cleaningthe vent-hoodfilter.
Corrosivecleaningagents,such as lye-basedoven
cleaners,may damagethefilter.
• Oversizedfoods or oversizedmetal utensilsshould
not be inserted in the microwaveoven as they may
createa fire or risk of electricshock.
• Do not cleanwith metal scouringpads. Piecescan
burn off the pad and touch electricalparts involvinga
risk of electricshock.
• Do not store anything directly on top of the
microwave oven when the microwave oven is in
operation.
• Do not cover or block any openings on the
microwave oven.
• Do not store this microwave oven outdoors. Do not
use the microwave oven near water for example,
near a kitchen sink, in a wet basement, near a
swimming pool, or similar location.
• Do not immerse cord or plug in water.
• Keep cord away from heated surfaces.
• Do not let cord hang over edge of table or counter.
• Do not mount over a sink.
• Do not cover racks or any other part of the oven with
metal foil. This will cause overheating of the oven.
• Liquids such as water, coffee, or tea are able to
be overheated beyond the boiling point without
appearing to be boiling due to surface tension of
the liquid. Visible bubbling or boiling when the
container is removed from the microwave oven is
not always present. This could result in very hot
liquids suddenly boiling over when a spoon or
other utensil is inserted into the liquid. To reduce
the risk of injury to persons.
1) Do not overheat the liquid.
2) Stir the liquid both before and halfway through
heating it.
3) Do not use straight-sided containers with
narrow necks.
4) After heating, allow the container to stand
in the microwave oven for a short time before
removing the container.
5) Use extreme care when inserting a spoon or
other utensil into the container.
SAVE THESE INSTRUCTIONS
PRECAUTIONS
TO
EXPOSURE
TO
AVOID
EXCESSIVE
POSSIBLE
MICROWAVE
ENERGY
(a) Do not attempt to operate this oven with the
door open since open - door operation can
result in harmful exposure to microwave
energy. It is important not to defeat or tamper
with the safety interlocks.
(b) Do not place any object between the oven
front face and the door or allow soil or cleaner
residue to accumulate on sealing surfaces.
(c) Do not operate the oven if it is damaged. It is
particularly important that the oven door close
properly and that there is no damage to the:
(1) Door (bent),
(2) Hinges and latches (broken or loosened),
(3) Door seals and sealing surfaces.
(d) The oven should not be adjusted or repaired
by anyone except properly qualified service
personnel.
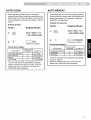
Electrical
requirements
Electrical Shock Hazard
Observe all governing codes and
ordinances. A 120 Volt, 60 Hz, AC only,
20 amp fused electrical supply is
required. (A time-delay fuse is recommended.)
It is recommended that a separate circuit
serving only this appliance be provided.
GROUNDING
• For all cord connected appliances:
The microwave oven must be grounded.
In the event of an electrical short circuit,
grounding reduces the risk of electric
shock by providing an escape wire for the
electric current. The microwave oven is
equipped with a cord having a grounding
wire with a grounding plug. The plug must
be plugged into an outlet that is properly
installed and grounded.
Ensure proper ground
exists before use
Plug into a grounded 3-prong
outlet. Do not remove ground
prong. Do not use an adapter.
Do not use an extension cord.
Failure to follow these
instructions can result in death,
fire, or electrical shock.
INSTRUCTIONS
WARNING:
Improper use of the
grounding can result in a risk of electric
shock.
Consult a qualified electrician or
serviceman if the grounding instructions
are not completely understood, or if doubt
exists as to whether the microwave oven
is properly grounded.
Do not use an extension cord. If the power
supply cord is too short, have a qualified
electrician or serviceman install an outlet
near the microwave oven.
• For a permanently connected appliance:
The microwave oven must be connected
to a grounded, metallic, permanent wiring
system, or an equipment grounding
conductor should be run with the circuit
conductors and connected to the
equipment grounding terminal or lead
on the microwave oven.
SAVE THESEINSTRUCTIONS
6
Getting to Know Your
Microwave Oven
This section discusses the concepts behind microwave cooking. It also shows you the basics you need to know
to operate your microwave oven. Please read this information before you use your oven.
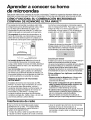
HOW YOUR KENMORE ULTRA WAVE
HOOD COMBINATION WORKS
Microwave energy is not hot. It causes food to make
its own heat, and it's this heat that cooks the food.
Microwaves are like TV waves, radio waves, or
light waves. You cannot see them, but you can see
what they do.
A magnetron in the microwave oven produces
microwaves. The microwaves move into the oven
where they contact food as it turns on the turntable.
TM
MICROWAVE
Conventional microwave ovens operate on HIGH
power only. To achieve a 70% power level in a
conventional microwave oven, the oven operates
70% of the time at HIGH power and 30% of the
time OFF.
Magnetron
TheULTRAWAVETM InverterMicrowaveSystem
deliverspowercontinuously,to defrostmoreevenlyand
minimizeovercookingof foodand messyfoodspatters.
Oven cavity
Metal floor
Glass tray
The glass turntable of your microwave oven lets
microwaves pass through. Then they bounce off a
metal floor, back through the glass turntable, and
are absorbed by the food.
Microwaves pass through most glass, paper, and
plastics without heating them so food absorbs the
energy. Microwaves bounce off metal containers so
food does not absorb the energy.
ULTRA WAVE TM Inverter Microwave System
ULTRA WAVE TM Inverter Microwave System gives
you better microwave cooking performance for
defrosting, cooking and reheating foods quickly
and uniformly.
The ULTRA WAVE TM Inverter Microwave System
is proven technology that delivers a constant
stream of microwave power - true high, medium,
and low power.
Sensor Cooking
The ULTRAWAVE MInverterMicrowaveSystemfeatures Sensor Cookingfunctions.A humiditysensor in
the oven cavity detects moistureand humidityemitted
from food as it heats.The sensor adjustscookingtimes
to varioustypes and amountsof food. Sensorcooking
takes the guessworkout of microwavecooking.
For the best cooking results
• Always cook food for the shortest cooking time
recommended. Check to see how the food is
cooking.
• Stir, turn over, or rearrange the food being
cooked about halfway through the cooking time
for all recipes. This will help make sure the food
is evenly cooked.
• If you do not have a cover for a dish, use wax
paper, or microwave-approved paper towels or
plastic wrap. Remember to turn back a corner of
the plastic wrap to vent steam during cooking.
Radio interference
Using your microwave oven may cause interference
to your radio,TV, or similar equipment.When there is
interference,you can reduce it or remove it by:
• Cleaning the door and sealingsurfacesof the oven.
• Adjusting the receiving antenna of the radio or
television.
• Movingthe receiver away from the microwave oven.
• Pluggingthe microwave oven into a different outlet
so that the microwave oven and receiverare on
different branch circuits.
Testing your microwave
oven
containerin
theabout
oven.1Close
door. in a
I glass
To test
the oven put
cup ofthe
coldwater
Testing
your dinnerware
or cookware
Test dinnerware or cookware before using. To
test a dish for safe use, put it into the oven with a
cup of water beside it. Cook at 100% cook power
for one minute. If the dish gets hot, do not use it.
Some dishes (melamine, some ceramic
dinnerware, etc.) absorb microwave energy,
Operating
Whenthetime
is up,the watershouldbe
heated.
Makesureit latches.Cookat
100%powerfor
1 minute.
becoming too hot to handle and slowing cooking
times. Cooking in metal containers not designed for
microwave use could damage the oven, as could
containers with hidden metal (twist-ties, foil lining,
staples, metallic glaze or trim).
safety precautions
• Never lean on the door or allow a child to swing
on it when the door is open.
• Use hot pads. Microwave energy does not heat
containers, but the heat from the food can make
the container hot.
• Do not use newspaper or other printed paper in
the oven.
• Do not dry flowers, fruit, herbs, wood, paper,
gourds, or clothes in the oven.
• Do not start a microwave oven when it is empty.
Product life may be shortened. If you practice
programming the oven, put a container of water in
the oven. It is normal for the oven door to look
wavy after the oven has been running for a while.
• Do not try to melt paraffin wax in the oven.
Paraffin wax will not melt in a microwave oven
because it allows microwaves to pass through it.
• Do not operate the microwave oven unless the
glass turntable is securely in place and can move
freely. The turntable can move in either direction.
Make sure the turntable is correct-side up in the
oven. Handle your turntable with care when
removing it from the oven to avoid possibly
breaking it. If your turntable cracks or breaks,
contact your dealer for a replacement.
• When you use a browning dish, the browning
dish bottom must be at least 3A6 inch above the
turntable. Follow the directions supplied with the
browning dish.
• Never cook or reheat a whole egg inside the
shell. Steam buildup in whole eggs may cause
them to burst, and possibly damage the oven.
Slice hard-boiled eggs before heating. In rare
cases, poached eggs have been known to
explode. Cover poached eggs and allow a
standing time of one minute before cutting into
them.
• For best results, stir any liquid several times
during heating or reheating. Liquids heated in
certain containers (especially containers shaped
like cylinders) may become overheated. The liquid
may splash out with a loud noise during or after
heating or when adding ingredients (coffee
granules, tea bags, etc.). This can harm the oven.
• Microwaves may not reach the center of a roast.
The heat spreads to the center from the outer,
cooked areas just as in regular oven cooking. This
is one of the reasons for letting some foods (for
example, roasts or baked potatoes) stand for a
while after cooking, or for stirring some foods
during the cooking time.
• Do not deep fry in the oven. Microwavable
utensils are not suitable and it is difficult to
maintain appropriate deep-frying temperatures.
• Do not overcook potatoes. At the end of the
recommended cooking time, potatoes should be
slightly firm because they will continue cooking
during standing time. After microwaving, let
potatoes stand for 5 minutes. They will finish
cooking while standing.
Electrical connection
than
110 volts,
cooking or
times
may
be longer.
I less
Ifyour
electric
powerline
outlet
voltage
is
8
Have a qualified electrician check your electrical
system.
I
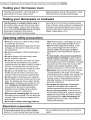
Microwave
oven features
®
®
®®
®®®
®
Your microwave oven is designed to make your
cooking experience as enjoyable and productive
as possible. To get you up and running quickly, the
following is a list of the oven's basic features:
4. Vent Grille
1. Metal Shielded Window. The shield prevents
microwaves from escaping. It is designed as a
screen to allow you to view food as it cooks.
6. Cooktop Light
2. Model and Serial Number Plate & Cooking
Guide Label
3. Charcoal Filter (behind Vent Grille)
®
5. Glass tray. The glass tray moves food as it
cooks for more even cooking. It must be in the
oven during operation for best cooking results.
7. Grease Filter. See "Caring for the filters"
section.
8. Control Panel. Touch the pads on this panel to
perform all functions.
9. Cooking Rack. Use for extra space when
cooking in more than one container at the
same time.
Defrost Plate
1. Glass tray
2. Support
3. Hub
Use the DEFROST PLATE provided for
complete defrosting.
The glass tray moves in both directions to help cook food more
evenly. Do not operate the microwave oven without the glass
tray in place.
To Install:
1. Place the support on the oven cavity bottom.
2. Place the glass tray on the support.
Fit the raised, hollowed groove of the glass tray bottom
between the rollers of the hub. The rollers on the support
should fit inside the glass tray bottom ridge.
!!!ii!i;i!i_i
il_i_
¸i!i;iiiiiiiiill
iii¸iiiii!iii_
i_!
!iii_;i_i!i!!!i!i!_!!iiii:iiiill
_!iiiii!!iii!iil;iiiiii
!iiiii
¸i!!!iil;i!i_i
i_
ii:iliiii!!!i;iii!!
i iiii!iiiiii!!!;iiii!iiiii
¸_iii_iii!!!!iilli!
_!_i!!!ii!!_i_!_i_lili!!il
iiiill
i!_
iii!!il
i!!iii
i_!i!:!!
i_i
_ii!i
i!iiii_
'!iiiill
!!!i;iii!!i;i!!_iiii_i
ii!!!iii!!!_!!iii_ilill
iiiiii!iiiii!;!i!
i !!i_il
_i_iiii!!!!!iii!il
i iiiiii_i;i_!iii!i!_iiiiiX_iiii
!ii!_!ili!i_iJ!J!i!i!i!ii!i!_
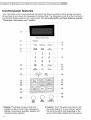
Control panel features
Your microwave oven control panel lets you select the desired cooking function quickly and easily.
All you have to do is touch the necessary Command Pad. The following is a list of all the Command
and Number Pads located on the control panel. For more information on these features, see the
"Using your microwave oven" section,
5m_
Trench5en,_;or
PLATE
1
4
TIME
ii
9
_J
5
8
....
3
0
AD#
CLE_
,,J
VEetr
1. Display. The display includesa clock and
indicatorsto tell you time of day, cooking time
settings, cook powers, quantities, weights, and
cooking functions selected,
10
V_rr
LIGHT
2. Popcorn. Touch this pad to pop popcorn with
the sensor feature. The oven's sensor will tell
the oven how long to cook depending on the
amount of humidity it detects from the popcom.
3. Pizza. Touch this pad to reheat one or several
slices of pizza without entering a cook time or
power.
17. Auto Cook. Touch this pad to cook
microwavable foods without entering a cook
time or power.
4. Vegetable. Touch this pad to cook Vegetable
without entering a cook time or power.
18. Auto Reheat. Touch this pad to reheat
microwavable foods without entering a cook
time or power.
5. Potato. Touch this pad to cook potatoes without
entering a cook time or power.
6. Frozen Entree. Touch this pad to cook a 10- to
21- ounce frozen entree without entering a cook
time or power.
19. Hold Warm. Touch this pad to keep hot,
cooked foods safely warm in your oven for up
to 99 minutes, 99 seconds. Hold Warm can be
used by itself, or it can automatically follow a
cooking cycle.
7. Dinner Plate. Touch this pad to cook without
entering a cook time or power.
20. Clock. Touch this pad to enter the time of day.
8. Sure Simmer. Touch this pad to simmer soups,
casseroles, stews, and other liquid foods.
21. Auto Defrost. Touch this pad followed by
Number Pads to thaw frozen meat by weight.
9. Number Pads. Touch number pads to enter
cooking times, cook powers, quantities, weights,
or food categories.
22. Express Defrost. Touch this pad to express
defrost. "GROUND BEEF 1.0 LBS TOUCH
10. Cook Time. Touch this pad followed by
Number Pads to set a cooking time.
23. Kitchen Timer. Touch this pad to set the
Kitchen Timer.
11. Power. Touch this pad after the cook time has
been set, followed by a Number Pad to set the
amount of microwave energy released to cook
the food. The higher the number, the higher the
microwave power or "cooking speed."
24. Melt. Touch this pad to melt chocolate, cheese,
butter, or marshmallows.
12. Add Minute. Touch this pad to cook for 1
minute at 100% cook power, orto add extra
minutes at the set cook power to your cooking
cycle.
13. Less. Touch this pad to subtract 10 seconds of
cook time each time you press it.
14. More. Touch this pad to add 10 seconds of
cook time each time you press it.
15. Start. Touch this pad to start a function. If you
open the door after the oven begins to cook,
retouch Start.
START" will appear in the display.
25. Soften. Touch this pad to soften ice cream,
cream cheese, butter, or frozen juice.
26. Vent On/Off. Touch this button to turn the fan
on or off.
27. Vent 5 Speed. Touch this button to choose
one of 5 fan speeds.
28. Light High/Night/Off. Touch this button to tum
the light on high, night, or off.
NOTE: If you try to enter incorrect instructions,
you will not hear any tones. Touch STOP/CLEAR
and re-enter the instructions.
16. Stop/Clear. Touch this pad to erase an
incorrect command, cancel a program during
cooking, or to clear the Display.
11
Using You r M icrowave
ven
This section gives you instructions for operating
each function. Please read these instructions
carefully.
AUDIBLE
INTERRUPTING
COOKING
You can stop the oven during a cycle by opening
the door. The oven stops heating and the fan
SIGNALS
Audible signals are available to guide you when
setting and using your oven:
• A programming tone will sound each time
you touch a pad.
• Seven tones signal the end of a Kitchen Timer
countdown.
• Four tones signal the end of a cooking cycle.
stops, but the light stays on.
To restart cooking, close the door and touch
START.
If you do not want to continue cooking,
open the door and touch STOP/CLEAR.
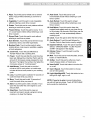
CHILD LOCK
Use this safety feature to lock the control panel
when you are cleaning the oven or so that children
cannot use the oven unsupervised.
CLOCK
When your microwave oven is first plugged in or
after a power failure, the Display will show "PLEASE
SET TIME OF DAY." If a time of day is not set,
":" will show on the Display until you touch "Clock."
Example for 10:30(AM):
Touch:
Display
To set CHILD LOCK:
Touch:
Display
Shows:
1,
Time of day.
Shows:
1,
: EIfTERTitle OF#RY
3,
I
0
3
0
'_'3D
,uuLHS,fl°_,
TI'H I_"
P,_,_-H_
_
5.
( 1
I1'-I •
2,
13
Tl"ll IF"
To cancel CHILD LOCK:
Touch:
Display
5 TR°_
T
1,
6,
NOTE: You can switch between AM and PM by
touching 1 or 2 after step 4.
12
Touch and hold until
LOCKED appears in
the display
(approximately
4 seconds).
Touch and hold until
LOCKED
disappears in the
display
(approximately
4 seconds).
Shows:
KITCHEN
TIMER
COOKTOP LIGHT
Your microwave oven can be used as a kitchen
timer. You can set up to 99 minutes, 99 seconds.
The pad on the bottom right of the control panel
controls the cooktop light.
Example for 3 minutes:
Example for HIGH:
Touch:
Display Shows:
Touch:
Display Shows:
1.
HISH
I_I ml_l
: Eh'TER,Tim,,,E,,,
,,,,
.
R_,_5EL
2.
3
0
0
• I-#-I Tl'l! ir
T
T
3.uu
,uuLHS,_R,
.LILI
.
once for HIGH light
twice for NIGHT light
2.
TIMER and time
counting down.
EXHAUST
The bottom of the control panel controls the 5-speed
exhaust fan.
Example for level 4:
Touch:
Display Shows:
1.
_.Ef)EL
,/
I
I,' I
V_r
0_0_
O
EIFF
bG_
HIGF_IN_fOFF
EXPRESS
DEFROST
One express defrost sequence is preset in the oven,
The Express Defrost feature provides you with the quick
defrosting method for 1.0 pound "GROUND BEEF"
only.
Example for IIb of Ground beef:
Touch:
Display Shows:
1.
5ROUI'IDBEEF/.LTLB5
TOUEH
5 TRRT
This shows the last level until you
select the fan speed level.
2.
0
To turn off, touch button once
or twice depending on light
setting.
FAN
O
0
_.Ef)EL
I
I,' I
VENT
Time counting down and
5=S_EB
Touch until Level 4.
.
EXP°_E55DEF°_OST
scrolls across display.
VERT
0_0_
Turn off fan when desired.
NOTE: If the temperature from the range or cooktop
below the oven gets too hot, the exhaust fan in the
vent hood will automatically turn on at the LEVEL 5
setting to protect the oven.
It may stay on up to an hour to cool the oven,
When this occurs, the VENT button will not turn the
fan off.
13
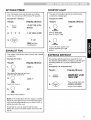
ADD MINUTE
MULTI-STAGE
COOKING
A time-saving pad, this simplified control lets
you quickly set and start microwave cooking at
100% power without the need to touch START.
For best results, some recipes call for different cook
powers during different stages of a cook cycle. You
can program your oven to switch from one power
level to another for up to 3 stages.
Example for 2 minutes:
Example for 2-stage cook cycle:
Touch:
Display
Time of day.
.
2.
Shows:
Twice
Time counting down
and POWER 100.
Touch:
Display
.
TFI! IF
2. :3
0 '
0
T
FI
FII I
JR
PE_,EE
_9.uu"
nn EMTEEPE,UEE
3.
This feature lets you program a specific cook time
and power. For best results, there are 10 power
level settings in addition to HIGH (100%) power.
Refer to the "Microwave Power Levels Table" on
page 15 for more information.
T
to set a 3-minute cook
time for the first stage.
NOTE: Each time you touch ADD MINUTE, it will
add 1 minute up to 99 rain 59 seconds.
TIMED COOKING
Shows:
I
It
I
! TFIIF_
LEVEL,,u,u
FI, I
.
F_
IF
,uu__H
5TRET
TFH
to set an 80% cook
power for the first stage.
NOTE: If you do not select a power level, the oven
will automatically cook at HIGH (100%) power.
.
Example for 5 minutes, 30 seconds at 80%
power:
Touch:
Display
•_ ,_H
TFH IF
Shows:
* _J_.l
5,RE,
T
T
.
to set a 7-minute cook
time for the second stage.
.
.
IF
T
T
5:30 TFH
,uuLH
S,RE,
FI
FII I
u_
PE_,EE
• r_r_
FI, I
._,_,
Ehit_,,_ P_,_'E_
,
,I
,
! TFIIF_
_EJE",
,_,_
9E;E;,,EEPO_EE
7 _ P_ER 50
.
I
4.
II
•
I
! TFIIF_
1'3
.
TFH IF"
,uuLH
5TRET
to set a 50% cook power
for the second stage.
/31 I
5 . _gDPO_'E,9
80 ,_H
S,RE,
.
5.
Time counting down
and POWER 80,
Time counting down
and POWER 80,
10.
NOTE: After use of cook function, fan will run for 1
minute to cool if it senses too much heat,
14
FI
FI, I
JR
PO_,EE
When the first stage is over, you will hear two
short tones as the oven begins the second
cook stage.
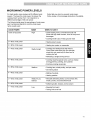
MICROWAVE
POWER LEVELS
For best results, some recipes call for different cook
powers. The lower the cook power, the slower the
cooking. Each number from 1 to 9 stands for a
different percentage of full cook power.
It also tells you when to use each cook power.
Follow recipe or food package instructions if available.
The following table gives the percentage of cook power
each number pad stands for, and the cook power
name usually used.
COOK POWER
100% of full power
NAME
High
WHEN TO USE IT
• Quick heating many convenience foods and
foods with high water content, such as soups and
beverages
• Cooking tender cuts of meat, ground meat
9 = 90% of full power
* Heating cream soups
8 = 80% of full power
• Heating rice, pasta, or casseroles
7 = 70% of full power
Medium-High
• Cooking and heating foods that need a
Cook Power lower than high (for example,
whole fish and meat loaf) or when food is
cooking too fast
• Reheating a single serving of food
6 = 60% of full power
• Cooking requiring special care, such as cheese
and egg dishes, pudding, and custards
• Finishing cooking casseroles
5 = 50% of full power
Medium
• Cooking ham, whole poultry, and pot roasts
• Simmering stews
4 = 40% of full power
• Melting chocolate
• Heating pastries
3 = 30% of full power
Medium-Low,
Defrost
2 = 20% of full power
1 = 10% of full power
• Manually defrosting foods, such as bread, fish,
meats, poultry, and precooked foods
• Softening butter, cheese, and ice cream
Low
• Keeping food warm
• Taking chill out of fruit
15
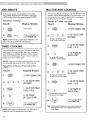
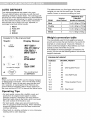
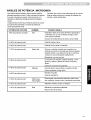
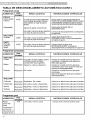
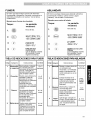
AUTO DEFROST
Four defrost sequences are preset in the oven,
The auto defrost feature provides you with the best
defrosting method for frozen foods. The cooking guide
will show you which defrost sequence is recommended
for the food you are defrosting, For added convenience,
the Auto Defrost includes a built-in beep mechanism
that reminds you to check, turn over, separate, or
rearrange to get best defrost results.
Meat
1
.1 to 6.0 (45g to 2722g)
Poultry
2
.1 to 6.0 (45g to 2722g)
Fish
3
.1 to 6.0 (45g to 2722g)
3. FISH
4. BREAD
Bread
4
.1 to 1.0 (45g to 450g)
Display
Weight conversion
Shows:
NERTTOUEH
I
POUL
TRYTOUEH
2
FISHTDUEH
9
BEER#TOUEH
_/
1,
2,
O.OL_5
El/TEEgEISHT
and
to enter the weight
L2_5
TOUEH5TRET
Time counting down
and DEFROST.
4,
NOTE:
When you touch the START pad, the display changes
to defrost time count down. The oven will beep during
the DEFROST cycle. At this time, open the door and
turn, separate, or rearrange the food. Remove any
portions that have thawed. Return frozen portions to
the oven and touch START to resume the defrost cycle.
Operating
Tips
• For best results, remove fish, shellfish, meat, and
poultry from its original closed paper or plastic
package (wrapper). Otherwise, the wrap will hold
steam and juice close to the foods, which can cause
the outer surface of the foods to cook,
• For best results, shape your ground meat into the
form of a doughnut before freezing, When defrosting,
scrape off thawed meat when the beep sounds and
continue defrosting.
• Place foods in a shallow container or on a microwave
roasting rack to catch drippings.
16
WEIGHTS YOU
CAN SET
(tenths of a pound)
1. MEAT
Touch:
1
FOOD
TOUCH
Auto Defrost
2. POULTRY
Example for 1.2 Ibs of ground beef:
3,
This table shows you food type selections and the
weights you can set for each type. For best
results, loosen or remove covering on food.
table
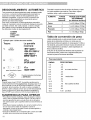
You are probably used to food weights as being in
pounds and ounces that are fractions of a pound (for
example, 4 ounces equals 1/4 pound). However, in
order to enter food weight in Auto Defrost, you must
specify pounds and tenths of a pound.
If the weight on the food package is in fractions d a
pound, you can use the following table to convert the
weight to decimals.
EQUIVALENT
WEIGHT
OUNCES
DECIMAL WEIGHT
1.6
.10
3.2
.20
4.0
.25
4.8
.30
6.4
.40
8.0
.50
9.6
.60
11.2
.70
12.0
.75
12.8
.80
14.4
.90
16.0
1.00
One-Quarter
Pound
One-Half Pound
Three-Quarters
One Pound
Pound
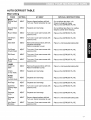
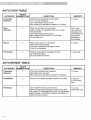
AUTO DEFROST
TABLE
Meat setting
FOOD
SETTING
AT BEEP
BEEF
Ground Beef,
Bulk
MEAT
Removethawed portionswith fork.
Turnover. Returnremainderto oven.
Do not defrost less than 1/4lb.
Freeze in doughnut shape.
Place on the DEFROST PLATE.
Ground Beef,
Patties
MEAT
Separate and rearrange.
Do not defrost less than 2 oz. patties.
Depress center when freezing.
Round S_ak
MEAT
Turn over. Cover warm areas with
aluminum foil.
Place on the DEFROST PLATE.
Tenderloin
Steak
MEAT
Turn over. Cover warm areas with
aluminum foil.
Place on the DEFROST PLATE.
Stew Beef
MEAT
Remove thawed portions with fork.
Separate remainder.
Return remainder to oven.
Place in a microwavable baking dish.
Pot Roast,
Chuck Roast
MEAT
Turn over. Cover warm areas with
aluminum foil.
Place on the DEFROST PLATE.
Rib Roast
MEAT
Turn over. Cover warm areas with
aluminum foil.
Place on the DEFROST PLATE.
Roiled Rump
Roast
MEAT
Turn over. Cover warm areas with
aluminum foil.
Place on the DEFROST PLATE.
MEAT
Remove thawed portions with fork.
Return remainder to oven.
Place in a microwavable baking dish.
MEAT
Separate and rearrange.
Place on the DEFROST PLATE.
PORK
Chops
(1/2 inch thick)
MEAT
Separate and rearrange.
Place on the DEFROST PLATE.
Hot Dogs
MEAT
Separate and rearrange.
Place on the DEFROST PLATE.
Spareribs
Country-style
Ribs
MEAT
Turn over. Cover warm areas with
aluminum foil.
Place on the DEFROST PLATE.
Sausage,
Links
MEAT
Separate and rearrange.
Place on the DEFROST PLATE.
Sausage,
Bulk
MEAT
Removethawed portionswith fork.
Turnover. Returnremainderto oven.
Place in a microwavable baking dish.
Loin Roast,
Boneless
MEAT
Turn over. Cover warm areas with
aluminum foil.
Place on the DEFROST PLATE.
LAMB
Cubes for
Stew
Chops
(1 inch thick)
SPECIAL INSTRUCTIONS
17
AUTO
DEFROST
TABLE
(CONT.)
Poultry setting
FOOD
CHICKEN
Whole
(up to 6 Ibs)
SETTING
POULTRY
TURKEY
Breast
(up to 6 Ibs)
SPECIAL INSTRUCTIONS
Turn over (finish defrosting breastside down). Cover warm areas with
aluminum foil,
Place chicken breast-side up on the
DEFROST PLATE. Finish defrosting by
immersing incold water. Remove giblets when
chicken is partially defrosted.
Separate pieces and rearrange.
Placeon the DEFROST PLATE.
Turn over. Cover warm areas with
aluminum foil.
Finish defrosting by immersing in coId water.
POULTRY
Turn over. Cover warm areas with
aluminum foil.
Place on the DEFROST PLATE.
Finish defrosting by immersing in coId water.
POULTRY
Turn over. Cover warm areas with
aluminum foil.
Place on the DEFROST PLATE.
Finish defrosting by immersing in cold water.
Cut-up
CORNISH
HENS
Whole
AT BEEP
Fish setting
FOOD
SETTING
AT BEEP
SPECIAL
INSTRUCTIONS
FISH
Fillets
FISH
Turn over. Separate fillets when
partially thawed if possible.
Place in a microwavable baking dish.
Carefully separate fillets under cold
water.
Steaks
FISH
Separate and rearrange.
Place in a microwavable baking dish.
Run cold water over to finish defrosting.
Whole
FISH
Turn over.
Place in a microwavable baking dish.
Finish defrosting by immersing in cold
water.
Crabmeat
FISH
Break apart. Turn over.
Place in a microwavable
baking dish.
Lobster tails
FISH
Turn over and rearrange.
Place in a microwavable
baking dish.
Shrimp
FISH
Separate and rearrange.
Place in a microwavable
baking dish.
Scallops
FISH
Separate and rearrange.
Place in a microwavable
baking dish.
SHELLFISH
Bread setting
FOOD
Bagel
Dinner RoII
Muffin
Hamburger
Hot Dog Bun
Slices of Bread
Loaf of Bread
18
SETTING
BREAD
AT BEEP
Turnoverand rearrange.
SPECIAL INSTRUCTIONS
Placeon 3 sheetsof papertowel.
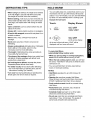
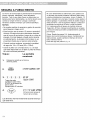
DEFROSTING
TIPS
• When using Auto Defrost, the weight to be entered
is the net weight in pounds and tenths d pounds
(the weight of the food minus the container).
• Before starting, make sure you have removed any
of the metal twist-ties which often come with frozen
food bags, and replace them with strings or elastic
bands.
• Open containers such as cartons before they are
placed in the oven.
HOLD WARM
You can safely keep hot, cooked food warm in your
microwave oven for up to 99 minutes, 99 seconds
(about 1 hour, 40 minutes). You can use Hold Warm
by itself, or to automatically follow a cooking cycle.
Example for hold warm:
Touch:
Display
F_I
1.
WArM
• Always slit or pierce plastic pouches or packaging.
• If food is foil wrapped, remove foil and place it in e
suitable container.
FI
I I
Shows:
[it
TOU[H5 TRET
• Slit the skins, if any, of frozen food such as
sausage.
2.
• Bend plastic pouches of food to ensure even
defrosting.
At the end of the hold warm, "END" will be
displayed and four tones will sound.
• Always underestimate defrosting time. If defrosted
food is still icy in the center, return it to the
microwave oven for more defrosting.
• The length of defrosting time varies according to
how solidly the food is frozen.
• The shape of the package affects how quickly food
will defrost. Shallow packages will defrost more
quickly than a deep block.
• As food begins to defrost, separate the pieces.
Separated pieces defrost more easily.
• For better results, let food stand after defrosting.
(For more information on standing time, see the
"Microwave Cooking Tips" section.)
• Turn over food during defrosting or standing time.
Break apart and remove food as required.
H,.&.,w'RE;,
F_I
FI
I I
177
scrollsacross display.
To make Hold Warm
automatically follow another cycle:
• While you are touching in cooking instructions,
touch HOLD WARM before touching START.
• When the last cooking cycle is over, you will hear
two tones. "Hold Warm" will come on while the oven
continues to run.
• You can set Hold Warm to follow Auto Defrost,
Cook, or multi-cycle cooking.
NOTES:
• Hold Warm operates for up to 99 minutes, 99
seconds.
• Opening the oven door cancels Hold Warm.
Close the door and touch Hold Warm, then touch
START if additional Hold Warm time is desired.
• Food cooked covered should be covered during
Hold Warm.
• Pastry items (pies, turnovers, etc.) should be
uncovered during Hold Warm.
• Complete meals kept warm on a dinner plate
should be covered during Hold Warm.
• Do not use more than one complete Hold Warm
cycle (about 1 hour, 40 minutes). The quality of
some foods will suffer with extended time.
19
!i!i_ii!i'iil
!ii:_:!:
!'?i!
_iii_i_i!_iiiil
i_i_i_i!i
i;;:ii!!
:i'_iii'?i!ii!!::_ii!!i_
_¸
!ii'iil!_;;;:!i!'_:
ii_!_i
! _IIiii
_i_ii!_'i
;iii
_Yiiii_i:iiiiiii:!
_¸
_!
ii'll
!i!i!_Ji_li
!li'_;_!i:
_!
iii_ii_i:
ii:
i:ii_ii!
_ii;ii_:iiii_
iii_ii_!i_!i_!i_!i_!i_!i_!i_!i_!i_!i_!i_!i_!i_
SURE SIMMER
Your microwave oven lets you simmer soups,
casseroles, stews, and other liquid foods. All you do
is set a simmer time and your oven will bring your
food to a boil and then simmer it for the time you
specify.
NOTES:
• You cannot change the cook power or doneness
for Sure Simmer.
• This function uses the sensor. The sensor needs
2 minutes 30 seconds to warm up after the oven
is connected to power or after a power failure.
If you start Sure Simmer during the warm up,
microwave energy will not be turned on until the
sensor is warm.
• When cooking vegetables, increase amount of
water to 1/4 to 1/2 cup (60 to 125ml).
• Cover dish with a hard lid, i.e., the lid that comes
with the dish or a dinner plate. Do not use plastic
wrap.
Touch:
1.
Display
Place the food in the oven and
close the door.
: EhlTEREB,
EII_"I6 T_",E
,
3,
3
0
0
0
Touch Number pads to
enter the simmer time.
Example for 30
minutes.
,
Shows:
3_1_* _J_J
TOU[HSTRUT
E -_- -_-7 SURE51fifiER
scrolls across
display.
The oven will bring
the food to a boil.
The food will then simmer for the time you set.
2O
When simmering foods like pasta use a container
that can hold enough water to cover the food
completely when cooking, such as a 3-quart (12 cup)
casserole with a lid, When cooking pasta or noodles,
add 1 tbsp (15ml) oil to the water before boiling.
Use the following method:
Place container with water in the oven and follow
steps 2-4, setting the simmer time at 1 second. At
the end of the signal, place the food in the water and
stir until completely covered by water. Cover, Repeat
steps 2-4, setting the simmer time you want,
Changing instructions you can change the simmering
time while simmering by repeating steps 2, 3, and 4.
Using Sensor Cooking
SENSOR
COOKING
SENSOR OPERATING
POTATO (EXAMPLE)
INSTRUCTIONS
Sensor Cook allows you to cook most of your favorite
foods without selecting cooking times and power
levels. The oven automatically determines required
cooking time for each food item. When the internal
sensor detects a certain amount of humidity coming
from the food, it will tell the oven how much longer to
heat. The display will show the remaining heat time.
For best results by Sensor, following these
recommendations.
Sensor cook allows you to cook most of your
favorite foods without selecting cooking times and
power levels.
Example for Potato:
Touch:
1.
Display
Shows:
Time of day.
• Food cooked with the sensor system should be at
normal storage temperature.
• Glass Tray and outside of container should be dry
to assure best cooking results.
2.
• Foods should always be covered loosely with
microwavable plastic wrap, waxed paper or a lid.
• Do not open the door or touch the "STOPtCLEAR"
key during the sensing time. When sensing time is
over, the oven beeps twice and the remaining
cooking time will appear in the display window. At
this time you can open the door to stir, turn, or
rearrange the food.
SENSOR
COOKING
GUIDE
Appropriate containers and coverings help assure
good Sensor cooking results.
• Always use microwavable containers and cover
them with lids or vented plastic wrap.
• Never use tight-sealing plastic covers. They can
prevent steam from escaping and cause food to
overcook.
E-_ -_-__q
POTRT8
scrolls across display.
When the cook time is over, you will hear four beeps
and COOK END will be displayed.
MORE/LESS
By usingthe MORE or LESSpads all of the sensor
cook and time cook settingscan be adjustedto cook
food for a longeror shorter time.
PressingMORE will add 10 secondsof cookingtime
each time you press it.
PressingLESS will subtract 10 secondsof cooking
time each time you pressit.
• Match the amount to the size of the container.
Fill containers at least half full for best results.
• Be sure the outside of the cooking container and
the inside of the microwave oven are dry before
placing food in the oven. Beads of moisture tuming
into steam can mislead the sensor.
21
SENSOR
COOKING
CATEGORY
Popcorn
TABLE
DIRECTION
AMOUNT
Popcorn lets you pop commercially packaged
microwave popcorn. Pop only one package at a time.
For best results, use fresh bag of popcorn.
Place bag of prepackaged microwave popcorn on the center of turntable.
Before popping, remove the rack from the oven (refer to Page 31).
3.0~3.5 oz.
package
This is reheat function for a leftover pizza.
Place on paper towel on a microwave-safe plate.
1~3 slices,
(5 oz. each)
Frozen Entree
Remove from outer display package. Slit cover.
If not in microwave-safe container, place on a plate.
Cover with plastic wrap and vent the plastic film by piercing with a fork
(3 times). After cooking, allow to stand for 3 minutes.
10 to 21 oz.
Dinner Plate
Place foods to be heated on dinner plate or similar dish.
Cover with plastic wrap and vent.
After cooking, allow to stand for 3 minutes.
1~2 servings
Fresh
Vegetable
Prepareas desired, wash,and leave residualwater on the vegetables.
Placein an appropriatelysized microwavecontainer.
Add amount of water accordingto the quantity (1~2 cups : 2 tablespoons,
3~4cups : 4 tablespoons).Cover with plasticwrap and vent.After cooking,
stir and allow to stand for 3 minutes.
1~4 cups
Frozen
Vegetable
Removefrom package,rinseofffrost under runningwater.
Placein an appropriatelysized microwavecontainer.
Add amount of water accordingto the quantity (1~2 cups : 2 tablespoons,
3~4 cups :4 tablespoons).Coverwith plasticwrap and vent.After cooking,
Pizza
e
-_
:_
stir and allow to stand for 3 minutes.
Canned
Vegetable
Potato
22
1~4 cups
Remove from the outer display can.
Place in an appropriately sized microwave container,
cover with plastic wrap, and vent.
After cooking, stir and allow to stand for 3 minutes.
1~4 cups
Pierce each potato with a fork and place the oven tray
around the edge, at least one inch apart.
After cooking, allow to stand for 5 minutes.
1~4 medium
(approx.
8 to 10 oz. each
AUTO COOK
AUTO REHEAT
Auto Cook lets you heat common microwaveprepared foods without selecting cooking times and
power levels. Auto Cook has preset cook powers for
4 food categories: Casserole, Rice, Bacon, end Hot
Cereal.
Example for Rice:
Auto Reheat lets you heat foods without selecting
cooking times and power levels. Auto Reheat has
preset cook powers for 3 categories: Casserole,
RolltMuffin, and Beverage.
Example for Casserole.
Touch:
Touch:
Display
Display
Au_b
5ELEETfiEflU I TO-7
--SEE EBEIff_"I5
5bfDE
5ELEETfiEhlUI TOq
--SEE EEIBI_IhI6
5L,'DE
,
2.
2.
E---2
E -_-_- 2 RIEE
scrolls across display.
Choose
CATEGORY
Casserole (Sensor)
Rice (Sensor)
Bacon
Hot Cereal
1
2
3
4
QUANTITY
1 to 4 cups
1/2 to 2 cups
2 to 4 slices
1 to 6 serving.,
The oven will cook food automatically by sensor
system, except Bacon and Hot Cereal. When the
cook time is over, you will hear four beeps and
COOK END will be displayed.
ER55E°_BLE
scrolls across display.
Choose food category:
food category:
TOUCH PAD
NUMBER
Shows:
Shows:
CATEGORY
TOUCH PAD
NUMBER
QUANTITY
Casserole (Sensor)
Roll/Muffin
Beverage
1
2
3
1 to 4 cups
1 to 6 pieces
1 to 2 cups
The oven will reheat only Casserole automatically
by sensor system.
When the cook time is over, you will hear four
beeps and COOK END will be displayed.
23
AUTO COOK TABLE
CATEGORY
TOUCH
NUMBER PAD
DIRECTION
AMOUNT
Casserole
(Sensor)
1
Assemble the ingredients per the recipe
in a 1~2- quart casserole.
Cover with plastic wrap and vent.
After cooking, stir and allow to stand for 3 minutes.
1~4 cups
Rice
(Sensor)
2
Place rice and twice as much liquid
(water, chicken, or vegetable stock) in a 2- quart
microwave dish.
Cover with plastic wrap and vent.
After cooking, allow to stand for 10 minutes.
Stir for fluffier rice.
1/2~2 cups
Use medium or
long grain rice.
Cook instant rice
according to
directions on
the package.
Bacon
3
Place bacon strips on a microwave
bacon rack for best results.
(Use dinner plate lined with paper towels
if rack is not available)
2~4 slices
Hot Cereal
4
Prepare as directed on package and cook.
Stir well before eating.
Use only instant hot cereal.
1~6 servings
AUTO REHEAT TABLE
CATEGORY
TOUCH
NUMBER PAD
DIRECTION
AMOUNT
Casserole
(Sensor)
1
Cover dish containing the casserole
with plastic wrap, and vent.
After cooking, stir and allow to stand for 3 minutes.
1~4 cups
Roll/Muffin
2
Remove from display package and place on a plate.
1~6 pieces
(2~3 oz. each)
fresh
Beverage
3
Use a wide-mouth mug. Do not cover.
Remove from display package and place on a plate.
(Be careful! The beverage will be very hot! Sometimes
liquids heated in cylindrical containers will splash out
when the cup is moved.)
1~2 cups
(240 ml per cup)
24
MELT
SOFTEN
The oven uses low power to melt foods (butter or
margarine, chocolate, marshmallows, or processed
cheese food). See the following table.
The oven uses low power to soften foods (butter, ice
cream, cream cheese, and frozen juice)
See the following table.
Example for 8 oz. Chocolate:
Example for quart of ice cream:
Touch:
Display Shows:
Touch:
1.
Timeefday.
3.
2
I "rn
IU
5ELEr_, , TEhul , u Y-SEEEOOKIh_
5b'#E
I
,
FT
Tll_l IF
IUUL-I_II
8 oz
once and
CHOCOLATE
scrolls across display.
Time counting down.
4.
ITI
I_III
ITFI
k'-E
EEER,_
L"_
MELT TABLE
;ODE CATEGORY
Time of day.
3.
EflDEDL
fl TE
"rn/ If"
IUULHI
4.
,
5ELEETfiEhIUI_V -SEEEOO_'h55bfDE
,
Display Shows:
2
/ Tll_
IU
"7
QUART once and ICE
CREAM
scrolls across display.
Time counting down.
SOFTEN TABLE
DIRECTION
AMOUNT
CODE %TEGORY
DIRECTION
AMOUNT
1
Butter or
Margarine
Unwrap and place in
micrewavable container,
No need to cover butter.
Stir at the end of ceekin(
to complete melting.
1, 2 or 3
sticks
1
Butter
Unwrap and place in
microwavable container,
Butter will be at room
temperature and ready
for use in recipe.
1,2 or 3
sticks
2
Chocolate
Chocolate chips or
4 or 8 ez
squares of baking
chocolate may be used.
Unwrap squares and
_lace in microwavable
container. Stir at the end
of cycle to complete
melting.
2
Ice
cream
Place container in oven.
Ice cream will be soft
enough to make
scooping easier,
Pint,
Quart,
Half
gallon
3
Cream
cheese
Unwrap and place in
microwavable Container.
Cream cheese will be at
room temperature and
ready for use in recipe.
3 or 8 oz.
4
Frozen
juice
Remove top.
Place in oven.
Frozen juice will be soft
enough to easily mix with
water.
6, 12 or
16 oz.
3
4
Cheese
Use processed cheese
food only. Cut into cubes,
Place in a single layer in
microwavable container.
Stir at the end of cookin(
to complete melting.
8 or 16
oz.
Marshmallows Large or miniature
marshmallows may be
used. Place in
micrewavable container.
Stir at the end of cycle t(
complete melting.
5 or 10
oz.
25
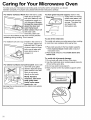
Caring for Your Microwave Oven
To make sure your microwave oven looks good and works well for a long time, you should
maintain it properly. For proper care, please follow these instructions carefully.
For interior
surfaces: Wash often with warm, sudsy
water and a sponge or
soft cloth. Use only mild,
nonabrasive soaps or a
mild detergent. Be sure
to keep the areas clean
where the door and
oven frame touch
when closed. Wipe well
with clean cloth.
Over time, stains can
occur on the surfaces as the result of food particles
spattering during cooking. This is normal.
For stubborn soil, boil a cup of water in the oven for 2
to 3 minutes. Steam will
soften the soil. To get rid
of odors inside the oven,
boil a cup of water with
some lemon juice or
vinegar in it.
To clean grass tray and support, wash in mild,
sudsy water; for heavily
Glass tray
soiled areas use a mild
cleanser and scouring
sponge. The glass tray
and support are
Support
dishwasher safe,
Hub
To use of the metal rack:
The metal rack gives you extra space when cooking
in more than one container at the same time.
1. Place rack securely in the four plastic supports.
• Rack must not touch metal walls or back of
microwave oven.
2, Place equal amounts of food both above and
below rack.
To avoid risk of property damage:
1. Do not cook with rack on floor of the oven.
For exterior surfaces and control panel: Use a soft
cloth with spray glass
cleaner. Apply the spray
glass cleaner to the soft
cloth; do not spray
directly on the oven.
NOTE: Abrasive
cleansers, steel wool
pads, gritty wash
cloths, some paper
towels, etc., can
damage the control panel and the interior and exterior
oven surfaces.
26
2. Use the metal rack when cooking equal amounts
of food at the same time.
3. Do not use rack to pop popcorn.
4. Rack must be on the four plastic supports when
used.
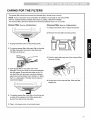
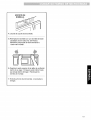
CARING FOR THE FILTERS
The grease filter should be removed and cleaned often, at least once a month.
NOTE: If your microwave hood combination is installed to recirculate air, the chaooal filter
(Part No. 5230W1A003A) available from Sears by calling 1-800-4-MY-HOME"q
The charcoal filter cannot be cleaned and should be replaced every 6 to 12 months.
Grease
filter
(Part No. 5230W2A004A):
Charcoal
filter
(Part No. 5230WIA003A):
1. Unplug microwave oven or disconnect power,
L
2. Remove the vent grille mounting screws.
1. Unplug microwave oven or disconnect power.
2. To remove grease filter, slide each filter to the side.
Pull filter downward and push to the other side.
The filter will drop out.
3. Push the right side lower part of the charcoal filter.
Remove the filter.
3. Soak grease filter in hot water and a mild
detergent. Scrub and swish to remove embedded
dirt and grease. Rinse well and shake to dry. Do
not clean filter with ammonia, corrosive cleaning
agents such as lye-based oven cleaners, or place
them in a dishwasher. The filter will turn black or
could be damaged.
4. Lift the back of the charcoal filter. Slide the filter
straight out.
4. To replace grease filter, slide filter in the frame slot
on back of the opening. Push filter upward and
push to front side to lock into place.
5. Plug in microwave oven or reconnect power.
27
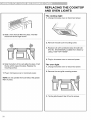
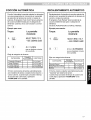
REPLACING THE COOKTOP
AND OVEN LIGHTS
The cooktop light
1. Unplug microwave oven or disconnect power.
5. Slide a new charcoal filter into place. The filter
should rest at the angle shown.
2. Remove the bulb cover mounting screw.
3. Replace bulb with candelabra-base 20-watt bulb
(Part No. 6912A40002A) available from Sears by
calling 1-800-4-MY-HOME _.
4. Plug in microwave oven or reconnect power.
6. Slide the bottom of the vent grille into place. Push
the top until it snaps into place. Replace the
mounting screws.
The oven light
1. Unplug microwave oven or disconnect power.
2. Remove the vent grille mounting screws.
7. Plug in microwave oven or reconnect power.
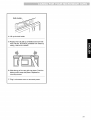
NOTE: Do not operate the hood without the grease
filters in place.
3. Tip the grille forward, then lift out to remove.
28
Bulb holder,
4. Lift up the bulb holder.
5. Replace the bulb with a cendelabra-base 30-watt
bulb (Part No. 3B70067A) available from Sears by
ceiling 1-800-4-MY-HOME _'.
6. Slide the top of the vent grille into place. Push the
bottom until it snaps into place. Replace the
mounting screws.
7. Plug in microwave oven or reconnect power.
29
MICROWAVE COOKING TIPS
Amount of food
Releasing pressure in foods
• If you increase or decrease the amount of food
you prepare, the time it takes to cook that food will
also change. For example, if you double a recipe,
add a little more than half the original cooking time.
Check for doneness and, if necessary, add more
time in small increments.
• Several foods (for example: baked potatoes,
sausages, egg yolks, and some fruits) are tightly
covered by a skin or membrane. Steam can build up
under the membrane during cooking, causing the
food to burst. To relieve the pressure and to prevent
bursting, pierce these foods before cooking with a
fork, cocktail pick, or toothpick.
Starting temperature of food
• The lower the temperature of the food beingput
into the microwave oven, the longer it takes to cook.
Food at room temperature will be re-heated more
quickly than food at refrigerator temperature.
Using standing time
• Always allow food to stand after cooking.
Standing time after defrosting and cooking allows
the temperature to evenly spread throughout the
food, improving the cooking results.
Composition of food
• Food with a lot of fat and sugar will be heated
faster than food containing a lot of water. Fat and
sugar will also reach a higher temperature than
water in the cooking process.
• The more dense the food, the longer it takes to
heat. "Very dense" food like meat takes longer to
heat than lighter, more porous food like sponge
cakes.
Size and shape
• Smaller pieces of food will cook faster than larger
pieces. Also, same-shaped pieces cook more
evenly than different-shaped pieces.
• With foods that have different thicknesses, the
thinner parts will cook faster than the thicker parts.
Place the thinner parts of chicken wings and legs in
the center of the dish.
• The length of the standing time depends on how
much food you are cooking and how dense it is.
Sometimes it can be as short as the time it takes
you to remove the food from the oven and take it to
the serving table. However, with larger, denser food,
the standing time may be as long as 10 minutes.
Arranging food
For best results, place food evenly on the plate. You
can do this in several ways:
• If you are cooking several items of the same
food, such as baked potatoes, place them in a ring
pattern for uniform cooking.
• When cooking foods of uneven shapes or
thickness, such as chicken breasts, place the
smaller or thinner area of the food towards the
center of the dish where it will be heated last.
• Layer thin slices of meat on top of each other.
Stirring, turning foods
• Stirring and turning foods spreads heat quickly to
the center of the dish and avoids overoooking at the
outer edges of the food.
• When you cook or reheat whole fish, score the
skin - this prevents cracking.
• Do not let food or a container touch the top or sides
of the oven. This will prevent possible arcing.
Covering food
Using aluminum foil
Cover food to:
• Reduce splattering
• Shorten cooking times
• Keep food moist
Metal containers should not be used in a microwave
oven. There are, however, some exceptions. If you
have purchased food which is prepackaged in an
aluminum foil container, refer to the instructions on
the package. When using aluminum foil containers,
cooking times may be longer because microwaves
will only penetrate the top of the food. If you use
aluminum containers without package instructions,
follow these guidelines:
You can use any covering that lets microwaves pass
through. See "Getting to Know Your Microwave
Oven" for materials that microwaves will pass
through. If you are using the Sensor function, be sure
to vent.
3O
MICROWAVE COOKING TIPS (CONT.)
Using aluminum
foil (cont.)
Removing the rack
• Place the container in a glass bowl and add some
water so that it covers the bottom of the container,
not more than 1/4in. (.64 cm) high. This ensures
even heating of the container bottom.
• When popping commercially packaged popcorn,
Remove the rack from the oven; Do not place
the bag of microwave popcorn on the rack or under
the rack.
• Always remove the lid to avoid damage to the
• In the case of popping microwave popcorn with
rack, that can cause the fire or damage to your
oven.
• Use only undamaged containers.
microwave
oven.
• Do not use containers taller than 3/4 in. (1.9 cm).
• Container must be at least half filled.
• To avoid arcing, there must be a minimum 1/4in.
(.64 cm) between the aluminum container and the
walls of the oven and also between two aluminum
containers.
• Always place the container on the turntable.
• Shield with small pieces of aluminum foil, parts of
food that may cook quickly, such as wing tips and
leg ends of poultry.
• Heating food in aluminum foil containers usually
takes up to double the time compared to reheating
in plastic, glass, china, or paper containers.
The time when food is ready will vary depending
upon the type of container you use.
• Let food stand for 2 to 3 minutes after heating so
that heat is spread evenly throughout container.
Cooking you should not do in your
microwave oven
• Do not do canning of foods in the oven. Closed
glass jars may explode, resulting in damage to the
oven.
• Do not use the microwave oven to sterilize objects
(baby bottles, etc.). It is difficult to keep the oven at
the high temperature needed for sterilization.
31
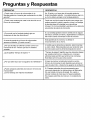
Questions and Answers
QUESTIONS
ANSWERS
Can I operate my microwave oven without the glass
tray or move the glass tray over to hold a large dish?
No. If you remove or move the glass tray, you
will get poor cooking results. Dishes used in
your oven must fit on the glass tray.
Can I use either metal or aluminum pans in my
microwave oven?
You can use aluminum foil for shielding (use
small, flat pieces), small skewers, and shallow
foil trays (if tray is not taller than 3/4 in. [1.9 cm]
deep end is filled with food to absorb microwave
energy). Never allow metal to touch walls or
door.
Is it normal for the glass tray to move in either
direction?
Yes. The glass tray moves from side to side,
depending on the rotation of the motor when the
cooking cycle begins.
Sometimes the door of my microwave oven appears
wavy. Is this normal?
This appearance is normal end does not affect
the operation of your oven.
Why does the dish become hot when I microwave
food in it? I thought that this should not happen,
As the food becomes hot it will conduct the heat
to the dish. Be prepared to use hot pads to
remove food after cooking.
What does "standing time" mean?
"Standing time" means that food should be
removed from the oven and covered for
additional time to allow it to finish cooking. This
frees the oven for other cooking.
Why does steam come out of the air exhaust vent?
Steam is normally produced during cooking. The
microwave oven has been designed to vent this
steam out the vents.
Can I pop popcorn in my microwave oven?
How do I get the best results?
Yes. Pop packaged microwave popcorn
following manufacturer's guidelines. Do not use
regular paper bags.
Do not repop unpopped kernels. Do not pop
popcorn in glass ccokwere.
32
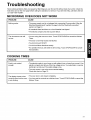
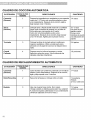
Troubleshooting
Most cooking problems often are caused by little things you can find and fix without tools of any kind. Check the
lists below and on the next page before ceiling for assistance or service. If you still need help, call Sears Service
at 1-800-4-MY-HOME _.
MICROWAVE
OVEN DOES NOT WORK
PROBLEM
CAUSE
Nothing works.
• The power supply cord is not plugged into a grounded 3 prong outlet. (See the
Electrical Requirements" section on page 6 end the "Eiectricel connection"
section on Page 8.)
• A household fuse has blown or a circuit breaker has tripped.
• The electric company has had a power failure.
The microwave oven will
not run.
• You are using the oven as e timer. Touch STOP/CLEAR
Timer.
to cancel the Kitchen
• The door is not firmly closed end latched.
• You did not touch START.
• You did not follow directions exactly.
• An operation that you set earlier is still running. Touch STOP/CLEAR
that operation.
COOKING
to cancel
TIMES
PROBLEM
CAUSE
Food is not cooked
enough,
• The electric supply to your home or wall outlets is low or lower than normal. Your
electric company can tell you if the line voltage is low. Your electrician or service
technician can tell you if the outlet voltage is low.
• The cook power is not at the recommended setting.
Check the chert on Page 15.
The display shows a time
counting down but the oven
is not cooking.
• The oven door is not closed completely.
• You have set the controls as a kitchen timer. Touch STOP/CLEAR
Kitchen Timer.
to cancel the
33
GLASS TRAY
PROBLEM
CAUSE
The glass tray will not
move.
• The glass tray is not correctly in place. It should be correct-side
firmly on the center hub.
up and sitting
• The support is not operating correctly. Remove the glass tray and restart the
oven. If the hub still does not move, call Sears Service at 1-800-4-MY-HOME _'.
Cooking without the glass tray can give you poor results.
TONES
PROBLEM
CAUSE
You do not hear
• You have not entered the correct command.
the programming or
end-of-cycle tone.
DISPLAY MESSAGES
The display is flashing " : ."
I PROBLEM
• There has been a power interruption. Reset the clock. (See the "Clock" section
CAUSE
on Page 12.)
If none of these items are causing your problem, call Sears Service at 1-800-4-MY-HOME
34
_.
35
Contenidos
Garantia ..........................................................
36
Servicio Sears ................................................ 37
Seguridad del homo de microondas ........... 38
Aprender a cortocer su homo
de microondas ............................................... 41
C6mo funciona su combinaci6n microondas
compana de kenmore ULTRA WAVE TM .......... 41
Probar su homo de microondas ...................... 41
Probar su vajilla o bateria de cocina ............... 42
Precauciones de seguridad operativa ............ 42
Conexi6n el6ctrica ......................................... 42
Caracteristicas del homo de microondas ...... 43
Funciones del panel de control ....................... 44
Usar su homo de microondas ...................... 46
Se_ales audibles ........................................... 46
Interrumpir la cocci6n ..................................... 46
Reloj ................................................................
46
Protecci6n de seguridad para niSos ............... 46
Cron6metro de cocina ..................................... 47
Ventilador de extracci6n ................................. 47
Luz superior de cocina .................................... 47
Descongelamiento rapido ............................. 47
Agregar minuto ............................................... 48
Cocci6n cronometrada .................................... 48
Cocci6n en etapas mQltiples ........................... 48
Niveles de potencia de microonda .................. 49
Descongelamiento automatico ...................... 50
Tabla de Descongelamiento Automatico ........ 51
Tabla de Descongelamiento Autom_tico (cont.).....52
Sugerencias para descongelamiento .............. 53
"Mantener caliente". ........................................ 53
Segura a fuego rento ...................................... 54
Usar sensor de coccibn ................................ 55
Sensor de cocci6n .......................................... 55
Papas (Ejemplo) ............................................. 55
Mas/Menos ..................................................... 55
Cuadro de Cocci6n del sensor ........................ 56
Cocci6n Automatica ........................................ 57
Recalentamiento Automatico .......................... 57
Cuadro de Cocci6n Automatica ...................... 58
Cuadro de Recalentamiento Automatico ........ 58
Fundir .............................................................
59
Tabla de indicaciones para fundir .................. 59
Ablandar .........................................................
59
Tabla de indicaciones para ablandar .............. 59
Cuidar su homo de microondas .................. 60
Cuidado de los filtros ..................................... 61
Reemplazar las luces de la parte
superior y del homo ........................................ 63
Sugerencias para la cocina en
su microonda ........................................... 65-66
Preguntas y respuestas ............................... 67
Solucibn de problemas ................................. 68
Servicio ....................................... tapa posterior
Garantia en.
Comb,nac,on
GARANTiA
TOTAL DE LA COMBINACION
EN LA CAM PANA DE SU MICROONDA
POR UN ANO COMPLETO
Durante un afio a partir de la fecha de compra, si esta
combinaci6n en la campana de su microonda
Kenmore tiene un fallo debido a defecto en el material
o en la mano de obra, Sears Io repara sin cargo.
GARANTiA
TOTAL DE C INCO ANOS
SOBRE
EL MAGNETRON
Durantecinco afios a partirde la fecha de compra,si e!
magnetr6nde esta combinaci6nen la campanade su
microondaKenmoretiene un fallo debido a defectoen el
materialo en la mano de obra,Sears la repara sin cargo.
La cobertura de la garantia mencionada arriba se
aplica solamente a la combinaci6n en la campana de
su microonda que se usa s61oen casas particulares.
EL SERVIClO DE GARANTiA ESTA DISPONIBLE
CONTACTANDO SIMPLEMENTE AL SERVICIO
SEARS A 1-800-4-MY-HOME ®
Esta garantia se aplica s61omientras este producto
esta en uso en los EE.UU.
Esta garantia le da a usted derechos legales
especificos que varian de estado en estado.
Sears, Roebuck y Co.,
Dept. 817WA,
Hoffman Estates, IL 60179
Por Ilamado de servicio:
1-800-4-MY-HOME ®
SM (1-800-469-4663)
Tenga a bien registrar la informacidn de su
modelo.
En el momento en que usted flame para recibir un
servicio para su producto, necesitara saber el
nQmero del modelo y el n_mero serial completo.
Puede encontrar esta informaci6n en la
placaletiqueta del nQmero serial y del modelo en el
lado superior de la cavidad frontal en su horno de
microondas. Tambien, registre las otras
informaciones mostradas abajo.
N_mero de modelo
N_mero de serie
Fecha de compra
36
Servicio Sears
Acuerdos Maestros de proteccion
Felicitaciones por haber hecho una compra inteligente
Su naevo producto Kenmore _'esta diseSado y fabricado para aSos de operaci6n segura.
Pero como todo producto, puede necesitar mantenimiento preventivo o reparaciones cada cierto
tiempo. Es alli cuando el tenet un Acuerdo Maestro de protecci6n le puede ahorrar dinero o evitar
que la falla empeore.
Adquiera un Acuerdo Maestro de protecciSn ahora y resgu&rdese de cualquier molestia o gastos
inesperados.
El Contrato de Protecci6n Maestro ayuda tambi6n extender la vida de su nuevo producto.
los aspectos incluidos en el Contrato :
Estas son
5( Servici_expert____evad_acab_p_rcua_quieradenuestr_s12____pr_fesi_na_esespecia_istasen
reparaciones.
5( Servicio ilimitado y sin cargo alguno, por las piezas o pot el trabajo en toda las reparaciones
cubiertas por el Acuerdo.
5( Garantia de "No-Lemon"
- cambio de su producto cubierto si ocurre mas de caatro o mas fallas
al producto dentro de doce primeros meses.
5( Reemplazo del producto si su este asegurado no puede arreglarse.
5( Control anual de mantenimiento
preventivo a pedido suyo sin cargo extra.
5( Ayuda r_pida via tel_fonico - Soporte telef6nico de un t6cnico de Sears sobre los productos que
se requiere de reparaci6n en casa, mas la programaci6n conveniente de servicio.
5( Protecci6n contra sobrecarga el_ctrica, pot daSos el6ctricos causados pot fluctuaciones de
corriente.
5( Reembolso de alquiler si la reparaci6n del producto asegurado toma mas tiempo de Io
prometido.
Una vez que ha comprado el Acuerdo, una simple Ilamada telefSnica es todo Io que le tomara para
agendar un servicio. Puede Ilamar a cualquier hora del dia o de la noche o hacer un compromiso de
atenci6n por telefono.
Sears tiene mas de 12,000 profesionales especialistas en reparaciones que tienen acceso a mas de
4.5 millones de piezas de calidad y accesorios. Esa es la clase de profesionalismo con la que puede
usted contar para ayudar a prolongar la vida de su nueva adquisici6n en los aSos por venir.
iSuscriba ya un Acuerdo Maestro de protecci6n!
Se aplican algunas limitaciones
800-827-6655.
Servicio
de instalacibn
y exclusiones.
Pot precios e informacibn adicional Ilame al 1-
Sears
Para la instalaci6n profesional de Sears de los aparatos del hogar, dispositivos de apertura de la
puerta del garaje, calentadores de agua, y otros items principales del hogar, Ilame en los Estados
Unidos a 1-800-4-MY-HOME ®.
37
Seguridad del horno de
mlcroondas
Su seguridad
y la seguridad
de los otros son muy importante.
Hemos dado muchos mensajes de seguridad en este manual yen su utensilio.
Lea siempre y acate todos los meneajee de eeguridad.
Este es el simbolo de alerta de seguridad.
Este simbolo indica que hay peligro de muerte o de heridas graves para usted u otros.
Todos los mensajes de seguridad estaran precedidos por el simbolo de alerta de seguridad
y de la palabra "PELIGRO" o "ADVERTENCIA." Estas palabras significan:
Hay peligro de muerte o de heridas graves si no
se siguen inmediatamente las instrucciones.
Hay peligro de muerte o de heridas graves si no
se siguen las instrucciones.
To(los los mensajes de seguridad identifican el riesgo, le indican c6mo reducir los riesgos de
lesiones y le dicen Io que podria pasar si las instrucciones no se siguen.
INSTRUCCIONES
IMPORTANTES
DE SEGURIDAD
Cuando se usan dispositivos electricos, deben seguirse las PRECAUCIONES
seguridad incluyendo lae siguientee
ADVERTENCIA: Para reducir el riesgo de
quemaduras, descarga electrica, incendio, lesiones
alas personas o exposici6n a excesiva potencia de
microondas
• Lea todas las instrucciones antes de usar el
homo de microondas.
• Lea y siga las "PRECAUCIONES PARA EVITAR
POSIBLE EXPOSICION A UNA EXCESIVA
POTENCIA DE MICROONDAS" especificas que
se encuentran en esta secci6n.
•El homo de microondas debe ser conectado a
tierra. Conecte solo al tomacorrientes
correctamente conectado a tierra.
Lea las "INSTRUCClONES PARA CONECTAR A
TERRA" que se encuentran al final de esta
secci6n.
• Instale o ubique el homo de microondas
solamente siguiendo las instrucciones de
instalaci6n provistas.
basicas de
• AIgunos productos tales como huevos con
c_scara completa y envases herm6ticos por
ejemplo, recipientes cerrados de vidrio, pueden
explotar y no deben set calentados en el homo de
microondas.
• Use el homo de microondas s61opara el fin
especifico tal como est_ descrito en este manual.
No use productos quimicos corrosives o vapores
en el homo de microondas. Este tipo de homo
est_ especificamente diseSado para calentar,
cocinar o secar alimentos. No est_ diseSado para
uso industrial o de laboratorio.
•Como cualquier artefacto, es necesario un control
estricto cuando es usado por los nifios.
•No opere el homo de microondas si tiene daSado
el cable de alimentaci6n o el enchufe, si no esta
funcionando correctamente o si ha sido daF_adoo
dejado caer.
GUARDE ESTAS INSTRUCCIONES
38
IMPORTANTES
INSTRUCCIONES
• El servicioal homo de microondasdebe ser hecho
solo por personalcalificado.Uame a una compafiia
de servido autorizadapara examinar,repararo
hacerajustes.
• Vea las instruccionespara la limpiezade la superficie
de la puertaen la secci6n"Cuidadode su Homo de
microondas".
• Para reducirel riesgode incendioen el interiordel
homo:
- No cocine de m_s los alimentos.Tengacuidadosi
se coloca para fadlitar la cocci6n, papel,pl_s%o u
otros materialescombustiblesdentro del homode
microondas.
- Quite las atadurasde alambre retorcidodel papel o
bolsas de pl_sticoantes de colocar balsasen el
homo.
- Si los materialesdentrodel homo se quemaran,
mantengala puertadel homo corrada,apague el
homo y desconecteel cable de alimentad6n o
cierreel paso de la corrienteel_ctricaen el fusible o
en el panel del disyuntor.
- No use el interiordel homopara almacenamiento.
No deje elementosde papel,utensiliosde cocina o
alimentos
en el interiordelhomocuandonoesteen uso.
• Adecuadopara su uso sobreelementosde cocinade
gas o electricos.
• Previstopara ser usadopor sobrelos rangos conun
anchom&ximode 36 pulgadas(91 cm).
• Limpieconfrecuencialas campanasde ventilad6n,
no debe permitirque se acumulegrasa en la
campanao en el filtro
• Cuandohayaalimentosque producenllamasbajo la
campana,enciendael extractor.
• Tengacuidadocuandolimpie el filtro del extractorcampana.Losagentes corrosivosde limpieza,tales
como limpiahornosbasados en lejia, puedendafiar
el flltro.
• No deben ser colocadosen el homo de microondas
alimentoso utensiliosde metal de gran tamafio ya
que pueden ocasionarincendioo riesgode descarga
el@ctrica.
de SEGURIDAD
• No limpiesobre un almohadillasasperasde metal.
Las piezaspueden quemarla almohadillay tocar las
pares electricasocasionandoriesgode descarga
el_ctdca.
• No almacene nadadirectamentesobreel homo de
microondascuandoest_ en funcionamiento.
• No cubrao bloqueeningunaaberturaen el homo de
microondas.
• No deje este homode microondasa la intemperie.
No Io usecerca del agua, por ejemplo,cerca de la
piletade la cocina,sobre una basehQmeda,o cerca
de una piletade nataci6no algo por el estilo.
• No sumerjael cable de alimentaci6no enchufeen el
agua.
• Mantengael cablede alimentad6n lejosde las
superficiescalientes.
• No deje el cablede alimentaci6ncolgandodel barde
de la mesa o mostrador.oNo Io monte sobre una
pileta.
• No cubralas rejillaso cualquierotra partedel homo
con laminasde metal. Estocausara
sobrecalentamientodel homo.
• Los liquidostales como agua, caf6 o t6,'pueden
sobrecalentarsemas all_ del puntode hervorsi estar
aparentementehirviendodebido a su tensi6n
superficial.No siemprese nota el burbujeoo el
hervoral retirarel recipientedel homo. Esto puede
causarque los liquidosmuy calienteshiervan
repentinamentecuandose introduceen el liquido
una cuchara o cualquierotro utensilio.
Para reducirel riesgo de producirlesionesalas
personas;
1) No recalienteliquidos.
2) Revuelvael liquido antesy mientrasse calienta.
3) No userecipientesde ladosrectoscon cuellos
angostos.
4) Luego de calentar,permitaal contenedor
permanecoren el homode microondaspor un
tiempo corto antes de quitado.
5) Tenga mucho cuidadocuandocoloqueuna cuchara
u otro utensiliodentrodel contenedor.
GUARDE ESTAS INSTRUCCIONES
39
PRECAUCIONES PARA EVITAR POSIBLE
EXPOSICION A UNA EXCESIVA POTENCIA DE
MICROONDAS
(a) No intentehacerfuncionar este homo con la puerta
abiertaya que el funcionamientocon puertaabierta
puede causarexposici6nnociva a la potenda de
microondas.Es importanteno descuidaru
obstaculizarla seguridadde los enclavamientos
electricosde interbloqueo.
(b) No coloqueningt3nobjetoentre la carafrontal del
homo y la puerta o permitaque se acumule
suciedado residuosde limpiadorsobrelas
superficiede sellado.
(c) No haga fundonar el homo si esta dafiado. Es
particularmenteimportanteque la puertadel homo
se cierrecorrectamentey que no haya dafio en:
(1) Puerta (torcida),
(2) Bisagrasy cerraduras(rotaso sueltas),
(3) Cerradurasde las puertaso superficies
selladas.
(d) Nadie excepto el personal de servicio
calificado debe hacer ajustes o reparaciones
en el homo.
Requisitos eldctricos
Observe todos los c6digos y ordenanzas. Se
requieren en el equipo 120 Volt, 60 Hz, CA
solamente, se requieren fusibles de 20 amp
(Se recomienda fueiblee de retardo).
Se recomienda que ee use un circuito separado
que alimente e61o a este dispositivo.
INSTRUCCIONES
No seguir estas instrucciones puede
Ilegar a causar muerte, incendio o
descarga eldctrica.
PARA CONECTAR A TIERRA
• Para todos los artefactos conectados con
cable de alimentaci6n :
El homo de microondas debe ser conectado a
tierra. En caso de corto circuito el6ctrico, la
conexi6n reduce el riesgo de descarga el6ctrica, ya
que provee un alambre de escape para la corriente
electrica. El homo de microondas esta equipado
con un cable de alimentaci6n que tiene un enchufe
con un cable de conexi6n a tierra. El enchufe debe
estar conectado a un tomacorrientes correctamente
instalado y conectado a tierra.
Asegure que la tierra
exista antes uso
Peligro de descarga et_ctrica.
Enchufe en un tomacorriente conectado
a tierra de 3 clavijas. No quite ta clavija
de conexi6n a tierra.
No use adaptador.
No use extensi6n de cable de
alimentacibn.
ADVERTENCIA:
El uso incorrecto de la
conexiSn a tierra puede ocasionar peligro de
incendio o de descarga el_ctrica.
Coneulte a un electricista calificado o personal de
servicio si las instrucciones no son completamente
comprendidas o si hay dudas sobre si el homo esta
adecuadamente conectado a tierra.
No use una extensi6n de cable de alimentaci6n. Si
el cable de alimentaci6n es demasiado corto, haga
instalar un tomacorriente per un t6cnico calificado
cerca del homo de microondas.
• Para un artefacto permanentemente
conectado:
El homo de microondas debe estar conectado a un
sistema met_lico de cables, permanente, de
conexi6n a tierra o un conductor de conexi6n a
tierra del equipo debe set accionado con los
conductores del circuito y conectados a la terminal
a tierra del equipo o toma de alimentaci6n del
homo de microondas.
GUARDE ESTAS INSTRUCCIONES
4O
Aprender a conocer su horno
de microondas
Esta secci6n habla de los conceptos de cocci6n a microondas. Tambien le muestra los elementos basicos que
usted debe conocer para operar el homo de microondas. Por favor lea esta informaci6n antes de usar su homo.
COMO FUNCIONA SU COMBINACION MICROONDAS
COMPANA DE KENMORE ULTRA WAVE TM
La energia de microondas no produce calor. Esta
energia hace que losalimentosgeneren calory este a
su vez hace que los alimentosse cocinen. Las
microondasson como las ondas de TV, radio o luz.
Ustedno laspuedevet, peropuedever Ioque hacen.
Los hornos convencionales a microondas operan
s61oen energia alta (HIGH). Para Iograr un nivel de
energia de 70% en un homo convencional a
microondas, el homo opera el 70% del tiempo en
energia alta y el 30% del tiempo apagado (OFF).
Un magnetr6n de produce las microondas en un
homo de microondas. Las microondas se mueven
dentro del homo donde se ponen en contacto con
los alimentos cuando giran sobre la bandeja giratoria.
Magnetr
n
El sistemade inversorde microondasULTRAWAVETM
entregaenergiaal en forma continua,paradescongelar
mas uniformementey minimizarel excesode cocd6n
de losalimentosy lassudas salpicaduras.
Cavidad_del
Piso de metal
Bande]a
homo
giratona de vidrio
La bandeja giratoria de vidrio de su homo de
microondas permite que las microondas pasen.
Luego, estas rebotan en el piso de metal, atraviesan
la bandeja giratoria de vidrio y son absorbidas por
los alimentos.
Las microondas pasan a traves de la mayoria de
los tipos de vidrio, papel y plastico sin calentarlos,
de manera que el alimento absorbe la energia. Las
microondas rebotan en los recipientes de metal, por
Io tanto los alimentos no absorben la energia.
Coccibn por sensor
El sistemade inversorde microondasULTRAWAVETM
cuenta confuncionesde cocci6npor sensor.
Un sensorde humedaden la cavidaddel homo detecta
la humedademitidapor los alimentosal calentarse.
El sensorajusta el tiempo para diversostipos y
cantidadesde alimentos.La cocci6npor sensorelimina
la incertidumbreal cocinarcon hornosde microondas.
Cbmo obtener
de coccibn
los bptimos
resultados
Sistema de inversor de microondas
ULTRA WAVE TM
• Siemprecocinelos alimentosper el tiempo mas
corto recomendado.Veriflquec6mo se estan
cocinandolos alimentos.
El sistema de inversor de microondas ULTRA
WAVE TM le ofrece mejor rendimiento de cocci6n
en microondas para descongelar, cocinar y
recalentar alimentos rapida y uniformemente. La
tecnologia probada del sistema de inversor de
microondas ULTRA WAVE TM entrega una
comente constante de energia de microondas verdadera energia alta, media y baja, a la vez que
usa menos potencia y ahorra tiempo.
• Para ayudara asegurarsede que los alimentos
estan cocinadosde forma pareja, revuelva,rote
o redistribuyalos alimentosquese est_n
cocinandoa la mitad del tiempo de cocci6n.
• Si ustedno tiene una tapa para un plato, use
papel enceradoo toallas de papel aprobadaspara
use con microondaso peliculade pl_stico.
Recuerdedoblar una esquinade la peliculade
pl_sflcepara que el vapor salgadurante la cocci6n.
Interferencia
de radio
Usar su homo de microondas puede causar
interferencia en su radio, TV o equipo similar.
Cuando hay interferencia, puede reducirla o
quitarla de la siguiente forma:
• Limpiar la puerta y sellar las superficie del homo.
• Ajustar la antena receptora de la radio o televisor.
• Llevar el receptor lejos del homo de microondas.
• Enchufar el homo de microondas en un
tomacerriente diferente de modo que el homo de
microondas y receptor est6n en diferentes ramas
de cimuitos.
41
Probar su horno de microondas
Para probar el homo ponga aproximadamente 1
taza de agua fria en un recipiente de vidrio en el
homo.
Cierre la puerta. Asegt3reseque se cierra. Cocine
a1100% de potencia per 1 minuto. A su debido
tiempo, el agua debe calentarse.
Probar su vajilla o bateria de cocina
PruebesuvajUlao bateriadecocina antesdeusar.
Para probarun platoy tenerun useseguro,colSqueloen
el homoconuna tazade agua al ladedel mismo.Si el
platose calientademasiadoy el aguaquedafria, no Io
use.Si la vajilla se calienta,no Io use. AJgunosplatos
(de melanina,a!gunavajillaceramica,etc.)absorbela
Precauciones
de seguridad
• Nunca se apoye en la puerta o permita a un nifio
que se balancee en ella cuando la puerta esta
abierta.
• Use protectores para objetos calientes. La
potencia microonda no calienta los envases, pero
el calor del alimento puede hacer que el recipiente
se caliente.
• No use papel de diarios u otto papel impreso en el
horno.
• No seque flores, frutas, hierbas, madera, papel,
calabacines o ropas en el horno.
• No encienda el homo de microondas cuando esta
vacio. La vida atil del producto puede ser
acortada. Si realiza la programaci6n del homo,
coloque un recipiente de agua en el homo. Es
normal que la puerta del homo se yea ondulada
despues de que el homo ha estado funcionando
por un lapso.
• No trate de derretir cera de parafina en el homo.
La cera de parafina no se derretira porque permite
a las microondas pasar a traves de la misma.
• No opere el homo de microondas a menos que la
bandeja de vidrio giratoria este segura en su lugar
y pueda mueve libremente. La bandeja giratoria
puede mueve hacia cualquier direcci6n.
Aseg_rese de que la bandeja giratoria esta
correctamente colocada en el homo. Tome su
bandeja giratoria con cuidado cuando la saque del
homo, para evitar la posibilidad de quebrada. Si
su bandeja giratoria se rompe o se quiebra,
contacte a su proveedor para un reemplazo.
• Cuando use un plato dorador, el fondo del plato
dorador debe ser al menos de por Io menos 3 I16
pulgadas por arriba de la bandeja giratoria. Siga
las directivas provistas con el plato dorador.
Conexibn
operativa
• Nunca cocine o recaliente un huevo entero con
cascara. La formaci6n de vapor en los huevos
enteros puede causar que revienten y
posiblemente darien el homo. Fraccione los
huevos duros hervidos antes de calentarlos. En
raras ocasiones, los huevos poche se han
reventado. Cubra los huevos poche y deje un
tiempo de un minute antes de cortarlos.
• Para obtener mejores resultados, revuelva
mientras se calienta o recalienta. Los liquidos
calentados en ciertos recipientes (especialmente
recipientes de forma cilindrica) pueden
sobrecalentarse. El liquido puede saltar hacia con
un fuerte sonido durante o despues de calentarse
o cuando se agreguen los ingredientes (granulos
de cafe, saquitos de te, etc.). Esto puede dariar el
homo.
• Las microondas pueden no Ilegaral centre de un
asado. El calor se difunde desde el centro hacia
afuera, areas cocidas, tal come un homo comL_n.
Esta es una de las razones para dejar algunos
alimentos (per ejemplo, asados o papas al homo)
permanecer per un memento despues de la
cocci6n o en otros alimentos, revolverlos durante
el tiempo de cocci6n.
• En el homo, no sumerja al freir. Los utensilios
para microondas no son adecuados para esto y
es dificil mantener temperaturas correctas para
frituras sumergidas.
• No cocine demasiado las papas. AI final del tiempo
de cocci6n recomendado, las papas deberan estar
ligeramente firmes porque continuaran la cocci6n
durante el tiempo de permanencia. Luego de
cocinar en el homo de microondas, deje alas
papas permanecer darante 5 minutos. Se
terminaran de cocinar mientras reposan.
El ctrica
es dede
menos
de 110
voltios, olos
tiempos
I salida
Si su linea
conexion
electrica
voltaje
de de
42
energiade lasmicroondas,calentandosedemaslado
paratomadoscon la manoy demorandolostiemposde
cocci6n.Cocinaren recipientesde metalno disefiados
parausede microondaspuedendafiarel homo,ya que
podriancontenermetaloculto(atadurasretorcidas,
laminasmetalicas,grapas,lustreo recortesmetalicos).
cocci6n pueden ser m_s largos. Haga queun
electricista calificado controle su sistema electrico.
Caracteristicas
del horno de microondas
0
®®
®
m
i
®®®
Su homode microondasesta diseSadopara hacersu
experienciade cocinaIo mas agradabley productiva
posible.Para resumiry explicarrapidamente,la
siguientees una lista de las caractedsticasbasicasdel
homo:
1. Ventana con pantallade metal evita que las
microondasse escapen. Esta dise_adacome una
pantallapara permitirlevisualizarla comida mientras
se cocina.
2. Placade modeloy n0merode seriey etiquetade
guia de cocciSn
3. FUtrode carbbn (detrasde la rejillade ventilaci6n)
1. Bandeja de vidrio
2. Soporte
3. Cubo central
®
®
4, Rejillade ventUacibn.
5. Bandejagiratoria.La bandeja giratoriahace girar los
alimentosmientrascocina para obteneruna cocd6n
mas pareja.Debe estar en el homoduranteel
funcionamientopara obtenermejoresresultadosde
cocciSn.
6, Luz auxiliar(para la mesada)
7. FUtrode grasa. Vet la secciSn"Cuidadodel los
filtros".
8. Panelde control.Toque los padsen este panelpara
realizartodas las funciones
9. Parrillade coccibn. Utilicelapara obtenerespacio
extra cuando cocine en m_s de un recipientea la vez.
Q
DESCONGELACI6N
PLACA DE LA
Utilice la PLACA DE LA DESCONGELACION
proporcionada para la descongelaci6n completa.
La bandeja de vidrio se mueve en ambas direcciones
para ayudar a cocinar mas parejamente.
No opere el homo de microondas sin la bandeja de
vidrio en su lugar.
Para instalar:
1. Coloque el soporte en la cavidad del piso del homo.
2. Coloque la bandeja de vidrio en el soporte.
Acomode el pie acanalado del piso de la bandeja de
vidrio entre los rodillos del cubo central. Los rodillos
del soporte deben calzar dentro del reborde de la
bandeja de vidrio.
43
Funciones del panel de control
El panel de control de su homo de microondas le permite sel_ ccionar rapida y facilmente la funci6n
de cocci6n deseada. Todo Io que tiene que hacer es tocar el pad de comando. La siguiente es una
lista de todos los pads de comando y nemeros ubicados en el panel de control. Para m_s
informacidn sobre estas caracteristicas, yea la seccidn "Usar su homo de microondas".
i
Tlfll_
0
CLE_
©
1. Pantalla. La pantalla incluye un reloj e
indicadores que le muestran la hera del dia, los
programas de las horas cocinar los alimentos,
las potencias de cocci6n, las cantidades, pesos
y las funciones de cocci6n seleccionadas.
44
2. Palomitas de maiz. Toque este pad para
preparar las palomitas de maiz con la
caracteristica del sensor. El sensor del homo le
dira al homo cuanto tiempo debera cocinar
segOn la cantidad de humedad que detecta
(deserta) en las palomitas.
3.Pizza.Toqueestepadpararecalentar
unao
variasporciones
de pizzasinintroducir
una
potencia
otiempodecocci6n.
4.Verduras.Toqueestepadparacocinarsin
introducir
unapotencia
otiempodecocci6n.
5.Papas(patatas)alhomo.Toqueestepadpara
cocinar
papassinintroducir
unapotencia
o
tiempodecocci6n.
6.Entradacongelada.
Toqueestepadpara
cocinar
de10a 21onzasdeentrada
congelada
sinintroducir
unapotencia
o tiempodecocci6n.
7.Platoprincipal.Toqueestepadparapreparar
sinintroducir
untiempoo potencia
decocci6n.
8.Seguraa fuegorento.Toqueestepadpara
hervirlentamente
sopas,cazuelas,
estofados
y
otrosalimentos
liquidos.
9. Pads num_ricos. Toque los pads numericos
para introducir tiempos de cocci6n, potencias de
cocci6n, cantidades, pesos, o categorias de
comidas.
10. Tiempo de cocci6n. Toque este pad seguido
por un pad numerico para determinar un
tiempo cocci6n.
11. Potencia. Toque este pad despu6s determinar
el tiempo de cocci6n, seguido por un pad
numerico para instalar la cantidad de potencia
de microondas liberadas para cocinar los
alimentos. Cuando mas alto el nemero mas
alto la potencia de microondas o "velocidad de
cocci6n."
12. Agregar minuto. Toque este pad para cocinar
por 1 minuto, al 100% de Potencia de cocci6n
o para agregar un minuto extra a la Potencia
de cocci6n.
13. Menos. Toque este pad para restar 10
segundos de cocci6n por cada vez que Io
presiona.
14. M_s. Toque este pad para agregar 10
segundos de tiempo extra de cocci6n cada
vez que Io presiona.
15. INIClAR. Toque este pad para iniciar una
funci6n. Si abre la puerta despu6s que el homo
comienza a cocinar, vuelva a tocar INICIAR
(START).
17. Cocci6n autom&tica. Toque este pad para
cocinar alimentos aptos para homo de
microondas sin introducir una potencia o
tiempo de cocci6n.
18. Recalentamiento automatico. Toque este
pad para recalentar alimentos aptos para
homo de microondas sin introducir una
potencia o tiempo de cocci6n.
19. "Mantener caliente". Toque este pad para
"Mantener caliente" las comidas cocinadas en
su homo hasta 99 minutos, 99 segundos. La
funci6n "Mantener caliente" puede ser usada
por si misma o puede seguir automaticamente
el ciclo de cocci6n.
20. Reloj. Toque este pad para introducir la hora
del dia correcta.
21. Descongelamiento automatico. Toque este
pad seguido por pads num6ricos para
descongelar came seg6n el peso.
22. Descongelamiento rapido. Toque este pad
para descongelamiento rapido.
"GROUND BEEF 1.0 LBS TOUCH START"
aparecera en la pantalla.
23. Cronbmetro de cocina. Toque este pad para
iniciar el Cron6metro de cocina.
24. Fundir. Toque este pad para fundir
chocolate, queso, mantequilla o malvavisco.
25. Ablandar. Toque este pad para ablandar
helados, cremas, queso, mantequilla o jugos
helados.
26. Ventilador On/Off. Toque este bot6n para
apagar o encender el ventilador.
27. Ventilador 5 Velocidades. Toque este bot6n
para elegir una de las 5 velocidades del
ventilador.
28. Luz Alta/Nocturna/Apagarla. Toque este
bot6n para encender la luz, ponefla en alta, en
noctuma o para apagafla.
NOTA: Si trata de introducir instrucciones
incorrectas, no escuchara ningen tono. Toque
DETENER/Limpiar (STOP/Clear) y reintroduzca
las instrucciones.
16. DETENER/Limpiar (STOP/Clear). Toque este
pad para borrar un comando incorrecto,
cancelar un programa durante la cocci6n,
o limpiar la pantalla.
45
Usar su horno de
microondas
Esta secci6n contiene instrucciones para Ilevar a
cabo cada funci6n. Tenga a bien leer
cuidadosamente estas instrucciones.
;ENALES AUDITIVAS
Las seSales auditivas estan disponibles para
guiarlo cuando programa y usa su homo ;
• Un tono de programacidn sonata cada vez
que usted toque un pad.
• Siete tonos sefialan el final de un conteo del
cron6metro de cocina.
• Cuatro tonos sei_alan la finalizaci6n de un ciclo
de cocci6n.
INTERRUMPIR
Abriendo la puerta, puede detener el homo
durante un ciclo. El homo deja de calentar y el
ventilador se detiene, pero la luz permanece
encendida.
Para retomar la coccibn, cierre la puerta y
toque START
Si no desea continuar la coccibn, abra la
puerta y toque STOP/Clear.
PROTECCIt_N
PARA NINOS
DE SEGURIDAD
Puede usar esta funci6n de seguridad para bloquear
el panel de control cuando se halla limpiando el
homo o que los niSos no puedan utilizar el homo sin
la supervisi6n.
RELOJ
Luego de enchufar su homo de microondas por
primera vez o luego de una interrupci6n por falla
electdca, la pantalla mostrara el mensaje "PLEASE
SET TIME QF DAY". Si la hora del dia no esta
determinada, la pantalla mostrara ":" hasta que
usted toque "Clock ".
Para determinar CHILD LOCK: (BIoqueo de
protecci6n)
Toque:
La pantalla
mostrar_:
1,
Hora del dia.
Ejemplo para 10:30(AM):
Toque:
LA COCCI(_N
La pantalla
mostrar_:
1,
: EI'ITER
TitleDFDRY
2,
3.
4,
1
0
3
0
I_' ÷ rl T_llf"
T
,_.30
,uuLflS,flR,
I_'
ILl
*
rl
o_
Tt3!
5.
RI_
T_I HILILIL_I
It-
I,e"
_'_/0 : 30 T,'II
, uuLfl
5T[7RT
6.
ILl
NOTA: Puede ir de A.M. y P.M. tocando 1 o 2 luego
del paso 4.
46
Toque y mantenga hasta
que aparezca LOCKED
en la pantalla
(aproximadamente
4 segundos).
T
Para cancelar CHILD LOCK: (Bloqueo de
protecci6n)
/
Toque:
La pantalla
mostrar_:
Toque y mantenga hasta
que desaparezca LOCKED
en la pantalla
(aproximadamente
4 segundos).
CRONOMETRO
DECOCINA
LUZ SUPERIOR
Su homo de microondas puede usarse como
cron6metro de cocina. Puede determinar haeta 99
minutes, 99 segundos.
Ejemple
Toque:
La pantalla
mostrar_:
Tim
1.
para HIGH:
Toque:
La pantalla
1.
mostrar_:
HISH
I_I ml_l
: EHTEE,,;E,,,,,,
R_,_5EL
2.
El pad en la parte inferior derecha del panel de
control controla la luz superior de cocina.
Ejemplo
para 3 minutes:
3
0
• FIFI TF_! IF
T
T
3.uu
,uuLHS,RE,
0
beNT
HIG_NERrIO_
Una vez para luz alta
Dos veces para luz nocturna
2.
*UU
TIMER y cuenta
regresiva.
VENTILADOR
DE EXTRACCION
Los dos pads en el centre inferior del panel de control,
controlan las 5 velocidades del ventilador de extracci6n
Ejemplo para nivel 4:
Toque:
1.
La pantalla
mostrar_:
_Ef)EL,
I
II
I I
2.
0
8FF
bG_r
HIGWNmm!O_
Para apagarlo, toque el bot6n
una vez o dos veces
dependiendo del ajuste de la luz,
DESCONGELAMIENTO
RAPIDO
Unasecuenciade descongetamiento
rapidosehallapredeterminada
en elhomo.Lafuncbndedescongelamiento
rapido(expressdefrost),
proveeunm_tododedesosngelamiento
rapidoparaunapedazode
"CARNEMOLIDA,GROUND
BEEF)"soiamentede 1.0libra.
Ejemplo para I libra de came molida:
Toque:
La pantalla
mostrar_:
1.
5EOUI'/#
BEEF117LB5
TOUEH
5TRET
ONIO_
Muestra el ultimo nivel que eligi6
para la velocidad del ventilador.
DE COCINA
_Ef)ELV
i
,tl I
VENT
5=5PEEB
Toque hasta niveI4
,
Cuenta regresiva de tiempo y
EXPEES5DEFE2,S'fse
desplaza per la pantalla.
VENT
ONIO_F
Apague el ventilador cuando desee
NOTA: Si la temperatura del range o de la parte superior
de la cecina que esta por debajo del homo se eleva
demasiado, el ventilador de extracci6n en Ia campana de
ventilaci6n se encender_ automaticamente en la
VELOCIDAD 5 (LEVEL 5) predeterminada para proteger
el homo. Puede permanecer asi hasta una hora para
enfriar el homo. Cuando esto ocurre, eI bot6n "VENT"
(Ventilador) no apagara el ventilador.
47
AGREGAR
COCCIC)N EN ETAPAS MULTIPLES
MINUTO
Es un pad de ahorro de tiempo, este control
simplificado le permite programar rapidamente e
iniciar la cocci6n por microonda a1100% de potencia
sin necesidad de tocar START.
Para mejoresresultados,algunas recetasnecesitanun Ciclo
de potenciapara un periodo de tiempo determinadoy otro
Ciclo de potenciapara otro periodo de tiempo. Su homo
puede programarsepara cambiarautom_ticamentede unoa
otro en un total de hasta dos ciclos.
Ejemplo para 2 minutos
Ejemplo para un ciclode coccibnen 2 etapas:
Toque:
La pantalla
mostrar_:
Toque:
Hora del dia.
.
La pantalla
mostrar_:
•
hit
rFl_l
I_lr
TIEE_
.
2.
Dos
veces
Cuenta regresiva de
tiempo y POWER 100.
NOTA: Cada vez que toque ADD MINUTE,
agregara 1 minuto hasta 99 minutos 59 segundos.
COCCI()N
2.
3
I-I1-1 TF_I IF
• _1_1
hit
FII I
3 ._
E_,IEEPE_EE
_&,EL,,_,_
3.
CRONOMETRADA
.
NOTE: Si no selecciona un nivel de potencia, el
homo automAticamente funcionar_ a potencia
ALTA(100%).
Toque:
TOUEH
5TRET
Para programar un 80%
de la potencia de cocci6n.
•
.
Ejemplo para 5 minutos, 30 segundos al 80% de
energia:
5.
8)
II
I
! TF_
I1-1
7 _ P_ER _
TFH IF
T
T
,_H 5IRE,
Para programar un 50%
de la potencia de cocd6n para la segunda etapa.
10.
T
NOTA: Despu@s del uso de la funci6n de cocci@n,
debe accionar el ventilador por 1 minuto para enfriar
en caso de que se sienta demasiado calor.
48
8.
Cuenta regresiva de
tiempo y POWER 80.
T
T
• r_r_
hit
F_I I
7 ._
EhlEEPO_EE
9.
IF
T
FII /
Para programar una
cocci6n de 7 minutos para la
segunda etapa.
5 38 POr_ER
8,9 iu_LH 51REi
TFll
IF
TIEE_
T
•
_1
hit
FIII
5 .3_g
Eh,ERPB_ER
I
It
I ! TF_ I1-1
LEVEL,i_,_
3.
4.
T
I_lr
dE P_ER
I
TF_! IF
5:30 ,uu_H5,_R,
FI
FI//
UE
PEewEE
rFl_l
• I-I1-1 TFH
F_
*
0
hit
*
La pantalla
mostrar_:
• Eh,ER _.uu'_,,o TIRE
1.
5
T
Para programar una
cocci6n de 3 minutos para la 1 etapa.
Esta funci6n le permite programar un tiempo de cocci6n y
potencia especificos. Para obtener mejores resultados,
hay 10 niveles de graduaci6n de potencia adem_s de
ALTA (100%). Refl@rasea la "Tabla de niveles de potencia
de microonda" en la pag. 49 para m_s informaci@n.
2.
T
3 uu ,,-,-,,.H5IRE,
_2 PO_EE
Cuenta regresiva de
tiempo y POWER 80.
Cuando la pfimera etapa termina, oir£ dos tonos
cortos cuando el homo comienza la segunda
etapa de cocci6n.
NIVELES
DE POTENCIA
MICROONDA
Tambien dice cuando usar cada potencia de cocci6n.
Paraobtenermejoresresultados,
algunasrecetasrequieren
diferentespotencias
de cocci6n.Cuantomasbajaesla potencia Siga las instrucciones de la receta del paquete de
de cocci6n,masbajaesla cocci6n.Cadant]merode I a 9
comida si estan disponibles.
representaundiferenteporcentaje
de potenciacompletade
cocci6n.
La siguientetablamuestrael porcentaje
de potenciade cocci6n
quecadant]merorepresenta
y el hombrede potenciade
cocci6ngeneralmente
usado.
POTENCIA DE COCCION
NOMBRE
100% de potencia completa
Alta
CUANDO USARLA
• Calentado rapido de muchas alimentos preparados
y alimentos con un alto contenido de agua, tales
como sopas y bebidas.
• Cocci6n de cortes tiernos de cerne, came molida.
9 =90% de potencia total
* Calentar sopas-crema.
8 =80% de potencia total
* Calentar arroz, pasta o cecerolas
7 =70% de potencia total
Medio alta
* Cocinar y celentar comidas que necesitan una
potencia de cocci6n mas baja que alta (por ejemplo,
pescado entero y una pieza de came) o cuando la
cemida se cocina demasiado rapidamente.
• Recelentar una sola porci6n.
6 =60% de potencia total
* La cocci6n que requiere cuidado especial, como
quesos y huevos y platos de huevos, budines y
flanes.
• Terminar la cocci6n de cecerolas
5 =50% de potencia total
Mediana
* Cocinar jam6n, aves enteras, y asados a la olla.
• Cocer estofados a fuego lento.
4 =40% de potencia total
3 =30% de potencia total
* Derretir chocolate
• Calentar pasteleria
Medio baja,
descengelar
2 =20% de potencia total
1 =10% de potencia total
* Descengelar manualmente alimentos, tales como
pan, pescado, carnes, aves, y alimentos prececidos.
* Ablandar mantece, queso, y helados.
Baja
* Mantener los alimentos celientes.
• Sacar el frio de las frutas.
49
DESCONGELAMIENTO
AUTOMATICO
Tres secuencias de descongelamiento est_n predeterminadas
en el horno. La funci6n de descongelamiento autom_tico le
proporciona el rnejor rn6todo de descongelarniento para
almentos congeIados. La guia de cocina le mostrara cual
secuencia de descongeIarniento se recornienda para el
almento que desea descongelar.
Para mayor conveniencia, el descongelarniento autom_tico
incluye un rnecanismo sonoro incorporado (bip)que Ie recuerda
que debe controlar. Dar vuelta, separar, o volver a arreglar
para obtener el mejor resultado del descongelarniento. Hay
tres diferentes niveles de descongelarniento.
1CARNE
2 AVES
3 PESCADO
4 PAN
Toque:
La pantalla
mostrar_:
flERTTOU£H
I
POUL
TRVTOUEH
2
FISHTOUEH
3
BRER#TOUEH
1,
3,
1
O.LTLb5
EI'ITER&/EISHT
Y
para introducir el peso
4,
PESOS QUE PUEDE
DETERMINAR
(en d_cimas de libra
Came
1
.1 a 6.0 (45g a 2722g)
Ayes
2
.1 a 6.0 (45g a 2722g)
Peseado
3
.1 a 6.0 (45g a 2722g)
Pan
4
.1 a 1.0 (45g a 450g)
Peso equivalente
ONZAS
PESO DECIMAL
/.2u_
3.2
.20
TOUEH
5TRRT
4.0
.25
4.8
.30
6.4
.40
8.0
.50
9.6
.60
11.2
.70
12.0
.75
12.8
.80
Cuenta regresiva de tiempo
y DEFROST.
PARA OPERAR
de peso
Usted probablemente no esta acostumbrado a rnedir los
pesos de los alimentos en libras y en onzas que son
fraociones de libra (por ejernplo, 4 onzas igual a 1/4 libra ).
No obstante, para poder introduoir el peso del alimento en
"Descongelarniento autornatico", debe especificarlo en
Iibras y d_cimas de libra.
Si el peso en el paquete del alirnento esta expresado en
fracciones de libra, puede usar la siguiente tabla para
convertir el peso a fracciones decimales.
.10
• Paraobtener mejoresresultados, saque el pescado,marisco,
carne o ave su paquete(envoltura)original. De otto modo la
envoltura guardar_ el vapor y eljugo cerca de los alimentos,
esto puedecausar que la superficieexterna de losa/mentos se
cocine.
• Paraobtener mejoresresultados, de a la came molidala forma
de una rosca (dona) antesde congetarla.Cuando la
descongele, alsonar el bip raspe la came ya descongeladay
conln0e el descongelamiento.
• Coloque los alimentosen un recipientepiano o sobre una rejilla
de asado para microondaspara recoger el goteo.
5O
TOQUE
Descong.
Automat,
1.6
NOTA:
Cuando toque el pad START, la pantalla cambia para Ia
cuenta regresiva de descongelamiento. Sonata un bip en el
homo durante el ciclo de DESCONGELAMIENTO. En este
mornento, abra la puerta y d_ vuela o vuelva a arreglar eI
alimento. Quite cualquier porciSn que ya este descongelada.
Vuelva a colocar en el horno las porciones congeladas y
toque START para retornar al ciclo de descongelamiento.
SUGERENCIAS
ALIMENTO
Tabla de conversibn
Ejemplo para 1.2 libra de came molida:
2,
Estatablale muestralaselecci6ndel tipode almentoy elpeso
quepuedeestablecerparacadalpo. Paraobtenermejores
resultados,aflojeo quiteta cubiertadel alimento.
un cuarto de libra
media libra
tres cuartos de libra
14.4
.90
16.0
1.00 unalibra
TABLA DE DESCONGELAMIENTO
Programar
AUTOMATICO
carnes
ALIMENTOS
PROGRAMAR
SEI_IAL ACUSTICA
INSTRUCCIONES
ESPECIALES
CARNE DE
VACA
Came molida,
en bulto
CARNE
Quitecon un tenedorlas porciones No descongelar menos de 1/4onza. Congele en
descongeladas.De vuelta.Vuelva el forma de rosca (dona).
resto al homo.
Coloque sobre la PLACE DE LA
DESCONGELAClON.
Camemolida,en
hamburguesas
CARNE
Separe y vuelva a disponer.
Nodescongele
menosde dosonzasde hamburguesas.
Comprimael centrocuandopongaa congelar.
Bistecredondo
CARNE
D6vuelta.CubralasareascaIientes
conhojasde papelde aluminio.
Coloque sobre la PLACE DE LA
DESCONGELACION.
Filetede Iomo
CARNE
D6vuelta.CubralasareascaIientes
conhojasde papelde aluminio.
Coloque sobre la PLACE DE LA
DESCONGELAClON.
Estofadode
came
CARNE
Quitelasporcionesdescongeladas Coloque en un plato de homo apto para
microondas.
contenedor.
Separeel resto.Vuelvael restoal homo.
Asado
a laoila
CARNE
Camemelida
asada
D6vuelta.CubralasareascaIientes
conhojade papelde aluminio.
Coloque sobre la PLACE DE LA
DESCONGELACION.
Asadede
costilla
CARNE
D6vuelta.CubralasareascaIientes
conhojade papelde aluminio.
Coloque sobre la PLACE DE LA
DESCONGELACION.
Nalgaarrollada
asada
CARNE
D6vuelta.CubralasareascaIientes
conhojade papelde aluminio.
Coloque sobre la PLACE DE LA
DESCONGELACION.
CORDERO
Cubos para
estofado
CARNE
Quitelasporcionesdescongeladas
con
untenedor.Vuelvael restoal homo.
Coloque en un plato de homo apto para
microondas.
Separe y vuelva a disponer.
Coloque sobre la PLACE DE LA
DESCONGELACION.
Chuletas
CARNE
(de1pulgada
deanch0)
CERDO
Chuletas
CARNE
(de 1/2pulgada
de ancho)
Separe y vuelva a disponer.
Coloque sobre la PLACE DE LA
DESCONGELACION.
CARNE
Separe y vuelva a disponer.
Costilias
sueitas
Costillas
estilo
country
CARNE
De vuelta. Cubra las areas
calientes con hoja de papel de
aluminio.
Tira de
Salchichas,
CARNE
Salchicha, en
bulto
CARNE
Quite
lasporciones
descongeladas
conun
tenedor.
D6vuelta.
VueNa
elrestoalhomo.
Lomo asado
deshuesado
CARNE
D6vuelta.
Cubra
lasareas
calientes
conhoja
Coloque sobre la PLACE DE LA
depapeldeatuminio.
NFRNNNAFI ANINN
Perro caliente
Coloque sobre la PLACE DE LA
DESCONGELACION.
Coloque sobre la PLACE DE LA
DESCONGELAClON.
Separe y vuelva a disponer.
Coloque sobre la PLACE DE LA
DESCONGELAClON.
Coloque en un plato de homo apto para
microondas.
51
TABLA DE DESCONGELAMIENTO
Programar
AUTOMATICO
(CONT.)
aves
ALIMENTOS
PROGRAMAR
POLLO
Entero (hasta
6 libras)
AVES
Despresado
GALLINAS
Enteras
AVES
SEI_IAL ACUSTICA
INSTRUCCIONES
ESPECIALES
Devueita(concluya
el descongelamiento
conla pechuga
haciaabajo).Cubralas
_reascalientesconhojasdepapelde
aluminio.
Coloque
elpolioconlapechuga
hacia
arriba_obre
la
PLACE DE LA DESCONGELACION. Concluya
eldescongelamiento
sumergiendo
enaguafria,Quitelos
menudos
cuando
elpolioest6parcialmente
descongelado,
Separe las partes y reacomode.
Coloquesobrela P,LACE DE LA
DESCONGELACION.
De vuelta. Cubra las areas calientes
con hoja de papel de aluminio.
Concluya el descongelamiento sumergiendo
en agua fria.
De vuelta. Cubra las areas calientes
con hoja de papel de aluminio,
Coloque
sobrela PLACE DE LA
DESCONGELACION.
Conchya
eldescongelamiento
sumergiendo
enaguafria.
De vuelta. Cubra las areas calientes
con hoja de papel de aluminio.
Coloque sobre la p!ace de la
DESCONGELACION. Concluya el
descongelamiento sumergiendo en agua fria.
PAVO
Pechuga
(hasta 6
libras)
AVES
Programar
pescados
ALIMENTOS
PROGRAMAR
PESCADO
Filetes
SEI_IAL ACUSTICA
Bistec
PESCADO D_ vuelta. Si fuera posible, separe
los filetes cuando se hallen
)arcialmente descongelados.
PESCADO Separe y vuelva a disponer.
Enteros
PESCADO D6 vuelta.
INSTRUCClONES
ESPEClALES
Coloque en un plato de homo apto para
microondas. Cuidadosamentesepare los
filetes bajo agua fria,
Coloque en un plato de homo apto para
microondas. Deje correr agua fria hasta que
concluya el descongelamiento.
Coloque en un plato de homo apto para
microondas,
Dejecorrer agua fria hasta que concluya el
descongelamiento.
SHELLFISH
Crabmeat
PESCADO Separelos. De vuelta.
Coloqueen unplatode homoaptoparamicroondas,
Lobster tails
PESCADO D_ vuelta y vuelva a disponerlas.
Coloqueen unplatode homoaptoparamicroondas,
Shrimp
PESCADO Separelos y vuelva a disponerlos
Coloqueen unplatode homoaptoparamicroondas.
Scallops
PESCADO Separelos y vuelva a disponerlos
Coloqueen unplatode homoaptoparamicroondas.
Programar
pan
ALIMENTOS
Rosca
DinnerRoll
Muffin
Hamburguesa
Hot DogBun
Rebanadas
depan
Hogazade pan
52
PROGRAMAR
PAN
SEI_IAL ACUSTICA
Darvueltay volvera cocinar.
INSTRUCCIONES
ESPECIALES
CoIoquesobre3 hojasde toallade papel.
SUGERENCIAS
PARADESCONGELAMIENTOMANTENER
• Cuando use el Descongelamiento automatico, el
peso a ser introducido es el peso neto en libras y
decimas de libras (el peso del alimento menos el
envase).
• Antes de comenzar, asegL_rese de quitar cualquiera
de las hilos o ataduras de metal que a menudo
vienen con las bolsas de alimentos y reempl_icelas
con hilos o bandas el_isticas.
CALIENTE
Puede mantener calientes y seguros los alimentos
cocinados, calentados en su homo de microondas
hasta 99 minutos, 99 segundos (aproximadamente 1
hora, 40 minutos). Puede usar "Mantener caliente"
por si mismo, o seguir automaticamente un ciclo de
cocci6n.
Ejemplo de "mantener
caliente":
• Abra los envases tales como cartones antes de
colocados en el homo.
Toque:
La pantalla
mostrar_:
• Siempre rompa o perfore las bolsas pl_isticas o
envolturas.
1.
FIJ l't Jl
m
HOL__FIE_,
TOU[H5Tfl_
T
2.
H,.&.uw'RE;,
• Si los alimentos estan envueltos, quite la hoja de
aluminio y col6quelos en un envase adecuado.
• Rompa las cascaras si hubiera, de alimentos
congelados tales como salchichas.
• Doble los envases plasticos de alimentos para
asegurar un descongelamiento parejo.
• Siempre calcule en menos el tiempo de
descongelamiento. Si el alimento descongelado
esta aen helado en el centro, vuelva a colocado en
el homo de microondas para mas
descongelamiento.
• El tiempo que toma el descongelamiento varia de
acuerdo a la solidez de congelamiento del alimento.
• La forma del envase afecta a la velocidad con que
el alimento se descongela, descongelar.
Los envases pianos se descongelan mas
rapidamente que un bloque profundo.
• Cuando el alimento comienza a descongelarse,
separare los pedazos. Los pedazos separados se
descongelan mas facilmente.
• Para obtener mejores resultados, permita
permanecer al alimento despues de descongelarse.
(Para mas informaci6n sobre tiempo de
permanencia, vea la secci6n "Sugerencias de
cocci6n en microondas ")
• De vuelta el alimento durante el descongelamiento
o tiempo de permanencia. Separe y quite el
alimento cuando sea necesario.
F_I
FI
I I
[it
se desliza a trav6s de la
pantalla.
AI final de la funci6n "Mantener caliente",
aparecera en la pantalla el mensaje "END "y
se oiran cuatro tonos.
Para qae "Mantener caliente" siga
aatomaticamente a otro ciclo:
• Mientras esta tocando las instrucciones de cocina,
toque Mantener caliente antes de tocar START.
Cierre la puerta y toque Mantener Caliente, luego
toque START si se desea un tiempo adicional de
Mantener Caliente.
• Caando termina el t_ltimo ciclo de cocci6n, oira
dos tonos. "Mantener caliente" seguira mientras el
horno contint_a funcionando.
• Puede programar que "Mantener caliente" siga al
descongelamiento automatico, cocci6n o cocci6n en
ciclos meltiples.
NOTAS:
• "Mantener caliente" opera hasta un total de 99
minutos, 99 segundos.
• Abrir el homo cancela "Mantener caliente".
Cierre la puerta y toque "Mantener caliente", luego
toque START si se desea un tiempe adicional de
"Mantener caliente"
• Los alimentos ya cocinados deben ser cubiertos
durante "Mantener caliente".
• Los platos de pasteleria (pasteles, empanadas, etc.)
deben estar sin cubierta durante la funci6n
"Mantener caliente".
• Las comidas completas que se desee mantener
calientes sobre un plato, deben cubrirse durante la
funci6n "Mantener caliente".
• No use mas de un ciclo completo de "Mantener
caliente" (aproximadamente 1 hora, 40 minutos).
La calidad de algunos alimentos se desmejorara
con un tiempo muy extendido.
53
SEGURA A FUEGO RENTO
Su homo de microondas le permite hervir lentamente
sopas, casuelas, estofados y otros almentos
liquidos. Todo Io que debe hacer es determinar un
tiempo para hervir lentamente y su homo Ilevara a su
comida a romper el hervor y luego a continuar
hirviendo durante el tiempo que usted especifique.
NOTAS:
• No puede cambiar la energia
para Segura a fuego rento.
• Esta funci6n
usa el sensor.
o grado de cocci6n
El sensor necesita
2
minutos 30 segundos para calentarse despues
que el homo se encienda o luego de un corte de
energia. Si inicia Segura a fuego rento durante
el calentamiento,
la energia microondas no se
encendera hasta que el sensor este caliente.
• Cuando cocine verduras, aumente la cantidad
de agua de 1/4 a 1/2 taza (60 a 125ml).
• Cubra el plato con una tapa dura, i.e., la tapa
que esta disponible con el plato o plato de mesa.
No use envolturas plasticas.
Toque:
1.
La pantalla
mostrar_:
Coloque la comida en el horno y
cierre la puerta.
:EtffER E2,2,1@15
fiRE
,
3. 3
0
0
0
13. 1313
3E
.uu
T_!
Ir
T
Toque los pads
_uuLH 5_°_
num@icos para entrar
START en el tiempo de
hervor lento.
Ejemplo para 30 minutes.
,
T
C-_-_-II2 5b_E 51fifiE_
El homo har& romper el
hervor de la comida.
Los almentos herviran lentamente durante el tiempo
que determine.
54
AI cocer lentamente los alimentos come pastas use
un envase que pueda contener suficiente agua para
cubridos totalmente al cocinarse, (como 3-quarts -12
tazas- cazuela) con una tapa. Cuando cocine pasta o
fideos agregue 1 cucharada (15ml) de aceite al agua
antes de hervir. Use el siguiente m6todo: Coloque el
recipiente con agua en el homo y siga los pasos
2-4, determinando el tiempo de cocci6n lenta en
lsegundo. AI final, coloque los alimentos en el agua
y remueva hasta que est6n completamente cubiertos
por el agua.
Cubra, Repita los pasos 2-4, determinando el
tiempo de cocci6n lenta que desea, Cambiando las
instrucciones, puede cambiar el tiempo de hervor
lento mientras hierve.
Para ello siga los pasos 2,3, y 4.
USAR SENSOR DE COCClON
SENSOR
DE COCCION
SENSOR OPERATIVA INSTRUCCIONES
El sensor de cocci6n le permite cocinar la mayoria de
sus comidas favoritas sin seleccionar los tiempos de
cocci6n y niveles de potencia. La pantalla indicara
"round shape" (forma redonda) durante el periodo
inicial del sensor. El homo automaticamente
determina el tiempo de cocci6n requerido para cada
articulo de cocina. Cuando el sensor interno detecta
una cierta cantidad de humedad proveniente de los
alimentos, le indicara al homo cuanto le tomara
calentado. La pantalla mostrara el tiempo restante de
calentamiento. Para obtener los mejores resultados
con el sensor, siga estas recomendaciones:
PAPAS (EJEMPLO)
Cocci6n del sensor le permite cocinar sus alimentos
favoritos sin seleccionar los tiempos de cocoi6n y
niveles de potencia.
Ejemplo para papas:
Toque:
La pantalla
mostrar_:
Hora del dia.
• Los alimentos cocinados con el sistema de sensor
deben hallarse a temperatura normal de
almacenamiento.
2.
• La bandeja de vidrio y la parte extema del
recipiente deben estar secos para asegurar los
mejores resultados de cocci6n.
Cuando haya concluido el tiempo de cocci6n oira
cuatro bips y aparecera "COOK END" en la
pantalla.
• Los alimentos siempre deben estar cubiertos de
modo suelto con envoltura plastica apta para
microondas, papel encerado o una tapa.
C___3Pfi,R,u
que se desplaza a trav6s
de la pantalla.
MAS/MENOS
Usandolas teclas Mas o Menos todas las cocciones
• No abra la puerta ni toque la tecla "STOP/CLEAR"
durante el tiempo correspondiente al sensor.
Cuando este tiempo termine, el homo emitira dos
bips, y el tiempo restante para cocinar aparecera
en la pantalla. En este momento podra abrir la
puerta para revolver, girar o redistribuir el alimento.
GUiA DE COCINA
CON SENSOR
Envases apropiados y cubiertas aseguraran buenos
resultados de cocoi6n por medio del sensor.
del sensory los tiemposde cocci6nprogramados
puedenser ajustadospor el alimentode cocci6nen
un tiempo largo o corto.
PresionandoMasse agregara 10 segundosdel
tiempo de cocci6ncada vez que Iopresione.
PresionandoMenosse restara 10 segundosdel
tiempo de cocci6ncada vez que Iopresione.
• Siempre use envases aptos para microondas y
ct_bralos con tapas o envolturas plasticas
ventiladas.
• Nunca use cubiertas plasticas ajustadas o selladas.
Estas pueden evitar que el vapor escape y causar
un exceso de cocci6n en los alimentos.
• Haga coincidir la cantidad con el tamafio del
envase. Llene los envases por Io menos hasta la
mitad para obtener mejores resultados.
• Asegurese que el exterior del envase de homeado y
el interior del homo de microondas se hallen secos
antes de colocar el alimento en el homo. Las gotas
de humedad al transformarse en vapor pueden
confundir al sensor.
55
CUADRO
DE COCCI( N
CATEGORIA
DEL SENSOR
DIRECCIONES
CANTIDAD
Palomitas de
Maiz
Popcorn le permite preparar las palomitas de maiz para horno de
microondas empacados comercialmente. Prepare Qnicamenteun
paquete cada vez. Para mejores resultados, use una bolsa fresca de
)olomitas de maiz. Coloque el empaque de palomitas preempacado
)ara homo de microondas. Antes de preparar las palomitas, remueva el
separador del homo (referir a la pagina 65).
Paquete de
3.0-3.5 onzas
Pizza
Este es la funci6n de recalentamiento para una pizza sobrante.
Coloque en un papel de cocina sobre un plato de homo apto para
microondas.
1-3 tajadas
(5 onzas cadaun_
Entrada
Congelada
Saque del empaque exterior. Dividalo.
Si no esta en un plato de homo apto para microondas, col6quelo sobre
el plato, cobra con envoltura plastica y abra unos respiraderos.
Despues de la cocoi6n, deje reposar unos 3 minutos.
De 10 a 21 onzas
Plato de Cena
Coloque los alimentos para ser calentado en el plato de cena o vajilla
similar. Cubra con el empaque plastico y abra un respiradero a la
pelicula plastica perforando con un tenedor (3 veces). Despues de la
cocoi6n, deje reposar unos 3 minutos.
1-2 porciones
i
>
Verduras
Saque del empaque, lave la escarchabajo el agua corriente.
Congeladas Coloqueen un platode homo aptopara microondasdel tamaio apropiado.
Agregue la cantidaddel agua de acuerdoa la cantidad(1-2 vasos: 2
cucharadasde t_, 34 vasos : 4 cucharadasde te)
Cubracon envolturapl_stca y abra unos respiraderos.
Despuesde la cocci6n,agitey deje reposarunos 3 minutos
1-4 vasos
Verdura
Preparecomo Iodesee, limpiey quiteel agua residualsobre las
1-4 vasos
fresca
verduras.Coloque
enla
plato
de homo
apto para
microondasdel
tamaSo
apropiado.
Agregue
cantidad
del agua
de acuerdoa
la cantidad
(1-2
vasos: 2 cucharadasde t_, 34 vasos : 4 cucharadasde te) Cubracon
envolturaplasticay abra unosrespiraderos.Despu_sde la cocci6n,agite y
deje reposarunos 3 minutos
Verdura
Enlatada
Saque de la lata externa.
Coloque en un plato de homo a _topara microondas del tamaSo
apropiado, cobra con envoltura tastica y abra unos respiraderos.
Despues de la cocoi6n, agite y ceje reposar unos 3 minutos.
1-4 vasos
Perfore cada papa con un tenedor y coloque sobre la bandeja del
homo al rededor del borde, apartada al menos una pulgada. Despues
de la cocci6n, deje reposar unos 5 minutos,
1-4 medio
(aprox. De 8 a 10
onzas cada una)
Papas
56
COCCI(_N
AUTOMATICA
RECALENTAMIENTO AUTOMATICO
Cocci6n Automatica le permite calentar los alimentos
comunes preparados por microonda sin necesidad
de selecci6n de tiempos de cocci6n o niveles de
potencia. El programa "Auto Cook" tiene la potencia
de cocci6n predeterminada para 4 categorias de
alimentos: cacerola, arroz, tocino (bac6n) y Cereal
caliente.
Recalentamiento Automatico le permite calentar los
alimentos sin necesidad de selecci6n de tiempos de
cocci6n o niveles de potencia.
El programa "Auto Reheat" tiene la potencia de
cocci6n predeterminada para 3 categorias de
alimentos:
Ejemplo para arroz:
Ejemplo para cazuela:
Toque:
La pantalla
mostrar_:
I
f-T
m
_111 /
5ELE_,
,;E;,_,
TO_'
--SEE_dH;,,o
o_,.E
1,
E---3
2,
Cacerola, Rollos/Panecillos
Toque:
1,
BEH_
(muffins) y Bebidas.
La pantalla
mostrar_:
/
f-T
m _111 IT_
5ELE£,
,E;,_,
,_3
t-t'It'iJ_It- t-! lJi'_
--SEE_dH;,,o
o_,.E
I_IEE
que se desplaza a trav6s
de la pantalla.
E____7_55Ef_O_E
2,
que se desplaza a trav6s
de la pantalla.
Elegir la categoria de alimento.
CATEGORiA
Cacerola (Sensor)
Arroz (Sensor)
Tocino (bac6n)
Cereal Caliente
TQCAR EL
_AD NOMERO
1
2
3
4
CANTIDAD
De1a4 vas0s
De1/2a 2vas0s
De2a4 tajadas
De1a6 p0rci0ne_
El homo cocinara los alimentos automaticamente
por el sistema de sensor, excepto tocino (bac6n) y
Cereal caliente. Cuando haya concluido el tiempo
de cocci6n oira cuatro bips y aparecera
"COOK END" en la pantalla.
Elija una categoria de alimento.
CATEGORiA
Cacerola(Sensor)
Rollos/Panecillos
(muffins'
Bebidas
TOCAR EL
3AD NOMERO CANTIDAD
1
2
3
De1a4 vases
De1a 6pedaz0s
De1a 2vases
El homo volvera a calentar automaticamente s61o
"Cacerola" por sistema de sensor.
Cuando haya concluido el tiempo de cocci6n oira
cuatro bips y aparecera "COOK END" en la
pantalla.
57
CUADRO
DE COCCI()N
CATEGORIA
AUTOMATICA
TOCARELPAD
NUMER0
DIRECCIONES
CANTIDAD
Caserola
(Sensor)
1
Prepare los ingredients por recipiente en una caserola
cuarta de 1-2. Cocine con envoltura plastica y abra
unos respiraderos. Despues de la cocci6n, agite y
deje reposar unos 3 minutos.
1-4 vases
Arroz
(Sensor)
2
Coloque arroz y liquido doble veces de su cantidad
(agua, polo o esencia de verdura) en un plato de
homo apto para microondas de 2 cuarto.
Cubra con envoltura plastica y abra unos
respiraderos. Despues de la cocci6n, deje reposar
unos 10 minutos. Agitelo para suavizar el arroz.
1/2- 2 vasos
Usegranode arroz
grandeso medio.
Cocineel arroz
instantaneo
deacuerdo
alas indicaciones
del
paquete.
Tocineta
3
Coloque las tiras de tocineta sobre la rejila para
mejores resultados. (Utilice un plato para cena
alineado con el papel de cocina si se dispone de la
rejilla.
2-4 tajadas
Cereal
Caliente
4
Prepare como Io indica el empaque y cocine.
Agite bien antes de comer. Use _nicamente los
cereales calientes instantaneo.
1-6 porciones
CUADRO
DE RECALENTAMIENTO
CATEGORIA
TOCAREL PAD
NUMERO
AUTOMATICO
DIRECClONES
CANTIDAD
Caserola
(Sensor)
1
Cubra el plato que contiene la caserola con envoltura
plastica y abra respiraderos. Despues de la cocci6n,
agite y deje reposar unos 3 minutos.
14- vasos
Rollo/Panecillos
2
Saque del empaque y coloque sobre un plato.
1-6 pedazos
frescas
(2-3 oz. Cada una)
Bebida
3
Use una mug de boca ancha. No Io cubra.
(Tenga cuidado, la bebida puede estar muy caliente!
A veces los liquidos calientados en los contenedores
cilindricas salpicara al mover el vaso.)
1-2 vasos
(240ml per vaso)
58
FUNDIR
ABLANDAR
El horno usa baja energia para fundir alimentos
(mantequilla o margarina, chocolate, malvaviscos o
alimentos procesados con queso). Vea la tabla a
continuaci6n:
Ejemplo para cuarto de helado:
Ejemplo para 8 onzas de chocolate:
Toque:
El horno usa baja energia para ablandar alimentos
(mantequilla, helados, quesos crema y jugos
helados), Vea la tabla a continuaci6n.
Toque:
La pantalla
mostrar_:
Hera del dia.
La pantalla
mostrar_:
1,
Hera del dia.
2,
I
FTm
&IIIITFJ,u q5ELEf_,,,_,ul
-SEEEOOff_"15
E_"DE
1,
5ELEF_
f fi6_IbI/ "fPV -SEEEOOK_%
E_"DE
2,
LrE EBER,
El-/BESt.fifE
3,
TEll If"
IUULfll
/ Tn
IU
Tll_l IF
II..ll..ll..-I_ll
I Tll_
II..I "7
4,
QUART una vez y ICE
CREAM
que se desplaza a trav6s
de la pantalla. Cuenta
regresiva de tiempo.
&'_
80Z una vez y
CHOCOLATE
que se desplaza a trav6s
de la pantalla. Cuenta
regresiva de tiempo.
4,
3,
TABLA DE INDICACIONESPARAFUNDIR
TABLADEINDICACIONES
PARAABLANDAR
C6digc
Categoria
C6digo Categoria
1
Mantequilla
o margarina
Desenvuelvalay cokXluela
1,2o3
en un envase apto para
pordones
microondas.No es necesadc
cubrir la mantequilla.AI
concluirla cocci6n revuelva
para compietar la fusi6n.
2
Chocolate
Pueden usarse botches de
chocolate o cubes de
chocolate de hornear,
Desenvuelva los cuadrados
y col6quelos en un
recipiente apto para
microondas. AI fin del ciclo
revuelvalos para completar
la fusi6n.
4o 8
onzas
Usesolamente alimentos
>rocesadoscon queso,
C6rtelo en cubes, Col6quelo
en una sola capaen un
envase apto para
microondas.AI conduir Ia
cocci6n revuelvapara
completar lafusi6n.
8 o 16
onzas
Puedenusarse malvaviscos
grandes o pequefios,
Col6quelos en un envase
apto para microondas. AI
final del ciclo revu61valos
para completar la fusi6n.
5 o 10
onzas
3
4
Quesos
_lalvaviscos
Instrucciones
Cantidad
Instrucciones
Cantidad
1
_aatequilla Destape y coloque dentro de
un contenedor para
microondas. La mantequilla
estara a la temperatura del
recinto y listapara su use en
la receta.
2
Helados
Coloque el envase en el
horno. Los helados seran Io
suficientemente blandos
para ser aprovechadosmas
f_cilmente.
Pinta,
Cuarto,
Medic
gal6n
3
Quesos
crema
Desenvuelvay coloque en
unenvase aptopara
microondas. El queso crema
estara a temperatura
ambiente y listopara usar
segQnla receta.
3o 8
onzas
4
Quite la tapa. Col6quelo en
heladosJUg°s
el homo. El jugo helado sera
Io suficientemente blando
para mezclarsef_cilmente
con agua.
1,2 o 3
)orciones
6, 12 o
16 onzas
59
Cuidar su horno de microondas
Para asegurarse de que su homo de microondas se vea bien y trabaje debidamente durante mucho tiempo,
debe mantenedo adecuadamente. Para su cuidado correcto, siga cuidadosamente estas instrucciones.
Para las superficies interiores : Lave a menudo
con agua jabonosa tibia
con esponja o patio
suave.
Use solo jabones
suaves no abrasives o
un detergente suave.
Asegt_rese de
mantener las areas
limpias donde se
tocan la puerta y el
marco del borne cuando se cierran,
Limpie bien con un pare limpio. Con el tiempo,
pueden aparecer manchas en la superficie como
resultado de salpicaduras de particulas de alimento
durante la cocci6n. Esto es normal.
Para suciedad rebelde,
hierva una taza de agua
en el homo durante 2 o
3 minutos. El vapor
ablandara la suciedad.
Para quitar olores
dentro del homo, hierva
una taza de agua con
algo de jugo de lim6n o
vinagre.
Para superficies exteriores y panel de control:
Use un pare suave con
limpiador de vidrios en
spray. Aplique el
limpiador de vidrios en
spray al pare suave; no
aplique el spray
directamente en el
horno.
NOTA:
Los limpiadores
abrasives, las almohadillas de lana de acero, los
paros limpiadores _speros, algunas toallas de
papel, etc., pueden dafiar el panel de control y las
superficies intedores o exteriores del horno.
60
Para limpiar la bandeja giratoria y el soporte de la
misma, lave las zonas
Bandeja de vidrio
muy sucias con agua
jabonosa templada. Use
un limpiador suave y
espoeja para fregar.
Soporte
El soporte y la bandeja de
vidrio pueden laverse en
lavevajillas.
Cube cent_l
UTILISATION DE LAGRILLE METALLIQUE
La grille metallique permet a I'utilisateur de disposer
de plus d'espace et deplacer simultanement plus d'un
recipientdans le four pour une cuisson.
1. Placer la grille en ben appui sur les quatresupports
de plastique.
• II NE FAUT PAS que la grille touche les parois
metalliques ou le fond de la cavite du four.
2. Placer des quantites egales d'aliments AUDESSUS et AU-DESSOUS de la grille.
• II faut que les quantites d'aliments soient
approximativement identiques, pour une bonne
repartition de I'energieabsorbee.
Pour _viter un risque de dommages materiels :
1. Ne pas utiliser la grille pour uneoperation
d'ecletement de mars.
2. Lots de I'utilisation,la grille dolt tou-jours reposer
sur les quatre supportsde plestique.
3. Utiliser la grille uniquement pour feirecuire le
contenu de deux recipients d'aliments.
4. Ne pas effectuer une cuisson alorsque la grille
repose sur la sole du four.
CUIDADO DE LOS FILTROS
Los filtro de grasa deben ser quitados y lavados a menudo, al menos una vez al mes.
NOTA: Si esta instalada la combinaci6n en la campana de su microonda para recircular el aire, el filtro de
carb6n (No. De Pedazo 5230W1A003A) disponible de Sears Ilamando a 1-800-4-MY-HOME _.
El filtro de carbon no puede ser limpiado y deberia ser reemplazado cada 6 a 12 meses.
Filtro de grasa
(No. De Pedazo 5230W2A004A);
It;
Filtro de carbbn (No. DePedazo5230WIA003A):
1. Desenchufe el homo de microondas o desconecte
la energia electrica.
2. Quite los tomillos de montaje de la rejilla del
agujero de ventilaci6n.
1. Desenchufe el homo de microondas o desconecte
la energia electrica.
2. Para quitar los filtro de grasa, deslica cada filtro
hacia el costado. Tire de los filtro hacia abajo y
empuje hacia el otro lado. El filtro caera.
3. Incline la rejilla hacia delante, luego levantela para
quitarla.
3. Embeba el filtro de grasas en agua caliente y un
detergente suave. Limpie y sacuda la suciedad
embebida y la grasa. Enjuague bien y sacuda para
secar. No limpie los filtro con amoniaco, agentes
corrosivos de limpieza tales como limpiadores de
homo basados en lejia ni los coloque en el
lavaplatos. Los filtro se volveran negros o pueden
daRarse.
4. Levante la parte posterior del flltro de carb6n.
Deslica el filtro directamente hacia fuera.
4. Para reemplazar los flltro de grasa. Deslice el filtro
en la ranura del marco hacia apoye el lado de la
abertura. Empuje el filtro hacia arriba y empuje
hacia el lado anterior para bloquear en su lugar.
5. Enchufe el homo de microondas o reconecte la
corriente electrica.
61
REEMPLAZARLAS LUCES DE LA
PARTE SUPERIORY DEL HORNO
La luz de la parte superior
para la cocina
(cooktop)
1. Desenchufe el homo de microondas o desconecte
la energia electrica.
5. Deslice un Nuevo flltro de carb6n en su lugar.
El filtro debe descansar en el angulo que se
muestra.
2. Quite el tomillo de montar de cubierta de bombilla.
3. Reemplace la bombilla con una bombilla de base
candelabra de 20 vatios. (No. De Pedazo
6912A40002A) disponible de Sears Ilamando a
1-800-4-MY-HOME_.
6. Deslice el rondo de la rejilla del ventilador en su
lugar. Empuje la parte superior hasta que calce en
su lugar. Reemplace los tomillos de montaje.
7, Enchufe el homo de microondas o reconecte la
energia electrica.
NOTA: No opere la campana sin el filtro de grasas
en su lugar.
4. Enchufe el homo de microondas o reconecte la
energia electdca.
Luz del horno
1. Desenchufe el homo de microondas o desconecte
la energia electrica.
2. Quite los tomillos de montaje de la rejilla del
agujero de ventilaci6n.
3. Incline la rejilla hacia delante, luego levantela para
quitarla.
62
SOPORTE DE
BOMBILLA
4. Levante el soporte de la bombilla.
5. Reemplace la bombilla con una bombilla de base
candelabro de 30 vatios (No. De Pedazo
3B70067A) disponible de Sears Ilamande a
1-800-4-MY-HOME_.
6. Desplice la parte superior de la rejilla de ventilaci6e
dentre de su lugar. Empuje la parte inferior hasta
que encaje dentro del lugar. Recoloque los
temillos de montaje.
7. Enchufe el homo de microondas o reconecte la
energia.
63
SUGERENCIAS PARA LA COCINA EN SU MICROONDA
Cantidad de alimentos
Liberar la presibn en los alimentos
• Siaumenta
o disminuye
lacantidad
dealimentos
queprepara, • Cortarlosa{imentos
(potejemplo:
papasalhomo,salchichas,
eltiempoquetomaccoinaresealimento
tambiencambiara.
Por
yemasdehuevos,
y algunas
frutas)estanajustadamente
cubiertos
porunapielo membrana,
Elvaporpuedelevantarse
ejemplo,
si duplica
{acantidad
queindicaunareceta,
agregueun
pocom_sdelamitaddeltiempooriginalindicado
decocci0n.
bajodelamembrana
durante
laccocidn,
causando
quelos
Compruebe
el gradodeterminacidn
y, sifueranecesaho,
alimentos
revienten.
Paraaliviar{apresi6n
paraevitarque
revienten,
perfore
losalimentos
antesdeconocer
conun
agregue
m_stiempaenpequeSos
incrementos.
tenedor,pinche
decocktailo escarbadientes.
Temperaturade iniciode la preparaci6n
• Mientras
mbsbajalatemperatura
delosalimentos
quese
colocan
enel homodemicroondas,
mayorserae{tiempoque
tomaraparacocinar.
Losa{imentos
a temperatura
dela
habitacidn
sepodranvolvera catentar
m_sr_pidamente
quetos
alimentos
a temperatura
delrefrigerador.
Composicibn de los alimentos
• Losalimentos
conmuchagrasay muchaaz0carsecalentaran
masrapidoquelosalimentos
quecontienen
muchaagua.La
grasay elaz0cartambien
alcanzan
unatemperatura
masalta
que{adelaguaenel proceso
decocci_n,
• Mientras
m_sdensosseanlosalimentos,mastiempotomar_
paracalentarse.
Losa{imentos
"Muydensos"ta{escomo{a
cameromanmastiempoparavo{veracalentarse
que{osm_s
livianos,
m_sporosos
comopasteles
esponjosos.
TamaSo y forma
• Lospedazosmaspeque_os
dealimentossecocinar_n
mas
rapidoquelospedazos
m_sgrandes.
Tambi_nlospedazos
deta
mismaformasecocinanmasparejoquelospedazosde
diferentes
formas.
• Conlosalimentosquetienendiferenteespesor,{aspartes
masdelgadas
secocinaran
m_srapidamente
que{aspartesmas
gruesas.
Coloque
laspadesm_sde{gadas
delasalasdepolioy
laspiernas
y patasene{centrode{plato.
Usar el tiempo de permanencia
• Permita
siempre
quelosaiimentos
permanezcan
unmomento
despues
dela coccion.
E{tiempode permanencia
despu_s
del
descongelamiento
y cocoi6n
permitequelatemperatura
se
disperse
enformaparejaa travesdetodoslosalimentos,
mejorando
losresultados
dela coccion.
• Laduracibn
de{tiempodeperrnanencia
depende
de{a
cantidad
dealimentos
queestacocinando
ydela densidad
de
losmismos.A vecespuedesettancortocomoeltiempoque{e
tomasacarlosa{imentos
delhomoy Ilevarlos
a lamesadonde
sesirven.Sinembargo,
cuandosetratadea{imentos
demayor
tamaSo
y masdensos,e{tiempodepermanenc_a
puedeset
m_so menosde10minutos.
Ordenar los alimentos
Paraobtener
mejoresresuitados,
coloquelosalimentos
demodo
pareioenelplato.Puedehacedo
dediferentes
maneras:
• Siestacoeinando
variosingredientes
paraelmismoplato,
potejemplo
papas(patatas)
horneadas,
coldquelas
comoun
ani{{o
parasucocimiento
uniforme.
• Cuandococineaiimentosdeformaso densidades
irregulares,
porejemplo
pechugas
depo{{o,
co{oque
{aporcidn
m_spequeSa
o m_sdelgada
enelcentrodetplatodondese
calentara
alfinal.
• Eneapasde alimentosfinos,coloque
unasobreotra,
• Cuandococineo vuelvaa calentar
un pescadoentero,haga
cortessobre{apie{,estopreviene
eIresquebrajamiento.
Revolver, dar vuelta los alimentos
• Nopermitaquelosenvasesde losalimentostoquenlaparte
• Revolver
ydarvue{talosalimentos
disperse
eIcalorrapidamente superior
o {oscostados
delhomo.Estoevitaralaposible
haciae{centrodeIplatoy evitaquesecocinedem_senlos
formaci0n
deunarcoel_ctrico.
bordes
externos
delosalimentos.
Uso de la hoja de papel de aluminio
Cubrir los alimentos
Cubra los alimentos para:
• Reducir las salpicaduras
• Acortar los tiernpos de cocci6n
• Mantener la humedad de los alimentos
Puedeusarcua{quier
cubier_a
quepermitaseratravesado
por[as
micrcondas.
Vea"Conocer
suhomodemicrconda"
paraconocer
losmatedales
quelasmicroondas
atraviesan.
Siestausando
la
funcionSensor,asegure
{aventilaci6n.
64
Losenvasesde metalno debenusarseen un homode
microondas.Noobstantehayalgunasexcepciones.Si
compr5alimentosquevienenemba{adoen una hojade
papelde aluminio,guieseporlas instruccionesque estan
en el envase.Cuandouseenvasesde hojade pape{de
aluminio,los tiemposde cocoi6npuedenserm_s largosya
que lasmicroondaspenetrarans61oIasuperficiede los
alimentos.Si encuentraque no tieneinstrucciones
en el
paquete,sigaestoslineamientosgenerales:
SUGERENCIAS PARA LA COCINA EN SU MICROONDA (Cont.
Uso de la hoja de papel de
aluminio (cont.)
• Coloque los envases en un cuenco de vidrio y
agregue agua hasta cubrir la parte inferior de los
envases, no mas de 1/4 de pulgada (0.64 cm.) de
altura. Esto asegurara la distdbuci6n uniforme de
calor en la parte inferior de los envases.
• Siempre quite la tapa para evitar daSo al homo.
• Use solamente envases no daSados.
Remover el separador
• AI preparar las palomitas empacadas
comercialmente, Remueva el separador del
homo; No coloque la bolsa de las palomitas para
el homo microondas sobre el separador o debajo
del separador.
• En el caso de preparar las palomitas para el homo
micrcondas con el separador, puede causar
incendio o daRo a su homo de microondas.
• No use envases mas altos que 3/4 de pulgada
(1.9 cm).
• Los envases deben estar Ilenos al menos hasta la
mitad.
• Para evitar la formaci6n de arco electrico debe
haber una distancia minima de 1/4 de pulgada
(0.64 cm) entre los envases de aluminio y las
paredes del homo y tambien entre dos envases de
aluminio.
• Protecci6n con pedazos pequeSos de papel de
aluminio, piezas de alimento que puede cocer
rapidamente, tales como las puntas de ala, pemiles
de ayes,
• Calentar alimento de los envases de papel de
aluminio toma usualmente el doble del tiempo
comparado con el recalmentamiento en envases
plasticas.Vidrio, china o papel. El tiempo que toma
para que un alimento este listo vadara segun el tipo
de envases que use.
• Deje descansar a los alimentos de 2 a 3 minutos
luego de calentados de modo que el calor se
distribuya uniformemente por los envases.
Lo que no se debe cocinar en su
horno de microondas
• No enlate alimentos en el homo. Los frascos
cerrados pueden explotar causando daRo al homo.
• No use el homo de microondas para esterilizar
objetos (biberones, etc.). Es dificil mantener al
homo en las altas temperaturas que se necesitan
para esterilizar.
65
Preguntas y Respuestas
PREGUNTAS
RESPUESTAS
&Puedo usar mi homo de microondas sin la
bandeja giratoria o hacerla girar sosteniendo un plato
grande?
No. Si quita o no hace girar la bandeja giratoria,
tendra resultados pobres. Los platos que se usan en
su homo deben encajar en la bandeja giratoria.
&Puedo usar sartenes de metal o de aluminio en mi
homo de microondas?
Puedeusarunahojadepapeldealuminioparaproteger(use
pedazospequeSos
y pianos),pequeSostrozosyen bandejas
de aluminioplanas(sila bandejanoesmasaltaque
3/4pulg.[1.9cm] de profundidad
y estaIlenaconlosalimentos
paraabsorberlapotenciade micrconda).
&Es normal que la bandeja giratoria gire en
cualquiera de las dos direcciones?
Si. La bandeja giratoria rota en sentido de las agujas
del reloj o contrario al mismo, dependiendo la rotaci6n
del motor cuando comienza el ciclo de cocci6n.
A veces la puerta de mi homo de microondas
aparece ondulada. &Es esto normal?
Esta apariencia es normal y no afecta el
funcionamiento de su homo.
&Por que el plato se calienta cuando cocino con
microonda en 61? Pienso que eso no deberia
suceder,
A medidaquelos alimentosse calientan,estostransmiten
su caloral plato.Est_preparadaparausarprotecci6npara
lasmanosparasacarlos alimentosdespuesde cocinar.
&Que significa "tiempo de espera" ?
"Tiempo de espera" significa que los alimentos deben
ser sacados del homo y cubiertos por un tiempo
adicional para permitir que terminen de cocinarse.
Esto libera al homo para otra cocci6n.
&Por que sale vapor por los agujeros de ventilaci6n?
Elvaporse producenormalmentedurantela cocciSn.
El homode microondasha sidodiseSadoparaeliminarel
vaporde estemodo,a tray,s de losagujerosde ventilaciSn.
&Puedo preparar palomitas de maiz en mi homo de
microondas?
&C6mo obtengo los mejores resultados?
Si. Prepare palomitas de maiz empacado para
microonda siguiendo las indicaciones del fabricante.
No use bolsas comunes de papel. No vuelva a
colocar nQcleosde maiz que no hayan explotado.
No prepare palomitas de maiz en un recipiente de
vidrio.
66
Solucibn de problemas
La mayoria de los problemas de cocina estan causados a menudo por peque£_ascosas que usted puede
determinar y solucionar sin herramientas de ningen tipo. Controle las listas de mas abajo en las paginas
siguientes antes de pedir asistencia a un servicio. Si ann necesita ayuda, Ilame a Service Sears a
1-800-4-MY-HOME_'.
EL HORNO DE MICROONDAS
NO FUNCIONA
PROBLEMA
CAUSA
Nada funciona.
• El cable de alimentaci6n de energia electrica no esta enchufado a un
tomacorriente de tres clavijas. (Vea la secci6n "Requisitos electricos" en la pag.
40 y la secci6n "Conexi6n electrica" en pag. 42.)
• Ha saltado un fusible de la casa o un disyuntor ha interrumpido el circuito
• Ha habido una falla de alimentaci6n en el suministro de la compaSia electrica.
El homo de microondas no • Usted esta usando el homo como cron6metro.
funcionara.
Toque STOP/CLEAR para cancelar el homo como cron6metro de cocina.
• La puerta no esta firmemente cerrada y bloqueada.
• No toc6 START.
• No sigui6 exactamente las instrucciones.
• Continea funcionando una operaci6n programada previamente.
Toque STOP/CLEAR para cancelar esa operaci6n.
TIEMPOS
DE COCClON
PROBLEMA
CAUSA
Los alimentos no estan
suficientemente cocidos.
• El suministro electdco a su casa o a ese enchufe de pared no es suficiente o es
mas bajo que Io normal. Su compa_ia electrica puede decide si la linea esta
baja. Su electricista o tecnico de servicio le puede decir si el enchufe de pared
suministra poco
• La potencia de coccidn no esta en la programaci6n recomendada. Compruebe
la tabla en la pag. 49.
La pantalla mostrara una
• La puerta del homo no esta cerrado por completo.
cuenta regresiva pero el
• Ha fijado los controles al temporalizador de cocina.
homo no esta funcionando. Toque STOP/CLEAR para cancelar el tempodzador de cocina.
67
BANDEJA
GIRATORIA
PROBLEMA
CAUSA
La bandeja giratoria no
gira.
• La bandeja giratoria no esta colocada correctamente en su lugar. Debe ser
corregida levantando un costado y presionando firmemente sabre el eje central.
• El soporte no esta funcionando correctamente. Quite la bandeja giratoda y
reinicie el homo. Si aQn necesita ayuda, Ilame a Service Sears a
1-800-4-MY-HOME_. Cocinar sin la bandeja giratoria le dara resultados pobres.
TONOS
PROBLEMA
CAUSA
No se aye el tono de fin de • No ha introducido el comando correcto.
programa o de fin de ciclo.
MENSAJES
EN LA PANTALLA
PROBLEMA
CAUSA
La pantalla esta
centelleando" :".
• Ha habido una interrupci6n de suministro de energia. Reinicie el reloj.
(Vea la secci6n "Reloj "an la pag. 46.)
Si ninguna de estas temas le ceusa problemas, Ilame a Service Sears a 1-800-4-MY-HOME_.
68
Your Home
iiiiiiiiiiiiii
iiiiiiiiiiiiii
For repair-in your home-of all major brand appliances,
lawn and garden equipment, or heating and cooling systems,
no matter who made it, no matter who sold it!
iiiiiiiiiiiiii
For the replacement parts, accessories and
owner's manuals that you need to do-it-yourself.
iiiiiiiiiiiiii
For Sears professionalinstallationof home appliances
and items like garage door openers and water heaters.
iiiiiiiiiiiiii
1-800-4-MY-HOME
®
(1-800-46g-4663)
Call anytime, day or night (U.S.A. and Canada)
iiiiiiiiiiiiii
WWW.Sears.con'l
W'tr_W.
sea
rs.
ca
ourHome
For repair of carry-in items like vacuums, lawn equipment,
and electronics, call or go on-line for the locationof your nearest
Sears Parts & Repair Center.
1-800-488-1222
Call anytime, day or night (U.S.A. only)
WW'tr._.
sea
rs.
co
n'_
To purchase a protectionagreement (U.S.A.)
or maintenance agreement (Canada)on a product serviced by Sears:
iiiiiiiiiiiiii
1-800-827-6655
(U.S.A.)
Pare pedir servicio de reparacibn
a dornicilio,y pare ordenar piezas:
1-800-361-6665
(Canada)
Au Canada pour service en frangais:
1.800.LE.FOYERMC
1-888-SU-HOGAR s"
(1-800-533-6937)
(1-888-784-6427)
SEARS
Registered Trademark/_eTrademark / 6M Service Mark of Seam, Roebuck and Co.
® Mama Registrade/'he Mama de F_hrica/SM Marca de Servicio de Sears, Roebuck and Co.
MCMarque de commerce/MD Marque d6pos6e de Sears, Roebuck and Co.
@ Sears, Roebuck and Co.