1
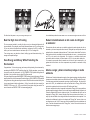
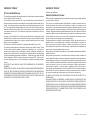
fan installation instructions
installing a new ceiling fixture outlet
box
READ AND SAVE THESE
INSTRUCTIONS
WARNING:
Read entire booklet carefully before beginning
installation. Save these instructions.
All wiring must be in accordance with national and local
electrical codes and ANSI/NFPA 70. If you are
unfamiliar with wiring, you should use a qualified
electrician.
This fan is designed to be installed on an existing
electrical outlet box. The outlet box must be UL Listed
for ceiling fan installations, if it is not, a new box must
be installed.
To avoid possible electrical shock, before installing
the fan, disconnect the power by turning off the circuit
breakers to the outlet box and associated wall switch
location. If you cannot lock the circuit breakers in the
off position, securely fasten a prominent warning
device, such as a tag, to the service panel.
To reduce the risk of personal injury, do not bend the
blade attachment system when installing, balancing,
or cleaning the fan. Never insert foreign objects
between the rotating fan blades.
The fan blades must be at least 7 feet above the floor.
The fan blades must be at least 30 inches from the
wall or the nearest obstruction.
preparing for the fan installation
1
choosing the mounting site
Standard Mounting hangs from the ceiling by a downrod
(included), for ceilings 8 feet or higher. For ceilings higher
than 8 feet, extension downrods are available.
Angle Mounting hangs from a vaulted or angled ceiling.
If you do not have an existing fixture located where you
wish to place your fan, an approved ceiling fixture oulet
box must be installed and wired.
WARNING: To reduce the risk of fire, electrical shock,
or personal injury, mount to outlet box marked
acceptable for ceiling fan support using the mounting
hardware provided with the outlet box.
using existing ceiling fixture outlet box
After turning the power OFF at its source (either circuit
breaker or fuse box), lower the old fixutre and disconnect
the wiring. Check the ceiling fixture outlet box to be sure
that it is marked ‘Approved for ceiling fan mounting’. If it is
not, a new box must be installed.
NOTE: The fan weight is 17 lbs.
installing the mounting bracket
3
Attach the bracket to the ceiling fixture outlet box with the
mounting hardware included with the outlet box.
NOTE: On sloped ceilings, align the canopy opening
towards the top or room peak.
CAUTION: Tighten the screws firmly by hand only,
being careful not to bend the bracket by over
tightening.
To reduce the risk of personal injury, use only the
mounting hardware provided with the approved outlet
box to install mounting bracket.
Ceiling Fan
Approved
Outlet Box
Carefully unpack the fan to avoid damage to the fan parts.
Check for shipping damage to the motor or fan blades. If
one of the fan blades was damaged in shipment, return all
of the blades for replacement.
NOTE: If you are installing more than one fan, keep the
fan blades in sets as they were shipped.
If any parts are missing or damaged, contact your dealer.
assembling the fan
2
1.
Feed the wires from the motor through the canopy,
then the downrod and ball assembly.
2. Screw the downrod into the fan assembly until tight.
3. Securely tighten the downrod set screw.
CAUTION: Failure to fully tighten the downrod before
securely tightening the set screw may cause the fan
to fall during normal operation.
32° Max
Mounting
Bracket
Ceiling Wiring
unpacking the fan parts
Flat Washer
Approved
Outlet Box
Hardware
hanging the fan
4
To hang the fan body in the mounting bracket, hold the fan
body firmly and insert the ball into the bracket opening.
Check that no wires were pinched. Rotate the fan body
until the slot in the nylon ball fits into the pin opposite the
bracket opening.
NOTE: The fan weight is 17 lbs.
Canopy
Ball
Downrod
Set Screw
12”
Standard Mounting
Angled Mounting
Pin
Slot
© 2003 HBG
41615-01 09/12/2003
wiring the fan
removing the shipping blocks
operating the ceiling fan
Attach the fan wires to the ceiling fixture outlet box wiring
by placing the bare ends of the wires together and then
securing with a wire nut. Test that the connection is secure
by pulling on the wire nut. Connect as follows:
On the motor, remove the five shipping blocks by
unscrewing the screws. Set these screws aside for
installing the blades.
Discard the five shipping blocks.
1.
2.
5
•
GREEN leads from mounting plate and fan to
GROUND conductor of power source. Secure with
wire nut.
•
WHITE wire from fan to white NEUTRAL wire in ceiling
fixture outlet box. Secure with wire nut.
7
9
3.
•
BLUE wire and BLACK power wire from fan to BLACK
power wire in ceiling outlet box. Secure with wire nut.
WARNING: Be sure no bare wires or wire strands
are visible after making connections
Shipping Blocks
Turn on the electrical power to the fan.
The fan pull chain controls the power to the fan. The
pull chain has four settings in sequence: High,
Medium, Low, and Off.
NOTE: Pull the chain slowly to change settings.
Release slowly to preven the chain from recoiling into
the blades. The chain uses a breakaway connector
that separates if the chain is jerked. If this happens,
simply reinsert the chain into the connector.
To change the direction of air flow, turn the fan off and
let it come to a complete stop. Slide the reversing
switch on the fan to the opposite position as. Restart
the fan.
troubleshooting
installing the blades and blade
brackets
8
Blue Wire for Optional
Independent Light
Control (if used for this
reason, connect to the
light power wire from
the ceiling outlet box)
2 Black
Wires
2 White
Wires
1.
2.
2 Green
Wires
Attach the blades to the blade bracket with the three
blade screws and flat washers provided for each blade.
Securely hand tighten the screws.
Install the assembled blade and blade bracket to the
fan motor. Securely hand tighten the screws. Repeat
for each blade assembly.
installing the canopy
6
1.
2.
3.
Tuck the wires into the outlet box with the wire nuts
pointed upwards, so that the WHITE and BLACK wires
are on opposite sides of the outlet box and all wires
are clear of the bracket opening.
Loosen the 2 canopy screws in the mounting bracket.
Raise the canopy to the mounting bracket, assuring
that now wires are pinched, and pass the canopy
screws through the keyholes in the canopy.
Rotate the canopy counter clockwise to engage the
keyholes. Tighten the canopy screws firmly by hand
only.
Blade Screw
Flat Washer
Problem: Nothing happens; fan does not move.
1. Turn power on, replace fuse, or reset breaker.
2. Loosen canopy, check all wiring connections according
to the wiring instructions.
3. Push motor reversing switch firmly up or down to
ensure thta the switch is engaged.
4. Pull the pull chain to ensure it is on.
5. Remove the shipping bumpers.
Problem: Noisy operation.
1. Tighten the blade bracket screws until snug.
2. Tighten the blade screws until snug.
3. Check to see if the blade is cracked. If so, replace all
the blades.
Problem: Excessive wobbling.
1. Tighten all blade and/or blade bracket screws.
2. Turn power off, support fan very carefully, and check
that the hanger ball is properly seated.
Blade
Bracket
Screw
Canopy
Canopy Screw
© 2003 HBG
41615-01 09/12/2003
Our fans have the power to cut your cooling costs up to 40%.
Los ventiladores pueden ahorrarle hasta el 40% del costo de refrigerar su casa u oficina.
Beat the High Cost of Cooling
Reducir dramáticamente el alto costo de refrigerar
el ambiente!
The air movement created by a ceiling fan lets you set your thermostat higher and still
stay comfortable. Every degree you raise the thermostat saves up to 7% on energy costs.
So, you can cut back on expensive air conditioning...and save up to 40%* on cooling. In
winter, your fan recirculates warm air and saves up to 10%* on heating bills.
*Your savings many vary based on climate, building type and thermostat setting. On
average at low speed settings.
Save Energy and Money While Protecting the
Environment
Congratulations! You're saving energy and money while protecting the environment by
purchasing this ENERGY STAR® qualified ceiling fan! With this purchase, you are doing
your part to protect the environment. In 2010, ENERGY STAR qualified ceiling fans are
projected to cut air pollution by more than 500 million pounds!
Your new ceiling fan has earned the ENERGY STAR because it meets high energy efficiency
specifications set by the Environmental Protection Agency (EPA). ENERGY STAR qualified
ceiling fans save energy because they have more efficient fan motors and air delivery due
to more aerodynamic blade configurations. Ceiling fan models that have earned the
ENERGY STAR move air 14 - 20% more efficiently than typical ceiling fan models. For
more information on ENERGY STAR visit www.energystar.gov.
El movimiento del aire creado por un ventilador colgante le permite ajustar más alto su
termostato y al mismo tiempo estar bien cómodo. Cada grado que usted puede elevar la
graduación de su termostato le ahorra hasta un 7% del costo de electricidad. Por lo tanto,
usted puede reducir la necesidad del aire acondicionado, tan caro...y economizar hasta
un 40%* en el costo de la refrigeración. En el invierno, su ventilador efectúa una
recirculación del aire caliente y le ahorra hasta un 10%* en el costo de la calefacción.
*La economía suya puede variar de acuerdo con el clima, el tipo de construcción y la
graduación del termostato. Las cifras representan un promedio en actuación a baja
velocidad.
Ahorre energía y dinero mientras protege el medio
ambiente
Felicitaciones! Usted está ahorrando energía y dinero mientras protege el medio ambiente
al comprar este ventilador de techo con calificación de "Energy Star" (Estrella de Energía).
Con esta compra usted está cooperando a proteger el medio ambiente. Se estima que,
para el año 2010, ¡los ventiladores de techo con calificación de "Energy Star" habrán
reducido la contaminación del aire en más de 500 millones de libras!
Su nuevo ventilador de techo se ha ganado la etiqueta de "Energy Star" porque satisface
las altas especificaciones de eficacia en el uso de energía establecidas por la Agencia de
Protección Ambiental (EPA son las siglas en inglés). Los ventiladores de techo, con las
etiquetas de "Energy Star", ahorran energía porque tienen motores más eficaces y un
mejor flujo de aire debido a las configuraciones más aerodinámicas de sus paletas. Los
modelos de ventiladores de techo con la etiqueta de "Energy Star" mueven el aire con
una eficacia que es de 14 a 20% mayor que la de los modelos típicos de ventiladores de
techo. Para más información acerca de "Energy Star", visite el sitio en la Internet con la
dirección www.energystar.gov.
© 2003 HBG
41615-01 09/12/2003
Installer's Choice®
Installer's Choice®
30 Year Limited Warranty
(Selección del instalador)
The manufacturer makes the following warranty to the original user or consumer purchaser
of each Installer's Choice® ceiling fan:
If your Installer's Choice® fan motor fails at any time within thirty years after the date of
sale due to a defect in material or workmanship, we will provide a replacement part free of
charge. If no replacement part can be provided, we will refund the purchase price of your
fan. The foregoing limited warranty applies only to the motor itself, and does not apply to
electronic controls such as remote controls, remote control receivers or transmitters used
in conjunction with the motor. These electronic control items are included in the one year
warranty below.
If any part of your Installer's Choice® ceiling fan other than the motor, glass globes or light
bulbs fails at any time within one year of the date of sale to you due to a defect in material
or workmanship we will repair, or at our option, replace the defective part free of charge
through our service department.
This warranty is voided if this product is not purchased and installed in the U.S.A.
This warranty excludes defects, malfunctions or failures of any Installer's Choice® ceiling
fan which were caused by repairs by persons not authorized by us, use of parts or
accessories not authorized by us, mishandling, improper installation, modifications or
damage to the ceiling fan while in your possession, or unreasonable use, including failure
to provide reasonable and necessary maintenance. To obtain servicing contact the HBG
Service Department, 2500 Frisco Avenue, Memphis, Tennessee 38114. Please contact
us before shipping your fan to us. Proof of purchase is required when requesting warranty
service.
IN NO EVENT SHALL HBG BE LIABLE FOR CONSEQUENTIAL OR INCIDENTAL
DAMAGES.
SOME STATES DO NOT ALLOW LIMITATION ON HOW LONG AN IMPLIED WARRANTY
LASTS OR THE EXCLUSION OR LIMITATION OF INCIDENTAL OR CONSEQUENTIAL
DAMAGES SO THE ABOVE LIMITATION OR EXCLUSIONS MAY NOT APPLY TO YOU.
THIS WARRANTY GIVES YOU SPECIFIC LEGAL RIGHTS, AND YOU MAY ALSO HAVE
OTHER RIGHTS THAT VARY FROM STATE TO STATE.
Garantía limitada de 30 años
El fabricante ofrece la garantía siguiente al comprador o usuario original de cada ventilador
de techo Installer's Choice®:
Si el motor de su ventilador Installer's Choice® falla en cualquier momento dentro de
treinta años después de la fecha de venta, debido a un defecto en el material o en la
mano de obra, le suministraremos una pieza de repuesto completamente gratis. Si no le
podemos suministrar esa pieza de repuesto, le devolveremos el precio de compra de su
ventilador. Esta garantía limitada se aplica solamente al motor y no se aplica a los controles
electrónicos, tales como los controles remotos y los receptores o transmisores de control
remoto utilizados en conjunto con el motor. Estos componentes del sistema de control
remoto se incluyen en la garantía de un año descrita abajo.
Si cualquier parte de su ventilador de techo Installer's Choice®, que no sea el motor, las
pantallas de vidrio o las bombillas, falla en cualquier momento dentro de un año de la
fecha en que compró el ventilador, debido a un defecto en el material o en la mano de
obra, repararemos o cambiaremos, a nuestra opción, la pieza defectuosa completamente
gratis a través de nuestro departamento de servicio.
Esta garantía no será válida si este producto no es comprado e instalado en los Estados
Unidos de América.
Esta garantía excluye defectos, mal funcionamiento o fallas de cualquier ventilador de
techo Installer's Choice® que hayan sido causados por reparaciones hechas por personas
no autorizadas por nosotros, por el uso de piezas o accesorios no autorizados por nosotros,
mal uso, instalación inadecuada, modificaciones o daños del ventilador de techo mientras
esté en su posesión o por un uso incorrecto, incluyendo la falla en suministrar un
mantenimiento razonable y necesario para el ventilador. Para obtener servicio,
comuníquese con el departamento de servicio de HBG, 2500 Frisco Avenue, Memphis,
Tennessee 38114. Por favor comuníquese con nosotros antes de enviarnos su ventilador.
Se requiere una prueba de compra cuando se solicite servicio bajo garantía.
EN NINGÚN CASO SERÁ HBG RESPONSABLE DE DAÑOS INDIRECTOS O
INCIDENTALES.
ALGUNOS ESTADOS NO PERMITEN LA LIMITACIÓN DE LA DURACIÓN DE UNA
GARANTÍA IMPLÍCITA NI LA EXCLUSIÓN O LIMITACIÓN DE DAÑOS INDIRECTOS O
INCIDENTALES, ASÍ QUE LA LIMITACIÓN O LA EXCLUSIÓN ANTERIOR PUEDE NO
SER APLICABLE EN SU CASO. ESTA GARANTÍA LE CONCEDE CIERTOS DERECHOS
LEGALES ESPECÍFICOS Y TAMBIÉN PODRÁ TENER OTROS DERECHOS QUE
VARÍAN DE ESTADO A ESTADO.
© 2003 HBG
41615-01 09/12/2003