1
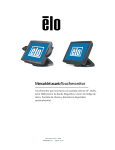
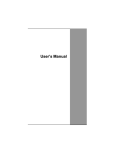
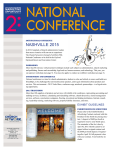
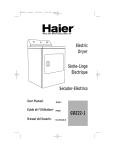
Electric Dryer
Sèche-linge Genesis
Secadora Eléctrica
User Manual
Model # HLF103Q/R, GDE700AW, CHLF103Q, CGDE700AW
Guide de l’Utilisateur
Modéle # HLF103Q/R, GDE700AW, CHLF103Q, CGDE700AW
Manual del Usuario
Para Modelo de # HLF103Q/R, GDE700AW, CHLF103Q, CGDE700AW
Quality • Innovation • Style
English
IMPORTANT SAFETY INSTRUCTIONS
WARNING - To reduce the risk of fire, electric shock, or injury
to persons when using your appliance, follow the basic
precautions, including the following:
1.
Read all of the instructions before using this appliance.
2.
Don’t dry articles that have been previously cleaned in, washed in,
soaked in, or spotted with gasoline, dry clean solvents or other
flammable explosive sub stains as they give off vapors which could
ignite or explode.
3.
Do not allow children to play on or in the appliance. Close
supervision of children is necessary when the appliance is used near
children.
4.
Before the appliance is removed from service or discarded, remove
the door to the drying compartment.
5.
Do not reach into the appliance if the drum is moving.
6.
Do not install or store this appliance where it will be exposed to
water and/or to the weather.
7.
Do not tamper with controls.
8.
Do not repair or replace any part of the appliance or attempt any
servicing unless specifically recommended in the user-repair
instructions that you understand and have skills to carry out.
9.
Do not use fabric softeners or products to eliminate static unless
recommended by the manufacturers of the fabric softener or
product.
10. Do not use heat to dry articles or products to eliminate static unless
recommended by the manufacturers of the fabric softener or
product.
11. Clean lint screen before or after each load.
12. Keep area around the exhaust opening and adjacent surrounding
areas free from the accumulation of lint, dust and dirt.
13. The interior of the appliance and the exhaust duct should be cleaned
periodically by qualified service personnel.
14. Do not place items exposed to cooking oils in your dryer. Items
contaminated with oil may contribute to a chemical reaction than
could cause a load to catch fire.
15. If material has been used with any flammable liquids or solids, it
should not used in the dryer until all terraces of flammable liquids
and its fumes have been removed.
1
English
16. This dryer must be properly installed in accordance with the
installation instructions before it is used. See grounding instructions in
the installations sections.
17. Proper grounding must be ensured to reduce the risk of electric shock
and force. Check with a qualified electrician or service personnel if
you are in doubt as to whether the dryer is properly grounded.
18. Use the dryer only for its intended purpose, drying clothes.
19. Always disconnect dryer from electrical supply before attempting any
service. Disconnect power cord by grasping the plug, not the cord.
20. Replace worn power cord and/or loose plugs.
21. To reduce the risk of electric shock or fire, do not use extension cords
or adapters to connect dryer electrical power source.
SAVE THESE INSTRUCTIONS
DANGER
Risk of child entrapment. Before you throw away your old
dryer, take off the door so that children may not get trapped
inside.
Thank you for using our Haier
product. This easy-to-use manual
will guide you in getting the best
use of your dryer.
Remember to record the model and
serial number. They are on a label
in back of the dryer.
Model number
Serial number
Date of purchase
Staple your receipt to your manual.
You will need it to obtain warranty service.
2
English
Table Of Contents
PAGE
SAFETY INSTRUCTIONS ....................................................................1
INSTALLATION INSTRUCTIONS ................................................4-12
Tools and Materials Required ................................................................4
Electrical Requirements ........................................................................4
Unpacking Your Dryer ........................................................................4
Exhaust System Connections ................................................................5
Requirements and Instructions ..............................................................5
Materials ............................................................................................5
Location of Your Dryer ........................................................................7
Installation in Mobile Home ................................................................7
Electrical Connections ........................................................................9
Requirements and Instructions ..............................................................9
3-Wire Cord Connections ..................................................................10
4-Wire Cord Connections ............................................................11-12
OPERATING INSTRUCTIONS ....................................................13-21
Understanding the Control Panel ........................................................13
Preparations before drying..................................................................15
Load clothes into dryer ......................................................................16
Auto Dry Cycle ............................................................................16-18
Timed Dry Cycle ................................................................................19
Rack Dry Cycle ..................................................................................20
Other Features ..................................................................................20
Normal Operating Sounds ................................................................21
Tips ..................................................................................................21
CARE AND CLEANING GUIDE ..........................................................21
TROUBLESHOOTING ......................................................................22
WARRANTY......................................................................................23
3
English
INSTALLATION INSTRUCTIONS
• Select a suitable location for the dryer on a hard even surface away from
direct sunlight or heat sources, baseboard heaters, cooking appliances etc.
Any floor unevenness should be corrected with leveling legs located on the
bottom of the dryer.
Tools and materials required
•
Phillips head and flathead screwdrivers
•
Channel-lock adjustable pilers
•
1/2 inch open end wrench
•
Carpenter’s level
•
Measuring tape (12ft. min.)
•
Duct tap
•
Rigid or flexible metal 4 inch (102cm) duct
•
Vent hood
Electrical requirements
U.S. Only
Power supply:
3 or 4 wire, 240 Volt, 30 Amp,60Hz, 1 Phase Power Supply Cord Kit (not
supplied when sold in the United States) – Purchase to meet local electrical codes.
The dryer MUST employ a 3-conductor power supply cord NEMA 10-30 Type
SPDT RATED AT 240 Volt AC minimum, 30 Amp., with 3 open end spade lug
connectors with upturned ends or closed loop connectors and marked for use with
clothes dryers. If being installed in a manufactured (mobile) home,the dryer MUST
employ a 4-conductor power supply cord. NEMA 14-30 type SRDT or ST (as
required) rated at 240 Volt AC Minimum, 30 Amp., with 4 open end spade lug
connectors with upturned ends or closed loop connectors and marked for use with
clothes dryers. See Electrical Connections for A 4-Wire System.
Canada Only
Candian models are supplied with the appropriate power cord.
Unpacking Your Dryer
1. Remove all packaging material. This includes the foam base and all adhesive
tape holding the dryer accessories inside and outside.
2. Inspect and remove any remains of packaging, tape or printed materials
before using the dryer.
4
English
Exhaust System Connections
Requirements and Instructions
WARNING
The following are specific requirements for proper
and safe operation of your dryer. Failure to follow
these instructions can create excessive drying times
and fire hazards.
1. Do not use plastic flexible duct to exhaust the dryer. Excessive lint can build
up inside exhaust system and create a fire hazard and restrict air flow.
Restricted air flow will increase dryer times. If your present system is made up
of plastic duct or metal foil duct, replace it with a rigid or flexible metal duct.
Ensure present duct is free of any lint prior to installing dryer duct.
2. If the dryer is on exhausted out doors, some fine lint will be expelled into the
laundry area. An accumulation of lint in any area of the home can create a
health and fire hazard. To reduce risk of fire, dryer MUST BE EXHAUSTED
OUTDOORS.
3. Do not allow combustible material (for example: clothing, draperies/curtains,
paper) to come in contact with exhaust system. The dryer must not be
exhausted into a chimney,a wall,a ceiling,or any concealed space of a
building which can accumulate lint, resulting in a fire hazard.
4. Exceeding the length of duct pipe or number of elbows allowed in the
”Maximum Length” charts can cause an accumulation of lint in the exhaust
system, Plugging the system could create a fire hazard, as well as increase
drying times.
5. Do not screen the exhaust ends of the vent system, nor use any screws of
rivets to assemble the exhaust system. Lint can become caught in the screen,
as increasing drying times. Use an approved vent hood to terminate the duct
outdoors, and seal all joints with duct tape. All male duct pipe fittings must
be installed downstream with the flow of air.
Explosion hazard:
Do not install the dryer where gasoline of other flammable are kept or
stored.
If the dryer is installed in a garage, it must be minimum of 18 inches
(45.7cm) above the floor. Failure to do so can result in death, explosion,
fire of burns.
5
English
Materials
Use only 4 inch (10.2cm) diameter (minimum) rigid of flexible metal duct and
approved vent hood which has a swing-out damper hat open when the dryer is
in operation. When the dryer stops, the dampers automatically close to prevent
drafts and the entrance of insects and rodents. To avoid restricting the outlet,
maintain a minimum of 12 inches (30.5cm) clearance between the vent hood and
the ground or any other obstruction. The vent flap should be able to move freely.
Although vertical orientation of the exhaust system is acceptable. Certain
extenuating circumstances could affect the performance of the dryer:
1. Only rigid metal duct work should be used.
2. Venting vertically through a roof may expose the exhaust system to down
drafts causing an increase in vent restriction.
3. Running the exhaust system through an area not insulated may cause
condensation and faster accumulation of lint.
4. Compression of crimping of the exhaust system will cause an increase in vent
restriction.
The exhaust system should be inspected and cleaned a minimum of every 12
months with normal usage. The more the dryer is used the more often you should
check the exhaust system and vent hood for proper operation.
6
English
Location of Your Dryer
Do Not Install Your Dryer:
• In an area exposed to dripping water or outside weather conditions.
• In an area where it will come in contact with curtains, thick carpet,or any
thing that will obstruct the flow of combustion and ventilation air.
• On carpet floor must be solid with a maximum slope of 1inch (2.54 cm).
Installation in Mobile Home
• Dryer must be exhausted outside (outdoors, not beneath the mobile home)
using metal ducting that will not support combustion. Metal ducting must be
4 inches (10.16 cm) in diameter with no obstructions. Rigid metal duct is
preferred.
• If dryer is exhausted through the floor and area beneath the mobile home is
enclosed, the exhaust system must terminate outside the enclosure with the
termination securely fastened to the mobile home structure.
• Refer to previous pages for other important venting requirements.
• Installation must conform to current Manufactured Home Construction &
Safety Standard.
7
English
8
English
Electrical Connections
Requirements and Instructions
WARNING
The following are specific requirements for proper
and safe electrical installation of your dryer. Failure
to follow these instructions can create
electrical shock and/or fire hazard.
1. This appliance must be properly grounded. Electrical shock can result if the
dryer is not properly grounded. Follow the instructions in this manual for
proper grounding.
2. Do not use an extension cord with this dryer. Some extension cords are not
designed to withstand the amounts of electrical current this dryer utilizes and
can melt, creating electric shock and/or fire hazard. Locate the dryer within
reach of the receptacle for the length power cord to be purchased, allowing
some slack in the cord. Refer to the electrical requirements in this manual for
the proper power cord to be purchased.
3. A UL approved strain relief must be installed onto power cord. If the strain
relief is not attached, the cord can be pulled out of the pulled out of the
dryer and can be cut by any movement of the cord, resulting in electrical
shock.
4. Do not use an aluminum wire receptacle with copper wired power cord and
plug (or vice versa ). A chemical reaction occurs between copper and
aluminum and can cause electrical shorts. The proper wiring and receptacle
is a copper wired power cord with a copper wired receptacle.
Note: Dryers operating on 208 Volt power supply sill have longer drying times
than operation on 240 Volt power supply.
Danger: Improper connection of the equipment grounding conductor can
result in a risk of electrical shock. Check with a licensed
electrician if you are in doubt as to whether the appliance is
properly grounded.
9
English
3-Wire Cord Connections (USA only)
1. Remove the screws securing the terminal block access cover and the strain
relief mounting bracket located on the back of the dryer upper corner.
2. Install a U.L. approved strain relief into the power cord entry hole of the
mounting bracket. Finger tighten the nut only at this time.
3. Thread a U.L. Approved 30 Amp. Power cord, NEMA 10-30 Type SRDT,
through the strain relief.
4. Attach the power cord neutral (center wire) conductor to the brass colored
center terminal on the terminal block. Tighten the screw securely.
5. Attach the remaining two power cord outer conductors to the outer brass
colored terminals on the terminal block. Tighten both screws securely.
Warning: Do not make a sharp bend or crimp wiring/conductor at
connections.
6. Reattach the strain relief mounting bracket to the back of the dryer with two
screws. Tighten screws securely.
7. Tighten the screws securing the cord restraint firmly against the power cord.
8. Tighten the strain relief nut securely so that the strain relief does not turn.
9. Reinstall the terminal block cover.
Green Ground
Screw
Brass Terminal
Green Neutral
Ground Wire
Nut
Tighten Nut to
These Threads
Power Cord
Strain Relief
Mounting Bracket
10
English
4-Wire Cord Connections
Green Ground
Screw
Green Power Cord
Ground Wire
Brass Terminal
Terminal Block
Green Neutral
Ground Wire
Black
Tighten Nut to
These Threads
Red
Nut
Power Cord
Strain Relief
Mounting Bracket
1. Remove the screws securing the terminal block access cover and the strain
relief mounting bracket located on the back of the dryer upper corner.
2. Install a UL approved strain relief into the power cord entry hole of the
mounting bracket . Finger tighten the nut only at this time.
3. Remove the green neutral ground wire from the green ground screw located
above the terminal block.
Typical Conductor
Receptacle
Black 240V
White Neutral
Typical 4
Conductor Cord
Red 240V
Green Ground
11
English
4. Thread a U.L. approved 30 Amp power cord. NEMA 14-30 type ST or SRDT
through the strain relief.
5. Attach the green power cord ground wire to the cabinet with green ground
screw.
6. Attach the white (neutral) power cord conductors to the outer cord and the
green ground wire from the dryer harness to the brass-colored center
terminal on the terminal block. Tighten the screw securely.
7. Attach the red and black power cord conductors to the outer brass-colored
terminals on the terminal block.
Warning: Do not make a sharp bend or crimp wiring /conductor at
connections.
8. Tighten the screws securing the cord restraint firmly against the power cord.
9. Tighten the strain relief nut securely so that the strain relief does not turn.
10. Reinstall the terminal block cover.
Caution: Label all wires prior to disconnection, when servicing controls.
Wiring errors can cause improper operations and be
dangerous. Check unit for proper operation after servicing.
Warning: Discard or destroy the carton and plastic bags after the dryer is
unpacked. Children should not be allowed to use them to play
with. Cartons covered with rugs. Bedspreads, or plastic sheets
can become an airtight chamber and cause suffocation leading
to death. Make all packing materials inaccessible to children.
Warning: The instructions in this manual and all other literature included
with this dryer can not cover every possible condition and
situation that may occur. Good safe practice and caution must
be applied when installing, operating and maintaining any
appliances, after installing, if you are in doubt, call a certified
electrician to install and wire the dryer.
12
English
OPERATING INSTRUCTIONS
Understanding the Control Panel
Note: Features may vary per model.
Start/Pause Button: (1)
• Press the button to turn the dryer ON. Press this button once to start the dry
process. Press this button once again to pause the activity during the dry
cycle.
Off Button: (2)
• Press the button to turn on drayer off.
Signal Button: (3)
• Used to select buzzing volume or turn off the buzzer.
Temp Button: (4)
• Used to set drying temperature. There are 4 available drying temperatures:
High, Medium, Low, and Air Dry (no heat).
Sensor Dry Level Button: (5)
• Used to set drying time of auto-programs. If no auto-program is selected,
pressing the button will cause the chime to sound.
Wrinkle Saver Button: (6)
• This convenient feature lets you delay the start of the dry cycle between 3 to
24 hours. Press the "Wrinkle Saver" to choose the number of hours you want to
delay the start of the cycle.
• If no delay, the wrinkle saver indicator is off and remaining time indicator is
on.
• The LED display indicates remaining time of non-reserved program. If setting
"Wrinkle Saver" in standby status, the LED display indicates 3 hr, which will
increase by 1 hr with each press (until 24 and return to 3). If held for 1.5
seconds, LED display indicated value will increase continuously.
13
English
More Time & Less Time Button: (7)
• Set time from 0 to 180 minutes when Timed Dry or Rack Dry cycle selected.
Timed-Dry Cycles Button: (8)
• "Timed-Dry Cycles" button will let you select your desired dry mode.
Timed Dry: You can set status of "Temp", "Signal" and dry time with "More Time"
and "Less Time" by yourself.
Rack Dry: This program is used to dry articles like sport shoes.
Auto-Dry Cycles Button: (9)
• "Auto-Dry cycles" button will let you select your desired dry cycles. For your
convenience, there are seven fabric care dry cycles programmed in this mode:
Normal, Heavy, Cotton, Bulky Items, Casual, Delicate, Touch Up and Custom.
Normal
Normal drying
Heavy
Heavy weight material such as jeans or bath towels.
Cotton
Special drying for cotton clothes.
Bulky Items
Drying bulky clothing, such as bed sheets.
Casual
Drying casual everyday clothes.
Delicate
Drying small quantity clothes and delicate fabric.
Touch Up
Used to select wrinkle-remove function.
Custom
The drying program defined by user and stored.
Status lights: (10)
• Status lights notes which part of the cycle the machine is in.
Digital display: (11)
• Indicate remaining time (min) during cycle operation. Indicate remaining delay
time (hr).
Note: if door opened during cycle running, displays "E2" and alarms.
Function Light Indicator:
• The function "display light" indicates selected feature is "ON" or the cycle is
about to begin.
• During the dry cycle, "flashing light" indicates current running program.
• Rapidly flashing light indicates that the dryer is not operating properly.
14
English
PREPARATIONS BEFORE DRYING
• Sort the clothes of the same kind (cotton, synthetics, woolen) to dry.
• Dark and light colored clothes should be separately dried. Fabrics prone to
losing lint and those prone to adhering lint shall be separately dried. Clothes
prone to falling lint should be turned inside out before putting into the dryer.
• Make sure buttons and ornaments on the clothes are high temperature
resistant and won't damage drum surface. Before loading, the clothes should
have their zippers zipped up, buttons and hooks done up and belts tied so as
to avoid entanglement or other obstacles.
• If possible, turn out the clothes pockets for uniform drying.
• Check if clothes remain soiled. If yes, wash them again, otherwise the soils
may be permanently set.
• Small articles shall be collected in a mesh bag before loading and drying, so
as to avoid entanglement and ensure easy to remove.
• Make sure the power socket is reliably grounded. The grounding terminal
shall not be connected to gas or tap water pipelines.
• Make sure exhaust duct has been properly connected.
• Make sure lint filter is clean and properly installed. If lint filter is not in place,
tumbling items could enter the exhaust system and cause damage to the dryer.
Notes: Applies to Auto Dry cycle and Timed Dry cycle.
• For Rack Dry cycle, remove the lint filter and assemble the drying rack with its
rear end slightly downward inclined. The configuration is as shown in the
following figure: Make sure lint filter is clean and then assemble it properly. If
lint filter is not in place, tumbling items could enter the exhaust
system and cause damage to the dryer.
15
English
LOAD CLOTHES INTO DRYER
• The appropriate load shall be 1/3 ~ 1/2 of the drum volume. Avoid too
much load, space is needed to allow clothes free rotation for uniform and
wrinkle proof drying.
• When drying big articles, only 2-3 pieces shall be loaded at a time and
supplemented with small and medium sized articles.
• For delicate clothes or less load, two towels may be added to get better
drying and wrinkle-proof effects.
• Do not excessively dry clothes to avoid wrinkles, shrinkage, roughness,
electro static charges accumulation and more lint.
Rack Dry cycle
• This program is designed specially for articles like sport shoes. During drying
please make sure the articles are placed on the rack with no risk of
entangling the baffles while drum is rotating.
Note: If drying rack is not in place, rolling inner tub could collide with drying
rack and causes damage to the dryer and drying rack.
AUTO DRY CYCLE
1.Press any button except "Off" button to power on.
• Turn on the power switch, the computer board beeps once and the
dryer transfers from off status to the initial operating status (Normal program).
• If no "Start/Pause" button is pressed in 5 min after powering on, it
automatically cuts off power and returns to off status.
• It returns to off status immediately upon end of a cycle; Whatever status
the computer board is (start, pause, alarm etc.). Pressing "Off" button will
stop all operations and it enters off status.
• Various button initial status for "Normal program".
16
English
Cycle Signal
Softer
Wrinkle Care
Off
Cycles
Normal
LED display
Indicate current program remaining time
Temp
High
Sensor Dry Level
More Dry
Timed/Cycles
Auto-program
2. Press "Auto-Dry Cycles" button to select a suitable full automatic cycle.
• The Normal program will be automatically selected after powering on. If
another full automatic program is desired, press "Auto-Dry Cycles" button
until corresponding indicator turns on.
Casual
Normal
Heavy
Delicate
Cotton
Touch Up
Custom
Bulky Items
Auto-Dry Cycles
• To select your desired settings the "Custom" function should be chosen.
• It can memorize programs defined by user and display the previous program
upon next application of this function.
Use details are as follows:
After powering on, press "Auto-Dry Cycles" until"Custom" status, then set
"Timed-Dry Cycles" to Timed Dry or Rack Dry, and set status of other buttons.
Press "Start/Pause" button or after half a minute, the program defined by user
himself will be stored and will be directly displayed upon next use.
Notes: Pressing "Sensor Dry Level" button will be inactive during use of "Custom"
function.
3. Press "Sensor Dry Level" button to select a suitable drying time.
• After powering on, the clothes dryer automatically sets dryness at "very", which
means a longer drying time. If other drying time is desired, press "Sensor Dry
Level" button to select a shorter time.
17
Français
4. Press "Temp" button to set a suitable drying temperature.
• After switching on, the dryer sets corresponding temperature adapting to
different program selected. If other drying temperature is wanted, press "Temp"
button to enable such a selection.
5. Press "Signal" button, a buzzer will sound upon end of a cycle.
• After switching on, the dryer automatically sets buzzer at "Softer", while the
user may define three prompt sound conditions "Louder", "Softer" and "Off".
6. Press "Wrinkle Saver"button to select a suitable reserved drying program.
• After powering on, the dryer delay start drying program automatically sets
as disabled. When you desire a drying cycle after a delay time, press
"Wrinkle Saver" button to set wrinkle saver drying program. After initial
pressing, the LED display indicates 3 hrs, which will be increased until 24 hrs
by an increment 1 hr with every pressing. Press again will display drying time.
Here if press again, it will repeat from 3 hrs. If keep pressed for 1.5 seconds,
LED display will increase continuously.
• When "Wrinkle Saver" is enabled, your selected program indicator turns off
while "Wrinkle Saver"indicator and remaining reservation time indication turn
on. During reserved period, pressing "Wrinkle Saver" button can indicate
reserve status.
• To change operating program or cancel delay, you should press “OFF” and
re-select a new cycle.
7. Press "Touch Up" button to select wrinkle-proof drying mode.
• Use the "Touch Up" cycle to continue drying if clothes are still damp after the
Automatic cycle.
• You can also use the "Touch Up" cycle to remove wrinkles from clean
clothes which packed tightly in a suitcase or closet.
8. Press "Start/Pause" button
• When starting the machine, first close the door and then press this
button.
• If pause is needed during machine operating, press this button. Pressing
again will resume operation.
18
Français
TIMED DRY CYCLE
1.
Press any button except "Off" button to power on.
2.
•
Press "Timed-Dry Cycles" button and select "Timed Dry" cycle.
After powering on, press "Timed-Dry Cycle" button to select "Timed Dry"
program.
3.
•
Press "More Time" And "Less Time" buttons to set a suitable time.
After setting "Timed-Dry Cycle" to "Timed Dry" , you can press these two
uttons to increase or decrease drying time as you desires.
4-6.Press buttons "Temp", "Cycle Signal", "Wrinkle saver", and "Touch Up" to
define your desired program.
Notes: For "Timed Dry" program, use of buttons "Temp", "Cycle Signal",
"Wrinkle Saver" and "Touch Up" is the same as for auto-programs.
"Sensor Dryness Level" is inactive, pressing of which will get alarms.
7.
19
Press "Start/Pause" button.
Français
RACK DRY CYCLE
1.
Press any button except "Off" button to power on.
2.
Press "Timed-Dry Cycles" button and select "Rack Dry" cycle.
• After powering on, press "Timed-Dry Cycle" button to select "Rack Dry"
program.
3.
Press "More Time" And "Less Time" buttons to set a suitable time.
• After setting "Timed-Dry Cycle" to "Rack Dry", you can press these two
buttons to increase or decrease drying time as you desire.
4-7.Press buttons "Temp", "Signal", "Wrinkle saver", and "Touch Up" to define
your desired program.
Notes: For "Rack Dry" program, use of buttons "Temp", "Signal", "wrinkle Saver"
and "Touch up" is the same as for auto-programs. "Sensor Dry Level" is
here inactive, pressing of which will get alarms.
8.
Press "Start/Pause" button.
Other Features
Your dryer also has the following features for your convenience:
Lint Filter:
• All dryers come with a lint filter that needs to be cleaned before or after every
use (read “Care and Cleaning Guide” Section).
Leveling Legs:
• Your dryer has four leveling legs which are located in the front and rear corners of your dryer. After installing your dryer in its final position, you can level
your dryer.
• Leveling legs can be adjusted by turning them clockwise to raise your dryer or
by turning them counterclockwise to lower your dryer.
20
NORMAL OPERATING SOUNDS
The following sounds are normal during the operation of the dryer.
• Tumbling sound: this is normal as the heavy wet clothes in the dryer are
continuously being tossed around.
• Air rushing noise: this happens as the dryer drum spins at very high RPM and
the air is rushing through the dryer drum.
Tips
• For best drying results, clean the lint filter before and after every use.
• Do not overload the dryer.
• Balance the dryer load, evenly throughout the dryer for the best result.
• Drying time depends on many variables: load size,type of fabric, and
moisture in it, heat and moisture in the room, electric voltage, length of the
exhaust duct, etc.
• To eliminate guessing and conserve energy,we recommend for certain clothes
to choose an auto drying setting.
• Always follow the fabric care instructions supplied by the garment
manufacturer.
CARE AND CLEANING GUIDE
• Lint filter needs to be cleaned
before and after each use for your
unit to operate at optimum
efficiency. The filter can be removed
by pulling on the tabs located on
the inside of the dryer door. The
Lint Filter
filter may be washed or vacuumed.
Remove the excess water from the filter
by gently shaking the filter. This will remove dust and particles trapped in
the filter. Lint built up in screen restricted airflows. This causes longer drying
time. After cleaning slide the filter back in place. Do not use your dryer with
out the lint filter.
• Do not use any type of spray cleaner when cleaning the interior.
• Hazardous fumes or electric shock could occur. If dryer drum becomes stained,
clean the drum with damp cloth. Remove any residue before drying next load.
• Clean the cabinet with mild soap and water. Do not use harsh or abrasive
cleaners, this could damage the dryer.
• Clean the duct and the vent on a regular basis to avoid clogging which
could affect the efficiency of the dryer.
21
TROUBLE SHOOTING
Dryer does not operate:
• Check if unit is plugged in. The plug may have come loose.
• Check if the electrical wall receptacle is of proper voltage.
• Check if the circuit breaker needs to be reset or if the fuse needs to be
replaced.
• Check if the unit is in the “off” model. Press start button again.
• Check if the door is open.
Dryer is working but not drying the clothes:
• Unit maybe overloaded. The dryer drum should be only half full.
• Check exhaust ducts and vents. Vents should be free of obstructions.
• Duct should be dust and lint free. Duct should be cleaned regularly.
• Dryer load need to be resorted. Heavy clothes may need to be separated
from regular clothes.
• Bulk clothes may require repositioning.
• If the clothes dries unevenly a higher dry setting may be required or clothes
in the dryer need to be resorted.
• Dryer making noise when drying: coins, loose change, buttons and other
heavy objects could cause this noise.
• Dryer may need to be leveled.
• Read operating guide for normal operating sounds.
Static:
• Caused by over drying. Adjust for shorter drying time.
• Mixed with synthetics fabric. Sort and separate different fabric.
• Use a fabric softener.
22
English
LIMITED WARRANTY
Full ONE Year Warranty
For 12 months from the date of original retail
purchase, Haier will repair or replace any part
free of charge including labor that fails due to
a defect in materials or workmanship.
Limited Warranty
After only year from the original retail purchase date Haier shall provide a part at no
cost , as indicated below, to replace said part
as a result or a defect in materials or workman
ship, Haier is solely responsible for the cost of
the part. All other costs such as the cost of the
part. All other costs such as labor trip charge,
etc are the responsibility of the owner.
Second Year.
Haier will provide All Parts.
Third through Fifth Year.
NOTE: This warranty commences on the date
the item was purchased and the original purchase receipt must be presented to the authorized service representative before warranty
repairs are rendered.
Exceptions: Commercial or Rental Use
warranty.
90 days labor from date of original purchase.
90 days parts from date of original purchase
NO OTHER WARRANTY APPLIES.
For Warranty Service
Contact your nearest authorized service center.
All service must be performed by a Haier
authorized service center. For the name and
telephone number of the nearest authorized
service center please call
1-877-337-3639.
Before calling please have available the
following information:
Model number and serial number of your
appliance( found on the rear of the unit on the
upper left hand side).
The name and address of the dealer you purchased the unit from and the date of purchase.
A clear description of the problem.
A proof of purchase (sales receipt).
This warranty covers appliances within the continental united States. Puerto Rico and Canada
. What is not covered by this
warranty:
23
Replacement or repair of household fuses, circuit breakers, wiring or plumbing.
A product whose original serial number has
been removed or altered.
Any service charges not specifically identified
as normal such as normal service area or
hours.
Damage to clothing.
Damage incurred in shipping
Damage caused by improper installation or
maintenance.
Damage from misuse, abuse accident, fire,
flood, or acts of nature.
Damage from service other than on authorized
Haier dealer or service center.
Damage from incorrect electrical current, voltage or supply.
Damage resulting from any product modification, alteration or adjustment not authorized by
Haier.
Adjustment of consumer operated controls as
identified in the owners manual.
Hoses, knobs, lint trays and all attachments,
accessories and disposable parts.
Labor, service transportation, and shipping
charges for the removal and replacement of
detective parts beyond the initial 12-month
period.
Damage from other than normal household
use.
Any transportation and shipping charges.
THIS LIMITED WARRANTY IS GIVEN IN LIEU
OF ALL OTHER WARRANTIES EXPRESSED OR
INCLUDING THE WARRANTIES OF MERCHANTABILITY AND FITNESS FOR A PARTICULAR PURPOSE
The remedy provided in this warranty is exclusive and is granted in lieu of all other remedies.
This warranty does not cover incidental or consequential damages so the above limitations
may not apply to you .Some states do not
allow limitations on how long on implied warranty lasts, so the above limitations may not
apply to you.|
This warranty gives you specific legal rights,
and you may have other rights, which vary,
from state to state.
Haier America
New York, NY 10018
IMPORTANT
Do Not Return This Product To The Store
If you have a problem with this product, please contact the "Haier Customer Satisfaction
Center" at 1-877-337-3639.
DATED PROOF OF PURCHASE REQUIRED FOR WARRANTY SERVICE
IMPORTANT
Ne pas Réexpédier ce Produit au Magasin
Pour tout problème concernant ce produit, veuillez contacter le service des
consommateurs ‘Haier Customer Satisfaction Center’ au 1-877-337-3639.
UNE PREUVE D’ACHAT DATEE EST REQUISE POUR BENEFICIER DE LA GARANTIE.
IMPORTANTE
No regrese este producto a la tienda
Si tiene algún problema con este producto, por favor contacte el "Centro de Servicio al
Consumidor de Haier" al 1-877-337-3639 (Válido solo en E.U.A).
NECESITA UNA PRUEBA DE COMPRA FECHADA PARA EL SERVICIO DE LA GARANTIA
Made in China
Fabriqué en Chine
Hecho en China
Haier America
New York, NY 10018
HLF103Q
Issued: JULY 2006
Printed in China
Part # WD-8888-90