1
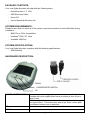
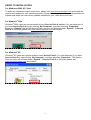
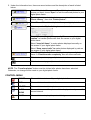
Digital Keychain 1.5” LCD Model #: 1-5DPF350 1-5DPF355 1-5DPF360 User’s Manual PID # 161304-109241, 161309-109241, 161310-109241 Rev. 071023 All brand name and trademarks are the property of their respective owners USER’S RECORD: To provide quality customer service and technical support, it is suggested that you keep the following information as well as your store receipt and this user’s manual. Date of Purchase: ________________________________ Model Number: ________________________________ Serial Number: ________________________________ Product Rev Number (located below the UPC on the package): ____________________ FCC RADIATION NORM: FCC This equipment has been tested and found to comply with limits for Class B digital device pursuant to Part 15 of Federal Communications Commission (FCC) rules. FCC Compliance Statement These limits are designed to provide reasonable protection against frequency interference in residential installation. This equipment generates, uses, and can radiate radio frequency energy, and if not installed or used in accordance with the instructions, may cause harmful interference to radio communication. However, there is no guarantee that interference will not occur in television reception, which can be determined by turning the equipment off and on. The user is encouraged to try and correct the interference by one or more of the following measures: Reorient or relocate the receiving antenna Increase the separation between the equipment and the receiver Connect the equipment into an outlet on a circuit different from that to which the receiver is connected to. CAUTION! The Federal Communications Commission warns the user that changes or modifications to the unit not expressly approved by the party responsible for compliance could void the user’s authority to operate the equipment. 2 PACKAGE CONTENTS: Your new Digital Keychain will ship with the following items. - Digital Keychain 1.5” LCD - USB Extension Cable - Driver CD - User’s Manual & Warranty Info. SYSTEM REQUIREMENTS: Please be sure that you meet all of the system requirements below to avoid difficulties during installation. - IBM PCs or 100% Compatibles - Windows® 2000, XP, Vista - Available USB Port SYSTEM SPECIFICATIONS: Your new Digital Keychain complies with the following specifications. - USB Interface HARDWARE DESCRIPTION: DOWN POWER/ENTER SWITCH UP POWER / ENTER SWITCH Press to turn on your digital photo frame or press and hold for 5 seconds while your digital photo frame is running to turn off your photo frame. While the digital photo frame is turned on, press this switch to open the control menu. This button also acts as an “Enter” button after the different function icon is selected. Press to view previous photos or select a function icon. UP DOWN Press to view next photos or select a function icon. 3 PRIOR TO INSTALLATION For Windows® 2000, XP, Vista To avoid any hardware conflict and/or error, please visit www.windowsupdate.com and install the most recent updates for your operating system. Please also visit your motherboard manufacturer’s website and install the most recent updates available for your video and sound card. For Windows® 2000 Windows® 2000 users are recommended to have Service Pack 4 installed. You can determine if you have Service Pack 4 by right-clicking “My Computer”, and then selecting “Properties”. Select the “General” tab and the Service Pack you have will be listed under “System”. If Service Pack 4 is not listed, please visit www.windowsupdate.com and install it. For Windows® XP Windows® XP users are recommended to have Service Pack 2. You can determine if you have Service Pack 2 by right-clicking “My Computer”, and then selecting “Properties”. The Service Pack you have will be listed under “System”. If Service Pack 2 is not listed, please visit www.windowsupdate.com and install it. 4 INSTALLATION: NOTE: Please be sure that you close all the applications on your computer before you begin the installation. Please charge you Digital Keychain by connecting the enclosed USB cable to your computer following the instruction below for minimum of 4 hours prior of first use. Each full charge will last for 2 hours of viewing time. The actual charging time varies depending the level of discharge. The life cycle of the internal rechargeable battery is 400 charges. 1. Turn on your computer. 2. Insert the enclosed drive CD into the CD-ROM drive of your computer. 3. The Photo Viewer Setup Wizard will appear automatically, follow the onscreen instructions to complete the installation. 4. When the following interface appear for the last step, please click “Yes, restart the computer now” to restart your computer. 5. After your computer has restarted, plug the USB mini-B connector of the enclosed USB cable to your digital photo frame. 6. Plug the USB-A connector of the enclosed USB cable into an available USB port on your computer. 7. Your computer will automatically detect and install the necessary drivers. 8. Your new digital photo frame is now ready to be used. 9. The “Photo Transfer Application” icon as shown below will appear on your desktop. 5 USING THE SOFTWARE 1. Double click the “Photo Transfer Application” icon on your desktop 2. The following dialog box will open to ask you whether you want to reload your photos to the photo viewer. Click “Yes” if you want to keep the photos that are currently stored in your digital photo frame, click “No” and the “Photo Transfer Application” will not keep record of the photos that is currently stored in you digital photo frame. Note: If “No” is selected, all existing photos will be lost after you have transferred new photos to your digital photo frame. 3. The screen below will appear. 4. Some basic information is shown in the box on the upper right of the “Photo viewer” interface, including the quantity of photos currently stored, the maximal capacity of your digital photo frame, the present page and the amount of photos selected. 6 5. Under the information box, there are seven buttons and the description of each is listed below. Click “Add photos” to open an “Open” dialog box. Select the photos you want, chose “Open” to add the selected photos to your digital photo frame. To delete photos, select the photos you want to delete in the “Photo Library”, then click “Delete photos”. Click “Clear all” to delete all photos from your digital photo frame. Click to open the “Option” dialog box as shown below. Select “When adding a photo, use its file name as photo caption” to transfer photos with their file names to your digital photo frame. Select “keep full frame” to make photos displayed normally on the screen of your digital photo frame. Select “Keep aspect ratio” to make photos displayed by ratio on the screen of your digital photo frame. Click “Transfer photos” to transfer the photos to your digital photo frame. A “Photo transfer completely” box will show onscreen. Click to view previous page of photos selected. Click to view next page of photos selected. NOTE: The “Transfer photos” button must be clicked after photos have been selected. Otherwise, no change will be made to your digital photo frame. CONTROL MENU POWER Choose this icon to turn off your digital photo frame. EXIT Choose this icon to exit control menu. DELETE Choose this icon to delete photos. SLIDE Choose this icon and the photos will be displayed one by one at 3second interval. SHOW GAME Choose this icon to play the pre-installed game. 7 WARRANTY INFORMATION: 1 Year Limited Warranty Gear Head, LLC warrants that this product shall be free from defects in materials and workmanship for one year from date of purchase. If the product is defective, Gear Head, LLC’s sole obligation under this warranty shall be at its election, subject to the terms of this warranty, to repair or replace any parts deemed defective. This warranty is for the exclusive benefit of the original purchaser and is not assignable or transferable. THIS WARRANTY IS MADE IN LIEU OF ALL OTHER WARRANTIES, EXPRESS OR IMPLIED, AND ANY IMPLIED WARRANTIES, INCLUDING THE IMPLIED WARRANTIES OF MERCHANTABILITY AND FITNESS FOR A PARTICULAR PURPOSE, ARE LIMITED TO THE TERMS OF THIS WARRANTY, UNLESS OTHERWISE PROHIBITED BY LAW. Exclusions To the fullest extent permitted by law, Gear Head, LLC expressly disclaims and excludes from this warranty any liability for damages, including but not limited to general, special, indirect, incidental, consequential, aggravated, punitive or exemplary damages, and economic loss (even if Gear Head™ is informed of their possibility), third party claims against you, including for any loss or damages, and claims or damages related to loss of, or, damage to, your records or data. This warranty does not apply to any product the exterior of which has been damaged or defaced. This warranty will be voided by misuse, improper physical environment, improper repair, acts of God, war or terror, commercial use, and improper service, operation or handling. Technical Support Gear Head™ provides Technical Support Monday - Friday from 9:00 am – 5:30 pm Eastern Time. Before calling, please make sure you have available the Model # (located on the front page of your User’s Manual) and information regarding your computer’s operating system. Please contact our technicians at 1-866-890-7115 Return Merchandise for Service Any claim under this warranty must be made in writing to Gear Head, LLC, at the address provide by our technician, within 30 days after the owner discovers the circumstances giving rise to any such claim, and must include a copy of this warranty document, a receipt or copy of your invoice marked with the date of purchase, and the original packaging. You may obtain service by calling the technician for a Return Merchandise Authorization (RMA) number. The RMA number must be prominently displayed on the outside of the shipping carton and the package must be mailed to Gear Head™ postage prepaid. 8