1
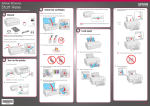
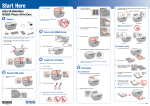
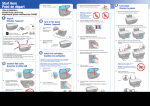
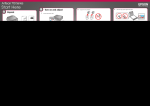
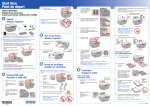
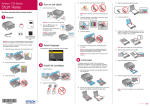
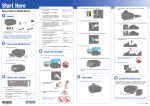
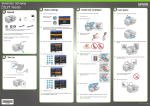
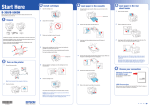
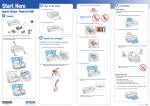
Start Here
Epson Stylus® Photo 1400
1
Unpack
3
Install Ink Cartridges
7
Close the ink cartridge cover and press it down until it clicks.
8
Close the printer cover.
3
Press in the release button and slide the edge guide to the left.
Note: Don’t load paper before installing the ink cartridges.
1
Lift up the printer cover.
2
Open the cartridge cover.
Release button
4
3
Load paper against the right edge guide and behind the tab.
Unpack the ink cartridges.
Tab
Caution: Do not open ink cartridge packages until you are ready to install
the ink. Cartridges are vacuum packed to maintain reliability.
Larger papers
9
If anything is missing, contact Epson® as described on the back of
this sheet.
Press the ink button to charge ink. Charging takes about
three minutes.
Remove all the tape and foam sheets.
4
Remove only the yellow tape from each cartridge.
Tab
Smaller papers
Caution: Don’t turn off the printer while the
or you’ll waste ink.
Caution: Don’t remove any other seals from the cartridges.
power light is flashing
Note: The first time you install ink cartridges, the printer uses some ink
to charge the printing system, so print yields may be lower with the first
cartridges. Subsequent ink cartridges will last for their full rated life.
2
1
4
Turn On the Printer
Plug in the power cable.
5
Insert the cartridges in the holder for each color.
1
Note: Don’t load paper sideways; always load it short edge first.
Load Paper
Open the paper support and pull up its extensions.
5
Press in the release button and slide the left edge guide over.
Paper support
2
Larger papers
Press the
power button.
6
Press the cartridges down until they click.
2
Open the output tray and pull out its extension.
Smaller papers
Output tray
*411559800*
*411559800*
4115598
1-F
Rev.0
C
4115598
1-F
Rev.0
M
4115598
1-F
Rev.0
Y
4115598
1-F
Rev.0
K
5
Install Software
Macintosh
1
Your software works with Windows® 2000, XP, XP Professional x64 Edition,
and Windows Vista®, and Mac OS® X 10.2.8, 10.3.9, 10.4.x, and 10.5.x.
Make sure the printer is
NOT CONNECTED to your computer.
2
2
The printer makes noise after ink cartridge installation.
For the best prints, use genuine Epson paper and ink. You can purchase
them at Epson Supplies CentralSM at www.epson.com/ink3 (U.S. sales) or
www.epson.ca (Canadian sales). You can also purchase genuine Epson
paper and ink from an Epson authorized reseller. To find the nearest one,
call 800-GO-EPSON (800-463-7766).
Recommended Papers
• If the printer stops moving or making noise, but the green power light
is still flashing after five minutes, turn off the printer. If the light is
still flashing when you turn it back on, contact Epson as described
in “Any Questions?”.
Make sure the printer is
NOT CONNECTED to your computer.
Note: If you see a screen like this,
click Cancel and disconnect the
USB cable. You can’t install your
software that way.
Need Paper and Ink?
• The first time you install ink cartridges, the printer must charge its print
head for three minutes or so. Wait until charging finishes (the green
power light stops flashing) before you turn off the printer, or it may
charge improperly and use excess ink the next time you turn it on.
Windows
1
Solving Problems
Insert the printer Software CD.
Epson papers are specially coated to work with genuine Epson inks for
optimal image quality and maximum longevity.
• Turn off the printer, then make sure the ink cartridges are inserted all the
way and the ink cartridge cover is closed completely. Also make sure
no packing material remains in the printer. Wait a moment, then turn the
printer back on to clear the error.
3
Double-click the
4
Click Install and follow the on-screen instructions. Software installation
takes several minutes.
Ultra Premium Photo Paper Glossy
You’re having problems installing the printer software.
Instant-drying heavyweight paper for long-lasting,
high gloss photos. Suitable for framing or special
occasions.
• Carefully follow the installation instructions to the left. Do not connect
your printer to the computer until you are instructed to do so, and make
sure your printer is turned on and the USB cable is securely connected at
both ends. Also make sure your system meets the system requirements
listed in the User’s Guide.
Premium Photo Paper Glossy
• Close your other programs, including any screen savers and virus
protection software, and install the software again.
High gloss, instant-drying paper for beautiful,
durable photos made to share or display in
an album.
Epson icon.
Insert the printer Software CD.
With Windows Vista, if you see the
Autoplay window, click Run Epsetup.exe.
Then click Continue at the User Account
Control screen.
5
When prompted, connect the USB cable. Use any open USB port on
your computer. Make sure the printer is turned on.
Genuine Epson Inks
Any Questions?
Look for the number below
to find your cartridges. It’s as easy
as remembering your number!
Look here for answers:
3
Click Install and follow
the on-screen
instructions. Software
installation takes
several minutes.
User’s Guide
Basic steps for using the printer.
On-screen Reference Guide
Black T079120
Magenta T079320
Cyan T079220
Lt. Magenta T079620
Lt. Cyan T079520
Yellow T079420
Click the desktop shortcut for easy access to
printer information.
1
On-screen help with your software
Select Help or ? when you’re using
your software.
2
4
When you see this screen,
click the first option and then
click Next.
If you will connect your printer
to your computer through an
external print server, click the
second option, click Next, and
skip to step 7.
5
6
Mac OS X 10.5 users: skip to step 10.
Other users: continue with step 7.
7
When you see this screen, click Open the Printer List.
Epson Technical Support
Internet Support
Visit Epson’s support website at epson.com/support and select your
product for solutions to common problems. You can download drivers and
documentation, get FAQs and troubleshooting advice, or e-mail Epson with
your questions.
Speak to a Support Representative
Before you call Epson for support, please have the following
information ready:
Epson, Epson Stylus, and Claria are registered trademarks; Epson Exceed Your Vision is a registered
logomark; and Supplies Central is a service mark of Seiko Epson Corporation.
General Notice: Other product names used herein are for identification purposes only and
may be trademarks of their respective owners. Epson disclaims any and all rights in those marks.
• Product name (Epson Stylus Photo 1400)
• Product serial number (located on the back of the printer)
• Proof of purchase (such as a store receipt) and date of purchase
• Computer configuration
• Description of the problem
When prompted, connect the USB cable. Use any open USB port on
your computer. Make sure the printer is turned on.
8
Follow the steps to the right to add the Stylus Photo 1400.
This information is subject to change without notice.
© 2008 Epson America, Inc. 8/08
CPD-22648R1
Then call:
• U.S.: (562) 276-7282, 6 AM to 6 PM, Pacific Time, Monday through Friday
• Canada: (905) 709-2567, 6 AM to 6 PM, Pacific Time, Monday through Friday
Days and hours of support are subject to change without notice.
Toll or long distance charges may apply.
Instructions
1
Software Technical Support
2
Adobe® Photoshop® Elements
(206) 675-6358
Web: www.adobe.com/support
Note: If installation doesn’t continue after a moment, make sure you
securely connected and turned on the printer.
6
Follow the on-screen instructions to install the rest of the software
and register your printer.
Cut out the card below and keep it with you when
purchasing replacement ink cartridges.
9
Click Next again, if necessary.
Epson Stylus Photo 1400 Ink
®
7
When you’re done, remove the CD.
You’re ready to print! See your User’s Guide or your on-screen Reference
Guide for instructions.
10
Follow the on-screen instructions to install the rest of the software and
register your printer.
11
When you’re done, eject the CD.
Black T079120
Magenta T079320
Cyan T079220
Lt. Magenta T079620
Lt. Cyan T079520
Yellow T079420
You’re ready to print! See your User’s Guide or your on-screen Reference
Guide for instructions.
Printed in XXXXXX
41115598
1-B
Rev.0
C
4115598
1-B
Rev.0
M
4115598
1-B
Rev.0
Y
4115598
1-B
Rev.0
K