1
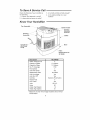
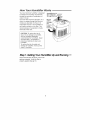
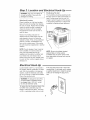
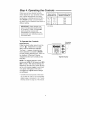
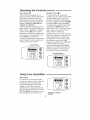
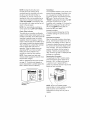
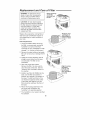
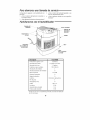
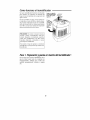
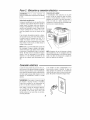
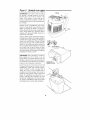
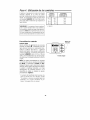
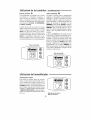
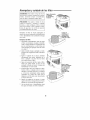
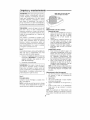
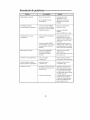
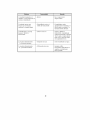
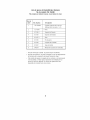
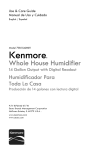
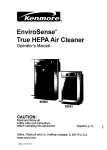
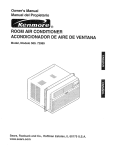
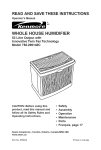
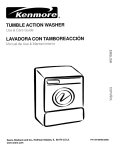
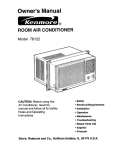
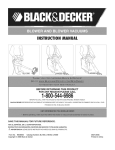
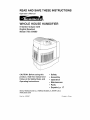
READ AND SAVE THESE INSTRUCTIONS
Operator's
Manual
®
WHOLE HOUSE HUMIDIFIER
8 Gallon Output with
Digital Readout
Model 758.154080
CAUTION:
Before using this
product,
read this manual and
follow all its Safety Rules and
Operating
Instructions.
• Safety
• Assembly
• Operation
• Maintenance
• Parts
• Espa_ol,
p. 17
Sears, Roebuck and Co., Hoffman Estates, IL 60179 U.S.A.
www.sears.com
Part No. SP6597
Printed
in China
P_ONE YEAR
FULL WARRANTY
ON KENMORE
HUMIDIFIER
_
If any part of this humidifier fails due to a defect in material or workmanship
within one year from the date of purchase, or it the humidifier motor fails due
to a defect in material or workmanship
during the second year from the date
of purchase, RETURN THE HUMIDIFIER
TO THE NEAREST
SEARS PARTS &
REPAIR CENTER, and it will be repaired free of charge. This warranty does
not include humidifier filters, which are expendable
parts that can wear out
from normal use in less than one year. This warranty gives you specific legal
rights, and you may also have other rights which vary from state to state.
Sears, Roebuck
and Co., Dept. 817WA,
Hoffman
Estates,
IL 60179
GENERAL SAFETY INSTRUCTIONS
Safety
Signal Words
DANGER:
information
means if the safety
is not followed someone
be seriously
injured
WARNING:
information
could
4.
Keep the humidifier
5.
Do not put foreign
humidifier.
6.
Do not allow
will
or killed.
Close
means if the safety
is not followed someone
be seriously
injured
CAUTION:
means
information
is not followed
7.
or killed.
Never
someone
may
8.
use your humidifier
To reduce
the risk of fire or shock
120V, A.C. electrical
extension
cords.
2.
Keep the electric
areas. To reduce
hazard,
never
directly
outlet.
unplug
Do not use
cord out of traffic
the risk of fire
the humidifier
while
any
in any
the risk of electrical
or damage
to humidifier,
do
while
unit
is running.
9.
10.
To reduce
the risk of damage
humidifier,
unplug
To reduce
the risk of accidental
when
to
not in use.
electrical shock, do not touch the
cord or controls with wet hands.
cord
under rugs, near heat registers,
radiators,
stoves or heaters.
3. Always
the
when
or damaged
not tilt, jolt or tip humidifier
into a
put the electric
is necessary
part is missing
manner.
if the safety
plug humidifier
inside
to be used as a toy.
attention
hazard
hazard,
objects
used by or near children.
be injured.
1. To reduce
clean.
11.
before
Note the warning
label shown
below.
WARNING:
To reduce risk of fire,
electric shock, or injury always unplug
before servicing or cleaning.
moving it, before cleaning,
or
whenever
the humidifier
is not in
service.
Table of Contents
Warranty
General
To Save
Know
Your Humidifier
How Your
Step
Information
Humidifier
1. Getting
Up and
...............................
Safety Instructions
....................
A Service Call ...........................
.............................
Works
....................
Electrical
2
3
Step 3. Water
3
Using
4
Replacement
Your Humidifier
Instructions
.................
Hook-Up
..................................
5
Fill ....................................
6
Step 4. Operating
Your
Cleaning
Running ...................................
Step 2. Location
2
the Controls
Humidifier
and Care
..........................
Troubleshooting
5
Repair
8-9
of Filters .......... 10
and Maintenance
4
........... 7-8
...................
..............................
Parts .....................................
11
12-13
14-15
To Save A Service
Check
the following
if your
Call --
humidifier
is
not operating.
1. Is power
2. Is there
cord attached
electrical
to outlet?
power
3. Is humidity
control
4. Is the cabinet
surface?
set high enough?
sitting
on a level
to outlet?
Know Your Humidifier
Fan Assembly
-.. Bottle
......
Housing
Assembly
Handle
Speed &
Humidity
Controls
=:
.......
Bottle
Base
Humidistat
(On Power
Cord)
Filter:
Replacement
32-15508
Description
Gallon
Output/24
Capacity
of Bottle
Capacity
of Base
hrs
Sq. Ft. Coverage
Fan Speeds
Auto
Fan Speed
Replacement
Auto
Filter
Humidistat
Auto Shut
Off
Controls
Rubber
CUL
758.154080
8
1.2 Gallons
1.2 Gallons
1700
3
Yes
32-15508
Yes
Yes
Electronic (Push Button)
Feet
6
Listed
Yes
Volts
120 A.C.
Hertz
60
Amps
(High
Speed)
1.2
Watts
(High
Speed)
81
Based
on an area with average
ceiling
height
insulation
and an 8 foot
No.
How Your Humidifier
Your new Kenmore
to satisfy
home
humidifier
humidity
through the principle
water in the air.
Once
in, passes
is designed
requirements
of evaporation
the filter becomes
drawn
Works --
saturated,
through
of
air is
the filter and
CAUTION:
injury,
To reduce
air
virtually
housing
the risk of
fire or damage
to humidifier,
use only cleaners specifically
recommended
for humidifiers.
use flammable,
Dry
enters
through
the
louvers
in the
moisture is absorbed
into the air. All
evaporation
occurs in the humidifier
so
any residue remains in the filter. This
natural process of evaporation
eliminates
white dust.
Humidified
air is
then released
throuc
combustible
poisonous
humidifier.
materials
to clean
To reduce
the risk of scalds
damage to humidifier,
water in humidifier.
never
Never
or
your
and
put hot
Step 1. Getting Your Humidifier Up and Running -Once
removed
from
packing
materials.
properly
seated
its carton,
Verify
(See
remove
the filter is
pg.10).
all
Step 2. Location
and Electrical
Positioning
WARNING:
For your own safety, do
not use humidifier
if any parts are
damaged
or missing.
should
the back
exit side) and left side, at
Place
humidifier
on a flat level
take extra care
in leveling
the unit on carpet.
where
where
Moist
air (humidity)
humidifier
placing
be positioned
away from
through
the wall. Air
all of the louvers
assembly
to operate
with
in order for the
at peak efficiency.
the humidifier
the most humidity is needed
the most air will be circulated
throughout
the house
cold air return.
to enter
in the housing
surface,
when
Position
(cord
2 inches
needs
A Location
The Unit
The humidifier
least
Selecting
Hook-Up
such
or
as near a
produced
At least 2"
from wall
will
disperse
into the whole house, but the
area closest to the unit will have the
highest
humidity.
If the unit is positioned
close
to a window,
form
on the window
the unit should
location.
NOTE:
from
condensation
pane.
be repositioned
Due to release
humidifier,
away from
may
If this occurs
of cool,
in another
moist
it is best to direct
thermostat
air
air
NOTE:
and hot air
registers and to position humidifier
next
to an inside wall. Unit should not be
placed
where
or warm
cold
air from
directly
air from
outside
a hot air register
walls
humidifier
humidistat
4 inches
body on power
from obstruction
(located
outside
and away
cord)
is free
from any hot
air register.
blows
on it.
Electrical
Locate
nearest
Hook-Up
120V A.C. wall socket
in
If the plug does not fit fully in the outlet,
the location desired, preferably
on inside
wall. With the humidifier
in the desired
reverse
location,
outlet.
route the electrical
cord safely
so no one will trip or upset
Plug in the electrical
WARNING:
or shock
To reduce
hazard,
the humidifier.
cord.
the risk of fire
humidifier
be plugged into a 120VA.C.
Do not use extension
cords.
To reduce
the risk of electrical
humidifier
has a polarized
blade
Be sure
approximately
is wider
outlet
outlet.
shock,
this
plug (one
than the other).
will fit in a polarized
should
This plug
only one way.
plug. If it still does not fit, contact
a qualified
way.
electrician
Do not change
to install
the proper
the plug in any
Step 3. Water Fifl ,
WARNING:
To reduce
Bottle
the risk of fire
\
or shock hazard, do not pour or spill
water into control or motor area.
If controls get wet, let them dry
completely
and have unit checked
by
authorized
service personnel
before
plugging
in.
After
the humidifier
will be operating
is positioned
where
you are ready
humidifier.
The bottle
lifts straight
away from
the base. Take care not to
bump or damage fill valve
the bottom of the bottle.
Invert
button
the bottle.
to lock in open
under
careful
Debris
seating.
assembly
on
the valve stem
Place
bottle
Fill the bottle,
not to allow
being
any debris
to get in
may interfere
with the
Once
z Base
up and
and turn clockwise
position.
the faucet.
the bottle.
valve
Press
into the bottle
it
to fill the
PUSH iN
the bottle is full,
press the valve stem button
counter clockwise
to release
TURN
CLOCKWISE
and turn
and close.
CAUTION:
Use only 32-14900
Registered
from Sears
Bacteriostat
available
Retail store. Under no
EPA
circumstances
should you use water
treatment
products designed
for
Roto belt or Ultrasonic
humidifiers.
Place
the water
humidifier
bottle
base. When
back
Spring
Valve
Assembly
into the
positioned
properly, the plunger will open and the
water will flow into the base. The base
will hold the entire
bottle.
Once
and repeat
humidifier
contents
the bottle
the filling
of the water
is empty,
process.
remove
it
The
is now filled to capacity.
To
benefit from less frequent filling let the
humidifier
exhaust both the water from
the bottle
and the base before
filling.
\
Step 4. Operating
Where
you set your desired
levels
depends
level,
outside
on your
A starting
humidity
personal
temperature
temperature.
the Controls
different
When Outdoor
Temperature is:
comfort
and inside
set point of 30% -
40% ROOM humidity
is recommended
but there may be conditions
that require
a
setting.
IMPORTANT:
Water
result if condensation
damage may
starts to form
on windows
Humidity
or walls.
--
-10 ° F
2°F
10 ° F
20 ° F•
Recommended indoor
Relative Humidity is:
-24 ° C
-18°C
-12 ° C
_6° C•
20%
25%
3O%
35%
* and above
SET
point should be lowered until
condensation
no longer forms. We
recommend
room humidity levels do
not exceed 50%.
To Operate
the Controls
Digital
Display
Press
the power
unit on*
delay
_).
while
button
initially
Once
reading
be displayed.
during
this time.
a ROOM
between
A flashing
NOTE:
The default
startup
are (LOW)
SET humidity.
After
20% - 95% will
is no power
settings
desired
plugged
the original
\
is less
at initial
FI fan speed
interruption.
\
20 display
humidity
and 65%
settings
by the user, they remain
as the unit remains
unplugged
calibrate.
is complete
indicates that the room
than 20%.
selected
is a slight
the electronics
calibration
humidity
once to turn the
there
Two bars (- -) appear
Function
Buttons
are
as long
in and there
If the unit is
default
settings
are employed.
* Humidifier fan should operate at initial start
up. If it does not, refer to, "Fan not operating
(digital display is illuminated)" in the "Trouble
Shooting" section on page !2 of this manual.
'_Digital
Display
Operating
Speed
Button
the Controls
O
This humidifier
Humidity
is equipped
speed
fan control.
speed
button
speed
setting.
(cont'd.)
with a 3-
Initially
will display
Each
the
the current
push
Control
This button
depressing
humidity
will automatically
required
of the speed
(%) settings
digital
(AUTO)
readout.
A.
is displayed
The higher
on the
the setting,
the
is pressed.
range
the
This humidifier
cycle on and off as
to maintain
(LOW}
setting
you to adjust
to suit your needs.
The readout
and desired
FI and
O
allows
button advances
the mode through the
settings of (HIGH) F3, (MEDIUM)
F2,
The selected
--
the selected
setting.
displays both actual (ROOM)
(SET) humidity percentage
when
humidity
The ROOM
control
readout
of 20% to 95%.
button
has a
if the room humidity
faster water is evaporated
and released
into the air. FI (LOW) is the quietest
level is equal to or less than 20% the
display will show a flashing 20.
setting
The SET
and is provided
for conditions
de not require
a rapid evaporation
When
A is selected
(AUTO)
humidifier
will determine
speed
needed to bring
humidity
that
rate.
the
initially
the required fan
the actual room
up to the set humidity.
readout
depressing
will display
Each
increases
Button ,,
the humidity
humidity
press
of 5%.
button
setting.
of the button
the setting
continuously
of 25% to
in increments
the current
additional
of 65% operates
Speed
has a range
65% and is adjusted
by 5%. A SET point
the humidifier
regardless
of the ROOM
'\
reading.
The humidistat
that senses
the
readings is located on the power cord.
insure that it is free from obstruction.
Humidity
Button,
1
Using
Refill
Your Humidifier
Display
For maximum
run time
and the base should
the bottle
both the bottle
be filled.
When
and the base empties
display
alternates
reading
and "F"
additional
water
the room
(FILL),
both
the
humidity
informing
is required.
Also at this
time the unit will automatically
switch into
DRY OUT MODE and continue
to run on
the lowest
speed
until the filter is dry.
Refill/Dry
Display
Out Mode
NOTE:
During
humidity
Humidistat
this time the room
level will continue
to be
The humidistat
located
monitored
and the humidifier
will cycle
the fan on and off until the filter is
senses
completely
and off to maintain
leaving
air. It causes
dry. The fan will shut off
you with a dry humidifier
that is
on the power
the percentage
SET point.
of humidity
the humidifier
"ROOM"
the humidifier
humidifier
until a reading
SET point
is achieved.
with water
and the fan will
to the set speed.
NOTE:
Fan automatically
lowest
speed
during
Check
Filter
indicator
The ability
switches
DRY
to efficiently
supply humidity output relies heavily on the
condition of the filter. As the filter loads with
impurities
it gradually
capability.
When this happens,
output
is reduced
loses its wicking
has to
work longer to satisfy the selected setting.
This humidifier has a check filter reminder
timed to appear
after 720 hours of
operation.
When the display
alternating
"CF"
shows
the SET
an
and "room humidity"
Some areas have high water
content
frequent
causing
on page
and Care of Filter"
10. If a build-up
severe discoloration
filter to restore
Check
Display
of deposits
is evident
maximum
replace
efficiency.
falls 3%
unwanted
tampering
with the
humidifier
locked.
settings
the controls
can be
Activation
Out
Procedure
the humidifier
functions
set up, hold the power
seconds.
The display
have been
button
down
will show
2 seconds;
release
the control
will resume
"CL"
filter changes.
Refer to "Replacement
reading
point again.
Lock
settings.
the need for more
or
the power
If buttons
is active,
for 5
"CL"
the display
are operated
the "CL"
for
button
and
of the
will
in
while
is displayed
and
are unaffected.
Deactivation
Procedure
To deactivate
the "CL"
function
simply
press and hold the power button for 5
seconds.
"CL" will flash at the rate of
1 second
the
the
To avoid
settings
mineral
of 1% above
The fan will turn
room humidity.
The room humidifier
continue
to function with the locked
setting at 5 second intervals it is a
reminder to check the filter condition.
NOTE:
the SET
to run the
Control
After
moisture
and the humidifier
falls 3% below
point and will continue
below
OUT MODE.
of any humidifier
reading
off until the ROOM
to
on
humidity
The fan will turn on if the
less prone to mold and mildew growth.
If DRY OUT MODE is not desired, refill
return
to cycle
the selected
cord
in the
period
on and
1 second
of 2 seconds
display
of room
NOTE:
Be sure
off for a
and then resume
the
humidity.
Filter /
approximately
body on power
obstruction
register.
humidistat
4 inches
cord
and away
located
outside
humidifier
is free from
from any hot air
Replacement
WARNING:
and Care of Filter --
To reduce
the risk of
Grasp housing
assembly
securely
and
shock or injury from moving parts,
always unplug humidifier
before
removing
or replacing
any parts.
lift
off .............
_
CAUTION:
To help retard bacteria
growth and keep maximum
efficiency,
the filter should be replaced
at least
once per season, or more often
under hard water conditions.
Use
Kenmore
32-15508
recommended
replacement
Replace
filter.
the evaporative
wicking
least
once per humidification
more
depending
on water
_
filter at
season
or
conditions
in
Position start
and finish
of
coiled filter at
center of base
your area.
Filter
Replacement
1. Unplug humidifier.
Before removing
the filter, we recommend
moving the
humidifier
to an area where floor
coverings
are not
damage.
(i.e.
2. Remove
the water
Be sure
valve.
3. Grasp
susceptible
kitchen
bottle and set aside.
not to bump
the housing
to water
or bath areas.)
or damage
assembly
the fill
and lift
straight up and away from the base
and set aside. The filter is now
accessible.
4. Take note of the filter position.
Remove the filter. You may want to
clean the base at this time. See the
"Cleaning
Your
this manual.
5. Install
base.
Humidifier"
section
a new filter (32-15508)
Align housing
assembly
bottom
with
top of base
and reposition
of
into the
Coil the filter and position
it
between the uprights in the bottom of
the base. The start and finish of the
coil should
be captured
of the base
filter should
(see diagram) and the
be resting on the floor of
curely
at the center
the base.
6. Return
the housing
top of the base.
humidifier
assembly
Reposition
to its operating
7. The humidifier
is now
to the
the
position.
ready
to be filled
for operation.
i0
Cleaning
and Maintenance
-NOTE: Remove
excess
water before cleaning
WARNING:
To reduce the risk of injury,
fire or damage to humidifier,
use only
cleaners
specifically
recommended
humidifiers.
Never use flammable,
combustible
clean your
for
or poisonous
materials
to
humidifier.
To reduce the
risk of scalds and damage to
humidifier,
never put hot water
humidifier.
in
Step 3
Bi-Weekly
CAUTION:
Local water purity varies
from area to area and under certain
conditions
water impurities
and
airborne bacteria may promote the
growth of microorganisms
in the
reservoir
of the humidifier.
cleaning
easier,
be empty
following
method:
a.
the humidifier
Allow
REFILL
message
3.
Unplug
1.
use the
illuminates
and
has stopped
2.
Parts
and Care of Filter"
may be a little water
the base. Carefully dump
remove with a sponge.
the water
exposed
to water.
Empty base after 20 minutes.
Rinse with water until bleach
End of Season
2
There
Base
Pour 1/2 gallon of water and 1/2
teaspoon
chlorine bleach into the
smell
base. Rinse thoroughly
with clean
water after all steps are complete.
page 10.
NOTE:
warm
is gone. Allow unit to dry out
completely.
NOTE: The water bottle should be
cleaned in the same manner as the
1.
See "Replacement
with clean
scale and
solution.
normally
the
humidifier.
To Remove
a soft cloth
base. Let solution stay for 20
minutes,
carefully swishing every
few minutes.
Wet all surfaces
WARNING:
To reduce the risk of shock,
always unplug humidifier
before
cleaning or servicing.
If humidifier
is not
un-plugged,
fan could start after
housing is removed.
Step
Rinse thoroughly
water to remove
Disinfecting
to run until the
"F"
Dampen
with undiluted
white vinegar and
wipe out the base to remove scale.
the humidifier
this,
the automatic
shutoff
humidifier
fan.
b.
soft brush.
and completely
out. To accomplish
cup of
undiluted
white vinegar. Let
solution stay 20 minutes.
Clean all interior surfaces
with a
cleaning
base should
dried
2.
1
To make
base with water
and add one 8 ounce
To retard bacteria growth that may
cause odors and be harmful to your
health, use only Kenmore replacement
filters. We also recommend
using EPA
approved
bacteriostat,
and humidifier
cleaner, available at your local Sears
store.
Step
Maintenance
Removing
Scale
1. Fill the humidifier
Maintenance
Follow "Bi-Weekly
Maintenance"
instructions
at end of humidification
2.
season.
Remove
3.
Let humidifier
still in
filter.
dry completely
before
storing.
4.
5.
out or
Store in cool, dry location.
Install a new filter in clean
humidifier
before next season begins.
NOTE: "Bi-Weekly
Maintenance"
procedure
11
is also recommended
do not plan to run the humidifier
one week or more.
if you
for
Troubleshooting,
Trouble
Probable
Cause
Remedy
Digital display not illuminated.
• No Power.
• Power button has not been
depressed,
• Check 120 volt power source.
• Press power button once to
turn on.
Fan not operating (digital
display is illuminated).
• ROOM humidity level is not
3% or more below SET
humidity level.
• Reservoir is empty.
• Raise SET humidity level if
desired.
• SET humidity level is 65%.
• A SET humidity percentage
of 65% operates fan
continuously. Adjust SET
level between 25% - 60%.
• Continue to run until desired
Fan running continuously.
• ROOM humidity level has not
reached 1% or more above
SET humidity level.
Poor evaporation
of water.
• Increase fan speed.
• Fill humidifier with water.
humidity level is achieved.
This may take up to 48 hours
initially.
• CHECK FILTER message
flashing,
• Mineral buildup on filter.
• Change to a fresh new
filter.
NOTE: Local water purity
varies from area to area.
Bottle empties completely.
• This is normal for initial filling.
• Refill bottle for maximum run
time.
Bottle continues to empty
after complete filling.
• Air is entering water bottle.
• Check for leak in water bottle.
Bottle not emptying.
• Spring Valve Assembly
damaged or missing post
in bottom of base.
• Check orientation of bottle.
• Base full of water.
12
Reposition so that fill valve on
bottom of bottle is depressed
by post in bottom of base.
• The base will hold the
contents of water bottle (1.2
gallons). Continue to run
humidifier to deplete water
from base.
Trouble
Probable Cause
Remedy
Display blinks or fan moves
slightly when humidifier is
plugged in.
• Normal
• No action required.
Fan operating slower than
speed registered on digital
display,
• Humidifier
MODE".
Humidifier not shutting off
during "DRY OUT MODE".
• Filter not dry.
• During "DRY OUT MODE" the
humidifier will continue to run
on "LOW" speed as required
for up to 2 hours or until the
filter is completely dry.
Alternating "F" and room
humidity displayed.
• Reservoir is empty.
• Fill humidifier with water.
Alternating "CF" and room
humidity displayed.
° Filter may be dirty.
• Replace filter.
• Unplug unit for 30 seconds
and reptug in to clear display.
in "DRY OUT
13
• Humidifier automatically
switches fan to (LOW) F1
when "F" and alternating room
humidity is displayed.
Repair Parts
Parts List for Kenmore
Humidifier
Model No. 758.154080
1\
.6
14
Parts List for Kenmore Humidifier
Model No. 758.154080
Always
Key No
order
by part
number
- Not
Part No,
Description
758.154080
Housing,
1
all parts
2
32-15508
3
831188-1
Support,
4
831189
Float,
5
831187-1
Base
6
831190
Foot Rubber
7
831199
Bottle Assembly
8
831207
Cap,
9
SP6597
Owner's
Hardware
item - May be purchased
Standard
1 Stock
• Any attempt
of most Sears
to repair
1-9)
1 Filter
item - May be secured
Department
number
Upper Assembly
(includes
*
by key
Float
Reservoir
Screw
through
Manual
(not shown)
locally
the Hardware
retail stores.
the control
assembly
create a hazard unless repair is done
technician.
Repair service is available
store.
15
or motor
may
by a qualified service
at your nearest Sears
YourHome
For repair - in your home - of all major brand appliances,
lawn and garden equipment, or heating and cooling systems,
no matter who made it, no matter who sold it!
For the replacement parts, accessories and
owner's manuals that you need to do-it-yourself.
For Sears professional installation of home appliances
and items like garage door openers and water heaters.
1-800-4-MY-HOME_
Anytime, day or night
(1-800-469-4663)
(U.S.A. and Canada)
www.sears.com
www.sears.ca
Our Home
For repair of carry-in products like vacuums, lawn equipment, and
electronics, call or go on-line for the nearest
Sears Parts and Repair Centre.
1-800-533-6937
www.sears.ca
To purchase a protection agreement (U.S.A.) or
maintenanceagreement (Canada)on a product serviced by Sears:
1-800-827-6655 (U.S.A.)
1-800-381-6665 (Canada)
Parapedirserviciodereparacion
a
domicilio,y paraordenarpiezas:
1-888-SU-HOGARsM
AuCanada
pourserviceenfran_ais:
1-800-LE-FOYERMc
(1-800-533-6937)
(1-888-784-6427)
www.sears.ca
C) Sears, Roebuck and Co.
(_' Registered Trademark / TMTrademark / sMService Mark of Sears, Roebuck and Co.
(_' Mama Registrada / TMMama de Fabrica / sMMama de Servicio de Sears, Roebuck and Co.
Mc Marque de commerce / MoMarque deposee de Sears, Roebuck and Co.
Sold by: Sears
Part No. SP6597
Canada
Inc., Toronto,
Form
Ontario,
No. SP6597-1
Canada
M5B
2B8
Printed
in China
05/06
LEA Y GUARDE ESTAS INSTRUCCIONES
IVlanualdel usuario
®
HUIViIDIFICADOR
PARA TODA LA CASA
Produccion de 8 galones con
lecturadigital
modelo 758.154080
PRECAUCION: Antes de utilizar este
• Seguridad
producto, lea este manual y siga
todas las normas de seguridad e
instrucciones de utilizacion.
• Ensamblaje
• Utilizacion
• Mantenimiento
• Piezas
Sears, Roebuck and Co., HoffmanEstates, IL 60179 U.S.A.
www.sears.com
No. de pieza SP6597
Impreso en China
GARANTiACOMPLETADE UN ANO PARAEL HUMIDIFICADORKENMORE_'_
Si cualquierpiezade estehumidificador
falla debidoa un defectodematerialo defabricacion
dentrodelplazodeunanoa partirde la fechadecompra,o siel motordel humidificador
falla
debidoa undefectodematerialo defabricacionduranteel segundoanoa partirdela fechade
compra,DEVUELVA
EL HUMIDIFICADOR
ALCENTRODEPIEZASY REPARACl0N
DESEARSMAs
CERCANOy serzi reparado sin ning_Jncargo. Esta garantia no incluye los filtros del
humidificador,queson piezasperecederasquesepuedendesgastarpor causadel uso normal
en menosdeun ann. Estagarantiale confierea ustedderechoslegalesespecificosy es posible
queustedtambientengaotros derechosquevarian deun estadoa otro.
Sears, Roebuckand Co., Dept. 817WA,HoffmanEstates, IL 60179
INSTRUCCIONESGENERALESDE SEGURIDAD
5. No ponga objetos extranos dentro del
humidificador.
Palabras de senal de seguridad
PELIGRO: Significa que si no se sigue la
informaci0n de seguridad, alguien resultara
lesionadogravementeo morir&
6. Nodeje queel humidificador se use como un
juguete. Esnecesarioprestar mucha atencion
cuando el humidificador sea usado por nifios
o cercade ellos.
7. No utilice nunca el humidificador mientras
alguna piezafalte o este daflada de cualquier
manera.
ADVERTENClA:Significa que si no se sigue la
informacion de seguridad,alguienpodriaresultar
lesionadogravementeo morir.
PREOAUCION:Significa que si no se sigue la
informacion de seguridad, alguien pudiera
resultar lesionado.
8. Para reducir el riesgo de peligro electrico o
danos al humidificador, no incline, sacuda ni
vuelque el humidificador mientras la unidad
este en marcha.
1. Parareducir el riesgo de peligro de incendioo
descargas electricas, enchufe el humidificador directamenteen un tomacorriente de
120 V C.A. Nouse cordones de extension.
9. Para reducir el riesgo de dar_os al
humidificador, desenchdelo cuando la base
este vacia o cuando el humidificador no este
2. Mantenga el cable electrico alejado de las
zonas de trafico. Para reducir el riesgo de
peligro de incendio, no ponga nunca el
cordon electrico debajode alfombras ni cerca
de salidas de calor, radiadores de calor,
estufas de cocina o calentadores.
en USO.
10. Parareducir el riesgo de descargas electricas
accidentales, no toque el cable de alimentacion ni los controles con las manos rnojadas.
11. Fijeseen la etiqueta de advertencia que se
muestra a continuacion.
3. Desenchufe siempre el humidificador antes
de trasladarlo, antes de limpiarlo o siempre
que no este en servicio.
4. Mantenga limpio el humidificador.
ADVERTENClA:
Parareducirel riesgode incendio,
descargas electricas o lesiones, desenchufe
siempreel humidificadorantesde Ilenarlo,hacerle
servicio de ajustesy reparacioneso limpiarlo.
indice
Conexion electrica ...................................... 21
Informacion de garantia ............................... 18
Instrucciones generales de seguridad .........18
Para ahorrarse una Ilamada de servicio .......19
Familiaricese con el humidificador .............. 19
Como funciona el humidificador ................. 20
Paso 3. Llenado con agua ........................... 22
Paso 4. UtilizaciOnde los controles .......23-24
Utilizacion del humidificador ...................24-25
Reemplazoy cuidado de los filtros .............. 26
Limpieza y mantenimiento ........................... 27
Resolucion de problemas .......................28-29
Piezas de repuesto .................................30-31
Paso 1. Preparacion y puesta en
marcha del hurnidificador ...................... 20
Paso 2. Instrucciones de ubicacion ............. 21
18
Para ahorrarse una Ilamada de servicio-Compruebe
funciona,
Io siguiente si el humidificador
1. _Esta el cable de alimentacion
un tomacorriente?
no
3. _,Esta el control de humedad ajustado a un
nivel Io suficientemente alto?
conectado a
4. _,Esta el gabinete ubicado en una superficie
nivelada?
2. gHay alimentaciOn electrica al tomacorriente?
Familiaricese con el humidificador -Conjunto del .
ventilador
Asa de la botella
Controles de
velocidad y
humedad
Conjunto de la <
carcasa
Botella
Base
Higrostato
(en el cordon de
alimentacion)
"- Filtro:
No. de repuesto
32-15508
758.154080
Descripcion
8 (30 litros)
Producci0n en galones/24 h
Capacidad de la botella
1,2 galones (4,5 litros)
Capacidad de la base
1,2 galones
1700 (158 m2)
Cobertura en pies cuadrados
Velocidades del ventilador
3
Velocidad automatica del ventilador
Si
32-15508
Filtro de repuesto
Si
Higrostato automatico
Si
Apagado automatico
Controles
Electr6nicos (pulsadores)
6
Pies de goma
Si
Catalogado por CUL
120 V C.A.
Voltaje
Frecuencia
60 Hz
Intensidad (alta velocidad)
1,2A
Potencia (alta velocidad)
81 W
Basada en una zona con aislamiento promedio y una altura de habitacion
de 2,44 m (8 pies).
19
Como funciona el humidificador
--
Su nuevo humidificador Kenmoreesta disenado
para satisfacer los requisitos de humedad del
hogar a traves del principio de la evaporaciondel
agua en el aire,
Luego, se expulsa
aire humidificado a
traves de la parte
superior
Unavezque elfiltro se satura,se haceentrar aire,
el cual pasa a traves del filtro y absorbe humedad Todala evaporacionocurre en el humidificador,por Io quetodos los residuos permanecen
en el filtro Este proceso natural de evaporacion
elimina practicamenteel polvo blanco,
[I aire
secoentra
a travesde
las
rejillas
ubicadas
en la
carcasa
PRECAUCION:
Parareducirel riesgo de lesiones,
incendio o danos al humidificador,utilice unicamente limpiadores recomendadosespecificamente para humidificadores,No utilice nunca
materialesinfiamables, combustibleso toxicos
para limpiarel humidificador,
Para reducir el riesgo de quemarse y de daflar el
humiditicador, no ponga nunca agua caliente en el
humidificador.
Paso 1.Preparaciony puesta en marchadel humidificadorUna vez que hayasacado el humidificador de la
caja de carton, quite todos los materiales de
empaquetamiento, Verifique que el filtro este
asentado apropiadamente (consulte la p_igina
26).
2O
Paso 2. Ubicacion y conexion electrica
Colocacion de la unidad
ADVERTENCIA: Para su propia seguridad, no
utilice el humidificador si alguna pieza esta danada
o falta.
El humidificador debe colocarse con la parte
trasera (el lado de salida del cable de alimentaci6n) y el lado izquierdo al menos a 5 cm (2
pulgadas) de la pared. El aire tiene que entrar a
traves de todas las rejillas ubicadas en el
conjunto de la carcasapara que el humidificador
funcione con la maxima eficiencia,
Selecci6n de una ubicaci6n
Coloqueel humidificador en una superficie plana
y nivelada,Tengacuidado adicional de nivelar la
unidad cuando la coloque sobre una alfombra,
Coloque el humidificador en el lugar donde se
necesite mas humedado donde se hagacircular
la mayor cantidad de aire a traves de la casa,
como por ejemplo cema de un retorno de aire
frio,
AI menos
a5 cm
El aire hL_medo(humedad) producido se dispersara por toda la casa, pero el areamas proxima a
la unidad tendra la humedad mas alta. Si la
unidad esta ubicada cerca de una ventana, es
posible que se forme condensacion en el vidrio
de la ventana. Si esto ocurre, se debe colocar la
unidad en otra ubicacion,
NOTA:Debidoaque elhumidificador expulsaaire
frio y hL_medo,Io mejor es dirigir el aire alejandolo del termostato y las salidasde aire caliente,
y posicionar el humidificador junto a una pared
interior, No debe colocarse la unidad en lugares
donde el aire frio procedente de las paredes
exteriores o el aire caliente procedente de una
salida de aire caliente sople directamente hacia
ella.
NOTA:Aseguresede que el higrostato, ubicado
aproximadamentea 10 cm (4 pulgadas)fuera del
cuerpo del humidificador,en el cordon de alimentacion, este libre de obstrucciones y alejado de
todas las salidas de aire caliente.
Conexion electrica ,
Si el enchufe no entra completamente en el
tomacorriente, invierta el enchufe. Si sigue sin
entrar, pongase en contacto con un eledricista
calificadopara que instaleel tomacorriente apropiado. Nocambie el enchufe de ningun modo.
Localiceel tomacorriente de pared de 120V C.A.
mas cercanoen la ubicacion deseada,prderiblementeen una paredinterior.Con el humidificador
en la ubicacion deseada,dirija el cordon electrico
de modo seguro paraque nadietropiece con el ni
desajuste el humidificador. Enchufe el cordon
electrico.
ADVERTENCIA: Para reducir el riesgo de peligro
de incendio o descargas electricas, el humidificador debe enchufarse en un tomacorriente de
120 V C.A. No utilice cordones de extension.
Para reducir el riesgo de descargas electricas,
este humidificador tiene un enchufe polarizado
(un terminal es mas ancho que el otro). Este
enchufe entrara de un solo modo en un tomacorriente polarizado.
21
Paso 3. Llenado con agua
Botella,
ADVERTENCIA:
Parareducir el riesgo de peligro
de incendio o descargaselectricas,no eche ni
derrame agua en el area de los controleso del
motor. Si los controles se mojan, deje que se
sequencompletamentey hagaque la unidadsea
revisadapot personaldeservicioautorizadoantes
de enchufarla.
Despues de que el humidificador este posicionado en el lugar donde vaya a utilizarse, habra
Ilegado el momento de Ilenarlo. La botella se
levantadiredamente hacia arriba y alejandosede
la base. Tengacuidado de no golpear ni danar el
conjunto de la valvula de Ilenado ubicada en la
parte inferior de la botella.
Base
Inviertalabotella. Oprimael boton del vastago de
lavalvula hacia el interior de la botella y girelo en
el sentido de las agujas del reloj para bloquear la
valvula en la posicion abierta. Coloque la botella
bajo una Ilave de agua. Llene la botella, teniendo
cuidado de no permitir que entren residuos en
ella. Los residuospueden interferir con el asiento
de la valvula. Una vez que la botella este Ilena,
oprima el boton del vastago de lavalvula y girelo
en sentido contrario al de las agujasdel reloj para
desbloquear lavalvula y cerrarla.
OPRIIVIA
taro registrado por EPA 32-14900, el cual se
puedeobteneren una tiendaminoristaSears.En
ningunacircunstanciadebeustedusar productos
I de
PRECAUCION:
Utilice
tratamientode
aguaL]nicamenteun
disenadosparabacterioshumidifi-
GIRE EN EL SENTIDO DE
LAS AGUJAS DEL RELOJ
Conjunto de la
valvula de resorte
cadoresde discode impulsoo ultrasonicos.
Coloquelabotella de aguade vueltaen la basedel
humidificador. Cuando este colocada correctamente, el embolo se abrira y el agua fluira al
interior de la base. La base albergara todo el
contenido de la botella de agua. Una vez que la
botella este vacfa, retirela y repita el proceso de
Ilenado. El humidificador esta ahora Ileno a su
maxima capacidad. Para beneficiarse de tener
que Ilenar el humidificador con menos ffecuencia, deje que el humidificador agote el aguatanto
de la botellacomo de la baseantes de Ilenarlo.
\
22
Paso 4. Utilizacion de los contro/esEl punto en el que ajuste los nivelesde humedad
deseados @pen@ de su nivel de confort
personal, latemperatura exteriory latemperatura
interior. Se recomienda un punto de ajuste inicial
de humedadAMBIENTEdel 30 al 40 por ciento,
pero puede haber condiciones que requieran un
ajustedistinto.
Cuandola
temperatura
exteriores:
-10° F
2° F
IO°F
20° F*
La humedad
relativa interior
recomendadaes:
-24°C
-18°0
-12°C
-6°0 *
2O%
25%
3O%
35%
* y superior.
IMPORTANTE: Si se empieza a formar condensacion se pueden producir danos en las ventanas o
en las paredes causados por agua. Debe bajarse el
punto de AJUSTE de la humedad hasta que ya no
se forme condensacion. Recomendamos que los
niveles de humedad ambiente no excedan el 50%.
Para utilizar los controles
Pantalla digital
Optima el boton de alimentacion una vez para
encender la unidad __. Inicialmente, hay una
ligera demora mientras los componentes electrOnicos se calibran. Dos barras (- -) aparecen
durante este tiempo. Unavez que la calibracion
se hayacompletado, se mostrara una lectura de
humedad AMBIENTEentre el 20 y el 95 por
ciento. Una visualizacion de un 20 que parpadea indica que la humedad ambiente es inferior
al 20%.
NOTA:Los ajustes preestablecidos en la puesta
en marcha inicial son la velocidad del ventilador
F1 (BAJA)y la humedad de AJUSTEdel 65%.
Despuesde que el usuario seleccionelos ajustes
deseados,dichos ajustespermaneceranmientras
la unidad se mantenga enchufada y no haya
interrupciones del suministro electrico. Si se
desenchufa la unidad, se emplean los ajustes
preestablecidosoriginales.
El ventilador del humidificador debe funcionar en la
puesta en marcha inicial. Si no funciona, consulte
"El ventilador no funciona (la pantalla digital esta
iluminada)" en la seccion "Resolucion de problemas" de la pagina 28 de este manual.
23
Botonesde
funciones
' Pantalla digital
Utflizacbn de los controles (continuacion)-Bot6n de velocidad
Control de humedad 0
Este humidificador esta equipado con un control
de ventilador de 3 velocidades. Inicialmente, al
oprimir el boron de velocidad se visualizara el
ajuste de velocidad actual. Cada pulsacion del
boton develocidad haceavanzarel modo a traves
de los ajustes de F3 (ALTA),F2 (INTERMEDIA),
F1 (BAJA)y A (AUTO).
Este boton le permite ajustar la humedad para
adaptarlaa sus necesidades.Estehumidificadorse
encendera y apagara ciclicamente de modo
automatico segun se requiera para mantener el
ajuste seleccionado.La lectura muestra tanto los
ajustes de porcentaje de humedad (%) real
(AIV]BIENTE)
como deseado(AJUSTE)cuandose
oprimeel boton de control de humedad.Lalectura
AMBIENTEtiene un intervalo del 20 al 95 por
ciento.Si el nivelde humedadambientees igual o
inferior al 20%, la pantalla mostrara un 20 que
parpadea.
La lectura del AJUSTEtiene un intervalo del 25 al
65 por ciento y se ajustaen incrementos de 5%.
AI oprimir inicialmente el boton de humedad, se
visualizara el ajuste de humedad actual. Cada
pulsacion adicional del boton aumenta el ajuste
en un 5%. Un punto de AJUSTEde 65% hace
funcionar continuamente el humidificador, independientemente de la lectura AIV]BIENTE El
higrostato que detecta las lecturas esta ubicado
en el cordon de alimentacion, AsegL]resede que
este libre de obstrucciones.
El ajuste seleccionado se muestra en la lectura
digital. Cuanto m_isalto seael ajuste,mas rapidamente se evaporara y liberara el agua al aire. F1
(BAJA) es el ajuste mas silencioso y se proporciona para condicionesqueno requieranunatasa
de evaporacionrapida. Cuando se seleccione A
(AUTO), el humidificador determinara la velocidad del ventilador que sea necesariapara Ilevar
la humedadambientereal a lahumedadajustada.
Botondevelocidad,,
'\
1
Botondehumedad
Utilizacbn del humidificador -Visualizacion de relleno
Para obtener el maximo tiempo de funcionamiento, se deben Ilenar tanto la botella como la
base. Cuando tanto la botella como la base se
vacfen, la lectura de humedad ambiente y "F"
(LLENAR) alternaran en la pantalla, informando
que se requiem agua adicional. Tambien en este
momento, la unidad cambiara automaticamente
al MODO DE RESECACIONy continuara funcionando a la velocidad mas baja hasta que el filtro
este seco.
Visualizacionderelleno /
Mododeresecaci6n
24
NOTA:
Durante
este
tiempo,
elnivel
dehumedad
Higrostato
ambiente
seguira
siendo
supervisado
yelhumidi-El higrostato ubicadoen elcordon de alimentacion
ficador
encendera
y apagar_J
ciclicamente
el detectael porcenta]ede humedadpresente en el
ventilador
hasta
queelfiltroestecompletamente
aire. Hace que el humidificador se encienda y
seco.
Elventilador
seapagara,
dejando
unhumi- apague ciclicamente para mantener el punto de
dificador
seco
queesmenos
propenso
alcreci- AJUSTEde humedad seleccionado.El ventilador
miento
demoho
y verdin.
Si nosedesea
el seencenderasi la lectura"AMBIENTE" desciende
IVIODO
DERESECAClON,
rellene
elhumidificador
un 3% por debajo del punto de AJUSTEy seguira
conagua
y elventilador
regresara
alavelocidadhaciendofuncionar el humidificador hastaque se
dea]uste.
Iogreuna lecturade un 1% por encima del punto
NOTA:
Elventilador
cambia
automaticamente
a de AJUSTE.El ventilador se apagarahastaque la
AMBIENTEdesciendade nuevoun 3% por
la velocidad
masba]adurante
el IV]ODO
DE lecwra
debajodel punto de AJUSTE.
RESECACION.
Indicadorde comprobaci6ndel filtro
La capacidad de cualquier humidificador para
suministrar eficientementehumedad depende en
gran medidadel estadodel filtro. A medidaque el
filtro se carga con impurezas,pierdegradualmente
su capacidadde mecha. Cuando esto ocurre, la
produccionde humedadsereducey el humidificador tienequetrabajarmas tiempo parasatisfacerel
a]uste seleccionado. Este humidificador tiene un
recordatorio de comprobaciondel filtro temporizado para aparecer despues de 720 horas de
funcionamiento. Cuando la pantalla muestre un
a]uste que alterna entre "CF" y "humedad
ambiente"a intervalosde 5 segundos,eso es un
recordatoriode comprobarel estadodelfiltro.
NOTA:Algunas zonastienen un alto contenido de
mineralesen el agua,Io cual causala necesidadde
hacercambios mas frecuentesdel filtro.
Consulte la seccion "Reemplazoy cuidado del
filtro" en la pagina26. Si es evidentequehay una
acumulacion de depositos o una descoloracion
intensa, reemplace el filtro para restablecer la
maximaeficiencia.
Bloqueo de los contreles
Para evitar una manipulacion indebida y no
deseada de los a]ustes del humidificador, se
pueden bloquear los controles.
Procedimiento de activacion
Despuesde que se hayan ajustado lasfunciones
del humidificador, mantenga oprimido el boton
de alimentacion durante 5 segundos. La pantalla
mostrara "CL" durante 2 segundos; suelte el
boton de alimentacion y el control reanudarala
visualizacion de la humedad ambiente. El
humidificador ambiental continuara funcionando
con los a]ustes bloqueados. Si se accionan los
botones mientras lafuncion "CL" este activa, se
visualizara "CL" en la pantalla y los a]ustes no
resultaranafectados.
Procedimiento de desactivaciOn
Para desactivar la funcion "CL", simplemente
oprima y mantengaoprimido el boron de alimentacion durante 5 segundos. "CL" parpadearacon
una frecuencia de 1 segundo encendido y 1
segundo apagado durante un periodo de 2
segundosy luego reanudaralavisualizacionde la
humedadambiente.
/
visualizaciondecomprobaciondel filtro
NOTA:Asegurese de que el higrostato ubicado
aproximadamentea 10 cm (4 pulgadas)fuera del
cuerpo del humidificador en el cordon de
alimentacion este libre de obstrucciones y este
alejadode todas las salidas de aire caliente.
25
Reemplazo y cuidado de los filtro -ADVERTENCIA:
Parareducir el riesgo de descargas electricaso lesionescausadaspor las piezas
moviles, desenchutesiempre el humidificador
antesde quitar o reemplazarcualquierpieza.
A_larre firmemente
e/conjunto
de la carcasa y
lev_intelo
-\
PREOAUCION:
Para ayudar a retardar el crecimiento de bacterias y mantener la maxima
eficiencia,se debe reemplazarel filtro al menos
una vezpor estacion,o mas a menudoen condiciones de agua dura. Use el filtro de repuesto
recomendadoKenmore32-15508.
Reemplace el filtro de mecha vaporizador al
menos unavez por temporadade humidificaciOn
o mas, dependiendode las condiciones del agua
de su zona.
_
Coloclue el
comlenzo y el
final del filtro
enrollado en el
centro de la base
Reemplazo del filtro
1. Desenchufeel humidificador. Antes de quitar
el filtro, recomendamostrasladar el humidificador a un lugar dondelos revestimientosdel
piso no esten propensos a suffir dafios por
causadel agua (por ejemplo,zonasde cocina
o de bafio.)
2. Quite la botella de agua y pOngalaa un lado.
Aseguresede no golpear nidafiar lavalvula de
Ilenado.
3. Agarre el conjunto de la carcasa, levantelo
directamente hacia arriba, alejandolo de la
base, y pongalo a un lado. Una vez hecho
esto, tendra accesoal filtro.
4. Fijeseen la posicion del filtro. Quite el filtro.
Puede que quiera limpiar la base en este
momento. Consulte la seccion "Limpieza del
humidificador" de este manual.
5. Instale un filtro nuevo (32-15508) en la base.
Enrolle el filtro y coloquelo entre los postes
ubicados en el fondo de la base.El comienzo
y el final del arrollamiento deben quedar
capturados en el centro de la base (vea el
diagrama) y el filtro debe estar descansando
en el piso de la base.
6. Retorne el conjunto de la carcasa a la parte
superior de labase.Coloquede nuevoel humidificadoren su posicion de funcionamiento.
7. Una vez hecho esto, el humidificador estara
listo para ser Ilenadocon el fin de utilizarlo.
26
_llnee la parte
inferior del conjunto
de la carcasa con
la parte superior
de la base y
reposicione la
unidad de modo
_ro
Limpieza y mantenimiento -NO]A:Quite el excesode agua
antesdelimpiar la unidad
ADVERTENCIA:
Parareducirelriesgode lesiones,
incendio o daflos al humidificador,utilice unicamente limpiadores recomendadosespecificamente para humidificadores.No utilice nunca
materialesinflamables, combustibleso toxicos
para limpiar el humidificador. Para reducir el
riesgo de quemarsey de danarel humidificador,
no ponganuncaaguacalienteen elhumidificador.
PREOAUCION:
La purezadel agua local variade
una zona a otra yen ciertas condiciones las
impurezascontenidasen el aguay las bacterias
suspendidasen el aire puedenfomentarel crecimiento de microorganismosen el deposito del
humidificador.
Para retardar el crecimiento de bacteriasque
_uedencausar olores y ser perjudicialespara la
salud, utilice LJnicamentefiltros de repuesto
Kenmore. Tambien recomendamos utilizar un
bacteriostatoaprobadopor la EPAy un limpiador
_ara humidificadores, los cuales se pueden
conseguiren sutiendaSearslocal.
Paso 1
Parafacilitar la limpieza,la basedel humidificador
debe estar vacia y completamente seca. Para
Iograr esto, utilice el metodo siguiente:
a. Dejequeel humidificador funcione hastaque
el mensajede RELLENAR"F" se ilumine y el
apagado automatico haya parado el ventilador del humidificador.
b. Desenchufeel humidificador.
ADVERTENCIA:
Parareducir el riesgo de @scargas electricas,desenchufesiempre el humidificador antes de limpiarlo o hacerleservicio de
ajustesy reparaciones.Si elhumidificadorno esta
desenchufado,el ventilador podria ponerse en
marchadespuesde quitar lacarcasa.
Paso 2
Para quitar piezas
Consultela seccion "Reemplazoy cuidado de los
filtro" en lapagina26.
NOTA:Es posible que at_nhayaun poco de agua
en la base.Vierta cuidadosamenteel agua para
sacarlade la baseo quitela con una esponja.
27
Paso 3
Mantenimiento cada dossemanas
Remocionde rostra
1. Llenela basedel humidificadorcon aguay
agrege una taza de 8 onzas de vinagre
blanco sin diluir. Deje que la solucion
permanezca en la base durante 20
minutos.
2. Limpietodas las superficiesinteriorescon
un cepillo blando. Humedezcaun patio
suavecon vinagreblancosin diluir y limpie
la basecon el paf_oparaquitar lacostra.
3. Enjuaguea rondo con agua templada y
limpia para quitar la costra y la solucion
limpiadora.
Desinfeccionde la base
1. Eche1,9 litros (1/2 galon) de agua y 1/2
cucharaditade blanqueadorde cloro en el
interior de la base. Deje que la solucion
permanezcaen la basedurante 20 minutos, agitandola cuidadosamente cada
pocos minutos.Moje todaslas superficies
que normalmenteestenexpuestasa agua.
2. Vacie la base despues de 20 minutos.
Enjuaguelacon agua hasta que el olor a
blanqueadorhaya desaparecido.Dejeque
la unidad sesequecompletamente.
NOTA:La botellade aguase debelimpiar de la
mismamaneraque labase.Enjuaguelaa rondo
con agua limpia despuesde completar todos
los pasos.
Mantenimiento de final de temporada
1. Sigalasinstruccionesde "Mantenimientocada
dos semanas" al final de la temporada de
humidificacion.
2. Quiteel filtro.
3. Dejequeel humidificadorse sequecompletamenteantesde guardarlo.
4. 6uarde el humidificador en un lugar fresco y
seco.
5. Instale un filtro nuevo en el humidificador
limpio antes de que comience la proxima
temporada.
NOTA:El procedimientode "Mantenimientocada
dos semanas"tambiense recomiendasi usted no
piensautilizarel humidificadorduranteunasemana
o mas.
Resolucion de problemas -Problema
Pantalladigital no iluminada.
El ventilador no funciona
(la pantalladigital esta iluminada).
Causa probable
Remedio
• No hay corriente electrica.
• Compruebela fuente de
alimentacion de 120 V.
• No se ha oprimido el boron
de alimentacion,
• Oprima una vez el boton de
alimentacion para encender
la unidad.
• El nivel de humedad AMBIENTE
• Subael nivel de AJUSTEde
humedad si Io desea.
no esta un 3% o mas por debajo
del nivel de AJUSTEde humedad.
• El deposito esta vacio.
• Aumente la velocidad del
ventilador.
• Llene el humidificador con agua.
El ventilador esta en marcha
continuamente.
• El nivel de AJUSTEde humedad
es de165%.
• El nivel de humedad AMBIENTE
no ha alcanzado un 1% o mas por
encima del nivel de AJUSTEde
humedad.
• Un porcentajede AJUSTEde
humedad de165% hace que el
ventilador funcione continuamente.
Gradueel nivel de AJUSTEentre
25% y 60%.
• Continue haciendofuncionar la
unidad hasta que se Iogre el nivel
de humedad deseado.Esto podria
tomar hasta 48 horas inicialmente.
Mala evaporacion de agua.
• El mensajede COMPROBAR
FILTROesta parpadeando,
• Acumulacion de minerales
en elfiltro,
• Cambie el filtro con un filtro
totalmente nuevo.
Nota: La purezadel agua local varia
de una zona aotra.
La botella sevacia completamente.
• Esto esnormal para
el Ilenado inicial,
• Rellenela botella para Iograr el
maximo tiempo de funcionamiento.
La botella contintJavaciandose
despues de Ilenarla completamente,
• Esta entrando aire en
la botella de agua.
• Compruebesi hay un escape
en la botella de agua.
La botella no se vacia.
• El conjunto de lavalvula de resorte
esta danado o falta un poste en el
rondo de la base.
• Compruebela orientacbn de la
botella. Reposicionelade modo
que la valvula de Ilenado ubicada
en la parte interior de la botella
este oprimida por el poste ubicado
en el fondo de la base.
• La base esta Ilena de agua.
• La base albergara el contenido de
la botella de agua (4,5 litros O
1,2 galones). Contint]e haciendo
funcionar el humidificador para
agotar el agua de la base.
28
Problema
Causa probable
Remedio
La visualizacion parpadea o el
ventilador se mueve ligersmente sl
enchufar el humidificador.
• Normal
• No se requiere tomar
ninguna medida.
El ventilador funciona mas
• El humidificador esta en el
• El humidificador cambia
despscio que Is velocidsd
registrada en la pantalls digital.
El humidificsdor no se apsgs
durante el "MODO DE
RESECACION".
"MODO DE RESECACION'.
• El filtro no esta seco.
sutomaticamente el ventilsdor s F1
(BAJA) cuando se visuslizsn "F' y
humedad smbiente alternante.
• Duranteel "MODO DE
RESECACION",el humidificador
continusra funcionando s velocidad
"BAJA" segtJnse requiera durante
hasta 2 horss o hasta que el filtro
este completamente seco.
Se visualizsn slternativsmente
"F' y Is humedad ambiente.
• El deposito esta vacio.
• Llene el humidificsdor con sgua.
Se visualizsn slternativsmente
"CF" y la humedsd smbiente.
• El filtro podris estar sucio.
• Reemplsceel filtro.
• DesenchufeIs unidsd durante 30
segundos y reenchdela pars
borrar la psntalls.
29
Piezas de repuesto ,
Lista de piezas del humidificador Kenmore
No. de modelo 758.154080
1\
.6
3O
Lista de piezas del humidificador Kenmore
No. de modelo 758.154080
Pidasiemprepornumerode pieza,no pornumerode clave
No. de
clave
No. de pieza
Descripcion
1
758.154080
Conjunto superior de la carcasa
(incluye todas las piezas 1 a 9)
2
32-15508
3
831188-1
Soporte del flotador
4
831189
Deposito del flotador
5
831187-1
Base
6
831190
Pie de goma
7
831199
Conjunto de la botella
8
831207
Tapade tornillo
9
SP6597
Manual del usuario (no mostrado)
i Filtro
Articulo de herrajes estandar. Se puedecomprar Iocalmente.
t Articulo de existencias. Se puede conseguir a traves del departamento
de ferreteria de la mayoria de lastiendas minoristas Sears.
• Todo intento de reparar el conjunto de los controles o el motor puede
crear un peligro, a menos que la reparaciOnsea realizada por un
tecnico de servicio calificado. El servicio de reparaciones esta
disponible en la tienda Sears m_iscercana.
31
Your Home
For repair - in your home - of all major brand appliances,
lawn and garden equipment, or heating and cooling systems,
no matter who made it, no matter who sold it!
For the replacement parts, accessories and
owner's manuals that you need to do-it-yourself.
For Sears professional installation of home appliances
and items like garage door openers and water heaters.
1-800-4-MY-HOME _'
Anytime, day or night
(1-800-469-4663)
www.sears.com
(U.S.A. and Canada)
www.sears.ca
Our Home
For repair of carry-in products like vacuums, lawn equipment,
and electronics, call or go on-line for the nearest
Sears Parts and Repair Center.
1-800-488-1222
Anytime, day or night (U.S.A. only)
www.sears.com
To purchase a protection agreement (U.S.A.) or
maintenance agreement (Canada) on a product serviced by Sears:
1-800-827-6655
Para pedir servicio
domicilio,
(U.S.A.)
de reparacion
y para ordenar
piezas:
1-888-SU-HOGAR sM
(1-888-784-6427)
1-800-361-6665
a
(Canada)
Au Canada pour service en fran£ais:
1-800-LE-FOYER
Mc
(1-800-533-6937)
www.sears.ca
@ Sears, Roebuck and Co.
® Registered Trademark / 7M Trademark / sMService Mark of Sears, Roebuck and Co
® Marca Registrada / TMMarca de Fabrica / s_ Marca de Servicio de Sears, Roebuck and Co
Mc Marque de commerce / MDMarque deposee de Sears, Roebuck and Co.
Part No. SP6597
Form No. SP6597-1
Printed in China 05/06