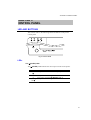
1
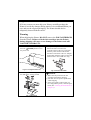
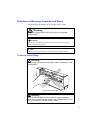
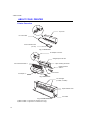
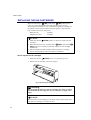
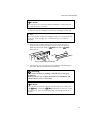
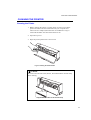
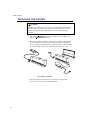
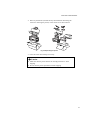
Brother Mobile Full Color Inkjet Printer MP-21C/CDX User’s Guide Please read this manual thoroughly before using the printer. Keep this manual in a convenient place for quick and easy reference at all times. Shipment of the Printer If for any reason you must ship your Printer, carefully package the Printer to avoid any damage during transit. It is recommended that you save and use the original packaging. The Printer should also be adequately insured with the carrier. Warning When shipping the Printer, DO NOT remove the INK CARTRIDGES from the Printer. Failure to fit the ink cartridges into the Printer during shipping will cause severe damage to the Printer and will VOID THE WARRANTY. 1 DO NOT remove the ink cartridges. (On/Off) button to turn Push the the printer off. 2 Turn your computer off and remove the Printer Interface Card from the computer. Remove the PC Card cable from the printer and from the Printer Interface Card. Remove the AC Adapter and Parallel Interface Cable if connected (MP-21CDX or PA-21MP user only). Fig. 0-1 Turning the Printer off 3 Pack the printer in the original carton box and tape it securely closed. Fig. 0-3 Repacking Fig. 0-2 Remove the Cable ! Caution • Make sure the printer has the ink cartridges fitted when shipping. • DO NOT turn the printer upside down while shipping. • If the print quality reduces after you have shipped the printer, clean the print head. (See ‘Cleaning the Print Head’ in Chapter 4) (For USA & CANADA Only) For technical and operational assistance, please call: In USA In Canada 1-877-284-3238 949-859-9700 Ext. 329 1-800-853-6660 514-685-6464 (outside California) (within California) (within Montreal) If you have comments or suggestions, please write us at: In USA In Canada Printer Customer Support Brother International Corporation 15 Musick Irvine, CA 92618 Brother International Corporation, Ltd. 1, Rue Hôtel De Ville Dollard-des-Ormeaux P.Q. Canada H9B3H6 BBS For downloading drivers from our Bulletin Board Service, call: In USA 1-888-298-3616 In Canada 1-514-685-2040 Please log on to our BBS with your first name, last name and a four digit number for your password. Our BBS supports modem speeds up to 14,400, 8 bits no parity, 1 stop bit. Fax-Back System Brother Customer Service has installed an easy to use Fax-Back System so you can get instant answers to common technical questions and product information for all Brother products. This is available 24 hours a day, 7 days a week. You can use the system to send the information to any fax machine, not just the one you are calling from. Please call 1-800-521-2846 (USA) or 1-800-681-9838 (Canada) and follow the voice prompts to receive faxed instructions on how to use the system and your index of Fax-Back subjects. DEALERS/SERVICE CENTERS (USA only) For the name of an authorized dealer or service center, call 1-800-284-4357. SERVICE CENTERS (Canada only) For service center address in Canada, call 1-800-853-6660 INTERNET ADDRESS For technical questions and downloading drivers:http://www.brother.com UJ5351001 Printed in Japan Mobile Full Color Inkjet Printer MP-21C/CDX USER’S GUIDE (For USA & CANADA Only) For technical and operational assistance, please call: In USA In CANADA 1-877-284-32387746 949-859-9700 Ext. 329 1-800-853-6660 514-685-6464 (outside California) (within California) (within Montreal) If you have comments or suggestions, please write us at: In USA In CANADA Printer Customer Support Brother International Corporation 15 Musick Irvine, CA 92718 Brother International Corporation (Canada), Ltd. - Marketing Dept. 1, rue Hôtel de Ville Dollard-des-Ormeaux, PQ, Canada H9B 3H6 BBS For downloading drivers from our Bulletin Board Service, call: In USA 1-888- 298-3616 In CANADA 1-514-685-2040 Please log on to our BBS with your first name, last name and a four digit number for your password. Our BBS supports modem speeds up to 14,400, 8 bits no parity, 1 stop bit. Fax-Back System Brother Customer Service has installed an easy to use Fax-Back System so you can get instant answers to common technical questions and product information for all Brother products. This is available 24 hours a day, 7 days a week. You can use the system to send the information to any fax machine, not just the one you are calling from. Please call 1-800-521-2846 (USA) or 1-800-681-9838 (Canada) and follow the voice prompts to receive faxed instructions on how to use the system and your index of Fax-Back subjects. DEALERS/SERVICE CENTERS (USA only) For the name of an authorized dealer or service center, call 1-800-284-4357. SERVICE CENTERS (Canada only) For service center addresses in Canada, call 1-800-853-6660 INTERNET ADDRESS For technical questions and downloading drivers: http://www.brother.com i Trademarks The brother logo is a registered trademark of Brother Industries, Ltd. Windows is a trademark of Microsoft Corporation. All other brand and product names mentioned in this User’s Guide are registered trademarks of their respective companies. Compilation and Publication Notice Under the supervision of Brother Industries Ltd., this manual has been compiled and published, covering the latest product’s descriptions and specifications. The contents of this manual and the specifications of this product are subject to change without notice. Brother reserves the right to make changes without notice in the specifications and materials contained herein and shall not be responsible for any damages (including consequential) caused by reliance on the materials presented, including but not limited to typographical and other errors relating to the publication. ©1998 Brother Industries Ltd. ii Definitions of Warnings, Cautions, and Notes The following conventions are used in this User’s Guide: Warning Indicates warnings that must be observed to prevent possible personal injury. ! Caution Indicates cautions that must be observed to use the printer properly or prevent damage to the printer. ✒ Note Indicates notes and useful tips to remember when using the printer. To Use the Printer Safely Warning DO NOT put your hands into the printer while it is printing to avoid causing injury. Fig. 0-1 Inside the Printer Warning Keep the ink cartridges away from children. If ink is swallowed, drink plenty of water. The ink contains no harmful substances, but if you are concerned you should consult a doctor. iii Warning Before cleaning the printer platen, be sure to turn off the (On/Off) button and make sure that all the LEDs are off. Remove the Printer Interface Card Cable and AC Adapter if connected (MP-21CDX or optional PA-21MP users only) from the printer. Warning DO NOT put your hands into the printer or move the carriage by hand. The printer may move the carriage by itself and cause injury. Warning DO NOT push the shutters in the ink cartridge slot with your fingers. There are sharp pins inside the Ink Cartridge Slot. If you touch them, it might cause injury. Printer Do's and Don't for Optimum Print Quality ! Caution DO NOT touch the nozzles and the print head. DO NOT move the print head by hand or remove the print head from the printer. ! Caution During thunderstorms, push the (On/Off) button to turn off the printer and make sure that all the LEDs are off. Remove the Printer Interface Card Cable and AC Adapter if connected (MP-21CDX or optional PA21MP users only ). ! Caution DO NOT turn off or suspend your PC while the printer LEDs are on or blinking. iv ! Caution DO NOT touch the flat cable and Ink Tube. Fig. 0-2 The Flat Cable and Ink Tube ! Caution Keep the printer on a flat surface. ! Caution DO NOT move or shake the printer while it is printing. ! Caution Do not disassemble the printer. ! Caution DO NOT remove the Printer Interface Card, PC card cable or AC Adapter if connected (MP-21CDX or optional PA-21MP users only) while the printer LEDs are on or blinking. ! Caution When you carry the printer in your car, put the printer in a protective bag or wrap the printer in a cloth. ! Caution When you carry the printer , put the printer in a plastic bag . v ! Caution If the printer get wet, wait until it dries out completely before attempting to print. ! Caution If you drop the printer, check that there are no broken parts. If you find some parts broken, consult your dealer or our authorized service representative. ✒ Note We recommend you select the status monitor ON when you use the printer. vi Printer Do's and Don't When Traveling ! Caution DO NOT leave the printer inside your car. ! Caution DO NOT shake or damage the printer. ! Caution When you carry the printer keep it upright. ! Caution When you travel by air, do not put the printer in your suitcase. Carry the printer onto the aircraft as hand baggage. ! Caution When you carry the printer, keep the ink cartridges installed. ✒ Note If you take the printer and AC adapter abroad, make sure that the power plug and the voltage requirements of the printer are correctly matched. ✒ Note It is recommended that you carry spare Brother Ink Cartridges when you travel with your printer. vii USER’S GUIDE TABLE OF CONTENTS CHAPTER 1 INTRODUCTION ABOUT THE GUIDEBOOKS 1-1 ABOUT YOUR PRINTER Printer Overview Features Operating and Storage Environment 1-2 1-2 1-3 1-4 CHAPTER 2 PAPER HANDLING PAPER SPECIFICATIONS 2-1 ABOUT BROTHER SPECIAL PAPER About Brother Special Coated Paper About Brother Special Glossy Paper 2-4 2-4 2-5 LOADING PAPER 2-6 How to Load Paper in the Paper Feeding Slot 2-6 How to Load Paper in the Straight Paper Path Slot 2-7 How to Load Envelopes in the Straight Paper Path Slot 2-8 How to Load Paper in the Auto Cut Sheet Feeder (MP-21CDX or optional SF-21MP users only) 2-9 CHAPTER 3 CONTROL PANEL LED AND BUTTONS LEDs Buttons 3-1 3-1 3-3 CHAPTER 4 MAINTENANCE viii CLEANING THE PRINT HEAD 4-1 REPLACING THE INK CARTRIDGES 4-2 CLEANING THE PRINTER 4-5 REPACKING THE PRINTER 4-6 TABLE OF CONTENTS CHAPTER 5 TROUBLE SHOOTING ALARM INDICATIONS AT A GLANCE Operator Calls Service Calls 5-1 5-1 5-2 PAPER JAMS How to clear paper jams 5-3 5-3 Q&A Setting Up the Printer Hardware Setting Up the Printer for Windows Paper Handling Printing Print Quality 5-5 5-5 5-6 5-7 5-8 5-9 APPENDIX PRINTER SPECIFICATIONS Printing Controller Electrical and Mechanical Print Media Appendix-1 Appendix-1 Appemdix-1 Appendix-2 Appendix-2 ix USER’S GUIDE IMPORTANT INFORMATION: REGULATIONS Federal Communications Commission (FCC) Declaration of Conformity (For U.S.A. only) Responsible Party: Brother International Corporation 100 Somerset Corporate Boulvard Bridgewater, NJ 08807-0911, USA TEL : (908) 704-1700 declares, that the products Product Name: Brother Mobile Inkjet Printer MP-21C/CDX, Printer Interface Card CI-100 AC Adapter AD-100MP, AD-200MP (for MP21CDX or optional PA-21MP user) complies with Part 15 of the FCC Rules. Operation is subject to the following two conditions: (1) This device may not cause harmful interference, and (2) this device must accept any interference received, including interference that may cause undesired operation. This equipment has been tested and found to comply with the limits for a Class B digital device, pursuant to Part 15 of the FCC Rules. These limits are designed to provide reasonable protection against harmful interference in a residential installation. This equipment generates, uses, and can radiate radio frequency energy and, if not installed and used in accordance with the instructions, may cause harmful interference to radio communications. However, there is no guarantee that interference will not occur in a particular installation. If this equipment does cause harmful interference to radio or television reception, which can be determined by turning the equipment off and on, the user is encouraged to try to correct the interference by one or more of the following measures: – Reorient or relocate the receiving antenna. – Increase the separation between the equipment and receiver. – Connect the equipment into an outlet on a circuit different from that to which the receiver is connected. – Consult the dealer or an experienced radio/TV technician for help. Important A shielded interface cable should be used in order to ensure compliance with the limits for a Class B digital device. Changes or modifications not expressly approved by Brother Industries, Ltd. could void the user’s authority to operate the equipment. x REGULATIONS Industry Canada Compliance Statement (For Canada only) This Class B digital apparatus complies with Canadian ICES-003. Cet appareil numérique de la classe B est conforme à la norme NMB-003 du Canada. Radio Interference (220-240 V model only) This printer complies with EN55022(CISPR Publication 22)/Class B. Before this product is used, ensure that you use a double-shielded interface cable with twisted-pair conductors and that is marked “IEEE1284 compliant”. The cable must not exceed 1.8 metres in length. IMPORTANT - For Your Safety When you use an AC Adapter with this printer, be sure to use only the Brother option part number AD-100MP(100V), or AD-200MP(200V) . Geräuschemission / Acoustic Noise Emission (For Germany Only) Lpa < 70 dB(A) DIN 45635-19-01-KL2 xi USER’S GUIDE IMPORTANT - Wiring Information (For U.K. only) If the power cord supplied with the AC Adapter (for MP-21CDX or option) is not suitable for your electrical outlet, remove the plug from the mains cord and fit an appropriate three pin plug. If the replacement plug is intended to take a fuse then fit the same fuse as the original. If a moulded plug is severed from the power cord then it should be destroyed because a plug with cut wires is dangerous if plugged into a live socket outlet. Do not leave it where a child might find it. In the event of replacing the plug fuse, fit a fuse approved by ASTA to BS1362 with the same rating as the original fuse. Always replace the fuse cover. Never use a plug with the cover omitted. WARNING - DO NOT CONNECT EITHER WIRE TO THE EARTH TERMINAL WHICH IS MARKED WITH THE LETTER ‘E’, BY THE EARTH SYMBOL OR COLOURED GREEN OR YELLOW. The wires in the mains cord are coloured in accordance with the following code: Blue: Brown: Neutral Live The colours of the wiring in the power lead of this AC Adapter may not correspond with the markings which identify the terminals in your plug. If you need to fit a different plug, proceed as follows. Remove a length of the cord outer sheath, taking care not to damage the coloured insulation of the wires inside. Cut each of the wires to the appropriate length. Remove a short section of the coloured insulation to expose the wires. The wire which is coloured blue must be connected to the terminal which is marked with the letter “N” or coloured black or blue. The wire which is coloured brown must be connected to the terminal which is marked with the letter “L” or coloured red or brown. The outer sheath of the cord must be secured inside the plug. The coloured wires should not hang out of the plug. xii REGULATIONS DECLARATION OF CONFORMITY (EUROPE) We, Brother International Europe Ltd., Brother House 1 Tame Street, Guide Bridge, Audenshaw, Manchester M34 5JE, UK. declare that this product is in conformity with the following normative documents: EMC: EN 55022 Class B, EN 50082-1 following the provisions of the Electromagnetic Compatibility Directive 89/336/EEC (as amended by 91/263/EEC and 92/31/EEC) and that the AC Adapter, as supplied with this system, conforms with EN 60950. This system also follows the provisions of the Low Voltage Directive 73/23/EEC. Issued by: Brother International Europe Ltd. European Technical Services Division xiii CHAPTER 1 INTRODUCTION CHAPTER 1 INTRODUCTION ABOUT THE GUIDEBOOKS You have two guidebooks for this printer. Read each guidebook in the following order: 1. Read the Quick Setup Guide to set up your printer and connect it to your computer. It also contains information about setting up your computer for your printer by installing the printer driver. 2. Read the Users Guide to obtain information about the following. CHAPTER 1 - Introduction CHAPTER 2 - Paper Handling CHAPTER 3 - Control Panel CHAPTER 4 - Maintenance CHAPTER 5 - Troubleshooting APPENDIX INDEX 1-1 USER’S GUIDE ABOUT YOUR PRINTER Printer Overview Top Cover PC Card Cable Printer Interface Card (CI-100) Fig. 1-1 Front View AC Adapter Connector Straight Paper Path Slot Paper Feeding Slot Guide Auto Cut Sheet Feeder -1 Parallel Interface Cable -2 Printer Stand AC Adapter -2 Fig. 1-2 Rear View Ink Cartridges (LC03BC, LC03MY) Paper Release Lever Print Head Fig. 1-3 Inside the Printer 1-(MP-21CDX or optional SF-21MP users only) 2-(MP-21CDX or optional PA-21MP users only) 1-2 CHAPTER 1 INTRODUCTION Features This printer has the following features: ❏ Small and Light InkJet Printer This printer weighs about 1kg (2.2 lbs.) and the footprint is very small. You can take the printer with you anywhere, any time you want. ❏ Lowest Power Consumption in the World Power consumption is so small (2.5-3.0 W: printing, 0.5 W: waiting ) that it is possible to take power from a Notebook PC through the Printer Interface Card. Even if you use the AC adapter (MP-21CDX or optional PA-21MP users only), it’s also easy to carry around. ❏ Quietest InkJet Printer in the World The printer is so quiet (less than 40dBA), that the printer never disturbs you while you are working. ❏ No need for an AC Adapter or Printer Cable The printer can take power from the Notebook PC through the Printer Interface Card. Therefore you do not have to carry an AC adapter and a printer cable with you all the time. ❏ Brilliant 4 Color Output at 720 dpi You can get wonderful output at 720 by 720 dpi resolution. When you print on Brother special coated paper and glossy paper, you can get excellent high resolution output. ❏ Two color print mode When you select this mode through the printer driver, you can print the color output in two colors. You can select Black/Cyan, Black/Magenta or Black/Yellow. ❏ Low Running Cost You don’t have to throw the print head of your printer away every time you have emptied an ink cartridge. When you run out of ink, you have to change only ink cartridges. ❏ Straight Paper Path The printer can print on various types of paper - plain paper, coated paper, glossy paper, transparencies, envelopes and organizers - with fewer paper jams. ❏ Auto Cut Sheet Feeder (MP-21CDX or SF-21MP users only) The Feeder is detachable.When using the Feeder, you can easily load up to 30 sheets of paper. When carried with the printer it fits on the bottom of the printer and the total size including the printer is about A4 size. ❏ AC Adapter and Parallel Interface Connector (MP-21CDX or PA21MP users only) When you want to print faster, use the AC Adapter. When you cannot print using the PC Card slot, use the Parallel Interface Cable and AC adapter instead. 1-3 USER’S GUIDE Operating and Storage Environment Please take note of the following before using the printer. Power Supply Use the printer within the specified power range. AC power: Frequency: ±10% of the rated power voltage 50/60 Hz (100-120V or 220-240 V) The power cord, including extensions, should not exceed 5 meters (16.5 feet). Do not share the same power circuit with other high-power appliances, particularly an air conditioner, copier, shredder, etc. If it is unavoidable that you must use the printer with these appliances, we recommend you use a voltage transformer or a high-frequency noise filter. Use a voltage regulator if the power source is not stable. Environment Use the printer only within the following ranges of temperature and humidity. Ambient temperature: 10°C to 35°C (50°F to 95°F) Ambient humidity: 20% to 80% (without condensation) Use the printer in a ventilated room. Place the printer on a flat, horizontal surface. Keep the printer clean. Do not place the printer in a dusty place. Do not place the printer where it is exposed to direct sunlight. Use a blind or a heavy curtain to protect the printer from direct sunlight when the printer is unavoidably set up near a window. Do not place the printer near devices that contain magnets or generate magnetic fields. Do not subject the printer to strong physical shocks or vibrations. Do not expose the printer to open flames or salty or corrosive gasses. Do not place objects on top of the printer. Do not place the printer near an air conditioner. Keep the printer horizontal when carrying it. If you have kept the printer in temperatures over 35°C or under 10°C for some time, place the printer in an environment where the temperature is between 10°C and 35°C for 30 minutes before using the printer. 1-4 CHAPTER 2 PAPER HANDLING CHAPTER 2 PAPER HANDLING PAPER SPECIFICATIONS The output quality of Inkjet printers depends on the paper type being used. Before you print, be sure to check the information below. ✒ Note It is recommended that you test paper, especially special sizes and types of paper, on this printer before purchasing large quantities. The printer can handle paper that has the following specifications. With this printer, you can print on plain paper, coated paper, transparencies, glossy paper and envelopes. Paper Type Paper Size Cut sheet A4, Letter, Executive, Legal (*1), B5 Coated Paper for 360 dpi printing A4, Letter, Executive, Coated Paper for 720 dpi printing Legal (*1), B5 Transparencies A4, Letter (*3) Glossy paper A4, Letter Envelopes DL, COM-10, Monarch, B5, C5 (*2) Organizer K, L Feeder Capacity (MP-21CDX or SF-21MP users only) 30 sheets of 75 g/m2 20 × × × × Paper Weight Range From Paper Support: 60 to 105 g/m 2 (16 to 28 lb.) From Straight Paper Path: 60 to 157 g/m 2 (16 to 42 lb.) 60 to 105 g/m 2 (16 to 28 lb.) Auto Cut Sheet Feeder: Paper Size User Defined: 100-216 x 100-356 mm (3.94-8.5 x 3.94-14 inches) *1 - Legal size paper can only be used in the Paper Feeding Slot and the Straight Paper Path Slot, it cannot be used in the Auto Cut Sheet Feeder. *2 - Envelopes can only be used in the Straight Paper Path Slot. *3 - After finishing printing a page, remove each sheet of paper. 2-1 USER’S GUIDE ✒ Note To get the best output quality and to avoid any damage, use Brother special coated paper and glossy paper. Quality Coated Paper for 360 dpi Color InkJet printing BP36CL (Letter), BP36CA (A4) High Quality Coated Paper for 720 dpi Color InkJet printing BP72CL (Letter), BP72CA (A4) Color InkJet Glossy Paper (Super Fine mode) BPGLL (Letter), BPGLA (A4) Recommended paper Cut sheet: Transparencies: ! Xerox 4200 (in USA) Xerox Premier 80g/m2 (in Europe) or equivalent 3M CG3460, 3M CG3410-BPTRL (in USA) 3M CG3460, 3M CG3410 (in Europe) Caution When you print on transparencies, it is possible to stain your hands or clothes if you touch the surface of the transparency immediately after it is printed out. We recommend you load transparencies from the paper feeding slot. Remarks Use a recommended type of paper, especially plain paper, for optimum printing. For more information on paper specifications, consult your nearest authorized sales representative or the place you purchased the printer. You cannot use transparencies designed for laser-based copier use. You can use recycled paper in this printer. ! Caution Before using any paper, make sure that it is not curled. If it is, you should straighten the paper as much as possible by rolling it in the opposite direction of the curl. Feeding curled or damaged paper may cause paper jams and mis-feeds. 2-2 CHAPTER 2 PAPER HANDLING Printable area The Printable area depends on the settings in your application. The figure below shows the physically printable area and non guaranteed print area of various paper types with this printer. Cut Sheet 3.4mm(0.13"):A4, A5 6.4mm(0.25"):Let, Leg 3.4mm(0.13"):A4, A5 6.4mm(0.25"):Let, Leg User Defined 6.4mm(0.25") 6.4mm(0.25") 3mm(0.12") 20mm(0.78") 3mm(0.12") 20mm(0.78") 11.5mm(0.45") 11.5mm(0.45") Envelopes 3.4mm(0.13") 3.4mm(0.13") 20mm(0.78") 20mm(0.78") Unprintable Area Non Guaranteed Print Area Fig. 2-1 Printable Area The following types of paper and envelopes are not recommended for use. • • • • • • • • • Damaged, curled, wrinkled, or irregularly shaped paper and envelopes Extremely shiny or highly textured paper and envelopes Envelopes with clasps Envelopes of baggy construction Envelopes not sharply creased Embossed envelopes Paper and envelopes already printed with a laser printer Envelopes pre-printed on the inside Paper and envelopes that cannot be arranged uniformly when placed in a pile 2-3 USER’S GUIDE ABOUT BROTHER SPECIAL PAPER ! Caution When you print on coated paper, transparencies and glossy paper, be sure to select the correct media in the ‘Quality/Color’ tab in the printer driver. About Brother Special Coated Paper We recommend you use Brother special coated paper, depending on the resolution you are using, for you to get the brilliant color output you expect. For Fine quality: Quality Coated Paper for 360 dpi Color InkJet printing NO. BP36CL BP36CA (letter) (A4) For Super Fine quality: High Quality Coated Paper for 720 dpi Color InkJet printing NO. BP72CL (letter) BP72CA (A4) These papers are manufactured specifically for this printer to provide optimum print quality. When using these papers please follow the notes below: • • • • • 2-4 There is a surfaced side and non-surfaced side to the paper, and it is specially coated only on the surfaced side. Therefore, when loading paper in the printer, make sure that the whiter side (the coated surface) is facing up. DO NOT touch the coated side of the paper, as it will absorb water and perspiration easily and might cause decreased output quality. Be sure to use the most suitable coated paper, according to the resolution you are using. If you do not use the most suitable paper you may not get good print output quality. When storing paper, keep it in the original bag and seal the bag. Make sure you keep the paper flat. Keep paper away from moisture and out of the direct rays of the sun. Printing resolution (Set from the printer driver): Select Normal mode for 360 dpi printing Select Super Fine mode for 720 dpi printing CHAPTER 2 PAPER HANDLING About Brother Special Glossy Paper When you print on glossy paper, you can get a very clear and crisp output. We recommend you use Brother special glossy paper for you to get the best output, as the paper is especially designed to be used for Brother Inkjet printing. For 720 dpi: Color InkJet Glossy Paper NO BPGLL BPGLA (letter) (A4) • DO NOT touch the surface of the glossy paper, as water or perspiration will stain the surface. DO NOT touch the printing side of the paper. • You should use the glossy paper in normal office environmental conditions: Temperature: 1525°C (5977°F) Humidity: 40 60% • After finishing printing a page, remove each sheet of paper immediately and place it face up on a flat surface until it is completely dry. DO NOT place anything on the printed side of the paper. • When storing a stack of printed glossy paper, place a sheet of paper between each sheet of printed glossy paper. • Printing resolution (Set from the printer driver): Super Fine mode 2-5 USER’S GUIDE LOADING PAPER How to Load Paper in the Paper Feeding Slot 1. Open the Paper Feeding Slot Guide. Fig. 2-2 Open the Paper Feeding Slot Guide 2. Make sure that the (On/Off) LED is on. Take a sheet of paper and insert it into the Paper Feeding Slot. Be sure to insert the paper to the right hand side of the Paper Feeding Slot Guide looking at the printer from the front. Fig. 2-3 Loading Paper ✒ Note • About 2 seconds after you insert the paper, the printer feeds the paper and then reverse feeds the paper a little, the printer is now ready to print. • Hold the paper until the printer picks up the paper correctly. • If the paper does not load straight, open the top cover and pull the release lever. Pull the paper out, close the top cover and try again . • When you print on transparencies, remove each sheet immediately after it is printed out. 2-6 CHAPTER 2 PAPER HANDLING How to Load Paper in the Straight Paper Path Slot Make sure that the (On/Off) LED is on. Take a sheet of paper and insert it into the Straight Paper Path Slot. Be sure to insert the paper to the right hand side of the Paper Feeding Slot Guide looking at the printer from the front. Be sure to adjust the paper to the mark below. 1. Fig. 2-4 Loading Paper in the Straight Paper Path Slot ! Caution • Make sure you insert paper into the Paper Feeding Slot straight so that the paper does not skew. • Be sure to adjust the paper setting in the printer driver. • Load thick paper and envelopes from the straight paper path slot. • When the printer is in Auto-Power off mode, the paper will be ejected automatically. Turn the printer on and load the paper again. 2-7 USER’S GUIDE How to Load Envelopes in the Straight Paper Path Slot 1. Take an envelope and insert it into the Straight Paper Path slot. Be sure to adjust the paper to the mark below. Fig. 2-5 Loading Envelopes ✒ Note • When you load envelopes, insert the envelope carefully so that it won't skew. • Do not print on the rear of envelopes. If you do, it might damage the printer. • When loading envelopes, load them with the print side face up. • When you print on envelopes, be sure to load them with the short edge downwards with the flap to the left hand side when you view the printer from the front. • When an envelope is curled, straighten it before printing. Fig. 2-6 Straighten the Envelopes • Fold the flap securely with a pen or with your finger before loading envelopes. • Make sure that the amount of curl of the envelope is less than 5 mm when you load envelopes. Curl at the edge of envelopes must be less than 1 mm. If you print on these envelopes, it might damage the printer. Fig. 2-7 Fold the flap 5mm(0.195") Fig. 2-8 curl height 2-8 1mm Curl at the edge CHAPTER 2 PAPER HANDLING How to Load Paper in the Auto Cut Sheet Feeder (MP-21CDX or optional SF-21MP users only) 1. Make sure that the Latches on both sides of the Auto Cut Sheet Feeder are closed. 2. Fit the Auto Cut Sheet Feeder onto the printer. Push the latches securely until you hear them click into the lock position. Fig. 2-9 Fit the Auto Cut Sheet Feeder onto the Printer 3. Tilt the Auto Cut Sheet Feeder fully (1). Press the center of the Feeder cover a little and open the Feeder Cover(2). Fig. 2-10 Tilt the Feeder and Open the Cover 2-9 USER’S GUIDE 4. Pull the wire up. Fig. 2-11 Pull the Wire up 5. Fan the stack of paper before loading. 6. Load the paper stack with the printing (coated) side upwards. Align the right side of the paper against the right hand side of the Auto Cut Sheet Feeder. Make sure that the paper is stacked below the mark. You can load up to approx. 30 sheets of plain paper (75g / m2). 7. Adjust the Paper Guide to the left hand side of the paper and close the Feeder Cover. Fig. 2-12 Loading Paper ✒ Note When you install the Feeder onto the printer, make sure that the Feeder is straight. 2-10 CHAPTER 2 PAPER HANDLING ! Caution • You can load glossy paper only from the Paper Feeding Slot or from the Straight Paper Path Slot. • When you load glossy paper, load only one sheet at a time. • Make sure the paper loaded in the Feeder is all the same type. • When adding paper, first remove any remaining paper from the Feeder and stack it with the new paper, then insert the new paper stack into the Feeder. • Be sure to adjust the paper setting in the printer driver. • Do not tilt the printer forwards. • When you carry the printer, move the printer and Feeder carefully as shown below. Do not hold only the Feeder when carrying the printer. Do not turn the printer upside down. Be sure to set the Printer Stand in the original position before removing the Feeder. Fig. 2-13 The Printer and the Auto Cut Sheet Feeder ✒ Note If the paper will not load from the Feeder, use the Paper Feeding Slot and try again. Ensure that the latches are connected securely and tilt the Feeder fully. 2-11 USER’S GUIDE How to Remove the Auto Cut Sheet Feeder from the Printer 1. Open the Feeder Cover and remove the paper. 2. Move the Paper Guide to the left. 3. Fold the wire back in the Auto Cut Sheet Feeder, and close the Feeder Cover and then tilt the Feeder forwards. ! Caution Ensure you move the Paper Guide to the left, otherwise it will cause damage to the Auto Cut Sheet Feeder. 4. Open the Latches(①) on the rear of the Cut Sheet Feeder by them forwards and push the Latches(②) on both sides inwards into the sheet feeder. Remove the Auto Cut Sheet Feeder from the Printer. Fig. 2-14 Latches 5. Set the Latches on both sides of the Cut Sheet Feeder to the normal position. Fig. 2-15 Latches ! Caution Treat the Latches carefully so that they do not break. 2-12 CHAPTER 3 CONTROL PANEL CHAPTER 3 CONTROL PANEL LED AND BUTTONS This section refers to the following LEDs and buttons on the printer control panel. Fig. 3-1 Control Panel LEDs The (On/Off) LED The (On/Off) LED indicates the current power status of the printer. LED On ● Off ❍ Blinking ❍↔● Printer status The printer is turned on and ready to print. The printer is turned off. (Alarm) LED on. Error status with the The printer is receiving data. 3-1 USER’S GUIDE Ink LEDs ( (BC) LED and (MY) LED) Each Cartridge LED indicates when the ink is low or empty. LED Blinking ❍↔● On ● Printer status The color ink cartridge is running out of ink. You should prepare a new ink cartridge for that color. The color ink cartridge is empty. You should replace it with a new one immediately for optimum print quality. See ‘Replacing the Ink Cartridges’ section in Chapter 4. This may also indicate that one or more ink cartridges may not be installed correctly or there is no cartridge installed if the (Alarm) LED is on. (Alarm) LED (Alarm) LED indicates a printer error status. The LED On ● Blinking ❍↔● Printer status Paper empty, paper jam or mis-feeding. If a paper jam occurs, refer to ‘Paper Jams’ in Chapter 5. There is no ink cartridge installed or the ink cartridge(s) is not installed correctly when an ink LED(s) is also on. The top cover of the printer is open and should be closed so that the printer can print. (Alarm) LED is on or blinking and the printer has detected When the an error condition, refer to the ‘Alarm Indications at a Glance’ section in Chapter 5 and clear the problem to make the printer ready to print. When LED+ (On/Off) LED+ (Alarm) LED and Ink LEDs ( (MY) LED) Blink in Turn (BC) • The printer is making itself ready to print. • The printer is cleaning the print head. When All the LEDs Blink at the Same Time System error occurred. Refer to the ‘Service Calls’ section in Chapter 5. 3-2 CHAPTER 3 CONTROL PANEL Buttons The (On/Off) Button (Retry) When you press this button and the printer becomes ready to operate. When you press this button and the printer is turned off. (On/Off) LED comes on, the (On/Off) LED goes off, the (Alarm) LED is on and the (On/Off) LED is off, When the pressing this button will resume printing and the mis-feed will be cleared. Make sure that the (On/Off) LED comes on after you press this button. Clean Button When you want to clean the print head, press this button. Warning Even if you turn the (On/Off) button off, power is not completely shut off. In case of emergencies, you must remove the Printer Interface Card from the computer and remove the AC Adapter from the mains if connected (MP-21CDX or PA-21MP users only) in order to shut off power completely. 3-3 CHAPTER 4 MAINTENANCE CHAPTER 4 MAINTENANCE CLEANING THE PRINT HEAD Clean the print head if you get white lines in text or graphics on your printed document. You can clean the 4 color (black, cyan, yellow, magenta) print heads by control panel button operation. ✒ Note When the printer is performing print head cleaning, all the LEDs blink alternately. How to clean the print head Press the Clean button and the printer cleans the print head automatically. Wait until all the LEDs stop blinking. ! Caution Do not remove cables when the printer is cleaning its print head. ✒ Note You can also clean the print head from the printer driver. Select ‘Maintenance’ from the ‘MP-21C series’ group in Windows. Automatic Periodical Cleaning This printer carries out Automatic Periodical Cleaning to ensure that the printer maintains optimum print quality at all times. This setting will use ink during the cleaning sequences. If you want to only clean the print head by manually selecting cleaning, you can turn this setting off through the printer driver. This setting will save ink but you will need to clean the print head manually when necessary. To turn the setting to off, select 'Maintenance' from the MP-21C series group in Windows. ✒ Note When you carry out cleaning 3 times within one hour by using the printer clean button, the third clean will become a 'Power Clean'. 4-1 USER’S GUIDE REPLACING THE INK CARTRIDGES (BC) LED and/or (MY) LED) blink or When the Ink LED(s) ( come on, replace the indicated color ink cartridge with a new one. We strongly recommend you only use Brother original ink cartridges for the printer as these will provide the best print quality. Using other ink may void the warranty for this printer. Black & Cyan Magenta & Yellow ! LC03BC LC03MY Caution • Make sure that the (On/Off) LED is on when you replace the ink cartridges. (BC) LED and/or • When the ink has run out, the Ink LED(s) ( (MY) LED) turn on. When you find this, replace the ink cartridges immediately. • DO NOT replace the Ink Cartridges while the printer is working. • Use the ink cartridge up within 6 months of installation. How to replace the ink cartridges 1. Make sure that the (On/Off) LED is on. Open the top cover. 2. Remove the ink cartridge you need to replace. Fig. 4-1 Removing the Cartridge Warning DO NOT push the shutters in the ink cartridge slot. There are sharp pins inside the Ink Cartridge Slot. If you touch them, it might cause injury. ! Caution DO NOT remove ink cartridges if you do not need to replace them. Once you remove a cartridge, you cannot re-use it. 4-2 CHAPTER 4 MAINTENANCE ! Caution Throw away the removed ink cartridges immediately so that you do not re-install the old one by mistake. 3. Open the new ink cartridge box and take the cartridge out of the bag. ✒ Note You can recognize whether the cartridge is used or new by the white gum on the rear of the cartridge. If it is stained with ink, it is a used ink cartridge. 4. Insert the new cartridge, making sure to insert it into the correct position. Push it in until you hear a click as it locks into position. (BC) LED and/or (MY) Make sure that the Ink LED(s) ( LED) turn off. Fig. 4-2 Install a New Ink Cartridge 5. Close the top cover. The printer will automatically start cleaning the print head. Wait until all the LEDs stop blinking. Warning If ink stains your body or clothing, wash with soap or detergent immediately. If ink gets in your eyes, irrigate them with water immediately and consult a doctor if you are concerned. ! Caution Once you have installed the cartridge, DO NOT take it out until the Ink (BC) LED and/or (MY) LED) blinks or comes on or until LED( the ink runs out. Once you have removed an ink cartridge, DO NOT reinstall it. 4-3 USER’S GUIDE ! Caution Once you install an ink cartridge, use it up within 6 months. Use ink cartridges within 2 years of the production date. ! Caution DO NOT remove the Ink Cartridges when the printer is off. If you have replaced ink cartridges while the printer is turned off, reset the ink counter from the maintenance tool in the printer driver. If you do not reset the counter the inside of the printer or the printouts may get stained with ink. ! Caution Be sure to replace ink cartridges when the printer indicates ink empty or nearly empty. ! Caution DO NOT shake the ink cartridges. ! Caution DO NOT leave the printer with empty ink cartridges or with the ink cartridges removed. ! Caution DO NOT re-use ink cartridges you have removed from the printer. ✒ Note (BC) LED and/or (MY) LED) and the If either of the Ink LEDs ( (Alarm) LED is on after you have installed the ink cartridges, check that the ink cartridges are installed correctly. ✒ Note Every 5 days, the printer will clean its print head automatically when you send the first print job. 4-4 CHAPTER 4 MAINTENANCE CLEANING THE PRINTER Cleaning the Printer 1. Before cleaning the printer or printer platen, be sure to turn off the printer and remove the PC Card Cable from your computer and remove the AC Adapter (MP-21CDX or PA-21MP users only) if connected and make sure that all the LEDs are off. 2. Open the top cover. 3. Wipe the printer platen with a cotton swab. Fig. 4-3 Cleaning the Printer Platen ! Caution DO NOT touch the Flat Cable, Rollers, Print Head and the Encoder Strip when cleaning. Fig.4-4 The Flat Cable and the Encoder Strip 4-5 USER’S GUIDE REPACKING THE PRINTER ! Caution Whenever you transport the printer, use the packing materials which are provided with your printer. Also, follow the steps below to repack the printer, or the printer may be damaged. This will void the printer’s warranty. 1. Turn off the (On/Off) button and turn the printer off. Make sure that the (On/Off) LED is off. 2. Remove the Printer Interface Card from your computer. Remove the PC Card Cable from the printer and Printer Interface Card. Remove the AC Adapter, Parallel Interface Cable and Auto Cut Sheet Feeder if connected.(MP-21CDX, PA-21MP and SF-21MP users only) Fig. 4-5 Remove the Cable 3. Wrap the printer in the plastic bag and place it in the original carton box with the original packing material. 4-6 CHAPTER 4 MAINTENANCE 4. Place any documents (manual and any documentation describing the reason for returning the printer) in the carton box as shown below. Fig. 4-6 Repacking the printer 5. Close the carton box and tape it securely. ! Caution • Make sure that the printer has the ink cartridges fitted to it when • shipping. Do not turn the printer upside down while shipping. 4-7 CHAPTER 5 TROUBLESHOOTING CHAPTER 5 TROUBLE SHOOTING ALARM INDICATIONS AT A GLANCE Operator Calls If a recoverable error occurs, the printer indicates an ‘operator call’ by (Alarm) LED. blinking or turning on the Find the error and take the appropriate action to correct it. The printer automatically recovers from most errors, but you may need to reset the printer with the button as described below. LEDs (Alarm) ● (On/Off) ❍ Error Paper jam Action Clear the paper jam by referring to the next section “PAPER JAMS”. Paper empty Mis-feed Load paper in the printer by referring to Chapter 2. Reinstall the paper. When using the Auto Cut Sheet Feeder (MP-21CDX or SF-21MP users only), press (On/Off) button after reinstalling the paper the stack into the Feeder. The Top Cover of the printer is open. Close it to resume printing. (Alarm) ❍↔● Cover Open (On/Off) ● No Cartridge (Alarm) ● Ink ● ( (BC) and/or (MY)) Ink ● ( Ink Empty Replace the ink cartridge with a new one. Ink Nearly Empty Indicates that the indicated ink cartridge will run out soon. You should purchase a new ink cartridge ready for when Ink Empty is indicated. Service call See the Service Calls section on the next page. (BC) and/or (MY)) Ink ❍↔● ( One or more ink cartridges are not installed correctly or are missing. (BC) and/or (MY)) All ❍↔● ✒ Note If the printer does not operate as you expect it to, it is recommended that you unplug the printer, then plug it in and try printing again. If you still have problems, consult your dealer or our authorized service representative before returning this product. 5-1 USER’S GUIDE Service Calls If an unrecoverable error occurs, the printer indicates the need for a service call by lighting all the LEDs and then the following combination of lamps alternately: Service Call (On/Off) (Alarm) (BC) Service 1 ❍ ❍ ❍ Service 2 ❍ ❍ ● Service 3 ❍ ❍ ● Service 4 ❍ ● ❍ (MY) ● ❍ ● ❍ (BC) Service 5 ❍ ● ❍ Service 6 ❍ ● ● Service 7 ❍ ● ● Service 8 ● ❍ ❍ (MY) ● ❍ ● ❍ (BC) Service 9 ● ❍ ❍ Service 10 ● ❍ ● Service 11 ● ❍ ● Service 12 ● ● ❍ (MY) ● ❍ ● ❍ (BC) Service 13 ● ● ❍ Service 14 ● ● ● ● ON (MY) ● ❍ ❍ OFF Service Call (On/Off) (Alarm) Service Call (On/Off) (Alarm) Service Call (On/Off) (Alarm) If you see any of these service call indications, turn the button off and on and then try to print again. (On/Off) If you cannot clear the error and see the same service call indication after turning on the printer, make sure that the status monitor of the printer is on and consult your dealer or our authorized service representative. Report the error status and situation referring to the table above. 5-2 CHAPTER 5 TROUBLESHOOTING PAPER JAMS How to clear paper jams 1. Open the Top Cover and pull the Release Lever. Fig. 5-1 Pulling the Release Lever 2. Pull out the jammed paper carefully with the top cover open. Fig. 5-2 Pulling the Jammed Paper Out 3. Push back the Release Lever and close the Top Cover. ✒ Note • When the printer platen gets stained, clean the platen referring to the ‘Cleaning the Printer’ section in Chapter 4. • Ensure you leave the top cover open when you are removing jammed paper. 5-3 USER’S GUIDE How to clear a paper jam when using the Auto Cut Sheet Feeder (MP-21CDX or SF-21MP users only) If a paper jam occurs when you are using the Feeder, try to remove the jammed paper as shown in ‘How to clear paper jams’ section of this chapter. If you cannot remove it, even after following the instructions, do the following. 1. Open the top cover and pull the Release Lever. 2. Tilt the Auto Cut Sheet Feeder forwards. 3. Pull the jammed paper from the Feeder side. Fig. 5-3 Pulling the Jammed Paper Out 4. Tilt the Feeder back. 5. Push back the Release Lever and close the top cover. 5-4 CHAPTER 5 TROUBLESHOOTING Q&A This section contains commonly asked questions and the answers concerning your printer. If you have encountered a problem, try to find the question relating to your problem and take the steps recommended to correct the problem. Setting Up the Printer Hardware Question The printer does not work. All LEDs are off. The printer does not print. Recommendation The printer may not be turned on. Check to see if the AC adapter (MP-21CDX or PA-21MP users only) is plugged into a live power source or the Printer Interface Card is connected to the computer and the (On/Off) button is on. Check that both ends of the PC Card Cable are connected securely to the printer and your PC/ Printer interface Card. Check the following: • The printer is turned on. • The (On/Off) LED is on. • All of the protective parts have been removed. • The top cover of the printer is closed. • The ink cartridges are installed properly. (BC) LED and/or (MY) • The Ink LEDs ( LED) are not on. If one or more are on, replace the ink cartridge(s). • The Printer Interface Card and the cable is securely connected between the printer and computer or the printer is connected to the AC Adapter and parallel Interface Cable. • The (Alarm) LED is off. If the (Alarm) LED is blinking or on, refer to the Operator Call section of this manual. • In Windows, the MP-21C/CDX printer is selected in the printer settings in your application. • The host is configured correctly: check printer port, print manager etc. (clear stored job or ‘use print manager’ is selected off) • Printer port you select is the correct one for using the Printer Interface Card or Parallel Interface Connector. Try cleaning the print head. 5-5 USER’S GUIDE Setting Up the Printer for Windows Question I cannot print from my application software. I cannot print the entire page. Computer indicates a device time-out. Computer indicates Paper Empty. Computer indicates Off Line. Computer indicates Power Off. Computer indicates an error message other than above. 5-6 Recommendation Make sure the supplied Windows printer driver is installed correctly and selected in your application software. Check to see if the size of paper in the feeder is the same as the one that you have selected in your application or the printer driver • If the (Alarm) LED is blinking, clear it referring to the ‘Alarm Indications at a Glance’ section in this chapter and try to print again. • If the (Alarm) LED is off, wait a short while and then click on the Retry button on the PC screen dialog box. • If the (On/Off) LED is blinking, press the cancel button on your PC and retry printing. • If all the LEDs are blinking alternately, the printer is cleaning its print head. Wait until they stop blinking. Check to see if the (On/Off) LED is on. Paper is empty. Load paper and press the (On/Off) button if the (Alarm) LED is on with the (On/Off) LED blinking to recover from the error status.. Press the (On/Off) button to make the printer ready. Check the (On/Off) LED is on. Check if the printer is securely plugged into the AC outlet or the Printer Interface Card is connected to the computer and the (On/Off) LED is on. Check the following; • The printer is connected directly to the computer. • The computer is set to work in bi-directional mode. • The printer port is correct. • Selection of the printer is correct. • Recommended interface cable is being used. • If the printer port is set as an ECP port, change it to be a bi-directional port. See your PC’s manual for how to change the printer port. CHAPTER 5 TROUBLESHOOTING Paper Handling Question The printer does not load paper. How can I load envelopes? What paper can I use? How can I clear paper jams? The printer loads more than one sheet at a time when using the Auto Cut Sheet Feeder (MP-21CDX or optional SF21MP users only). The printer doesn’t eject paper. Paper loads skewed when using the Auto Cut Sheet Feeder (MP-21CDX or optional SF-21MP users only). Mis-picking up paper when using the Feeder. Recommendation • When you feed paper from the Paper Feeding Slot, make sure to push the paper fully down into the slot with the paper straight. (For MP-21CDX and optional SF-21MP users only) • Check to see if the (Alarm) LED is on. If so, the Auto Cut Sheet Feeder may be out of paper or not properly installed. If it is empty, load a new stack of paper into the feeder. • Check to see if the paper loaded meets the specification of the paper described in Chapter 2. • If there is paper in the Auto Cut Sheet Feeder, make sure that it is straight. If the paper is curled, you should straighten it before printing. Sometimes it is helpful to remove the paper, turn the stack over and replace it in the paper tray. • Reduce the stack of paper in the Auto Cut Sheet Feeder, then try again. You can load envelopes from the Straight Paper Path Slot. Your application software also must be set up correctly to print on the envelope size you are using. This is usually done in the page setup or document setup menu of your software. Refer to your applications manual for further information. See Chapter 2 for details. You can use plain paper, coated paper, glossy paper, envelopes and transparencies. For information on loading paper, see “Paper Handling” in Chapter 2. See the “PAPER JAMS”section in this chapter. Check to see if: • The paper loaded is all the same type. • Paper that meets the specifications is loaded. • Papers were fanned before loading. • The stack of paper is not too high. • The side guide is not set too tight. Turn the printer off and on. Check the following; • The side guide is adjusted correctly. • The amount of paper you have loaded is correct. Refer to ‘Paper Handling’ section in Chapter 2. Check to see if : • The Feeder is installed correctly. • The Feeder has been tilted backwards. For details, see Chapter 2. 5-7 USER’S GUIDE Printing Question The printer prints unexpectedly or it prints incorrect images. The computer hangs up when the printer starts printing, or an application error occurs. My headers or footers appear when I view my document on screen but do not show up when I print them. Printing takes too long. The printer doesn’t print in color. The printer will not turn on again or is unable to print after the PC goes into sleep mode (Suspend or Hibernation) when using Windows 3.1x. 5-8 Recommendation • Cancel the print job from your computer. Then, turn the printer off and on. • Make sure your application software is correctly set up to use this printer and check the printer driver settings or printer settings in your application software. • If the printer port is set as an ECP port, change it to be a bi-directional port. See your PC’s manual for how to change the printer port. Check to see if the system resources are enough (PC memory, etc). When you have many applications open, the system resources of your PC will not be enough and your PC will hang up. Close applications you are not using and try again. Most Inkjet printers have a restricted area that cannot be printed on. Adjust the top and bottom margins in your document to allow for this. Check by using the preview screen in the application. • When you print color graphic images, there is a large amount of data and the printer will take a relatively long time to complete printing. • When all the LEDs are blinking alternately, the printer is making itself ready to print. Wait till the (On/Off) LED comes on. Printing speed depends on the memory size and performance of your PC. • Super Fine mode takes a long time to complete printing, set the mode to Normal mode or Draft mode. • The printer may be set in monochrome mode. Check the setting of the printer driver. • Check that the ink has not run out. • Make sure that the PC is on. Remove the Printer Interface Card and re-insert it into the PC. • Contact the vendor of the PC you are using and get the latest PC card service software from them. • Restart your computer. CHAPTER 5 TROUBLESHOOTING Print Quality ✒ Note You can clear a print quality problem by replacing an ink cartridge with a (BC) LED or (MY) LED) is on or new one if the Ink LED ( blinking. Question Printed pages contain white horizontal lines or the image is faint. ABCDE Fig. 5-4 White Horizontal Lines or Faint Images Nothing is printed on the page. Fig. 5-5 White Page The colors of your print output are not what you expected. Vertical lines are not aligned or the outline of characters is faint. Envelopes are stained with ink. The printout is not clear or the color is not vivid. Recommendation • You may clear the problem by cleaning the print head several times. (See “Cleaning the print head” in Chapter 4). • If the same problem occurs after cleaning, print the test print to identify the cartridge that is causing the problem and replace the ink cartridge. (See “Replacing the ink cartridges” section in Chapter 4). If the same problem still occurs, contact your dealer or our authorized service representative. • Clean the print head several times. (See “Cleaning the print head” section in Chapter 4). • Make sure that the ink cartridges are not empty. If they are, replace the ink cartridges. (See “Replacing the ink cartridges” section in Chapter 4). • If the same problem occurs, contact your dealer or our authorized service representative. • Carry out print head cleaning. • Try test printing from the maintenance program in the printer driver. • Check to see if the ink cartridges are installed correctly and are not empty. • You can adjust the color by using the custom setting in the driver. Colors which printers can express and colors you see on monitors are somewhat different. The printer may not be able to express exactly some colors on your monitor. Check if the printer driver settings are correct. In Bi-Directional Printing, the printer prints from right to left and left to right. Therefore, sometimes vertical lines may not be aligned. Adjust the alignment through the printer driver after carrying out a test print or select uni-directional printing in the printer driver. When the printer platen gets stained, clean the printer platen referring to ‘Cleaning the Printer’ section in Chapter 4. • Use Brother special papers or very white papers. • Check to see that you are not printing on the reverse side of special paper. • Check if the ink cartridges are installed correctly. 5-9 USER’S GUIDE Question Colors are light. Some colors are missing. Printed paper is damaged by excessive ink. Printout is fuzzy. The space between lines of text is narrower than you have set. Black lines appears. Banding appears. Recommendation You may have printed in Draft mode. Set to Normal mode or Super Fine mode in the printer driver. • Clean the print head several times. • Ink may have run out. Check to see if you have run out of certain ink colors. Check if the printer driver settings are correct. Select the correct resolution for the media you are using. • Clean the print head. • Use Brother genuine ink and cartridges. Check to see if there is an obstacle in the paper path. Open the top cover and check. • Check to see if the media setting is correct in the printer driver. • You can carry out horizontal line alignment from the printer driver. For details, see Help. If the same problem still occurs, contact your dealer or our authorized service representative. 5-10 CHAPTER 5 TROUBLESHOOTING ! Caution Operation of the printer outside the specifications shall be deemed abuse and all repairs thereafter shall be the sole liability of the end user /purchaser. (For USA & CANADA Only) For technical and operational assistance, please call: In USA In CANADA 1-877-284-3238 949-859-9700 Ext. 329 1-800-853-6660 514-685-6464 (outside California) (within California) (within Montreal) If you have comments or suggestions, please write us at: In USA In CANADA Printer Customer Support Brother International Corporation 15 Musick Irvine, CA 92718 Brother International Corporation (Canada), Ltd. - Marketing Dept. 1, rue Hôtel de Ville Dollard-des-Ormeaux, PQ, Canada H9B 3H6 BBS For downloading drivers from our Bulletin Board Service, call: In USA 1-888-298-3616 In CANADA 1-514-685-2040 Please log on to our BBS with your first name, last name and a four digit number for your password. Our BBS supports modem speeds up to 14,400, 8 bits no parity, 1 stop bit. Fax-Back System Brother Customer Service has installed an easy to use Fax-Back System so you can get instant answers to common technical questions and product information for all Brother products. This is available 24 hours a day, 7 days a week. You can use the system to send the information to any fax machine, not just the one you are calling from. Please call 1-800-521-2846 (USA) or 1-800-681-9838 (Canada) and follow the voice prompts to receive faxed instructions on how to use the system and your index of Fax-Back subjects. DEALERS/SERVICE CENTERS (USA only) For the name of an authorized dealer or service center, call 1-800-284-4357. SERVICE CENTERS (Canada only) For service center addresses in Canada, call 1-800-853-6660 INTERNET ADDRESS For technical questions and downloading drivers: http://www.brother.com 5-11 APPENDIX APPENDIX PRINTER SPECIFICATIONS Printing Print Method Piezo with 32 X 4 nozzles Resolution 720 X 720 dots per inch (DPI) - Super Fine 360 X 360 dots per inch (DPI) - Normal 180 X 360 dots per inch (DPI) - Draft Print Speed (with Printer Interface Card) 107 cps at 10 cpi Up to 1.7 PPM in full color (Brother Standard Test Sheet) (with AC Adapter) 180 cps at 10 cpi Up to 2.5(Letter)/2.4(A4) PPM in Blue/Black mode with AC Adapter (Brother Standard Test Sheet) Up to 2 PPM in full color (Brother Standard Test Sheet) Print Width 203.2 mm (8 inches ) Controller Interface PCMCIA interface Parallel interface Control panel 2 buttons and 4 LEDs Diagnostics Self-diagnostic program Appendix-1 USER’S GUIDE Electrical and Mechanical Power Source <Printer Interface Card mode> Power Save Mode: 0.6 W Stand-by: 1.0 W Printing-average: 2.5 W or less <AC Adapter mode> Power Save Mode: 0.7 W Stand-by: 1.1 W Printing-average: 3.2 W or less Noise Printing: 40 dB A or less Temperature Operating: 10 to 35°C (50 to 95°F ) Storage: -20 to 60°C (-4 to 140°F ) Humidity Operating: 20 to 80% (without condensation) Storage: 5 to 95% (without condensation) Dimensions (D X W X H) 50.8 X 300 X 106 mm (2.0 X 11.8 X 4.2 inches ) Weight Approx. 1,000 g. (2.2 lb ) Print Media Paper input Manual loading from the Paper Feeding Slot or Automatic loading from the Optional Feeder • Paper Type Plain paper, coated paper, glossy paper, transparencies, envelopes and organizer sheets • Paper size: A4,Letter Executive, B5,A5, Legal Envelopes: commercial No.10 DL, B5, C5, Monarch Organizer: K, L Width Length Weight • Appendix-2 100-215.9 mm (3.94-8.5”) 100-355.6 mm (3.94-14”) 2 60-157 g/m . (16-42 lb) Maximum optional feeder capacity: Approx. 30 sheets 2 of 75 g/m plain paper. APPENDIX Paper Output 1 sheet, face up It is recommended that printed sheets are taken from the paper output slot immediately after printing. Ink Twin cartridge system: separate from the print head Service Life of Ink Cartridge Approx. 250 page / LC03BC at 5% coverage Approx. 150 page / LC03MY at 5% coverage Appendix-3 INDEX INDEX —A— (Alarm) LED Auto Cut Sheet Feeder —M— 3-2, 5-1 2-9 misfeed (MY) LED —B— (BC) LED 3-3 4-1 2-1 2-2, 2-5 5-1 2-1 —E— 2-1, 2-8 5-1 5-2 —F— Feeder Capacity 2-1 2-1 —H— High Quality Coated Paper for 720 dpi Color InkJet printing (On/Off) Button (On/Off)LED operator call Organizer 3-3 3-1 5-1 2-1 —P— Paper Size Type Paper empty Paper Feeding Slot Paper Feeding Slot Guide paper guide Paper jam Paper Weight Range printable area 2-1 2-1 5-1 2-6 2-6 2-10 5-1, 5-3 2-1 2-3 Quality Coated Paper for 360 dpi Color Inkjet printing 2-2, 2-4 —R— 2-2, 2-4 —I— ink cartridges Ink Empty Ink LEDs Ink nearly empty 5-1 —Q— —G— Glossy paper No Cartridge —O— —C— Envelopes error recoverable unrecoverable 3-2 —N— 3-2 Clean Button clean the print head Coated paper Color InkJet Glossy Paper Cover Open Cut sheet 5-1 4-2 5-1 3-2 5-1 Recommended paper Release Lever replacing the ink cartridges Retry 2-2 5-3 4-2 3-3 —S— service call Straight Paper Path Slot 5-2 2-7, 2-8 Index-1 USER’S GUIDE —W— —T— Transparencies Index-2 Windows 2-1 5-6