1
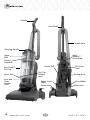
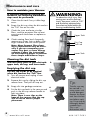
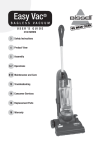
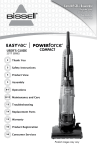
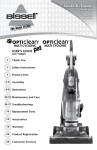
Earn BISSELL Rewards!
Register your
product today!
See details on
back page
USER'S GUIDE
23T7 SERIES
2
Thank You
3
Safety Instructions
4
Product View
5
Assembly
6-7
8-12
Operations
Maintenance and Care
13
Troubleshooting
14
Replacement Parts
15
Warranty
16
Product Registration
16
Consumer Services
Thanks for buying a BISSELL Vacuum
We’re glad you purchased a BISSELL Easy Vac floor and carpet
vacuum. Everything we know about floor care went into the design
and construction of this complete, high-tech home cleaning system.
Your BISSELL Easy Vac is well made, and we back it with a limited
one year warranty. We also stand behind it with a knowledgeable,
dedicated Consumer Services department, so, should you ever have
a problem, you’ll receive fast, considerate assistance.
My great-grandfather invented the floor sweeper in 1876. Today,
BISSELL is a global leader in the design, manufacture, and service
of high quality homecare products like your BISSELL Easy Vac.
Thanks again, from all of us at BISSELL.
Mark J. Bissell
Chairman, President & CEO
2
www.bissell.com
800.237.7691
IMPORTANT SAFETY INSTRUCTIONS
When using an electrical appliance,
basic precautions should be observed,
including the following:
■ Keep hair, loose clothing, fingers, and all
Read all
instructions
before using your
upright VACUUM.
■
Always connect to a polarized outlet
(left slot is wider than right). Unplug
from outlet when not in use and before
conducting maintenance.
■
■
■
■
WARNING: To
reduce the risk of fire,
electric shock, or injury:
■
non-polarized outlet or extension cord.
■
■Do not modify the polarized plug to fit a
■ Do not leave vacuum cleaner unattended
when it is plugged in.
■ Unplug from outlet when not in use and
■
■
■
■
■
■
■
■
■
■
■
before servicing.
Do not use outdoors or on wet surfaces.
Do not allow children to operate vacuum
cleaner or use as a toy.
Close attention is necessary when used
by or near children.
Do not use for any purpose other than
described in this User’s Guide.
Use only manufacturer’s recommended
attachments.
Do not use with damaged cord or plug.
If appliance is not working as it should,
has been dropped, damaged, left outdoors, or dropped into water, have it
repaired at an authorized service center.
Do not pull or carry by cord, use cord as
a handle, close a door on cord, or pull
cord around sharp edges or corners. Do
not run appliance over cord. Keep cord
away from heated surfaces.
Do not unplug by pulling on cord. To
unplug, grasp the plug, not the cord.
Do not handle vacuum cleaner or plug
with wet hands.
Do not put any object into openings.
Do not use with any opening blocked;
keep openings free of dust, lint, hair,
and anything that may reduce air flow.
www.bissell.com
■
■
■
parts of body away from openings and
moving parts.
Turn off all controls before plugging or
unplugging vacuum cleaner.
Use extra care when cleaning stairs.
Do not pick up flammable materials
(lighter fluid, gasoline, kerosene, etc.) or
use in the presence of explosive liquids
or vapors.
Do not pick up toxic material (chlorine
bleach, ammonia, drain cleaner, etc.).
Do not use vacuum cleaner in an
enclosed space filled with vapors given
off by oil base paint, paint thinner, some
moth proofing substances, flammable
dust, or other explosive or toxic vapors.
Do not pick up hard or sharp objects
such as glass, nails, screws, coins, etc.
Do not pick up anything that is burning
or smoking, such as cigarettes, matches,
or hot ashes.
Do not use without filters in place.
Use only on dry, indoor surfaces.
Keep appliance on a level surface.
SAVE THESE
INSTRUCTIONS
FOR FUTURE USE
THIS APPLIANCE
HAS A POLARIZED
PLUG.
To reduce the risk of electric shock,
this appliance has a polarized plug (one
blade is wider than the other). This plug
will fit in a polarized outlet only one
way. If the plug does not fit fully in the
outlet, reverse the plug. If it still does
not fit, contact a qualified electrician to
install a proper outlet. Do not change
the plug in any way.
This model is for household use only.
800.237.7691
3
Product view
Handle
Cord Hook
Stretch Hose
Carrying Handle
Quick
Release™
Cord Wrap
Upper
Tank
Primary
Separator
Easy Empty™
Dirt Cup
Lower Tank
Inner and
Outer
Circular
Filters
4
www.bissell.com
Crevice Tool
Dirt Cup
Release
Lever
20' Power
Cord
Dusting Brush
Power Switch
Pedal
Hose Holder
Detent Lever
Foot Hose
800.237.7691
Assembly
This user’s guide has been designed
to help you get the utmost satisfaction
from your Easy Vac. You’ll find assembly and operating instructions, safety
precautions, as well as maintenance
and troubleshooting instructions. Please
read this guide thoroughly before
assembling your vacuum cleaner.
Pay particular attention to the product diagram, assembly instructions,
and part names. Locate and organize
all parts before assembly. Familiarize
yourself with the parts and where they
go. Following this user’s guide will
greatly enhance your ability to get the
most performance from your vacuum
for many years.
Your vacuum comes in two, easy-toassemble components: the handle and
the base.
1. Position the handle so the lower snap is
facing the back of the vacuum.
Warning:
Do not plug in your vacuum clean-
er until you have completely assembled it per the following instructions
and are familiar with all instructions
and operating procedures.
Handle
Lower Snap
Base
2. Line up the holes on the base with the
snap and knob on the handle.
3. Insert the handle into the base and push
until you hear it lock into place.
Note: The handle is designed so
only the correct snaps will fit comfortably with the holes in the base.
Do not use excessive force while
assembling this vacuum. It should
fit together with ease.
Dusting Brush
Crevice Tool
4. Wrap power cord around cord wraps
and place attachments in their correct
holders. Your vacuum assembly is now
complete.
Handle position
Press the detent lever with your foot
to place your vacuum in one of three
positions.
1. Upright- For storage and transporting.
1.
2.
3.
2. Normal Cleaning- Press detent lever once.
Use for most household floor cleaning tasks.
3. Low Cleaning- With the vacuum in normal cleaning position, press detent lever
again. Use for reaching under low furniture, such as tables, chairs, or beds.
www.bissell.com
5
800.237.7691
Operations
Special tools
Your BISSELL Easy Vac is not only a
powerful carpet and rug vacuum
cleaner, it’s also a versatile above floor
vacuum cleaner when you select one of
the special tools.
1. Raise handle to upright position.
2.
2. Grasp hose and remove from hose holder.
3. Attach tools by firmly pushing onto vacuum hose.
Crevice Tool:
Use in tight narrow spaces.
3.
Dusting Brush:
Use to dust upholstery, drapes, blinds,
shelves, baseboards, and much more.
*Note: Brush will continue to rotate
while tools are in use.
Transporting cleaner
1. To move your cleaner from room to room,
put the handle in the upright position, tilt the
cleaner back on its rear wheels, and push
forward.
2. The cleaner can also be moved by using
the carrying handle on the front of the
vacuum.
6
www.bissell.com
NOTICE:
The floor brush will continue to rotate
while your vacuum is used for above floor
cleaning. To prevent carpet damage, do
not lean on the vacuum or let the powerfoot tilt forward.
800.237.7691
Operations
Using your cleaner
1. Remove the plastic plug guard and
dispose.
2. Unclip polarized plug from power cord.
3. Rotate the Quick Release cord wrap
towards floor and slip power cord from
upper and lower cord wraps.
Cord
Hook
4. Connect power cord plug to a polarized
outlet.
5. To keep the power cord out of your way
while cleaning, place it in the cord hook
by the top of the vacuum.
Power Switch pedal
The red power switch pedal is located
on the back of the cleaner, under the
cord wraps.
1. Step on the power switch to turn the unit
“On”. The rotating floor brush and suction will start.
2. Step on the pedal again to turn the vacuum
“Off”.
Power
Switch
Pedal
Quick
Release
Cord
Wrap
Tip:
Before cleaning under low furniture,
check for objects that might block the
vacuum hose. Do not pick up hard
or sharp objects such as glass, nails,
screws, coins, paper clips, etc. with
vacuum.
caution:
Before using your vacuum, make
sure that all filters (pre-motor and
post-motor) are in place. Do not
operate your vacuum without the
filters.
www.bissell.com
800.237.7691
7
Maintenance and care
How to maintain your Vacuum
WARNING:
To reduce the risk of injury from
To maintain maximum cleaning performance, the following maintenance
steps must be performed:
1. Clean the dirt tank if any visible clogs
occur.
moving parts and/or electrical
shock, step power switch to “OFF”
and disconnect polarized plug
from electrical outlet before performing troubleshooting checks
2. Empty the dirt cup when the dirt reaches
the “Full” line on the side.
3. Check the inner and outer circular
filters, and the pre-motor filter at least
once a month and clean or replace as
needed.
Upper Tank
4. Check rotating floor brush frequently,
remove any strings, hair or debris that
might interfere with the suction power.
Dirt Cup
Full Line
Note: More frequent filter cleaning or replacement may be necessary if you are vacuuming new
carpet, fine dust, or have allergy
concerns. Follow the instructions
on the following pages to perform
these simple maintenance steps.
Lower Tank
Cleaning the dirt tank
You have three parts to your dirt tank:
upper tank, dirt cup, and lower tank.
2.
3.
Emptying the dirt cup
The dirt cup needs to be emptied
when dirt reaches the “Full” line.
1. Turn off vacuum and unplug it from
electrical outlet.
2. Remove dirt cup by sliding the dirt cup
release lever. Then pull dirt cup out.
3. Empty dirt into garbage container.
4. Put the dirt cup back in the vacuum and
push in the dirt cup release handle to
lock into place.
Note: There is one clips on the
base of the vacuum that the cup
will fit into to ensure proper
placement.
8
www.bissell.com
Tip:
4.
The dirt cup may
be washed in
warm water with
a mild detergent.
Remove the lower
tank from the bottom before washing. Rinse and dry
thoroughly before
re-attaching it.
This is not
dishwasher safe.
800.237.7691
Maintenance and care
Cleaning the lower tank and inner/outer circular filters
1. Turn off vacuum and unplug it from
electrical outlet.
2.
2. Remove dirt cup by sliding the dirt cup release lever to the right. Then pull dirt
cup out.
3. Remove lower tank.
4. Grasp the circular filters and twist to
unlock. Pull straight up to remove.
5. Separate the outer foam and the inner
pleated circular filters. Wash them by
hand in warm water. Mild detergent
may be used if desired. Rinse well, then
air dry thoroughly before putting back
together and replacing in lower tank.
4.
6. Place the filters back into the lower tank
and twist to lock into place.
Tip:
Vacuuming new carpet or vacuuming
fine powders such as drywall dust may
clog the filters, so check them more frequently. Shake out or replace as
necessary.
www.bissell.com
800.237.7691
9
Maintenance and care
Cleaning the pre-motor filter
The pre-motor filter protects the motor
from debris. It is the small, round filter
located underneath the dirt cup, right
above the motor.
1. Turn off vacuum and unplug it from
electrical outlet.
2.
3.
2. Remove dirt cup by sliding the dirt cup
release lever to the right. Then pull dirt
cup out.
3. Lift up lower cup to access the pre-motor
filter.
4. Remove the small round pre-motor filter
located on the base of the vacuum.
4.
5. Remove any dust or debris from the
filter. Rinse well under warm water, then
Pre-Motor
air dry thoroughly before replacing.
Filter
6.
Note: Always make sure all filters
are in place and thoroughly dry
before using this vacuum.
6. Replace dirt cup and slide the dirt cup
release lever to lock into place.
Cleaning the upper tank
1. Turn off vacuum and unplug it from
electrical outlet.
3.
2.
2. Remove dirt cup by sliding the dirt cup
release lever to the right. Then pull dirt
cup out.
3. Twist the primary separator to unlock it
and pull it down. Brush off any dirt and
rinse off screen with warm water. Air
dry completely before replacing.
6.
5.
4. Check hose inlet for any clogging.
5. Reassemble the primary separator by
centering the front symbol and twisting
toward lock position, as shown.
6. Replace dirt cup and slide lever to lock
position.
Lock Position
WARNING:
Do not operate cleaner with
10
damp or wet filters or without
all filters in place.
www.bissell.com
800.237.7691
Maintenance and care
Power cord storage
WARNING:
To reduce the risk of injury from
When you have finished using your
Easy Vac, store the power cord on
the cord wrap.
1. Turn off vacuum cleaner and unplug power
cord.
moving parts and/or electrical
shock, turn power switch OFF and
disconnect polarized plug from electrical outlet before performing
troubleshooting checks.
2. Loop power cord around cord wraps
on back of cleaner, making certain
Quick Release cord wrap is pointed up
towards handle.
3. Clip molded plug to power cord to
secure.
Clean and replace rotating floor brush
You should check your cleaner’s rotating floor brush and drive belt regularly
for wear or damage. You should also
clean the brush and brush ends by
removing string, hair and carpet fibers.
These can wrap around the brush and
hamper its ability to effectively clean
your carpet. Also, remove any debris
that has accumulated under the brush
cover.
1. Turn off vacuum and unplug from electrical outlet.
4.
3.
2. Place vacuum upside down with brush
roll facing upwards.
3. Remove five screws as shown with a
small Phillips screwdriver.
4 Lift off brush cover.
5. Grasp floor brush at both ends and lift
out.
Five Screws
5.
8.
6. Clean strings, hair and other debris
from floor brush, motor shaft, and drive
belt.
7. Check floor brush for worn areas and
replace if needed.
Air Passageway
9.
8. Check air passageway for obstructions.
Remove debris from this area.
9. When finished cleaning, reposition floor
brush and drive belt. Then replace the
brush cover and five screws.
www.bissell.com
800.237.7691
11
Maintenance and care
Replace drive belt
Drive Belt
1. Follow steps 1-4 of previous section,
“Clean and replace rotating floor brush”. 3.
Motor Shaft
4.
2. Check drive belt carefully for wear,
cuts and stressed areas. If the drive belt
appears worn, you will need to replace it.
3. Grasp old drive belt and remove from
motor shaft. Discard old drive belt.
4. Loop new drive belt over motor shaft
and stretch other end over floor brush in
the space provided between the bristles.
7.
5.
5. Place ends of floor brush down into slots
on sides as shown.
6. Turn floor brush by hand several times
in the direction of the motor shaft. If
properly installed, drive belt will align
itself on floor brush.
7. Replace brush cover and five screws.
Cleaning stretch hose and foot hose
1. Locate the stretch hose where it connects
to the dirt cup on the back of the vacuum. 2.
2. Push in and twist to release hose from
the holder.
3. Look to see if there is any debris in the
hose. Clean as necessary.
4. Locate the clear foot hose under the
hose holder.
5. Remove the two screws located to the left
of the hose.
5.
Two Screws
Clear Foot Hose
6. Check for any debris in the hose.
7. Use a long narrow object such as a
broomstick to clean the hose. Remove
clogs or debris.
8. Replace two screws to attach foot hose.
Replace stretch hose by snapping into
the holder.
WARNING:
Do not use sharp objects such
as a hanger, to remove clogs.
*Note: If the debris cannot be
reached through the hose, then follow the instructions for cleaning the
air passageway in the “Clean and
replace rotating floor brush” section.
12
www.bissell.com
800.237.7691
Troubleshooting
WARNING:
To reduce the risk of electric shock, turn power OFF
and disconnect plug from electrical outlet before
performing maintenance or troubleshooting.
Vacuum cleaner won’t run
Possible causesRemedies
1. Vacuum cleaner is not plugged in
1. Check electrical plug
2. Blown fuse/tripped breaker
2. Check/replace fuse or reset breaker
Vacuum cleaner won’t pick up dirt
Possible causesRemedies
1.
Dirt cup is full
1. Empty dirt cup
2. Filter dirty
2. Check, remove debris or clean
3. Hose not secure
3. Check to be sure hose is snapped into place at both ends
4. Dirt cup not in place
4.
5. Vacuum path clogged
5.
6. Rotating power brush drive belt broken
Make sure dirt cup is fully inserted and dirt cup
release handle is pushed in completely
Visually check air passageway, hose inlet,
and hose for anything that might be obstructing.
the vacuum path. Carefully remove blockage
6. Replace drive belt
7. Drive belt stretched
7. Check drive belt area and remove obstructions
Replace drive belt if necessary
8. Floor brush bristles worn
8. Replace floor brush
9. Floor brush jammed
9. Remove floor brush and clean debris from
brush and ends Check drive belt for any damage
Other maintenance or service not included in the manual should be
performed by an authorized service representative.
Thank you for selecting a BISSELL product.
Please do not return this product to the store.
For any questions or concerns, BISSELL is happy to be of service.
Contact us directly at 1-800-237-7691.
www.bissell.com
800.237.7691
13
Replacement parts - BISSELL Easy Vac®
Item
1
2
3
4
5
6
7
14
Part No.
Part Name
203-7592
203-7034
203-7627
203-7593
203-7032
203-7033
203-7596
1
2
6
7
www.bissell.com
Dirt Cup
Drive Belt
Floor Brush
Inner & Outer Circular Filter Set
Crevice Tool
Dusting Brush
Vacuum Hose Replacement
3
4
5
800.237.7691
Warranty - BISSELL Easy Vac®
This warranty gives you specific legal rights, and you may also have other rights which may
vary from state to state. If you need additional instruction regarding this warranty or have
questions regarding what it may cover, please contact BISSELL Consumer Services by E-mail,
telephone, or regular mail as described below.
Limited One Year Warranty
Subject to the *EXCEPTIONS AND EXCLUSIONS identified below, upon receipt of the product
BISSELL Homecare, Inc. will repair or replace (with new or remanufactured components or
products), at BISSELL’s option, free of charge from the date of purchase by the original
purchaser, for one year any defective or malfunctioning part.
See information below on "If your BISSELL product should require service".
This warranty applies to product used for personal, and not commercial or rental service. This
warranty does not apply to fans or routine maintenance components such as filters, belts, or
brushes. Damage or malfunction caused by negligence, abuse, neglect, unauthorized repair, or any
other use not in accordance with the User's Guide is not covered.
If your BISSELL product should require service:
Contact BISSELL Consumer Services to locate a BISSELL Authorized Service Center in your
area.
If you need information about repairs or replacement parts, or if you have questions about
your warranty, contact BISSELL Consumer Services.
Website or E-mail:
www.bissell.com
Use the “Customer Services” tab.
Or Call:
BISSELL Consumer Services
1-800-237-7691
Monday - Friday 8 a.m. - 10 p.m. ET
Saturday 9 a.m. - 8 p.m. ET
Or Write:
BISSELL Homecare, Inc.
PO Box 3606
Grand Rapids, MI 49501
ATTN: Consumer Services
BISSELL HOMECARE, INC. IS NOT LIABLE FOR INCIDENTAL OR CONSEQUENTIAL
DAMAGES OF ANY NATURE ASSOCIATED WITH THE USE OF THIS PRODUCT. BISSELL’S
LIABILITY WILL NOT EXCEED THE PURCHASE PRICE OF THE PRODUCT.
Some states do not allow the exclusion or limitation of incidental or consequential damages, so the
above limitation or exclusion may not apply to you.
*EXCEPTIONS AND EXCLUSIONS FROM THE TERMS OF THE LIMITED WARRANTY
THIS WARRANTY IS EXCLUSIVE AND IN LIEU OF ANY OTHER WARRANTIES EITHER
ORAL OR WRITTEN. ANY IMPLIED WARRANTIES WHICH MAY ARISE BY OPERATION
OF LAW, INCLUDING THE IMPLIED WARRANTIES OF MERCHANTABILITY AND FITNESS
FOR A PARTICULAR PURPOSE, ARE LIMITED TO THE ONE YEAR DURATION FROM THE
DATE OF PURCHASE AS DESCRIBED ABOVE.
Some states do not allow limitations on how long an implied warranty last so the
above limitation may not apply to you.
www.bissell.com
800.237.7691
15
Don't forget to register your product!
Registering is quick, easy and offers you benefits over the lifetime of your product.
You’ll receive:
BISSELL Rewards Points
Automatically earn points for discounts and free shipping on future purchases.
Faster Service
Supplying your information now saves you time should you need to contact us with
questions regarding your product.
Product Support Reminders and Alerts
We’ll contact you with any important product maintenance reminders and alerts.
Special Promotions
Optional: Register your email to receive notice of offers, contests, cleaning tips and more!
Visit www.bissell.com/registration now!
BISSELL consumer services
For information about repairs or replacement parts, or questions about your warranty, call:
BISSELL Consumer Services
1-800-237-7691
Monday - Friday 8 a.m. — 10 p.m. ET
Saturday 9 a.m. — 8 p.m. ET
Or write:
BISSELL Homecare, Inc.
PO Box 3606
Grand Rapids MI 49501
ATTN: Consumer Services
Or visit the BISSELL website - www.bissell.com
When contacting BISSELL, have model number of cleaner available.
Please record your Model Number: ___________________
Please record your Purchase Date: ___________________
NOTE: Please keep your original sales receipt. It
provides proof of purchase date in the event of a
warranty claim. See Warranty on page 19 for details.
16
©2010 BISSELL Homecare, Inc
Grand Rapids, Michigan
All rights reserved. Printed in China
Part Number 110-4317
Rev 12/10
Visit our website at:
www.bissell.com
www.bissell.com
800.237.7691