1
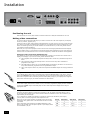
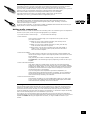
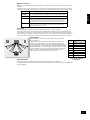
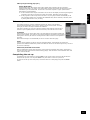
H A N DBOOK Arcam DV137 DVD player DV137 English Safety guidelines CAUTION ATTENTION RISK OF ELECTRIC SHOCK DO NOT OPEN RISQUE DE CHOC ELECTRIQUE NE PAS OUVRIR CAUTION: To reduce the risk of electric shock, do not remove cover (or back). No user serviceable parts inside. Refer servicing to qualified service personnel. WARNING: To reduce the risk of fire or electric shock, do not expose this apparatus to rain or moisture. The lightning flash with an arrowhead symbol within an equilateral triangle, is intended to alert the user to the presence of uninsulated ‘dangerous voltage’ within the product’s enclosure that may be of sufficient magnitude to constitute a risk of electric shock to persons. The exclamation point within an equilateral triangle is intended to alert the user to the presence of important operating and maintenance (servicing) instructions in the literature accompanying the product. CAUTION: In Canada and the USA, to prevent electric shock, match the wide blade of the plug to the wide slot in the socket and insert the plug fully into the socket. Important safety instructions This product is designed and manufactured to meet strict quality and safety standards. However, you should be aware of the following installation and operation precautions: 1. Take heed of warnings and instructions You should read all the safety and operating instructions before operating this appliance. Retain this handbook for future reference and adhere to all warnings in the handbook or on the appliance. Power supply cords should be routed so that they are not likely to be walked on or pinched by items placed upon or against them, paying particular attention to cords and plugs, and the point where they exit from the appliance. 11. Grounding Ensure that the grounding means of the appliance is not defeated. 2. Water and moisture 12. Power lines The presence of electricity near water can be dangerous. Do not use the appliance near water – for example next to a bathtub, washbowl, kitchen sink, in a wet basement or near a swimming pool, etc. Locate any outdoor antenna/aerial away from power lines. 3. Object or liquid entry Take care that objects do not fall and liquids are not spilled into the enclosure through any openings. Liquid filled objects such as vases should not be placed on the equipment. 4. Ventilation Do not place the equipment on a bed, sofa, rug or similar soft surface, or in an enclosed bookcase or cabinet, since ventilation may be impeded. The unit should be installed in a well-ventilated area. 5. Heat Locate the appliance away from naked flames or heat producing equipment such as radiators, stoves or other appliances (including other amplifiers) that produce heat. 6. Climate The appliance has been designed for use in moderate climates. 7. Racks and stands Only use a rack or stand that is recommended for use with audio equipment. If the equipment is on a portable rack it should be moved with great care, to avoid overturning the combination. 8. Cleaning Unplug the unit from the mains supply before cleaning. The case should normally only require a wipe with a soft, damp, lint-free cloth. Do not use paint thinners or other chemical solvents for cleaning. We do not advise the use of furniture cleaning sprays or polishes as they can cause indelible white marks if the unit is subsequently wiped with a damp cloth. 9. Power sources Only connect the appliance to a power supply of the type described in the operating instructions or as marked on the appliance. Warning: This is a Class I device and must be earthed. Warning: The mains plug is used as the disconnect device from the mains supply and shall remain readily operable. DV137 E-2 10. Power-cord protection 13. Non-use periods If the unit has a stand-by function, a small amount of current will continue to flow into the equipment in this mode. Unplug the power cord of the appliance from the outlet if left unused for a long period of time. 14. Abnormal smell If an abnormal smell or smoke is detected from the appliance, turn the power off immediately and unplug the unit from the wall outlet. Contact your dealer immediately. 15. Servicing You should not attempt to service the appliance beyond that described in this handbook. All other servicing should be referred to qualified service personnel. 16. Damage requiring service The appliance should be serviced by qualified service personnel when: A. the power-supply cord or the plug has been damaged, or B. objects have fallen, or liquid has spilled into the appliance, or C. the appliance has been exposed to rain, or D. the appliance does not appear to operate normally or exhibits a marked change in performance, or E. the appliance has been dropped or the enclosure damaged. Safety compliance This product has been designed to meet the IEC 60065 international electrical safety standard. Contents E nglish Safety guidelines................................................ E-2 Important safety instructions............................. E-2 Safety compliance............................................ E-2 Installation......................................................... E-4 Positioning the unit........................................... E-4 Making video connections.................................. E-4 Making audio connections.................................. E-5 The remote-control and trigger inputs................. E-6 Using the remote control................................... E-6 Connecting to a power supply............................ E-6 Basic use of your DVD player.............................. E-7 Introduction..................................................... E-7 Front-panel controls.......................................... E-7 Basic operation................................................ E-7 Using the CR-515 remote control........................ E-8 Advanced controls (CR-515)............................... E-9 Using the CR-415 remote control...................... E-10 Advanced controls (CR-415)............................. E-11 Configuring your DVD player............................. E-12 Introduction................................................... E-12 Obtaining a picture......................................... E-12 Using the Set-up menus.................................. E-12 Operational set-up.......................................... E-13 Video set-up.................................................. E-14 Audio set-up.................................................. E-16 Speaker set-up............................................... E-18 Delay set-up.................................................. E-18 Trim set-up.................................................... E-19 Completing the set-up..................................... E-19 DVD/VCD special playback modes.................... E-20 Jumping to a particular point............................ E-20 Special playback modes................................... E-20 Environmental matters: This handbook is printed in the U.K. on recycled paper, and is itself fully recyclable and biodegradeable. Remote-control codes....................................... E-23 The paper used is from the ‘Revive’ range of papers, manufactured in the U.K. by Robert Horne. In Revive, 75% of the paper is de-inked post-consumer waste, with the remaining 25% being mill broke and virgin fibre. The recycled pulps used in the production of this paper are a combination of Totally Chlorine Free (TCF) giving zero AOX and Elemental Chlorine Free (ECF) giving a resultant AOX level of less than 0.5kg per 1000kg of pulp. Technical specifications.................................... E-24 Disc types supported....................................... E-24 The small print: CD disc navigator screen................................... E-21 The HDMI interface........................................... E-22 About HDMI .................................................. E-22 Connecting using HDMI................................... E-22 Troubleshooting.............................................. E-22 Guarantee......................................................... E-26 On line registration......................................... E-26 < This product incorporates copyright protection technology that is protected by method claims of certain U.S. patents and other intellectual property rights owned by Macrovision Corporation and other rights owners. Use of this copyright protection technology must be authorized by Macrovision Corporation, and is intended for home and other limited viewing uses only unless otherwise authorized by Macrovision Corporation. Reverse engineering or disassembly is prohibited. Consumers should note that not all high definition television sets are fully compatible with this product and may cause artifacts to be displayed in the picture. In case of 525/625 progressive scan picture problems, it is recommended that the user switch the connection to the ‘Standard Definition’ output. If there are questions regarding TV set compatibility with this model 525/625p DVD player, please contact your dealer or the Arcam Customer Support Department. < Manufactured under license from Dolby Laboratories. ‘Dolby’, ‘Pro Logic’, ‘MLP Lossless’, and the double-D symbol are trademarks of Dolby Laboratories. < Manufactured under license from Digital Theater Systems, Inc. U.S. Pat. No’s. 5,451,942; 5,956,674; 5,974,380; 5,978,762; 6,226,616; 6,487,535 and other U.S. and world-wide patents issued and pending. “DTS” and “DTS Digital Surround” are registered trademarks of Digital Theater Systems, Inc. Copyright 1996, 2003 Digital Theater Systems, Inc. All Rights Reserved. < HDMI, the HDMI logo and High-Definition Multimedia Interface are trademarks or registered trademarks of HDMI Licensing LLC. < DivX, DivX Certified, and associated logos are trademarks of DivXNetworks, Inc and are used under license. DV137 E-3 Installation ���������������� ����� ������ ������� ��������� ����� �������� �� ����������� � �� �� ��������������� ������� ���������� � ���� � �� � ���������� � ������ �� ������������ ����������������� ������� ������������������ ������������� ������������� ��� �� � Positioning the unit Place the DV137 on a level, firm surface and ensure that there is adequate ventilation for the unit. Making video connections To view the pictures from the DVD player you need to connect one of its video outputs to your display device (TV, monitor, projector, etc.). The DV137 has five video output options, described below. You need only use one type of video from the list; choose a type that your display device supports. If your display device does not support any of the above connection types then you will be unable to use it with the DV137; in this case, please contact your dealer for further assistance. Note that you may connect equipment such as AV receivers in the signal path between the DVD player and the display device, so long that the connected equipment also supports the type of video signal you intend to use. For instructions on how to connect AV equipment, consult the manual for that equipment. Using two video connections simultaneously It is possible to use two video connections simultaneously (routing one connection to a second room or display, for example). If you wish to do this, please read these notes: < The Composite video and SCART outputs are always active. These carry interlaced output at all times. < The Component video output is always active. It can be set to carry either interlaced or progressive-scan output. < The HDMI output is active only if a compatible display is detected by the DV137. It can be set to carry either interlaced, progressive-scan or high-definition output. < The S-video output is active only when the Component and HDMI outputs are carrying interlaced video. Composite video If your display device offers only a composite input (sometimes labelled CVBS or just ‘video’), connect this to the COMPOSITE video output of the DVD player using a 75Ω phono cable suitable for video use. Note that a composite video connection gives the lowest-quality output; if your display device supports other video connection types, we advise that those are used instead. S-Video The S-Video output (also known as S-VHS or Y/C) is commonly supported by display devices worldwide. Connect the S‑VIDEO output of the DVD player to the S‑Video input of the display device using an appropriate cable. Component video Use three 75Ω phono cables to connect the Component Y, Pb, Pr outputs of the DVD player to the Y, Pb, Pr inputs of the display device. Ensure that the cables are suitable for video use and that they are approximately the same length. If your television is capable of accepting a progressively scanned (de-interlaced) video signal, you may wish to use the progressive video output from the DV137. If you are unsure whether your display device can accept DV137 alternative progressive video, please refer to its instruction manual or consult Y Y your dealer. Some component video interfaces are labelled differently to the DV137; see the table if the component inputs of your display device are not labelled ‘Y, Pb, Pr’. DV137 E-4 alternative alternative Y Y Pb Cb (B–Y) U Pr Cr (R–Y) V SCART output The SCART connector is common on European A/V equipment and provides a convenient connection method between your DVD player and display device, carrying both video and stereo audio. If you are using a SCART connection and you do not wish to listen to the audio through your TV, then it is best to mute your TV’s speakers; muting the TV will prevent this audio being heard. E nglish Note that the SCART output has a control signal that switches your TV to its SCART input when the DV137 is turned on. It will also signal to wide-screen TVs the correct aspect ratio (16:9 or 4:3), provided this feature is supported by the TV. HDMI digital video The HDMI connector offers uncompressed digital video and audio transmission between the DV137 and the display device, and provides the highest quality output. Generally, it is also the easiest connection type to configure. To use this video connection, you will require a HDMI or HDMI/DVI cable between the DV137 and your display device or receiver. See page 22 for further details. Making audio connections The DV137 offers a number of alternatives for connecting audio. The connection type to use depends on the rest of your system; chose the type most appropriate to your amplifier. If you want to listen to audio through... < ...we recommend the following: Your television How you listen to audio through your TV depends on the inputs it has and your video connection: < SCART: If you are using a SCART connection, this will carry stereo audio. No further connection is required. < HDMI: If you are using an HDMI connection (not DVI), this will carry audio. No further connection is required. < Stereo phono: (For use with a connection type other than SCART or HDMI.) If your TV has stereo phono inputs, follow the instructions below for a stereo amplifier. < Your stereo amplifier If you wish to listen to audio from your player through a stereo amplifier, then use the stereo analogue outputs. These outputs provide a stereo down-mix of the source material. Using a stereo phono cable of a suitable length, connect the outputs labeled L/R Stereo out to the left and right inputs (respectively) for DVD or CD on your amplifier. < Your multi-channel amplifier Using phono cables of a suitable length, connect the multi-channel analogue outputs of your DVD player to the multi-channel input of your amplifier (labelled something like ‘DVDA’, ‘SACD’ or ‘5.1 IN’). Ensure that each channel is connected as labelled (so that the left-channel output from the DVD player is connected to the left-channel input on the amplfier). If you are using three stereo amplifiers to provide the amplification, we recommend grouping related channels within an amplifier: use one amplifier for the left and right channels, one for the two surround channels and one for the centre channel and (if necessary) the subwoofer. < Your surround-sound receiver Connect either the HDMI or one of the S/PDIF digital outputs to the ‘DVD’ input of your receiver. These digital outputs provide PCM, Dolby Digital, DTS or MPEG multi-channel audio, depending on the source material. Listening to DVD-audio or SACD discs The high quality of DVD-audio and SACD discs can be realised only by using either the multi-channel analogue or the HDMI outputs. Using a conventional digital connection between your DVD player and surround-sound receiver will not allow you to hear these discs at their best, since the audio carried across the digital link when these discs are played is compromised (i.e. limited to a sample rate of 48K). This is true for all DVD players and is not a limitation of your DV137. If you wish to use a surround-sound receiver for decoding your movie sound-track, but want also to enjoy DVDA/SACD, we recommend either following the connection advice given above for ‘multi-channel amplifier’ in addition to using the digital audio connection, or using an HDMI connection to your receiver. DV137 E-5 The remote-control and trigger inputs The REMOTE IN input can be used to pass RC5 codes to the DV137 if it is installed in a position (or system) where infrared cannot be used. If this is required, please contact your dealer for further information. The trigger in input can be used to switch the DV137 in and out of stand-by. Connecting the trigger output of your Arcam amplifier (or other compatible device), will cause the DV137 to come out of stand-by automatically when the amplifier is switched on, returning to stand-by when the amplifier is switched off. Please see your amplifier handbook for further information. In normal use there is no need to make any connections to these inputs. Using the remote control The functions of buttons on the remote control are described on pages 8 and 9 (CR-515) or pages 10 and 11 (CR-415). Please keep in mind the following when using the remote control: < Ensure that there are no obstacles between the remote control and the remote sensor on the DV137. The remote has a range of about seven meters. (If the remote sensor is obscured, the remote control input jack on the rear panel is available. Please contact your dealer for further information.) < Remote operation may become unreliable if strong sunlight or fluorescent light is shining on the remote sensor of the DV137. < Replace the batteries when you notice a reduction in the operating range of the remote control. The remote control input requires a mono 3.5mm jack, with the tip active and the sleeve grounded. The remote control signals must be in modulated RC5 format (at 36kHz), with a voltage level of between 5V and 12V. Inserting batteries into the CR‑515 remote control A. Open the battery compartment by pressing the button on the back of the remote control. Notes on inserting the remote control batteries < Incorrect use of batteries can result in hazards such as leakage and bursting. < < Do not mix old and new batteries together. Do not use different kinds of battery together—although they may look similar, different batteries may have different voltages. < Ensure that the plus (+) and minus (—) ends of each battery match the indications in the battery compartment. < Remove batteries from equipment that is not going to be used for a month or more. < When disposing of used batteries, please comply with governmental (or other) regulations that apply in your country or area. B. Insert four ‘AAA’ batteries into the battery compartment, following the polarity indications given inside the compartment. C. Press the battery cover back into position. Connecting to a power supply Mains lead The appliance is normally supplied with a moulded mains plug already fitted to the lead. Check that the plug supplied with the unit fits your supply and that your mains supply voltage agrees with the voltage setting (115V or 230V) indicated on the rear panel of the unit. If for any reason the plug needs to be removed, it must be disposed of immediately and securely, as it is a potential shock hazard when inserted into the mains socket. Inserting batteries into the CR‑415 remote control � � If your mains supply voltage or mains plug is different, or you require a new lead, please consult your Arcam dealer. Plugging in Push the plug (IEC line socket) of the power cable supplied with the unit into the socket (POWER INLET) in the back of the unit. Make sure it is pushed in firmly. A. Open the cover of the remote control battery compartment Put the plug on the other end of the cable into your power supply socket and switch the socket on. B. Insert two ‘AAA’ batteries into the battery compartment, following the polarity indications given inside the compartment. � � C. Slide and press the battery cover back into position. DV137 E-6 Basic use of your DVD player ����� ���� �� ���� ����� ���� ����� ��� E nglish ���������������� ���� ����� ����� Introduction ‘Basic operation’ explains how to play a DVD, CD or other type of disc. Note that it may be necessary to configure your player correctly for your system before optimum – or any – playback can be achieved. Player configuration is described beginning on page 12. More sophisticated features – such as special playback modes and programming jumps and playback sequences – are described in the ‘Advanced features’ section, later in this handbook. Front-panel controls Switching on Switch the unit on by pressing the POWER button. The status LED glows green when the unit is powered up and red when in stand-by mode (stand-by is operated from the remote control). Note that the remote control sensor is located on the right-hand side of the display window. Do not obstruct this or the remote control will not work. Basic operation Loading a disc Press LOAD on the front panel (or OPEN on the handset) and place the disc on the tray, with the playback side facing down (some discs are double sided, in which case the side labelled ‘side A’ should face up to play side A). Press LOAD on the front panel to close the tray. The disc loads after a pause of a few seconds. Playing a disc Many DVDs begin playing automatically, but some titles begin by displaying a menu. Select the menu item ‘Play movie’ (or similar) using the cursor pad, then press OK to start playback. For discs that do not play automatically (including CDs and VCDs), press PLAY. Fast play Press 8 or 7 on the front-panel or remote control to play fast forwards or backwards. For DVDs, VCDs and CDs the following speeds for fast playback are available: x2, x4, x8, and x16. Press the button repeatedly to cycle through the different speeds. To resume normal playback speed, press PLAY. Fast playback is not available for MP3/WMA discs. Skipping chapters/tracks To skip chapters (or tracks on a CD), press / or 0. When skipping back, the first button press takes you to the beginning of the current chapter. Pressing the button again takes you to the start of the previous chapter. Pausing playback Press PAUSE on the front panel or ; on the remote control to pause playback. To resume playback, press PLAY on the front panel or 4 on the handset. Stopping playback Press the STOP button on the front panel or < on the remote control to stop playback. When playing a DVD, pressing STOP once performs a ‘resume stop’. If you now press PLAY, playback resumes from the point it was stopped. If you press STOP twice, this is a ‘complete stop’, and playback resumes from the beginning of the disc. Front panel menu navigation If desired, it is possible to navigate disc and player menus using the front panel buttons; to this end, the NAV button is provided. Pressing the NAV button causes the player to enter ‘navigator’ mode, indicated by ‘NAV’ being shown on the front panel display. In this mode, the front panel buttons take on the functions illustrated above each button, for example the STOP and PAUSE buttons become 6 and 5. To exit navigator mode, press the NAV button for a second time. DV137 E-7 Using the CR-515 remote control DISP (display) Standby Press Standby to toggle the standby state of the DVD player. Dims or turns the DV137’s display on or off. Turning the display off generally gives a slight improvement in sound quality. Pressing DISP once turns the display off; twice dims the display. To restore the display to full brightness, press DISP a third time. HDMI Selects the picture resolution for HDMI output. CLEAR * Use CLEAR to clear a numeric field. Reserved for future use � ���� � � � � � � � � � ���� � ����� 0–9 keypad This allows direct access to individual tracks on audio CDs. To select a track, press the corresponding keypad button followed by OK. For tracks greater than 9, enter the digits in sequence. For example, to play track 15, press 1, then 5, then OK. SRCH (search) Accesses the ‘Search’ menu to navigate to any point on the disc. OPEN Opens and closes the disc tray Page Up/Down (DVD-audio)/ Slow play (other discs) ���� ���� DVD-audio: Some DVD-audio discs allow the user to browse through images (photographs of the artist, lyrics, etc.) while music is being played. Use the 3 or 4 buttons to change to the previous/next page. Note that this is not available on all DVD-audio discs. Other discs: Press 3 or 4 on the remote control to play slow forward or backwards. There are four speeds of slow playback: 1/8, 1/6, 1/4 and 1/2. Press the button repeatedly to cycle through the different speeds. To resume normal playback speed, press PLAY. Note that slow-play does not apply to audio CDs or DVDaudio discs. ������ Fast play and Skip chapter/tracks Cursor pad and OK button �� Use the cursor pad to navigate the On-Screen Display (OSD) and menu pages. Confirm your selection with the OK button. SETUP ����� ���� Pause (;), Play (4) and Stop (<) (see page 7). ���� These buttons are described on the next page. MENU Press MENU to access the DVD ‘Disc’ menu. This navigation menu is specific to a disc and varies for each title, but typically offers facilities to select chapters, languages, and view extra material such as trailers or documentaries. Playback control Advanced controls Press STATUS to give play status information about the current disc. Press STATUS again to close the status display. The status information displayed varies depending on the type of disc – DVD, CD or VCD. Play fast (7 8) and Skip (0 /) chapters/ tracks in both directions (see page 7). ‘Setup’ allows you to configure the DV137 for use in your system. Ensure no disc is playing and press SETUP to access the ‘Setup’ menu. STATUS ���� ����� ��� Once the menu has been accessed, use the cursor pad to move around the menu and press OK to activate a menu ‘button’. MUTE ���� ����� ���� ����� Stops sound to the speaker outputs of certain Arcam amplifiers. ��� ��� ���� ����� Volume +/– Adjusts the volume on Arcam remote-controllable amplifiers. ������ DV137 E-8 Note that the volume (+/–) controls and MUTE button have no effect on the audio output level of the DVD players. If the remote control receiver (located on the right of the frontpanel window) is not ‘visible’ to the remote control hand-set, then the remote control will not work! Either locate the unit differently, or take advantage of the remote control input on the rear of the player (consult your dealer for further information on this option). E nglish Advanced controls (CR-515) SUBT (subtitle) Press SUBT on the remote control to cycle through the available subtitle languages, including ‘OFF’. Some discs force subtitles on, overriding any set up preferences. MODE This button brings up a menu very similar to the ‘Audio’ page of the Set-up menu (as described on page 17) and allows the Dolby Pro Logic II settings to be changed while the disc is being played. TITLE Press TITLE to access the DVD’s ‘Title’ menu. Note that this feature applies only to multi-title discs. TRIM This button brings up a menu very similar to the ‘Trims’ page in the Set-up menu (as described on page 19). It allows on-the-fly changes to the relative volume of each speaker in your system, while a disc is being played. RTN (return) Press RTN to move back through the DVD ‘Disc’ and ‘Title’ menus. Note that this feature is only of use with discs using multi-level menus. For a full description, see page 19. ZOOM Press ZOOM to enlarge a particular area of the picture. Each press of the ZOOM button increases the zoom. Pressing ZOOM when the maximum enlargement has been reached returns the image to normal size. ���� ���� ����� ��� ���� ����� ���� ����� ��� ��� ���� ����� RPT (repeat) AUDIO Some DVDs offer the facility to select different audio tracks. Press AUDIO to cycle through the available tracks. The on-screen display shows the number, language and type of audio track, e.g. ‘1 Eng D 6CH’. SHUFF (shuffle) Press RPT to to cycle through the repeat play options. Press SHUFFLE to toggle random playback A–B This button enables you to repeat a selected section from the disc (see page 20). ANGLE Some DVDs offer the facility to select different camera angles. If this feature is available the ‘camera’ symbol lights in the display. Press ANGLE to cycle through the available angles. DV137 E-9 Using the CR-415 remote control 0–9 keypad This allows direct access to individual tracks on audio CDs. To select a track, press the corresponding keypad button followed by OK. For tracks greater than 9, enter the digits in sequence. For example, to play track 15, press 1, then 5, then OK. OPEN Opens and closes the disc tray DISP (display) Dims or turns the DV137’s display on or off. Turning the display off generally gives a slight improvement in sound quality. Pressing DISP once turns the display off; twice dims the display. To restore the display to full brightness, press DISP a third time. A–B This button enables you to repeat a selected section from the disc (see page 20). RPT (repeat) Press RPT to cycle through the repeat play options. DVD Standby OPEN 1 2 3 DISP 4 5 6 A–B 7 8 9 RPT CLEAR 0 PROG both directions (see page 7). SETUP Use CLEAR to clear a numeric field. DVD-audio: Some DVD-audio discs allow the user to browse through images (photographs of the artist, lyrics, etc.) while music is being played. Use the ( or ) buttons to change to the previous/next page. Note that this is not availble on all DVD-audio discs. 8) and Skip (0 /) chapters/tracks in ‘Setup’ allows you to configure the DV137 for use in your system. Ensure that no disc is playing and press SETUP to access the ‘Setup’ menu. CLEAR Page Up/Down (DVD-audio)/ Slow play (other discs) Fast play and Skip chapter/tracks Play fast (7 Press Standby to toggle the standby state of the DVD player. Note that Arcam CD players are not controlled by this button. SETUP MENU Other discs: Press ( or ) on the remote control to play slow forward or backwards. There are four speeds of slow playback: 1/8, 1/6, 1/4 and 1/2. Press the button repeatedly to cycle through the different speeds. To resume normal playback speed, press PLAY. OK Note that slow-play does not apply to audio CDs or DVDaudio discs. MENU Playback control Press MENU to access the DVD ‘Disc’ menu. Pause (;), Play (4) and Stop (<) (see page 7). Advanced controls These buttons are described on the next page. This navigation menu is specific to a disc and varies for each title, but typically offers facilities to select chapters, languages, and view extra material such as trailers or documentaries. AUDIO TRIM TITLE RTN ZOOM ANGLE SUBT MODE RAND STATUS MEM SRCH Once the menu has been accessed, use the cursor pad to move around the menu and press OK to activate a menu ‘button’. Cursor pad and OK button Use the cursor pad to navigate the On-Screen Display (OSD) and menu pages. Confirm your selection with the OK button. MUTE Stops sound to the speaker outputs of certain Arcam amplifiers. Volume +/– CR-415 Adjusts the volume on Arcam remote-controllable amplifiers. Note that the volume (+/–) controls and MUTE button have no effect on the audio output level of the DVD players. DV137 E-10 If the remote control receiver (located on the right of the frontpanel window) is not ‘visible’ to the remote control hand-set, then the remote control will not work! Either locate the unit differently, or take advantage of the remote control input on the rear of the player (consult your dealer for further information on this option). E nglish Advanced controls (CR-415) SUBT (subtitle) TRIM This button brings up a menu very similar to the ‘Trims’ page in the Set-up menu (as described on page 19). It allows on-the-fly changes to the relative volume of each speaker in your system, while a disc is being played. For a full description, see page 19. Press SUBT on the remote control to cycle through the available subtitle languages, including ‘OFF’. Some discs force subtitles on, overriding any set up preferences. TITLE Press TITLE to access the DVD’s ‘Title’ menu. Note that this feature applies only to multi-title discs. AUDIO Some DVDs offer the facility to select different audio tracks. Press AUDIO to cycle through the available tracks. RTN (return) Press RTN to move back through the DVD ‘Disc’ and ‘Title’ menus. Note that this feature is only of use with discs using multi-level menus. The on-screen display shows the number, language and type of audio track, e.g. ‘1 Eng D 6CH’. ZOOM Press ZOOM to enlarge a particular area of the picture. Each press of the ZOOM button increases the zoom, normally until a maximum of 4x enlargement is reached. Pressing ZOOM when the maximum enlargement has been reached returns the image to normal size. AUDIO TRIM TITLE RTN ZOOM ANGLE SUBT MODE RAND STATUS MEM SRCH RAND MODE This button brings up a menu very similar to the ‘Audio’ page of the Setup menu (as described on page 17) and allows the Dolby Pro Logic II settings to be changed while the disc is being played. SRCH (search) Press RAND to toggle random playback It is possible to get access to any point on the disc directly using the ‘Search’ menu. STATUS Press SRCH to access the ‘Search’ menu. Press STATUS to give play status information about the current disc. Press STATUS again to close the status display. The status information displayed varies depending on the type of disc – DVD, CD or VCD. ANGLE Some DVDs offer the facility to select different camera angles. If this feature is available the ‘camera’ symbol lights in the display. Press ANGLE to cycle through the available angles. DV137 E-11 Configuring your DVD player Introduction This section of the document describes the use of the ‘Set-up’ menu, which is used to configure your player for your system and your personal preferences. Obtaining a picture To view the Set-up menu for the initial configuration, we recommend the use of the composite video output to connect to your display device. This is because the high quality video output has several display modes and may be incompatible with your display device in its default configuration. Ensure that your display device is switched on and that you have selected the correct video input. You should see the image shown on the right. This is the image that the DVD player gives whenever there is no disc playing. NOTE: To protect your screen from damage caused by persistent static images, a ‘screen saver’ facility activates after a few minutes of inactivity. When this occurs, the image shown on the right will be ‘bounced’ around the screen. To reset the image to the central position, press the stop button on the player or on the remote control. Using the Set-up menus Your DV137 has two different set-up menus: < The Set-up menu allows configuration of all aspects of your DVD player. Configurable items and their potential values are described on the following pages. < The Display set-up menu is a series of video test patterns with instructions that will allow you to configure your display optimally for your DVD player. The Set-up menu The Set-up menu comprises six pages of options. The tabs on the left side of the screen show the pages available, indicating the nature of the items on each page. To change between pages, move the menu highlight to the appropriate tab and press E. To change an item first use the UP/DOWN controls to highlight the item, then press OK to open the list of options for the menu item. The current option for the menu item is indicated. The UP/DOWN controls can be used then to select the new option and pressing OK confirms the new selection and closes the option list. (If the item to be changed is controlled by a slider, press OK to activate the slider and OK again when the desired value has been selected.) Note that items that are not applicable currently (for example, the Pro Logic II settings when Pro Logic II processing is switched off) are shown ‘greyed out’, and cannot be highlighted or changed. To enter the Set-up menu, press the SETUP button on the remote control. Press Setup for a second time to close the menu. The Display set-up menu For optimum video performance it is necessary to configure your display for the video source – your DVD player, in this case. A series of test patterns generated by your DVD player will allow you to optimise colour balance, contrast, brightness and to centre your picture. Full instructions for each test pattern are displayed on the screen before the test pattern is shown. To enter the Display set-up menu, move the menu highlight to the ‘Display’ button, then press OK. Press Setup for a second time when you have finished. DV137 E-12 Operational set-up Preferred language This settings allows you to specify your preferred language. The default language is English, but three other languages (French, German and Dutch) are supported. Status messages On Pop-up messages are enabled. Off No pop-up messages, only menus when required. E nglish This setting controls the ‘pop up’ messages that appear on screen. Certain messages, such as ‘No Disc’ are always shown regardless of how this is set. Subtitle display This setting controls which subtitles displayed on your TV (although note that some discs may force the subtitles to be displayed regardless of how this item is set). Off No Subtitles. On Subtitles are displayed in the ‘preferred language’. Closed Caption Closed-caption information from the disc (where available) is sent to your TV. The default setting for Subtitle is ‘Off’. Note that not all discs will have your preferred language available as a subtitle. Some discs will require you to chose your preferred subtitle language from the disc menu and some discs may force the subtitles to be displayed regardless of how this item is set. Closed-caption information is available only on discs produced for the US and Canadian markets and will be displayed only by TVs that support NTSC-format signals. Auto power off This setting can be used to put your player into stand-by mode automatically if the player is left unused. Off The player will not enter stand-by mode automatically. 30 minutes The player will enter stand-by mode automatically after 30 minutes disuse. DVD priority Many DVD-Audio discs are actually dual DVD-Audio/DVD-Video discs. To decide which part is selected for playing, you can set the priority with this control. DVD-Audio The DVD-Audio part is played DVD-Video The DVD-Video part is played SACD priority Many SACD discs are actually hybrid SACD/CDs. To decide which layer is selected for playing, you can set the priority with this control. SACD The SACD layer is played CD The CD layer is played DivX subtitles If you use DivX subtitles, choose the appropriate language group from the list. The factory setting is ‘Normal’. DivX registration DivX Video-On-Demand (VOD) is a digital video delivery service that lets you copy video content from your computer to a CD or DVD for playback on your DV137. To register for this service, a playergenerated registration code is required. This code can be seen by selecting the ‘DivX registration’ button. For more information on this service, please visit www.divx.com/vod. DV137 E-13 Video set-up If your display device is HDMI-compliant, the DV137 can read the capabilities of the display device directly; the information allows the DV137 to configure its output automatically and optimally for the attached device. See page 22 for more information about connecting to HDMI devices. Main video output This setting is to tell the DV137 which of the available video outputs is the ‘main’ output, i.e., in the event of a conflict between video outputs, which output has priority. HDMI Select this item if you are connecting the DV137 to an HDMI-compliant device, and you are happy for the DV137 to configure itself automatically for the device it is attached to. This is the recommended setting if you are connecting the DV137 to an HDMI-compliant device. HDMI as DVI Analogue Select this item if you are connecting the DV137 to a DVI-compliant device, and you are happy for the DV137 to configure itself automatically for the device it is attached to. Select this setting if you are not connecting the DV137 to a HDMI-compliant device. Display standard This is set at the factory to be appropriate for the type of display device used in your country. Should you need to change this setting, the options are as follows. Auto The video output is taken from that recorded on the disc. When no disc is playing, the logo screen is displayed using the standard of the last disc played. NTSC NTSC is always used as the video standard. Note that PAL discs are converted to NTSC, but this causes some reduction in the quality of the video output (and may cause the video to become ‘jerky’). This is the best setting to use if your display device can accept only NTSC video (this is generally the case in North America); better results are obtained by using ‘Auto’, but your display device must be able to support PAL. PAL PAL is always used as the video standard. Note that NTSC discs are converted to PAL, but this causes some reduction in the quality of the video output (and may cause the video to become ‘jerky’). Better results will be obtained by using ‘Auto’, but your display device must be able to support NTSC. HDMI as DVI Even though your display device may be fully HDMI compliant, it is possible that in-line receivers or repeaters may work only in DVI mode. In this case, it is useful to disable HDMI, forcing DVI output instead. Selecting ‘HDMI as DVI’ will force the DV137 into DVI mode even when an HDMI device is detected. Display shape This needs to be set correctly for the type of display device you have and the type of display you prefer. 4:3 Letterbox Use this setting if you have a conventional 4:3 display device, and you prefer to view wide screen movies in letterbox format (with black bars at the top and bottom). 4:3 Panscan Use this setting if you have a conventional 4:3 display device, and you prefer to view wide screen movies in Pan & Scan format (cropping the sides of the image). 16:9 Use this setting if you have a wide screen (16:9) display device. Material in 16:9 format is displayed so as to fill the screen. If you have a 4:3 display device and you have set a preference for Panscan, it does not mean you will always see movies in this format, since Panscan display must be supported by the disc being played. HDMI resolution Normally the video resolution of the HDMI output is set to the native format of the connected display device. If you wish to specify the output format, however, use this setting. Auto The output resolution will be set appropriately for the connected display. This is the recommended setting if you are connecting the DV137 to an HDMI- or DVI-compliant device. SD-interlaced The HDMI output will be restricted to interlaced resolutions (i.e., NTSC 480i or PAL 576i). This setting cannot be used for DVI devices. SD-progressive The HDMI output will be restricted to progressive resolutions with no scaling (i.e., NTSC 480p or PAL 576p). (Other resolutions) Resolutions of 720p, 1080i and 1080p are also available. This setting can be changed only if ‘Main video output’ is set to ‘HDMI’ or ‘HDMI as DVI’. DV137 E-14 HDMI colour space This setting controls the type of video (the colour space) given out over the HDMI connection. Auto The colour space will be set appropriately for the connected display. YUV The HDMI connection carries Y, Pb, Pr (YUV) component video. RGB (video) The HDMI connection carries RGB video with standard video levels. RGB (PC) The HDMI connection carries RGB video with PC (0–255) video levels. E nglish This is the recommended setting if you are connecting the DV137 to an HDMI- or DVI-compliant device. This setting can be changed only if ‘Main video output’ is set to ‘HDMI’. This setting has no effect on the analogue video outputs. Analogue resolution Allows selection of interlaced or de-interlaced (progressive scan) output from the component video connection. SD-interlaced The video output will always be interlaced (standard definition video). Use this setting if your display device does not support progressive scan. SD Progressive The component- and HDMI-video outputs will put progressive scan video out for both PAL and NTSC discs. Use this setting only if your display device supports progressive scan in both PAL and NTSC formats. This setting can be changed only if ‘Main video output’ is set to ‘Analogue’. Note that the video on the component video connections always matches that on the HDMI link, so changing this value when in ‘Analogue’ mode will change the HDMI output too. The S-video output will be muted when progressive scan is active. Analogue NTSC black (Pedestal) This setting controls the ‘pedestal’ signal or black level when the NTSC video standard is used. 0 IRE This removes the pedestal from NTSC video. This setting should be used in Japan, and also if you are using RGB video, whatever the country. 7.5 IRE This is the standard pedestal level that should be used in all countries that use NTSC video, with the exception of Japan. Not all displays support progressive scan. If you enable progressive scan accidentally and your display does not support it, you may be unable to view the picture from the DVD player, including the on-screen display required to change the video settings back. If this happens, use a composite or SCART video connection (which always carry interlaced video) between the DV137 and your display device in order to be able to see the set-up menu and correct the mistake. This setting can be changed only if ‘Main video output’ is set to ‘Analogue’. Note that this setting has no effect on PAL, progressive scan or HDMI outputs. DV137 E-15 Audio set-up This section allows you to configure the analogue, digital and HDMI audio outputs. In particular, the digital output type needs to be set correctly if you are using an external audio decoder, receiver or D-A converter. Digital audio output This setting configures the digital audio output – coaxial, optical and HDMI. S/PDIF stereo PCM When the ‘Stereo PCM’ digital output is selected, all audio material played is down-mixed to stereo and output as stereo PCM. Use this setting if you have an external D-A converter that supports only 2-channel PCM. S/PDIF bitstream The Bitstream setting supports the following audio standards: < 2 channel PCM (on CDs or DVDs) < Dolby Digital < MPEG multi channel < DTS multi channel Use this setting if you have a receiver/decoder that supports Dolby Digital. HDMI The primary audio connection is the HDMI link. Select this item if you are using an HDMI connection between your DV137 and your receiver or display device. The audio type will be changed automatically to work with the device attached to your player. Do not select this item if your HDMI display device cannot decode audio or if you are connecting to a DVI device (since a DVI link cannot carry audio) – choose one of the other settings instead. DVD sample rate This needs to be set correctly if you are using an external audio decoder, receiver or D-A converter connected to the S/PDIF digital audio output. Max 96K Choose this option if your external audio decoder is able to process digital audio with a sample rate of up to 96kHz, or if you are not using the digital audio outputs. This is the maximum sample rate present on DVD-video discs. Max 48K Choose this option if your external audio decoder is unable to process digital audio with a sample rate of up to 96kHz. This is the normal setting for this menu item. Note that this setting is relevant only to the output from DVD-video discs. Audio compression Allows compression of the audio stream to be turned on or off, where ‘On’ is intended for ‘late night’ listening when large volume changes are not desirable. Turning compression on decreases the volume of the louder passages, i.e., the total dynamic range of the audio is reduced. Normally, however, this item is set to ‘Off’, to disable compression. This menu option affects both the analogue and the HDMI outputs (although note that the HDMI output is affected only when multi-channel uncompressed audio is requested by the receiver, not otherwise). The co-axial and optical digital audio outputs are never affected by this menu setting. Compression is available only on Dolby Digital recordings. VCD mode Some VCD discs are produced with a dual-mono soundtrack. This means that the left audio channel carries one language, the right another. In this case it can be useful to listen to just one of the channels. Stereo Choose this option to play the VCD with both channels audible. Left channel only Choose this option to play the VCD with only the left channel audible. The audio from the left channel will be routed to both the left and right speakers. Right channel only Choose this option to play the VCD with only the right channel audible. The audio from the right channel will be routed to both the left and right speakers. This setting applies only to VCD discs. DV137 E-16 Dolby Pro Logic II Dolby Pro Logic II decoding is designed to produce a 5-channel analogue output from two‑channel source material. Off No Dolby Pro Logic decoding is performed. Dolby Pro Logic Dolby Pro Logic decoding is performed. Dolby Pro Logic decoding is a legacy mode, and we recommend using one of the Dolby Pro Logic II decoding options instead. Movie Movie mode should be used with material marked as ‘Dolby Surround’ encoded. Music Music mode is for use with any stereo music recording. As the optimum decoding method varies according to the recording, Music mode allows user adjustment of the processing characteristics; information about adjusting the Music mode by using ‘Dimension’, ‘Centre Width’ and ‘Panorama’ controls can be found below. Matrix The Matrix mode is the same as the Music mode except that the directional enhancement logic is turned off. Matrix mode may be used to enhance mono signals by making them seem ‘larger’. E nglish Set this item to one of the following. Due to the different recording methods used for movies and music, it is recommended that the correct decoding mode for your source material is used to obtain the best results. Dimension (This setting can be adjusted only when Dolby Pro Logic II Music mode is selected.) ‘Dimension’ allows you to adjust gradually the soundfield either towards the front or towards the rear. If a recording is too spacious or strong from the surrounds, it can be adjusted ‘forward’ to get a better balance. Likewise, if a stereo recording is somewhat too ‘narrow’ sounding, it can be adjusted toward the rear to get a more enveloping, immersive result. We recommend ‘Dimension’ is set to 0 for normal use. Centre Width ����� ���� ������ ����� ����� (This setting can be adjusted only when Dolby Pro Logic II Music mode is selected.) With Dolby Pro Logic II decoding, dominant centre signals come only from the centre speaker. If no centre speaker is present, the decoder splits the centre signal equally to the left and right speakers to create a ‘phantom’ centre image. The Centre Width control allows variable adjustment of the centre image so it may be heard only from the centre speaker; only from the left/right speakers as a phantom image; or from all three front speakers to varying degrees. We recommend ‘Centre Width’ is set to 3 for normal use. Panorama Mode Display Centre spreading effect 0 No centre spreading 1 20.8° 2 28° 3 36° 4 54° 5 62° 6 69.8° 7 Phantom centre The ‘Centre Width’ setting for Dolby Pro Logic II Music Mode (This setting can be adjusted only when Dolby Pro Logic II Music mode is selected.) Extends the front centre image to include the surround speakers for an exciting ‘wrap-around’ effect with side wall imaging. DV137 E-17 Speaker set-up This menu screen allows you to specify the speaker configuration that is connected to the analogue ouputs of your DVD player. (If you are using the HDMI or SPDIF audio outputs, this speaker configuration should be performed in your surround-sound receiver.) It is important that this configuration reflects accurately the actual situation, otherwise audio quality may be severely compromised. The speakers are indicated as follows: Front L/R This is the setting for the ‘Front’ speakers Centre This is the ‘Centre’ speaker setting. Surround L/R This is the setting for the ‘Surround’ speakers (normally next to or behind the user). Subwoofer This is used to indicate whether a subwoofer is connected. For each speaker, the player can be configured to send either audio with the full frequency range of the source material, or with a reduced frequency range. The reduced frequency range option is used normally when ‘satellite’ speakers are used for the surround channels; these cannot handle low frequency information. Full frequency speakers are commonly called ‘Large’ speakers, with reducedrange speakers given the name ‘Small’. Low frequency information is re-routed from ‘small’ speakers to ‘large’ speakers, or to the subwoofer (depending on the speaker configuration). NOTES: 1. Any speaker that is not connected should be identified by selecting ‘Not Present’ for that speaker. 2. Although the DV137 is very flexible in the speaker configurations it can handle, some restrictions have been applied. For example, if no subwoofer is present, then it is not possible to configure the Front speakers to be ‘Small’ since there would be nowhere to redirect the low frequency information. Sub with stereo This setting is relevant to 2-channel source material only (such as CDs). It controls whether the low frequency information is redirected to the subwoofer, or not. This item can be changed only if a subwoofer is specified as present in the system. Not used No redirection of low-frequency information occurs; all the audio is sent to the Front speakers. Bass redirected Low-frequency information is redirected to the subwoofer, with the remaining (higher-frequency) information sent to the Front speakers. Bass duplicated All the audio is sent to the Front speakers. In addition, the low-frequency information is duplicated to the subwoofer. Crossover Frequency This setting defines the frequency at which bass-redirection begins. Frequencies below this level are redirected from ‘small’ speakers to the Fronts or to the subwoofer; frequencies above this level are not redirected. The redirection frequency is the same for all the speakers in a system. The optimum crossover frequency depends on the characteristics of your speaker set-up, and is best determined by experimentation. We suggest you start at 100Hz. Delay set-up The delay set-up menu page allows two different types of delay to be configured: those due to speaker positioning and those due to video post-processing. Speaker positioning The relative positioning of speakers within a room (particularly a large room) may mean that sound from some speakers arrives at the listener later than sound from others. By altering the delay settings for the different speakers, this difference in arrival time can be reduced or eliminated. When setting the delay, it should be imagined that the listener is sitting in a circle of the speakers; the delay indicates the distance of the speaker from the listener. Measurement Units Your DV137 allows you to choose the measurement units that you feel most comfortable with: centimetres or feet. Delays Delays for the front, centre and surround speakers can be set using the associated sliders. Specifying the different speaker distances will cause a slight delay to be added to the output of the closest speakers so that the sound from all the speakers will arrive at the listener at the same time. Note that these delay sliders affect only the analogue and the HDMI outputs (although the HDMI output is affected only when multi-channel uncompressed audio is requested by the receiver, not otherwise). The SPDIF digital audio output is never affected by changes here. If you are using the SPDIF connection between the DV137 and your receiver, set all of the delays to zero. DV137 E-18 Video post-processing (lip-sync.) Delay (NTSC/PAL) Modern displays and video scalers often employ digital video processing that can introduce a significant video delay. The ‘Delay’ menu items allow correction of this effect by delaying the audio soundtrack up to 150 milliseconds. The amount of correction required in a given system is best determined by experimentation. < If the interlaced video outputs of the DV137 are in use and the display is converting the signal to progressive scan then we recommend a delay of 50–80ms, depending upon the display. E nglish < If the progressive video output of the DV137 is in use, the player corrects automatically for its own processing delays and it is unlikely that additional delay will be necessary. Therefore, start by setting these items to 0ms (no delay). Trim set-up The relative sensitivity (volume) of different speakers can lead to some speakers sounding disproportionately loud or quiet, relative to others in the system. The trims setting of your DV137 can help to address this inbalance. This page is relevant only if you are using the analogue audio outputs of the DV137 to connect to your amplifier/receiver. If this is not the case, set all the trims to be 0 dB. Test Noise Setting this item to ‘On’ causes pink noise to be generated from the speaker indicated by the on-screen highlight. The noise is at the volume indicated by the slider for the speaker. Setting this to ‘On’ may be useful in ensuring that the relative volume for each speaker is the same. Note that this setting is set automatically to ‘Off’ on exit from this menu page. Trims Trims for all the speakers can be set using the associated sliders. These settings are useful if the speakers have different sensitivities (and so have different volumes for the same input levels). The trims can be set in 1dB steps. Subwoofer/Sub with stereo trims Both the ‘Subwoofer’ and the ‘Sub with stereo’ trims control the subwoofer trim setting. ‘Subwoofer’ is the trim used when multi-channel material is being played; ‘Sub with stereo’ is the subwoofer trim used with 2-channel material. Completing the set-up Complete the set-up procedure by pressing SETUP on the remote control. This saves all the data and closes the set-up menu. You can press SETUP at any time while in a menu to quit from it. To return to the set-up menu at any time, ensure that there is no disc playing and press the SETUP button. DV137 E-19 DVD/VCD special playback modes This section explains the special playback modes for DVDs and VCDs. The operations described here are not exactly the same for DVDs and VCDs, but very similar. Note that many VCDs have a single track, so some operations involving tracks will not be relevant. Jumping to a particular point Press the SRCH button on the remote control to open the ‘Search’ menu: If the disc is playing, then the elapsed and total times on the disc are shown in the top right of the page. A jump can be performed using different specifiers: jump to a particular time or to a specified chapter/track on the disc. Time Highlight the ‘Time’ field and enter the time in hours, minutes and seconds, then press OK. The Search menu is removed from the screen and playback starts from the time specified. Invalid time entries are ignored. Title/Chapter (Applies to DVDs only) To jump to a title or chapter, highlight the title/chapter position and enter the number of the title/chapter to jump to, before pressing OK. It is possible to jump to a chapter within a different title to the current one by entering a value into both fields. Note that specifying a title without a chapter will jump to the first chapter in the title. Group/Track (Applicable to DVD-audio discs only.) To jump to a group or track, highlight the group/track position and enter the number of the group/track to jump to, before pressing OK. It is possible to jump to a track within a different group to the current one by entering a value into both fields. Note that specifying a group without a track will jump to the first track in the group. Track (Applies to VCDs only) To jump to a specified track on a VCD, enter the track number in the ‘Track’ field, then press OK. Note that many VCDs have only one track. Closing the Search menu When displayed, this menu screen can be closed again by pressing the SRCH button (which also has the effect of cancelling the search). Special playback modes Repeat, shuffle or looped (A-B repeat) playback modes are available. Repeat Press the RPT button on the remote control to cycle through the repeat options. For DVDs, a chapter or title repeat may be selected (i.e., play continuously the current chapter or the current title). For VCDs, a track or disc repeat is available. When a chapter/track repeat is selected, the loop symbol on the front panel display is illuminated and the current chapter/track is repeated. If a title/disc repeat is selected, the loop symbol and ‘ALL’ are illuminated and the current title/disc is repeated. To cancel repeat, press the RPT button until ‘Repeat: Off’ is displayed. Shuffle Press the SHUFF (CR-515) or RAND (CR-415) button on the remote control to switch shuffle play on.This causes the chapters/tracks to be played in random order. To cancel random play, press the SHUFF (CR-515) or RAND (CR-415) button for a second time. A-B repeat The DV137 can repeat a specific section of a DVD or VCD; this is called an A-B repeat. To perform an A-B repeat, wait until the disc is at the point where you want the repeat to start, then press A-B. The OSD shows a repeat symbol, followed by ‘A–’, and the front panel shows ‘A–’. Press A-B again at the point you want the repeat to end. The repeat symbol, followed by ‘A-B’ is shown on the display device, and the front panel shows ‘A-B’. The selected section is repeated in a loop. To cancel the A-B repeat, press A-B again. An ‘Off’ message is displayed on the OSD. DV137 E-20 CD disc navigator screen When a disc containing audio/video/image files is detected by the DVD player, the disc navigator screen is displayed. In the example, a CD-R containing MP3 files is shown. E nglish The following areas can be identified: File/Folder Control window The name of the file or folder that is currently selected. The following advanced functions can be accessed from here: Filter: You can use this to allow only certain types of file to be displayed (audio, photo and video) Folder/track list area Repeat: Repeat playback of the current file, or all the files in the folder. The names of folders, files and tracks are displayed here. Selecting an item here and pressing OK plays the file, displays the photo, or opens the folder, as appropriate. Mode: The files can all be played back in a random or shuffled order. An ‘intro’ mode is also available whereby the first few seconds of each track is played as a preview. Preview area for JPEG (photographic) images. Edit mode: If you wish to program a specific sequence for playback, activate the edit mode, then return to the track list area. The track list can now be browsed, but each time OK is pressed, a tick appears by the track. Once the sequence of chosen tracks has been selected, return to the control window and select ‘Add to program’. To play the sequence, go to ‘Program view’ and press PLAY. Program view: Select ‘Program view’. The track list now shows only those items in the programmed sequence. To play a programmed sequence, press PLAY. Return to ‘Browser view’ to view all the available tracks. Add to program: Adds the selected tracks to the program sequence. Clear program: Clears the program sequence. DV137 E-21 The HDMI interface If you have a HDMI- or DVI-equipped monitor or display, you can connect it to the DV137 using a HDMI cable. The HDMI connector carries uncompressed digital video, as well as digital audio. About HDMI HDMI (High Definition Multimedia Interface) supports both video and audio on a single digital connection for use with DVD players, digital TV, set-top boxes, and other AV devices. HDMI was developed to combine the technologies of High-bandwidth Digital Content Protection (HDCP) and the Digital Visual Interface (DVI) in one specification, with the addition of transmission of digital audio information; HDCP is used to protect digital content transmitted to DVI-compliant displays. HDMI has the capability to support standard or high-definition video, together with stereo or multichannel surround-sound audio. HDMI features include uncompressed digital video, one connector (instead of several cables and connectors), and communication between the AV source and AV devices. Connecting using HDMI If the HDMI connector is to be used, we recommend first setting the ‘Main video output’ item on the video menu page to ‘HDMI’. This will give full ‘plug and play’ functionality. See page 14 for details on how to do this. Use a HDMI cable to connect the HDMI socket on this player to a HDMI socket on a compatible display device or receiver. The arrow on the cable connector body should be face up for correct alignment with the connector on the DV137. If the DV137 has been configured to ‘HDMI’, then the DV137 will configure its video output automatically to match the capabilities of the attached HDMI device. NOTE: A HDMI connection can be made only with HDMI or DVI-equipped components compatible with both DVI and HDCP. Note that if you choose to connect to a DVI device, you will need an adaptor (HDMI to DVI) to do so; a DVI/HDCP connection, however, does not support audio signals. If you require further information on the possibilities for connecting your DV137 to your DVI/HDMI equipped display device, please contact your Arcam dealer. Troubleshooting Problems with video No video (blank screen) < Check that the HDMI cable is connected correctly at both ends. If an HDMI-equipped A/V receiver is in use, try connecting the DV137 directly to the display device, in order to isolate where the fault may lie. < Check that the display device is set to display the HDMI input (i.e., has not been set to some other video input, instead). < Check that the HDMI input of the receiver and/or display device is enabled. See the user handbook of the connected device for details on doing this. < Using an alternative video display device (e.g., connected via the composite video out), check that the ‘Main Video Output’ item on the Video page of the Set-up menu is set to ‘HDMI’. See page 14 for details on how to do this. < Consult the user handbook of the display device to ensure that it can handle the output formats provided by the DV137. The DV137 can provide the following: 720 x 480p (NTSC progressive scan) 1280 x 720p 720(1440) x 480i (NTSC interlaced) 1920 x 1080i 720 x 576p (PAL progressive scan) 1920 x 1080p 720(1440) x 576i (PAL interlaced) At least one of these standards must be supported by the connected device in order for it to work with the DV137. No video (random noise) Random noise will be displayed if the content-protection algorithm fails to authenticate the attached device. This will occur, for example, if a DVI device that does not support HDCP (such as a computer monitor) is connected to the DV137. To attempt to isolate this problem, remove all discs from the DV137, then power-off both the DV137 and the connected display device. Switch the display device on, then the DV137 – at this point, the idle logo of the DV137 should be shown on the display device. If this is not the case, please check the items listed above for a blank screen. If the noise appears when a copy-protected disc (DVD) is played, then it is the authentication that is failing. Please contact your dealer for further information. Problems with audio The type of audio provided by the HDMI connector depends on the configuration of the DV137 (see ‘Audio Setup’ on page 16). Note that pure DVI devices (connections requiring a HDMI to DVI convertor cable) do not support audio via this connection. Note that for audio to be transmitted over HDMI, ‘Digital audio out’ must be set to ‘HDMI’. DV137 E-22 Remote-control codes The following table gives the IR-commands accepted by the DV137. The system code for the DV137 is 25 (in common with other Arcam DVD players). Command Decimal Code Power toggle 25–12 Power-on 25–123 Power-off 25–124 E nglish Power commands Playback control commands Command Decimal Code Track number ‘n’, (e.g., 1) 25–n (e.g., 25–1) Track forward 25–32 Track back 25–33 Fast forward 25–52 Fast rewind 25–50 Slow forward 25–30 Slow rewind 25–31 Open 25–45 Pause 25–48 Stop 25–54 Play 25–53 Display control commands Command Decimal Code Display 25–18 Advanced control commands Command Decimal Code Repeat toggle 25–29 Repeat A-B 25–59 Clear 25–58 Up 25–86 Down 25–85 Left 25–81 Right 25–80 OK 25–87 Shuff / Rand 25–64 Subtitle 25–65 Title 25–66 Menu 25–67 Zoom 25–68 Audio 25–69 Return 25–72 Angle 25–73 Setup 25–74 Status 25–75 Search 25–76 Mode 25–77 Trim 25–37 HDMI 25–88 DV137 E-23 Technical specifications General Power Requirements 100/115V or 230V AC, set by voltage selector switch on rear panel Power consumption < 35 VA Dimensions 435mm x 80mm x 350mm Weight net: 5.1kg; packed: 8.0kg Video outputs Composite video 1 x gold plated phono. 1V pk-pk in 75Ω S-Video 1 x 4-pin mini-DIN. Y 1V pk-pk in 75Ω, C 0.3V pk-pk in 75Ω Component video Interlaced or Progressive 3 gold plated phono sockets. Y 1V pk-pk in 75Ω, Pb 0.7V pk-pk in 75Ω, Pr 0.7V pk-pk in 75Ω SCART socket with RGB video All 0.7V in 75Ω, composite video 1V in 75Ω, and stereo audio Auto switching of TV with aspect ratio control HDMI 19-pin HDMI connector Supported video formats are: 720 x 576p, 720(1440) x 576i, 720 x 480p, 720(1440) x 480i, 1280 x 720p, 1920 x 1080i, 1920 x 1080p audio to 6-channel/96kHz (24-bit). Audio outputs Analogue audio outputs Stereo and multi-channel output on gold-plated phono sockets Output level 2.2V rms at 0dB signal, 4V rms with HDCD discs (left and right channels only) Frequency response 20Hz to 20kHz (+0.1db, –0.5dB) THD+N <0.005% for 1kHz 0dB signal, measured 22Hz–22kHz, unweighted Signal-to-noise ratio 105dB, measured 20Hz–20kHz, unweighted Digital audio output (IEC958) PCM/Dolby Digital/MPEG/DTS on gold plated phono (coax) and TOSLINK (optical) Accessories supplied CR-515 or CR-415 remote control 4 (CR-515) or 2 (CR-415) AAA batteries mains lead E&EO NOTE: All specification values are typical unless otherwise stated. Continual improvement policy Arcam has a policy of continual improvement for its products. This means that designs and specifications are subject to change without notice. Disc types supported The ARCAM DV137 DVD-player plays a range of disc types. These disc types include: < < < < < < < < < DVD-Video (single region, set at factory) DVD-Audio SACD version 1.3 MPEG2-encoded video files MPEG4-encoded (DivX) video files (in AVI, MP4, and MP4-Nero formatting CDDA (‘normal’ audio-CDs) including HDCD decoding, CD-R, and CD-RW Video CD, and SVCD MP2, MP3, WMA, and OGG audio files (some restrictions apply) JPEG image files on CD (Picture CDs) and DVD. Other disc formats may not play correctly in this player. DVD-R/RW and CD-R/RW discs (Audio CDs and Video CD/Super VCDs) recorded using a DVD recorder, CD recorder or personal computer are not guaranteed to play in the DV137. Incompatability may be due to a number of possibilities, including the type of disc used and the recording method. DV137 E-24 CD-R/RW and DVD-R/RW compatibility < This unit will play CD-R and CD-RW discs recorded in CD Audio or Video CD/Super VCD format, or as a CD-ROM containing the audio and video file types listed above. Other content may cause the disc not to play, or to create noise/distortion in the output. < This unit will play DVD-R/RW discs that are recorded using the DVD Video format, or as a DVDROM containing the audio and video file types listed above. < < This unit cannot be used for recording discs. < < E nglish < < This player is compatible with multi-session discs, but plays only sessions that are closed. Unfinalised discs cannot be played. File names must not contain blank spaces or special characters (.+/=). A CD-ROM used to compile your files must be ISO 9660 Level 1 or Level 2 compliant. CD physical format: Mode1, Mode2 XA Form 1, or Mode2 Form 2. File names up to 15 characters are supported. A DVD-ROM used to compile your files must be ISO 9660 Level 1 or Level 2 compliant. Each disc (CD or DVD) may contain up to 1500 directories. Each directory may contain up to 2100 files. Compressed audio compatibility The DV137 will play CD- or DVD-ROM discs containing files saved in the MPEG1 Audio Layer 2 (MP2), MPEG1 Audio Layer 3 (MP3), Windows Media file (WMA) and OGG formats, with sampling rates of 44.1 or 48kHz. Incompatible files will not play correctly, potentially causing noise or distortion on the audio outputs. < Fixed bitrate files are recommended. Variable bitrate (VBR) files are playable, but the playing time may not be shown correctly. < This player recognises only tracks that are named with the file extensions ‘.mp3’, ‘.wma’, ‘.mp2’ and ‘.ogg’ (upper-case equivalents may also be used). < There are many different recording bit-rates available to encode your audio files. Those supported by this player are: For MP2, MP3 and OGG playback The following constant bit rates are supported: 32, 64, 80, 96, 112, 128, 160, 192, 256 and 320 kilobits per second. Variable bit rate (VBR) between 96kb/s and 320kb/s is also supported. For WMA playback The following constant bit rates are supported: 48, 64, 80, 96, 128, 160 and 192kb/s. Note that MP3 audio encoded at 128 Kbps or higher should sound close to regular CD Audio quality. This player will play lower bitrate MP3 or WMA tracks, but be aware that the sound quality becomes noticeably worse at lower bitrates. Picture disc compatibility This DVD player will play CDs or DVDs containing JPEG images. < Only files with the .jpg or .jpeg extension will be recognised (upper-case equivalents may also be used). < Kodak picture discs are supported (only the files in the JPEG directory will be shown on the screen). < < Fuji picture discs are supported (select the JPEG files in the clips menu). Konica and QSS picture discs are not supported. PC created disc compatibility < If you record a disc using a personal computer, even if it is recorded in a ‘compatible format’ as listed above, there will be cases in which the disc may not be playable in this machine due to the setting of the application software used to create the disc. In these particular instances, check with the software publisher for more detailed information. < Check the DVD-R/RW or CD-R/RW software disc boxes for additional compatibility information. DV137 E-25 Guarantee Worldwide Guarantee This entitles you to have the unit repaired free of charge, during the first two years after purchase, at any authorised Arcam distributor provided that it was originally purchased from an authorised Arcam dealer or distributor. The manufacturer can take no responsibility for defects arising from accident, misuse, abuse, wear and tear, neglect or through unauthorised adjustment and/or repair, neither can they accept responsibility for damage or loss occurring during transit to or from the person claiming under the guarantee. The warranty covers: Parts and labour costs for two years from the purchase date. After two years you must pay for both parts and labour costs. The warranty does not cover transportation costs at any time. Claims under guarantee This equipment should be packed in the original packing and returned to the dealer from whom it was purchased, or failing this, directly to the Arcam distributor in the country of residence. It should be sent carriage prepaid by a reputable carrier – not by post. No responsibility can be accepted for the unit whilst in transit to the dealer or distributor and customers are therefore advised to insure the unit against loss or damage whilst in transit. For further details contact Arcam at: Arcam Customer Support Department, Pembroke Avenue, Waterbeach, CAMBRIDGE, CB5 9QR, England. Problems? If your Arcam dealer is unable to answer any query regarding this or any other Arcam product please contact Arcam Customer Support at the above address and we will do our best to help you. On line registration You can register your Arcam product on line at: www.arcam.co.uk Pembroke Avenue, Waterbeach, CAMBRIDGE CB5 9QR, England Issue 2 SH167