1
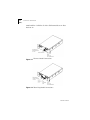
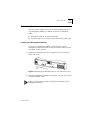
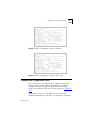
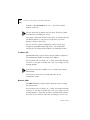
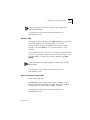
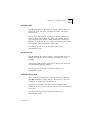
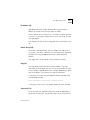
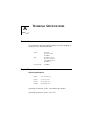
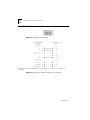
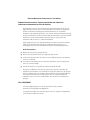
®
SUPERSTACK II UPS
MANAGEMENT MODULE
USER GUIDE
(3C16020 AND 3C16021)
3Com Corporation ■ 5400 Bayfront Plaza ■ Santa Clara, California ■ 95052-8145
© 3Com Ireland 1996. All rights reserved. No part of this documentation may be reproduced in any form or by
any means or used to make any derivative work (such as translation, transformation, or adaptation) without
permission from 3Com Ireland.
3Com Ireland reserves the right to revise this documentation and to make changes in content from time to time
without obligation on the part of 3Com Ireland to provide notification of such revision or change.
3Com Ireland provides this documentation without warranty of any kind, either implied or expressed, including,
but not limited to, the implied warranties of merchantability and fitness for a particular purpose. 3Com may
make improvements or changes in the products(s) and/or the program(s) described in this documentation at
any time.
UNITED STATES GOVERNMENT LEGENDS:
If you are a United States government agency, the documentation and software described herein are provided
to you subject to the following restricted rights:
For units of the Department of Defense:
Restricted Rights Legend: Use, duplication or disclosure by the Government is subject to restrictions as set forth
in subparagraph (c) (1) (ii) for restricted Rights in Technical Data and Computer Software clause at 48 C.F.R.
52.223 7013. 3Com Ireland c/o 3Com Limited, ISOLAN HOUSE, Brindley Way, Hemel Hempstead, Herts, HP3 9XJ
UK.
For civilian agencies:
Restricted Rights Legend: Use, reproduction or disclosure is subject to restrictions set forth in subparagraph (a)
through (d) of the Commercial Computer Software — Restricted Rights Clause at 48 C.F.R. 52.227.19 and the
limitations set forth in 3Com’s standard commercial agreement for the software. Unpublished rights reserved
under the copyright laws of the United States.
3Com is a registered trademark of 3Com Corporation. Registered trademarks are registered in the United States
and may or may not be registered in other countries.
SuperStack and 3TECH are trademarks of 3Com Corporation.
3ComFacts and Ask3Com are service marks of 3Com Corporation.
Unless otherwise indicated, 3Com registered trademarks are registered in the United States and may or may not
be registered in other countries.
CompuServe is a registered trademark of CompuServe, Inc.
Other brand and product names may be registered trademarks or trademarks of their respective holders.
CONTENTS
ABOUT THIS GUIDE
Introduction vii
Conventions vii
INTRODUCTION
Networking Terminology
1-1
INSTALLATION
The SuperStack II UPS Management Module 2-1
Before You Start 2-2
Installing the Management Module 2-2
CONFIGURING THE M ANAGEMENT MODULE
Before You Start 3-1
Local Configuration 3-1
Using the Configuration Screens 3-2
Changing the Configuration Fields 3-3
IP address (IP) 3-3
Netmask (NM) 3-4
Gateway (GW) 3-4
Token Ring Network Speed (RS) 3-4
BOOTP retries (BR) 3-5
Authorized Password (PW) 3-5
Command Security Level (LV) 3-5
UPS Unit ID (ID) 3-6
Get-community name (CG) 3-6
Set-community name (CS) 3-6
Trap Community name (CT) 3-6
sysName (SN) 3-7
sysContact (SC) 3-7
sysLocation (SL) 3-7
Attached Devices (AD) 3-7
Host Table Setup Screen 3-8
IP Address (HI) 3-9
Delete Entry (DE) 3-9
Ping (PI) 3-9
Trap Level (TL) 3-9
Trap Type (TT) 3-10
CONNECTING TO THE NETWORK
Ethernet Model 4-1
Token-Ring Model 4-1
Exiting the Configuration Program
4-1
TECHNICAL SPECIFICATIONS
Standards A-1
Physical Properties
Serial Port Pin Out
A-1
A-1
TROUBLESHOOTING
TECHNICAL SUPPORT
On-line Technical Services C-1
3Com Bulletin Board Service C-1
World Wide Web Site C-2
ThreeComForum on CompuServe C-2
3ComFacts Automated Fax Service C-2
Support from Your Network Supplier C-3
Support from 3Com C-4
Returning Products for Repair C-4
ELECTRO-MAGNETIC COMPATABILITY STATEMENTS
Federal Communications Commission Radio and Television
Interference Statement for Class B Devices
CSA STATEMENT
VCCI STATEMENT
LIMITED WARRANTY
ABOUT THIS GUIDE
Introduction
This guide describes how to install and use the SuperStack ° II UPS
Management Module.
Each procedure is outlined in a series of steps. These procedures
are written primarily for network supervisors who are responsible
for installing and configuring the Management Module. You should
also be familiar with PC hardware and software and have a basic
understanding of your network. Your network should be set up
and operating properly.
Conventions
The icon conventions that are used in this guide are:
Icon
Type
Description
Information Note
Information notes call attention to
important features or instructions.
Caution
Cautions alert you to system damage or
loss of data.
Warning
Warnings alert you to the risk of severe
personal injury.
Avertissement
Les avertissements vous préviennent
qu’il existe un risque de blessure grave.
Warnung
Warnhinweise sollen Sie auf mögliche
schwere Körperverletzungen aufmerksam
machen.
vi
ABOUT THIS GUIDE
The text conventions that are used in this guide are:
Convention
Description
“Enter” vs. “Type” When the word “enter” is used in this guide, it means to
type something, then press the Return or Enter key. Do not
press the Return or Enter key when an instruction simply says
“type.”
Text represented
as screen display
This typeface is used to represent displays that appear on
your screen, for example: Enter the IP address:
Text represented
as commands
This typeface is used to represent commands that you enter,
for example: IP 191.0.0.172
Keys
When specific keys are referred to in the text, they are
shown as [Enter] or [Return].
Italics
Italics are used to denote new terms or emphasis.
1
INTRODUCTION
In the modern business environment, communication and sharing
information is crucial. With computer networks becoming larger
and more complex, a constant power supply is vital to the
operation of our organization. Your computer system relies on the
battery backup of an Uninterruptible Power System (UPS) to
maintain network integrity when the main power source fails.
The SuperStack II UPS Management Module provides network
power management through UPS monitoring and control. The
Management Module is shipped with default settings that you can
change to meet the needs of your organization.
Networking Terminology
A Network is a collection of workstations (for example,
BM-compatible personal computers) and other equipment (for
example, printers), connected for the purpose of exchanging
information. Networks vary in size, some are within a single room,
others span continents.
Ethernet is a type of local area network, referring to the
technology used to pass information around the network.
10BASE-T is the name given to the Ethernet protocol that runs
over Unshielded Twisted-Pair (UTP) cable. The Management
Module uses an RJ-45 connector for connecting your network.
Token Ring is the name given to a network that uses token
passing technology in a sequential manner. Token Ring networks
use unshielded twisted-pair (UTP) cable or Shielded Twisted-Pair
(STP) cable. The Management Module uses either an RJ-45
connector or a 9-pin connector for connecting your network.
1-2
CHAPTER 1: INTRODUCTION
Simple Network Management Protocol (SNMP) is a protocol
that controls how a management station gains information from a
device. SNMP is composed of three areas:
■
A set of rules that define how a management station can
communicate with a device.
■
A Management Information Base (MIB) that defines what
information can be obtained from the device by the
management station. Every SNMP-manageable device has a
MIB, which is a list of information about it.
■
Unsolicited messages called Traps, which work differently to the
usual request/reply management communication. You can
configure a device so that it generates a trap if a certain
condition occurs, for example a port partitioning. The trap will
be sent to the management station to inform it of the
occurrence.
Device is a term that is used to refer to a piece of network
equipment. Every device has a unique address that is used to
identify it on the network.
Internet Protocol (IP) is a data communication protocol used to
connect computers and data equipment into computer networks. It
is used on a large international network called the Internet, which
is composed of universities, government facilities, research
institutions, and private companies.
DUA1602-0AAA01
2
INSTALLATION
This chapter describes the SuperStack II UPS Management Module
and how to install the module in the SuperStack II UPS.
The SuperStack II UPS Management Module
The Management Module is a single box that connects to the
SuperStack II UPS directly through the management power
connector.
The Management Module is available in two different models:
Ethernet (3C16020) and Token Ring (3C16021). The Ethernet
model can connect to a twisted-pair Ethernet (10base-T) network
using an RJ-45 connector. With the Token-Ring model, you can
connect the Management Module to a shielded or unshielded
twisted-pair Token Ring at 4 Mbps or 16 Mbps.
The module contains a full SNMP agent that implements the
Internet standard (RFC-1628) UPS Management Information Base,
private extensions for more control, and relevant portions of MIB II.
WARNING: The RJ-45 connector is a data socket. Only data cables
should be connected to it. Do not connect telephone outlets to
these connectors.
AVERTISSEMENT: Le connecteur RJ-45 est une prise de données.
Seuls des âbles de données devraient y être connectés. Ne reliez
pas de prises téléphoniques à ces connecteurs.
WARNUNG: Bei dem Anschluß RJ-45 handelt es sich um eine
Datenbuchse, an die ausschließlich Datenleitungen angeschlossen
2-2
CHAPTER 2: INSTALLATION
werden dürfen. Schließen Sie keine Telefonanschlüsse an diese
Buchsen an.
Figure 2-1 Ethernet Model Connections
Figure 2-2 Token-Ring Model Connections
DUA1602-0AAA01
Before You Start
2-3
Before You Start
You must have a SuperStack II UPS installed and operating to use
the Management Module, in addition to one of the following
cables:
■
Twisted-pair cable for an Ethernet network
■
The patch cable (STP or UTP) for your Token Ring network type
Installing the Management Module
To install the Management Module, you need access to the
management power connector on the UPS and the cables that are
connected to your network.
1 Remove the blanking plate on the SuperStack II UPS rear panel.
Retain the screws.
.
Figure 2-3 Removing the Blanking Plate on the SuperStack II UPS
2 Slide the Management Module into the open slot and secure with
the blanking plate screws.
Make sure the RJ-45 connector is located at the bottom of the
Management Module.
DUA1602-0AAA01
2-4
CHAPTER 2: INSTALLATION
Figure 2-4 Sliding the Module into the UPS
3 Connect the male end of the management power cable (provided
with the module) into the management power connector on the
back panel of the UPS.
Connect the other end of the cable to the management power
connector on the Management Module labeled “UPS.”
Tighten the screws on the cable connectors to ensure a good
connection.
Figure 2-5 Connecting the Power Cable
DUA1602-0AAA01
CONFIGURING THE
MANAGEMENT MODULE
3
You must configure the SuperStack II UPS Management Module
before you can use it. The Management Module has a
configuration program that you can access by connecting the
module to a terminal or a computer with a terminal emulation
program.
Before You Start
Make sure you contact your network administrator for the
following values: IP address, Netmask (subnet mask), and Default
Gateway. For the Token-Ring model, you also need the operating
speed of the Token-Ring network (4 Mbps or 16 Mbps). Write
these values down for future reference.
To use the configuration screens for the Management Module,
you need:
■
A serial cable (see Appendix A)
■
A terminal with an RS-232 serial port, or a PC with a terminal
emulation program such as Windows Terminal®
The serial line should be set to 9600 baud, No parity, 8 bits, and 1
stop bit. The configuration program always runs at these settings.
Local Configuration
To connect the module to the terminal and start the configuration
program:
1 Plug the male end of the serial cable into the serial port labeled
“TERM.”
3-2
CHAPTER 3: CONFIGURING THE MANAGEMENT MODULE
2 Plug the other end of the serial cable into the serial port on the
back of the terminal.
3 Press [Return]. The Main Configuration screen for the module type
appears (“Figure 3-1 Main Configuration Screen for Ethernet” or
“Figure 3-2 Main Configuration Screen for Token Ring”).
If the Main Configuration screen does not appear, press [Return]
and make sure the Management Module is properly connected to
the UPS (see “Installing the Management Module”).
If you still do not see the Main Configuration screen, check the
following conditions:
■
Check the communications settings of the terminal you are
using. It should be set to 9600 baud, No parity, 8 bits, and 1
stop bit.
■
If the serial configuration is correct, check the cable between
the module and terminal to be sure all connections are secure.
■
Make sure your terminal program is on the correct
communications port for your RS-232 connection.
■
Verify that the management power cable is connected to the
UPS.
Using the Configuration Screens
Each version of the Management Module has its own configuration
screen. When you start the configuration program, the Main
Configuration screen for your module appears. Figure 3-1 shows
the screen for the Ethernet module. Figure 3-2 shows the screen
for the Token-Ring module.
The Main Configuration screen shows the current configuration
settings for your Management Module. A list of command (CMD)
options are available in the left column of the screen.
DUA1602-0AAA01
Changing the Configuration Fields
3-3
Figure 3-1 Main Configuration Screen for Ethernet
Figure 3-2 Main Configuration Screen for Token Ring
Changing the Configuration Fields
The first fields you must configure are IP address, Netmask and
Default Gateway, and for Token Ring, Ring Speed. In addition,
configure the Token Ring Network Speed for the Token-Ring
model. You should also add a host to receive traps (see “Trap Level
(TL)”).
To change the value of a setup option, enter the two letter
command followed by the new value. For example, to change the
DUA1602-0AAA01‘
3-4
CHAPTER 3: CONFIGURING THE MANAGEMENT MODULE
IP address, type: IP a.b.c.d where a, b, c, and d are numbers
between 0 and 255.
The new values do not appear until you press [Enter] on a blank
command line to redisplay the screen.
If you enter a command without a new value, the existing value for
that option appears. If you enter an invalid value, the screen
displays a range of valid values.
You can refresh the Main Configuration screen to show your
changes by typing CF and pressing [Enter]. The configuration
settings you can change are described in the following sections.
IP address (IP)
Type IP followed by a space and the Internet address assigned to
the Management Module to change the IP address.
Use the format a.b.c.d, where a, b, c, and d are numbers between
0 and 255. If you type a number that is not in this range, an error
message appears.
If you do not know the IP address to use, contact your network
administrator.
Press [Enter] to save the new setting and return to the
configuration screen.
Netmask (NM)
Type NM followed by a space and the Netmask value to change
the netmask value.
Use the format a.b.c.d, where a, b, c, and d are numbers between
0 and 255. If you type a number that is not in this range, an error
message appears. If your local network is partitioned into subnets,
be sure to set this value to show that (for example, 255.255.0.0).
DUA1602-0AAA01
Changing the Configuration Fields
3-5
If you do not know the Netmask value to use, contact your
network administrator.
Press [Enter] to save the new setting and return to the
configuration screen.
Gateway (GW)
To change the default gateway, type GW followed by a space and
the default gateway. The default gateway is the default
destination for all packets not addressed to the local network
segment. This value must be set if you have routers in your
network.
Use the format a.b.c.d, where a, b, c, and d are numbers between
0 and 255. If you type a number that is not in this range, an error
message appears. If there is not a primary gateway, type GW
0.0.0.0.
If you do not know the default gateway, contact your network
administrator.
Press [Enter] to save the new setting and return to the
configuration screen.
Token Ring Network Speed (RS)
(Token-Ring model only)
Type RS followed by a space and the speed (in Mbps) of your
Token-Ring network. Type 4 for a 4-Mbps Token Ring, or 16 for a
16-Mbps Token Ring. The default speed is 16 Mbps.
Press [Enter] to save the new setting and return to the
configuration screen.
DUA1602-0AAA01‘
3-6
CHAPTER 3: CONFIGURING THE MANAGEMENT MODULE
BOOTP retries (BR)
Type BR followed by a space and the number of times the
Management Module should request BOOTP configuration. You
can specify any positive number up to 255 (the default is 30). If
you set this field to 0, no BOOTP requests are made. To have the
module request BOOTP configuration repeatedly until it receives a
successful configuration, specify –1 in this field. Retries are sent at
approximately two-minute intervals.
Press [Enter] to save the new setting and return to the
configuration screen.
Be sure to set this field to 0 if your network does not have a
BOOTP server. If you specify any other value, you have to wait
while the Management Module powers on and receives a
successful BOOTP configuration (or completes the specified number
of requests).
Authorized Password (PW)
This field is reserved for future use.
Command Security Level (LV)
To change the command security level, type LV followed by a space
and the corresponding level number. This command determines
who receives data or sends commands.
There are three possible entries: 1, 2, or 3.
1
The standard level allows anyone with the correct community name (for
SNMP) to receive data or send commands. The standard level is the
default.
DUA1602-0AAA01
Changing the Configuration Fields
2
The high-sets level restricts sets and commands to those hosts that
appear in the host table; any SNMP manager with the correct
get-community name may request data.
3
The high level is the most secure. Only those hosts who appear in the
host table and users with the correct community name can receive data
or send commands.
3-7
Press [Enter] to save the new setting and return to the
configuration screen.
UPS Unit ID (ID)
To change the UPS Unit ID field type ID followed by a space and
the “name of the UPS unit“ that you are currently configuring. You
must use quotes to enclose the UPS unit name. You can enter up
to 16 characters to identify the UPS unit.
Press [Enter] to save the new setting and return to the
configuration screen.
Get-community name (CG)
To change the community name, type CG followed by a space and
the community name. This command changes the community
name hat the SNMP manager can use when performing a get
operation, but not set operations.
Type up to 16 alphanumeric characters to specify the
get-community name. This field is case-sensitive and cannot
contain blanks.
Make sure the get-community name is different than the
set-community name to avoid conflicts with set operations.
Press [Enter] to save the new setting and return to the
configuration screen.
DUA1602-0AAA01‘
3-8
CHAPTER 3: CONFIGURING THE MANAGEMENT MODULE
Set-community name (CS)
Type CS followed by a space and the community name to change
the community name the SNMP manager uses when performing
set or get operations.
Type up to 16 alphanumeric characters to specify the
set-community name. This field is case-sensitive and cannot contain
blanks.
Press [Enter] to save the new setting and return to the
configuration screen.
Trap Community name (CT)
Type CT followed by a space and the community name to change
the community name that is sent along with the traps to your
network manager.
Type up to 16 alphanumeric characters to specify the trap
community name. This field is case-sensitive and cannot contain
blanks.
Press [Enter] to save the new setting and return to the
configuration screen.
sysName (SN)
To change the system name field type SN followed by a space and
the “system name“. You must use quotes to enclose the system
name. Type the system name assigned by your system administrator
(up to 63 alphanumeric characters).
The name you enter is used by network operators, and is not used
for network addressing. (If you do not specify a system name
here, you can do so using your SNMP management application.)
Press [Enter] to save the new setting and return to the
configuration screen.
DUA1602-0AAA01
Changing the Configuration Fields
3-9
sysContact (SC)
Type SC followed by a space and the “system contact name“ to
change this field. You must use quotes to enclose the system
contact name.
Type up to 63 alphanumeric characters to identify someone to
contact with questions about this device. For example, you can
type a person’s name, phone number, department, or physical
location. (If you do not specify a system contact here, you can do
so using your SNMP management application.)
Press [Enter] to save the new setting and return to the
configuration screen.
sysLocation (SL)
Type SL followed by a space and the “system location name“ to
change this field. You must use quotes to enclose the system
location.
Type up to 63 alphanumeric characters to identify the location of
the installed Management Module.
Press [Enter] to save the new setting and return to the
configuration screen.
Attached Devices (AD)
To list the protected equipment currently connected to the UPS,
type AD followed by a space and the “device name“. You must
use quotes to enclose the attached devices.
Type up to 63 characters (for device names) to identify other
SuperStack devices, such as hubs and switches, that are connected
to the UPS.
Press [Enter] to save the new setting and return to the
configuration screen.
DUA1602-0AAA01‘
3-10
CHAPTER 3: CONFIGURING THE MANAGEMENT MODULE
Host Table Setup Screen
The Host Table Setup screen allows you to add hosts permanently
to the Management Module’s Host Table. The host table
automatically adds hosts as nonpermanent entries when host
communication is established with the Management Module. This
command must be used if you want to receive traps.
To access this screen from the Main Configuration screen, type HS
and press [Return]. The Host Table Setup screen appears (Figure
3-3).
Figure 3-3 Host Table Setup Screen
The Host Table Setup screen displays the host access list and the
current setting for each host. The host number (Host Num) appears
in the left column of the screen.
To change a value of a host field, type the two letter command for
a specific host number. For example, to change the IP address,
type: HI n a.b.c.d where n equals the host number and a, b, c,
and d are numbers between 0 and 255.
You can change the following settings in the Host Table Setup
screen:
DUA1602-0AAA01
Host Table Setup Screen
3-11
IP Address (HI)
Type HI and the host number followed by a space and the IP
address of the host entry that you want to modify.
Use the format a.b.c.d, where a, b, c, and d are numbers between
0 and 255. If you type a number that is not in this range, an error
message appears.
Press [Return] to save the new setting and return to the host access
list.
Delete Entry (DE)
To remove a configured host, you can change its IP address to a
new value, if one exists. Otherwise, use the Delete Entry command.
To delete the entry, type DE and the host number and press
[Return].
Only eight hosts can be stored in the permanent memory.
Ping (PI)
The Ping option verifies the host’s physical address. If you are
connected to the network, you can use the Ping function to verify
a host’s address. Type PI and the host number followed by a space
and the IP address. Press [Return] to send the command.
If the ping is successful, the Management Module responds with
the following message:
ping Successful: Round Trip Time=xx.xx sec
If the ping is unsuccessful, the module displays an error message.
Trap Level (TL)
To set the trap level, type TL and the host number followed by a
space and the trap level. The possible values for the trap level are:
DUA1602-0AAA01‘
3-12
CHAPTER 3: CONFIGURING THE MANAGEMENT MODULE
0
None), hosts do not receive any traps
1
Critical), hosts receive only severe traps
2
Major), hosts receive severe and serious traps
3
(All), to receive all traps
Press [Return] to save the new setting and return to the host access
list.
The default setting for this field is 0 (None).
Trap Type (TT)
To set the trap type, type TT and the host number followed by a
space and the trap type. The Management Module provides four
possible trap types.
1
(Stnd MIB),
hosts receive UPS Standard MIB-defined traps
2
Private MIB),
hosts receive PrivateMIB-defined traps
3
Stnd+msgs),
hosts receive UPS Standard MIB traps plus additional information
4
Private+msgs),
hosts receive PrivateMIB traps plus additional messages
Press [Return] to save the new setting and return to the host access
list. The default setting for this field is 1 (Stnd MIB).
DUA1602-0AAA01
4
CONNECTING TO THE NETWORK
Be sure you have the appropriate cables and connectors as
described in “Before You Start” on page 2-3.
Ethernet Model
To connect an Ethernet Management Module to the network:
1 Plug one end of a twisted-pair cable into the RJ-45 port on the
Management Module.
2 Plug the other end into an appropriate port on your network
device.
Token-Ring Model
For a Token-Ring network, you need the appropriate cable to
connect to your network type. To connect a Token-Ring
Management Module to the network:
1 Plug one end of the network cable into the Management Module.
For a shielded twisted-pair network, plug the 9-pin connector into
the 9-pin jack on the Management Module. Tighten the screws on
the connector to ensure a good connection. For an unshielded
twisted-pair network, plug one end of the cable into the RJ-45 port
on the Management Module.
2 Plug the other end of the network cable into an appropriate port
on your Token-Ring device.
4-2
CHAPTER 4: CONNECTING TO THE NETWORK
Exiting the Configuration Program
To save your configuration, type SA and press [Return]. This
command saves the changes entered in the Main Configuration
screen and restarts the Management Module.
Your SuperStack II UPS Management Module is now configured.
Disconnect the terminal from your Management Module.
DUA1602-0AAA01
TECHNICAL SPECIFICATIONS
A
Standards
The SuperStack II UPS Management Module has been designed to
comply with the following standards:
Safety
UL 1950
CSA C22.2-950
EN 60950
EMC
EN 55022 Class B
FCC Part 15 Class B
CSA C108-8 Class B
EN 50082-2
Environmental
EN 60068
Physical Properties
Physical Specifications
Width
11.8 cm (4.63 in)
Height
3.2 cm (1.25 in)
Depth
16 cm (6.25 in)
Weight
373 g (0.821 lb)
Operating Environment: 0-90% (noncondensing) humidity
Operating Temperature: 0-40°C (32-105°F)
A-2
APPENDIX A: TECHNICAL SPECIFICATIONS
Serial Port Pin Out
Figure A-1 Serial Port Numbering
Only three links should be made. Other pin definitions are for information only, and are not
supported.
Figure A-2 Serial Port Cabling (Module to PC/Terminal)
DUA1602-0AAA01
TROUBLESHOOTING
B
Use the following troubleshooting chart to help you solve any
problems that may occur with the SuperStack II UPS Management
Module.
Table B-1 Troubleshooting Chart
Problem
Possible Cause
Corrective Action
Management
Module does not
respond to SNMP
get requests, but
does respond to
pings.
Wrong community
name being used. The
get-community name
that was set during
the module
configuration does
not match the one
being used by your
network management
system (NMS) for get
requests.
To verify that the community name is
mismatched, connect a terminal to the
module (see “Local Configuration”on page
3-2).
If the authentication failed, SNMP source:
x.x.x.x:y message appears (where x.x.x.x is
the IP address of your NMS) every time your
NMS does an SNMP get request, then
correct the get-community name used by the
NMS.
Note that community names are
case-sensitive, and non-alphanumeric
characters (such as spaces) are included in
the count. Please refer to your NMS user’s
guide for more information on configuring
community names.
The Management
Module does not
initialize and
“open” onto the
Token Ring.
Bad cable connection.
Incorrect ring speed
configured in the
Management Module.
Verify cable connections at Management
Module and at the concentrator.
Verify the proper ring speed with the
network administrator, and configure the
Management Module for that speed.
B-2
APPENDIX B: TROUBLESHOOTING
The Token Ring
stops functioning
when the
Management
Module powers up
and starts
connecting to the
Token Ring.
Incorrect ring speed
configured in the
Management Module.
Verify the proper ring speed with the
network administrator, and configure the
Management Module for that speed.
Using the same
community name
for SNMP gets and
sets; gets work, but
sets do not.
The same community
name is used for both
gets and sets.
Make sure the get-community name and
set-community name are different. You can
use the set-community name for doing both
gets and sets.
If you want to use just one community name
(such as public) for gets and sets, then
configure the Management Module’s
get-community name to some value you are
not using (such as unused) and configure its
set-community name to the desired value
(public).
DUA1602-0AAA01
TECHNICAL SUPPORT
C
3Com provides easy access to technical support information
through a variety of services. This appendix describes these services.
On-line Technical Services
3Com offers worldwide product support seven days a week, 24
hours a day, through the following on-line systems:
■
3Com Bulletin Board Service (3ComBBS)
■
World Wide Web site
■
ThreeComForum on CompuServe®
■
3ComFacts SM automated fax service
3Com Bulletin Board Service
3ComBBS contains patches, software, and drivers for all 3Com
products, as well as technical articles. This service is available via
modem or ISDN seven days a week, 24 hours a day.
Access by Modem
To reach the service by modem, set your modem to No parity, 8
bits, and 1 stop bit. Call the telephone number nearest you:
Country
Data Rate
Telephone Number
Australia
up to 14400 bps
(61) (2) 9955 2073
France
up to 14400 bps
(33) (1) 69 86 69 54
Germany
up to 9600 bps
up to 9600 bps
(49) (89) 627 32 188
(49) (89) 627 32 189
C-2
APPENDIX C: TECHNICAL SUPPORT
Hong Kong
up to 14400 bps
(852) 537 5608
Italy (fee required)
up to 14400 bps
(39) (2) 273 00680
Japan
up to 14400 bps
(81) (3) 3345 7266
Singapore
up to 14400 bps
(65) 534 5693
Taiwan
up to 14400 bps
(886) (2) 377 5838
U.K.
up to 28800 bps
(44) (1442) 278278
U.S.
up to 28800 bps
(1) (408) 980 8204
Access by ISDN
ISDN users can dial-in to 3ComBBS using a digital modem for fast
access up to 56 Kbps. To access 3ComBBS using ISDN, dial the
following number:
(408) 654-2703
World Wide Web Site
Access the latest networking information on 3Com’s World Wide
Web site by entering our URL into your internet browser:
http://www.3Com.com/
This service features news and information about 3Com products,
customer service and support, 3Com’s latest news releases, selected
articles from 3TECH ä (3Com’s award-winning technical journal),
and more.
ThreeComForum on CompuServe
ThreeComForum is a CompuServe-based service containing
patches, software, drivers, and technical articles about all 3Com
products, as well as an interactive forum for technical questions. To
use ThreeComForum, you need a CompuServe account.
To use ThreeComForum:
1 Log on to CompuServe.
DUA1602-0AAA01
3ComFacts Automated Fax Service
C-3
2 Enter go threecom.
3 Press [Return] to see the Ask3Com SM main menu.
3ComFacts Automated Fax Service
3Com Corporation’s interactive fax service, 3ComFacts, provides
data sheets, technical articles, diagrams, and troubleshooting
instructions on 3Com products 24 hours a day, seven days a week.
Call 3ComFacts using your touch-tone telephone. International
access numbers are:
Country
Fax Number
Hong Kong
(852) 2537 5610
U.K.
(44) (1442) 278279
U.S.
(1) (408) 727 7021
Local access numbers are available within the following countries:
Country
Fax Number
Country
Fax Number
Australia
800 123853
Netherlands
06 0228049
Belgium
0800 71279
Norway
800 11062
Denmark
800 17319
Portugal
0505 442607
Finland
98 001 4444
Russia
(Moscow only)
956 0815
France
05 90 81 58
Spain
900 964445
Germany
0130 8180 63
Sweden
020 792954
Italy
1678 99085
U.K.
0800 626403
Support from Your Network Supplier
If additional assistance is required, contact your network supplier.
Many suppliers are authorized 3Com service partners who are
DUA1602-0AAA01
C-4
APPENDIX C: TECHNICAL SUPPORT
qualified to provide a variety of services, including network
planning, installation, hardware maintenance, application training,
and support services.
When you contact your network supplier for assistance, have the
following information ready:
■
Diagnostic error messages
■
A list of system hardware and software, including revision levels
■
Details about recent configuration changes, if applicable
If you are unable to contact your network supplier, see the
following section on how to contact 3Com.
Support from 3Com
If you are unable to receive support from your network supplier,
technical support contracts are available from 3Com.
In the U.S. and Canada, call (800) 876-3266 for customer service.
If you are outside the U.S. and Canada, contact your local 3Com
sales office to find your authorized service provider:
Country
Telephone Number
Country
Telephone Number
Australia
(Sydney)
(Melbourne)
(61) (2) 959 3020
(61) (3) 653 9515
Japan
(81) (3) 3345 7251
Mexico
(525) 531 0591
Belgium*
0800 71429
Netherlands
*
06 0227788
Brazil
(55) (11) 546 0869
Norway*
800 13376
Canada
(416) 498 3266
Singapore
(65) 538 9368
Denmark*
800 17309
South Africa (27) (11) 803 7404
Finland*
0800 113153
Spain*
(34) (1) 3831700
France*
05 917959
Sweden*
(45) (8) 632 91 00
Germany*
0130 821502
Taiwan
(886) (2) 577 4352
DUA1602-0AAA01
Returning Products for Repair
Hong Kong
(852) 868 9111
United Arab
Emirates
(971) (4) 349049
Ireland*
1 800 553117
U.K.*
0800 966197
Italy*
1678 79489
U.S.
(1) (408) 492 1790
C-5
*These numbers are toll-free
Returning Products for Repair
A product sent directly to 3Com for repair must first be assigned a
Return Materials Authorization (RMA) number. A product sent to
3Com without an RMA number will be returned to the sender
unopened, at the sender’s expense.
To obtain an RMA number, call or fax:
DUA1602-0AAA01
Country
Telephone Number
Fax Number
U.S. and Canada
(800) 876 3266
option 2
Europe
31 30 60 29900
option 5
Outside Europe,
U.S. and Canada
(1) (408) 492 1790
(1) (408) 764 7290
C-6
APPENDIX C: TECHNICAL SUPPORT
DUA1602-0AAA01
ELECTRO-MAGNETIC COMPATABILITY STATEMENTS
Federal Communications Commission Radio and Television
Interference Statement for Class B Devices
This equipment has been tested and found to comply with the limits for Class B
digital devices, pursuant to part 15 of the FCC Rules. These limits are designed to
provide reasonable protection against harmful interference in a residential
installation. This equipment generates, uses, and can radiate radio frequency energy
and, if not installed and used in accordance with the instructions, may cause harmful
interference to radio communications. However, there is no guarantee that
interference will not occur in a particular installation.
If this equipment does cause harmful interference to radio or television reception,
which can be determined by turning the equipment off and on, the user is
encouraged to try to correct the interference by one of the following measures.
User Instructions:
■
Reorient or relocate the receiving antenna.
■
Increase the separation between the equipment and receiver.
■
Connect the equipment into an outlet on a circuit different from that to which the
receiver is connected.
■
Ensure that card mounting screws, connector attachment screws and all ground
wires are secured and tight.
■
Consult the dealer or an experienced radio/TV technician for help.
Changes or modifications not expressly approved by the party responsible for
compliance could void the user’s authority to operate the equipment. This product
was FCC certified under test conditions that included the use of shielded I/O cable
and connectors between system components. To be in compliance with FCC
regulations, the user must use shielded cables and connectors and install them
properly.
CSA STATEMENT
This Class B digital apparatus meets all requirements of the Canadian
Interference-Causing Equipment Regulations.
Cet appareil numérique de la classe B respecte toutes les exigences du Règlement
sur le matériel brouilleur du Canada.
VCCI STATEMENT
Limited Warranty
HARDWARE: 3Com warrants its hardware products to be free from defects in workmanship and
materials, under normal use and service, for the following lengths of time from the date of purchase from
3Com or its Authorized Reseller.
Internetworking products
One Year
Network adapters
Lifetime
Ethernet stackable hubs and Unmanaged Ethernet fixed port repeaters
*Power supply and fans in these stackable hubs and unmanaged repeaters
Lifetime*
(One year if not
registered)
One Year
Other hardware products
One Year
Spare parts and spares kits
90 days
If a product does not operate as warranted during the applicable warranty period, 3Com shall, at its
expense, correct any such defect by repairing the defective product or part or, at its option, by delivering
to Customer an equivalent product or part to replace the defective item. All products that are replaced
will become the property of 3Com. Replacement products may be new or reconditioned. Any replaced or
repaired product or part has a ninety (90) day warranty or the remainder of the initial warranty period,
whichever is longer.
3Com shall not be responsible for any software, firmware, information, or memory data of Customer
contained in, stored on, or integrated with any products returned to 3Com pursuant to any warranty.
SOFTWARE: 3Com warrants that the software programs licensed from it will perform in substantial
conformance to the program specifications therefore for a period of ninety (90) days from the date of
purchase from 3Com or its Authorized Reseller. 3Com warrants the magnetic media containing software
against failure during the warranty period.
No updates are provided. 3Com’s sole obligation hereunder shall be (at 3Com’s discretion) to refund the
purchase price paid by Customer for any defective software products, or to replace any defective media
with software which substantially conforms to 3Com’s applicable published specifications. Customer
assumes responsibility for the selection of the appropriate applications program and associated reference
materials. 3Com makes no warranty that its software products will work in combination with any
hardware or applications software products provided by third parties, that the operation of the software
products will be uninterrupted or error free, or that all defects in the software products will be corrected.
For any third party products listed in the 3Com software product documentation or specifications as
being compatible, 3Com will make reasonable efforts to provide compatibility, except where the
non-compatibility is caused by a “bug” or defect in the third party’s product.
STANDARD WARRANTY SERVICE: Standard warranty service for hardware products may be obtained by
delivering the defective product, accompanied by a copy of the dated proof of purchase, to 3Com’s
Corporate Service Center or to an Authorized 3Com Service Center during the applicable warranty period.
Standard warranty service for software products may be obtained by telephoning 3Com’s Corporate
Service Center or an Authorized 3Com Service Center, within the warranty period. Products returned to
3Com’s Corporate Service Center must be pre-authorized by 3Com with a Return Material Authorization
(RMA) number marked on the outside of the package, and sent prepaid, insured, and packaged
appropriately for safe shipment. The repaired or replaced item will shipped to Customer, at 3Com’s
expense, no later than thirty (30) days after receipt by 3Com.
WARRANTIES EXCLUSIVE: IF A 3COM PRODUCT DOES NOT OPERATE AS WARRANTED ABOVE,
CUSTOMER’S SOLE REMEDY SHALL BE REPAIR, REPLACEMENT, OR REFUND OF THE PURCHASE PRICE PAID,
AT 3COM’S OPTION. THE FOREGOING WARRANTIES AND REMEDIES ARE EXCLUSIVE AND ARE IN LIEU OF
ALL OTHER WARRANTIES, EXPRESS OR IMPLIED, EITHER IN FACT OR BY OPERATION OF LAW, STATUTORY OR
OTHERWISE, INCLUDING WARRANTIES OF MERCHANTABILITY AND FITNESS FOR A PARTICULAR PURPOSE.
3COM NEITHER ASSUMES NOR AUTHORIZES ANY OTHER PERSON TO ASSUME FOR IT ANY OTHER
LIABILITY IN CONNECTION WITH THE SALE, INSTALLATION, MAINTENANCE OR USE OF ITS PRODUCTS.
3COM SHALL NOT BE LIABLE UNDER THIS WARRANTY IF ITS TESTING AND EXAMINATION DISCLOSE THAT
THE ALLEGED DEFECT IN THE PRODUCT DOES NOT EXIST OR WAS CAUSED BY CUSTOMER’S OR ANY
THIRD PERSON’S MISUSE, NEGLECT, IMPROPER INSTALLATION OR TESTING, UNAUTHORIZED ATTEMPTS TO
REPAIR, OR ANY OTHER CAUSE BEYOND THE RANGE OF THE INTENDED USE, OR BY ACCIDENT, FIRE,
LIGHTNING, OR OTHER HAZARD.
Limitation of Liability. IN NO EVENT, WHETHER BASED IN CONTRACT OR TORT (INCLUDING NEGLIGENCE)
SHALL 3COM BE LIABLE FOR INCIDENTAL, CONSEQUENTIAL, INDIRECT, SPECIAL, OR PUNITIVE DAMAGES
OF ANY KIND, OR FOR LOSS OF REVENUE, LOSS OF BUSINESS, OR OTHER FINANCIAL LOSS ARISING OUT OF
OR IN CONNECTION WITH THE SALE, INSTALLATION, MAINTENANCE, USE, PERFORMANCE, FAILURE, OR
INTERRUPTION OF ITS PRODUCTS, EVEN IF 3COM OR ITS AUTHORIZED RESELLER HAS BEEN ADVISED OF
THE POSSIBILITY OF SUCH DAMAGES.
Some states do not allow the exclusion of implied warranties or the limitation of incidental or
consequential damages for consumer products, so the above limitations and exclusions may not apply to
you. This warranty gives you specific legal rights which may vary from state to state.
GOVERNING LAW: This Limited Warranty shall be governed by the laws of the state of California.
3Com Corporation, 5400 Bayfront Plaza, Santa Clara, CA 95052-8145