1
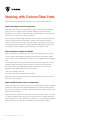
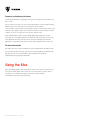
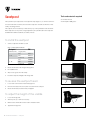
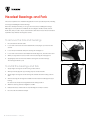
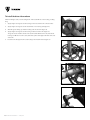
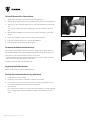
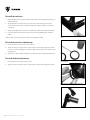
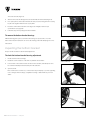
Service Information
Speed Concept 2011
The Trek Speed Concept bike is the fastest frameset we have ever made. To accomplish
this, we have used shaped tubes, hidden front and rear brakes, and very thin-walled carbon
tubes. Because of these unique features, the Speed Concept bike requires different or
additional assembly and adjustment techniques. Some of the tasks may have been done by
the factory. We include the instructions for these steps here for later reference when you
need to perform service on this bike.
We have also provided general maintenance information:
•
Carbon fiber care
•
Headset bearing installation
•
Bottom bracket bearing installation for a variety of bottom bracket types
Note: Instructions for Shimano’s electronic Di2 are in a separate document. See your dealer.
These instructions are written for an experienced mechanic. If you need further information,
refer to your bicycle owner’s manual, the instructions in a bicycle mechanic’s handbook, or
consult your dealer.
Please save these instructions for future reference. Also check www.trekbikes.com for
updates.
Note about performing mechanical work on bicycles:
Many people think of bicycles as simple machines, almost toys. However, modern bicycles
use high-tech materials and designs that rely on correct maintenance and precision
workmanship. If any part on the bicycle is worn, corroded, rusted, loose, or damaged in
any other way, replace the part. If you do not have the correct tools or experience, do not
perform the tasks in this manual; take your bicycle to your dealer for service.
In some cases we provide several methods of checking the tightness or connection of parts.
The most preferable of these is always the one with the most precision. In other words,
correct mechanical work requires that all bolts be tightened with a torque wrench.
Incorrect mechanical work on your bicycle could lead to damage or premature breakage of a
part, which could cause you to fall and lead to serious injury or death.
Table of Contents
Working with Carbon Fiber Parts.................................................................... 1
Custom Components of the Speed Concept................................................2
Crankset
Pressing bearings........................................................................................... 19
SRAM GXP...................................................................................................... 20
Sizing the Bike......................................................................................................3
Shimano HollowTech.....................................................................................23
Seatpost
Campagnolo UltraTorque.............................................................................27
To install the seatpost.....................................................................................4
Inspecting the bottom bracket................................................................... 29
To adjust the height of the saddle................................................................4
FSA MegaExo AL........................................................................................... 30
To reverse the seatpost head........................................................................4
Crankset Troubleshooting.............................................................................. 33
Using a Repair Stand
To attach the workstand clamp adapter.....................................................5
Headset Bearings and Fork
To remove the fork and bearings..................................................................6
To install the bearings and fork.....................................................................6
Cable Housings
To install the housing.......................................................................................7
To install the rubber top tube grommet......................................................7
Aerobar Assembly
To install the extensions and armrests.......................................................8
To install the shifters.......................................................................................9
To install the brake levers...............................................................................9
Aerobar Installation
To install the completed aerobar assembly.............................................10
Derailleur Cables
To connect the front derailleur cable.......................................................... 11
To connect the rear derailleur cable........................................................... 11
Front Brake
To install and adjust the front brake.......................................................... 12
Rear Brake
To install and adjust the rear brake............................................................ 14
DuoTrap Computer Sensor
To install a Duotrap sensor.......................................................................... 16
Draft Storage Box
To install a storage box................................................................................. 17
ii TREK SERVICE INFORMATION
24 May 2010
Working with Carbon Fiber Parts
Carbon fiber parts are different from metal parts, so they require different treatment.
Avoid sharp edges or excessive pressure
Carbon fiber composite can be damaged by sharp edges or clamping mechanisms which
cause a point load, or a high pressure area. Before installing any carbon fiber part, or
attaching any component to an existing carbon fiber part, follow these procedures to make
sure the parts or components are carbon-compatible.
As carbon frames have gotten lighter and lighter, you can now feel movement in the tubes
when you squeeze them. This is normal and no reflection of the strength of the frame.
However, repeated compression of the sides of the tubes is not good for them, and could
eventually lead to frame damage. Do not squeeze the frame tubing with your fingers, and
especially never clamp the tubing in any mechanical device, including car racks.
Clean carbon parts before installation
With some interfaces of metal parts, grease is used on the clamping surfaces to prevent
corrosion. When making adjustments, always grease the threads and shoulders of bolts.
Grease reduces corrosion and allows you to achieve the correct tightness without damaging
tools.
However, with most carbon parts you should avoid grease. If grease is applied to a carbon
part that is clamped, the part may slip in the clamp, even at the recommended torque
specification. When assembling parts that clamp a carbon surface, we recommend
applying one of the following special carbon prep products:
· Tacx carbon assembly compound
· Fiber Grip™ carbon fiber assembly gel from Finish Line
On the other hand, the bearing seats of the Speed Concept frameset do require grease, as
explained in these instructions.
Never modify the fork, frame, or components
The parts of the Speed Concept frameset have been carefully designed to meet the strength
and function requirements of safe riding. Modifying these parts in any way may make the
bike unsafe. As an example, removing the redundant wheel retention tabs on fork tips could
make the fork less functional.
Suspension forks can add stress to a bike frame. Never add a suspension fork to a road bike,
or change style and/or length of forks. If you are unsure if a fork is compatible with a frame,
call Trek customer service. Any modification of a frame, fork, or components means that the
bike no longer meets our specifications and will therefore void the bike’s warranty.
1 TREK SERVICE INFORMATION
24 May 2010
Custom Components of the
Speed Concept
The Speed Concept design incorporates a number of special parts with special features.
This section gives a brief explanation of some of the features, their use and maintenance,
and general information about the bike.
Compatibility of parts
Trek only recommends Bontrager parts for the Speed Concept bike because with these parts
the torque specifications and, crush strength have been evaluated by our engineering staff.
Other parts might not meet our requirements and could lead to damage.
Carbon fiber construction
Carbon fiber composite is by weight the lightest, strongest frame material available today.
Please read about special care needed for carbon fiber in your the Trek bicycle owner’s
manual.
Two fork designs: integrated and traditional direct-connect
The leading fork design provides the least wind drag of any bicycle we have ever designed.
With the carefully intergrated headtube / fork interface and hidden headset bearings, the
air flows smoothly across the frame. However, this design limits the rotation of the fork; if
you turn the aerobar too far the fork will contact the frame, possibly damaging the paint.
The traditional fork design is more economical with only a slight penalty in wind drag.
Internal cable routing
To minimize wind drag, the cables and housiing of the Speed Concept are hidden to the
maximum extent possible.
Seatpost for either time trial or triathlon
The cap of the seatpost can be removed and rotated 180 degrees to gain different positions.
In addition, there are different legnths of seatposts availabe.
Hidden brakes
Brakes will require re-adjustment if the wheels are changed because the brakes are sensitive
to rim width. There are no barrel adjusters.
Carbon rims
Make sure you use brake pads that are compatible with the rim material.
2 TREK SERVICE INFORMATION
24 May 2010
Preparing and tightening fasteners
For each threaded fastener, apply a light coat of grease to the threads and shoulder of the
bolt or screw.
The correct torque is noted on or near every threaded fastener on the Speed Concept bike.
Because the specs are on the bike, we do not list them in this manual.
The specification on the bike tells you the maximum torque. Do not exceed it. However, you
should also try to tighten a bolt to close to the listed value; do not leave bolts loose. Either
condition, too loose or too tight, can cause a bolt or clamp to break.
When multiple fasteners attach a part, gradually tighten alternating bolts in small
increments; do not completely tighten one and then the other. As the bolts become snug,
check alignment of the parts and use a torque wrench for final tightening. When the
tightening is completed, all bolts of a given clamp must be tightened to the same torque.
For more information
Trek dealers have access to the Trek Customer Service department for information about
the Speed Concept bikes and parts, and can order any and all parts for the bikes through
standard channels. You can find updates to this manual at this web address:
www.trekbikes.com/us/en/support/manuals
Sizing the Bike
Before assembling the bike, make sure the frame is the correct size for the customer and
as much as possible, that you have chosen the correct stem and spacer stack. There is
information on our website that explains how to do this. Visit or website:
www.trekbikes.com/us/en/support/manuals
3 TREK SERVICE INFORMATION
24 May 2010
Seatpost
Tools and materials required
The Speed Concept seatpost has an aerodynamic shape (Figure 1), so cannot be turned or
• Park Polylube 1000 grease
• 5 mm allen wrench
reversed in the frame. However, the head of the seatpost is reversible to allow for a wide
variety of seating positions.
The seatpost can be inserted dry or with carbon prep on the part that is inside the frame.
If the seatpost does not provide enough adjustment, an optional head for the seatpost is
available with a different setback (see Table 1, below).
To install the seatpost
1.
Select a seatpost from Table 1, below.
Table 1. Seatpost lengths and setbacks
Seatpost
Setback (mm)
/- 10
+
/- 35
+
Length (mm)
275
335
Head only
275
335
Head only
PN
421511
421512
419629
419097
419096
419630
2.
Grease the threads of the wedge bolt (Figure 2).
3.
Re-install the bolt.
Figure 1. Speed Concept seatpost
4. Wipe excess grease from the clamp.
5.
Insert the seatpost and tighten the wedge bolt.
To reverse the seatpost head
1.
Loosen and remove the two head bolts (Figure 3).
2.
Remove the head, turn it around, and re-insert it into the seatpost.
3.
Grease the threads, insert the bolts, and tighten.
Figure 2. Wedge bolt that secures the seatpost
To adjust the height of the saddle
1.
Loosen the wedge bolt.
2.
Slide the post up or down as necessary.
3.
Make sure the minimum insertion mark is inside the frame.
4. Tighten the wedge bolt.
Figure 3. Bolts holding head on seatpost
4 TREK SERVICE INFORMATION
24 May 2010
Using a Repair Stand
Tools and materials required
•
Workstand
Use special care when putting the new Speed Concept frame in a workstand. The only
•
Workstand clamp adapter,
accepted or recommended method is to use the special workstand clamp adapter designed
PN 403494 (includes pads
specifically for this frameset (Figure 1). The adapter clamps only to the seatpost, which must
PN 416102)
be installed first.
To attach the workstand clamp adapter
1.
Open the workstand clamp adapter (Figure 1).
2.
Wrap the adapter around the seatpost.
If needed, extend the seatpost to provide room for the adapter.
3.
Insert the base of the seatpost clamp in the workstand.
Figure 1. Seatpost clamp.
5 TREK SERVICE INFORMATION
24 May 2010
Headset Bearings and Fork
This section explains how to install the integrated fork on the Speed Concept bike, including
removing and installing the headset bearings.
If the fork is already in the bike, you can go to the next section, installing the housings.
Although you can replace the fork without disconnecting the derailleur cables and rear
brake cable, this procedure may be easier with the cables disconnected. These instructions
explain the steps without removing these cables.
To remove the fork and bearings
1.
Disconnect the front brake cable.
2.
Loosen and remove the four aerobar attachment screws (Figure 1), and remove the
aerobar.
3.
Loosen the pinch bolt that clamps the steering axle nut (Figure 1).
Pinch bolt
Aerobar
attachment holes
4. Loosen and remove the three stem attachment bolts (Figure 2), and remove the stem.
5.
While you support the fork, loosen and remove the steering axle nut (Figure 2).
6. Apply light pressure to the fork to slide the steering axle out of the bearings.
The bearings should drop out.
To install the bearings and fork
1.
Apply a light coat of grease to the bearing contact surfaces.
2.
With your hands, align the upper bearing and press it into the frame.
3.
Apply a light coat of grease to the steering axle and slide the lower bearing onto the
axle.
Figure 1. Location on stem of aerobar attachment
bolts
Steering axle
nut
Stem
attachmentt
holes
4. Slide the steering axle through the headtube from the bottom and through the upper
bearing.
Be careful not to bump the fork against the frame during insertion.
5.
Attach the steering axle nut and tighten to 2.5Nm.
6. Reattach the stem, and then the aerobar, following the normal procedures.
7.
Reconnect the front brake and adjust.
6 TREK SERVICE INFORMATION
24 May 2010
Figure 2. Location on stem of stem attachment bolts
Cable Housings
Tools and materials required
•
Derailleur cable and 4 mm housing
If the housings are already in place, go to the next section. If you are assembling a new bike,
•
Brake cable and 5 mm housing
don’t be confused by the backwards cables in the housing; those cables are just there to
•
Housing cutters
hold the housing in place during shipping.
•
Cable liner
If you are replacing cables or housing, you must remove the stem and aerobar before
•
Tape
proceeding.
To install the housing
Housing window
Note: Only 4mm housing will fit into the derailleur housing stops.
1.
2.
Detach the bottom bracket cable guide.
Slide a piece of 4mm shift housing through the top tube housing window (Figure 1),
down the down tube, and into the non-drive shift housing stop in the bottom bracket
cable guide.
To determine the length of housing, use the previous piece as a guide, or install a new
1500mm piece that you will resize later.
3.
Leave the housing long (do not cut it). Where the upper end of the housing exits the
top tube, mark it with a piece of tape. This is to differentiate it from the rear housing.
4. Slide a piece of 4mm shift housing through the top tube housing window, down the
down tube, and into the drive-side shift housing stop in the bottom bracket cable guide.
To determine the length of housing, use the previous piece as a guide, or install a new
1500mm piece that you will resize later.
5.
Figure 1. Housing window in the top tube
Brake housing
Slide a piece of brake housing through the top tube housing window, down the down
tube, and out of the bottom bracket (Figure 2). The housing should be in the middle,
between the two derailleur housing stops.
To determine the length of housing, use the previous piece as a guide, or install a new
700mm piece that you will resize later.
6. Leave the housing long (do not cut it yet).
7.
Re-install the bottom bracket cable guide.
To install the rubber top tube grommet
Figure 2. Brake housing protruding from the bottom
bracket shell
Derailleur housing
There is a seal, or rubber grommet, that seals around the housing and into the hole in the
top tube (Figure 3). It has three holes in it, one for each of the cables that run through the
frame.
1. Slide the brake housing through the cutout in the grommet and into the rear most hole
(lower hole in the picture).
2.
Slide the derailleur housings through the cutout in the grommet and place the front
derailleur housing on the left and rear derailleur housing on the right.
3.
With the round, box end of an 8mm wrench, press the edges of the grommet until it
snaps fully into place and sits flush with the top tube.
If it is not flush, it will rub on the stem when the aerobar is turned.
7 TREK SERVICE INFORMATION
24 May 2010
Brake housing
Figure 3. Top tube housing grommet
Aerobar Assembly
This section explains how to assemble the aerobar: the extensions, armrests, shift levers,
and brake levers.
The size of stem (Table 3, page 10) controls the reach and height of the aerobar. The elbow
pads are attached to the top of the aerobar, and their height is controlled by a spacer stack.
The first spacer is permanently attached to the aerobar (Figure 2).
Figure 1. Completed aerobar assembly
To install the extensions and armrests
To install the extension tubes to the aerobar
The following letter references (A, B, C, etc.) are for Figure 3. The arm rests, arm pads, and
extension tubes have a left and right part; these instructions do not say left or right, but
assume you use left parts on the left, etc.
1. Determine the desired width and height of the extensions and armrests.
2.
Loosely attach the upper brackets (I) and lower brackets (J) to the aerobar. Insert
two extension tube clamp screws (H) through an upper bracket and a lower bracket,
through the spacers and aerobar, and into the nuts (L).
Determine the appropriate screw length from Table 2, below.
Figure 2. Permanent spacer bonded to aerobar
A
Table 2. Spacers (mm) and required bolts length (mm)
3.
Spacer(s)
Screw
5
30
10
30
10 + 5
30
10 + 10
45
25
45
25 + 5
45
25 + 10
60
25 + 10 + 5
60
25 + 10 + 10
60
25 + 10 + 10 + 5
75
Place an extension tube clamp (G) between the upper and lower brackets, and tighten
the extension clamp bolts until snug.
4. Slide an extension tube (M) through the extension tube clamp and adjust the position
of the extension tube to the desired length and rotational angle.
Do not clamp the end of the carbon tube; leave a minimum of 15 mm of extension tube
exposed behind the arm rest bracket (E).
8 TREK SERVICE INFORMATION
24 May 2010
H
I
B
C
D
E
F
G
J
M
K
L
N
Figure 2. Aerobar assembly diagram and parts list
Note: for clarity, not all parts snown
Part name
Quantity
A
B
C
D
E
F
G
H
I
J
K
Arm pad, right and left
Screw, arm pad holder
Arm pad holder, right and left
Pinch bolt, arm rest bracket
Arm rest bracket
Pinch bolt, extension tube clamp
Extension tube clamp
Screw, extension tube clamp
Upper bracket, extension tube clamp
Lower bracket, extension tube clamp
Spacers
L
M
N
Nut, extension tube clamp
Extension tube
Aerobar
1 ea
4
1 ea
2
2
4
2
4
2
2
see
Table 2
2
1
5.
Insert the extension tube clamp pinch bolts (F) and tighten.
6. Slide an arm rest bracket (E) onto the extension tube.
7.
Insert the arm rest bracket pinch bolt (D).
8. Adjust the arm rest bracket to the desired angle, and tighten the pinch bolt.
Note: extreme angle adjustment might limit the ability of the arm pad holders to align
correctly.
9.
Repeats steps 2-8 for the other side of the aerobar.
10. Tighten all the fasteners.
To install the arm pad holders and arm pads
The width of the arm pad holders can be customized to suit your body type and riding style.
1. Insert two arm pad holder screws (B) through the desired holes of an arm pad holder
(C) and into the arm rest bracket (E).
Two screws are required per side to prevent the arm pad holders from spinning on the
arm rest bracket.
2.
Tighten the arm pad holder screws.
3.
Repeat steps 1-2 for the other side.
4. Place the arm pads on the hook-and-loop fasteners of the arm pad holders.
To install the shifters
Install the shifters in the extensions following normal installation procedures. Do not
overtighten the clamp wedge mechanism. Do not exceed 45 lb•in (5 N•m).
Do not drill or cut the extension tubes. Tighten the shift lever mounting bolt until the shift
lever is firmly in place.
To install the brake levers
Install the brake levers following normal installation procedures. Do not overtighten the
clamp or wedge mechanisms.
9 TREK SERVICE INFORMATION
24 May 2010
Aerobar Installation
After the housing is in the frame and you have assembled the aerobar, you can complete
the aerobar installation. This requires that you simultaneously insert the housings into
the aerobar and install the stem attachment hardware. If you anticipate possible stem or
extension changes, you can leave up to 5cm extra housing. This much extra housing can be
pushed into the downtube.
Figure 1. “Stem” of Speed Concept bike
To install the completed aerobar assembly
1.
Front brake
cable exit
Housing exit to stem
Choose a stem (Figure 1) from Table 3, below.
Table 3. Stem sizes (mm) and part numbers
Near
Far
reach/rise
reach/rise
Low
50/10
302464
100/10
302467
Medium
60/45
302465
100/45
302468
High
80/75
302466
110/75
302469
2.
Put a ferrule on the front brake housing.
3.
Slide the housing into the aerobar (Figure 2) until you can connect the aerobar to the
stem.
Shift housing ports
Figure 2. Cable routing through aerobar
Aerobar attachment
4. Install the aerobar attachment screws (Figure 3) and tighten.
5.
Cut the housings to length.
6.
Install the brake cable through the brake housing, and the derailleur cables into the
correct housing for the front and rear derailleurs; but do not attach the cables to the
derailleurs or rear brake yet.
If you did not mark the derailleur housings, you will have to determine the correct
housing for each cable through trial-and-error.
7.
Install the screws that secure the stem cap (Figure 4): two cover hinge screws and the
front cover screw.
Figure 3. Stem attached to fork
Front
cover
screw
Cover
hinge
screws
Figure 4. Cover on stem
10 TREK SERVICE INFORMATION
24 May 2010
Derailleur Cables
Cable liner
At this point in the assembly, the cables should be in the housing that runs through the
downtube. These instructions explain the correct routing through the bottom bracket cable
guide and to each of the derailleurs.
Figure 1. Cable liner for front derailleur in bottom
bracket cable guide
To connect the front derailleur cable
1.
Slide a piece of cable liner onto the front derailleur cable until the liner touches the
back of the housing stop in the bottom bracket (Figure 1).
2.
Orient the front derailleur liner grommet (Figure 2) and slide it onto the liner (Figure 3),
and then snap the grommet into the frame hole in the seat tube.
3.
Cut the liner so that it does not interfere with the action of the front derailleur.
Drive side
4. Attach the cable to the derailleur and adjust as normal.
To connect the rear derailleur cable
1.
From the bottom bracket cable guide, run the bare cable (with no liner) through the
chainstay and out the dropout exit hole.
2.
Install the dropout housing stop in the dropout exit hole (Figure 4).
3.
Measure and cut the rear derailleur housing.
Figure 2. Correct orientation of seat tube grommet
4. Install the housing, connect the cable to the derailleur, and adjust the derailleur as
normal.
Figure 3. Seat tube grommet on cable liner to front
derailleur
Figure 4. Rear derailleur cable passing through the
dropout housing stop
11 TREK SERVICE INFORMATION
24 May 2010
Front Brake
Wedge
The front brake on the Speed Concept bike (Figure 1) is hidden from the wind and from your
eyes. But when correctly assembled and adjusted, they work very well. The Speed Concept
Cover
Arm with
roller
brakes use wedge/roller actuation (Figure 2), so cable tension is critical.
The design of the front and rear brake design is different, so the instructions are also. Follow
the steps carefully, in order.
Cover
attachment
screws
Figure 1. Exploded view of front brake
To install and adjust the front brake
1.
Place a ferrule on the end of the housing to be inserted in the aerobar.
2.
Slide the housing through the aerobar (The routing varies according to the stem size;
see Figure 3 or Figure 4).
continued
Figure 2. Wedge between rollers
Figure 3. Housing (and cable) route through aerobar
for low/near and medium/near stems
Figure 4. Housing route through aerobar for all stems
except low/near and medium/near
12 TREK SERVICE INFORMATION
24 May 2010
Front Brake (cont.)
3.
Measure the housing at the lever, then cut to length (Figure 5).
4. Slide the cable through the housing.
5.
Slide the wedge up the cable, and place it between the rollers (Figure 3).
6. Pull the cable tight and note the position of the wedge on the cable.
7.
Remove the wedge from the rollers, move the wedge up the cable about 1 mm, and
tighten the cable clamp bolt.
Hold the top and bottom surfaces of the wedge with pliers or an adjustable wrench
while you tighten the nut (Figure 6).
Note: Do not leave the wedge in the brake while you tighten the nut; this will break the
delrin guide on the back of the wedge.
Figure 5. Setting the length and cutting the housing
8. Re-install the wedge between the rollers.
Do not cut the cable yet. Tuck the cable out of the way.
9.
Set the pad spacers (see Table 4, below) and align the brake pads with the rim.
Table 4. Brake pad spacing between pads and brake arms, mm for two pad types
Rim
width
(mm)
Brake pad type
Rubber Cork
19
3.5
3.5
21
2
3.5
23
1
2.5
25
0
1.5
Figure 6. Hold the wedge while you tighten the clamp
bolt
Tab
10. Size and cut the cable, and reattach the wedge.
11. Finish the end of the cable so that it will not interfere with the brake return spring.
If you choose to only cut the cable and not dress the end, the extended tunnel of the
wedge prevents immediate fraying of the cable.
If desired, solder the end. Or install a cable crimp, then bend it forward.
Attachment screws
12. Engage the tab of the brake cover with the fork, then swing the brake cover into place
and install the two attachment screws (Figure 7).
13. Center the brake with the set screws (Figure 8 shows the screws, which are accessible
through holes in the brake cover).
Figure 7. Front brake cover
Figure 8. Centering screw for front brake (screw is
accessible through cover)
13 TREK SERVICE INFORMATION
24 May 2010
Rear Brake
Noodle
Mounting bracket
Cover
Wedge
The rear brake (Figure 1) on the Speed Concept bike use a wedge/roller actuation (Figure
Arm with roller
2), so cable tension is critical.
Booster
The design of the front and rear brake design is different, so the instructions are also. Follow
the steps carefully, in order. The rear brake is inside a cover (Figure 3), under the bottom
bracket. It is mounted on a bracket that is bolted to the frame. The bracket can be moved,
allowing you to center the brake.
Cover attachment screws
Figure 1. Exploded diagram of rear brake
To install and adjust the rear brake
1.
Loosen the two bracket attachment bolts (Figure 4), center the brake, and retighten the
bolts.
2.
Slide the cable out through the housing, the noodle (short plastic liner in the cable
guide), and the cable guide of the mounting bracket (Figure 1).
3.
Slide the wedge up the cable, and place it between the rollers (Figure 2).
4. Loosen the cable clamp bolt, pull the cable tight, and note the position of the wedge on
the cable.
continued
Figure 2. Wedge and rollers
Attachment screws
Figure 3. Cover for rear brake
Bracket attachment bolts
Figure 4. Brake bracket attached to frame
14 TREK SERVICE INFORMATION
24 May 2010
Rear brake (cont.)
5.
Remove the wedge from the rollers, move the wedge up the cable about 1 mm, and
tighten the cable clamp bolt. Hold the top and bottom surfaces of the wedge with a
pliers or an adjustable wrench while you tighten the nut (Figure 5).
Note: Do not leave the wedge in the brake while you tighten the nut; this will break the
delrin guide on the back of the wedge.
6. Re-install the wedge.
Do not cut the cable yet. Tuck the cable out of the way.
7.
Set the pad spacers (see Table 5 below) and align the brake pads with the rim.
The rear brake does not have a centering screw. To move the brake side-to-side, loosen
the bracket attachment bolts, reposition the brake, and re-tighten the bolts.
Figure 5. Holding the wedge while tightening the cable
clamp nut
Table 5. Brake pad spacing between pads and brake arms, mm for two pad types
Rim
width
(mm)
Brake pad type
Rubber Cork
19
3.5
3.5
21
2
3.5
23
1
2.5
25
0
1.5
Figure 6. Brake booster (rear brake only)
8. If needed, re-center the brake.
9.
Size and cut the cable, and reattach the wedge.
10. Finish the end of the cable so that it will not interfere with the brake return spring.
If you choose to only cut the cable and not add anything, the extended tunnel of the
wedge prevents immediate fraying of the cable.
If desired, solder the end. Or install a cable crimp, then bend it downward.
11. Place the brake booster over the brake (Figure 6).
12. Install the three brake cover attachment screws (Figure 7), two of which also attach the
brake booster.
Figure 7. Attaching the rear brake cover over the brake
booster
15 TREK SERVICE INFORMATION
24 May 2010
DuoTrap Computer Sensor
The 2011 Speed Concept frame includes a special pocket on the left chainstay for
installation of the Bontrager DuoTrap sensor that combines speed and cadence sensing in a
single, wireless unit. This unit attaches through a hole in the chainstay (Figure 1).
To install a Duotrap sensor
1.
Remove the attachment screw and the cover plate over the chainstay.
2.
Slide the cylindrical part of the sensor through the chainstay (Figure 2) until the sensor
sits flush (Figure 3).
3.
Install the attachment screw and tighten.
4. Place the rubber plug over the attachment screw (Figure 3).
Figure 1. Hole through the chainstay for Duotrap sensor
Figure 2. Sliding the speed cylinder of a Duotrap sensor
through the chainstay
Rubber plug
Figure 3. Duotrap sensor installed on chainstay
16 TREK SERVICE INFORMATION
24 May 2010
Draft Storage Box
The 2011 Speed Concept frame can be equipped with an optional storage box (Figure 1)
which is placed behind the seat tube, out of the wind resistance. The box is held in place by
clamping the seatstays.
To install a storage box
1.
Squeeze the side tabs (Figure 1) to open the lid.
2.
Loosen the clamp bolt (Figure 2).
You do not need to completely remove the bolt.
3.
Remove the rear wheel from the frame.
Side tab
4. Slide the draft box between the seatstays (Figure 3).
5.
While holding the draft box in position (Figure 1), tighten the clamp bolt until the draft
box is secure.
Figure 1. Draft storage box behind the seat tube
(seatpost removed)
Figure 2. Clamp bolt in bottom of draft box
Figure 3. Placing draft box between seatstays
17 TREK SERVICE INFORMATION
24 May 2010
Crankset
The Speed Concept uses the same bearing system as a Madone; there are no parts that
thread into the frame. Instead, the bearings are a slip-fit into the frame. However, the Speed
Concept uses the new tighter fit of the bearings, which may require using a headset press
(see page 19).
Bearings kits are available for all major brand of cranksets: SRAM/TruVativ/Bontrager GXP,
Shimano HollowTech, Campagnolo UltraTorque, and FSA MegaExo.
Each kit includes a slightly different set of bearings, seals, and spacers. When installing
other crankset systems, follow the manufacturer’s instructions to achieve the correct
assembly and adjustment.
Do not use a hammer or bearing press to install the bearings into the frame. If the bearing fit
is too tight, make sure the bearing seats are clean and free of debris.
All bottom bracket systems share the same procedure to install the bottom bracket shields.
Do these steps before installing the bearings.
To install the axle shields
Figure 1. Applying grease to the axle shield
Your frame may already have the axle shields installed in the frame.
1. Apply a light coat of grease to the male axle shield (smaller diameter, Figure 1).
2.
Place the male axle shield into the bottom bracket shell from the drive side (Figure 2).
3.
Place the female (larger diameter) axle shield into the bottom bracket shell from the
non-drive side.
4. With the installation tool (Figure 3), push together the two halves of the axle shield.
When they are inserted in the correct position, there will be an audible click.
5.
Go to the instructions (on the following pages) for the bearing system you want to
install.
Figure 2. Inserting one half of the axle shield into frame
Figure 3. Release tab
18 TREK SERVICE INFORMATION
24 May 2010
Pressing bearings
Tools required
The bearing fit is tighter in the Speed Concept than in early Madone models. If the bearings
Installation
do not slip in by hand, follow this procedure after you have installed the bearing shield
• Park headset press
(page 21).
Removal
Notes:
• Brass punch
• Be very careful when using the press. Too much force can crack the bottom bracket shell.
• Hammer
• Press in one bearing at a time.
To press a bearing
1.
Install the bearing shield.
2.
Press the bearing into the frame by hand as far as possible.
3.
With the cup guide on the bearing side (Figure 1), slide the bearing press through the
bearing and frame.
4. Center the guide in the bearing.
5.
Press the bearing into the bottom bracket shell until the bearing is flush with the shell.
To remove a bearing
If you cannot remove a bearing because it is stubborn, follow these directions.
1. Remove the crankset.
2.
Slide the punch through one side of the bottom bracket shell to the back side of the
bearing.
3.
Position the punch on the inside ring of the bearing.
4. Gently tap the punch with the hammer, then move 90 degrees around the bearing and
tap again.
5.
Continue tapping and moving around the bearing. TAP GENTLY.
6. Go around the bearing and keep tapping.
DO NOT HIT HARD. Excessive force can damage the bottom bracket shell.
19 TREK SERVICE INFORMATION
24 May 2010
Figure 1. Using a headset press to install the bearings
SRAM GXP
Part description
SRAM
These instructions explain how to install a SRAM/TruVativ/Bontrager GXP crankset (Figure
Kit
404700
1) in a new Speed Concept. To complete the installation, you will also need the SRAM
Ceramic kit
411814
instructions, available at: http://www.sram.com/_media/techdocs/2005_gxp-05-r5-e.pdf
Drive side parts
Bearing
281824
Tools and materials required
Ceramic
293617
• Crankset and bottom bracket
Bearing
• 8 mm allen wrench
Seal
281820
Axle shield
281823
Wave washer
282866
• Bearing installation tool PN 404694
• Rock “N” Roll Super Coat grease
Non-drive side parts
• Bottom bracket parts
Bearing
282864
• TruVativ GXP installation instructions
Ceramic
293618
Bearing
Wave washer
Figure 1. SRAM bearing set
20 TREK SERVICE INFORMATION
24 May 2010
Seal
Bearing
Bearing with lip (facing in)
Seal
282865
Axle shield
281822
Metal seal
To install the bearings
1.
Apply a liberal coat of grease to the contact surfaces of one bearing and the drive side
of the bottom bracket shell (Figure 1).
2.
Slide a bearing onto the installation tool.
Either side of the drive-side bearing is the “right side.” The non-drive bearing on GXP
systems has a lip (Figure 2). Install the bearing so that the lip faces in.
3.
Press one bearing into the drive side of the bottom bracket shell (Figure 3).
To remove the installation tool, press the release tab.
4. Repeat steps 1-3 for the other bearing on the non-drive side.
Figure 1. Greasing the bearing and the frame saddle
To install the drive-side crankarm
When handling the seals, avoid bending them. A bent seal will rub on the bearing, creating
drag.
1. Apply a light coat of grease to the bearings on the face and the axle contact surface.
2.
Apply a light coat of grease to the metal inside of one bearing seal (Figure 4).
3.
Install the wave washer and with the grease facing up, slide the bearing seal onto the
axle (Figure 5).
4. Apply a light coat of grease to the bearing contact area of the axle (Figure 6).
The grease areas should be about 1 inch (25 mm) wide. On the drive side, start at the
bearing seal. On the non-drive side, start at the splines and apply toward the drive side
of the axle
5.
Figure 2. Grease on the frame and the non-drive side
bearing (with the lip facing in)
Insert the axle through the drive-side bearing in the bottom bracket (Figure 7).
Figure 3. Pressing the bearing into the frame
Figure 4. Greasing the bearing covers
21 TREK SERVICE INFORMATION
24 May 2010
To install the non-drive side crankarm
1.
Apply a light coat of grease to the inside of the metal bearing seal.
2.
With the grease side toward the bearing, slide the bearing seal onto the axle (Figure 8).
3.
Follow the TruVativ GXP installation instructions to complete to install the non-drive
crank arm.
4. Tighten the crank bolt to the torque specifications (see page 38).
5.
Follow the steps in “Inspecting the bottom bracket.”
To remove the bottom bracket bearings
Figure 5. Sliding the wave washer and bearing cover
onto the axle
The Speed Concept bottom bracket bearing system is designed to be a slip fit. However,
after the first installation some bearings might be tight. If the bearings do not easily come
out by hand, you may use the following method to remove them.
1. Slide the crank axle into the bearing so that the bearing is over the non-drive side of the
axle, about 1 inch (25 mm) from the non-drive end.
2.
Gently rock the axle while you pull the axle out.
Inspecting the bottom bracket
Every 3 months check the bottom bracket adjustment.
Figure 6. Greasing the axle
To check the bottom bracket bearing adjustment
1.
Lift the chain from the chainrings.
2.
Rotate the crank so that one of the arms is parallel to the seat tube.
3.
Put one hand on the crank arm and one hand on the seat tube, and attempt to move
the crank arm laterally toward and away from the seat tube.
4. Spin the cranks.
If the crank feels or sounds loose, or if the motion stops abruptly or you hear a grinding
noise coming from the bearings, readjust the bearings or take the bike to your Trek dealer.
Figure 7. Sliding the axle through the bearings
Figure 8. Metal bearing cover in place over the bearing
22 TREK SERVICE INFORMATION
24 May 2010
Shimano HollowTech
Tools and materials required
These instructions explain how to install a Shimano HollowTech (Figure 1) in a new Speed
• Crankset and bottom bracket
Concept. To complete the installation, you will also need the Shimano instructions, available
• Shimano FC16 crank arm installation tool
at: http://techdocs.Shimano.com/media/techdocs/content/cycle/SI/Dura-Ace/FC-7800-
• 5 mm Allen Wrench
7803/SI_1F30H_En_v1_m56577569830605111.pdf.
• Bearing installation tool PN 404694
• Rock “N” Roll Super Coat grease
• Bottom bracket parts
Seal
Bearing
Bearing
Seal
Figure 1. Shimano bearing set
Part description
Shimano
Kit
404699
Ceramic kit
411813
Drive side parts
Bearing
281824
Ceramic
295213
bearing
Seal
281820
Axle shield
281823
Wave washer
-
Non-drive side parts
Bearing
281824
Ceramic
295213
bearing
23 TREK SERVICE INFORMATION
24 May 2010
Seal
281820
Axle shield
281822
To install the bearings
1.
Apply a liberal coat of grease to the contact surfaces of one bearing and the drive side
of the bottom bracket shell (Figure 2).
2.
Slide a bearing onto the installation tool.
Either side of the bearing is the “right side.”
3.
Press one bearing into the drive side of the bottom bracket shell (Figure 3).
To remove the installation tool, press the release tab (Figure 3).
4. Repeat steps 1-3 for the other bearing on the non-drive side.
Figure 2. Greasing the bearing and the frame seat
Figure 3. Pressing the bearing into the frame
24 TREK SERVICE INFORMATION
24 May 2010
To install the drive-side crankarm
When handling the seals, avoid bending them. A bent seal will rub on the bearing, creating
drag.
1. Apply a light coat of grease to the bearings on the face and the axle contact surface.
2.
Apply a light coat of grease to the metal inside of one bearing seal (Figure 4).
3.
With the grease facing up, slide the bearing seal onto the axle (Figure 5).
4. Apply a light coat of grease to the bearing contact area of the axle (Figure 6).
The grease areas should be about 1 inch (25 mm) wide. On the drive side, start at the
bearing seal. On the non-drive side, start at the splines and apply toward the drive side
of the axle
5.
Figure 4. Greasing the bearing covers
Insert the axle through the drive-side bearing in the bottom bracket (Figure 7).
Figure 5. Sliding the bearing cover onto the axle
Figure 6. Greasing the axle
Figure 7. Sliding the axle through the bearings
25 TREK SERVICE INFORMATION
24 May 2010
To install the non-drive side crankarm
1.
Apply a light coat of grease to the inside of the other bearing seal.
2.
With the grease side toward the bearing, slide the bearing seal onto the axle (Figure 8).
3.
Align the non-drive crank arm with the groove on the axle and slide the crank onto the
axle.
The non-drive crank arm should point 180 degrees opposite of the drive-side crank
arm.
4. With the plastic installation tool, press the crank onto the axle (Figure 9) as far as it
will go.
5.
Release the installation tool and spin the cranks 10 to 20 revolutions.
Figure 8. Pressing in the second bearing cover
6. Follow the Shimano instructions to complete the installation.
7.
Follow the steps in “Inspecting the bottom bracket.”
To remove the bottom bracket bearings
The Speed Concept bottom bracket bearing system is designed to be a slip fit. However,
after the first installation some bearings might be tight. If the bearings do not easily come
out by hand, you may use the following method to remove them.
1. Slide the crank axle into the bearing so that the bearing is over the non-drive side of the
axle, about 1 inch (25 mm) from the non-drive end.
2. Gently rock the axle while you pull the axle out.
Inspecting the bottom bracket
Every 3 months check the bottom bracket adjustment.
To check the bottom bracket bearing adjustment
1.
Lift the chain from the chainrings.
2.
Rotate the crank so that one of the arms is parallel to the seat tube.
3.
Put one hand on the crank arm and one hand on the seat tube, and attempt to move
the crank arm laterally toward and away from the seat tube.
4. Spin the cranks.
If the crank feels or sounds loose, or if the motion stops abruptly or you hear a grinding
noise coming from the bearings, readjust the bearings or take the bike to your Trek
dealer.
26 TREK SERVICE INFORMATION
24 May 2010
Figure 9. Pressing the crank arm onto the axle
Campagnolo UltraTorque
The Speed Concept uses a special bearing system that has no parts that thread into
the frame. Instead, the bearings are a slip-fit into the frame. However, the Campagnolo
UltraTorque system requires you to attach bearing supports (seal seats) to the Speed
Concept bottom bracket shell (Figure 1). This section explains how to do that.
The seal seats might fit into the frame tightly. In this case, you might need to tap the cups
with a soft-faced mallet. However, do not use a hammer or bearing press to install the
bearings into the frame. If the bearing fit is too tight, make sure the seal seats are clean and
free of debris.
Wave washer
Washer
Bearing
Seal seat
Washer
Bearing
Figure 1. Campagnolo bearing set
Part
description
Campagnolo
Tools and materials required
Kit
407383
To complete the installation, you will need the Campagnolo instructions, available at: http://
www.campagnolo.com/pdf/7225306_Ultra_torque_05_07.pdf.
Also read the warning: http://www.campagnolo.com/pdf/7225365_warning_Ultra_
Torque_0607.pdf
• Crankset and bottom bracket (bearings come pressed onto the axle halves)
• Plastic crank arm installation tool
• LocTite® 638 retaining compound, TCG 408082
• LocTite® primer 7649, TCG 408083
• 5 mm Allen Wrench
• Rock “N” Roll Super Coat grease
• Bottom bracket parts
27 TREK SERVICE INFORMATION
24 May 2010
Drive side parts
Bearing
Campy part
Seal seat
281825
Axle shield
281823
Washer
281826
Non-drive side parts
Bearing
Campy part
Seal seat
281825
Wave
281827
washer
Axle shield
281823
Washer
281826
To install the seal seats
1.
Clean all surfaces to be bonded (bottom bracket shell, seal seats) with alcohol wipes or
similar (Figure 2).
2.
Apply a thin film of LocTite Primer to the outer step of the bearings cups and the
outer shoulder of the bottom bracket shell (Figure 3). Allow the primer to evaporate
completely.
3.
Apply LocTite 638 to the faced of the seal seat that contacts the bottom bracket shell.
4. Press the seal seat into the frame (Figure 4). If needed, tap lightly with a soft-faced
mallet.
Let the LocTite cure for at least 24 hours before inserting the bearings.
Figure 2. Cleaning bonding surfaces with an alcohol
wipe
To install the non-drive side bearings
1.
Insert a washer into the non-drive side seal seat.
2.
Apply a liberal coat of grease to the contact surfaces of the bearing (Figure 5) and the
non-drive side seal seat (Figure 6). Insert the Wave washer into the non-drive side seal
seat (Figure 7).
3.
Slide the non-drive side axle through the seal seat and bottom bracket shell (Figure 8).
To install the drive side bearings
1.
Insert a washer into the drive side seal seat.
2.
Apply a liberal coat of grease to the contact surfaces of the bearing (Figure 5) and the
Figure 3. Applying LocTite primer to the outer step of
the bearing cups
Figure 4. Inserting the bearing cups into the bottom
bracket shell
Figure 5. Greasing the bearings
28 TREK SERVICE INFORMATION
24 May 2010
drive side seal seat (Figure 6).
3.
Slide the drive side axle through the seal seat and bottom bracket shell (Figure 8).
4. Line up the splines of the bottom bracket axle and press the axle together. If necessary,
tap the ends together with the heel of your palms.
5.
Insert the crank bolt from the drive side (Figure 9) and tighten to the torque
specifications (see page 38).
6. Follow the steps in “Inspecting the bottom bracket.”
To remove the bottom bracket bearings
Figure 6. Greasing the bearing cups
With the Campagnolo system, each of the two bearings are pressed onto one of the
halves of the bottom bracket axle. To remove the bearings, follow the Campagnolo service
instructions.
Inspecting the bottom bracket
Every 3 months check the bottom bracket adjustment.
To check the bottom bracket bearing adjustment
1.
Lift the chain from the chainrings.
2.
Rotate the crank so that one of the arms is parallel to the seat tube.
3.
Put one hand on the crank arm and one hand on the seat tube, and attempt to move
the crank arm laterally toward and away from the seat tube.
Figure 7. Inserting the Wave washer (after the washer)
on the non-drive side
4. Spin the cranks.
If the crank feels or sounds loose, or if the motion stops abruptly or you hear a grinding
noise coming from the bearings, readjust the bearings or take the bike to your Trek
dealer.
Figure 8. Inserting the non-drive side axle
Figure 9. Tightening the axle bolt
29 TREK SERVICE INFORMATION
24 May 2010
FSA MegaExo AL
FSA
These instructions and parts are for the aluminum FSA cranks only. The current “B” kit will
Part
description
not work for FSA carbon cranks.
BB90 bearing kit “B”
293227
The Speed Concept uses a special bearing system that has no parts that thread into the
Drive side parts
frame. Instead, the bearings are a slip-fit into the frame (Figure 10). This section explains
Axle shield
281823
how to install the bearings and crankset.
Bearing
300162
The bearings might fit into the frame tightly. In this case, you might need to tap them with
Seal
294668
a soft-faced mallet. However, do not use a hammer or bearing press to install the bearings
Non-drive side parts
into the frame. If the bearing fit is too tight, make sure the bearings are clean and free of
Axle shield
281822
debris.
Bearing
300162
Seal
294668
Tools and materials required
To complete the installation, you will also need the FSA instructions, available at:
http://www.road.fullspeedahead.com/downloadfly.aspx?download=downloads/
Install_MegaExoAlloy.pdf.
• Crankset and bearings (bearing shields come pressed onto the bearings)
• 5 mm Allen Wrench
• Rock “N” Roll Super Coat grease
• Bottom bracket parts
Bearing with shield pressed on
Bearing with shield pressed on
Figure 10. FSA bearing set
30 TREK SERVICE INFORMATION
24 May 2010
To install the bearings
1.
Apply a liberal coat of grease to the contact surfaces of one bearing and the drive side
of the bottom bracket shell (Figure 11).
2.
With the plastic bearing shield facing out, press one bearing into the drive side of the
bottom bracket shell (Figure 12).
3.
Repeat Steps 1-2 for the other bearing on the non-drive side.
To install the drive-side crankarm
1.
Apply a light coat of grease to the axle surface where the bearings will be in contact
(Figure 13).
The grease areas should be about 1 inch (25 mm) wide. On the drive side, start at the
bearing seal. On the non-drive side, start at the splines and apply toward the drive side
of the axle
2.
Insert the axle through the drive-side bearing in the bottom bracket (Figure 14).
Figure 11. Greasing the bearing and the frame saddle
Figure 12. Pressing the bearing into the frame with the
shield on the outside
Figure 13. Greasing the axle
Figure 14. Sliding the axle through the bearings
31 TREK SERVICE INFORMATION
24 May 2010
To install the non-drive side crankarm
1.
Align the non-drive crank arm with the groove on the axle and slide the crank onto the
axle.
The non-drive crank arm should point 180 degrees opposite of the drive-side crank
arm.
2.
Install the FSA crank bolt and tighten to their torque specifications (Figure 15).
3.
Follow the FSA instructions to complete the installation.
4. Follow the steps in “Inspecting the bottom bracket.”
To remove the bottom bracket bearings
The Speed Concept bottom bracket bearing system is designed to be a slip fit. However,
after the first installation some bearings might be tight. If the bearings do not easily come
out by hand, you may use the following method to remove them.
1. Slide the crank axle into the bearing so that the bearing is over the non-drive side of the
axle, about 1 inch (25 mm) from the non-drive end.
2.
Gently rock the axle while you pull the axle out.
Inspecting the bottom bracket
Every 3 months check the bottom bracket adjustment.
To check the bottom bracket bearing adjustment
1.
Lift the chain from the chainrings.
2.
Rotate the crank so that one of the arms is parallel to the seat tube.
3.
Put one hand on the crank arm and one hand on the seat tube, and attempt to move
the crank arm laterally toward and away from the seat tube.
4. Spin the cranks.
If the crank feels or sounds loose, or if the motion stops abruptly or you hear a grinding
noise coming from the bearings, readjust the bearings or take the bike to your Trek
dealer.
32 TREK SERVICE INFORMATION
24 May 2010
Figure 15. Pressing the crank arm onto the axle
Crankset Troubleshooting
This section describes problems that occasionally occur, and possible solutions. If these
solutions do not solve a problem, contact Customer Service.
Bearing play in a GXP crank or bottom bracket assembly
The crank feels loose when grasped at the pedal end and rocked side-to-side.
Cause
Solution
Wave washer not
First, verify that the crank has been tightened to the torque
compressed fully
specifications (see page 38). Most issues with play in
This is usually caused by
insufficient torque on the nondrive crank arm.
GXP crankarms are resolved when the arms are properly
In rare instances a tolerance
stack can be created by the five
critical parts: non-drive bearing,
drive bearing, drive-side seal,
bottom bracket shell, and axle
length.
tightened.
If this does not solve the issue, add a 0.5mm washer/spacer
to increase the bearing preload.
Spline of GXP crankarm is
Remove the crankarm and re-install with plenty of grease.
undersized
Verify that the crank has been tightened to the torque
• We have seen some variation in
the tolerance of GXP crankarms.
specifications (see page 38).
• If the installation torque is not
sufficient, the crank arm will not
completely compress the shield
and bearing race.
Re-check the bearings after installation. The GXP axle
33 TREK SERVICE INFORMATION
Spacer
(PN 294162) between the wave washer and seal (Figure 1)
spline is tapered, so it requires that the crank be completely
tightened to seat on the axle.
24 May 2010
Wave washer
Seal
Figure 1. SRAM bearing set
Bearing
Crank is rubbing or there is excessive drag
If you notice that the crank arms rotate poorly, there are several possible issues.
Cause
Solution
Out of spec or bent non-drive metal seal
Install a new metal seal (same Part
• The inside chamfer of the metal seal (Figure 2) rubs
on the outer race of the bearing.
Number: 282865). We have revised the
• The metal seal deforms under the compressive load
of the non-drive arm and rubs on the outer race of the
bearing.
metal seal by adding a ring of material,
diameter. This will move the outer edge of
the seal away from the bearing.
Bearing not seated properly
Make sure the halves of the axle shield
• The axle shield might not be seated completely in the
frame (Figure 3) causing the flange of the shield to foul
the bearing.
are snapped together, and then remove
• A tight bore can cause the installer to think the
bearing is seated when it is not.
Metal seal
0.3mm thick, to the seal around the inner
Figure 2. SRAM bearing set
and reinstall the bearing. When properly
installed the bearing will not sit even with
bottom bracket shell.
•Enduro bearing: 0.75mm inside the shell.
•GXP non-drive bearing: 0.25mm outside
the shell
Figure 3. Inserting one half of the axle shield into frame
GXP triple crankset can’t be properly preloaded
Although some cranksets change the arm configuration to add clearance for a third
chainring, the GXP crankset uses a longer axle. Without additional spacers, a longer axle
Spacer
will not compress the bearing..
Cause
Solution
Different axle lengths require different
Install a 5mm thick spacer (Part Number
spacers
291276) between the wave washer and the
Triple GXP crank axles are 5mm longer than doubles.
red bearing seal (Figure 4).
Seal
Wave washer
Figure 4. SRAM bearing set
34 TREK SERVICE INFORMATION
24 May 2010
Bearing