1
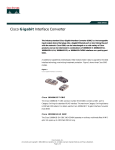
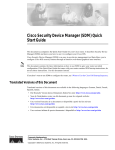
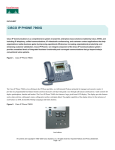
Getting Started with the
Cisco IP Phone 7910 Series
Corporate Headquarters
Cisco Systems, Inc.
170 West Tasman Drive
San Jose, CA 95134-1706
USA
http://www.cisco.com
Tel: 408 526-4000
800 553-NETS (6387)
Fax: 408 526-4100
Customer Order Number: DOC-7811443=
Text Part Number: 78-11443-02
THE SPECIFICATIONS AND INFORMATION REGARDING THE PRODUCTS IN THIS MANUAL ARE SUBJECT TO CHANGE WITHOUT
NOTICE. ALL STATEMENTS, INFORMATION, AND RECOMMENDATIONS IN THIS MANUAL ARE BELIEVED TO BE ACCURATE BUT
ARE PRESENTED WITHOUT WARRANTY OF ANY KIND, EXPRESS OR IMPLIED. USERS MUST TAKE FULL RESPONSIBILITY FOR
THEIR APPLICATION OF ANY PRODUCTS.
THE SOFTWARE LICENSE AND LIMITED WARRANTY FOR THE ACCOMPANYING PRODUCT ARE SET FORTH IN THE INFORMATION
PACKET THAT SHIPPED WITH THE PRODUCT AND ARE INCORPORATED HEREIN BY THIS REFERENCE. IF YOU ARE UNABLE TO
LOCATE THE SOFTWARE LICENSE OR LIMITED WARRANTY, CONTACT YOUR CISCO REPRESENTATIVE FOR A COPY.
The following information is for FCC compliance of Class A devices: This equipment has been tested and found to comply with the limits for a Class
A digital device, pursuant to part 15 of the FCC rules. These limits are designed to provide reasonable protection against harmful interference when
the equipment is operated in a commercial environment. This equipment generates, uses, and can radiate radio-frequency energy and, if not installed
and used in accordance with the instruction manual, may cause harmful interference to radio communications. Operation of this equipment in a
residential area is likely to cause harmful interference, in which case users will be required to correct the interference at their own expense.
The following information is for FCC compliance of Class B devices: The equipment described in this manual generates and may radiate
radio-frequency energy. If it is not installed in accordance with Cisco’s installation instructions, it may cause interference with radio and television
reception. This equipment has been tested and found to comply with the limits for a Class B digital device in accordance with the specifications in
part 15 of the FCC rules. These specifications are designed to provide reasonable protection against such interference in a residential installation.
However, there is no guarantee that interference will not occur in a particular installation.
Modifying the equipment without Cisco’s written authorization may result in the equipment no longer complying with FCC requirements for Class
A or Class B digital devices. In that event, your right to use the equipment may be limited by FCC regulations, and you may be required to correct
any interference to radio or television communications at your own expense.
You can determine whether your equipment is causing interference by turning it off. If the interference stops, it was probably caused by the Cisco
equipment or one of its peripheral devices. If the equipment causes interference to radio or television reception, try to correct the interference by
using one or more of the following measures:
• Turn the television or radio antenna until the interference stops.
• Move the equipment to one side or the other of the television or radio.
• Move the equipment farther away from the television or radio.
• Plug the equipment into an outlet that is on a different circuit from the television or radio. (That is, make certain the equipment and the television
or radio are on circuits controlled by different circuit breakers or fuses.)
Modifications to this product not authorized by Cisco Systems, Inc. could void the FCC approval and negate your authority to operate the product.
The Cisco implementation of TCP header compression is an adaptation of a program developed by the University of California, Berkeley (UCB) as
part of UCB’s public domain version of the UNIX operating system. All rights reserved. Copyright © 1981, Regents of the University of California.
NOTWITHSTANDING ANY OTHER WARRANTY HEREIN, ALL DOCUMENT FILES AND SOFTWARE OF THESE SUPPLIERS ARE
PROVIDED “AS IS” WITH ALL FAULTS. CISCO AND THE ABOVE-NAMED SUPPLIERS DISCLAIM ALL WARRANTIES, EXPRESSED
OR IMPLIED, INCLUDING, WITHOUT LIMITATION, THOSE OF MERCHANTABILITY, FITNESS FOR A PARTICULAR PURPOSE AND
NONINFRINGEMENT OR ARISING FROM A COURSE OF DEALING, USAGE, OR TRADE PRACTICE.
IN NO EVENT SHALL CISCO OR ITS SUPPLIERS BE LIABLE FOR ANY INDIRECT, SPECIAL, CONSEQUENTIAL, OR INCIDENTAL
DAMAGES, INCLUDING, WITHOUT LIMITATION, LOST PROFITS OR LOSS OR DAMAGE TO DATA ARISING OUT OF THE USE OR
INABILITY TO USE THIS MANUAL, EVEN IF CISCO OR ITS SUPPLIERS HAVE BEEN ADVISED OF THE POSSIBILITY OF SUCH
DAMAGES.
CCIP, CCSP, the Cisco Arrow logo, the Cisco Powered Network mark, the Cisco Systems Verified logo, Cisco Unity, Follow Me Browsing, FormShare,
iQ Breakthrough, iQ FastTrack, the iQ Logo, iQ Net Readiness Scorecard, Networking Academy, ScriptShare, SMARTnet, TransPath, and Voice LAN
are trademarks of Cisco Systems, Inc.; Changing the Way We Work, Live, Play, and Learn, The Fastest Way to Increase Your Internet Quotient, and
iQuick Study are service marks of Cisco Systems, Inc.; and Aironet, ASIST, BPX, Catalyst, CCDA, CCDP, CCIE, CCNA, CCNP, Cisco, the Cisco
Certified Internetwork Expert logo, Cisco IOS, the Cisco IOS logo, Cisco Press, Cisco Systems, Cisco Systems Capital, the Cisco Systems logo,
Empowering the Internet Generation, Enterprise/Solver, EtherChannel, EtherSwitch, Fast Step, GigaStack, Internet Quotient, IOS, IP/TV, iQ Expertise,
LightStream, MGX, MICA, the Networkers logo, Network Registrar, Packet, PIX, Post-Routing, Pre-Routing, RateMUX, Registrar, SlideCast,
StrataView Plus, Stratm, SwitchProbe, TeleRouter, and VCO are registered trademarks of Cisco Systems, Inc. and/or its affiliates in the U.S. and certain
other countries.
All other trademarks mentioned in this document or Web site are the property of their respective owners. The use of the word partner does not imply a
partnership relationship between Cisco and any other company. (0301R)
Getting Started with the Cisco IP Phone 7910 Series
Copyright © 2000-2002, Cisco Systems, Inc.
All rights reserved.
CONTENTS
CHAPTER
1
Introduction 1-1
CHAPTER
2
Installing the Cisco IP Phone 7910 Series 2-1
Safety Notices 2-1
Installing the Phone and Connecting to the Network 2-3
Auto-Registering Your Phone Using TAPS 2-6
CHAPTER
3
Using the Cisco IP Phone 7910 Series 3-1
How to Use the Handset and Speaker 3-2
Using the Handset 3-2
Using the Speaker 3-2
Adjusting the Handset Volume 3-3
Adjusting the Speaker Volume 3-3
Customizing Phone Settings 3-4
Adjusting the Ringer Volume 3-4
Changing the Ringer Sound 3-4
Changing the LCD Contrast 3-5
Making Telephone Calls 3-5
Placing a Call 3-6
Answering a Call 3-6
Ending a Call 3-6
Muting a Call 3-7
Placing a Call on Hold 3-7
Transferring a Call 3-7
Redialing the Last Number Dialed 3-8
Getting Started with the Cisco IP Phone 7910 Series
78-11443-02
v
Contents
Parking a Call 3-8
Making Conference Calls 3-9
Placing a Conference Call 3-9
Establishing Meet-Me Conference Calls 3-10
Using Call Pickup 3-10
Picking Up Calls in Your Group 3-11
Picking Up Calls Outside of Your Group 3-11
Using Call Forwarding 3-12
Forwarding All Calls 3-12
Forwarding All Calls When Not at Your Phone 3-13
Using Voice Mail 3-14
Configuring Speed Dial Buttons 3-14
INDEX
Getting Started with the Cisco IP Phone 7910 Series
vi
78-11443-02
C H A P T E R
1
Introduction
The Cisco IP Phone 7910 Series telephone is a full-feature telephone that
provides voice communication over an IP network. The main features of the
phone are illustrated in Figure 1-1 and explained in Table 1-1.
Figure 1-1
Cisco IP Phone 7910 Series Features
1
2
3
4
5
6
7
8
9
10
11
16
15 14
13
44007
12
Getting Started with the Cisco IP Phone 7910 Series
78-11443-02
1-1
Chapter 1
Table 1-1
Introduction
Cisco IP Phone 7910 Series Features
Figure
Callout
Feature
Description
1
Handset
Lift the handset and press the dial pad numbers to place a call, review
voice mail messages, answer a call, and so on.
2
LCD screen
The IP Phone “desktop” which displays the time, date, your phone
number, caller ID, and line or call status.
3
Line button
Open a new line to make or receive a call, or end the current call. See
the “Making Telephone Calls” section on page 3-5.
4
Hold button
Put a current call on hold, or take a call off hold. See the “Placing a
Call on Hold” section on page 3-7.
5
Transfer button
Transfer the current caller to a different phone number. See the
“Transferring a Call” section on page 3-7.
6
Settings button
Adjust handset, speaker, and ringer volume, ringer type, and contrast
on the LCD screen. See the “How to Use the Handset and Speaker”
section on page 3-2 and the “Customizing Phone Settings” section on
page 3-4.
7
Footstand
adjustment
Adjusts the angle of the phone base. See the “Installing the Phone and
Connecting to the Network” section on page 2-3.
Getting Started with the Cisco IP Phone 7910 Series
1-2
78-11443-02
Chapter 1
Table 1-1
Introduction
Cisco IP Phone 7910 Series Features (continued)
Figure
Callout
Feature
Description
8, 9, 10, 11,
15
Programmable
buttons
These buttons are programmable by your system administrator. The
options you have depend on what your system administrator
configured for your phone. This is a list of the available features, with
the button assignments for the default features. If a button does not
work according to its label (or does not work at all), ask your
administrator if the button has been configured.
•
msgs (button 8)—Access your voice mail messages. See the
“Using Voice Mail” section on page 3-14.
•
conf (button 9)—Initiate a conference call. See the “Placing a
Conference Call” section on page 3-9.
•
forward (button 10)—Redirect your calls to another telephone
number. See the “Forwarding All Calls” section on page 3-12.
•
speed dial (buttons 15)—Quickly call a frequently-dialed number.
See the “Configuring Speed Dial Buttons” section on page 3-14
for information on setting up speed dials.
•
redial (button 11)—Dial the last number called. See the
“Redialing the Last Number Dialed” section on page 3-8.
•
park—Store a call at a specified number and then use another
phone to retrieve the call. See the “Parking a Call” section on
page 3-8.
•
call pickup—Answer a call that comes in on a telephone
extension other than your own. See the “Using Call Pickup”
section on page 3-10.
•
meet-me—Set up a Meet-Me conference, which is a conference at
a pre-set phone number that is not your own number. See the
“Establishing Meet-Me Conference Calls” section on page 3-10.
12
Speaker button
Toggles the speaker on and off. See the “Using the Speaker” section
on page 3-2.
13
Mute button
Toggles the handset mute on and off. See the “Muting a Call” section
on page 3-7.
Getting Started with the Cisco IP Phone 7910 Series
78-11443-02
1-3
Chapter 1
Table 1-1
Introduction
Cisco IP Phone 7910 Series Features (continued)
Figure
Callout
Feature
Description
14
Volume buttons
Increase or decrease the volume for the currently active voice
receiver: handset or speaker. The volume keys also control the ringer
volume, and the contrast of the LCD, and you can use them to scroll
through menus displayed on the LCD.
16
Key pad
Press the key pad buttons to dial a phone number. Key pad buttons
work exactly like those on your existing telephone. Also use these
keys to select items from menus shown on the LCD
Getting Started with the Cisco IP Phone 7910 Series
1-4
78-11443-02
C H A P T E R
2
Installing the
Cisco IP Phone 7910 Series
Before you can successfully install the phone, your system administrator must
prepare the network for your phone. If a technician is not installing your phone,
verify with the system administrator that the network is ready for the phone, read
the safety notices, and install the phone.
These sections help you install the Cisco IP Phone 7910 Series telephone:
•
Safety Notices, page 2-1
•
Installing the Phone and Connecting to the Network, page 2-3
Safety Notices
These are the safety considerations for using the Cisco IP Phone. Read these
notices before installing or using the phone.
Warning
This warning symbol means danger. You are in a situation that could cause
bodily injury. Before you work on any equipment, be aware of the hazards
involved with electrical circuitry and be familiar with standard practices for
preventing accidents. To see translations of the warnings that appear in this
publication, refer to the Regulatory Compliance and Safety Information
document that accompanied this device.
Getting Started with the Cisco IP Phone 7910 Series
78-11443-02
2-1
Chapter 2
Installing the Cisco IP Phone 7910 Series
Safety Notices
Warning
Read the installation instructions before you connect the system to its power
source.
Warning
Ultimate disposal of this product should be handled according to all national
laws and regulations.
Warning
Do not work on the system or connect or disconnect cables during periods of
lightning activity.
Warning
To avoid electric shock, do not connect safety extra low voltage (SELV) circuits
to telephone network voltage (TNV) circuits. LAN ports contain SELV circuits,
and WAN ports contain TNV circuits. Some LAN and WAN ports use RJ-45
connectors. Use caution when connecting cables.
The next warning applies when you use an external power supply.
Warning
This product relies on the building's installation for short-circuit (over current)
protection. Ensure that a fuse or circuit breaker no larger than 120 VAC, 15A U.S.
(240 VAC, 10A international) is used on the phase conductors (all
current-carrying conductors).
Warning
The device is designed to work with TN power systems.
Getting Started with the Cisco IP Phone 7910 Series
2-2
78-11443-02
Chapter 2
Installing the Cisco IP Phone 7910 Series
Installing the Phone and Connecting to the Network
Installing the Phone and Connecting to the Network
Before installing the phone, read the safety warnings in the “Safety Notices”
section on page 2-1.
Refer to Figure 2-1 for an overview about how to connect the
Cisco IP Phone 7910 Series telephone to your PC, the network, and a power
source. All ports are located at the rear of the phone base unit.
Figure 2-1
Cisco IP Phone 7910 Series Telephone Cable Connections
Cisco IP phone 7910
Network port
AC adapter port
(optional power cube)
Handset plug
Access port
(Cisco IP phone 7910+SW only)
44729
RS-232 port
Use this procedure to install the phone on a network that has already been
prepared to host the phone.
Step 1
Connect an Ethernet cable to the network port on the phone.
Use the Ethernet cable supplied in the box with your Cisco IP phone. If you need
a longer cable, contact your system administrator.
Step 2
Connect the handset to its port. Clip the cord into the slot to the right of the port.
Getting Started with the Cisco IP Phone 7910 Series
78-11443-02
2-3
Chapter 2
Installing the Cisco IP Phone 7910 Series
Installing the Phone and Connecting to the Network
Step 3
Connect the power plug to the DC48V AC adapter port (optional).
The Cisco IP Phone 7910 Series telephone can be powered by several different
methods. If you are not sure how your phone is receiving power, ask your system
administrator.
After the telephone has power connected to it, the phone begins its startup
process. Once completed, the main LCD screen appears, displaying the phone’s
extension (or directory number) and the current date and time. If the phone does
not start up successfully, contact your system administrator for help.
Step 4
If your phone has an access port, you can connect your computer to the phone
using an Ethernet cable to enable your computer to access the network through the
Cisco IP Phone. Your company might choose this option if you do not have
multiple Ethernet ports in your work space.
However, this option is not available on all Cisco IP Phone 7910 Series models.
If your phone does not have an access port, you cannot connect a network device
to the phone.
Step 5
Push in the footstand adjustment knob and adjust the footstand to the desired
height that makes using the display and buttons most comfortable for you.
You can also mount the telephone on the wall using the mounting holes on the
footstand. Adjust the footstand so that it lies flat against the phone body. There is
an optional locking mount kit if you are mounting the phone in a public location;
contact your system administrator if you want to use a locking wall mount.
Step 6
If you mount the phone on a wall, or have the phone close to vertical on your desk,
adjust the handset rest so that the handset hooks onto it. Figure 2-2 shows how to
do this.
Getting Started with the Cisco IP Phone 7910 Series
2-4
78-11443-02
Chapter 2
Installing the Cisco IP Phone 7910 Series
Installing the Phone and Connecting to the Network
Figure 2-2
2
3
77354
1
Using the Handset Rest
1
Set the handset aside and use your thumb and finger to grasp and pull out
the square plastic tab in the handset rest.
2
Rotate the tab 180 degrees.
3
Slide the tab back into the handset rest with the extension protruding from
the top of the tab.
Replace the handset in the rest. The tab hooks into a slot in the handset to
ensure that the handset will not slip out of the rest.
Step 7
If your system administrator asks you to auto-register your telephone, see the
“Auto-Registering Your Phone Using TAPS” section on page 2-6 for instructions.
Getting Started with the Cisco IP Phone 7910 Series
78-11443-02
2-5
Chapter 2
Installing the Cisco IP Phone 7910 Series
Auto-Registering Your Phone Using TAPS
Auto-Registering Your Phone Using TAPS
Your administrator may ask you to auto-register your Cisco IP Phone using TAPS,
the Tool for Auto-Registered Phones Support. TAPS might be used either for a
new phone or to replace an existing phone.
Note
Only follow this procedure if your phone administrator asks you to.
Procedure
Step 1
If the phone is not already installed, see the “Installing the Phone and Connecting
to the Network” section on page 2-3 for instructions on installing the phone
available.
After you plug the phone into a port, the phone automatically registers and
displays a number.
Step 2
Dial the TAPS extension provided by your system administrator.
Step 3
Follow the voice prompts to enter your personal extension number (provided by
your system administrator), followed by #. Listen to the voice prompts to
determine if you need to enter the entire number, including area code.
Step 4
Hang up the phone.
The phone resets and displays your extension number.
Getting Started with the Cisco IP Phone 7910 Series
2-6
78-11443-02
C H A P T E R
3
Using the Cisco IP Phone 7910 Series
Read these sections to learn how to use your Cisco IP Phone 7910 Series
telephone:
Caution
•
How to Use the Handset and Speaker, page 3-2
•
Customizing Phone Settings, page 3-4
•
Making Telephone Calls, page 3-5
•
Using Call Forwarding, page 3-12
•
Using Voice Mail, page 3-14
•
Configuring Speed Dial Buttons, page 3-14
Using a cell or mobile phone in close proximity to a Cisco IP Phone might cause
interference.
Getting Started with the Cisco IP Phone 7910 Series
78-11443-02
3-1
Chapter 3
Using the Cisco IP Phone 7910 Series
How to Use the Handset and Speaker
How to Use the Handset and Speaker
You can place calls with the handset or speaker, but you can only talk to your party
through the handset. Through the speaker, you can only listen to a call. These
sections describe the use of the handset and speaker and how to adjust the volume
of the call:
•
Using the Handset, page 3-2
•
Using the Speaker, page 3-2
•
Adjusting the Handset Volume, page 3-3
•
Adjusting the Speaker Volume, page 3-3
Using the Handset
To place and answer calls with the handset, simply lift the handset. To change
from handset to speaker, press Speaker and hang up the handset.
Using the Speaker
The speaker is designed to be used for “hands-free” dialing. You can use it to
place a call, and then pick up the handset if the other party answers the phone.
The speaker does not allow for two-way communication. However, you can have
the handset off-hook with the speaker on, enabling the calling party to hear you
over the handset while you listen through the speaker. You might want to do this
if you want to use the phone for conference calls.
To place calls using the speaker, press Speaker and dial the number. When the
party answers, pick up the handset. If the handset is off-hook with the Speaker
button enabled, you can speak into it, allowing the calling party to hear you. This
allows others to listen to both sides of the conversation.
If you are only listening to a call, you can leave the handset in the rest. The mute
button automatically lights, indicating that the calling party cannot hear you.
When finished with the call, press Speaker to hang up.
Note
You cannot use the speaker to transmit your voice.
Getting Started with the Cisco IP Phone 7910 Series
3-2
78-11443-02
Chapter 3
Using the Cisco IP Phone 7910 Series
How to Use the Handset and Speaker
Adjusting the Handset Volume
You can temporarily change the handset volume while on a call by pressing the
volume up/down keys. Your change only affects the current call.
To change the volume of your handset and save it as the default volume setting:
Step 1
Press the Settings button. Optionally, lift the handset before pressing Settings so
you can hear the volume as you adjust it.
Step 2
Press 1 on the key pad.
Step 3
Press the up or down volume keys to adjust the volume to the desired level.
Step 4
To save the volume setting for future calls, press # on the key pad and then press
the Settings button to exit the Settings menu.
Adjusting the Speaker Volume
You can temporarily change the speaker volume while on a call by pressing the
volume up/down keys. Your change only affects the current call.
To change the volume of your speaker and save it as the default volume setting:
Step 1
Press the Settings button. Optionally, press Speaker before pressing Settings so
you can hear the volume as you adjust it.
Step 2
Press 2 on the key pad.
Step 3
Press the up or down volume keys to adjust the volume to the desired setting.
Step 4
To save the volume setting for future calls, press # on the key pad and then press
the Settings button to exit the Settings menu.
Getting Started with the Cisco IP Phone 7910 Series
78-11443-02
3-3
Chapter 3
Using the Cisco IP Phone 7910 Series
Customizing Phone Settings
Customizing Phone Settings
You can change various settings on your Cisco IP Phone 7910 Series telephone to
ensure that the ringer volume, ring sound, and LCD contrast are set appropriately
for you.
Adjusting the Ringer Volume
To increase or decrease the volume of the ringer:
Step 1
Press the Settings button.
Step 2
Press 3 on the key pad.
Step 3
Press the up or down volume keys to adjust the volume to the desired setting. The
ringer sounds so that you can hear the chosen volume level.
Step 4
To save the volume setting, press # on the key pad and then press the Settings
button to exit the Settings menu.
Changing the Ringer Sound
To change the sound used by the ringer:
Step 1
Press the Settings button.
Step 2
Press 7 on the key pad.
Step 3
Press the up or down volume keys to scroll through the list of available ring types.
Each ring type sounds as you scroll through the list.
Step 4
To save the selected ring type, press # on the key pad and then press the Settings
button to exit the Settings menu.
Getting Started with the Cisco IP Phone 7910 Series
3-4
78-11443-02
Chapter 3
Using the Cisco IP Phone 7910 Series
Making Telephone Calls
Changing the LCD Contrast
To improve the readability of the LCD, change the amount of contrast:
Step 1
Press the Settings button.
Step 2
Press 5 on the key pad.
Step 3
Press the up or down volume keys to set the desired intensity of the display.
Step 4
To save this setting, press # on the key pad and then press the Settings button to
exit the Settings menu.
Making Telephone Calls
These sections describe how you can place, answer, or otherwise manage a
telephone call:
•
Placing a Call, page 3-6
•
Answering a Call, page 3-6
•
Ending a Call, page 3-6
•
Muting a Call, page 3-7
•
Placing a Call on Hold, page 3-7
•
Transferring a Call, page 3-7
•
Redialing the Last Number Dialed, page 3-8
•
Parking a Call, page 3-8
•
Making Conference Calls, page 3-9
•
Using Call Pickup, page 3-10
Getting Started with the Cisco IP Phone 7910 Series
78-11443-02
3-5
Chapter 3
Using the Cisco IP Phone 7910 Series
Making Telephone Calls
Placing a Call
You can place a call with the telephone in any of the following ways:
•
Lift the handset and dial the number.
•
Press the Line button and dial the number.
•
Press Speaker and dial the number. If someone answers, pick up the handset
to talk to them.
•
To use speed dial, press one of the speed buttons. See the “Configuring Speed
Dial Buttons” section on page 3-14 for details on how to set speed dial
numbers.
Answering a Call
You can answer calls coming to your direct telephone extension or to others in
your group.
To answer a call coming to you directly, simply lift the handset. To answer calls
coming to other telephone extensions, you must use Call Pickup (see “Using Call
Pickup” section on page 3-10).
You cannot answer a call using the Speaker button. The speaker only transmits
audio from the party calling you; there is no microphone to transmit your voice to
the calling party.
Ending a Call
You can end a call in any of these ways:
•
If using the handset, hang up the handset.
•
If using the speaker, press Speaker.
•
Press the line button.
Getting Started with the Cisco IP Phone 7910 Series
3-6
78-11443-02
Chapter 3
Using the Cisco IP Phone 7910 Series
Making Telephone Calls
Muting a Call
While on a call, you can mute the handset, preventing the party you are speaking
to from hearing what you or someone else in the room is saying. When using the
speaker, your call is automatically muted if the handset is in the cradle.
•
To mute a call, press Mute.
•
To disengage mute, press Mute again.
Placing a Call on Hold
While in a call, you can place the call on hold, so that the caller cannot hear you
and you cannot hear the caller. The caller will hear a beeping tone or music, so do
not use hold while on a conference call.
•
To place a call on hold, press the Hold button.
•
To return to the call, press the Hold button again.
Transferring a Call
To transfer a call to another phone:
Step 1
During a call, press the Transfer button. This places the call on hold.
Step 2
Dial the number to which you want to transfer the call.
Step 3
When the party answers, announce the call and press Transfer.
Step 4
Hang up if the party accepts the call.
Step 5
Press Hold to return to the original call if the party refuses or does not answer the
call.
Note
You can also transfer a call by pressing Transfer when the phone begins
to ring. In this case, the caller is transferred to the other phone without
being announced, and you cannot return to this call.
Getting Started with the Cisco IP Phone 7910 Series
78-11443-02
3-7
Chapter 3
Using the Cisco IP Phone 7910 Series
Making Telephone Calls
Redialing the Last Number Dialed
To redial the most recently dialed number, lift the handset and press the redial
button.
Redial is an optional feature configured by your system administrator. Although
your phone supports this feature by default, your system administrator might have
removed this feature from your phone.
Parking a Call
You can store or “park” a call at a specified number and then use any other phone
(for example, a phone in someone else’s office or in a conference room) to retrieve
the call.
Call Park is an optional feature configured by your system administrator; your
phone does not support this feature by default. Call Park is only available if your
system administrator configured your phone to support it.
Step 1
During an active call, press the park button.
The display shows the number to which the call is parked.
Step 2
Make a note of the Call Park number and then hang up. The call is now parked at
that number, allowing you to retrieve it from another phone.
Note
Step 3
You have a reasonable but limited amount of time to retrieve
the parked call before it disconnects. See your system
administrator for more information.
To retrieve the parked call from any phone in the Cisco CallManager system, dial
the Call Park number at which the call was parked.
Getting Started with the Cisco IP Phone 7910 Series
3-8
78-11443-02
Chapter 3
Using the Cisco IP Phone 7910 Series
Making Telephone Calls
Making Conference Calls
Conference calls allow you to have multiple callers participating in the same
telephone call.
The ability to make conference calls with your telephone is an optional feature.
Your phone supports some of these features by default. However, the specific
features available to you depend on how your system administrator configured
your phone to support them.
These sections describe how to make conference calls with the phone:
•
Placing a Conference Call, page 3-9
•
Establishing Meet-Me Conference Calls, page 3-10
Placing a Conference Call
To turn a call into a conference call:
Step 1
During a call, press the conf button.
This automatically opens a new line and places the other party on hold.
Step 2
Place a call to another party.
Step 3
When the call connects, press conf again to add this party to the conference call.
Tip
•
Once the conference call initiator disconnects, no new parties can be added.
•
Avoid putting a conference call on hold. When you put a call on hold, a
beeping tone automatically generates every few seconds, or music is played
(depending on how your administrator has configured the system).
•
To transfer a conference call to another telephone, press the Transfer button.
Dial the number to which you want to transfer the call and then press
Transfer again. All parties are transferred.
Getting Started with the Cisco IP Phone 7910 Series
78-11443-02
3-9
Chapter 3
Using the Cisco IP Phone 7910 Series
Making Telephone Calls
Establishing Meet-Me Conference Calls
A Meet-Me conference allows other callers to dial into the conference call. The
ability to make Meet-Me conference calls with your telephone is an optional
feature. Your phone does not support this feature by default. It requires a special
conference number, and it is only available if your system administrator
configured your phone to support it.
To establish a Meet-Me conference call:
Step 1
Press the Line button.
Step 2
Press the Meet-Me button.
Step 3
Dial the Meet-Me conference number.
Step 4
Follow the voice instructions to establish the Meet-Me conference.
You can also join Meet-Me conference calls established by other people. To join
a Meet-Me conference, dial the Meet-Me conference number provided by the
Meet-Me conference initiator. Do not press the Meet-Me button to simply join a
call. You are connected to the conference once the conference initiator has dialed
in and established the conference.
Using Call Pickup
Call pickup allows you to answer a call that comes in on a telephone extension
other than your own. When you hear an incoming call ringing on another phone,
you can redirect the call to your phone by using the call pickup feature.
There are two types of call pickup available on Cisco IP Phones:
•
Call Pickup—For picking up incoming calls within your own group. The
appropriate call pickup group number is dialed automatically when you
choose this feature. See the “Picking Up Calls in Your Group” section on
page 3-11.
•
Group Call Pickup—For picking up incoming calls within your own group or
in other groups. You must dial the appropriate call pickup group number
when using this feature. See the “Picking Up Calls Outside of Your Group”
section on page 3-11.
Getting Started with the Cisco IP Phone 7910 Series
3-10
78-11443-02
Chapter 3
Using the Cisco IP Phone 7910 Series
Making Telephone Calls
Call Pickup and Group Call Pickup are optional features configured by your
system administrator; your phone does not support these features by default. They
are only available if your system administrator has configured your phone to
support them.
Picking Up Calls in Your Group
Call Pickup allows you to pick up incoming calls within your own group. When
you activate Call Pickup, it automatically dials the call pickup group number
associated with the line you selected on your phone. If there is a call coming in
on another telephone number in that same group, the call immediately begins
ringing on your line. If there is more than one incoming call in the pickup group,
then you receive the first unanswered call. If there are no unanswered calls in the
group when you activate Call Pickup, your phone is placed back on hook.
Step 1
Press the Line button.
Step 2
Press the Call Pickup button.
Step 3
Answer the incoming call that is redirected to your phone.
Picking Up Calls Outside of Your Group
Group Call Pickup allows you to pick up incoming calls within your own group
or in other groups. You must dial the appropriate call pickup group number when
using this feature.
If there is a call coming in on another telephone number in the call pickup group
you dialed, that call immediately begins ringing on your line. If there is more than
one incoming call in the pickup group, then you receive the first unanswered call.
If there are no unanswered calls in the group, or if you dial an invalid call pickup
group number, you receive a fast busy tone.
Step 1
Press the Line button.
Step 2
Press the Group Call Pickup button.
Step 3
Dial the desired call pickup group number.
Getting Started with the Cisco IP Phone 7910 Series
78-11443-02
3-11
Chapter 3
Using the Cisco IP Phone 7910 Series
Using Call Forwarding
Step 4
Answer the incoming call that is redirected to your phone.
Step 5
To dial a different call pickup group number, hang up and begin again.
Using Call Forwarding
The Cisco IP Phone 7910 Series telephone includes call forwarding, which allows
you to redirect calls made to your telephone to another phone. This is useful if you
know you will be away from your desk for several days, for example, on a
business trip or a vacation.
Call Forwarding is an optional feature configured by your system administrator.
Although your phone supports this feature by default, your system administrator
might have removed this feature from your phone.
These sections describe how you can set up call forwarding:
•
Forwarding All Calls, page 3-12
•
Forwarding All Calls When Not at Your Phone, page 3-13
Forwarding All Calls
Use this procedure to forward all incoming calls to another number.
Step 1
Press the forward button.
You should hear two beeps.
Step 2
Enter the number to which you want to forward all your calls.
Be sure to enter the number exactly as you would if you were to call that number.
For example, enter an access code such as “9” or the area code, if necessary. The
LCD displays a message with the number to which your calls are being forwarded.
Step 3
To cancel forwarding of all calls, press the forward button. You should hear a
beep and the LCD should only show your extension, indicating that call
forwarding is not active.
Getting Started with the Cisco IP Phone 7910 Series
3-12
78-11443-02
Chapter 3
Using the Cisco IP Phone 7910 Series
Using Call Forwarding
Forwarding All Calls When Not at Your Phone
If you are not at the location of your phone, you can use a computer to configure
your phone to forward calls. Use this procedure to forward incoming calls to
another number from a remote computer.
Step 1
Using a web browser on your desktop computer, log in to the Cisco CallManager
User Options page.
See your system administrator for details.
Step 2
Select your phone from the Select a Device to Configure drop-down list box.
Step 3
Click “Forward all calls to a different number” from the list of available
configuration options.
Step 4
Select the check box next to the line you want to forward.
Note
Step 5
When you want to cancel call forwarding, repeat this procedure but clear
this check box.
Type the number to which you want to forward all incoming calls.
Be sure to enter the number exactly as you would if you were to call that number
from the Cisco IP Phone 7910 Series telephone. For example, enter an access code
such as “9” or the area code, if necessary.
Step 6
Click Update.
Step 7
Click Log off to exit the configuration utility.
Getting Started with the Cisco IP Phone 7910 Series
78-11443-02
3-13
Chapter 3
Using the Cisco IP Phone 7910 Series
Using Voice Mail
Using Voice Mail
Voice mail allows you to access messages left by callers if you are unavailable to
take their calls. Voice mail is an optional feature configured by your system
administrator. Your particular phone setup might not support accessing voice mail
by the push of a button as described here.
To access voice mail, press the msg button. The first time you access voice mail,
you will have to set it up. Obtain the initial password from your system
administrator, log in, and follow the voice prompts.
The red message waiting light on your handset lights when you have a new voice
mail message.
Configuring Speed Dial Buttons
Depending on how your system administrator has configured your
Cisco IP Phone 7910 Series telephone, you can configure several buttons to speed
dial the numbers you use most.
Step 1
Using a web browser on your desktop computer, log in to the Cisco CallManager
User Options page.
See your system administrator for details.
Step 2
Select your phone from the Select a Device to Configure drop-down list box.
Step 3
Click “Update your Speed Dial buttons/Print your button template” from the list
of available configuration options.
Step 4
Enter the phone numbers and display text you want to associate with your speed
dial buttons.
Be sure to enter the numbers exactly as you would if you were to call that number
from the Cisco IP Phone 7910 Series telephone. For example, include an access
code such as “9” or the area code, if necessary.
Step 5
When you are done, click Update to store your settings. To restore your previous
settings, click Cancel.
Step 6
Click Log off to exit the configuration utility.
Getting Started with the Cisco IP Phone 7910 Series
3-14
78-11443-02
INDEX
forwarding 3-12
A
muting 3-7
auto-registering phone 2-6
parking 3-8
placing 3-6
putting on hold 3-7
B
transferring 3-7
beeping tone 3-7
conf button
illustration of 1-1
C
using 3-9
conference calls, placing 3-9
cables, illustration of 2-3
call forwarding
definition of 3-12
F
from your computer 3-13
features, illustration of 1-1
setting and canceling 3-12
footstand adjustment
call pickup
definition of 3-10
illustration of 1-1
forward button
outside of your group 3-11
illustration of 1-1
within your group 3-11
using 3-12
call pickup button
illustration of 1-1
using 3-11
calls 3-8
G
group call pickup button, using 3-11
answering 3-6
ending 3-6
Getting Started with the Cisco IP Phone 7910 Series
78-11443-02
IN-1
Index
illustration of 1-1
H
placing calls with 3-6
handset
illustration of 1-1
stabilizing 2-5
using 3-2
M
meet-me button
volume 3-3
illustration of 1-1
hanging up 3-6
using 3-10
hold 3-7
meet-me conference calls, placing 3-10
hold button
msg button
illustration of 1-1
illustration of 1-1
using 3-7
using 3-14
mute 3-7
mute button
I
illustration of 1-1
installing phone 2-3
using 3-7
interference, from cell phone 3-1
N
K
network, connecting to 2-3
key pad, illustration of 1-1
P
L
park 3-8
LCD screen
park button
changing contrast 3-5
illustration of 1-1
illustration of 1-1
using 3-8
line button
programmable buttons
hanging up with 3-6
illustration of 1-1
Getting Started with the Cisco IP Phone 7910 Series
IN-2
78-11443-02
Index
R
T
redial 3-8
TAPS, using 2-6
redial button
transfer 3-7
illustration of 1-1
using 3-8
redialing 3-8
transfer button
illustration of 1-1
using 3-7
ringer
changing sound 3-4
volume 3-4
U
User Options web pages
to configure speed dial 3-14
S
to set call forwarding 3-13
safety notices 2-1
settings button
illustration of 1-1
using 3-4
speaker
V
voice mail 3-14
volume
using 3-2
adjusting for handset 3-3
volume 3-3
adjusting for ringer 3-4
speaker button
hanging up with 3-6
adjusting for speaker 3-3
volume buttons, illustration of 1-1
illustration of 1-1
placing calls with 3-6
speed dial buttons
configuring 3-14
placing calls with 3-6
Getting Started with the Cisco IP Phone 7910 Series
78-11443-02
IN-3
Index
Getting Started with the Cisco IP Phone 7910 Series
IN-4
78-11443-02