1
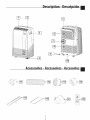
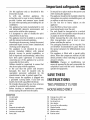
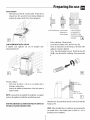
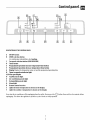
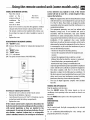
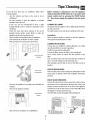
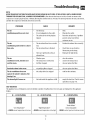
AlECONDITIONER
INSTRUCTION
MANUAL
SAVE
THESE
INSTRUCTIONS
CONDITIONNEUR
D'AIRPORTATIF
MODED'EMPLOI
CONSERVEZ
CETTENOTICE
AIEEACONDICIONADO
POET#,TIL
INSTRUCCIONES
DEUSO
CONSERVE
ESTAS
iNSTRUCCIONES
LEACUIDADOSAMENTE
ESTE
INSTRUCTIVO
ANTESDEUSARSUAPARATO
PACN130HPE
gister this productonline and receivea freetrial issue
of Cook'sIllustrated.
Visitezwww.delonghiregistration.com
Visitezwww.delonghi.com for a
Listof servicecentersnearyou.
--nregistrez
ce produiten [[gne et recevezun num_ro
gratuit de Cook'slllustrated.
Visit www.delonghiregistration.com
[tez www.delonghi.com pour y voir une [[stedes
centresde r_parationprochesde chezvous.
este productoen ffneay redba un ejemplargratis
de Cook'slllustrated.
Visite www.delonghiregistration.com
ghi.comparaver [a [[sta de centrosde
servicioscercanosa usted.
ELECTRICAL
SPECIFICATIONS
DONNEES
ELECTRIQUES
ESPECIFICACIONES
ELECTRICAS
115V_6OHzIOA
2
Description- I)escripci6n
%
AccessoriesAccessoires
- Accesorios
3
Important safeguards
•
•
•
•
•
•
•
•
•
•
Usethis applianceonly as describedin this
instruction
manual.
As with any electrical appliance, the
instructionsaimto coverasmanysituationsas
possible.Cautionand commonsenseshould
be usedwhenoperatingand installingthis air
conditioner.
Thisappliancehasbeenmanufacturedto cool
and dehumidifydomesticenvironmentsand
mustnot beusedfor otherpurposes.
It is dangerousto alter or modifythe unit's
characteristics
inanyway.
Theappliancemustbe installedin accordance
with therelevantnationallegislation.
Shouldrepairsbenecessary,
contactthenearest
authorizedRepairServiceCenter.Unauthorized
servicingcanbedangerous.
The applianceis not intendedfor use by
persons (including children) with reduced
physical,sensoryor mental capabilities,or
lackof experience
andknowledge,unlessthey
have been given supervisionor instruction
concerninguseof the applianceby a person
responsible
for theirsafety.
Childrenshouldbe supervised
to ensurethat
theydo notplaywith theappliance.
In the casethat the power cord becomes
damaged,this must be repaired only by
specializedpersonnel authorized by the
manufacturer
in orderto protectagainstfire.
Alwaysensurethe applianceis pluggedinto
a grounded3-prongoutlet. If you haveany
doubtscheckwith a qualifiedelectrician.
Westronglydiscourage
theuseofanextension
corddueto potentialsafetyhazards.
Beforecleaningor maintenanceoperations,
alwaysunplugtheunitfromtheoutlet.
•
•
•
•
•
•
•
•
•
•
Donot pullon orplacestrainon thepowercord
whenmovingthe appliance.
Theappliance
shouldnotbeinstalledwherethe
atmosphere
maycontaincombustible
gases,oil
orsulphur,or nearheatsources.
Do not rest hot or heavy objects on the
appliance.
Cleanthefiltersatleastoncea week.
Avoidusingheatersneartheunit.
The unit shouldbe transportedin a vertical
position.If thisisnotpossiblesecuretheunitat
anangle,do notlie it horizontally.
Beforetransportingthe unit, drain the unit.
After transportation,wait at least 6 hours
beforeswitchingtheunit on.
Thepackagingmaterialscanbe recycled.You
are thereforerecommended
to placethem in
the specialcontainersfor differentiatedwaste
collection.
Thisapplianceis fitted with a specialsafety
device.Whenthe compressor
switchesoff,this
devicepreventsit from switchingon againfor
at least3 minutes.
WARNING:Changesor modificationsnot
expressly
approvedbythe partyresponsible
for
compliance
couldvoid the user'sauthorityto
operatetheequipment.
SAVETHESE
INSTRUCTIONS
THISPRODUCT
ISFOR
HOUSEHOLD
ONLY
DESCRIPTION
I
2
3
Airoutletgrille
Controlpanel
Handles
10 Drainagehosewith 2 caps
11 Wallflangewith cap
12 Airexhausthose
4
5
Castors
Filter
6
7
8
9
Evaporatorairintakegrille
Airexhausthosehousing
Condenserairintakegrille
Powercable
13
14
15
16
17
18
4
Hoseadaptor
Accessory
for wa[lmounting
Windowbracket
Additionalwindowbracket
Windowoutlet
Remotecontrol
Preparin 9 for use
ELECTRICAL
CONNECTIONS
Sashwindow
Before
plugging
theappliance
into
themains
socket,
check Openthe window.
that:
Placethe windowbracket15 in thewindow, extendingit
Theoutlet's
power
supply
corresponds
tothevalue to fit thewidth of the window(fig.C).
indicated
ontherating
label
ontheback
ofthe
appliance; Placethe air conditioner near the window. Insert the
assembledexhausthose12 into thewindowbrackethole
The
outlet
and
electrical
circuit
areadequate
forthe
15.
appliance;
Makesuretheair exhausthoseis unobstructed.
The
outlet
isa3-hole
grounded
outlet
_,:i_.
Ifthis
isnot
thecase,
you
must
choose
another
outlet.
If you havea very largewindow, in orderto cover your
EaBure
tofollow
these
important
safety
instructions window aperture, usethe additional window bracket
absolves
themanufacturer
ofallBabBity.
without holesextending it to the desireddimension,
The power cable must be replaced by a quaBfied
then fix the bracketby usingthe lockingpin provided.
professional only.
Whenextractingthe windowbracketandjoining the two
The instructions
below will enable you to prepare your air
piecespayattentionyoudo not coverthe hole.
conditioner for operation as efficiently as possible.Before
use, make sure the air intake and outlet grilles are
unobstructed.
AIR-CONDITIONING
WITHOUTINSTAI.IATION
Justa few simplestepsand yourcomfortis ensuredwith your
air conditioner:
Screwthe hoseadaptor13 to the hose'send 12.
Fit the air exhausthosein the housingat the backof the
appliance.Insertitas showninfigureA.
D
Other set-up methods:
Thanksto the lockingpin, it'spossibleto usethewindow
bracketalsofor slidingwindows.Positionthe holeof the
bracketso to allow a correctinstallation of the exhaust
hose(seefigureI)).
Screwthe window outlet 17 to the other end of the
exhausthose.(seefig. B).
%
%
Keepthe air hosesas shortand free of curvesas possibleto
avoidconstrictions.
5
Preparingfor .se
Frenchwindow
After havingscrewedthe windowoutlet 17 into the air
exhausthose 12, openthe Frenchwindow slightly and
positionthewindowoutlet 17 asshownin figure E.
inthewindow pane in thewooden
kickboardof a
Frenchwindow
inthewalh youare
recommendedto
insulatethe section
ofwall usingsuitable
insulation,
[--_
Fitthewallflange11intothehole.
Screw
thehoseadaptor13 tothehose's
end12.
Fittheairexhaust
hoseinthehousingatthebackofthe
appliance
asshowninfigureA.
Screwthewallmountingaccessory
14 intothehose12
(fig.B),then,fit it intothewallflange11asshowninfig.
L
SEMI-PERMANENTINSTALLATION
If required, your appliance can also be installed semF
permanently(Fig.F).
12 inches
30
F'_
cm
%
12 inches
Proceed
asfollows:
Drilla hole(o134mm
/ 5,28in.) in an outsidewallor
throughawindowpane.
Respect
the heightanddimensions
ofthe holegivenin
figuresFandG
iiiii
ii_
iii X1O0cm
iiiii
iiiiiiitX39 inches
_MIN 35 cm
MAX 14inches
NOTE:Asspecialtoolsare requiredfor installation,we suggest
D
you havethe applianceinstalledbyspecializedpersonnel.
Whenthehose12isnotfitted,theholecanbeclosed
withthe
flangecap11
I(EEPTHEAIR HOSES
ASSHORT AND FREEOFCURVESAS
POSSIBLETOAVOIDCONSTRICTIONS.
NOTE:Wheninstallingthe air conditionersemi-permanently,
you shouldleavea door slightly open (as little as I cm) to
guaranteecorrectventilation.
6
Controlpanel
DESCRIPTION
OFTHECONTROL
PANEL
A
ON/OFFbutton
g
MODEselection button
Airconditioning,dehumidifying,fan,heating.
C
D
Fanspeed selection button(MAX/MED/MIN)
Timer button
E
Programmedoperationincreasetemperature/time button
F
Programmedoperationdecreasetemperature/time button
G
DisplayDisplaysthe temperaturevaluessetandthe programmedoperatingtime
H Timerin operation indicatorlight
I/L/M Fanspeedlights
N
Fan/Heatmode fight
0
Air-conditioningmode light
P
Dehumidifying mode light
Q
E
Alarm light
Eemote control receiver
S
Light:the innertemperature isshown on the dispJay
T
Light:the outdoor temperature isshown on the dispJay
Neverturn theair conditioneroff byunpluggingfrom theoutlet. Alwayspressthe _
unplugging.Thisallowsthe applianceto performacycleofchecksto verifyoperation.
7
button,thenwait for a few minutesbefore
Operation
TURNINGTHEAPPLIANCE
ON
FANMODE
Beforeplugging theappliancecheckthecopsonthe hock
Adjustfan speedby pressingthe FANbutton (C)asdescribed
of the unit ore correctly inserted and screwed on the
drainagehose10.
for the air-conditioningmode.
Rememberthat the higherthe speed,the moreair is filtered.
Plug intoan outlet. Twolinesappearon the displayindicating
If you select"MIN" speed,lessair isfiltered but the appliance
is alsolessnoisy.
that the applianceis in stand-by.Pressthe ON/STAND-BY
buttonCA).Whenturnedon, theair conditionerstartsoperating
in the samemodeaswhenit wasturnedoff. Pressthe MODE
button (B) until the light correspondingto the desiredmode
lightsup:
Light(0): air-conditioningmode
Light(P): dehumidifyingmode
Light(N): fan/heating mode(the lightchangescolourfrom
yellowto red)
HEMINGMODE
Thisisidealinspringandautumnwhenoutdoortemperatures
arenotparticularly
severe.
Whenusingtheappliance
inthismode,
theairhosemustbe
beattached.
Tosetthismodecorrectly:
Press
theMODEbuttonanumber
oftimesuntilthe redlight
(N)appears.
Selectthetargettemperature
bypressing
the +
or- buttonuntilthecorresponding
valueisdisplayed.
AIRCONDITIONING
MODE
PROGRAMMING
THETIMER
Thetimercanbeusedtodelayappliance
startuporshutdown.
Thisavoids
wastingelectricity
byoptimising
operating
periods.
Ideal for hot muggy weather when you need to cool and
dehumidifythe room.
The displayshowsthe innertemperature:the light (S) turns
on.
To modifythe settemperature,pushthe (E)or (F) button to
Howto programmedelayedstart up
reachthe desiredtemperature.The(T) light turnson and the
(S)light turnsoff. (Tochangefrom°F to °Cor viceversa,press
for few secondsboth buttonEandF).
Plugthe applianceinto a mainssocketand pressthe ON/
OFFbuttonCA),then selectthe requiredoperatingmode
andothersettings(temperature,fanspeed,etc).
Pressthe ON/OFFbuttonCA)again to placethe appliance
After 15 seconds,the innertemperature is shown on the
display.
The(S) light turnson.
instandbymode.
Pressthetimer button(D).Thetimer light'H" flashes.
Usethe + (E)or- (F) buttonsto setthe numberof hours
Youcanadjustthe temperatureonlyin airconditioningmode.
Thenselectthe fan speedby pressingthe FANbutton (C)until
the light correspondingto the requiredfan speedlightsup:
delaybeforetheappliancecomeson.Thetime increases
or
decreasesinstepsof onehour.
MAX:
theairconditioneroperatesatmaximumtoachieve
Theindicator
light (H)flashesuntil theappliancestartsup.
MED:
the targettemperatureasrapidlyaspossible
reduces noise levels while maintaining a
comfortabletemperature
Youcansetthe applianceto comeon with a delayof up to 24
hours.Tocancelthe timer programme,pressthe timer button
(D)again.Light (H)stopsflashing.
MIN"
for silentoperation
Themostsuitable
temperature
fortheroomduringthesummer
variesfrom75°t:to87°t:(24to 27°0. Youarerecommended,
however,
not to seta temperature
muchbelowthe outdoor
temperature.
Howto programmedelayedshutdown
Delayedshut downcan be programmedinany operating
mode(airconditioning/ fan/dehumidifying).
Pressthetimer button(D).Thetimer light'H" flashes.
Usethe + (E)or- (F) buttonsto setthe numberof hours
DEHUMIDIFYING
MODE
delaybeforetheappliancegoesoff.
Thetime increases
or decreasesinstepsof onehour.
Idealfor reducingthe humidity in a roomwithout loweringor
The light (H) flashes until the appliance turns off as
raisingthe temperature(springor autumn,damprooms,rainy
spells,etc). When the dehumidifyingmodeisselected, the
light (P)comeson.At thesametime, the'MIN"fan speedlight
programmed.At the settime, the air conditionershutsdown
and remainsin standby.Tocancelthe timer programme,press
the timerbutton(D) again.
(M) comeson.In this mode,otherspeedscannotbeselected.
Light (H)stopsflashing.
8
Usingthe remotecontrolunit (somemodelsonly)
MODELS
WITH REMOTE
CONTROL
Point the remote
f 4
control at the
',
_ _,
receiveron the air _ _,
conditioner. The
'
-
MAX16,4ft
MAX5 metres "
[
remote control
rnust be no rnore
than 16,4ft (5 metres)awayfrom the appliance(without
obstaclesbetweenthe remotecontrolandthereceiver).
The remotecontrolmust be handledwith extremecare.
Do not dropit or exposeit to direct sunlightor sources
of
heat.
Replacethe cover.
in fire. Batteries may explode or leak. If the remote
control will not be used for a certain length of time,
removethe batteries.
Note:Thisequipmenthasbeentestedandfoundtocomply
....................................................
15of the FCCRules.Theselimits are designedto provide
reasonableprotectionagainstharmful interferencein a
residentialinstallation.
This equipment generates,uses and can radiate radio
frequency energy and, if not installed and used in
accordancewith the instructions,may cause harmful
interferenceto radiocommunications.However,there is
noguaranteethat interferencewill notoccurinaparticular
DESCRIPTION
OFTHEREMOTECONTROL
19) "ON/OFF"button
20) Increase/Decrease
button for temperature/programmed
use
installation. If this equipment does cause harmful
interferenceto radioor televisionreception,whichcanbe
determinedbyturningthe equipmentoffand on,the user
is encouragedto try to correctthe interferencebyoneor
21) "MODE"button
moreof thefollowing measures:
- Reorientor relocatethe receivingantenna.
22) "TIMER" button
23) °F/°Cscalebutton
- Increasetheseparation
betwee_the equipmentand
receiver.
24) Fanspeedselectionbutton (MAX/MED/MIN).
j
...........
- Connecttheequipmentinto anoutlet ona circuit
differentfrom that to whichthe receiveris connected.
- Consultthe dealeroran experiencedradio/TV
technicianfor help.Changesor modificationsnot
i BS°_i
[O_®OFF
expresslyapproved
bythepartyresponsiblefor compliance
could voidthe user'sauthorityto operatethe equipment.
This device complies with Part 15 of the FCCRules.
Operationis subjectto the following two conditions:(I)
thisdevicemaynotcauseharmfulinterference,and(2)this
device must acceptany interferencereceived,including
interferencethat maycauseundesiredoperation.
This ClassB digital apparatuscomplieswith Canadian
ICES-O03.
TURNINGTHEAPPLIANCE
ON
Insertingor replacingthe batteries
Removethe coveron the rearof the remotecontrol;
Removethe oldbatteries,if present.
Plugthe applianceinto the mains.
Pressthe ON/OFFbutton (19) (when turned on, the air
conditionerstarts operatingin the samemodeaswhen it was
turnedoff).
Correctlyinserttwo newL03"AAA"1,5Vbatteries(seethe
instructionsinsidethe batterycompartment);
PresstheMODEbutton(21)to selectthe requiredmode
COOLING
Replacethe cover.
DEHUMIDIFYING
FANONLY
If the remotecontrol unit is replacedor discarded,the
batteries mustbe removedanddisposedof inaccordance
with current legislation as they are harmful to the
environment. Donot mix old andnew batteries.Donot
mix alkaline, standard (carbon-zinc)or rechargeable
(nickel-cadmium)batteries. Donot disposeof batteries
HEATING
Onthe controlpanel,the light correspondingto the selected
rnodecorneson.
For air conditioning/dehumidifying/fanonly settings and
programmingthetimer,seepage8.
Tips/Cleanin
Toget the best from your air conditioner,followthese
recommendations:
closethe windowsanddoorsin the roomto be air
conditioned.
Theonlyexception
is whenthe appliance
is installed
through
a holeinthewall.
In thiscase,youarerecommended
to leavea slight
draughtthrougha dooror windowto guarantee
correct
ventilation.
Protectthe roomfrom directexposure
to the sun by
partiallyclosingcurtainsand/orblindsto makethe
appliance
muchmoreeconomical
to run;
Never
restobjects
ofanykindontheairconditioner;
Never
obstruct
theairintake6 oroutlet1grilles;
Makesuretherearenoheatsources
intheroom.
Before cleaning or maintenance, turn the appliance
off by pressingthe ON/Off button CA)or in models with
remote control unit, by pressingthe ONlOff button
19, then always unplugthe appliance from the mains
socket.
CLEANING
THECABINET
Youshouldcleanthe appliancewith a slightlydampcloththen
dry with a drycloth.
Forsafetyreasons,neverwashthe air conditionerwith water.
Precautions
Neveruse petrol, alcoholor solventsto cleanthe appliance.
Neversprayinsecticide
liquidsor similar.
CLEANING
THEAIR FILTERS
To keepyour air conditioner working efficiently, you should
cleanthe dustfilter everyweekof operation.
...............
i
Thefilter ishousedinthe intakegrille.
Tocleanthefilters, removethefilter asshowninfigureL.
Usea vacuumcleanerto removethe dust collectedon the
filter.
closedoorsand
windows
If it is verydirty, immerseinwarm waterandrinsea numberof
times. Thewater shouldneverbehotterthan 40°C.
After washing,leavethe filter to dry. Putthe filter backin its
housing.
STARTOFSEASON
CHECKS
donotcover
Makesurethe power cableand plug areundamagedandthe
earth systemis efficient. Follow the installation instructions
theappliance
precisely.
ENDOFSEASON
OPERATIONS
Todrainall water from the circuit,removethe externalcap by
Neverusetheappliancein verydamprooms(laundriesfor
unscrewingit in the anticlockwisedirectionthen, removethe
internalcapfrom the drainhoseon the backof the appliance
example).
Neverusetheapplianceoutdoors.
I
andallow the water to drainout intoa basin(figureM). When
the applianceisempty,replacethecaps.
I
i.i
i i
Cleanthe filter anddry thoroughlybeforeputting back.
closeblindsor
curtains
Makesuretheairconditioner
isonalevelfloor.
10
Troubleshooting
NOTE:
NEVEETRANSPORT
ORTURNTHEAPPLIANCE
UPSIDEDOWNORONITSSIDE.IF THiSOCCURS,
WAIT6 HOURSBEFORE
TURNINGTHEAPPLIANCEON,24 HOURSIS EECOMMENDEB
(Afterthe unit hasbeenonitsside,oil needsto returnto the
compressor
to ensureproperfunction.Withoutallowing theunit thistime (6-24hours)Theunit mayfunctionfor only ashorttime,
andthenthe compressor
will breakdown fromlackof oiL)
CAUSE
PROBLEM
REMEDY
Theair
Noelectricity.
Wait.
conditioningunit doesnot start.
It isnotpluggedintotheoutlet.
Pluginto the outlet.
Thesafetydeviceofthe plug has
Resetthe safetydevice,if problem
tripped.
persistscontactourtoll free
customerservice.
Theair
Theairexhausthosehasa constric-
conditioning unit works for a short
tion.
time only.
Theairexhausthoseisblocked.
Positionthe exhausthosecorrectly.
Checkthereare noobstacles.
Obstructingairdischarge.
Thereare tight bendsin the air
Eliminatethe tight bends.
exhausthose.
Theair
Windowopen.
closethewindow.
conditioner works, but doesnot
Theexhausthoseisdetached,
connectthe exhausthose.
cool the room.
Airfiltersclogged,
cleanor replace
the filter.
Particularodour in the room
air purifyingfiltersclogged
cleanor replacethe filters.
Theair conditioner doesnot
the safetydevicehastripped
waitfor threeminutes.
the tank insidetheapplianceisfull.
emptythe tank (see"Endof season
operate for about 3 minutes after
turning it on
Thealarm light Qcomeson
operations)on page10).
SELF-DIAGNOSIS
Theappliancehasa selfdiagnosissystemto identifya numberof malfunctions.Errormessages
aredisplayedon theappliance
display.
IF... IS DISPLAYED,
IF... IS DISPLAYED,
IF... IS DISPLAYED,
"LowTernperature"
"HighTemperature"
(sensordamaged)
"ProbeFailure"
...MEANS:roomtemperatureis toolow
...MEANS:
roomtemperatureistoohigh
11
...MEANS:contactyourlocalcustomerservice
Technicalspecifications
TECHNICAL
SPECIFICATION
Powersupplyvoltage
Max.absorbedpower
SAFETY
PLUG
seeratinglabel
air conditioning
70 +95°F 21+35%
Theapplianceisfitted with asafetyplug to protectthe
powercable.
If poweris cutoff, unplugfromthe outletandmakesure
the powercableisundamaged.
If the cable is damaged, call the service center
immediately.
If power cuts off frequentlyand the power cable is
undamaged,
contactaqualifiedelectrician.
Roomtemperaturefor
air conditioning
50+ 80.6°F10+ 27°C
OPERATION
OFTHESAFETY
PLUG
duringairconditioning/heating
Refrigerant
Coolingcapacity
LIMIT CONDITIONS
Roomtemperaturefor
Ifthe safetydeviceincorporated
intheplugtrips andcuts
off the powersupply,checkthat the powercableand
plug arenot damaged.
If the powercableis undamaged,to restoreoperation
pressthe"RESET"
button.
To verify correct operationof the plug, pressthe
"TEST"buttonperiodicallyandmakesurethe appliance
disconnects.If this is not the case,contactthe service
center.
Transport, filling, cleaning,recoveryand disposal
of refrigerant shouldbe performedbya technical
service centre appointed by the manufacturer
only. The appliance shouldbe disposedof by a
specialistcentre appointedby the manufacturer
only.
NEVERTRANSPORT
ORTURN
THEAPPLIANCE
UPSIDE
Torestoreoperation,pressthe"RESET"
button.
DOWNOR ON ITS SIDE.IF THIS OCCURS,
WAIT6
HOURSBEFORE
TURNINGTHEAPPLIANCE
ON,24
HOURSISRECOMMENDED.
(Afterthe unit hasbeenon
its side,oil needsto returnto the compressor
to ensure
properfunction.Withoutallowingthe unitthis time (624hours)Theunit mayfunctionforonly ashorttime,and
thenthe compressor
will breakdownfromlackofoil)
Thisapplianceis equippedwith a 3 pronggrounded
plug.Theplug mustbe connectedintoan outletthat is
properlyinstalled
andgroundedinthe accordance
with
all localcodesand ordinances.Donot modifythe plug
providedwiththe appliance.If it will not fit the outlet,
haveaproperoutletinstalled
bya qualifiedelectricianor
relocatethe unitto aproperoutlet.
If the householdelectricalsupply doesnot meet the
abovespecifications,
or if you arenot sureyourhome
has an effective electricalground, havea qualified
electricianor yourlocalelectricalutility companycheck
it andcorrectanyproblems.
12
Limited Warranty_
LiMiTED
WARRANTY
De'Longhiisthe distributorof Kenwoodhomeappliances.
Thiswarrantyappliesto aii homeapplianceswith De'Longhi
or Kenwood
brandnames
LimitedWarranty
We warrant each De'Longhi AIR CONDITIONERto be free from defects in material and workmanship.
From the purchase date, our obligation under this warranty is to provide one (1) year free parts and
labor on the entire AIR CONDITIONER,with an additional four (4) years free on any part of the sealed
system consisting of the compressor, evaporator, condenser and factory connected refrigerant tubing.
Labor and all other parts during the additional four (4) year warranty are to be paid by the owner. All
AIR CONDITIONERSin need of repair are to be shipped to an authorized De'Longhi service center at the
owner's expense, and De'Longhi will then incur the return shipping costs. After the first five (5) years
of ownership, all expenses (all parts, labor and shipping) are to be paid by the owner of the unit. This
warranty shall apply only if the AiR CONDITIONERis used inaccordance with the factory directions that
accompany it, and on an Alternating Current (AC) circuit. This warranty is in lieu of all other warranties
and representations, expressed or implied, and all other obligations or liabilities on our part. We do not
authorize any other person or company to assume for us any liability in connection with the sale or use
of our AiR CONDITIONER.This warranty shall not apply to any AIR CONDITIONERthat has been repaired or altered outside our factory nor shall it apply to any AIR CONDITIONERthat has been subjected
to misuse, negligence or accidents.
If repairs become necessary,see contact information below:
U.S. Residents:
Pleasecontact our toll free hotline at 1-800-322-3848
or log onto our website at www.delonghi.com
CANADAResidents:
Pleasecontact our toil free hotline at 1-888-335-6644
or log onto our website at www.delonghi.com
MEXICOResidents:
Pleasecontact our toil free hotline at 01-800-711-8805
or log onto our website at www.delonghi.com
The above warranty is in lieu of all other express warranties and representations.All implied
warranties are limited to the applicable warranty period set forth above. This limitation does not apply if
you enter into an extended warranty with De'Longhi. Some states/countries do not allow limitations on
how long an implied warranty lasts, so the above exclusions may not apply to you. De'Longhi does not
authorize any other person or company to assume for it any liability in
connection with the sale or use of its appliance.
How does countrylaw apply?
This warranty gives you specific legal rights, and you may also haveother rights, which vary from state
to state/country to country.
13
II
r-m
2
=
<_
%
5715110851/lo.ll