1
English
TM-L90
with Peeler
User’s Manual. . . . . . . . . . . . . . . . . . . . 1
Bedienungsanleitung . . . . . . . . . . . . . . 13
Gebruikershandleiding . . . . . . . . . . . . . 21
Manuel de l’utilisateur . . . . . . . . . . . . . . 29
Manual do utilizador . . . . . . . . . . . . . . . 37
Manual del usuario. . . . . . . . . . . . . . . . 45
Manuale dell’utente . . . . . . . . . . . . . . . 53
405230503
English
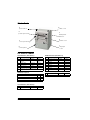
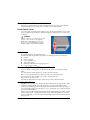
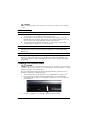
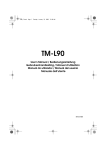
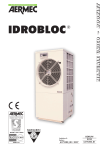
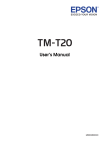
Printer Parts
5
power switch
4
cutter cover
6
3
peeler open lever
label peeler
detector
2
peeler cover
7
cover open lever
1
8
control panel
roll paper
cover
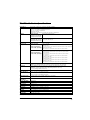
DIP Switch Tables
Serial interface (DIP switch 1)
SW
Function
ON
1-1
Power switch function Disabled
1-2
Interface condition
selection
Parallel interface (DIP switch 1)
OFF
SW
Function
Enabled
1-1
Power switch function Disabled
1-2
Reserved
Fixed to ON
--
1-3
Reserved
--
Fixed to OFF
1-4
Reserved
--
Fixed to OFF
1-5
Reserved
--
Fixed to OFF
1-6
Reserved
--
Fixed to OFF
1-7
Reserved
--
Fixed to OFF
1-8
Reserved
--
Fixed to OFF
By DIP switch By memory
switch
1-3
Handshaking
XON/XOFF
DTR/DSR
1-4
Data word length
7 bits
8 bits
1-5
Parity check
Enabled
Disabled
1-6
Parity selection
Even
Odd
1-7
1-8
Transmission speed (See table below.)
OFF
Enabled
Parallel interface (DIP switch 2)
Transmission speed
Transmission speed (bps)-bits per second
1-7
1-8
2400
ON
ON
4800
OFF
ON
9600
ON
OFF
19200
OFF
OFF
bps: bits per second
Serial interface (DIP switch 2)
SW
Function
ON
OFF
2-1
Reserved
--
Fixed to OFF
ii
ON
SW
Function
2-1 Reserved
ON
--
OFF
Fixed to OFF
English
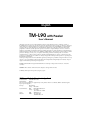
TM-L90 with Peeler Specifications
.
Print method
Thermal line 8 dots/mm × 8 dots/mm (203 dpi × 203 dpi)
Print font
Font A: 12 × 24
Font B: 9 × 17, except for Japanese (10 × 24)
Font C: 8 × 16 (only for Japanese)
Kanji font A: 24 × 24
Kanji font B/C: 20 × 24 / 16 × 16 (Both fonts are only for Japanese)
Columns
Models except for
Japanese
12 × 24 / 9 × 17 / 24 × 24/
12 × 24 / 12 × 72 / 9 × 51
When paper width is 80 mm:
48 / 64 / 24 / 48 / 64
Japanese
12 × 24 /10 × 24 / 8 × 16 /
24 × 24 / 20 × 24 / 16 × 16
When paper width is 80 mm:
48 / 57 / 72 / 24 / 28 / 36
Print width
72 mm, 576 dot positions (receipt roll paper with 80 mm width)
Character size
(W × H)
Models except for
Japanese
Font A (12 × 24):
1.50 × 3.0 mm / 1.5 × 6.0 mm / 3.0 × 3.0 mm / 3.0 × 6.0 mm
Font B (9 × 17):
Normal / double-high /
1.13 × 2.13 mm / 1.13 × 4.25 mm / 2.25 × 2.13 mm / 2.25 × 4.25 mm
double-width / quadruple Kanji font A (24 × 24):
3.0 × 3.0 mm / 3.0 × 6.0 mm / 6.0 × 3.0 mm / 6.0 × 6.0 mm
Japanese
Font A (12 × 24):
1.50 × 3.0 mm / 1.50 × 6.0 mm / 3.0 × 3.0 mm / 3.0 × 6.0 mm
Normal / double-high /
Font B (10 × 24):
double-width / quadruple 1.25 × 3.0 mm / 1.25 × 6.0 mm / 2.5 × 3.0 mm / 2.5 × 6.0 mm
Font C (8 × 16):
1.0 × 2.0 mm / 1.0 × 4.0 mm / 2.0 × 2.0 mm / 2.0 × 4.0 mm
Kanji Font A (24 × 24):
3.0 × 3.0 mm / 3.0 × 6.0 mm / 6.0 × 3.0 mm / 6.0 × 6.0 mm
Kanji Font B (20 × 24):
2.5 × 3.0 mm / 2.5 × 6.0 mm / 5.0 × 3.0 mm / 5.0 × 6.0 mm
Kanji Font C (16 × 16):
2.0 × 2.0 mm / 2.0 × 4.0 mm / 4.0 × 2.0 mm / 4.0 × 4.0 mm
Character sets
95 alphanumeric, 37 international characters, 128 × 11 graphic
Japanese: JIS (JISX0208-1990): 6879 characters, special characters: 845 characters
Print speed
Normal: Maximum 120 mm/s (120 mm/s or less with the label peeler issuing mode.)
High speed: Maximum: 150 mm/s
Ladder bar code, two-dimension bar-code printing: Maximum: 90 mm/s
Two-color printing: Maximum: 90 mm/s
Line spacing
3.75 mm
Paper dimensions
80 mm: 79.5 ± 0.5 × max diameter 90 mm
60 mm: 59.5 ± 0.5 × max diameter 90 mm
58 mm: 57.5 ± 0.5 × max diameter 90 mm
Thermal paper type
Roll paper: Monochrome: ENTPD, ENTPE, Two-color: ENTPC
Label paper: Monochrome: ENTLA series, Two-color: ENTLB series
Interface
(compatible)
RS-232C / IEEE 1284
Receive data buffer
4 KB/45 bytes
D.K.D. function
1 drive
Power supply
+24 VDC ± 7%
Current consumption
Normal: Approximately 1.7 A
Temperature
Operating: 5 to 45 °C, Storage: –10 to 50 °C
Humidity
10 to 90%
Reliability
MTBF: 360,000 hours, MCBF: 70,000,000 lines
Overall dimensions
203 × 140 × 148 mm
Weight (Mass)
Approximately 1.9 kg
lps: lines per second, dpi: dots per 25.4 mm (dots per inch)
iii
English
iv
English
English
TM-L90 with Peeler
User’s Manual
All rights reserved. No part of this publication may be reproduced, stored in a retrieval system, or
transmitted in any form or by any means, electronic, mechanical, photocopying, recording, or otherwise,
without the prior written permission of Seiko Epson Corporation. No patent liability is assumed with
respect to the use of the information contained herein. While every precaution has been taken in the
preparation of this book, Seiko Epson Corporation assumes no responsibility for errors or omissions.
Neither is any liability assumed for damages resulting from the use of the information contained herein.
Neither Seiko Epson Corporation nor its affiliates shall be liable to the purchaser of this product or third
parties for damages, losses, costs, or expenses incurred by purchaser or third parties as a result of:
accident, misuse, or abuse of this product or unauthorized modifications, repairs, or alterations to this
product, or (excluding the U.S.) failure to strictly comply with Seiko Epson Corporation’s operating and
maintenance instructions.
Seiko Epson Corporation shall not be liable against any damages or problems arising from the use of any
options or any consumable products other than those designated as Original Epson Products or Epson
Approved Products by Seiko Epson Corporation.
EPSON and ESC/POS are registered trademarks of Seiko Epson Corporation in the U.S. and other
countries.
NOTICE: The contents of this manual are subject to change without notice.
© 2004 by Seiko Epson Corporation, Nagano, Japan.
EMC and Safety Standards Applied
Product Name:
TM-L90 with Peeler
Model Name:
M165C
The following standards are applied only to the printers that are so labeled. (EMC is tested using the
Epson power supplies.)
Europe:
CE marking
Safety: EN 60950
North America: EMI:
FCC/ICES-003 Class A
Safety: UL 60950
/CSA C22.2 No. 60950
Japan:
EMI:
VCCI Class A
Oceania:
EMC:
AS/NZS 3548
/CISPR22 Class B
TM-L90 with Peeler User’s Manual 1
English
WARNING
The connection of a non-shielded printer interface cable to this printer will invalidate the EMC standards
of this device. You are cautioned that changes or modifications not expressly approved by Seiko Epson
Corporation could void your authority to operate the equipment.
CE Marking
The printer conforms to the following Directives and Norms:
Directive 89/336/EEC EN 55022 Class B
EN 55024
IEC 61000-4-2
IEC 61000-4-3
IEC 61000-4-4
IEC 61000-4-5
IEC 61000-4-6
IEC 61000-4-11
FCC Compliance Statement For American Users
This equipment has been tested and found to comply with the limits for a Class A digital device, pursuant
to Part 15 of the FCC Rules. These limits are designed to provide reasonable protection against harmful
interference when the equipment is operated in a commercial environment.
This equipment generates, uses, and can radiate radio frequency energy and, if not installed and used in
accordance with the instruction manual, may cause harmful interference to radio communications.
Operation of this equipment in a residential area is likely to cause harmful interference, in which case the
user will be required to correct the interference at his own expense.
For Canadian Users
This Class A digital apparatus complies with Canadian ICES-003.
Cet appareil numérique de la classe A est conforme à la norme NMB-003 du Canada.
Safety Precautions
This section presents important information intended to ensure safe and effective
use of this product. Please read this section carefully and store it in an accessible
location.
WARNING:
Shut down your equipment immediately if it produces smoke, a strange odor, or
unusual noise. Continued use may lead to fire. Immediately unplug the
equipment and contact your dealer or a Seiko Epson service center for advice.
Never attempt to repair this product yourself. Improper repair work can be
dangerous.
Never disassemble or modify this product. Tampering with this product may
result in injury or fire.
Be sure to use the specified power source. Connection to an improper power
source may cause fire.
Do not allow foreign matter to fall into the equipment. Penetration by foreign
objects may lead to fire.
If water or other liquid spills into this equipment, unplug the power cord
immediately, and then contact your dealer or a Seiko Epson service center for
advice. Continued usage may lead to fire.
2 TM-L90 with Peeler User’s Manual
English
CAUTION:
Do not connect cables in ways other than those mentioned in this manual.
Different connections may cause equipment damage and burning.
Be sure to set this equipment on a firm, stable, horizontal surface. The product
may break or cause injury if it falls.
Do not use in locations subject to high humidity or dust levels. Excessive humidity
and dust may cause equipment damage or fire.
Do not place heavy objects on top of this product. Never stand or lean on this
product. Equipment may fall or collapse, causing breakage and possible injury.
To ensure safety, unplug this product before leaving it unused for an extended
period.
Do not use aerosol sprayers containing flammable gas inside or around this
product. Doing so may cause fire.
Caution Labels
WARNING:
Do not connect a telephone line to the drawer kick-out connector; otherwise,
the printer and the telephone line may be damaged.
CAUTION:
The thermal head is hot.
CAUTION:
Be careful not to injure your hands on the manual cutter when installing roll
paper.
Control Panel
LEDs and Button
POWER LED
Is on when the power is on, and is off when the power is off.
ERROR LED
Is on when the printer is offline, and is off when the printer is online. It flashes
when an error occurs.
PAPER OUT LED
Comes on when roll paper is used up or not installed. When roll paper is being
installed, it starts flashing when the first label comes out after the roll paper cover
is closed, and goes off when the PAPER FEED button is pressed. When the printer
is issuing labels, it starts flashing when a label is issued and goes off when the
issued label is removed from the peeler. It also flashes when the printer is in a wait
status for the FEED button to be pressed.
FEED button
Feeds the roll paper.
TM-L90 with Peeler User’s Manual 3
English
Power Switch and Power Switch Cover
The power switch is on the top left of the printer. Press it to turn on the printer,
and press and hold it for more than 3 seconds to turn off the printer.
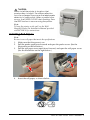
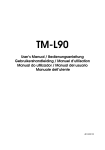
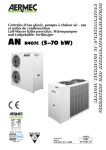
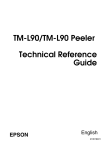
Power Switch Cover
You can use the enclosed power switch cover to make sure that the power switch
is not accidentally pressed. Peel off the backing tape and press the cover into place
to install it.
WARNING:
If an accident occurs when the power
switch cover (shown to the right) is
attached, immediately remove the
bottom cover and unplug the power
supply cable to avoid a fire hazard.
Unpacking
The following items are included for the
standard specification printer. If any items are damaged, contact your dealer.
❏ Printer
❏ Label roll paper
❏ Power switch cover
❏ Roll paper spacer
❏ Screw for installation of roll paper spacer
❏ Cover operation label
Downloading Drivers, Utilities, and Manuals
Drivers, utilities, and manuals can be downloaded from one of the following
URLs.
For customers in North America, go to the following web site:
http://www.epsonexpert.com/ and follow the on-screen instructions.
For customers in other countries, go to the following web site:
http://www.epson-pos.com/
Select the product name from the “Select any product” pulldown menu.
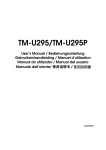
Installing the Printer
Whether you are going to use the printer in the label peeler issuing mode or label
continuous issuing mode (not using the peeler), you must install this printer
vertically (with the paper exit at the front). See the illustration at the top of page 5.
You can install it either on a flat surface, or you can hang it on a wall by using the
optional bracket (WH-10).
If the paper exit is blocked by label backing paper accumulating on a table or other
surface, a paper jam or other problem may occur. Install the printer in a location,
such as at the edge of a counter, where the backing paper will not accumulate near
the paper exit.
4 TM-L90 with Peeler User’s Manual
English
CAUTION:
Never install the printer in locations that
receive direct sunlight. The diffuse reflection
from the roll paper may cause the label peeler
detector to malfunction. When a malfunction
occurs, the PAPER OUT LED starts flashing. Press
the FEED button to resume using the printer.
Note:
To hang the printer on the wall, see the Wall
Hanging Bracket Set Installation Manual provided
with the WH-10 for instructions.
Installing Roll Paper
Note:
Be sure to use roll paper that meets the specifications.
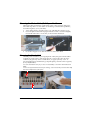
1. Make sure that the power is on.
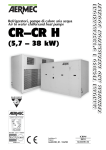
2. Pull the peeler open lever forward and open the peeler cover. (See the
illustration on the left below.)
3. Pull the roll paper cover open lever forward, and open the roll paper cover.
(See the illustration on the right below.)
4.
Insert the roll paper, as shown below.
TM-L90 with Peeler User’s Manual 5
English
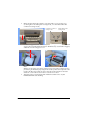
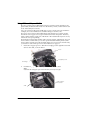
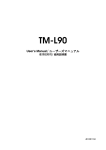
5.
Make sure that the mode switch is set to the mode you are going to use.
(To the right for the label peeler issuing mode, or to the left for the label
continuous issuing mode.)
Left: label continuous
issuing mode
6.
7.
Right: label peeler
issuing mode
Pull out the paper until the end exactly reaches the guideline (indicated with
arrows) shown in the illustration below. Eliminate any slack in the roll paper,
and then close the roll paper cover.
Note:
Making sure the paper end is at the guideline reduces the number of labels required
for detecting the minimum paper length. The number of labels issued depends on the
length of the label, but 2 labels are issued when the length of the label is less than
50 mm {2"}, and 1 label is issued when it is 50 mm {2"} or more.
After the paper is automatically fed and the first label comes out, the
PAPER OUT LED starts flashing.
6 TM-L90 with Peeler User’s Manual
English
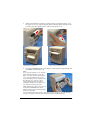
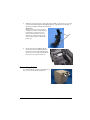
8.
When using the label continuous issuing mode (not using the peeler), close
the peeler cover now. When using the peeler (the label peeler issuing mode),
pass the paper through the peeler, and close the peeler cover.
label peeler issuing mode
label continuous issuing mode
Press the PAPER FEED button. The paper is automatically fed backward, and
the PAPER OUT LED goes off.
Note:
If you open the roll paper cover with roll
paper installed, make sure to open the
peeler cover first, and then the roll paper
cover. If you open them in the reverse
order, the roll paper can get trapped under
the roll paper cover when it is closed,
causing a possible paper jam. When
closing the roll paper cover, make sure to
close it firmly, pressing both ends.
While a label is being issued, do not touch
it until the PAPER OUT LED starts
flashing. Pulling it before that may result
in the waste of a label.
Do not block the label peeler detector with your fingers, or anything else while the label
issuing is in progress. This may cause the printer to feed the following label.
9.
TM-L90 with Peeler User’s Manual 7
English
CAUTION:
When installing roll paper, be careful not to injure your hands on the manual
cutter.
Troubleshooting
ERROR LED is on or flashing
❏
❏
❏
Make sure that the roll paper cover is closed and the PAPER OUT LED is not
on. Close the cover or replace the paper if necessary.
If the printer has been printing a lot and the print head gets too hot, the
ERROR LED starts flashing, and printing stops. When its temperature cools
down to the normal range, printing resumes automatically.
Turn off the printer and then turn it back on. If the LED is still flashing,
consult with your supervisor or a service person.
PAPER OUT LED is flashing
If the PAPER OUT LED continues to flash even after the issued label is removed,
the label peeler detector may be detecting something. Press the PAPER FEED
button once.
Paper jam
Turn off the power, open the peeler cover, and then open the roll paper cover to
check for a paper jam. If there is a paper jam, remove the jammed paper and
follow the instructions in the Installing Roll Paper section to prepare the printer
for printing.
Cleaning the Thermal Head
CAUTION:
After printing, the thermal head can be very hot. Be careful not to touch it and
to let it cool before you clean it. Do not damage the thermal head by touching
it with your fingers or any hard object.
Epson recommends cleaning the thermal head periodically (generally every 6
months) to maintain receipt print quality.
1. Turn off the printer, open the peeler cover, and then the roll paper cover.
2. Clean the thermal element of the print head with a cotton swab lightly
moistened with an alcohol solvent (ethanol, methanol, or IPA), as shown in
the illustration.
.
3.
Close the roll paper cover after the alcohol solvent has dried.
8 TM-L90 with Peeler User’s Manual
English
Cleaning the Platen Roller/Roll Paper End Sensor
When paper dust accumulates on the platen roller or the roll paper end sensor,
follow the steps below to clean them. To maintain good functional capabilities,
clean them regularly (every 6 months).
1. Turn off the printer, open the peeler cover, and then the roll paper cover.
2. Clean the platen roller and roll paper end sensor with a cotton swab lightly
moistened with water or an alcohol, as shown in the illustration.
.
3.
Close the roll paper cover after the water or alcohol has dried.
Cleaning the Peeler Unit
After the peeler is used for a prolonged period of time, the glue from the labels
accumulates on the rollers of the peeler unit. If you leave the rollers in such a
condition, the glue may stick to issued labels, or a paper jam may occur. To
prevent malfunctions and maintain good print quality, clean the rollers regularly
(every 100,000 labels).
You can clean them easily if you use a wasted label, as shown in the illustration.
Note:
Do not use any alcohol based solvents for cleaning. Such solvents may enter the roller shaft
and cause a malfunction of the peeler.
TM-L90 with Peeler User’s Manual 9
English
Using Different Paper Widths
Be sure to set the paper width with the memory switch to match printing to the
print width. (For detailed information on the memory switch, see the TM-L90 with
Peeler Technical Reference Guide.)
Also, do not increase the paper width after you have used a narrower width. For
example, do not use 60 mm {2.36"} and then change to 80 mm {3.15"}.
The reason not to increase the width setting if the printer has ever been used is
that when narrow paper is used, part of the head contacts the platen. Therefore,
when a wider setting is used, part of the head or the cutter blade may be worn out,
which can cause poor printing.
The TM-L90 accommodates 80 mm wide roll paper with no adjustments. For rolls
from 38 mm to 70 mm wide you use the spacer included with the printer. (Rolls
from 71 mm to 79 mm cannot be specified.) If the rolls are from 61 to 70 mm wide,
you break two tabs off the spacer. See the width note on page 11.
1. Insert the roll paper spacer so that the front edge goes through the notch and
down to the shaft, as shown below.
notch
roll paper spacer
front edge
2.
Push the roll paper spacer until you feel it click onto the shaft.
Note:
Check that the roll paper spacer slides smoothly to the left and right.
inside edge of
the spacer
shaft
10 TM-L90 with Peeler User’s Manual
English
3.
Slide the roll paper spacer to the appropriate width, as shown above. You can
use the measurement printed inside the printer, aligning the inside edge of
the spacer with the desired measurement.
Width note:
When you want to set the roll paper
width from 61 mm to 70 mm, break off
by hand the two tabs of the spacer
shown in the illustration. (You can
tabs
still also use widths from 38 mm to
60 mm with the spacer with the tabs
broken off.)
4.
Insert the screw included with the
spacer into the hole indicated in the
illustration to the right and tighten it.
(Even if you can see two holes, this is
the only one to put the screw in.)
hole for screw
Connecting Cables
To connect cables, first remove the bottom of
the cover as shown in the illustration.
TM-L90 with Peeler User’s Manual 11
English
To place cables, first break off by hand any of
the three portions indicated by circles in the
illustration (the other portion is on the right).
Then put the cables through the holes and
replace the bottom of the cover.
Cover Operation Label
If you use the cover operation label included in the package, attach it in one of the
following locations:
a) Side of the operation panel
b) Beside the power switch
c) Side of the printer
12 TM-L90 with Peeler User’s Manual