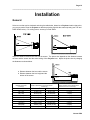
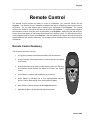
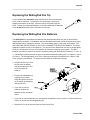
1
Page
i
Chisholm Aurora S500
SVGA LCD Projector
REFERENCE MANUAL
Aurora S500
Page ii
Safety Precautions
WARNING: To reduce the risk of fire or electric shock, do not expose this equipment to rain or
moisture. Dangerous high voltages are present inside the enclosure. Do not open the case.
Refer servicing to qualified personnel only.
FCC STATEMENT: This equipment has been tested and found to comply with the limits for a
Class A digital device, pursuant to Part 15 of the FCC Rules. These limits are designed to
provide reasonable protection against harmful interference when the equipment is operated in a
commercial env ironment. This equipment generates, uses and can radiate radio frequency
energy and, if not installed and used in accordance with the instruction manual, may cause
harmful interference to radio communications. Operation of this equipment in a residential area
is likely to cause harmful interference in which case the user will be required to correct the
interference at his or her own expense.
CANADIAN DEPARTMENT OF COMMUNICATIONS STATEMENT: This digital apparatus
complies with the Class A limits for radio noise emissions from digital apparatus as set out in the
Radio Interference Regulations of the Canadian Department of Communications.
Le présent appareil numérique n'émet pas de bruits radioélectriques dépassant les limites
applicables aux appareils numériques de la classe A prescrites dans le Règlement sur le
brouillage radioélectrique édicté par le Ministère des Communications du Canada.
IMPORTANT PRECAUTIONS
Save Original Packing Materials
The original shipping carton and packing materials will come in handy if you ever have to ship
your Projector. For maximum protection, repack the set as it was originally packed at the factory.
Avoid Volatile Liquid
Do not use volatile liquids, such as an insect spray, near the unit.
Moisture Condensation
Never operate this unit immediately after moving it from a cold location to a warm location.
When the unit is exposed to such a change in temperature, moisture may condense on the crucial
internal parts. To prevent the unit from possible damage, do not use the unit for at least 2 hours
when there is an extreme or sudden change in temperature.
CAUTION: Please read and observe all warnings and instructions given in this owner’s manual
and those marked on the unit. Retain this booklet for future reference.
This unit has been designed and manufactured to assure personal safety. Improper use can
result in electric shock or fire hazard. The safeguards incorporated in this unit will protect you if
you observe the following procedures for installation, use and servicing. With exception of the
Lamp, this unit is fully transistorized and does not contain any parts that can be repaired by the
user.
CAUTION: Do not remove the cabinet cover, or you may be exposed to dangerous voltage.
Refer servicing to qualified service personnel only.
Aurora S500
Page
iii
1. Read Owner’s Manual
After unpacking this product, read the owner’s manual carefully, and
follow all the operating and other instructions.
2. Power Sources
This product should be operated only from the type of power source
indicated on the marking label. If you are not sure of the type of power
supply to your home, consult your product dealer or local power
company. For products intended to operate from battery power or other
sources, refer to the operating instructions.
3. Source of Light
Do not look into the lens while the lamp is on. The strong light from
the lamp may cause damage to your eyes or sight.
4. Ventilation
Openings in the cabinet are provided for ventilation and to ensure
reliable operation of the product and to protect it from overheating.
These openings must not be blocked or covered. The openings
should never be blocked by placing the product on a bed, sofa, rug
or other similar surface. This product should not be placed in a builtin installation such as a bookcase or rack unless proper ventilation is
provided or the manufacturer’s instructions have been adhered to.
5. Heat
The product should be situated away from heat sources such as
radiators, heat registers, stoves, or other products (including amplifiers)
that produce heat.
6. Water and Moisture
Do not use this product near water - for example, near a bathtub, wash
bowl, kitchen sink, or laundry tub; in a wet basement; or near a
swimming pool and the like.
Aurora S500
Page iv
7. Cleaning
Unplug this product from the wall outlet before cleaning. Do
not use liquid cleaners or aerosol cleaners. Use a damp cloth
for cleaning.
8. Power-Cord Protection
Power-supply cords should be routed so that they are not
likely to be walked on or pinched by items placed upon or
against them, paying particular attention to cords at plugs,
convenience receptacles, and the point where they exit from
the product.
9. Overloading
Do not overload wall outlets; extension cords, or integral
convenience receptacles as this can result in a risk of fire or
electric shock.
10. Lightning
For added protection for this product during storm, or when it is
left unattended and unused for long periods of time, unplug it
from the wall outlet. This will prevent damage to the product
due to lightning and power-line surges.
11. Object and Liquid Entry
Never push objects of any kind into this product through
openings as they may touch dangerous voltage points or shortout parts that could result in a fire or electric shock. Never spill
liquid of any kind on the product.
12. Attachments
Do not use attachments not recommended by the product
manufacturer as they may cause hazards.
Aurora S500
Page
v
13. Mounting and Transport
Do not place this product on an unstable cart, stand, tripod, bracket, or
table. The product may fall, causing serious injury to a child or adult and
serious damage to the product. Use only with a cart, stand, tripod, bracket,
or table recommended by the manufacturer, or sold with the product. Any
mounting of the product should follow the manufacturer’s instructions and
should use a mounting accessory recommended by the manufacturer.
14. Damage Requiring Service
Unplug the projector from the wall outlet and refer servicing to qualified
service personnel under the following conditions:
•
•
•
•
•
•
When the power supply cord or plug is damaged.
If liquid has been spilled, or objects have fallen into the product.
If the product has been exposed to rain or water.
If the product does not operate normally by following the operating instructions.
If the product has been dropped or damaged in any way.
When the product exhibits a distinct change in performance indicating a need for service.
15. Servicing
With the exception of Lamp replacement an air filter cleaning,
do not attempt to service this product yourself as opening or
removing covers may expose you to dangerous voltages or
other hazards. Refer all servicing to qualified service
personnel.
16. Replacement Parts
When replacement parts are required, be sure the service
technician has used replacement parts specified by the
manufacturer or have the same characteristics as the
original part. Unauthorized substitutions may result in fire,
electric shock, or other hazards. The Lamp is user
replaceable.
17. Safety Check
Upon completion of any service or repairs to this product, ask
the service technician to perform safety checks to determine
that the product is in proper operating condition.
TRADEMARK NOTE: Trademarks appearing in this reference manual are trademarks or
registered trademarks of their respective companies.
Aurora S500
Page vi
Table of Contents
INTRODUCTION..................................................................... 1
Getting Started.................................................................. 3
Unpacking ......................................................................... 4
Setup ................................................................................ 6
Installation........................................................................ 12
PROJECTOR OPERATION ................................................... 13
Controls and Indicators..................................................... 13
Video Menu...................................................................... 16
Audio Menu...................................................................... 19
Preferences Menu ............................................................ 20
Information Menu ............................................................. 24
Remote Control ................................................................ 25
ANNOTATION OPTIONS .......................................................30
PenPal..............................................................................30
Pen and Tablet............................................................31
Mouse.........................................................................33
Mouse Clicks...............................................................34
Pencil..........................................................................34
Sound Control .............................................................35
Source Selection.........................................................35
Menu Selection ...........................................................35
Notepad ......................................................................35
Videopad.....................................................................35
Erase ..........................................................................35
WritingPad ...................................................................... 36
Pen and Tablet........................................................... 36
Icons.......................................................................... 38
Erase ......................................................................... 39
Pads .......................................................................... 39
Tools.......................................................................... 40
Mouse Clicks.............................................................. 45
Colors ........................................................................ 46
Sizes.......................................................................... 46
Projector Control Panel ...............................................47
TROUBLESHOOTING ........................................................... 50
CARE AND MAINTENANCE.................................................. 53
ACCESSORIES ..................................................................... 58
Aurora S500
Page 1
_____________________________________________________________________________
INTRODUCTION
Thank you for selecting the Aurora Projector. Our goal is to bring you innovative products of superior
quality and performance. We welcome your comments. This Owner’s Manual describes the operation of
the Aurora and it’s optional Annotation devices, WritingPad and PenPal. If you need assistance,
contact us at the number displayed when the Aurora is first powered on or at the number printed on the
back cover of this Owner’s Manual.
The Projector uses high-resolution polysilicon display technology and is capable of displaying up to 16.7
million colors. Aurora will produce a bright high quality image. For best performance use a high quality
projection screen and reduce the ambient room light.
The Aurora is available in three models:
• Model S500
• Model S500P
• Model S500W
Data and Video Projector
Data and Video Projector with PenPal Annotation option
Data and Video Projector with WritingPad Annotation option
Features
§
§
§
§
§
§
§
§
§
§
§
§
§
§
§
§
§
§
§
Uniformly bright high-quality picture
High-density, high-quality video for multimedia
Compact and lightweight for portability
Image inversion and reversal for front or rear
projection from the floor or ceiling
Large-screen image up to 300 inches diagonally
Projector keypad controls
Wireless Remote Control for presentation,
computer mouse, and Projector control
On-screen menus for easy adjustments
Concurrent computer monitor support
Easy connect cables
Automatic detection of fan failure
Built-in 12 watt stereo speaker system
Mac and PC compatible (VGA, SVGA, XGA)
Video and S-Video input (DVD, laserdisc, VCR, or CD-ROM)
Up to 2 selectable data inputs and 4 selectable video inputs
4 stereo audio inputs and 1 switched stereo audio output
On-screen menu control from the Projector, Remote Control or Annotation option
Automatic power management for saving energy
Universal power supply
Aurora S500
Page 2
______________________________________________________________________________
The Annotation option is available in two versions: 1) WritingPad and 2) PenPal. The WritingPad
option includes a large writing Tablet, a Pen, and a set of icon templates that allow you to do the
following:
§
§
§
§
§
§
§
§
§
§
§
§
Draw or write in any of 8 colors and 4 line weights
Highlight information
Erase
Draw and move boxes, frames and icons
Write on video or a notepad
Select and use 60 icons from 3 icon libraries
Use the Pen as a Microsoft mouse (Macintosh Mouse
Adapter is available as an accessory)
Quickly access frequently used features
Control the Projector
Turn the sound off and on
Freeze and unfreeze the projected image
Control notepad color and Pen button features
The PenPal Annotation option includes a small writing Tablet and Pen and allows you to do the
following:
§
§
§
§
§
§
Write in four colors with pressure sensitive line weights
Erase
Control the Projector
Use the Pen as a Microsoft mouse (Macintosh Mouse
Adapter is available as an accessory)
Turn the sound off and on
Write on video or a notepad
Additional accessories that may be purchased separately include:
§
§
§
§
§
Macintosh Mouse Adapter
Annotation devices
25-foot Annotation extension cable
Variety of Ceiling Mounts
Variety of Carry and Travel Cases
Aurora S500
Page 3
_____________________________________________________________________________
Getting Started
The Projector is simple to use. Plug it into a computer, a VCR,
a DVD, a laserdisc, a camera, or any device that provides RGB,
S-Video or composite output. You may also attach any audio
line output that is available from those devices. W hen attached to a compatible video and audio source,
the Projector will deliver a high quality video and audio experience.
If you are using a computer, the Projector plugs directly into the same computer connector used by your
computer monitor. Your computer monitor may also be connected to the Projector for simultaneous
viewing.
If you need to make adjustments to the Projector,
this can be done from the Projector keypad, the
Remote Control, or the Annotation option. Any
adjustments to the video mode you are using are
automatically saved.
The keypad for operating the Projector is located on top of
the Projector and connectors for attaching various devices
are located on the side. IR (infrared) lenses are located on
the front and back of the Projector and are used to receive input from the Remote Control. The 12-watt
stereo speaker system is located on the back of the Projector (away from the projected image).
The cables provided are labeled for easy
connection. The cable names correspond to the
name on the side of the Projector. Match the
Projector cables to the connectors on the side of
the Projector. For example, the PC or Mac RGB
cable may be connected to either RGB 1 or RGB
2. Connect only those cables that are needed for
your application.
Aurora S500
Page 4
______________________________________________________________________________
Unpacking
Unpack the shipping container. Inspect the contents to ensure that you have all the pieces identified
below. If anything is missing, please contact your dealer or call us directly.
Projector
Aurora S500
Page 5
_____________________________________________________________________________
Annotation Options
PenPal
WritingPad
The Annotation option will be included only if you purchased a model that includes this feature. If
anything is missing, contact your service representative or call the number displayed on the Projector
when it is powered on. If anything is damaged, call the freight company and keep the packaging to ensure
a proper claim with the freight company.
Aurora S500
Page 6
______________________________________________________________________________
Setup
1. Get Acquainted
Familiarize yourself with the features of the Projector.
Control Panel
Handle
Speakers
IR Lens
Foot Adjuster
Lens
Power Plug
Focusing Ring
Zoom Ring
Connector Panel Door
IR Lens
Foot Adjuster
2. Power Down
Turn off any equipment you intend to connect to the Projector.
ON
OFF
3. Find a Location
Establish a location for the Projector that is clear of debris, provides adequate ventilation, and
provides the throw distance image size required for your needs (see the Installation section for
determining image size and throw distance required).
Aurora S500
Page 7
_____________________________________________________________________________
4. Connector Panel
Open the Connector Panel Door and familiarize yourself with the Connector Panel.
5. Disconnect Your Monitor
The Projector uses your computer monitor port. To connect your computer, first disconnect your
computer monitor. If you are using a notebook computer, identify your external monitor connector
and make sure your video output is enabled (see your notebook manual).
6. Connect Your Computer
Next, select the appropriate RGB cable (PC or Mac) that fits your computer. If your computer
provides an audio output, you may also connect it to the corresponding audio input connectors
associated with the RGB connection.
NOTE: You may attach as many as two computers and select between them. A cable has been
provided for a PC and a Mac. Additional cables may be purchased separately.
To use your computer monitor concurrently, plug it into the short Y cable connector of your selected
RGB video cable. If you need additional distance for your monitor, a 9-foot extension cable is
available at most computer supply stores.
Aurora S500
Page 8
______________________________________________________________________________
Connecting to a PC
Check that the power for the Projector and computer are off before connecting the cables. Connect
the supplied PC Y RGB cable to the Projector as shown below. If you wish to use your monitor
concurrently with projection, connect the short Y cable to your PC monitor. Connect the other end of
the PC Y RGB cable to your PC monitor port. The supplied PC Y RGB cable may be connected to
either RGB 1 or RGB 2. Connect your computer audio to the corresponding RGB connector.
Connecting to a Mac
Check that the power for the Projector and computer are off before connecting the cables. Connect
the supplied Mac Y RGB cable to the Projector as shown below. If you wish to use your monitor
concurrently with projection, connect the short Y cable to your Mac monitor. Connect the other end of
the Mac Y RGB cable to your Mac monitor port. The supplied Mac Y RGB cable may be connected
to either RGB 1 or RGB 2. Connect your computer audio to the corresponding RGB connector.
Aurora S500
Page 9
_____________________________________________________________________________
7. Connecting a Video Device
To connect a VCR, DVD, laserdisc, or other video device, use the supplied Audio/Video cables with 3
connectors at each end and attach them to the audio/video connectors of Video 1 or Video 2 and to
the corresponding connectors of your video device.
Aurora S500
Page 10
______________________________________________________________________________
8. Connecting an External Amplifier, Computer Mouse, or Annotation
Device
If you have your own audio system, you may use the Audio Out connectors of the Projector to
provide a line level output to an external amplifier. If you do not want the Projector internal speakers
to operate, use the Audio Menu to disable them (the Audio Menu is discussed in the following pages).
If you have a Microsoft compatible mouse, you may use the Remote Control and/or the Annotation
Tablet as a mouse by connecting the PC Mouse Y Cable to the Mouse connector of the Projector and
the other end to the mouse serial port of your computer. Use the supplied adapter plug for converting
a 25-pin serial connector to a 9-pin serial connector. If you wish to use the Remote Control and/or the
Annotation device as a Macintosh mouse, a Macintosh Mouse Adapter is available as an accessory.
Your computer mouse may also be attached to the PC Mouse Y cable.
If you have the Annotation option, connect it to the Tablet connector of the Projector.
Aurora S500
Page 11
_____________________________________________________________________________
9. Secure Connectors
Tighten all cable connector screws.
10. Connect Power Cable
Connect the power cable to the Projector and plug the power cord into an outlet.
11.
Power On
ON
Turn on the Projector Lamp by depressing the Power key on the Control Panel or
depressing the Menu key on the Remote Control or optional Annotation device. Next
turn on your computer and any other equipment you attached to the Projector. If the
OFF
Projector is receiving power, the Lamp will light, the green Power LED will light, and all
active video sources will be identified. When you turn off your Projector Lamp, the Source LEDs on
the Projector keypad will turn off, the green Power LED will blink, and the cooling fan will
automatically turn off after the Projector has cooled.
NOTE: To turn off the Projector, hold down the Power key until the Lamp turns off. If you are using the
Remote Control or an Annotation device as a mouse, you must apply power to the Projector before you
power-on your computer in order for the mouse to be properly identified.
Adjust the room lighting. Your Projector is ready for use. You may make changes and adjustments with
the Projector keypad, Remote Control, or the Annotation option. Any changes or adjustments you make
are automatically saved and will be recalled the next time that you turn on the unit. See Troubleshooting
section if you are having problems.
Aurora S500
Page 12
______________________________________________________________________________
Installation
General
Select a room that can be darkened and using the table below, determine a Projector location that suites
your screen needs. Place the Projector so that the projecting light hits the screen squarely (see TOP and
SIDE VIEWS below). For ceiling mount, contact your local dealer.
Adjust the distance between the lens and the screen. The picture size depends on the distance between
the lens and the screen and the zoom setting of the Projector lens. Adjust the picture size by changing
the distances as shown below.
a: Distance between the lens and the screen.
b: Distance between the lens height and the
bottom of the screen.
Diagonal Screen Size:
inches (m)
Distance between the lens and the screen:
a inches (m)
Distance between the lens height and the
bottom of the screen: b inches (m)
Minimum Zoom
Maximum Zoom
40 (1.02)
57.09 (1.45)
79.92 (2.03)
0.7 (1.8)
60 (1.52)
86.61 (2.20)
121.26 (3.08)
1.0 (2.6)
80 (2.03)
116.54 (2.96)
162.99 (4.14)
1.4 (3.5)
100 (2.54)
146.08 (3.71)
204.72 (5.20)
1.7 (4.4)
120 (3.05)
175.98 (4.47)
246.46 (6.26)
2.1 (5.3)
150 (3.81)
220.47 (5.60)
308.66 (7.84)
2.6 (6.6)
200 (5.08)
294.88 (7.49)
412.99 (10.49)
3.5 (8.8)
300 (7.62)
456.69 (11.60)
--
5.2 (13.2)
Aurora S500
Page 13
_____________________________________________________________________________
PROJECTOR OPERATION
Controls and Indicators
Automatic Power Management
The Projector has a built-in power management system that causes it to automatically power down some
of the electronics whenever the Projector is turned off. This reduces power consumption and the need to
unplug the unit. Simply turn the Projector on or off as you need it, and the Projector responds
accordingly.
Automatic Fan Failure Detection
The Projector is equipped with internal fans that protect the display elements (LCDs) and Lamp from
overheating when the Projector is operating.
In the event that the Projector light is on and the fan is not operating, the Projector will prompt you with
the following message:
"The Projector fan is not operating. Discontinue use of the Projector until the problem is
resolved. Depress the <<Source>> key to clear this message."
Continued use of the Projector when the fan is not operating may cause damage to the LCDs and Lamp.
If the fan begins to operate, the message will automatically clear. If the fan problem cannot be cleared,
contact your service representative. If you clear the message by depressing the Projector Source key,
the message will not be re-displayed until the Projector Lamp has been turned off and on again.
Projector LEDs and Keypad
The Projector LEDs give the status of power and
each video source when the Projector Lamp is on.
The Projector Keypad allows selection of all
features and adjustments to the Projector through on-screen menus. These feature selections and
adjustments can also be accessed by the Remote Control or the Annotation option. In addition, some
Projector controls such as Volume and Freeze can be directly accessed with the Remote Control.
Volume on/off and Freeze can also be accessed with the WritingPad, and Volume on/off is available on
the PenPal.
Aurora S500
Page 14
______________________________________________________________________________
Power Key and LED
The Power key turns the Projector Lamp on and off.
To turn the Lamp on, depress the Power key. To turn
the Lamp off, depress and hold the Power key until
the Lamp turns off. A countdown will appear at the
bottom of the projected image while the Lamp key is depressed. This countdown is used to avoid
accidental power-down. The Power LED will light whenever the Projector Lamp is lit. When the Lamp is
turned off, the Power LED will flash until the cooling fan stops. The Lamp cannot be turned back on until
the Power LED stops flashing.
Source LEDs
When the Power LED is green, the four (4) Source
LEDs (RGB 1, RGB 2, Video 1, Video 2) indicate the
status of the attached video sources. An unlit LED
indicates the corresponding video source is not
present. Steady green indicates video present. Orange indicates video present and selected. Red
indicates the video was lost while selected. If a selected source is lost, it will remain selected unless you
change it with the Source key. When initially powered on, the last source selected before power-off will
be re-selected if it is available. If it is not available, the first available source will be selected.
Source Key
Up to six (6) data/v ideo sources may be connected
simultaneously to the Projector (2 RGB (PC and/or
Mac), 2 composite video, and 2 S-Video). The
Source key
is used to switch between the
connected sources and their associated audio. Any Source LED that is displayed in green or orange is a
selectable video source. Only one source may be selected at a time. W hen a source is selected, the
corresponding Source LED is illuminated orange. If both composite and S-Video are attached to either
the Video 1 or Video 2 source, the Source key will allow you to select them individually.
Center Image Keys
If the Menu key
has not been pressed, the
keys will allow you to move the projected image
left or right as necessary to center it. Any changes
you make will automatically be saved.
If On-Screen Prompts are enabled in the Preferences Menu, a message indicating the direction of image
movement will appear at the bottom center of the image whenever a direction key
is depressed. You
may use the corner highlights that appear during this operation as a visual reference from proper
alignment. When properly aligned, your projected image will exactly overlay the corner highlights.
Aurora S500
Page 15
_____________________________________________________________________________
For complete alignment of the image in any direction, use the Information Menu as discussed in the
following pages.
Volume Control Keys
If the Menu key
has not been pressed, the
keys will allow you to adjust the volume up or down.
If On-Screen Prompts are enabled in the Preferences Menu, a volume adjustment message will be
displayed whenever a volume key
is depressed. For complete audio control, use the Audio Menu as
discussed below.
Menu Keys
The Menu keys are used to enter, adjust and exit the Preferences, Video, Information and Audio menus.
These menus may also be accessed with the Remote Control or the Annotation device.
Depress the Menu key
and the menu at the right will be
displayed on the projected image. To select a specific menu,
depress the corresponding menu key on the Projector keypad
or Remote Control Pad. If you have the Annotation option, use
the Pen to directly select a menu with the fingertip of the hand
PREFERENCES
AUDIO
symbol. Depress the
key for the Audio Menu, the
key
for the Video Menu, the
key for the Preferences Menu or the
key for the Information Menu.
VIDEO
INFORMATION
Once selected, the corresponding menu will be displayed on the projected image. The last selected item
on the chosen menu is outlined in red. To select a different item on a menu, depress one of the up or
down
keys with the Projector keypad or the Remote Control. To change a selected item on a menu,
depress the left or right
keys with the Projector keypad or the Remote Control. If you have the
Annotation option, you may directly select and change items on the menus by touching the fingertip of
the hand
symbol on the item of your choice. Once you have completed your changes, exit the menu
by depressing the Menu key
and any change you have made will be saved automatically. If you have
the Annotation option, you may exit the menu by depressing the fingertip of the hand
exit
symbol on the
button in the upper left corner of the menu.
Either selecting a box or mov ing a slider makes all changes and adjustments. The numeric value
displayed in the corner of some adjustments is for reference purposes only. If you have the Annotation
option, a change is made by touching the fingertip of the hand
touching it on the slider
Aurora S500
symbol on the appropriate box or
button and moving the Pen with the tip depressed.
Page 16
______________________________________________________________________________
Aurora S500
Page 17
_____________________________________________________________________________
Video Menu
The Video Menu allows you to make adjustments to the currently selected
video source.
The Projector automatically sets the recommended
parameters for the video you are using; however, you may wish to make
additional adjustments with the Video Menu. Any changes you make affect
only the video source you are viewing.
Red
To make changes to the video parameters, press the Menu
key and
then the Video
key and the Video Menu to the right will be displayed.
Green
To exit the menu, press the Menu
key. If you have the Annotation
option, you may also exit the menu by depressing the fingertip of the hand
Blue
symbol on the Video Menu exit
button.
Color controls the saturation of color. + Color
will increase the color saturation and - Color will decrease the color
saturation. Move the slider left or right to adjust color. The Color control will
appear in a light gray
Color
-
60
+
if this control is unavailable for the
7
source you are viewing.
image.
Tint controls the amount of red and green in the
Move the slider left or right to adjust tint. The Tint control will appear in a light gray
if this control is unavailable for the source you are viewing.
Contrast controls the difference between the light and dark areas of the image.
Move the slider left or right to adjust contrast. +Contrast will increase the image contrast and - Contrast
will decrease the image contrast.
Brightness controls the intensity of the image. + Brightness will lighten the
image and - Brightness will darken the image.
Aurora S500
Page 18
______________________________________________________________________________
Red Level
The Red Level is used to adjust the amount of red in the image. + Red will
increase red in the image, and - Red will decrease red in the image. Use the Green Level and Blue Level
controls to perfect the image color setting. The Red Level control will appear in a light gray
Red Level
if this control is unavailable for the source you are viewing.
Green Level
The Green Level is used to adjust the amount of green in the image. + Green
will increase green in the image, and - Green will decrease green in the image. Use the Red Level and
Blue Level controls to perfect the image color setting. The Green Level control will appear in a light gray
Green Level
if this control is unavailable for the source you are viewing.
Blue Level
The Blue Level is used to adjust the amount of blue in the image. + Blue will
increase blue in the image, and - Blue will decrease blue in the image. Use the Red Level and Green
Level controls to perfect the image color setting. The Blue Level control will appear in a light gray
Blue Level
if this control is unavailable for the source you are viewing.
The Inverse adjustment controls whether colors will be displayed in their
normal mode or in an inverse or negative image mode. Inverse On will create an effect of viewing a
photographic negative. Inverse On is helpful when viewing white text on a black background. Inverse Off
will restore the original colors.
The Focus adjustment controls image flicker or sparkle. If the edge of an
image or character sparkles or a color is flickering, move the Focus slider until the best setting is found.
The Focus adjustment control will appear in a light gray
the source you are viewing.
if this control is unavailable for
If Image Scaling is On, a high-resolution XGA or a low-resolution VGA or
NTSC image will be scaled to fit the resolution of the Projector (SVGA 800 x 600). If Image Scaling is
Off, XGA images are automatically compressed horizontally from 1024 to 800 pixels of resolution and
lower resolution images are shown in their original resolution. If your Source is not a scalable image,
Image Scaling will appear in a light gray
.
Aurora S500
Page 19
_____________________________________________________________________________
NOTE: XGA is supported only at 60 Hertz. Using the software provided with your video card, check your
video card setting to ensure 60 Hertz has been selected.
The Frequency Shift adjustment is used to correct vertical bands of distortion
in the projected image. The easiest way to determine the need to make a frequency shift is to project a
full image of repeated information such as the letter M. If a frequency shift is necessary, you will notice 1
or more vertical bands where the image is distorted within each band. To correct the problem, move the
Frequency Shift slider in a direction that eliminates the distortion. Only one direction will improve the
condition. A Frequency Shift setting of 70 is normal. Frequency Shift will appear in a light gray
if this control is unavailable for the source you are viewing. W hen you are done making
a Frequency Shift adjustment, enter the Information Menu and center the image with the
keys.
The Factory Defaults selection allows you to restore factory video settings for
the video mode you are viewing. If you choose Yes and exit the Video Menu, the video mode you are
viewing will be reset to the factory settings. All Video Menu parameters will be reset and the image
position (Information Menu) will be restored to a Horizontal Offset of 0 and a Vertical Offset of 0.
Some video sources such as VGA can have many video modes; however, only the one you are viewing
will be reset. The video mode is displayed in the Information Menu and it is also briefly displayed when
you switch video sources.
Aurora S500
Page 20
______________________________________________________________________________
Audio Menu
The Audio Menu allows you to adjust the audio attached to the video source
you are viewing. Any audio changes you make are automatically saved.
Press the Menu
and then the Audio
key and the Audio Menu to the
right will be displayed. To exit the menu, press the Menu
key. If you have
the Annotation option, you may also exit the menu by depressing the
fingertip of the hand
symbol on the Audio Menu exit
button.
The Sound control sets the audio On or Off for the
video source you are viewing. Sound can also be turned On or Off with the Remote Control or the
Annotation device by touching the Mute
button.
The Volume adjustment sets the volume level for the video source you are
viewing. + Volume will increase the volume of the Projector's built-in speakers or increase the line level
Audio Out. - Volume will decrease the volume of the built-in speakers or decrease the line level of Audio
Out.
The Bass adjustment controls the bass level for both the internal speakers and
the Audio Out. + Bass will increase bass and - Bass will decrease bass.
The Treble adjustment controls the treble level for both the internal speakers
and the Audio Out. + Treble will increase treble and - Treble will decrease treble.
The Balance adjustment controls the balance of sound from a stereo input to
the internal speakers and the Audio Out. Moving the Balance slider toward + or - Balance will shift the
balance of sound from a stereo input.
The Audio Output control defines the speaker system to be used by the
Aurora S500
Page 21
_____________________________________________________________________________
selected video source. Selecting Int enables the Projector’s internal 12-watt stereo speaker system and
disables the audio output. Selecting Ext enables the Projector’s audio output for use with an external
amplifier and speaker system and disables the internal speakers.
Aurora S500
Page 22
______________________________________________________________________________
Preferences
Menu
The Preferences Menu allows you to configure the Projector and the
WritingPad or PenPal to your liking. If you do not have the Annotation
feature or it is not connected, Notepad Color and Pen Barrel Buttons are
disabled and they will appear in a light gray.
Press the Menu
key and then the Preferences
key and the
Preferences Menu to the right will be displayed. To exit the menu, press
the Menu
key. If you have the Annotation option, you may also exit
the menu by depressing the fingertip of the hand
Preferences Menu exit
symbol on the
button.
On-Screen Prompts controls the appearance
of messages in the lower center of the image whenever adjustments or
changes are made to the Projector. If On-Screen Prompts is On, the
prompts are visible. If On-Screen Prompts is Off, the prompts are not
displayed.
The Projection Mode defines the orientation
of the Projector’s image. The
mode is used for front projection from
a table. The
mode is used for rear projection from a table. The
mode is used for rear projection from a ceiling mount. The
used for front projection from a ceiling mount.
mode is
Tablet Select
Auto
PPal
WPad
You may change the Notepad Color to any of
8 colors. The color you select is displayed in the upper right-hand corner of the Notepad Color selection
and will become the Annotation device Notepad color when you exit the Preferences Menu and return to
the Notepad. Whenever the Notepad color is changed, a suitable Tool color is automatically assigned to
the last Notepad Tool you were using. You may change the assigned Notepad Tool color simply by
selecting a different color while using the Notepad. If you do not have the Annotation option, the
Notepad Color control will be disabled and will appear in a light gray
.
Aurora S500
Page 23
_____________________________________________________________________________
Pen Barrel Buttons allows you to choose the mode of operation for the
Pen barrel buttons of the WritingPad and PenPal Annotation options. For the PenPal, selecting
Custom or Std enables the lower Pen barrel button for erase when the Pencil is selected and right
mouse click when the Mouse is selected. When Off is selected, the Pen barrel buttons are
deactivated. This is the factory setting for PenPal when it is shipped.
The WritingPad allows use of both buttons as well as customization of the buttons depending on the
Pen Barrel Buttons setting. Off disables the Pen barrel buttons. If the Pencil
(standard) assigns the Pencil Eraser
the upper Pen barrel button.
If the Mouse
is selected, Std
to the lower Pen barrel button and the Large Eraser
to
Tool is selected, the lower barrel button enables the right mouse button and the
upper barrel button enables the left double click. See the Mouse
Tool description for additional
information. Custom allows you to assign any Tool or Icon with associated Color and Size to each of
the Pen barrel buttons. If you do not have
the Annotation option, the Pen Barrel
WritingPad
Buttons control will be disabled and will
appear in a light gray
.
Custom mode is very handy when you use
several Tools frequently, such as during a
presentation. For example, in Custom
mode you could assign a medium size red
Pencil to the Pen tip, a pointer Icon to the
lower barrel button, and the mouse to the
upper barrel button. This gives you instant
access to these three features directly from
the Pen.
Writing Mode
To assign a Pen barrel button, depress the
Pen barrel button and touch the Tool or
Mouse Mode
Icon, Size, and Color you wish to assign
(Icons can be selected from different icon
libraries). Once assigned, depressing that
Pen barrel button will select the feature.
Depressing the Pen barrel button and the Pen tip in the Writing Area will activate the assigned
feature.
Custom Setting
Aurora S500
Page 24
______________________________________________________________________________
Any changes you make in Custom mode are automatically saved so that the next time you use
Custom mode your last Pen tip setting and barrel button settings will be restored. If you are sharing
the Projector with other users, you may wish to set Pen Barrel Buttons to Off when you are done
with the Projector.
The Mouse Type identifies which type of mouse you have connected to the
Projector. The default is PC as this is the type of mouse cable provided with the Projector. If you have
purchased the Macintosh Mouse Adapter, change the Mouse Type to Mac. See the Mouse Tool
description for additional instructions on the proper use of the mouse.
NOTE: When using a PC Mouse Type, the Projector assumes you are using a Microsoft compatible
mouse driver. For the PC mouse to operate properly, you must apply power to the Projector before you
power-on your computer in order for the mouse to be properly identified.
If you wish to alternate between the PC and the Macintosh mouse, be sure to bring up the PC mouse as
described in the note above. Once the PC mouse is operating, you may change the mouse to Macintosh
or back to the PC by changing the appropriate cables and setting the Mouse Type to the corresponding
mouse source. The last Mouse Type setting is retained when you power-off the Projector.
The Language selection identifies the language to be used for Projector
messages and menus. The language options include Eng for English, Frn for French, Spn for Spanish
and Grm for German. To change the language, select the appropriate language and exit the Preferences
Menu. All subsequent messages will be shown in the new language. If a language is not available, it will
appear in a light gray.
The Cover is an electronic sheet of paper (see Remote Control at the end of
this section) that can be used to cover and uncover the projected video. This control allows you to
change the Cover color to any of 8 colors. The color you select is displayed in the upper right-hand
corner of the Cover Color selection and will become the Cover color when you exit the Preferences Menu.
If the Cover is selected when Cover Color change is made, the Cover color will change immediately. If
you are using the Annotation option, any writing on the Cover will be erased when the Cover color is
changed. If the Cover is not selected, the Cover Color change will take effect on the next use of the
Cover.
Cover Direction determines which direction the Cover may be moved. The
choices are up and down , left and right
, or any direction
. If the Cover is selected when the
Cover Direction is changed, the Cover will be refreshed immediately. If you are using the Annotation
option, any writing that was on the projected image will be erased when the Cover is refreshed. If the
Cover is not selected, the Cover Direction change will take effect on the next use of the Cover.
Aurora S500
Page 25
_____________________________________________________________________________
The Remote Control Button 2 (Select) is a programmable button. This menu
item allows you to assign one of the following four functions to Button 2. Once assigned, depressing
Button 2 on the Remote Control will cause that function to be performed.
Src
Allows you to switch to other video sources attached to the Projector. This function behaves
the same as the Source button on the Projector and the Annotation option.
Frz
Allows you to freeze and unfreeze the projected image. This function behaves the same as
the Freeze function on the WritingPad option.
Mute Disables or enables audio for the projected image. This function is the same as the Mute
button on the Annotation device.
Rcv
Re-Cover restores a full screen Cover.
The Pointer is an arrow that can be accessed with the Remote Control (see
Remote Control section of this document). You may change the Pointer color to any of 8 colors. The
color you select is displayed in the upper right-hand corner of the Pointer Color selection and will become
the Pointer color when you exit the Preferences Menu. If the Pointer is selected when Pointer Color
change is made, the Pointer color will change immediately. If the Pointer is not selected, the Pointer
Color change will take effect on the next use of the Pointer.
Tablet Select
Auto
PPal
WPad
The Tablet Select is used to select a tablet when using a tablet splitter. If you
are not using a splitter, the default auto box should remain checked. If you are using a splitter, check the
box that reflects which tablet you are using; Ppal for PenPal, or Wpad for WritingPad.
Aurora S500
Page 26
______________________________________________________________________________
Information
Menu
The Information Menu allows you to view information
about your current video source and gives access to
diagnostic information regarding the Projector.
The
diagnostic information is useful to our technical support
staff when diagnosing problems.
Press the Menu
key and then the Information
key
and the Information Menu to the right will be displayed. To
exit the menu, press the Menu
key. If you have the
Annotation option, you may also exit the menu by
depressing the fingertip of the hand
Information Menu exit
symbol on the
button.
When the Information Menu is selected, the
keys on
the Projector and the Remote Control Pad may be used to
center the image in the display. W hen these keys are
used the new image position is displayed in the Horizontal
Offset and Vertical Offset of the Information Menu. If you have the Annotation option, you may position
the image by depressing the fingertip of the hand
Information Menu.
symbol on the appropriate
key displayed on the
When the
keys are operated in this mode, each of the four corners of the display will be marked with a
highlight line to assist in aligning the projected image. The type of video being displayed determines the
placement of the highlight lines. To properly position the image, display a full screen of information and
move the image with the
keys until the edges of the image and the highlight lines overlap.
If you have the Annotation option, you may touch the
keys on the projected image with the fingertip
of the hand
symbol to make adjustments.
The Lamp Life displayed on the Information Menu indicates the percentage of Lamp life remaining before
the Lamp shutdown counter begins. When the Lamp Life counter reaches zero percent a countdown of
the remaining hours of Lamp life will be displayed each time the Lamp is lit. This message will clear after
a few seconds or may be cleared instantly by depressing any key on the Projector, Remote Control, or a
button on the Annotation option. To avoid a complete shutdown of the Projector, a replacement Lamp
should be installed before the countdown reaches zero. See the Care an Maintenance Section for
information on replacing the Lamp and resetting the Lamp Counter.
Aurora S500
Page 27
_____________________________________________________________________________
Aurora S500
Page 28
______________________________________________________________________________
Remote Control
The Remote Control provides the ability to control a presentation, your computer mouse, and the
Projector. The Remote Control is operated by batteries that may be changed by removing the cover on
the bottom. The unit uses infrared light to transmit your instructions to the Projector. The infrared
receivers are located to the right of the lens and top-rear of the Projector. To ensure proper operation,
the transmitter needs a clear path from the transmitter to the Projector. Obstructing the path with your
hand or some other object will reduce the effectiveness of the Remote Control. For best operation point it
at the projected image or directly at the Projector. With new batteries, the range of the Remote Control is
approximately 40 feet including reflections. As the battery power diminishes with use or age, the range
will diminish.
Remote Control Summary
The Remote Control has 7 controls:
1. A Trigger key located in the handle simulates a left mouse button.
2. A large Pressure Pad located at the top controls direction and speed
of movement.
3. A Mouse/Pointer/Volume button located directly below the Pressure
Pad switches control between the Mouse, the Pointer and Volume
control.
4. Cover (Button 1) enables and disables the Cover feature.
5. Select (Button 2) activates one of four preprogrammed features:
Source, Freeze, Mute and Re-Cover (see Preference Menu).
6. Menu (Button 3) allows access to all the Projector controls.
7. Right Mouse (Button 4) simulates the right mouse button.
Aurora S500
Page 29
_____________________________________________________________________________
Pressure Pad
The Pressure Pad
controls the speed and direction of movement. The position of your finger or
thumb on the edge of the Pressure Pad determines the direction. The pressure you apply to that position
determines the speed. For very slow movement, apply light pressure. To accelerate or move at higher
speeds, increase pressure.
The Pressure Pad is used to move the Mouse or Pointer (Center Button), Cover (Button 1), or make
selections from the Projector Menus (Button 3). When used with the Menus, movement is restricted to
left, right, up and down using the left, right, top and bottom edge of the Pressure Pad, respectively. When
used with Cover, the direction of movement is determined by the Cover Direction selected in the
Preference Menu.
Mouse/Pointer/Volume
The Mouse/Pointer/Volume (Center Button)
controls the selection of either your computer
Mouse, a Pointer generated by the
Projector, or Volume. The Pressure Pad controls
the Mouse, Pointer or Volume depending on which is selected. At power-on the Mouse is selected.
Depressing the Mouse/Pointer/Volume button will toggle the selection between the Mouse, Pointer and
Volume control. The feature selected is shown with a brief prompt on the projected image unless OnScreen Prompts have been disabled in the Preference Menu. For the Mouse selection to operate, the
proper mouse must be selected on the Preference Menu and the appropriate cables and/or adapter must
be attached to the Projector. Follow the instructions under Projector Setup in the Introduction for
installing the Mouse. When Volume is selected, the Pressure Pad allows you to move the volume up and
down.
Left Mouse Button
Trigger
The Trigger key, located underneath the Remote Control, operates the Left Mouse Button. As mentioned
above, the Mouse must be properly selected and connected for the Mouse features to operate. The
Trigger key is enabled at all times for activating the Left Mouse Button.
Aurora S500
Page 30
______________________________________________________________________________
To click, pull the Trigger once. To double click, pull the trigger twice. To drag, ensure that the Mouse is
selected (Mouse/Pointer/Volume button) then pull the trigger and hold while you move the mouse with the
Pressure Pad.
Right Mouse Button
Button 4 controls the Right Mouse Button. As mentioned above, the mouse must be properly selected
and connected for the Mouse features to operate. Button 4 is enabled at all times (except in Notepad
when using the Annotation accessory) for activating the Right Mouse Button.
To click the Right Mouse Button, momentarily depress Button 4. To double click, momentarily depress
Button 4 twice. To drag, ensure that the Mouse is selected (Mouse/Pointer button) then depress Button 4
while you move the mouse with the Pressure Pad.
Cover
Cover is an electronic sheet of paper that can be instantly placed over the projected video and moved
with the Pressure Pad to reveal the video information under it. Depress Button 1 to enable or disable the
Cover. When enabled the Cover is restored to its last mov ed position. You can change the Cover color
and the direction of movement in the Preference Menu.
Select
Select is a programmable key that can be set to any of 4 functions by changing the setting of Remote
Button 2 in the Preference Menu. The default setting is Source (Src). The functions are:
Source (Src)
Switches to other video sources attached to the Projector. This function is the
same as the Source key on the Projector and the Annotation devices.
Freeze (Frz)
Freezes and unfreezes the projected image. This function is the same as the
Freeze button on the WritingPad.
Mute
Mute disables or enables the audio for the selected Source (projected image).
This function is the same as the Mute button on the Annotation devices.
Re-Cover (Rcv) Restores the Cover over the entire projected image.
Aurora S500
Page 31
_____________________________________________________________________________
Menu
Menu activates and deactivates the Projector menus. This button behaves the same as the Menu button
on the Projector and on the Annotation device. Once the Menu has been activated, depressing an edge
of the Pad will select a specific menu. The edges of the Pad correspond directly to the Menu items. For
example, depressing the top edge of the Pad would select the Preference Menu.
Once a Menu has been selected, each successive depression of the top or bottom of the Pad will move
the Menu item selector up or down one item. The selected Menu item is denoted by a red box outlining
the item. Once a Menu item has been selected, applying pressure to the left or right edge of the Pad can
change it. For Menu items with slider adjustments, continuous pressure on the left or right edge will
provide continuous movement of the slider. For Menu items with discrete selections, each depression of
the left or right edge of the Pad will change the selected item. See discussion on the Menu system in the
following sections for more information. To exit the Menu, depress the Menu button.
Mouse Control
Before you can control your computer mouse with the Remote Control, the Projector must be properly
connected to your computer. Follow the instructions under Projector Setup.
Once the Mouse is properly connected, the Left Mouse button (Trigger) and Right Mouse button (Button 4)
control the left and right mouse buttons respectively and are active at all times. The Pad controls the
movement of the mouse.
Therefore, to move the Mouse, it must be selected with the
Mouse/Pointer/Volume button.
Click and double click are available at all times with the Left and Right Mouse buttons (Trigger and Button
4). To drag, depress the Left or Right Mouse button (Trigger or Button 4) as required and apply light
pressure to the Pad while in Mouse mode.
The edge of the Pad determines the direction and the amount of pressure on the edge of the Pad
determines the speed of mouse movement.
Aurora S500
Page 32
______________________________________________________________________________
Power On/Off from the Remote Control
Once the Projector has been connected to an external power source, it may be powered-up or powered
down from the Control Panel on the Projector or from the Remote Control.
To power-up the Projector with the Remote Control, depress any of the four numbered keys (1-4).
To power-down the Projector with the Remote Control, perform the following with the Remote Control:
•
•
Depress the Menu key (Button 3)
Pull the Trigger three times
Depress the Menu key (Button 3) to cancel and exit the Menu.
Presentation Control
As mentioned above, the Left and Right Mouse buttons (Trigger and Button 4) control the left and right
mouse button of your computer. This is handy when using presentation applications that use the left and
right mouse buttons to move forward or backward to the next slide.
In addition, you may enable a Pointer with the Mouse/Pointer/Volume button and use it to point or draw
attention to your subject while still maintaining control of your slide selection with the mouse buttons. The
Pointer is enabled and disabled by depressing the Mouse/Pointer/Volume button. You may change the
color of the Pointer with the Preference Menu. You can also use the Mouse instead of the Pointer with the
same button control.
For further presentation control, you may activate Cover, which is an electronic sheet of paper that can be
used to progressively reveal or hide presentation material. The color of the Cover and the direction that
you would like to move it can be set in the Preference Menu. Once selected, the Cover is moved with the
Pad in the same way that you would move the Pointer or Mouse.
Simply touching the corresponding button does switching between Cover and Pointer or Cover and
Mouse. The Pad will always control the last selected item.
Projector Control
The Menu (Button 3) provides access to the Projector menus and once activated the Pad controls all
access to Menu changes.
Additionally, Select (Button 2) can be programmed from the Preference Menu to provide switching of
video sources, freezing of video, re-covering the video, or muting of sound.
Aurora S500
Page 33
_____________________________________________________________________________
ANNOTATION OPTION
The Annotation option allows you to electronically write on your projected image independent of the
video sources that you may have attached, control an optional mouse, and make adjustments to the
Projector. The Annotation device consists of a writing Tablet that plugs directly into the Projector
(Tablet connector) and a Pen. There are two types of Annotation devices: WritingPad and PenPal.
Each is discussed in the following pages.
CAUTION: Do not use the Tablet on top of a monitor, as a monitor generates radio frequency noise that
may cause the Tablet to give unpredictable results.
PenPal
The PenPal Annotation option is a small annotation device that is
designed for simplicity and ease of use. When properly connected,
PenPal will perform as follows.
Use of the PenPal Tablet
The Tablet is used for writing on the projected image, controlling the Projector, or controlling a mousebased application (PC Mouse Adapter control is included, Macintosh Mouse Adapter is an additional
option). Controlling a mouse-based application requires the proper cable or adapter and compatible
mouse driver software in your computer. See the discussion on the Mouse
more information.
Tool in this section for
The Tablet surface consists of Touch Buttons and a Writing Area. The Writing Area is the Tablet area on
which all writing is done and corresponds to the projected image. The Touch Buttons are an array of
buttons across the top of the Writing Area that activate the various features of PenPal.
A Power light in the upper right hand corner of the Tablet provides operational information about the
Tablet. An orange Power light indicates power is present at the Tablet. A green Power light indicates that
power is present at the Tablet, the Pen is in proximity, and a Pen button is depressed.
Power Light
Touch Buttons
Writing Area
Aurora S500
Page 34
______________________________________________________________________________
Features of the PenPal Pen
The Pen does not require batteries to operate. Once the Tablet is connected and the Projector is
powered on, the Pen is active whenever it is in proximity of the Writing Area. Proximity means either end
of the Pen is near the surface of the Writing Area and the Pen is not touching the surface.
The Pen is very simple. It has the appearance of a pencil with an eraser and a rocker switch on the side.
The Pen is used to select features from the Touch Buttons, write on the projected image, adjust the
Projector, or control your computer mouse. An icon will appear on the projected image whenever the
Pen is in proximity of the Writing Area. The icon identifies the selected PenPal feature. The position of
the icon is changed by moving the Pen within the Writing Area while in proximity.
Upper Rocker Switch
Eraser
PenPal Pen
Lower Rocker Switch
Tip
The tip of the Pen contains a switch that can be activated when the Pen is in proximity of the Writing Area
or the Touch Buttons. When PenPal is in a writing mode, this switch activates writing and the amount of
pressure applied determines the line width. When in a mouse mode, this switch activates the left mouse
button and pressure is ignored. When in a Projector control mode, this switch allows you to select
Projector features and make Projector adjustments and pressure is ignored.
The eraser of the Pen also contains a pressure sensitive switch that can be activated when the Pen is in
proximity of the Writing Area or the Touch Buttons. When PenPal is in a writing mode, this switch
activates a large eraser. When in mouse mode, this switch activates the double left click mouse button.
When in a Projector control mode, this switch allows you to select Projector features and make
Projector adjustments and pressure is ignored.
To select a PenPal feature, depress the Pen tip on the desired feature in the Touch Button area. If the
feature selected is momentary, such as a left or right mouse click, the operation is performed immediately
and the last used feature remains unchanged. If the feature selected performs a function, such as moving
the mouse or writing, the Pen will display an appropriate icon showing the feature selected.
Moving the icon on the image is very much like moving a mouse. The easiest way to use the Pen is to
place it in proximity of the Writing Area, look at the projected image, position the icon, and press the Pen
tip to the Writing Area to perform the selected function.
At initial power on the Pen is enabled as a Red pencil. If a mouse is not available, the mouse Touch
Buttons will be ignored.
Aurora S500
Page 35
_____________________________________________________________________________
Enable Eraser
unused
Pointer & Eraser
Pointer, Writing
& Eraser
Writing Mode
Enable Right Mouse Click
unused
Pointer &
Double Left
Mouse Click
Pointer & Left or
Right Mouse Click
Mouse Mode
Select
unused
Pointer &
Select
Pointer & Select
Projector Control
NOTE: The lower half of the rocker switch behaves as an eraser when in writing mode, a select button
when in Projector control mode, and a right mouse button when in mouse mode. The upper half of the
rocker switch is not used.
NOTE: To activate the pencil end switch, it must be depressed on the Writing Area or Touch Buttons. To
activate the eraser switch, the Pen must be turned over and the eraser depressed on the Writing Area.
Touch Button Descriptions
The Touch Pad of PenPal consists of 13 buttons. The first 3 buttons
,
mouse, if the mouse is attached. Each of the four-color buttons
Pencil for writing in the selected color. The Projector controls
, and
control the
selects a
,
and
allow you to turn sound
off and on, select alternate v ideo sources, and access the Projector menus. The Pads
and
allow
you to select the Notepad for giving examples and explaining ideas or the Videopad for direct annotation
of the video source. The last button,
, allows you to instantaneously erase all annotation from the
projected image. Below is a more detailed discussion of each of these features.
Aurora S500
Page 36
______________________________________________________________________________
Mouse
The Mouse provides the ability to control a mouse-based application program. The Mouse Type setting
(PC or MAC) in the Preferences Menu determines which type of mouse you have selected. Use of the
Mouse
Tool with a Microsoft-compatible mouse driver requires the PC Mouse Y Cable to be attached to
Mouse connector of the Projector and to the mouse serial port of your computer, and a Mouse Type of
PC selected in the Preferences Menu. A connector adapter is provided if you are using a 25-pin
connector. You may also attach your computer mouse to the short cable of the PC Mouse Adapter cable.
Once attached, you may use either mouse, but not both simultaneously.
The Macintosh Mouse Adapter is available and may be purchased separately. Use of the Mouse
Tool
with the Macintosh Mouse Adapter requires installation of a driver, connection of the Macintosh Mouse
Adapter to the Mouse connector of the Projector and to the ADB port of your Macintosh, and a Mouse
Type of MAC selected in the Preferences Menu.
Once the mouse is properly installed, depressing the Pen tip on the Mouse
Tool will allow the PenPal
Pen and Tablet to become a Microsoft-compatible mouse or a Macintosh mouse, depending on which
mouse you installed and the Mouse Type setting of the Preferences Menu.
The tip of the Pen serves as the mouse button for a Macintosh or as the left mouse button for a Microsoftcompatible mouse. The lower half of the barrel button is equivalent to the Macintosh button or the right
button on a Microsoft-compatible mouse. The eraser end of the Pen is equivalent to a double left mouse
click.
Lower Rocker Switch
Upper Rocker Switch
Eraser
Tip
To use the Mouse, depress the Pen tip on the Mouse
Tool. Position the mouse on the image by
moving the Pen tip over the Writing Area while it is in proximity. To activate the left mouse button,
position the mouse to the desired position and depress the Pen tip. To activate the right mouse button,
position the mouse to the desired position, depress the lower barrel button, and then depress the Pen tip.
To double click the left mouse button, turn the Pen over so that the eraser end is in proximity and position
the mouse to the desired position, and depress the Pen eraser.
You may also double click the left mouse button by depressing the Pen tip twice. If you use this method,
be sure to keep the mouse position stationary between clicks or it will be detected by your application
software as two single clicks rather than one double click.
Left and right mouse clicks are also directly activated with the Mouse Click
buttons. When using
these Touch Buttons, the actions are taken immediately and the last selected Tool of the Pen remains
unchanged.
Aurora S500
Page 37
_____________________________________________________________________________
If the Pen should reach the edge of the Writing Area and the Mouse still has not reached the edge of the
image, simply move the Pen to the opposite side of the Writing Area and back, keeping the Pen in
proximity while you move it.
NOTE: To ensure that your PC correctly identifies the Microsoft-compatible mouse, the Projector must
be powered-on before your PC is powered-on.
NOTE: If you can adjust the mouse driver settings, we recommend a slow mouse speed and a medium
speed double click with acceleration not selected.
NOTE: If the Mouse
Tool is selected when you switch a video Source, the Mouse
Tool will
automatically be de-selected. This is done to minimize the chance of accidentally activating the mouse
while viewing a different video Source, for example, a VCR. The Mouse
mode; however, you must re-select it to use it.
Tool is still available in this
Left Mouse Click
The Left Mouse Click
button simulates the left mouse button of your personal computer mouse. To
activate the left mouse button, momentarily depress the Pen tip on the Left Mouse Click
double click, depress the Pen tip twice on the Left Mouse Click
button. To
button.
Right Mouse Click
The Right Mouse Click
button simulates the right mouse button of your personal computer mouse. To
activate the right mouse button, momentarily depress the Pen tip on the Right Mouse Click
To double click, depress the Pen tip twice on the Right Mouse Click
button.
button.
Pencil
There are four (4) colored Pencils available. Touching a color button selects that colored Pencil for
writing. Each Pad retains its last used color; therefore, switching between Videopad and Notepad will
automatically restore the last selected Pencil color. The available colors include red, green, blue and
yellow.
Sound Control
The Sound Control button enables and disables sound at the Projector speaker or external speakers
attached to the Projector.
Aurora S500
Page 38
______________________________________________________________________________
Source Selection
Up to six (6) video sources may be connected simultaneously to the Projector (PC or Macintosh on RGB
1 and RGB 2, S-Video on Video 1 and Video 2, composite video on Video 1 and Video 2). The Projector
Source button is used to switch between the connected sources.
Menu Selection
The PenPal Menu button provides access to the Preferences, Video, Information and Audio menus. Refer
to the Menu section of this Owner’s Manual for information on each of these menus.
Menu may also be used to turn the Projector Lamp on or off. When the Projector Lamp is off,
depressing the Pen on the Menu button will turn the Lamp on. When the Projector Lamp is on,
depressing the Pen on the Menu button will bring up the Menu and the message “Press Tablet Erase To
Power Down” will appear in red. To turn off the Lamp, depress the Pen on the Erase button.
Notepad
The Notepad is a writing pad for doing examples, explaining ideas or taking notes. To select the Notepad,
simply depress the Pen tip on the Notepad
button.
The color of the Notepad may be changed at any time with the Preferences Menu. If you change the
Notepad color, PenPal will automatically assign a suitable writing color. You may change the assigned
writing color at any time using the Color buttons.
Videopad
Videopad displays your selected video source as your writing pad. To select the Videopad, simply
depress the Pen tip on the Videopad
button. The Videopad may be used the same as the Notepad
except that the background is your selected video source.
Erase
Selecting Erase will cause all PenPal written information on the projected image to be erased.
may also be used to turn the Projector Lamp off. See Menu Selection above.
Aurora S500
Page 39
_____________________________________________________________________________
WritingPad
Use of the WritingPad Tablet
The Tablet is used for writing on the projected image, controlling the
Projector, or controlling a mouse-based application. Controlling a
mouse-based application requires the proper cable or adapter and
compatible mouse driver software in your computer. See the
discussion on the Mouse
information.
Tool in this section for more
The surface consists of Touch Buttons and a Writing Area. The
Writing Area is the area on which all writing is done and corresponds
to the projected image. The Touch Buttons are an array of buttons
along the side and top of the Writing Area that activate the various
features of the Annotation device.
A blinking Power light indicates power is present at the Tablet. A
steady Power light indicates that power is present at the Tablet and
the Pen is in proximity. A steady Ready light indicates the Tablet is
operational.
Features of the WritingPad Pen
The Pen is used to write on the projected image or to select or control features of the Annotation device,
the Projector, or your application program. Writing or drawing is done in the Writing Area located
adjacent to the Touch Buttons. This Writing Area corresponds to the projected image. The Pen functions
are selected by depressing the Pen tip on a Touch Button(s) located along the edge of the Tablet.
A symbol will appear on the projected image whenever the Pen is in proximity of the Writing Area.
Proximity means the Pen tip is near the surface of the Writing Area and the Pen tip is not depressed. The
symbol identifies the selected WritingPad feature. The position of the symbol is changed by moving the
Pen within the Writing Area while in proximity.
Moving the symbol on the image is very much like moving a mouse. The easiest way to use the Pen is to
place it in proximity of the Writing Area, look at the projected image, position the symbol, and press the
Pen tip to the Writing Area to perform the selected function.
The Pen has three moveable sensors: a Pen tip and two barrel buttons on the side of the Pen.
Depressing the Pen tip on a Touch Button selects that feature. Depressing and moving the Pen tip in the
Writing Area causes the selected Tool to be performed in the last selected Color and Size.
Aurora S500
Page 40
______________________________________________________________________________
If the Pen Barrel Buttons are set to Standard (Std) in the Preferences Menu, the lower barrel button may
be used to erase small areas with the Pencil Eraser
and the upper barrel button may be used to erase
large areas with the Large Eraser
. If the Mouse
Tool is selected, the lower barrel button is a right
mouse click and the upper barrel button is a double left mouse click. If Pen Barrel Buttons are set to
Custom in the Preferences Menu, the Pen barrel buttons can be programmed. The Pen Barrel Buttons
are initially Off; however, the Large Eraser
feature is always directly available as Touch Button Tool
.
The Pen is operated with batteries, which should provide about one year of service before replacement is
necessary. The batteries used are standard products that can be purchased at any store that sells
calculators, cameras or watches. See the Service Information section of this Owner’s Manual for more
details.
IMPORTANT NOTE: To conserve power, the Pen will automatically shut down if the Pen tip or barrel
buttons have not been used for more than a minute. To awaken the Pen, simply press any barrel button
or the Pen tip. When storing the Pen, ensure that the Pen tip and barrel buttons are not depressed in
order to avoid an unnecessary drain on the batteries. If the Pen is placed in a pencil holder, be sure that
the Pen tip is up. If the Pen is placed in your pocket, be sure the Pen clip is adjusted so that the Pen tip
does not reach the bottom of your pocket.
Aurora S500
Page 41
_____________________________________________________________________________
Touch Button Descriptions
The Touch Buttons are divided into 8 categories: Icons, Erase, Mouse Clicks, Tools, Pads, Colors, Sizes
and Projector control. Below is a detailed discussion of each of these Touch Button features.
Icons
The WritingPad includes three (3) libraries of twenty (20) Icons each. Icons can
be placed anywhere on the projected image. To select an Icon library, depress the
Pen tip on the Select Template button and a Select Template Menu will be
displayed. Using the Pen, touch the fingertip of the hand
symbol on the
template of interest and the 20 Icons of the selected template will be
displayed. When the desired icon set is displayed, select it by
depressing the fingertip of the hand
symbol on the exit
the upper left-hand corner of the Template Menu.
button in
Now select the corresponding paper Icon
Template from the set of three (3) Icon
Templates that were included with the
WritingPad. Place the Icon Template under
the plastic Tablet overlay and position the Icons
under the buttons to the right of the Select
Template button. The name of the template
will appear adjacent to the word Template
below the Writing Area and the Icons will
appear to the right of the Select Template
button when the paper template is correctly
positioned.
You only need to use Select Template when
changing libraries. Once a library has been
selected, the WritingPad will remember your
selection the next time you power-on.
To select an Icon, depress the Pen tip on the desired Icon. The symbol on the projected image when the
Pen is in proximity of the Writing Area will now be the Icon you selected. You may use this Icon as a
pointing device or to place copies of it on the projected image. To place a copy of the Icon on the
projected image, move the Icon symbol to the area you wish to mark and depress the Pen tip. If an Icon
has a wild color, the last Color selected will replace the wild color. You can identify the wild color Icons by
changing Color when a Select Template library is being displayed.
To move an Icon that has been placed on the image, position the Tool or Icon symbol near the center of
the Icon. When the hand
symbol appears, depress the Pen tip and move the Icon to the desired
position. Only the first 36 Icons that have been placed on the image may be moved. Icons may be
erased the same as other WritingPad-generated information. To discontinue the use of an Icon, simply
select another Icon or any Tool.
Aurora S500
Page 42
______________________________________________________________________________
Erase
The Erase
button will erase all WritingPad-generated information from the displayed image. To use
Erase, depress the Pen tip on
be instantly erased.
and all WritingPad-generated information on the projected image will
There are also three other ways to erase WritingPad-generated data.
areas in Videopad
and cuts holes in Notepad
, and
erases large areas,
erases
allows you to create custom erasers.
Pads
All WritingPad activities are performed in either Notepad
or Videopad
mode. The Tool or Icon,
Color and Size that you select in each Pad are automatically sav ed and restored when you switch between
Pads. The Cover and Re-Cover Pads operate on the Videopad by attaching a sheet of electronic paper
that can be moved about the image to reveal information on the Videopad.
Notepad
The Notepad is a writing pad for doing examples, explaining ideas or taking notes. To select the
Notepad, simply depress the Pen tip on the Notepad
button. The color of the Notepad may be
changed at any time with the Preferences Menu. If you change the Notepad color, the
WritingPad will automatically assign a suitable Tool color. You may change the assigned Tool
color at any time using the Color buttons.
The Scissors
Tool allows you to cut holes in the Notepad creating video windows for viewing
your selected video source. These video windows can be erased by shrinking them until they
disappear, moving a Box
over the windows.
over the windows, touching Erase
, or moving another window
Aurora S500
Page 43
_____________________________________________________________________________
Videopad
Videopad displays your selected video source as your writing pad. To select the Videopad, simply
depress the Pen tip on the Videopad
button. The Videopad may be used the same as the
Notepad except that the background is your selected video source. The Scissors
you to erase large areas of the Videopad.
Tool allows
Re-Cover
The Re-Cover
button creates an electronic paper overlay on the Videopad. Selecting Re-
Cover
, will cause the Videopad to be selected and an electronic sheet of paper to be placed
over the Videopad image. Any previously written WritingPad data will be erased. To reveal the
Videopad, place the Pen tip over the Cover in proximity of the Tablet and a direction icon will
appear. To move the Cover , depress the Pen tip while the direction symbol is present and
move the Pen in the allowed directions to move the Cover .
Cover
The Cover
button selects the Videopad and restores the last position of the Cover
Videopad. Any WritingPad data that is beneath the Cover
is destroyed.
on the
Tools
The Tools menu provides access to the WritingPad erasers, mouse and writing features. Each Tool
remains selected until changed by another Tool, Icon or Pen button selection. The last used Tool is
retained with each Pad; therefore, switching Pads will restore the Tool.
Aurora S500
Page 44
______________________________________________________________________________
Scissors
The Scissors
Notepad
allows you to erase large areas of the Videopad
or to cut windows in the
allowing you to view video through it. To erase with the Scissors
in Videopad
, depress the Pen tip on the Scissors
Tool, position the center of the Scissors
symbol at
any corner of a rectangular area to be erased, depress the Pen tip and draw a diagonal of the
area to be erased. The Scissors
will generate a dotted rectangle as the diagonal is drawn and
all WritingPad data within the rectangle will be erased.
To cut a window in the Notepad
, depress the Pen tip on the Scissors
Tool, position the
center of the Scissors
symbol at any corner of the window to be cut, depress the Pen tip and
draw a diagonal of the window. The Scissors
will cut a window as the diagonal is drawn and all
WritingPad data within the window will be erased. Once the window is drawn it may be moved
and re-sized the same as a Frame
or Box
(See Manipulating
and
Objects). To
erase a window, either reduce its size until it disappears, erase it by moving a box
touch the Erase
over it, or
button.
Mouse
The Mouse provides the ability to control a mouse-based application program. The Mouse Type
setting (PC or MAC) in the Preferences Menu determines which type of mouse you have selected.
Use of the Mouse
Tool with a Microsoft-compatible mouse driver requires the PC Mouse
Adapter cable to be attached to the Mouse connector of the Projector and to the mouse serial
port of your computer, and a Mouse Type of PC selected in the Preferences Menu. An adapter is
provided if you are using a 25-pin connector.
The Macintosh Mouse Adapter is available and may be purchased separately. Use of the Mouse
Tool as a Macintosh mouse requires installation of a driver, connection of the Macintosh Mouse
Adapter to the Mouse connector of the Projector and to the ADB port of your Macintosh, and a
Mouse Type of MAC selected in the Preferences Menu.
Once the mouse is properly installed, depressing the Pen tip on the Mouse
Tool will allow the
WritingPad Pen and Tablet to become a Microsoft-compatible mouse or a Macintosh mouse,
depending on which mouse you installed and the Mouse Type setting of the Preferences Menu.
The tip of the Pen serves as the mouse button for a Macintosh or as the left mouse button for a
Microsoft-compatible mouse. The lower barrel button is equivalent to the Macintosh button or the
right button on a Microsoft-compatible mouse. The upper barrel button is equivalent to a double
click of the Macintosh button or double click of the left button of a Microsoft-compatible mouse.
Aurora S500
Page 45
_____________________________________________________________________________
The Pen Barrel Buttons must be set to STD in the Preferences Menu for the Pen barrel button
mouse features to work.
Right Mouse Button
Double Click/Left Mouse Button
Left Mouse Button
To use the PC mouse, depress the Pen tip on the Mouse
Tool. Position the mouse on the
image by moving the Pen tip over the Writing Area while it is in proximity. To activate the left
mouse button, position the mouse to the desired position and depress the Pen tip. To activate the
right mouse button, position the mouse to the desired position, depress the lower barrel button,
and depress the Pen tip. To double click the left mouse button, position the mouse to the proper
position, depress the upper barrel button, and depress the Pen tip. The Macintosh mouse
behaves in a similar manner.
You may also double click the left mouse button by depressing the Pen tip twice. If you use this
method, be sure to keep the mouse position stationary between clicks or it will be detected by
your application software as two single clicks rather than one double click. Holding the Pen
vertical to the Tablet while clicking will reduce the chance of the mouse moving between clicks.
The double click of the upper barrel button is set for medium speed, so you may need to adjust
your mouse driver accordingly for it to work properly.
Left and right mouse clicks are also directly activated with the Mouse Click
Mouse Click section below). These Mouse Clicks
Tool or Pad.
buttons (see
operate independently of the selected
If the Pen should reach the edge of the Writing Area and the mouse still has not reached the edge
of the image, simply move the Pen to the opposite side of the Writing Area and back, keeping the
Pen in proximity while you move it.
NOTE: To ensure that the Microsoft compatible Mouse is correctly identified by your PC, the
Projector must be powered-on before your PC is powered-on.
NOTE: If you can adjust the mouse driver settings, we recommend a slow mouse speed and a
medium speed double click with acceleration not selected.
NOTE: If the Mouse
Tool is selected when you switch a video Source, the Mouse
Tool will
automatically be de-selected. This is done to minimize the chance of accidentally activating the
mouse while viewing a different video Source, for example, a VCR. The Mouse
available in this mode; however, you must re-select it to use it.
Aurora S500
Tool is still
Page 46
______________________________________________________________________________
Frame
Frame allows you to create a rectangular frame for diagramming or framing areas of interest. To
create a frame
, select the Frame
corner of the Frame
Tool with the Pen tip, position the upper right-hand
symbol at a corner of the frame
draw a diagonal of the frame
to be drawn, depress the Pen tip,
, and release the Pen tip. The frame
diagonal is being drawn. After the Pen tip is released the frame
selected Color and Size.
A previously drawn frame
Erase
may be erased with a Box
is displayed in the last
, Large Eraser
, or by shrinking it until it disappears. See Manipulating
information on moving and re-sizing a Frame
is generated while the
and
, Pencil Eraser
,
Objects for
.
Box
Box allows you to create rectangular objects, mini writing pads, hide video information, highlight
video information, or create erasers of any size. To create a box
position the upper right-hand corner of the Box
depress the Pen tip, draw a diagonal of the box
, select the Box
symbol at a corner of the box
Tool,
to be drawn,
, and release the Pen tip. The box
is
generated while the diagonal is being drawn. To highlight information, select the
Color
before you draw the box. To create a box of any color, select the Color before drawing the box.
To hide information, draw a box
over the information you wish to hide in any color except the
Color. To erase any WritingPad information or erase any holes in Notepad, move a box
over the area to be erased.
Any box may also be used as a mini writing pad. Once the box is created it can be moved or resized by activating a corner of the box (See Manipulating
and
Objects). To erase
information written on a box, simply activate a box corner with the Pen as you would if you were
going to move or re-size the box. A box may be erased by shrinking it until it disappears.
Aurora S500
Page 47
_____________________________________________________________________________
Manipulating
The Frame
and
Objects
and Box
Tools create objects (
and
) that can be moved or re-sized.
These operations are performed by grabbing a corner of a frame
or box
as described
below. Any tool except Mouse
may be selected.
To move a frame
, position the current Tool symbol inside the lower left-hand
or box
corner or the upper right-hand corner of the object until the hand
symbol appears. Depress the
Pen tip, move the object to the desired location, and release the Pen tip.
To re-size a frame
or box
, position the Tool symbol inside the upper left-hand corner or
the lower right-hand corner of the object until the re-size
symbol appears. Depress the Pen tip
and expand or shrink the object to the desired size by expanding or shrinking the diagonal.
Release the Pen tip when the object is the desired size. Activating any corner will also cause any
WritingPad-generated data on the frame
or box
to be erased.
Up to eighteen (18) frame
and box
objects may be moved or re-sized. If more than
eighteen 18 objects are created, only the first sev enteen (17) and the last one may be
manipulated.
A frame
or box
drawn over previously generated WritingPad information will erase that
information. Moving or expanding a box
over. Erasing any corner of a frame
frame
or box
disappears.
. A frame
will destroy any WritingPad information it passes
or box
or box
will destroy the ability to move or re-size that
may also be destroyed by shrinking it until it
Large Eraser
The Large Eraser is available as a Tool
and conditionally available (see Preference Menu) on
the upper barrel button of the Pen. When the Large Eraser is selected by either method, the Tool
symbol will change to a
and allow you to erase any WritingPad data that passes under
while the Pen tip is depressed. When you are done erasing, select another Tool.
Aurora S500
Page 48
______________________________________________________________________________
Upper Barrel Button
If Pen Barrel Buttons is STD in the Preferences Menu, depressing the upper Pen barrel button will
temporarily switch the Tool to a Large Eraser
and allow you to erase any WritingPad data
that passes under the Large Eraser
while the Pen tip is depressed. Release the Pen barrel
button and the Pen tip will restore the last used Tool.
Pencil
The Pencil allows you to electronically write or draw in the last selected Color and Size. To select
the pencil, depress the Pen tip on the Pencil
Tool. To write or draw, position the Pencil
tip to your starting point, depress the Pen tip, and begin writing or drawing while keeping the Pen
tip depressed. To change the color or size, simply depress the Pen tip on the desired Color or
Size button.
Mouse Clicks
Once the mouse has been properly connected, the Mouse Click buttons directly activate the left and right
mouse buttons regardless of the Tool selected. Ignore the Right Mouse Click if your computer mouse is a
single button mouse.
Left Mouse Click
The Left Mouse Click
button simulates the left mouse button of your personal computer
mouse. To activate the left mouse button, momentarily depress the Pen tip on the Left Mouse
Click
button. To double click, depress the Pen tip twice on the Left Mouse Click
button.
Right Mouse Click
The Right Mouse Click
button simulates the right mouse button of your personal computer
mouse. To activate the right mouse button, momentarily depress the Pen tip on the Right Mouse
Click
button. To double click, depress the Pen tip twice on the Right Mouse Click
button.
Aurora S500
Page 49
_____________________________________________________________________________
Colors
Eight (8) colors and highlight are available with a Tool or Icon. Touching a Color button selects that color
for use with the selected Tool or Icon until another Color button is touched. Each Pad retains its last used
Color; therefore, switching Pads will automatically restore the selected Color. The available colors
include:
Cyan
Blue
Magenta
Red
If you select
Tool with Color
Notepad
White
Black
, any writing in Videopad
write over and in Notepad
Box
Yellow
Green
Highlight
will appear in the inverse color of the video color you
an inverse hole will be cut in the paper to reveal the video behind it. The
is very useful for highlighting video information in the Videopad
or the
.
Sizes
Touching a Size button will select a line thickness for the Frame
or Pencil
Tools. Where
appropriate, the size of the Tool symbol reflects the size selected. The size will remain selected until
changed. Each Pad retains its last used size; therefore, switching Pads will automatically restore the Size.
Fine
Fine allows you to draw or erase a thin line (2 pixels plus an outline). To select Fine, depress the
Pen tip on the Fine
Aurora S500
Size.
Page 50
______________________________________________________________________________
Medium
Medium allows you to draw or erase a medium line (3 pixels plus an outline). To select Medium,
depress the Pen tip on the Medium
Size.
Large
Large allows you to draw or erase a thick line (4 pixels plus an outline). To select Large, depress
the Pen tip on the Large
Size.
Bold
Bold allows you to draw or erase a bold line (6 pixels plus an outline). To select Bold, depress the
Pen tip on the Bold
Size.
Panel
The WritingPad Panel allows direct access to sound control, image freezing, video source switching, and
Projector menu access.
Sound Control
The Sound Control button allows you to turn the sound on or off for the projected Source. If
Prompts are enabled a message will appear indicating the current status of the sound. To toggle
the sound off or on, depress the Pen tip on the
button.
Freeze
The Freeze button allows you to freeze or unfreeze the projected image. To toggle Freeze off or
on, depress the Pen tip on the
button.
Aurora S500
Page 51
_____________________________________________________________________________
Source Selection
Up to six (6) video sources may be connected simultaneously to the Projector (PC or Macintosh
on RGB 1 and RGB 2, S-Video on Video 1 and Video 2, composite video on Video 1 and Video 2).
The Source button allows you to sequentially switch between connected sources. If Video 1 or
Video 2 has both a composite and S-Video connected, Source will select them individually.
Menu Selection
The WritingPad Menu button provides access to the Preferences, Video, Information and Audio
menus. Refer to the Menu section of this Owner’s Manual for information on each of these
menus.
NOTE: The Menu may also be used to turn the Projector Lamp on or off. When the Projector
Lamp is off, depressing the Pen on the Menu button will turn the Lamp on. When the Projector
Lamp is on, depressing the Pen on the Menu button will bring up the Menu and the message
“Press Tablet Erase To Power Down” will appear in red. To turn off the Lamp, depress the Pen on
the Erase
Aurora S500
button.
Page 52
______________________________________________________________________________
TROUBLESHOOTING
On the following pages is a list of problems and probable causes. If your problem can be identified from
the list, check the probable causes for a solution. If you continue to have trouble resolving your problem,
contact our customer support group at the number displayed on the Projector at power-up or the number
on the back of this Owner’s Manual.
If problems persist, you may do a factory reset of the Projector by performing the following procedure.
CAUTION: Factory reset will change all menu settings to original factory settings. Any Preferences,
Video, Audio or Information Menu changes you have made will be lost.
1. Power-down the Projector from the Control
Panel or the Remote Control and wait for the
fan to power off.
CAUTION: DO NOT REMOVE POWER CABLE WHEN THE PROJECTOR LIGHT IS ON AS
THIS MAY DAMAGE THE PROJECTOR LAMP!
2. Remove the power cable from the side of the Projector.
3. On the Projector keypad, depress the
4. While holding both keys simultaneously
5. Continue to hold both keys
and
keys simultaneously
.
, plug the power cable back into the Projector.
until the Projector flashes the LEDs on the Control Panel.
6. The original factory settings have now been restored.
Lamp will not light
•
•
•
•
•
The power cable is not connected or power source is off.
If the Power LED is repeatedly flashing red three times, the Lamp has been exhausted and must be
replaced. See the Lamp replacement procedure in this Operator’s Manual. If the Lamp has just been
replaced, try resetting the Lamp hour counter again (see Lamp Replacement procedure in the Care
and Maintenance section of this Operator’s Manual).
If the Power LED is repeatedly flashing red five times, an internal fan has failed. Contact your local
dealer for service.
If the Power LED is repeatedly flashing red seven times, the Projector has overheated. Contact your
local dealer for service.
Make sure the Lamp door is seated.
Aurora S500
Page 53
_____________________________________________________________________________
Fan failure message
• The Projector constantly checks for proper operation of the fan. If a fan failure occurs, the fan failure
message will appear. To clear a fan failure message condition, depress the Source key on the
Projector. To avoid damage to the LCD or the Lamp, discontinue the use of the Projector until the
fan can be serviced. Check for objects stuck in the fan.
No image on the Projector
•
•
•
•
•
•
•
Projector power cable not connected.
AC outlet defective.
Computer or video device power not on.
Video cable not secure or cable is defective.
No video signal present.
Incompatible video signal.
Notepad selected.
No image on monitor
•
•
•
•
•
•
•
Incompatible video signal.
Computer or monitor video cable not secure or cable is defective.
Monitor power off or disconnected.
Projector power supply not connected.
No video signal from computer.
Computer power off or disconnected.
Contrast or brightness is not adjusted properly on the monitor.
Flickering or unstable image
• Adjust Focus setting (Video Menu).
• Computer video cable not secure or cable is defective.
• Incompatible video signal.
Poor color or no color
•
•
•
•
•
•
•
•
•
Try factory settings. Select Reset (yes) from the Video Menu.
Adjust Color setting (Video Menu).
Adjust Tint setting (Video Menu).
Adjust Contrast setting (Video Menu).
Adjust Focus setting (Video Menu).
Wrong Inverse mode. Change Inverse state (Video Menu).
Video from computer is monochrome.
Computer video cable not secure or cable is defective.
Adjust room lighting.
Aurora S500
Page 54
______________________________________________________________________________
Split image or partial image
• Image alignment needed; use the left, right, up and down keys the Information Menu selected.
• Incompatible video signal from computer.
Visible bright or dark spots
• An inactive subpixel may appear as a bright or dark spot on the display. The Projector may contain as
many as 20 inactive subpixels or 0.002% of a total of 921,600 subpixels.
Source LED is red
• Video signal has been lost. Check that the video source is still operating and video cable is secure.
No audio from internal speakers
•
•
•
•
•
•
•
Enable Sound (Audio Menu, Remote Control or Annotation device).
Select Int Audio from the Audio Menu (Audio Menu, Remote Control or Annotation device).
Volume is too low. Adjust volume with Audio Menu or Remote Control.
Projector power cable not connected.
AC outlet defective.
Audio source turned off.
Audio source not connected to the selected video source.
No audio from external speakers
•
•
•
•
•
•
•
•
•
Enable Sound (Audio Menu, Remote Control or Annotation device).
Select Ext Audio from the Audio Menu (Audio Menu, Remote Control or Annotation device).
Volume is too low. Adjust volume with external amplifier, Remote Control or Audio Menu.
External speakers not connected or not adjusted properly.
Projector power cable not connected.
AC outlet defective.
Audio source turned off.
Audio source not connected to the selected video source.
Audio Out cable not connected.
Mouse not working
•
•
•
•
•
Computer was powered-on before the Projector.
Mouse cable not installed (Mouse connector to the serial port of your computer).
Mouse software incompatible or not installed.
Standard mouse is still connected to the computer mouse port.
Wrong mouse type selected in the Preference Menu.
Aurora S500
Page 55
_____________________________________________________________________________
CARE AND MAINTENANCE
Storage and Transportation
Store and transport the system at temperatures between 0o and 140oF (-17o to 60oC). Avoid storage in
automobiles during seasonal temperature extremes. Automobile interior temperatures can exceed 160oF
o
o
o
(71 C) in summer and drop to -40 F (-40 C) in winter.
If the Projector has been exposed to extremely hot, cold or humid conditions, allow it to stand at room
temperature for at least 30 minutes before use. Since the Projector contains several pieces of glass,
avoid jarring impacts. When traveling, the Projector should be checked as baggage only when packed in
its original shipping container.
Cleaning & Handling
The external glass of the Projector may be cleaned with a lint-free nonabrasive cloth and a glass cleaner.
The Projector and the Annotation device may be cleaned with a lint-free nonabrasive cloth using water
and a mild detergent. Nev er use a hydrocarbon cleaner such as acetone, or an abrasive cloth. Be sure to
unplug any cables from the Projector, disconnect its power source, and disconnect the Annotation
device from the Projector before cleaning.
Avoid sharply banging or dropping the Projector and the Annotation Tablet and Pen, and never immerse
them in any fluid.
Never place the WritingPad Pen near your computer diskettes or other magnetic storage devices as the
Pen produces an electromagnetic field that could erase information.
IMPORTANT NOTE: To conserve power, the WritingPad Pen will automatically shut down if the Pen tip
or barrel buttons have not been used for more than a minute. To awaken the Pen, simply press any barrel
button or the Pen tip. When storing the Pen, ensure that the Pen tip and barrel buttons are not depressed
in order to avoid an unnecessary drain on the batteries. If the Pen is placed in a pencil holder, be sure
that the Pen tip is up. If the Pen is placed in your pocket, be sure the Pen clip is adjusted so that the Pen
tip does not reach the bottom of your pocket.
Aurora S500
Page 56
______________________________________________________________________________
Service Information
The system is designed for long, dependable service. However, should your equipment fail, contact us at
the number displayed on the Projector when it is first powered on or at the number printed on the back
cover of this Owner’s Manual. When returning equipment for service, be sure to use its original shipping
container and insure the shipment against loss or damage due to shipping.
Air Filter, Lens, and Projector Cleaning
To clean or service the Projector, turn off the Projector Lamp. After the fan stops, remove the all
cables.
To clean the Projector or the Lens, use a lint-free non-abrasive cloth.
To clean the Air Filter, lift the Projector by its handle and carefully place it on its side on a firm surface.
Using a screwdriver, carefully remove the Air Filter Door and the Air Filter. Return the Projector to a flat
position. Remove the Air Filter from the Air Filter Door and remove the dust from the Air Filter with a
vacuum cleaner.
IMPORTANT: Turning the Projector on its side, eliminates the chance of accidentally releasing debris into
the Lamp chamber, which can cause dust to reach the lenses
and LCDs.
Reinstall the Air Filter and secure the Filter Door.
Air Filter
Door
Air Filter Door
& Air Filter
Aurora S500
Page 57
_____________________________________________________________________________
Lamp Replacement
CAUTION: The Lamp is made of glass and is very fragile. Do not touch the Lamp with your bare hands
and do not jolt or damage it. Do not use an exhausted Lamp as it may burst and cause fire, injuries, or
damage to the Projector. If a Lamp bursts, pull out the power plug and ask your dealer to replace the
Lamp. Fragments of glass may cause injury or damage the Projector.
The Lamp has a life of 2,000 hours. Upon reaching 2,000 hours, a message will appear each time the unit
is turned on that displays the remaining hours before the unit will shut down and advises you to replace
the Lamp. This message will disappear after a few seconds or when you depress any key of the Control
Panel, Remote Control or Annotation device. If the remaining Lamp hours goes to zero, the Projector
will shut down and not restart, to protect the Lamp from bursting.
CAUTION: When replacing the Lamp, if the Projector has been operating, allow the Lamp to cool for an
hour before attempting to remove the Lamp.
To replace the Lamp, turn off the Projector and wait until the cooling fan stops. Remov e all cables.
Before proceeding, it is best to allow the Lamp to completely cool as noted above. On a mat or other
protected surface, gently turn the Projector over and loosen the two retaining screws of the Lamp cover.
Open the cover.
Lamp cover
Lamp
canister
When the Lamp canister is cool, loosen the two Lamp canister screws, lift the metal lever and extract the
Lamp canister by pulling straight up. Replace the Lamp canister with the new Lamp canister. Tighten the
lamp canister screws. Discard the old Lamp canister. Secure the Lamp door and return the Projector to
an upright position.
IMPORTANT NOTE: After installing the new Lamp, the Lamp
hour counter must be reset for the Lamp to operate properly. To
reset the Lamp hour counter, insert the power plug while
simultaneously holding the Source key down until the Source LEDs turn on and then off.
Aurora S500
Page 58
______________________________________________________________________________
Replacing the WritingPad Pen Tip
If you purchased the Annotation option and the stylus of the Pen becomes
worn, it may be replaced. To replace the Pen tip, grasp the tip and pull
straight out as shown to the right. Insert the new tip and press firmly into
place. Contact your sales representative or call the number that is displayed
on the Projector at power-up for information on Pen tips.
Replacing the WritingPad Pen Batteries
The WritingPad Pen is powered with batteries that should provide about one year of service before
replacement is necessary. The batteries used are standard products that can be purchased at any store
that sells calculators, cameras or watches. The correct battery type is a 393 silver oxide battery. DO
NOT USE ZINC AIR BATTERIES, AS THEY WILL CORRODE THE PEN ELECTRONICS. The Pen is
designed to operate on two or four batteries. You can use all four batteries at one time for longer battery
life or you can choose to use two of the batteries and keep the remaining two as spares. The spare
batteries can either be removed or stored in the battery casing with the polarities reversed (+ to - and - to
+). Reversing any battery creates an open circuit and deactivates the battery pair (i.e., batteries 1 and 2
or 3 and 4). The average battery life is 750 to 1,000 hours using two pen batteries and 1,500 to 2,000
hours using four pen batteries. To replace the Pen batteries, perform the following:
• Unscrew the Pen cap. Hold
the Pen from the bottom
and gently slide off the Pen
cover to expose the
batteries.
• Remove the old batteries by
pushing a thin, pointed
object through the open slot
on the bottom of the battery
casing as shown.
• If you wish to use four
batteries, position the
batteries as they are shown
above.
• If you wish to use two batteries, you must position the batteries in slots 1 and 2 or in slots 3 and 4 then
remove or reverse the remaining battery pair.
• Replace the Pen cover and screw the Pen cap onto the Pen.
Aurora S500
Page 59
_____________________________________________________________________________
Monitor Interference
If you are experiencing monitor interference with your WritingPad Tablet, you can reduce the interference
by changing the frequency your Pen uses.
To change the Pen frequency, press both side buttons and the Pen tip simultaneously and hold for
approximately three seconds.
To return to the default frequency, repeat the above process. When you replace the Pen batteries, the
Pen is automatically reset to the default frequency.
Aurora S500
Page 60
______________________________________________________________________________
ACCESSORIES
Item
Model
Description
WritingPad
1260
The electronic Tablet and Pen writing accessory.
PenPal
1244
Electronic Tablet and Pen writing accessory.
Tablet Extension Cable
1903
25-foot extension cable for the WritingPad Tablet.
Mac Mouse Adapter
1907
An adapter for using the WritingPad as a Macintosh
mouse.
Soft Carrying Case
1650
Soft carrying case for Projector, Annotation device, and
accessories
ATA Carrying Case
1614
Airline approved hard carrying case for Projector,
Annotation device, and accessories
Flush Ceiling Mount
1721
Attaches Projector flush with ceiling
Variable Ceiling Mount
1732
Attaches Projector 24 inches to 46 inches below ceiling
(variable)
Fixed Extension Mount
1716
Attaches Projector at fixed distance below ceiling
(customer-supplied ASA pipe)
RS232 Projector Control Kit
1358
Cable and documentation
Aurora S500
910 Campisi Way
Campbell, CA 95008
United States of America
Tel: (408)559-1111
Aurora S500
Fax: (408)559-0444
[email protected]
Copyright 1997
111497-87000062-02 Rev A
[email protected]
www.chisholm.com