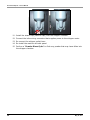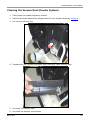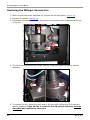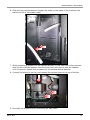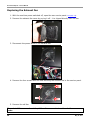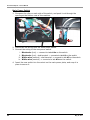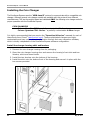
1
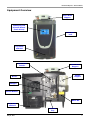
Service Manual Contact: Customer Service – Service à la clientèle 800.567.2951 Technical Support – Soutiens technique 888.854.0207 VKI Publication # 100271-001 May 15, 2015 Eccellenza Express – Service Manual 2 May 15, 2015 Eccellenza Express – Service Manual Table of Contents Safety Information .............................................................................. 5 Equipment Overview ........................................................................... 7 Rinse Cycles ........................................................................................ 8 Brewer Rinse Cycle ............................................................................ 8 Quick Brewer Rinse Cycle ................................................................... 9 Powder (Whipper) Rinse Cycle ............................................................ 9 Maintenance ...................................................................................... 10 Daily.............................................................................................. 10 Weekly .......................................................................................... 10 Monthly ......................................................................................... 11 Every 6-12 Months .......................................................................... 11 Sanitization – Milk System ............................................................... 12 Removing the Side Panels ................................................................. 13 Opening the Rear Service Panel ........................................................ 14 Removing the Top Cover ................................................................... 15 Replacing the Spout Support Bracket ................................................ 16 Replacing the Brewer ........................................................................ 18 Draining the Water Tank ................................................................... 20 Replacing the Brewer Motor .............................................................. 21 Replacing a Coffee Bean Hopper ....................................................... 23 Replacing a Coffee Bean Dispenser Motor ......................................... 24 Replacing a Powder Dispenser .......................................................... 25 Replacing a Powder Dispenser Motor ................................................ 27 Replacing the Power Supply .............................................................. 29 Replacing the Control/Options Boards .............................................. 32 Replacing the Expansion Board and LCD Display & Touch Panel ........34 Expansion Board ............................................................................. 35 LCD Display and Touch Panel ............................................................ 36 Replacing the Temperature Probe ..................................................... 38 Replacing the Outlet Valves .............................................................. 40 Replacing the Water Tank ................................................................. 42 Removing the Heater Element ........................................................... 43 Removing the Thermal Cut-Off Switch .............................................. 43 Disassembling the Dual Valve Manifold ............................................. 44 Disassembling an Outlet Valve .......................................................... 45 Replacing the Inlet Valve .................................................................. 47 Replacing the Bean Grinder ............................................................... 49 Replacing the Whipper Motor ............................................................ 51 Cleaning the Vacuum Duct (Powder System) .................................... 55 Replacing the Whipper Vacuum Fan .................................................. 56 Replacing the Exhaust Fan ................................................................ 58 May 15, 2015 3 Eccellenza Express – Service Manual Table of Contents Replacing Main Power Components ................................................... 59 Fuse Holder (5 Amp or 15 Amp) ........................................................ 59 Main Power Switch .......................................................................... 60 Service Cord ................................................................................... 61 Updating Firmware and Support Files ............................................... 61 Installing the Coin Changer ............................................................... 62 Install the changer housing skirt and levelers ..................................... 62 Install the coin changer housing ........................................................ 63 Install the coin changer assembly...................................................... 64 Test the machine and the coin changer system ................................... 65 Installing the Printer System ............................................................ 66 Installing the Printer and Housing ..................................................... 66 Printer Buttons ............................................................................... 67 Paper Specifications: ....................................................................... 67 Installing the Printer Paper Roll* ........................................................ 68 Automatic Paper Loading .................................................................. 69 Manual Paper Loading ...................................................................... 69 Printer Status LED ........................................................................... 70 Machine Messages ........................................................................... 70 Replacing the Printer Module ............................................................ 71 Error Messages.................................................................................. 74 Information in this document is subject to change without notice. 4 May 15, 2015 Eccellenza Express – Service Manual Safety Information Your safety is very important to us. It is imperative that you read and understand this safety information before proceeding with the installation, operation or servicing of this coffee maker. This equipment must be used specifically for the purpose for which it is designed. The manufacturer is not responsible for damage or injury resulting from improper use of this equipment. Always switch the machine power OFF and disconnect the service cord from the wall outlet when servicing this equipment, unless stated otherwise. This coffee maker is designed for indoor use ONLY and must never be installed outdoors. The installation of this equipment must comply with all municipal, state/provincial, and federal electrical and plumbing codes. Installation and servicing of this equipment must only be performed by qualified personnel. Do not attempt to install or service this equipment if you are not qualified as it may result in personal injury. There are no userserviceable parts inside the equipment. Do not attempt to lift or move this equipment by yourself. Use a hydraulic lift (or similar) or have a colleague provide assistance. This equipment must be installed in a location with an ambient temperature between 5°C-35°C (40°F-95°F). The main water supply pressure must be between a minimum of 20psi and a maximum of 100psi. This equipment must be positioned so that the wall plug and the main power switch are both easily accessible. Do not connect the coffee maker to a voltage supply other than the voltage indicated on the serial number decal. Do not immerse this coffee maker or any part of this equipment in liquid. Do not install the equipment in an area where water spray is present. This coffee maker must be installed securely on a level surface. If it does not appear to be a stable location, select another installation location. Keep hands clear of the dispensing area at the front of the coffee maker. Liquids being dispensed are extremely hot and can cause severe burns. Never disconnect the coffee maker by pulling on the service cord, and never use the coffee maker if the service cord is damaged. May 15, 2015 5 Eccellenza Express – Service Manual Safety Information If the service cord is damaged, it must be replaced with a new service cord that is available from your distributor or the manufacturer of this equipment. This equipment uses low voltage DC powered valves and motors. Do not connect components to a voltage supply other than the voltage indicated on their specifications. Never attempt to override the safety features incorporated into the equipment. They are there for your protection and should never be bypassed under any circumstances. Always switch the power off and disconnect the service cord when cleaning the interior of the coffee maker. Components inside the coffee maker can cause electrical shock resulting in personal injury. If the coffee maker is not working properly or appears to have a fault, switch off the power, disconnect the service cord and call an authorized technician immediately for service. Only qualified personnel should perform service on this equipment. Use caution when servicing the water heater or the outlet valves as they may be extremely hot and can cause severe burns. Use caution when working inside the coffee maker as there may be sharp edges on some components that can cause cuts. To prevent electrical shock, remove all jewelry (rings, watches, etc.) when servicing the coffee maker. Do not allow children to access this equipment. They are not aware of the potential dangers that exist. Never use ammonia based cleaners on machine surfaces as they will become discolored and/or damaged permanently. Use milder cleaning products, such as dish soap. Unauthorized modifications made to this coffee maker can result in serious personal injury and/or damage to the equipment, and voids all warranties and certifications. 6 May 15, 2015 Eccellenza Express – Service Manual Equipment Overview Coffee Bean Hoppers LCD Display and Selection Buttons (Touch Screen) Front Door Lock Cup Stand and Grill Coffee Bean Grinder Coffee Bean Hoppers Powder Hoppers Brewer Whipper Interior Buttons Waste Bin Cup Stand and Grill Grounds Tray May 15, 2015 7 Eccellenza Express – Service Manual Rinse Cycles Brewer Rinse Cycle WARNING: Make sure the waste container is under the brewer spout to catch the water coming from the brewer (throughout the complete rinse cycle). 1. Add VKI approved brewer cleaner to the brew chamber. 2. Press the "RINSE CYCLE" button on the control panel inside the front door. To exit the rinse cycle if it was pressed accidentally, press the “PREVIOUS” button on the front display. 3. Select the type of rinse cycle required. For a brewer rinse, press the "Coffee Rinse" button on the front selection panel to begin the cycle. To cancel the rinse cycle if it was pressed accidentally, switch OFF the machine using the main power switch at the rear. a) The piston will move to the top of the cylinder, water will pour in, and the brewer will pause for about 5 minutes. During this time, the cleaner breaks down all the oils and stains that have accumulated in the brewer. b) After the 5 minutes have elapsed, the brewer will cycle, dumping the cleaner into the waste container in the process. The brewer will then automatically cycle water seven consecutive times to rinse the cleaner from the brewer. After the rinse cycle is completed, the brewer will stop and the coffee maker will automatically exit the rinse mode. c) After the rinse cycle is complete, brew a few cups of coffee to relubricate the brewer. 8 May 15, 2015 Eccellenza Express – Service Manual Quick Brewer Rinse Cycle 1. Press the "RINSE CYCLE" button on the control panel inside the front door. 2. Select the type of rinse cycle required. For a quick brewer rinse, press the "Quick Cof. Rinse" button on the front selection panel to begin the cycle. a) The machine will now go through the same motions as preparing a coffee beverage, however, only hot water will be dispensed into the brewer (without coffee grounds). Repeat this process, if necessary. Powder (Whipper) Rinse Cycle 1. Press the "RINSE CYCLE" button on the control panel inside the front door. 2. Select the type of rinse cycle required. For a whipper rinse, press the "Powder Rinse" button on the screen to begin the cycle. a) The machine will now dispense hot water through the whipper motor and tubing to rinse residual powder product that may have accumulated in the system. Repeat this process, if necessary. May 15, 2015 9 Eccellenza Express – Service Manual Maintenance To keep the Eccellenza Express running efficiently and at peak performance, the following maintenance procedures must be performed at their specified intervals. It is recommended that equipment maintenance be scheduled at a time that would be the least disruptive to your customers. Whenever possible, replace the components requiring maintenance with new or refurbished ones, and then refurbish the older components at your shop. WARNING: Never use ammonia based cleaners on any machine surface as the surface will become discolored and/or damaged permanently. Use only mild cleaning products, such as dish soap. Daily ► Empty the Drip Tray – empty the contents of the drip tray and rinse the tray and grill under clean running water. ► Empty the Waste Bin – empty the contents of the waste bin. ► Refill the Coffee Hoppers, Powder Hoppers – top off the coffee and powder hoppers, and reset the product counters. ► Perform a Whipper Rinse Cycle – this should be done immediately after refilling the powder hoppers to flush any product that may have fallen into the whipper. ► Wipe Exterior and Countertop – using the clean towel, wipe any coffee grounds and spills from the exterior of the machine and the countertop. Weekly ► Clean the Grounds Tray and Floor Liner – empty and clean the grounds tray located below the brewer. Remove and clean the floor liner over the base of the machine. ► Wipe Interior Walls and Door - using a clean towel, wipe any coffee grounds and spills from the interior of the machine and the front door. ► Perform a Brewer Quick Rinse Cycle – for the weekly Brewer Quick Rinse cycle, it is not necessary to use any brewer cleaner. Simply flushing the system with the hot water will help to keep it clean. ► Clean the Brew Chamber – the brew chamber should be removed and thoroughly rinsed under warm running water. ► Clean the Grinder Spout – coffee grounds will accumulate in the grinder spout opening due to static electricity and moisture from the brewer. The grounds need to be removed or the grinder may jam. With the brew chamber removed, use a plastic stir stick to delicately remove any coffee accumulation from around the inner edge of the grinder spout. 10 May 15, 2015 Eccellenza Express – Service Manual Monthly ► Perform a Brewer Rinse Cycle – the full Brewer Rinse cycle requires the use of brewer cleaner to remove oils and stains from the brewer. ► Clean the Brewer Filter Screen – to minimize servicing time, replace the filter screen with one that has already been cleaned, then clean the stained filter screen at the shop and use it the next time a filter screen replacement is required. ► Clean the Whipper System – disassemble the whipper system and clean the components with hot water. ► Clean Hoses and Spouts – clean the exterior of all the product hoses and spouts with a wet towel. ► Thoroughly Clean the Interior – clean the interior walls, base and components with a clean wet towel. Every 6-12 Months ► Clean the Coffee and Powder Hoppers – the hoppers should be emptied of product and given a thorough cleaning to remove stains and oils that may have accumulated inside them. ► Delime the Water Tank - to minimize servicing time, replace the water tank with a tank that has already been delimed, then clean the removed tank at the shop and use it the next time a tank replacement is required. ► Clean the Outlet Valves - to minimize servicing time, replace the outlet valves with valves that have already been cleaned, then clean the removed valves at the shop and use them the next time a valve replacement is required. ► Replace the Water Filter – the water filter should be replaced at least once a year, or when the water flow rate through the filter has decreased. This is an indication that the filter is starting to clog. May 15, 2015 11 Eccellenza Express – Service Manual Sanitization – Milk System Should the Eccellenza Express milk system require sanitization, all of the following components must be removed and soaked in a sanitizing solution for 30 minutes. • • • • • • • • • • • Drip tray & grill Brewer spout Spout Support Plate (complete assembly) – this includes the milk spout and hot water spout Coffee hose Milk hose Hot water hose Brew chamber assembly Brewer screen Brewer (with screen removed) Whipper hose Whipper parts NOTE: When ready for use, the end-use concentration of all quaternary chemicals in the solution is not to exceed 200ppm of active quaternary compound. To perform a sanitization of the machine components that have an impact on the milk system, a large leak-proof container, a spray bottle and SC Johnson J-512 sanitizer are required. 1. Fill the leak-proof container with a mixture of water and sanitizer – the mixture is 2ml of sanitizer per liters of water. 2. Remove the components identified above from the machine. 3. Place them inside the container with the sanitizing solution. Let them soak for 5 minutes. 4. While the components soak, fill a spray bottle with the sanitizing solution (2ml sanitizer per liter of water). 5. Lightly spray the solution to the exterior of the machine, the interior walls and interior of the front door, the whipper blade and base, and to the counter-top. Do not wipe away the solution – let it dry naturally. 6. After their 5 minute soak, remove the components from the leak-proof container and rinse them with clean warm water. 7. Re-install all of the components back into the machine. 12 May 15, 2015 Eccellenza Express – Service Manual Removing the Side Panels 1. Open the front door. 2. Two screws secure each panel at the front of the machine. Remove the two screws securing the side panel that needs to be removed. 3. Pull the front of the panel outwards, and then towards the back to unlock it at the rear of the machine. May 15, 2015 13 Eccellenza Express – Service Manual Opening the Rear Service Panel 1. Switch the machine power OFF and disconnect the service cord from the wall outlet. 2. Turn the machine so that you have access to the rear panel. 3. Remove the two screws. 4. Lift the bottom of the panel until the panel is completely open. The top of the panel is hinged, and the machine top cover is angled, so the panel will remain open on its own. 14 May 15, 2015 Eccellenza Express – Service Manual Removing the Top Cover 1. Switch the machine power OFF and disconnect the service cord from the wall outlet. 2. Unlock the bean hopper cover and remove it. 3. Remove the individual hopper lids. 4. Remove the two screws securing the top cover at the front, and remove the two screws securing the top cover at the rear. 5. Lift the top cover to remove it. May 15, 2015 15 Eccellenza Express – Service Manual Replacing the Spout Support Bracket 1. Open the front door of the machine, and remove the waste bin. 2. Disconnect the hose from the brewer, and disconnect the powder and hot water hoses from the spout support. 3. While lifting the front of the brewer slightly, press down on the top of the spout support plate and pull it towards the front until it clears the brewer spout and can be removed. 16 May 15, 2015 Eccellenza Express – Service Manual 4. To re-install the spout support bracket, insert the bottom of the bracket into the slit on the front of the base. 5. While lifting the brewer, tilt the spout bracket upwards and to the back until it clears the brewer spout. If done properly, the brewer spout will enter the hole on the spout support plate and secure it in place. 6. Reconnect the powder and hot water hoses to the spout support, and reconnect the brewer hose. May 15, 2015 17 Eccellenza Express – Service Manual Replacing the Brewer Removing the Brewer 1. Remove the spout bracket support (see page 16). 2. Press down on the brewer release latch and pull the top of the brewer forward to release it. You may need to lift it slightly to clear the two bottom brewer guides. 3. Remove the brewer. 18 May 15, 2015 Eccellenza Express – Service Manual Installing the Brewer 4. Make certain that the brewer pin is properly aligned with the brewer motor coupling. If it’s not aligned, use the optional brewer crank tool to adjust the brewer pin. 5. Sit the brewer onto the two lower guides. 6. Push the top of the brewer towards the rear, making certain the brewer pin engages properly into the brewer motor coupling. Once coupled, press down on the brewer release latch until the brewer moves into position, and then release the latch to lock the brewer in place. May 15, 2015 19 Eccellenza Express – Service Manual Draining the Water Tank 1. Remove the right side panel (see page 13). 2. The end of the Eccellenza Express drain hose is equipped with a plastic valve. Remove the drain hose and valve fitting from the inner wall of the machine. It is secured in place by a large clip. 3. Remove the security plug from the end of the drain hose valve. 4. Place the hose inside a waterproof container and open the valve at the end of the hose. Water will start draining into the container. CAUTION - the water being drained may be extremely hot! 5. Once emptied, close the valve at the end of the hose, re-install the security plug into the valve, and re-install the drain hose onto the clip on the interior wall of the machine. 6. Re-install the right side panel onto the machine. 20 May 15, 2015 Eccellenza Express – Service Manual Replacing the Brewer Motor 1. Remove the brewer from the machine (see page 18). 2. Remove the right side panel (see page 13). 3. Remove the four screws securing the brewer bracket assembly to the machine. 4. Disconnect the wiring from the brewer motor, the home switch and ground terminal. May 15, 2015 21 Eccellenza Express – Service Manual 5. The brewer motor and bracket assembly can now be removed from the machine. 6. Remove the four screws securing the brewer motor to its mounting plate. 7. Remove the brewer switch plate assembly from the brewer motor by removing the three mounting screws. Be careful not to lose the small ground tab and lock washers – they must be re-installed onto the replacement motor. 8. Install the brewer switch plate onto the replacement motor (three screws), making certain to re-install the ground tab and lock washers. 9. Install the mounting plate onto the new motor (four screws). 10. Reconnect the wiring to the brewer motor, the home switch and reconnect the ground terminal. 11. Re-install the brewer bracket assembly onto the machine (install the two upper screws, and then the two lower screws). 12. Re-install the brewer (remember to reconnect the brewer hose). 22 May 15, 2015 Eccellenza Express – Service Manual Replacing a Coffee Bean Hopper The following instructions will guide you through the process of removing either of the coffee bean hoppers from the Eccellenza Express. 1. Remove the top cover (see page 15). 2. Remove the two screws securing the bean chute cover to the top of the machine, and lift the cover to remove it. 3. Lift the front of the bean hopper to be removed, and pull it forward until it clears the motor coupling at the rear. To install the replacement coffee bean hopper, follow these same instructions in the reverse order. May 15, 2015 23 Eccellenza Express – Service Manual Replacing a Coffee Bean Dispenser Motor The following instructions will guide you through the process of removing any of the coffee bean dispenser motors in the Eccellenza Express. 1. Remove the top cover (see page 15). 2. Remove the coffee bean hoppers (see page 23). 3. Disconnect the power wires from the motor that is to be replaced. 4. Remove the two screws securing the motor to be replaced from the support bracket. To install the replacement coffee bean dispenser motor, follow these same instructions in the reverse order. 24 May 15, 2015 Eccellenza Express – Service Manual Replacing a Powder Dispenser 1. Remove the retaining bracket at the front of the two dispensers by pulling on the right-hand side of the bracket. The left side of the bracket locks into the wall, whereas the right side of the bracket clips in place. Once the right side is pulled off, the left side will be free from the wall. 2. Lift the front of the powder dispenser and pull it forward to remove it. 3. Insert the new dispenser (already filled) onto the dispenser base making certain the coupling on the dispenser engages with the coupling on the dispenser motor. May 15, 2015 25 Eccellenza Express – Service Manual 4. Lower the front of the dispenser and lock it in place – a pin at the bottom of the dispenser must enter a hole in the dispenser base, locking it in place. 5. Install the retaining plate to secure the hoppers in place. Lock the left side into the slot on the wall, and push the right side onto the hopper support until it clips in place. 26 May 15, 2015 Eccellenza Express – Service Manual Replacing a Powder Dispenser Motor 1. Open the front door and remove the powder dispensers (see page 25). 2. Remove the three screws securing the motor cover, and then remove the cover. 3. Remove the two screws securing the motor that requires replacing. 4. Remove the motor from the support. May 15, 2015 27 Eccellenza Express – Service Manual 5. Disconnect the power wires (inline connector) from the motor that needs to be replaced. To install the replacement powder dispenser motor, follow these same instructions in the reverse order. 28 May 15, 2015 Eccellenza Express – Service Manual Replacing the Power Supply 1. Switch the machine power off and disconnect the service cord. 2. Remove the right side panel (see page 13). 3. Open the rear service panel (see page 14). 4. Remove the plastic protector caps from the two terminal blocks on the power supply. 5. Disconnect the four wires from the upper terminal block, and disconnect the three wires from the lower terminal block. May 15, 2015 29 Eccellenza Express – Service Manual 6. From the inside of the machine (just behind the dual outlet valve manifold), loosen the three screws that secure the power supply to the rear wall of the machine. 7. Lift the power supply until the screws are clear of the keyhole slots, and remove the power supply. 8. Install three screws onto the new power supply, but do not tighten them. There should be enough clearance between the screw head and the power supply to clear at least one thickness of sheet metal. 9. Install the new power supply to the wall by sliding the screws into the keyholes slots. Tighten all three screws to secure the power supply to the wall. 10. Connect the three wires to the lower terminal block. With the three screws loosened on the terminal block at the bottom of the power supply, insert the wiring terminals under their respective screws and tighten the screws to secure the terminals in place. Black White Green a. Terminal Screw #1 – Black wire b. Terminal Screw #2 – White wire c. Terminal Screw #3 – Green wire 30 May 15, 2015 Eccellenza Express – Service Manual 11. Connect the four wires to the upper terminal block. With the four screws loosened on the terminal block at the top of the power supply, insert the wiring terminals under their respective screws and tighten the screws to secure the terminals in place. Red a. b. c. d. Red Blue White Terminal Terminal Terminal Terminal Screw Screw Screw Screw #1 #2 #3 #4 – – – – Red wire Red wire Blue wire White wire 12. Install the plastic protector caps onto the two terminal blocks on the power supply. 13. Re-install the machine’s right side panel and close the rear service panel. 14. Reconnect the service cord to the wall outlet. 15. Switch the machine power on and test the equipment operation. May 15, 2015 31 Eccellenza Express – Service Manual Replacing the Control/Options Boards 1. Switch the machine power off and disconnect the service cord. 2. Open the rear service panel (see page 14). 3. Disconnect all of the wiring harness connectors from the control board / options board assembly. Also disconnect the ground wires from the tab on the control board heat sink. 4. Lift the control board/options board assembly upward until it clears the board support bracket, and remove the board assembly. 32 May 15, 2015 Eccellenza Express – Service Manual 5. Align the tabs on the new control board / options board assembly with the tabs on the board support bracket, and push down on the board assembly to lock it in place. 6. Reconnect all of the wiring harness connectors to the control board / options board assembly, including the ground wires to the tab on the control board heat sink. Start by connecting the rear harnesses first. NOTE: The wiring connectors are matched with their respective connectors on the board assembly, reducing the likelihood of making connection errors. Make certain to push the wiring connectors firmly into the board connectors, ensuring that they are locked in place. 7. When reconnecting the single black and single red wires, the black wire connects to J-12 and the red connects to J-13. 8. Close the rear service panel. 9. Reconnect the service cord to the wall outlet. 10. Switch the machine power on and test the equipment operation. May 15, 2015 33 Eccellenza Express – Service Manual Replacing the Expansion Board and LCD Display & Touch Panel The following procedure will guide you through the process of replacing the LCD display and the touch panel. 1. Open the front door of the machine. 2. Remove the expansion board cover. a. Open the clip and remove the wiring harness from it. b. To remove the cover, remove the four screws securing the cover to the door. LCD Display Expansion Board 34 May 15, 2015 Eccellenza Express – Service Manual Expansion Board 3. To remove the expansion board: a. Disconnect all of the wiring connectors from the expansion board. b. Remove the screws securing the expansion board to the door. 4. To install the expansion board: a. Align the expansion board with the standoffs on the front door. b. Secure the expansion board to the door using six screws. c. Connect all of the wiring connectors to the expansion board. Each connector is polarized to help simplify connections. May 15, 2015 35 Eccellenza Express – Service Manual LCD Display and Touch Panel CAUTION: Use caution when handling the LCD display and the touch panel as both of these assemblies contain glass and are very fragile. 5. To remove the LCD display and touch panel: a. Disconnect the wiring to the LCD display and the touch panel. b. Remove the two top screws securing the display to the door. c. Remove the two bottom screws securing the display to the door. This will also free the touch panel, which will slide down from between the LCD and front door. 6. To install the LCD display and touch panel onto the front door: a. Align the touch panel with the two lower guides on the inside of the front door. 36 May 15, 2015 Eccellenza Express – Service Manual b. While holding the touch panel in position, place the LCD display over the touch panel, and secure the bottom of the display using two screws. Make certain that the touch panel stays positioned between the display and the door while installing the two screws. Touch Panel c. With the touch panel and the LCD display properly aligned, install the two top screws to secure both to the front door. d. Make the necessary wiring connections for the LCD display and the touch panel. 7. Reinstall the expansion board cover and secure it in place with four screws. May 15, 2015 37 Eccellenza Express – Service Manual Replacing the Temperature Probe 1. Switch the machine power off and turn off the water supply. 2. Drain the water tank. 3. Remove the top cover (see page 15). 4. Remove the coffee bean hoppers (see page 23). 5. Remove the bean dispenser motor assembly (see page 24). 6. Open the rear service panel (see page 14). 7. Remove the right side panel (see page 13). 8. Pull the temperature probe out of the grommet securing it to the top of the water tank. 38 May 15, 2015 Eccellenza Express – Service Manual 9. Disconnect the temperature probe wiring. a) The inline connector for the temperature probe is located at the rear of the machine, above the power supply. b) Once disconnected, pull the inline connector (on the probe harness) through the channel in the corner above the power supply. 10. Connect the wiring on the new temperature probe. a) Pass the inline connector on the temperature probe harness through the channel in the corner above the power supply. b) Connect the temperature probe to the inline connector on the machine harness. 11. Insert the new temperature probe into the grommet on top of the water tank. 12. Re-install the right side panel and close the rear service panel. 13. Re-install the bean dispenser motor assembly. 14. Re-install the bean dispensers. 15. Re-install the top cover. May 15, 2015 39 Eccellenza Express – Service Manual Replacing the Outlet Valves 1. Switch the machine power off and unplug the service cord. 2. Remove the machine side panels (see page 13). 3. Drain the water tank (see page 20). NOTE: The Eccellenza Express is equipped with a single outlet valve on the right side (for the coffee) and a dual outlet valve manifold on the left side (two stacked outlet valves in one assembly - one for the powder and one for hot 4. To remove the coffee valve (on the right side of the water tank), grasp the valve and pull it straight out. You may need to twist it slightly to loosen it. 5. To remove the powder and hot water valve manifold (on the left side of the water tank), grasp the valve and pull it straight out. You may need to twist it slightly to loosen it. 40 May 15, 2015 Eccellenza Express – Service Manual 6. Disconnect the outlet hose for the valve to be replaced. In the case of the valve manifold, disconnect both of the outlet hoses. 7. Disconnect the wiring for the valve to be replaced. In the case of the valve manifold, disconnect both sets of wires. 8. Connect the outlet hose(s) onto the replacement valve(s). 9. Connect the power wires onto the replacement valve(s). OUTLET VALVE WIRING CONNECTIONS Coffee Valve Powder Valve Red Wires (outer on manifold) Hot Water Valve (inner on manifold) White Wires Yellow Wires 10. Install the new valve by sliding it into its respective port on the water tank. Make certain that both of the o-rings are present on each valve (and are the correct size) and make certain that the valve is completely seated into the water tank. 11. Reconnect the service cord and switch the machine power on. 12. Allow the water tank to fill and inspect the machine for leaks. Also inspect the outlet valve for any signs of dripping. If any leaks or dripping is present, correct the problem immediately. NOTE: When a valve is replaced, it may be necessary to adjust the valve’s flow rate by using the restrictor at the bottom of the valve. To decrease the flow, turn the restrictor clockwise. To increase the flow, turn it counter-clockwise. 13. Once certain that no leaks are present, re-install the machine side panels. May 15, 2015 41 Eccellenza Express – Service Manual Replacing the Water Tank 1. Switch off the power to the machine, and unplug the service cord. 2. Remove the side panels (see page 13). 3. Drain the water tank (see page 20). 4. Remove the top cover (see page 15). 5. Remove the coffee bean hoppers (see page 23). 6. Remove the bean dispenser motor assembly (see page 24). 7. Remove the temperature probe (see page 38). 8. Remove the outlet valves (see page 40). 9. Disconnect the wiring from the water level probes. 10. Disconnect the wiring from the heater element. 42 May 15, 2015 Eccellenza Express – Service Manual 11. Remove the Oetiker circle clamp and disconnect the inlet hose from the inlet fitting at the bottom of the water tank. 12. Lift the water tank up and out the top of the machine. To re-install the hot water tank, follow these same instructions in the reverse order. Removing the Heater Element Removing the Thermal Cut-Off Switch With the water tank removed from the machine, remove the water tank lid retaining bracket. This allows you to open the water tank should the heater element or the thermal cut-off switch need to be replaced. May 15, 2015 43 Eccellenza Express – Service Manual Disassembling the Dual Valve Manifold 1. Remove the two black clips (top and bottom center clips) securing the two valves together, and gently pull the two valves apart. 2. Remove the two clips securing the valve end cap to the valve body and gently remove the end cap. There are two o-rings located between the valve body and the end cap, and they must be replaced when re-assembling the valve. 3. Remove the two clips securing the valve inlet to the valve body and gently remove the inlet. There is an o-ring located between the valve body and the inlet, and it must be replaced when re-assembling the valve. 44 May 15, 2015 Eccellenza Express – Service Manual Disassembling an Outlet Valve Overview of Outlet Valve Components Breather Tube O-Ring Diaphragm Hex Nut & Washer Plunger Housing Coil Plunger Valve Body - Outlet Valve Body - Main Plunger Spring Spacer 1. Remove the breather tube from the valve. 2. Rotate the outlet section of the valve body counterclockwise to release it from the main valve body, and pull the two sections apart. Be careful not to lose the small orange o-ring located between the two valve body sections. 3. Remove the hex nut from the coil, and remove the coil from the main valve body. Be careful not to lose the small black spacer located between the coil and main valve body. May 15, 2015 45 Eccellenza Express – Service Manual 4. On the main valve body, twist the ground tab clockwise to free the plunger housing, and pull it away from the main valve body. This exposes the plunger and assembly. Be careful not to lose the small spring inserted into the end of the plunger. 5. Pull the plunger assembly out of the main valve body. This exposes the diaphragm installed onto the tip of the plunger. 6. Remove the diaphragm by pulling it off of the tip of the plunger. The spring on the other end of the plunger can also be removed. To re-assemble the outlet valve, follow these same instructions, but in the reverse order. 46 May 15, 2015 Eccellenza Express – Service Manual Replacing the Inlet Valve NOTE: The inlet valve consists of an assembly of hoses, fittings and a backflow prevention valve secured together by Oetiker (circle) clamps. To replace any component on this assembly, existing clamps will need to be broken using cutters. New clamps must be installed when re-assembling the inlet valve components. 1. Switch the machine power off and unplug the service cord. 2. Disconnect the water supply and drain the water tank. 3. Remove the left side panel (see page 13). 4. Disconnect the two power wires from the inlet valve. 5. Remove the Oetiker circle clamp securing the tubing assembly to the inlet valve. 6. At the rear of the machine, remove the two screws securing the inlet valve to the rear wall of the machine. The valve can now be completely removed. 7. Secure the new inlet valve to the rear of the machine with two screws. May 15, 2015 47 Eccellenza Express – Service Manual 8. Secure the tubing assembly to the new inlet valve with a new circle clamp (Oetiker). 9. Reconnect the power wires to the valve. 10. Re-connect the water supply to the inlet valve. 11. Switch the machine power on – the inlet valve will open and the water tank will start filling. 12. Check for leaks and repair, if required. 13. Re-install the left side panel. 48 May 15, 2015 Eccellenza Express – Service Manual Replacing the Bean Grinder 1. Switch the machine power off and unplug the service cord. 2. Remove the left side panel (see page 13). 3. Remove the top cover (see page 15). 4. Remove the left bean hopper (see page 23). 5. The top of the machine should look like the image below. The access holes for the grinder mounting screws are now exposed. 6. Disconnect the wiring from the grinder. May 15, 2015 49 Eccellenza Express – Service Manual 7. Insert a Philips screwdriver through the access holes at the top of the machine and remove the four mounting screws for the grinder. 8. The grinder can now be removed. To re-install the bean grinder, simply follow these same instructions in the reverse order. 50 May 15, 2015 Eccellenza Express – Service Manual Replacing the Whipper Motor NOTE: Replace the impeller if it has been removed and re-installed multiple times as it may become loose on the whipper shaft and fall off during operation. 1. With the machine power switched off, remove the left side panel (see page 13). 2. Disconnect the inline wiring connector that supplies power to the whipper motor. May 15, 2015 51 Eccellenza Express – Service Manual 3. Remove the steam trap from the whipper chamber, and disconnect the outlet hose. 4. Turn the small handle on the locking ring (on the whipper base) to the right until it stops. This unlocks the whipper chamber from the whipper base, allowing it to be pulled off. 5. Remove the screw securing the top of the whipper base to the machine wall, and turn the handle on the locking ring to the left until it stops. 52 May 15, 2015 Eccellenza Express – Service Manual 6. While pressing down on the locking clip at the front of the base, press down on the clip at the rear of the base, and push it out through the front of the wall. 7. Transfer any required components from the old whipper motor to the new whipper motor. 8. Install the new motor into the cutout in the machine wall. Install the bottom of the assembly first, and then push the top of the assembly into the cutout until the plastic clip locks it in place. 9. Turn the handle on the locking ring completely to the right and secure the base to the wall with a screw. 10. Insert the whipper chamber into the base (making sure to also insert the chamber’s inlet into the adaptor), and turn the handle on the locking ring to the center position to secure the chamber. May 15, 2015 53 Eccellenza Express – Service Manual 11. Install the steam trap (vacuum cap) onto the whipper chamber. 12. Connect the inline wiring connector that supplies power to the whipper motor. 13. Re-connect the whipper outlet hose. 14. Re-install the machine left side panel. 15. Perform a “Powder Rinse Cycle” to flush any powder that may have fallen into the whipper chamber. 54 May 15, 2015 Eccellenza Express – Service Manual Cleaning the Vacuum Duct (Powder System) 1. Swing open the powder dispenser bracket. 2. Remove the steam trap and the whipper bowl from the whipper assembly (see page 51). 3. Pull out the vacuum duct. 4. Separate the two vacuum duct parts and thoroughly clean and dry them. 5. Re-install the vacuum duct. 6. Re-install the whipper components. May 15, 2015 55 Eccellenza Express – Service Manual Replacing the Whipper Vacuum Fan 1. With the machine power switched off, remove the left side panel (see page 13). 2. Remove the brewer (see page 18). 3. Disconnect the wiring to the fan, and remove the vacuum tube connected to the top of the fan. 4. The fan is secured to the wall of the machine using two single-use plastic ratchet fasteners. 5. To remove the fan, gently pry each side of the fan until it slides free from the two ratchet fasteners. Once the fan is removed, the old ratchet fasteners must be discarded and replaced by new ones. 56 May 15, 2015 Eccellenza Express – Service Manual 6. Slide the new ratchet fastener through the holes on the inside of the machine (the wall at the left of the brewer area). 7. While maintaining pressure on the ratchet fastener on the inner wall of the machine, slide the fan onto the fastener from the outer wall, and press it onto the fastener until it is secure. Repeat this procedure for the second ratchet fastener. 8. Connect the wiring to the fan, and connect the vacuum tube to the top of the fan. 9. Re-install the brewer and the machine’s left side panel. May 15, 2015 57 Eccellenza Express – Service Manual Replacing the Exhaust Fan 1. With the machine power switched off, open the rear service panel (see page 14). 2. Remove the exhaust fan cover by prying it off – it is clipped directly onto the fan. 3. Disconnect the power wires to the exhaust fan. 4. Remove the four screws and hex nuts securing the exhaust fan to the service panel. 5. Remove the old fan. To re-install the rear exhaust fan, follow these same instructions in the reverse order. 58 May 15, 2015 Eccellenza Express – Service Manual Replacing Main Power Components The service cord must be disconnected from the wall outlet when servicing these components. They remain live even when the main power is switched off at the rear of the machine. The main power components are all secured to the rear of the machine, under the rear service panel. Opening this panel provides access to the two fuse holders, the power supply, the main power switch and the main power plug for the service cord. To access these components, the rear panel must be opened (see page 14). Fuse Holder (5 Amp or 15 Amp) Both of the fuse holders are located at the top rear of the Eccellenza Express. To replace either of the fuse holders: 1. Disconnect the wiring from the fuse holder. 2. Loosen the plastic hex nut that secures the fuse holder to the main power plate. 3. Pull the fuse holder out through the top of the machine. 4. Transfer the fuse and the cap from the old fuse holder onto the new one (if required). 5. Install the new fuse holder and secure it in place with the hex nut. 6. Connect the wiring to the new fuse holder. May 15, 2015 59 Eccellenza Express – Service Manual Main Power Switch 1. Compress the clips on each side of the switch, and push it out through the opening at the bottom rear of the machine. 2. Disconnect the wiring from the main power switch. 3. Connect the wiring to the new power switch. i. ii. iii. iv. Black wire (hot) -> connect to tabs #1a on the switch. Black wire (hot) - dual terminal -> connects to tab #1 on the switch White wire (neutral) - dual terminal -> connects to tab #2 on the switch. White wire (neutral) -> connects to tab #2a on the switch. 4. Insert the new switch into the cutout on the main power plate, and snap it in place to secure it. 60 May 15, 2015 Eccellenza Express – Service Manual Service Cord 1. Disconnect the service cord’s black and white wires from the main power switch. 2. Disconnect the green wire from the ground terminal. 3. Compress and remove the strain relief securing the service cord to the bottom of the machine, and remove the service cord. 4. Install the new service cord. 5. Reconnect the wiring to the power switch. i. Black wire (hot) –> connects to #1a. ii. White wire (neutral) -> connects to #2a. 6. Reconnect the ground wire to the terminal on the machine wall. Updating Firmware and Support Files Detailed instructions for updating the Eccellenza Café firmware and support files (Factory Settings, Text and Image) can be found in VKI Publication #200455-001. May 15, 2015 61 Eccellenza Express – Service Manual Installing the Coin Changer The Eccellenza Express uses the “MDB–Level 3” protocol to communicate with a compatible coin changer. Although several coin changer models are available with this protocol from different manufacturers, VKI has thoroughly tested and validated ONLY the following coin changer units for proper operation with the Eccellenza Express: COIN CHANGERS Coinco® Guardian 6000™ – a fully customizable 6-tube changer Coinco® Quantum 700™ Series – a partially customizable 4-tube changer It is highly recommended that you acquire the “Operation & Service” manuals for each of these items from Coinco® (www.coinco.com). These sophisticated changers are highly customizable and may require direct configuration through their own respective software, which is totally independent of the Eccellenza Express software configuration. Install the changer housing skirt and levelers 1. Remove the coin changer housing from its packaging. 2. Open the coin changer housing door and remove the housing’s front skirt and two levelers, which are stored inside. 3. Install the two levelers onto the bottom of the housing. 4. Install the skirt onto the bottom front of the housing and secure it in place with the two screws provided. 62 May 15, 2015 Eccellenza Express – Service Manual Install the coin changer housing 1. With the machine power switched off, remove the machine’s right side panel. The original right side panel is no longer required as the coin changer housing replaces it. 2. Locate the changer harness in the machine (clipped at the bottom of the machine). 3. Connect the white connector at the end of the wiring harness to the connector on the harness coming from the coin changer housing. 4. Re-install the right side panel (which now includes the coin changer housing). May 15, 2015 63 Eccellenza Express – Service Manual Install the coin changer assembly 1. Unlock the coin changer housing and pull the door open. 2. Loosen the three mounting screws on the inner wall of the housing. 3. Slide the coin changer over the three screws (there are three keyhole slots at the rear of the changer) and push down on it, making sure all three screws are inserted into the slot. 4. Flip open the acceptor portion of the coin changer and tighten the three screws to secure the changer to the housing, and then close the acceptor portion. 64 May 15, 2015 Eccellenza Express – Service Manual 5. Connect the coin changer wiring to the small board-mounted connector in the changer housing. 6. Close and lock the door of the coin changer housing. NOTE: The coin changers used in the Eccellenza Express (Coinco® Guardian 6000™ and Coinco® Quantum 700™ Series) are available in several configurations and can be customized using the changer’s own built-in software and hardware. Please consult the Operation & Service manuals provided by Coinco® for these units – they can be downloaded at www.coinco.com. Test the machine and the coin changer system 1. To switch the machine from free mode to coin mode, press the “Free/Coin” button on the interior button panel of the machine (on the inside of the front door). 2. Insert several coins to test the coin changer system (insert more than the selling price of the beverage). The coins should be accepted and a credit will be displayed on the LCD screen. 3. Make a beverage selection and press Start to prepare the beverage. You should receive change if your credit exceeded the selling price of the beverage. 4. Insert a few more coins, only this time, press the coin reject button on the changer. The money inserted should now be returned to you in the coin return cup. May 15, 2015 65 Eccellenza Express – Service Manual Installing the Printer System Installing the Printer and Housing With the machine power switched OFF, remove the dispenser cover, top cover and the right side panel. Install the new right side panel with printer housing onto the machine. Re-install the dispenser cover and top cover. 66 Connect the printer to the interface cable located beneath the water tank. To open the printer housing door, unlock the housing door and swing it downwards. May 15, 2015 Eccellenza Express – Service Manual the Printer: Enable ⇒ Switch the machine power on and Clock: Set ⇒theEnter the “Set-Up” Mode ⇒ ⇒ ⇒ ⇒ ⇒ ⇒ ⇒ ⇒ ⇒ ⇒ make sure it is in Vending (Coin) mode. Select the “Set Interface” menu Select “Set Clock” Select “Set Day” and set the day Press “Previous” Select “Set Month” and set the month Press “Previous” Select “Set Year” and set the year Press “Previous” Select “Set Hour” and set the hour Press “Previous” ⇒ Select “Set Minutes” and set the minutes ⇒ Press the ON/OFF (Online) button on the printer to switch it ON. ⇒ ⇒ ⇒ ⇒ ⇒ Enter the machine “Set-Up” Mode Select the “Set Vending” menu Select “Vending Device” Select “Printer” Select “Activate” Printer Buttons >> - Paper Feed Button Status LED II - ON/OFF Line Button (Power) Paper Specifications: May 15, 2015 Paper Width (mm): 60 +0/-0.5 Type of Paper: Thermal roll, outside heat sensitive Paper Roll Outside Diameter (mm): Max. 140 (with roll holder in standard position) Max. 100 (with other roll holder positions) Roll Core Inner Diameter (mm): 12.5 +1/-0 Roll Core Outside Diameter (mm): ≥25 Core Material: Plastic or cardboard Paper End: Not attached to role core Recommended Paper: JUJO-AF50KS-E (standard grade, 55 g/m2) JUJO-AF50KS-E3 (high sensitivity, 55 g/m2) Koehler KT100 P (medium sensitivity, 100 g/m2) Kanzan KPW 460 (heat stabilized, 73 g/m2) Equivalent types can be used 67 Eccellenza Express – Service Manual Installing the Printer Paper Roll* * Thermal printer paper is required – available at office supply retailers (not available from VKI) For correct paper loading (automatic or manual), cut the paper at the beginning of the roll according to the following recommendations. Remove the paper roll retainer from the end of the paper roll spindle. Install the roll onto the spindle and re-install the paper roll retainer. 68 May 15, 2015 Eccellenza Express – Service Manual Automatic Paper Loading Paper roll not shown to clarify illustration With the machine power on and the printer power online (II), insert the paper into the printer and then the roller will automatically feed the paper for a few centimeters. The cutter will then cut off the excess paper. To properly align the paper with the printer guides, press the “Paper Feed” (>>) button to feed a few centimeters of paper through the printer - this is done to align the paper. Once done, cut off any excess paper and close and lock the printer housing door. Manual Paper Loading Paper roll not shown to clarify illustration With the printer power off, lift the head-up lever to lift the print head and allow paper to feed through. May 15, 2015 Feed the paper through the rear of the printer towards the front. It will pass between the print head and the roller. 69 Eccellenza Express – Service Manual Lower the head-up lever to lower the print head onto the paper. Press the ON/OFF line (II) button to switch on the printer. To properly align the paper with the printer guides, press the “Paper Feed” (>>) button to feed a few centimeters of paper through the printer - this is done to align the paper. Once done, cut off any excess paper and close and lock the printer housing door. Printer Status LED The printer status LED indicates the current state of the printer according to the following table. Machine Messages The following printer related messages may appear on the LCD screen of the machine. Printer Error – the printer wiring is not connected. Printer Offline – the printer is connected, but it is off line (OFF). Change Printer Paper – the paper roll is spent and must be replaced. NOTE: If a coin changer, bill acceptor or printer housing is removed, ensure that the wiring harness in the machine is properly secured so as not to interfere with the removal and installation of the machine floor liner. 70 May 15, 2015 Eccellenza Express – Service Manual Replacing the Printer Module 1. Open the printer housing door and remove the printer paper roll from the printer unit. 2. Remove the printer housing back panel to expose the wiring harness. To create slack in the wiring, the harness must be unsecured from the housing wall by lifting it up and out of the notch in the metal. May 15, 2015 71 Eccellenza Express – Service Manual 3. Remove the printer lock plate by removing the plastic wing nut that secures it and sliding the plate towards the top of the printer door. 4. Lift the printer off the door and rotate it slightly. Disconnect the two wiring connections at the rear of the printer. The printer can now be completely removed. 72 May 15, 2015 Eccellenza Express – Service Manual 5. Connect the two wiring connections to the rear of the new printer, and properly position the printer onto the door. 6. Place the printer lock plate onto the printer door and slide it down over the edges of the printer, making sure it locks into the metal at the bottom of the door to secure the printer in position. 7. With the printer door still open, secure the wiring harness to the notch in the metal and reinstall the printer housing back panel. May 15, 2015 73 Eccellenza Express – Service Manual Error Messages MESSAGE DISPLAYED CAUSE POSSIBLE REMEDIES • Verify the brewer motor wiring. Brewer Error An error has been detected with the brewer. • The brewer may be jammed. Repair or replace the brewer. • The brewer motor may be jammed. Repair or replace the brewer motor. • Press "START" (the TEXT BOX at the top of the screen) to cycle the brewer. Brewer Home Error. Press Start to find home The brewer is not in the home or starting position. • The home switch may be defective or needs to be re-adjusted or cleaned. • An electrical connection to the brewer home switch is faulty. • The brewer brake may not be working properly. Adjust the brake or replace the brewer motor. Button Error An error has been detected with one of the interior buttons. Call Key Operator The cashbox in the changer unit is full (more than $220). Can Communic. Error A communication error is present between the control board and expansion board. Change Printer Paper The paper roll is spent. • An interior button may be stuck in the pressed position. Try to loosen the jammed button. • Firmware for the Eccellenza Café may have been mistakenly downloaded into the Eccellenza Express. • Empty the cashbox and reset the Key Operator message. • Verify wiring connections to the expansion board, control board, and LCD display. • The expansion board may need to be replaced. • Replace the paper roll. • Clean the water level probes. Check Water Level Probes The water tank is overfilling. • The water temperature may be too high – lower the temperature. • Inlet valve may be leaking – replace inlet valve. Cup Tray Overflow Error The cup tray on the front of the door has overfilled. Expansion Board Error An error has been detected with the expansion board. Factory Data Error 74 The Factory Settings file you are transferring is corrupt. • Remove and empty the contents of the cup tray. • Inspect the machine for a leaking outlet valve. • Verify the wiring connections to the expansion display. • Replace the expansion board. • Get an updated Factory Settings file and load it into the machine. May 15, 2015 Eccellenza Express – Service Manual MESSAGE DISPLAYED CAUSE POSSIBLE REMEDIES Factory Settings Version Error The version of Factory Settings is not compatible with the machine model. • The Factory settings file you are attempting to load is not the correct version for the firmware in the machine. Load the proper version of the Factory Settings file. Filling Water Tank The water tank is filling. • Normal operating message and does not indicate an error. Finding Brewer Home Brewer is cycling to find the home (starting) position. • Normal operating message and does not indicate an error. Heating Water Water inside the hot water tank is heating. • Normal operating message and does not indicate an error. LCD Error An error has been detected with the LCD display. Money System Error The coin changer or bill acceptor is not being detected. • Verify the wiring connections to the LCD display. • Replace the LCD display. • Verify the wiring connections at the control board and inside the changer unit. • Replace the defective coin changer or bill acceptor. • Empty and dry the overflow/cup tray. • Verify the water level probe adjustment. They may be set too high allowing too much water into the tank. Overflow Error A water overflow has been detected. • Water level probes may need cleaning. • Inlet valve may be leaking, constantly allowing water to enter the tank. Replace the inlet valve. • The water in the tank may be overheating. Lower the water temperature setting. • Check the temperature settings in the set-up. Overheat Error The water tank is overheating. PnB not Detected The control board is not being detected. Port J10 Not Detected Wiring harness is disconnected from port 10 on the control board. • Reconnect the wiring harness to port 10 on the control board. Port J23 Not Detected Wiring harness is disconnected from port 23 on the control board. • Reconnect the wiring harness to port 23 on the control board. Press Start to Find Brewer Home May 15, 2015 • The temperature probe may need to be replaced. • The USB cable is not connected to the control board or the expansion board. Verify the connections. • Press "START" (the TEXT BOX at the top of the screen) to cycle the brewer. The brewer is not in the home (starting) position. • If the brewer cannot detect the home position, check the brewer home switch & wiring, the brewer motor, and the brewer. 75 Eccellenza Express – Service Manual MESSAGE DISPLAYED CAUSE POSSIBLE REMEDIES Printer Error The printer wiring is not connected. • Connect the wiring to the printer module. Printer Offline The printer is connected but it is offline. • Press the ON/OFF line button (power) on the printer. SPI Eeprom Error No communication to the options board. • Check the wiring to the board. • Replace the options board. • Check the 15 amp fuse. Tank Not Heating Error The hot water tank is not heating. • Reset the thermal cut-off switch. • Verify wiring to heater element. • Check heater element. Temperature Probe Error The electronic temperature probe is not working properly. Verify Powder 1 Level Powder 1 dispenser is low and requires refilling. Verify Powder 2 Level Powder 2 dispenser is low and requires refilling. Verify Product Level 1 Coffee 1 dispenser is low and requires refilling. Verify Product Level 2 Coffee 2 dispenser is low and requires refilling. Verify Waste Bin Level Waste bin may be full. • Replace the temperature probe. • Refill the dispenser for powder 1. • Reset the “Refill” message for the Powder 1 dispenser. • Refill the dispenser for powder 2. • Reset the “Refill” message for the Powder 2 dispenser. • Refill the dispenser for coffee 1. • Reset the “Refill” message for the Coffee 1 dispenser. • Refill the dispenser for coffee 2. • Reset the “Refill” message for the Coffee 2 dispenser. • Empty the contents of the waste bin. • Reset the “Waste Bin” counter. • At this point, the water tank is not full and this message has to be reset. To reset it, switch the power off and on. Water Source Error Indicates a problem with the main water supply not getting to the water tank. • If the problem persists, check all components on the water line (water filter, tubing, fittings, etc.). • Check inlet valve to make certain it is functioning properly. • In the case of a temporary disruption with the water supply, the coffee maker will reset itself after every hour. • The whipper motor may be jammed. Clean the whipper assembly. Whipper Error 76 An error has been detected with the whipper. • Verify wiring to the whipper assembly. • The whipper motor assembly may need to be replaced. May 15, 2015