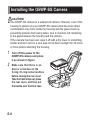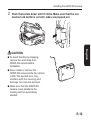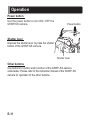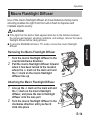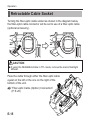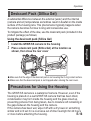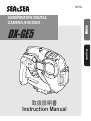
1
06154 DX-GE5 ᪥ᮏㄒ UNDERWATER DIGITAL CAMERA HOUSING English ྲྀᢅㄝ᫂᭩ Instruction Manual Introduction Thank you for purchasing SEA&SEA products. Please read this instruction manual carefully prior to using your underwater housing. Only with a thorough understanding of this manual’s content will you be able to use the housing correctly. After reading the manual, please be sure to keep it in a place where you can easily come back to it at any time. Note: Pressure-resistance inspection sticker Products bearing this sticker are those that have passed SEA&SEA’s criteria-based inspection for pressure resistance. The appearance of color evenness or weld lines on the external body of the product is normal and will not affect its performance. E-1 Contents E-2 English Safety Precautions .................................................................................... E-3 Accessories................................................................................................ E-6 Identification of Parts.................................................................................... E-7 Opening the Rear Cover.......................................................................... E-8 Installing the G5WP-SS Camera..................................................................... E-9 Operation................................................................................................... E-11 LCD Monitor Hood ...................................................................................... E-12 Hand Strap............................................................................................... E-13 Macro Flashlight Diffuser........................................................................ E-14 Retractable Cable Socket..................................................................... E-15 Desiccant Pack (Silica Gel)............................................................... E-16 Precautions for Using the Housing.................................................... E-16 Attaching the Optional Accessories...................................................... E-17 Wide-angle Conversion Lens (Option).............................................. E-18 Accessory Shoe............................................................................ E-19 Fiber-optic Cable (Option) Connection............................................ E-20 Maintenance and Storage.................................................................. E-21 Specifications................................................................................... E-22 Safety Precautions For safe handling of the product, please read the following precautions carefully before use. Failure to heed the precautions listed below could result in serious consequences. To prevent injury or damage to yourself and/or others, please observe the precautions as they contain highly important information related to personal and product safety. WARNING Situations that could result in severe injury or death. CAUTION Situations that could result in property damage or personal injury. WARNING 䃂 Keep out of reach of children to prevent accidental ingestion. If swallowed,seek medical advice immediately. CAUTION 䃂 Carefully observe the instruction manual for the compatible camera for this product before use. 䃂 This product has been designed and manufactured for use at a water depth within 55m / 183.3ft. Please note that diving to a depth in excess of 55m / 183.3ft may cause damage to the product or may lead to water leakage. 䃂 Unauthorized disassembling and/or modification could result in malfunction or flooding, and void product warranty. Take the product to a SEA&SEA authorized service center for repair or inspection. 䃂 Should you notice smoke or an unusual smell coming from the product, turn it off and remove the batteries immediately, taking care to avoid burns. Continued operation could result in injury. After removing the battery, take the product to a SEA&SEA authorized service center for inspection. 䃂 Discontinue use and turn the product off immediately should you notice flooding or leakage. E-3 Safety Precautions 䖃 When the product is flooding, interior pressure may build up. Please be careful E-4 English when opening the product as water may spurt out or the cap may open explosively and cause injuries. 䖃 Do not open the chassis or battery cap in the vicinity of open flames. 䖃 The product has been constructed with an airtight seal. When packing the product for airplane travel, do not seal-up the product to alleviate pressure build up due to atmospheric changes. 䖃 Do not open the product in a wet or sandy environment. Protect the interior from moisture and debris in order to prevent malfunction or flooding. 䖃 Avoid strong shocks/impacts or excess stress to prevent malfunction, damage or breakdown. Make sure that the product has been securely mounted to other products in order to prevent injury, fall or missing. 䖃 Do not rest heavy weight on the product. It might deform the outer casing, damage internal parts, make the waterproofing fail, or result in fire or electric shock. 䖃 Please note that some marks may be left on the camera scraping against the dials or gears of the housing. 䖃 Handle the product carefully so as not to scratch the front port, the lens, the flash window or the finder. 䖃 Always dry the front port, the lens, the flash window or the finder using a soft cloth to prevent stain or salt residue from marring the surface. 䖃 Rinse the product with fresh water, after underwater use. Ensure that the product is waterproofed before rinsing. Refer to [Maintenance and Storage] (P.E-21) for details. 䖃 Never use chemicals, cosmetics, any petroleum solvents such as paint thinner, or neutral detergent on the product. They may deform and damage the product. 䖃 Do not store the product in wet or high humidity place, to avoid mold, rust, corrosion or malfunction. 䖃 Do not store the product with naphthalene or camphor mothballs, or in locations such as a laboratory where chemicals are used. This environment can cause mold, rust, corrosion or malfunction. Safety Precautions 䃂 SEA&SEA SUNPAK Co., Ltd. assumes no liability for compensation of loss of captured images or expenses caused by loss of images, even if you are unable to shoot due to a product defect or malfunction. 䃂 SEA&SEA SUNPAK Co., Ltd. will not be responsible for the replacement or compensation for cameras, lenses or those accessories damaged due to your invalid operation. 䃂 SEA&SEA SUNPAK Co., Ltd. assumes no liability for errors or discrepancies in this manual. 䃂 Carefully observe the O-ring maintenance manual for the handling of O-rings before use. 䃂 The silicon grease included in the product package is inedible. E-5 Accessories Before using this model, check to make sure that all accessories are present. DX-GE5 䃂 䃂 O-ring remover Hand Strap English Sillicon Grease LCD Monitor Hood Desiccant Pack (Silica Gel) O-ring Maintenance Manual DX-GE5 Instruction Manual 䋨this manual䋩 E-6 Identification of Parts Power button Flash window Shutter lever Accessory shoe Macro flashlight diffuser Buckle Retractable cable socket Strap eyelet for macro flashlight diffuser/ Wide conversion lens Fiber-optic cable hook Zoom button T (Tele) Mode selection button Zoom button W (Wide) Function/OK button Face detection/ Left button Delete/ Down button Hand strap hook LCD monitor hood holder LCD monitor hood string eyelet E-7 Disp/Up button Flash/Macro mode/ Right button Menu button Playback button Tripod socket Opening the Rear Cover 1 Push the red buckle lock buttons together to unlock, and pull the buckle all the way towards back to lift the rear cover from the front case 䃂㩷Lift English 2 up the rear cover Pull the rear cover to open CAUTION 䃂㩷Before opening the rear cover, make sure that the housing is completely dry and free of salt deposits. If you find any salt deposits, rinse with fresh water and wipe off water completely with a soft cloth. 䃂 Never use the buckle/buckle lock buttons underwater. 䃂㩷When opening the rear door after use in the water, open it carefully not to let water or sand enter inside the housing. E-8 Installing the G5WP-SS Camera CAUTION 䖃 1 2 The G5WP-SS camera is a waterproof camera. However, even if the housing is placed on a wet G5WP-SS camera that has been dried, condensation may form inside the housing and the glass cloud up, preventing pictures from being taken, due to moisture left remaining in the gaps between the housing and the camera. If the camera has been wet, wipe it off with a dry towel or something similar and let it set it in a cool area out of direct sunlight for 24 hours or more before attaching the housing. Turn off the power of the G5WP-SS camera and place it as shown in figure Make sure that there is no dust or scratches on the O-ring / O-ring contact surface before closing the rear cover. Take the hand strap out, press the rear cover, and then put the buckle over the front case E-9 Installing the G5WP-SS Camera 3 Push the buckle down until it clicks. Make sure that the red buckle lock buttons on both sides are popped out English CAUTION 䖃 To avoid flooding by trapping, remove the wrist strap from G5WP-SS camera before installation. 䖃 Never install or remove the G5WP-SS camera while the camera is ON. The ejected lens may interfere with the housing and damage the camera and lens. 䖃 Make sure that the G5WP-SS camera is set parallel to the housing and not excessively slanted. E-10 Operation Power button Use the power button to turn ON / OFF the G5WP-SS camera. Power button Shutter lever Depress the shutter lever to press the shutter button of the G5WP-SS camera. Shutter lever Other buttons Use buttons to control each function of the G5WP-SS camera underwater. Please refer to the instruction manual of the G5WP-SS camera for operation of the other buttons. E-11 Operation LCD Monitor Hood 1 English 2 Put the LCD monitor hood string through the rear cover eyelet as shown Mount the LCD monitor hood to the holder CAUTION 䃂㩷Please be careful not to get the strap of the LCD monitor hood caught in the rear cover when closing. 䃂㩷Do not hold the LCD monitor hood to carry the housing. It may come off and the housing may fall down.䇭 E-12 Operation Hand Strap Attaching the hand atrap Put the hand strap through the hook on the housing, let other end go through between the strap, and pull the strap tight as shown. 䃂 Do not use the strap when out of water if using optional accessories (such as a wide-angle conversion lens, stay, arm, and strobe / light). The increased weight of the accessories may damage the strap and the strap hook, which may result in equipment damage / loss or personal injury. E-13 Operation Macro Flashlight Diffuser Use of the macro flashlight diffuser at close distances during macro shooting enables the light from the built-in flash to disperse and irradiate objects evenly. CAUTION 䖃㻌If the light from the built-in flash appears dark due to the distance between the camera and subject, shooting conditions, and settings, remove the macro flashlight diffuser before taking pictures. 䖃㻌If using the SEA&SEA strobe in TTL mode, remove the macro flashlight diffuser. English Removing the Macro Flashlight Diffuser 1 2 Turn the macro flashlight diffuser in the counterclockwise direction Pull the macro flashlight diffuser forward when it has been turned to the location where the 䕧 mark on the main unit and the 䕿 mark on the macro flashlight diffuser line up Attaching the Macro Flashlight Diffuser 1 2 Line up the 䕧 mark on the main unit and the 䕿 mark on the macro flashlight diffuser, and place the macro flashlight diffuser onto the lens part Turn the macro flashlight diffuser in the clockwise direction until you feel it click into place E-14 Operation Retractable Cable Socket Turning the fiber-optic cable socket as shown in the diagram below, the fiber-optic cable connector will be set to use of a fiber-optic cable (optional accessory). CAUTION 䖃㻌If using the SEA&SEA strobe in TTL mode, remove the macro flashlight diffuser. Pass the cable through either the fiber-optic cable eyelet on the left or the one on the right of the bottom of the unit. “Fiber-optic Cable (Option) Connection” (P. E-20) E-15 Operation Desiccant Pack (Sillica Gel) A substantial difference between the external (water) and the internal (camera and air) temperatures sometimes result in dewfall on the inside surface of the housing lens. This phenomenon typically happens when the camera becomes hot due to long and consecutive use. To mitigate the effect of the dew, use the desiccant pack (included in the product package) as follows; Using the desiccant pack (Sillica Gel) Install the G5WP-SS camera to the housing Place a desiccant pack (Sillica Gel) at the location as shown, then close the rear cover 䖃 Make sure that the edge of the desiccant pack is not covering the O-ring contact surface. 䖃 Make sure thet the desiccant pack is not trapped when closing the rear cover. Precautions for Using the Housing The G5WP-SS camera is a waterproof camera. However, even if the housing is placed on a wet G5WP-SS camera that has been dried, condensation may form inside the housing and the glass cloud up, preventing pictures from being taken, due to moisture left remaining in the gaps between the housing and the camera. If the camera has been wet, wipe it off with a dry towel or something similar and let it set it in a cool area out of direct sunlight for 24 hours or more before attaching the housing. E-16 English 1 2 Attaching the Optional Accessories This product accepts SEA&SEA optional accessories. By using this product in combination with those accessories, you will be able to try various shooting techniques. Lenses, strobes and other accessories have different depth rating. Check the depth rating for each before use. 䃂 Read the instruction manual for each accessory before use. 䃂 Wide-angle Conversion Lens (Option) Optional Wide-Angle Conversion Lens for DX-860G (#52115) can be attached to this product. Attaching a wide-angle conversion lens and setting the camera to wide converter mode may cause the four corners of the screen to get dark (vignetting). Press the Zoom button (T) once and confirm on the LCD screen that the vignetting in the four corners has been resolved before taking photographs. The camera angle of view in this state is equivalent to 28 mm (0.8 times). Attaching the Wide-Angle Conversion Lens 1 2 Remove the macro flashlight diffuser from the housing 䇸Macro Flashlight Diffuser䇹䋨P.E-14䋩 Align the salient on the upper surface of the housing lens and the mark on the lens bayonet, then impose the close-up lens to the housing E-17 Attaching the Optional Accessories 3 Turn the close-up lens clockwise until it clicks E-18 English CAUTION When using the lens, loosen or lightly shake the lens while underwater to remove any air trapped between the lens and the housing. 䃂 When the wide-angle conversion lens is used on land, there may be cases where it is difficult to focus the camera due to effects from the distance between the camera and subject, shooting conditions, and the like. 䃂 Attaching the Optional Accessories Accessory shoe SEA&SEA strobes / lights can be mounted to the accessory shoe by using optional Mini Shoe Arm (#29511) or Hot Shoe Arm (#29501). 䋼Example䋾 CAUTION The max. weight of an accessory that can be mounted to the accessory shoe is approx. 750g / 26.3oz. 䃂 Remove the accessories from the accessory shoe when carrying the housing out of water. 䃂 E-19 Attaching the Optional Accessories Fiber-optic Cable (Option) Connection This product has a fiber-optic cable socket for the external strobe connection. 䋼Example䋾 Cable socket 䇸Retractable Cable Socket䇹䋨P.E-15䋩 Plug the fiber-optic cable connector fully into the socket as shown. Ɣ External strobe works effectively for various shooting styles such as wide-angle photography (camera's built-in flash is insufficient), back-lighting condition, backscatter elimination, and macro photography (to acquire greater brilliance). E-20 Maintenance and Storage CAUTION 䃂 Never use chemicals, cosmetics, any petroleum solvents such as paint thinner, or neutral detergent on the product. They may deform and damage the product. 䃂 After each use in salt water, make sure it is watertight, then soak it sufficiently in fresh water and rinse with running water. Operate all the buttons, dials or levers underwater, but do not operate the buckle / buckle lock buttons. 䃂㩷Insufficient soaking causes damage by salt to the product. Salty residue may be left on the product where it will crystallize as it evaporates. Crystallized salt is hard to dissolve and difficult to be removed once formed, and it will result in water leakage. 䃂㩷After rinsing, dry the product well with a soft dry cloth, then let the product dry in the shade, out of direct sunlight. 䃂㩷Do not dry the product by heating (using a hair dryer, for example). Heating can deform and damage the product. 䃂㩷If you will not use the product for an extended period of time, store it away from high temperatures, high humidity, direct sunlight, or exterme cold. 䃂㩷Do not store the product with naphthalene or camphor mothballs, or in locations such as a laboratory where chemicals are used. This environment can cause mold, rust, corrosion or malfunction. 䃂㩷Always remove the camera from the housing after use. Thoroughly wipe off water before opening the housing and avoid any water drops inside the housing. 䃂㩷After using the product, maintain the O-rings before storing. Examine the O-rings before and after each dive. We recommend early exchange of the O-rings, at least once a year. 䃂㩷Every two years we recommend a complete overhaul of O-rings regardless of the frequency in use, for the best performance of the product. E-21 Specifications Compatible camera G5WP-SS Power button, Shutter lever, Zoom button (T/W), Mode selection button, Disp/Up button, Face detection/Left button, Function/OK button, Flash/Macro mode/Right button, Delete/Down button, Menu button, Playback button Construction Body䋺Polycarbonate Grip䋺ABS resin Depth rating 55m Dimensions Apporox.140(W)×109(h)×82.5(D) mm (5.5×4.3×3.25 inches) Weight 385g (housing only) Accessories 䃂㩷LCD monitor hood 䃂㩷O-ring remover 䃂㩷Desiccant pack (Silica Gel) 䃂㩷Hand strap 䃂㩷Silicone grease 䃂㩷O-ring maintenance manual 䃂㩷Instruction manual English Controls * The specifications and appearance are subject to change without notice. E-22 䝅䞊䜰䞁䝗䝅䞊䞉䝃䞁䝟䝑䜽ᰴᘧ♫ 䛈㻟㻟㻞㻙㻜㻜㻝㻢㻌ᇸ⋢┴ᕝཱྀᕷᖾ⏫㻟㻙㻞㻙㻞㻜 㼀㻱㻸㻚㻜㻠㻤㻙㻞㻡㻢㻙㻞㻞㻡㻝 䜹䝇䝍䝬䞊䝃䞊䝡䝇䝉䞁䝍䞊 㼀㻱㻸㻚㻜㻠㻤㻙㻞㻡㻡㻙㻤㻡㻝㻞 㼔㼠㼠㼜㻦㻛㻛㼣㼣㼣㻚㼟㼑㼍㼍㼚㼐㼟㼑㼍㻚㼏㼛㻚㼖㼜 SEA&SEA SUNPAK Co., Ltd. 3-2-20, Saiwai-cho, Kawaguchi-shi, Saitama, Japan 332-0016 TEL. +81-48-256-2251 World Customer Service Center TEL. +81-48-255-8512 http://www.seaandsea.jp 1003-Z-02A 䠄㻞㻜㻝㻜ᖺ㻤᭶⌧ᅾ䠋㻯㼡㼞㼞㼑㼚㼠㻌㼍㼟㻌㼛㼒㻌㻭㼡㼓㻚㻌㻞㻜㻝㻜䠅