1
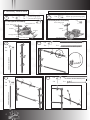
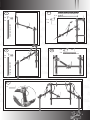
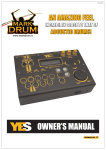
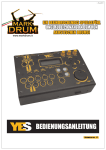
Content
1. Introduction1
2. Important safety instructions
2
3. Packing list4
4. Assembly instructions5
5. Product overview8
6. Before you start8
7. Ready to start9
8. Tempo9
9. Loop Record9
10. Preset kits9
11. Create kit10
12. Creative FX10
13. FX10
14. Preset Kits List12
15. Warranty 13
1. Introduction
Congratulations on your purchase of the YES drum kit by Mark Drum.
YES: The Yellow Sound
YES is the first professional electronic drum kit with a living, beating, acoustic, yellow, Italian
heart. Yellow is sunshine, energy, vitality, creativity, inspiration, and... madness. It’s true, we had
to be insane to cram so many innovations into a single kit! From the superb sounds provided
by the onboard drum kits, to the amazing lightness and portability of the aluminium rack
(powered by our bus connection system) and the innovative patented “Hot Spot Removal”
sensor technology, this is a drum product you have not seen before. All of these outstanding
features are packed into one practical and simple design, because... YES is MORE! Have you
ever wondered about the color of your sound? Now we can confirm: YES, the sound is YELLOW.
Calling Mark Drum “electronic drums” would be selling them short, since playing them feels so much
like playing an acoustic drum kit.
The Digital Signal Processor featured in the sound module is one of the most powerful on the
market.
The Smart Pad system features multiple triggers and electronic sensors on each pad, and 512
dynamic levels of the Mark Drum YES sounds will convey every small detail of your playing.
The “YES” Sound Module features a Bus Drum Interface: with a single RJ11 plug, you can connect
each pad directly to the ultralight and ultraportable aluminum rack bar, using spiral RJ11 cables (very
common and reliable)—this is faster and easier than connecting each single pad to the sound module.
We’re very proud to be on the cutting edge of design, feel, and sound; this is made possible by our
philosophy for all Parsek brands: always listening carefully to the needs and suggestions of musicians,
and taking advantage of our 100% Made in Italy production to make innovations and improvements
quickly.
This quick reference guide will help you get started with your Mark Drum kit. If you have any questions
after reading it, we invite you to contact us any time with your comments and questions at: info@
markdrum.it. More details will be provided in the forthcoming full product manual.
Thanks, and enjoy your Mark Drums!
1
2. Important safety instructions
1) Read these instructions;
2) Keep these instructions;
3) Heed all warnings;
4) Follow all instructions;
5) Do not use this apparatus near water;
6) Clean only with dry a cloth;
7) Do not block any ventilation openings. Install in accordance with the manufacturer’s instructions;
8) Do not install near any heat sources such as radiators, heat registers, stoves, or other apparatuses
(including amplifiers) that produce heat;
9) Do not defeat the safety purpose of the polarized or ground-type plug. A polarized plug has two
blades with one wider than the other. A grounding-type plug has two blades and a third grounding prong. The
wide blade or the third prong are provided for your safety. If the provided plug does not fit into your outlet,
consult an electrician for replacement of the obsolete outlet;
10) Protect the power cord from being walked on or pinched, particularly at plugs, convenience
receptacles, and the point where they exit from the apparatus;
11) Only use attachments/accessories specified by the manufacturer;
12) Unplug this apparatus during lightning storms or when unused for long periods of time;
13) Refer all servicing to qualified service personnel. Servicing is required when the apparatus has been
damaged in any way, such as when the power-supply cord or plug is damaged, liquid has been spilled or
objects have fallen into the apparatus, or when the apparatus has been exposed to rain or moisture, does not
operate normally, or has been dropped;
14)
“Warning: to reduce the risk of fire or electric shock, do not expose this apparatus to rain or moisture;
and objects filled with liquids, such as vases, should not be placed on this apparatus”;
15)
The socket outlet shall be installed near the equipment and shall be easily accessible;
16)
The power cord must be unplugged prior to servicing.
MORE INFORMATION
For warranty and service information, please contact your local Mark Drum distributor (contact information
available at www.markdrum.it).
For more technical information, please visit us at www.markdrum.it and fill out the form on the Contact Us
page.
We hope you enjoy your Mark Drum kit and use it to make great music!
“The Lightning Flash with arrowhead symbol within an equilateral triangle, is intended to alert the user to the
presence of uninsulated “dangerous voltage” within the product enclosure that may be of sufficient magnitude
to constitute a risk of shock to persons.”
“The exclamation point within an equilateral triangle is intended to alert the user to the presence of important
operating and maintenance (servicing) instructions in the literature accompanying the product.”
“The
Lightning
Flash
with
arrowhead
symbol
within
an
equilateral triangle, is intended to alert the user to the presence of
uninsulated “dangerous voltage” within the product enclosure that
may be of sufficient magnitude to constitute a risk of shock to persons.”
“The exclamation point within an equilateral triangle is
intended to alert the user to the presence of important
operating and maintenance (servicing) instructions in the
literature accompanying the product.”
2
2. Prècautions d’emploi
1) Lire ces instructions;
2) Conserver ces instructions;
3) Suivre tous les conseils d’utilisations;
4) Suivre toutes les instructions;
5) Ne pas utiliser cet appareil au bord de l’eau;
6) Nettoyer uniquement avec un chiffon humide;
7) Ne pas bloquer le système de ventilation. Installer conformément aux instructions du fabricant;
8) Ne pas installer l’appareil près d’une source de chaleur tel qu’un radiateur, un fourneau, ou bien un
autre appareil qui produit de la chaleur;
9) Ne pas modifier le système de sécurité de la fiche polarisée ou de de la fiche pour les prises de terre.
Une fiche polarisée a deux broches, l’une étant plus distante de l’autre. Une fiche pour prise de terre a deux
broches et une pointe pour la masse. La broche plus distante et la pointe pour la masse ont été installées pour
votre sécurité. Si la fiche fournie de rentre pas dans votre prise de courant consulter un électricien pour la
substitution;
10) Protéger le cordon d’alimentation afin qu’il ne soit pas piétiné ou écrasé tout particulièrement au
niveau des fiches, des prises de courant femelles, et des parties qui sortent de l’appareil;
11) Utiliser uniquement les accessoires recommendés par le fabricant;
12) Ne pas branché l’appareil en cas d’orage accompagné d’éclairs. Le débrancher en cas de non
utilisation prolongée;
13) S’adresser à un service assistance agréé si l’appareil a subi des dommages, si le cordon d’alimentation
ou la fiche a été endommagé, si un liquide a été renversé sur l’appareil ou bien si un object est tombé dans
l’appareil, si ce dernier a été exposé à la pluie ou à l’humidité, s’il ne fonctionne pas correctement ou s’il est
tombé;
14)
“Avertissant: pour réduire le risque du feu ou de décharge électrique, n’exposez pas cet appareil à
la pluie ou l’humidité et les objets remplis de liquides; tels que des vases, ne devraient pas être placés sur cet
appareil”;
15)
La prise de courant doit être installée près de l’appareil et doit être facilement accessible;
16)
La fiche principale doit être débranchée avant toute opération d’entretien.
3
3. Packing List
Rack Box
2 x Aluminum Tubular 800
2 x Aluminum Tubular 640
1 x Aluminum Tubular 640 (w/o foot)
1 x Aluminum Tubular 400
3 x Aluminum Profile DSCR© 640
Rack Fitting Box
9 x Rack Joint Assembly
2 x L120 spiral cable
7 x Pad Joint Assembly
5 x L Arm
1 x Drum Key
Cymbal Arms Box
2 x Cymbal arm
Sound Module Box
1 x Sound Module YES
1 x Power pack
1 x Power cable
1 x SD card 4GB
1 x RJ11 L120 spiral cable
3 x Tom Box
1 x Tom
1 x L120 spiral cable
Snare Box
1 x Snare
1 x L300 spiral cable
Ride Box
1 x Ride
1 x L300 spiral cable
Kick Box
1 x Kick Pad
1 x L300 spiral cable
1 x Curved beater
HiHat Box
1 x HiHat
1 x L300 spiral cable
1 x HiHat Felt
1 x HiHat plate
Crash Box
1 x Crash
1 x L300 spiral cable
4
4. Assembly Instructions
7x
7x
7x
1
Rack Box - Rack Fitting Box - Cymbal Arms Box
(screw long type)
(screw short type)
7 x Pad Joint Assembly
2
9 x Rack Joint Assembly
ED
washer
BL
SSEM
A
washer
washer
BLED
M
ASSE
hexagonal nut
screw long type
hexagonal nut
4
3
1x
2x
1x
2x
4x
Aluminum Tubular 640 (w/o foot)
Aluminum Profile DSCR© 640
Aluminum tubular 800
1x
(screw long type)
screw long type
hexagonal nut
screw short type
18 x
9x
5
6
1x
3x
Aluminum tubular 800
1x
5
2x
1x
Aluminum Profile DSCR© 640
1x
1x
8
7
1x
1x
2x
Aluminum tubular 640
1x
9
Aluminum Profile DSCR© 640
1x
10
2x
1x
1x
Aluminum Tubular 400
Aluminum tubular 640
1x
1x
11
2x
6
Sound Module Box - Crash Box - Tom Box - Ride Box - Snare Box
12
Crash
1x
Ride
1x
Tom2
1x
Tom1
1x
Sound Module
1x
Tom3
1x
Snare
1x
note: any pad can be connected to any socket on the rack
HiHat Box
Kick Box
13
1x
1x
1x
Mount the kick beater so that it hits the kick pad at
the center of its striking surface.
7
14
1x
1x
1x
1x
Put the hi-hat plate and felt on top of the existing
parts of your hi-hat stand.
5. Product Overview
25
13
26
23
14
20
4
27
1
2
3
5
6
7
8
15
16
17
18
21
22
24
28
9
10
11
12
19
29
6. Before you start
- Insert the SD Card in the slot (29).
- Once you’ve assembled the kit, connect the pads and turn on the Sound Module’s power.
Now you need to set up the hi-hat and calibrate the snare. The Mark Drum system allows you to use
your own hi-hat hardware and set its height as you like it, keeping the feel and performance you’re
used to.
- After setting the hi-hat to your desired height, push the hi-hat button (1) on the Sound Module.
Then, using the DOWN button (below OK), scroll through the menu until you find the “calibration”
option. Press OK, step on the hi-hat pedal to “close” it, and gently start playing the hi-hats with your
sticks. The hi-hats will be silent until the calibrations is finished, and at that time you will hear the
hi-hats produce sound.
- Set the snare skin tension to taste using a standard drum key, then press the SNARE button (4), and
scroll to the calibration page in the menu (as per the instructions above), push OK, and hit the snare
precisely on top of the white sensor closest to the L joint clamp. The snare will be silent until the
calibration is complete, then, at the end of the calibration, it will start producing sound.
The hi-hat and snare are now calibrated and ready to perform optimally.
- Before you start, check that the skins of the toms are also set up to your preferred tension .
- Set the bass drum pedal, taking care to have the beater perfectly centered on the kick pad. The skincovered kick pad was chosen after several tests with many drummers—they that found that it felt the
most like playing on an acoustic kick drum.
8
7. Ready to start
Now that everything is assembled and calibrated, you’re ready to discover all the exciting and natural
sounding Mark Drum sound presets!
Change the “kit” by scrolling through the choices using the UP and DOWN buttons on the Sound
Module (above and below the OK button), or use the DIAL CONTROL (28) and press OK to confirm
your choice and hear the preset. On the display you’ll find these symbols:
> = drumkit enabled
* = changing
Use the BACK button to go back.
The menu includes some very useful features and effects. For example, to further increase the realism
of the sound, the “Player Immersion” feature allows you to virtually “move yourself” from your playing
position (as you would hear yourself playing from behind the kit) to the position of the audience… or
even in between, in order to achieve the most natural feeling! Now you can choose your perspective!
8. Tempo
(CLICK-METRONOME)
To change the tempo and the click sound, press the TEMPO (19) button, and choose which parameter
you want to adjust (TIME – BPM – VOLUME – SELECT SOUND – TAP TEMPO).
Click OK (21) to select, or BACK (20) to go to the previous page.
If you choose “TAP TEMPO,” push the OK button and then play steady quarter notes on a drum (the
bass drum works best) to discover the tempo, then set the “TIME” (tempo) you like.
9. Loop record
Before you begin recording a loop, set a tempo then push the “LOOP REC” (18) button. The guide click
track will start, and then after two measures, recording starts and continues for four bars. Press LOOP
OPTION (17) / “STOP” to stop it or “PLAY” to re-start your recorded loop.
Note: The “LOOP” reproduces the sounds of whatever KIT you’re using.
The Loop track will be deleted when you turn off the unit.
10. Preset kits
There are 24 presets kits to cover all your needs, from rock to jazz, hip hop to metal, and much more.
The presets are comprised of more of 10,000 wav samples, all recorded at a sample frequency of
44.1 kHz, with up to 16 velocity samples levels (for creating a fully natural feel), and up to 16 random
samples per layer (to avoid the gunshot side effect).
Simply press the KIT button (14) and scroll through the list, pushing OK to activate! Check the list on
the last page of this guide to see descriptions of all the kit options.
9
11. Create kit
The 24 preset kits feature 205 different single voices:
> 19 bass drums
> 23 snares
> 13 hi-hats
> 52 toms
> 24 crashes
> 14 rides
> 60 special sounds
You can choose single voices from our factory programmed kits, mixing and matching them to create
your own USER kits (up to a maximum of four). Push the button for whichever drum or cymbal sound
you want to change (buttons 1 to 12), then push OK and press the CREATE KIT button (13), choose
one of the four locations available and “SAVE” by pushing the OK button. Repeat this operation for the
other drums and cymbals in the kit, and use your imagination!
12. Creative FX
The Mark Drum YES features three types of CREATIVE FX to tailor each kit to your specific tastes.
PLAYER IMMERSION
As already mentioned, the “Player Immersion” feature allows you to virtually “move” your listening
perspective. This was made possible through an elaborate, custom recording process that captured
the sounds from both the drummer’s perspective and the “audience” perspective, also including the
sympathetic resonance of the other drums… for an unparalleled REAL sound experience!
LAYER
This feature allows you to add a second sample to the main sample, thanks to the two-bus sample
structure. For example, you can layer a clap sound on top of a snare sound.
KALEIDOSCOPE
The Kaleidoscope is a very creative feature. You can use it to set the number of sample sound variations
you would like to add to your sound. Normally, the multi-samples use a fixed alternate sample that
is related to the level/volume of the hit. The Kaleidoscope Kits use multi-samples as unique sample
nuances, with each layer featuring 15 random variations to create “continuous moving” sounds,
giving free reign to your creativity.
13. FX
The FX section includes:
- Top-quality reverb processor
- Compressors for snare, toms, kick.
- Master EQ
Each FX features several ready-to-use factory presets.
10
FX - Preset List
• EQ
Description
01-Loudness1
Gentle Loudness Boost
02-Loudness2
Loudness Boost
03-Booster
Massive Boost
04-Boomy 1
Boomy Room Correction - cut@ 90Hz
05-Boomy 2
Boomy Room Correction - cut@ 80Hz and gentle High Boost
• COMPRESSOR
Description
01-Gentle
Lite compression
02-Classic
All-purpose medium compression
03-Massive
Massive compression
04-Heavy
Heavy compression
05-Attack#1
Transients Booster
06-Attack#2
Transients Booster
07-British
Pumping compression
08-Smooth
Smooth levelling compression
09-Rude
Aggressive compression with heavy attack and release
10-Impact
Heavy Attack and Levelling
• REVERB
Description
Time (secs)
01-Drummer 1
Small Room/Hall
0,5
02-Drummer 2
03-Solid Verb
04-Bright Slam
05-Thin Verb
06-Rounded
07-Dark Side
08-Rich One
09-Fat Stage
10-Ballad 1
11-Ballad 2
12-Ballad 3
13-LX Class
14-Garage
15-Big Hall
Small Dark Room/Hall with pre-delay
Fat Medium Reverb
Bright Small Reverb
Thin Reverb
Medium smooth reverb
Dark medium reverb
Rich fat medium hall
Fat wide medium hall
Medium rich hall with pre-delay
Medium rich hall with pre-delay (darker than 1)
Medium rich hall with pre-delay (darker than 2)
Big Class Hall
Deep dark reverb
Big and rich hall
0,5
0,8
0,9
1
1
1
1,2
1,4
1,4
1,8
2,4
2,9
3
3,5
11
14. Preset Kits List
Kit
Description
Creative FX
01 . Natural Kit
Acoustic, highly dynamic, lightly compressed natural
drum sounds
PLAYER IMMERSION
02. Studio Kit
Acoustic kit with studio processing
PLAYER IMMERSION
03. Vintage Kit
Acoustic sounds from the 60s and 70s, punchy with a
deep timbre
PLAYER IMMERSION
LAYER
04. Power Kit
Natural sounds mixed with synthetic components Rock/Alternative
PLAYER IMMERSION
LAYER
05. Elektro Kit
Electronic, with Mark Drum “Kaleidoscope” feature
- Electronic/Alternative/Jungle
KALEIDOSCOPE
LAYER
06. Heavy Artist Kit Rock kit, super-punchy and focused
PLAYER IMMERSION
07. Brushman Kit
Jazz kit with 18" closed bass drum and brushes
PLAYER IMMERSION
08. Funk Kit
Acoustic funk kit with piccolo snare
PLAYER IMMERSION
09. Dance-Club Kit
Electronic, Dance/House
LAYER
10. HipHop Kit
Electronic Hip Hop
PLAYER IMMERSION
LAYER
11. Afro Latin Kit
Percussion sounds, Afro/Latin (timbales, bongos,
congas)
PLAYER IMMERSION
12. Ethnic Kit
Percussion sounds, South American/ethnic (cajon,
cajinto, etc.)
PLAYER IMMERSION
13. Brush MX Kit
Pop/Jazz with brushes
PLAYER IMMERSION
14. Urban Kit
Hip Hop/Electronic/Alternative
PLAYER IMMERSION
LAYER
15. Compact Kit
Highly tuned small kit sounds
PLAYER IMMERSION
16. Resofunk Kit
Funky with a resonant snare
PLAYER IMMERSION
17 . Ballad Kit
Acoustic, deep snare reverb, Pop/Ballad
PLAYER IMMERSION
18. Metal Kit
Compressed and heavy sounds for Metal/Hard Rock
PLAYER IMMERSION
19. Hybrid Kit
Hip Hop/Funky
PLAYER IMMERSION
LAYER
20. Combo Kit
Hybrid, mix of drum kit and percussion
PLAYER IMMERSION
21 . Britcomp Kit
Highly compressed natural sounds
PLAYER IMMERSION
22. Wide Kit
Natural sounds with large reverb
PLAYER IMMERSION
23. Session Kit
Compressed with reverb, “record-ready”
PLAYER IMMERSION
24 . LoFi Heat Kit
Highly-processed Vintage/Lo-Fi sounds
PLAYER IMMERSION
12
15. Warranty
LIMITED WARRANTY
Mark Drum offers an international limited warranty on Mark Drum products purchased from any
authorized Mark Drum dealer, effective from the day of purchase. The terms of this warranty vary
from country to country; please contact the Mark Drum distributor in your country for details.
Please register this product online at www.markdrum.it to establish the date of purchase.
However, please note that you are required to retain a copy of your receipt as proof of purchase in
order to receive warranty service.
This warranty does not apply to any damage to the product caused by misuse, mishandling,
accident, abuse, alteration, modification or unauthorized repairs. Product appearance and normal
wear and tear (worn paint, scratches, etc.) are not covered by this warranty. Mark Drum reserves
the right to be the sole arbiter regarding the misuse or abuse of this product.
Mark Drum assumes no liability for any incidental or consequential damages, which may result
from the failure of this product. Any warranties implied in fact or by law are limited to the duration
of this express limited warranty. Your legal rights related to the warranty will vary depending on
the country of purchase.
WARRANTY CARD
This product is guaranteed by the warranty provided in the country of purchase, under the
following conditions:
A - The Mark Drum warranty is only applicable if this document, properly completed and with
the original invoice/bill of sale, mentioning model, serial number and purchase date, is presented
together with this document.
B - The obligations of Mark Drum are limited to the repair of defects. Warranty repair eligibility will
be decided at the sole discretion of Mark Drum or its representatives. Freight, freight insurance
costs, and any other costs related to the repair of this product are not covered by this warranty.
C - All warranty repairs must be made by Mark Drum or an authorized Mark Drum (PARSEK)
service center.
D - This warranty does not apply in the following instances:
• if the damage was caused by accident, negligence or modifications; use of non Mark Drum spare
parts; or improper use, installation or packing;
• if the serial number on the equipment is illegible;
• if the damage was caused by lightning, water, fire, incorrect main voltage, insufficient ventilation
or any other cause beyond the control of Mark Drum.
E – Mark Drum reserves the right to redesign or improve/modify its product at any time without
any obligation to modify previously manufactured products.
Parsek srl. - Italy - 66020 San Giovanni Teatino (Ch) - Via Po, 52/A
Tel. +39 085 446 37 55 - Fax +39 085 440 77 64 - www.markdrum.it - [email protected]
13
WARRANTY CARD
We’d like to thank you for choosing a Mark Drum product.
If any problem occurs, please don’t hesitate to contact our support team at [email protected].
You can fill out this form and send a copy to Mark Drum (Parsek srl, Via Po 52, 66020 San Giovanni
Teatino, CHIETI - ITALY).
Registering your warranty identifies you and your product, in case you are ever in need of
warranty service. Please note that in order to qualify for warranty service, you must retain a copy
of the sales receipt or bill of delivery as proof of purchase.
The information that you provide here will not be shared with any third parties and will be used
for Mark Drum internal business purposes only.
PRODUCT INFORMATION
Model
_________________________ Serial Number _________________________
Date of Purchase_________________________(mm/dd/yyyy)
DEALER INFORMATION Dealer
_________________________
Dealer City
_________________________ Dealer Country _________________________
PERSONAL INFORMATION
Purchased by:
First Name __________________________________
Last Name ________________________________
Your Email Address
_________________________
Address_________________________________________________________
City _________________________
State/Prov_________________________
Zip_________________________Country_________________________
Do you want to join our mailing list? □ YES □ NO
MORE INFO (* not mandatory)
*Age _________________________
*Occupation
_________________________
*Sex
WHERE DO YOU PLAY YOUR INSTRUMENT?
□ Stage / Performing Musician
□ School / Student
□ Home
□ Studio Recording
WHAT LEVEL OF PLAYER ARE YOU?
□ Beginner
□ Professional
PRODUCT PURCHASED VIA:
□ Internet
□ Amateur
_________________________
□ Classroom / Educator
□ Semi-Professional
□ Retail Store
WHAT MOST INFLUENCED YOUR BUYING DECISION?
______________________________________________________________________________________________________________
______________________________________________________________________________________________________________
____________________________________________________________________________________
14
Italy - via Po, 52 - 66020 San Giovanni Teatino (Ch)
Tel. +39 085 446 3755 - Fax +39 085 440 7764
www.markdrum.it