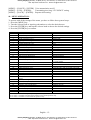
1
Παύλος Μεϊµάρης Ελπίδος 34 (ΒΑΟ) Συκιές, Θεσσαλονίκη τηλ 2310.634.513, 6977.38.38.73
URL: http://www.meimaris.com - Εmail: [email protected]
Παύλος Μεϊµάρης Ελπίδος 34 (ΒΑΟ) Συκιές, Θεσσαλονίκη τηλ 2310.634.513, 6977.38.38.73
URL: http://www.meimaris.com - Εmail: [email protected]
Παύλος Μεϊµάρης Ελπίδος 34 (ΒΑΟ) Συκιές, Θεσσαλονίκη τηλ 2310.634.513, 6977.38.38.73
URL: http://www.meimaris.com - Εmail: [email protected]
INDEX 1 of 2
Page no.
1.2.3.-
INTRODUCTION
MAINTENANCE AND SAFETY CAUTIONS
SUPPLIED ARTICLES AND OPTIONAL ACCESSORIES
3.1.- SUPPLIED ARTICLES
3.2.- OPTIONAL ACCESSORIES
4.- CHARACTERISTICS
5.- TECHNICAL SPECIFICATIONS
5.1.- GENERAL
5.2.- TRANSMITTER
5.3.- RECEIVER
6.- TRANSCEIVER DESCRIPTION
6.1.- CONTROLS, KEYS AND CONNECTORS
6.2.- LCD DISPLAY
7.- INITIAL PREPARATIONS
7.1.- INSTALL THE ANTENNA
7.2.- INSTALL THE BATTERY
7.3.- REMOVE THE BATTERY
7.4.- INSTALL AND REMOVE THE BELT CLIP
7.5.- INSTALL THE EXTERNAL MICROHEADSET (OPTIONAL)
7.6.- BATTERY CHARGING
8.- OPERATION
8.1.- TURN ON/OFF THE TRANSCEIVER
8.2.- VOLUME ADJUST
8.3.- TRANSMITTING/RECEIVING
8.4.- ALARM FUNCTION
8.5.- EMERGENCY CHANNEL
8.6.- REVERSE FREQUENCY FUNCTION
8.7.- SCANNING
8.8.- SELECT SCAN TYPE
8.9.- OPERATION MODE SELECTION
8.10.- FM RADIO
8.11.- SIDE KEYS DEFINITION
8.12.- “DTMF” ENCODE AND DECODE
8.13.- SIDE KEYS
8.14.- “DTMF/MSK/5-TONE” OPERATION
8.15.- “ANI” FUNCTION
8.16.- STORE
8.17.- EMERGENCY CALL CHANNEL STORAGE
8.18.- DELETE A CHANNEL
9.- SHORTCUTS OPERATION
10.- MENU OPERATION
11.- ADVANCED OPERATIONS
11.1.- SCANNING
11.2.- PRIORITY CHANNEL SCAN
11.3.- “VOX” FUNCTION SETTING
11.4.- SETTING THE TRANSMISSION POWER
English - 2 Παύλος Μεϊµάρης Ελπίδος 34 (ΒΑΟ) Συκιές, Θεσσαλονίκη τηλ 2310.634.513, 6977.38.38.73
URL: http://www.meimaris.com - Εmail: [email protected]
4
5
6
6
6
6
7
7
7
7
8
8
9
9
9
9
9
10
10
10
10
10
10
10
11
11
11
11
11
12
12
12
12
13
13
13
14
14
14
14
15
16
16
16
16
16
Παύλος Μεϊµάρης Ελπίδος 34 (ΒΑΟ) Συκιές, Θεσσαλονίκη τηλ 2310.634.513, 6977.38.38.73
URL: http://www.meimaris.com - Εmail: [email protected]
INDEX 2 of 2
Page no.
12.13.14.15.16.-
11.5.- SETTING SQUELCH
11.6.- “SCRAMBLER” FUNCTION
11.7.- BACKLIGHT COLOR SELECTION
11.8- “BEEP” ON/OFF
11.9.- VOICE PROMPT
11.10- “ANI” FUNCTION
11.11.- KEYPAD LOCK
11.12.- TIME OUT TIMER “TOT”
11.13.- SCAN TYPE SELECTION
11.14.- WIDE AND NARROW BAND SELECTION
11.15.- REPEATER SHIFT
11.16.- REPEATER SHIFT ADJUSTMENT
11.17.- SELECT “CTCSS” AND “DCS” ON TRANSMITTING AND
RECEIVING
11.18.- SELECT “CTCSS” AND “DCS” ON RECEIVING
11.19.- SELECT “CTCSS” AND “DCS” ON TRANSMITTING
11.20.- SELECT THE FREQUENCY STEP
11.21.- “CTCSS” SCAN
11.22.- “DCS” SCAN
11.23.- BACKLIGHT ON/OFF
11.24.- END ROGER ALERT
11.25.- FM RADIO AND MONITOR TWO WAY RADIO SIGNAL
11.26.- KEYPAD LOCK
11.27.- BATTERY SAVE FUNCTION
11.28.- A/B CHANNEL VOLUME ADJUSTMENT
11.29.- SETTING TRANSMITTING CHANNEL WHEN IN THE STATUS
OF DUAL STANDBY
11.30.- CROSS-BAND REPEATER MODE
11.31.- DUPLEX MODE
11.32.- SCAN ADD CHANNELS
11.33.- CHANNEL NAME EDIT
“CTCSS” TABLE
“DCS” TABLE
TROUBLESHOOTING
DECLARATION OF CONFORMITY
GUARANTEE
English - 3 Παύλος Μεϊµάρης Ελπίδος 34 (ΒΑΟ) Συκιές, Θεσσαλονίκη τηλ 2310.634.513, 6977.38.38.73
URL: http://www.meimaris.com - Εmail: [email protected]
16
17
17
17
17
18
18
18
18
19
19
19
19
19
20
20
20
20
20
20
21
21
21
21
21
22
22
22
23
23
23
24
25
26
Παύλος Μεϊµάρης Ελπίδος 34 (ΒΑΟ) Συκιές, Θεσσαλονίκη τηλ 2310.634.513, 6977.38.38.73
URL: http://www.meimaris.com - Εmail: [email protected]
1.- INTRODUCTION:
•
Our Company he thanks him for the trust deposited in this product, we
are convinced that it will be highly pleased with the quality and operation functions of this
equipment.
• This radio equipment has been designed and manufactured for users that specify a equipment of
communication of easy handling, of the highest quality and yield besides an excellent reliability.
• The transceiver that he has just acquired has been manufactured of agreement with a strict quality
control of the manufacturing company.
• This equipment is given in a packing that muffles the blows and vibrations of the transport,
guaranteeing this way an excellent state in the acquisition moment.
• After remove the packing, verify that the equipment or their accessories are not damaged. In the
event of doubt it doesn't use and contact the Technical Service or salesperson.
• The packing materials (plastic bags, etc.), they should not be left within reach of the children,
since they are a potential danger source.
• The manufacturer and the importer decline any responsibility for derived damages of an
inadequate, incorrect or imprudent use of the equipment.
• Read in a complete way this manual in order to avoiding damages in the equipment or incorrect
manipulations.
• It is important to stress that some of the functions of the equipment are explained in relation to
information given in remote or previous chapters, if you only read some concrete parts of this
manual, he will take a risk to not understanding the complete explanation of the functions of those
that it prepares the equipment.
• Attention to the notes included in the sections squares shady.
• Make sure of understanding all the indications of this manual correctly.
• Keep this manual for future consults.
• The equipment reparations or internal adjustments should always be carried out in a Technical
Authorized Service.
• Equipment internal manipulation, alteration or change of the technical characteristics performed
by personal unaware to the Technical Service, it invalidates the guarantee.
• This equipment has come out of the distributor's warehouses under technical use conditions
adapted to the effective country legislation of use this transceiver. To change this characteristics, to
carry out internal adjustments or not authorized modifications can take to an illegal use of the
equipment constituting an infraction sanction as well as to generate interferences that can harm to
other legally established communications.
• Verify that the equipment is programmed correctly, being adjusted to the requirements in the use
country.
• If this transceiver is used without license or authorization necessary, is infringed legislation and it
is incurred in legal responsibilities. In such a case, it should consult to the authorities of
Telecommunication or their distributor or salesperson to be informed of the obligations before the
use of this transceiver.
This transceiver requires of license for its use and it is dedicated to be used in the following EU
countries.
AT
IE
SE
LT
BE
IT
CH
MT
DK
LI
GB
PL
FI
LU
CY
SK
FR
NL
CZ
SI
DE
NO
EE
BG
GR
PT
HU
RO
IS
SP
LV
• The inadequate use of this equipment is the proprietor's of the same one exclusive responsibility.
English - 4 Παύλος Μεϊµάρης Ελπίδος 34 (ΒΑΟ) Συκιές, Θεσσαλονίκη τηλ 2310.634.513, 6977.38.38.73
URL: http://www.meimaris.com - Εmail: [email protected]
Παύλος Μεϊµάρης Ελπίδος 34 (ΒΑΟ) Συκιές, Θεσσαλονίκη τηλ 2310.634.513, 6977.38.38.73
URL: http://www.meimaris.com - Εmail: [email protected]
WARNING!
- The transceiver operation can be prohibited in certain places or enclosures, follow the use restrictions.
- Before using this transceiver, obtain the necessary authorization administrative or license.
- Follow the requirements of your country in the use of Radioamateur transceiver.
- This equipment is not changeable in its technical specifications by means of the keyboard use, being
necessary the physical equipment opening and the changing the electronic components for the technical
characteristics alteration.
2.- MAINTENANCE AND SAFETY CAUTIONS:
• Only use this equipment for the end that this has been manufactured. The manufacturer and the
salesperson won't accept any responsibility and the guarantee will invalidity in the event of
inadequate use of the transceiver.
• This equipment doesn't have components that the user can repair. Always consult to the
Authorized Technical Service for any repair.
• It should not turn ON/OFF the transceiver connecting and disconnecting the battery. Always use
the ON/OFF control.
• Install the battery correctly, the antenna and the accessories (optional), according to the
indications given in this manual.
• Avoid touch the antenna with the hand or with any part of the body when the equipment is
transmitting.
• In the event malfunction of the equipment or their battery charger (scent to burnt, smoke, etc.),
turn off it immediately, disconnect the battery charger of the 230 VAC wall outlet and consult to the
Technical Service.
• Don't introduce any object for the grooves of the speaker or for the connectors of the equipment.
• If it uses an external (optional) headphone, reduce to the possible maximum volume level, avoid
volume levels very high.
• Don't expose the equipment or the battery charger to the rain, directly sunlight for an extended
period of time, not place near a heat source (radiators, etc.) to blows, to the powder excess or dirt, to
the fire, to explosive or another type of dangerous conditions.
• Avoid the humidity condensation. The air humidity is deposited in the transceiver when place of a
cold atmosphere to other warm, making that the equipment doesn't work correctly. If condensation
takes place in the equipment, clean a dry cloth and wait to that dries off to light it.
• Don't place anything on the transceiver that can spill out on the same one.
• If the transceiver caused interferences in the video recorder, DVD, radio and television receiver,
or to any other electronic apparatus, take it away from the apparatus in question.
• Don't operate this transceiver while it is driving a vehicle, use hands free systems and respect the
traffic police indications.
• Turn off and do not use the equipment in areas where their use is restricted or prohibited (e.g. coal
gas , areas with explosion atmosphere, areas where it can interference the operation of other
equipments, on board airships, airports, etc.).
• Don't use this transceiver in the vicinity of other electronic equipments, especially next to medical
equipments. It can cause interferences in other equipments.
• To clean the equipment and the battery charger being turn off and with an antistatic cloth
(preferably) or a humid (not wet) cloth.
• Don't pulverize directly with any liquid or product on the transceiver or battery charger and never
use for their cleaning polish home products, detergents, alcohol or solvent.
• Don’t use for the cleaning a dry cloth, it could cause static sock.
• The not compatible accessories used with the transceiver they could limit the operation of the
transceiver, and even to damages invalidating the guarantee.
• Explosion risk if it replaces the battery for an incompatible one.
• As general safety cautions, the children should not operate any type of electric equipments.
English - 5 Παύλος Μεϊµάρης Ελπίδος 34 (ΒΑΟ) Συκιές, Θεσσαλονίκη τηλ 2310.634.513, 6977.38.38.73
URL: http://www.meimaris.com - Εmail: [email protected]
Παύλος Μεϊµάρης Ελπίδος 34 (ΒΑΟ) Συκιές, Θεσσαλονίκη τηλ 2310.634.513, 6977.38.38.73
URL: http://www.meimaris.com - Εmail: [email protected]
WARNING!
- The user is the responsible one of providing the enough protection during a thunderstorm uses the
transceiver with an external antenna in a vehicle, or it uses it in a housing like a fixed station and it installs the
antenna outdoors in a high location. Keep in mind that any antenna outdoors believes a direct trajectory for
the discharge from a ray (on 10 kA) to the transceiver. This trajectory even still exists with the “OFF”
transceiver.
- Any vehicle doesn't present a sure environment during a thunderstorm. This is very dangerous when the
antenna is installed in the external high vehicle. Remove the antenna and their cable in the next vision of a
thunderstorm.
3.- SUPPLIED ARTICLES AND OPTIONAL ACCESSORIES:
3.1.- SUPPLIED ARTICLES:
Carefully unpack the transceiver. We recommend that you identify the items listed in the following
table. If any items are missing or have been damaged, consult with yor distributor or salesperson.
ITEMS
Handportable transceiver
Antenna
Li-Ion battery
AC/DC adapter
Top table battery charger
Belt clip
User´s manual
QUANTITY
1
1
1
1
1
1
1
Note:
- The articles supplied in the packing, it can differ of those enumerated in the previous chart depending on the
transceiver acquisition country. For more information, consult with their distributor or salesperson.
3.2.- OPTIONAL ACCESSORIES:
ITEMS
External earphone
External micro-headset
External microphone
Vehicle battery charger
Leather case
Note:
- Consult with their distributor or salesperson to be informed on the optional available accessories.
4.- CHARACTERISTICS:
- VHF 5 W and VHF 4 W output power.
- Up to 128 groups of memory channels.
- Dot matrix dual displays.
- Automatic Numbering Identification “ANI” code.
- Built-in Voice Operate Transmit (VOX) function, programmable.
- “CTCSS/DCS/5 Tone/MSK/DTMF” tone, programmables.
- All channels scan and priority channel scan.
- “Scrambler” function, optional.
- Cross-band repeater function.
English - 6 Παύλος Μεϊµάρης Ελπίδος 34 (ΒΑΟ) Συκιές, Θεσσαλονίκη τηλ 2310.634.513, 6977.38.38.73
URL: http://www.meimaris.com - Εmail: [email protected]
Παύλος Μεϊµάρης Ελπίδος 34 (ΒΑΟ) Συκιές, Θεσσαλονίκη τηλ 2310.634.513, 6977.38.38.73
URL: http://www.meimaris.com - Εmail: [email protected]
- “Duplex” function.
- Self-setting “CTCSS/DCS”.
- FM RADIO receiving.
- Independent “A” band and “B” band operation setting.
5.- TECHNICAL SPECIFICATIONS:
5.1.- GENERAL:
Frequency range:
Working temperature:
Operating voltage:
Operating mode:
Antenna impedance:
Frequency stability:
Dimensions:
Weight:
Dutty cycle:
76 MHz – 108 MHz (FM radio receiver only).
VHF: 144 MHz - 146 MHz (Rx/Tx).
UHF: 430 MHz - 440 MHz (Rx/Tx).
-20 ºC to +60 ºC.
Li-Ion battery 7.4 V.
Simplex, semi-duplex or duplex.
50 Ω.
±2.5 ppm.
115 mm x 57 mm x 30 mm (whitout antenna).
223 gr (with battery).
3-3-54 minutes (Rx/Tx/Standby).
5.2.- TRANSMITTER:
RF output power:
Modulation type:
Maximum deviation:
Distortion:
Adjacent channel power:
Spurious emissions:
5W (VHF) and 4 W (UHF).
F3E (FM).
≤±5 kHz.
≤5 %.
≥65 dB.
≤7.5 µW.
5.3.- RECEIVER:
Sensitivity:
<0.2 µV (12 dB SINAD).
Audio distortion:
≤5 %.
Adjacent channel selectivity: ≥60 dB.
Intermodulation rejection: ≥60 dB.
Sporious radiations:
≥60 dB.
Blocking:
≥80 dB.
Note:
- This equipment is not modifiable in its technical specifications by means of the use of the keyboard, being
necessary the physical opening of the equipment and the alteration of its electronic components for the
modification of its technical characteristics.
English - 7 Παύλος Μεϊµάρης Ελπίδος 34 (ΒΑΟ) Συκιές, Θεσσαλονίκη τηλ 2310.634.513, 6977.38.38.73
URL: http://www.meimaris.com - Εmail: [email protected]
Παύλος Μεϊµάρης Ελπίδος 34 (ΒΑΟ) Συκιές, Θεσσαλονίκη τηλ 2310.634.513, 6977.38.38.73
URL: http://www.meimaris.com - Εmail: [email protected]
6.- TRANSCEIVER DESCRIPTION:
6.1.- CONTROLS, KEYS AND CONNECTORS:
Selector knob
Antenna
[ON/OFF/Volumen] control
Status led indicator
Speaker
Microphone
LCD display
[Menu] key
[A/B] key
[Enter] key
[VFO/MR] key
Alphanumeric keypad
[Reverse frequency] key
Keypad lock
Battery release lash
Battery release lash
External headset jack
PTT
Squelch
External microphone jack
Li-Ion battery
[ON/OFF/Volume] control
Status led indicator.
Busying indicator.
[PTT]
[VFO/MR]
Connectors:
“SMA” connector.
[MIC-SP] jack.
To turn ON/OFF the transceiver and adjust the volume level.
When the [PTT] is pressed, the status led indicator will be
illuminated in red color to indicate the transmitting status.
When receiving a signal, the display show the signal strength.
Press and hold to transmit.
To exit the menu or other function.
For antenna installation.
If you want to use a headset or a microphone, connect them to this
socket. If not, prevent water or dirt from dropping into it.
English - 8 Παύλος Μεϊµάρης Ελπίδος 34 (ΒΑΟ) Συκιές, Θεσσαλονίκη τηλ 2310.634.513, 6977.38.38.73
URL: http://www.meimaris.com - Εmail: [email protected]
Παύλος Μεϊµάρης Ελπίδος 34 (ΒΑΟ) Συκιές, Θεσσαλονίκη τηλ 2310.634.513, 6977.38.38.73
URL: http://www.meimaris.com - Εmail: [email protected]
6.2.- LCD DISPLAY:
Icon
Description
+/HI/LO
DCS
CTCSS
VOX
REV
PRE
Battery level indicator.
Shows the TX offset direction in relation to the Rx frequency.
Power level indicator, “HI” = High power / “LO” = Low power.
Keypad lock.
“DCS” code is turned on.
“CTCSS” tone is turned on.
“VOX” function turned on.
Call function.
Reverse frequency activated.
Priority scan activated.
Received signal strength and TX power.
Working frequency.
Menu.
Priority channel.
Call channel.
7.- INITIAL PREPARATIONS:
7.1.- INSTALL THE ANTENNA:
To install the antenna, insert into the “SMA” connector and rotate it clockwise until the end.
Note:
- Don't hold the antenna with the hand or don't wind the external microheadset (optional) to her to avoid a
bad transceiver performance.
7.2.- INSTALL THE BATTERY:
Install the battery in the later side of the transceiver inserting it in the down grooves and pressing it
of the up side against the transceiver until listening a “click”.
7.3.- REMOVE THE BATTERY:
To remove the battery, slip the two battery lash of the battery.
English - 9 Παύλος Μεϊµάρης Ελπίδος 34 (ΒΑΟ) Συκιές, Θεσσαλονίκη τηλ 2310.634.513, 6977.38.38.73
URL: http://www.meimaris.com - Εmail: [email protected]
Παύλος Μεϊµάρης Ελπίδος 34 (ΒΑΟ) Συκιές, Θεσσαλονίκη τηλ 2310.634.513, 6977.38.38.73
URL: http://www.meimaris.com - Εmail: [email protected]
7.4.- INSTALL AND REMOVE THE BELT CLIP:
Place the belt clip for slipping it for the grooves of the battery rear side until the end.
To remove the belt clip, liberate the retention lash of the belt clip and slip it until he separates to the
battery.
Note:
- Do not use any glue to fix the belt clip, it will damage the belt clip and the battery case.
7.5.- INSTALL THE EXTERNAL MICROHEADSET (OPTIONAL):
Remove the rubber cover and install the optional microheadset connecting it to the transceiver
“MIC-SP” jack.
7.6.- BATTERY CHARGING:
The battery pack is not fully charger when manufacturer, and charge it before first use.
The battery can not reach the normal capacity for the first time charging after purchasing or storing
it more than two months. However, it will return the normal capacity after charging and discharging
repeatedly 3-5 times.
To battery charging process:
1.- Insert the AC/DC adapter jack to the connector of top battery charger.
2.- Connect the AC/DC adaptor to the 230 VAC wall outlet.
3.- Put the Li-Ion battery or the turn off transceiver with the battery, on the desk top.
Notes:
- Make sure the battery connect with the touching piece of the charging terminal.
- The led indicator red illuminates, indicates that the Li-Ion battery is in charging procedure.
- The led indicator green illuminates, indicates that the Li-Ion battery is fully charging. Charge the battery in
power off mode transceiver.
- Do not short circuit the Li-Ion battery terminals.
- Do not dispose the Li-Iom battery in fire.
- Do not disassemble the case of the Li-Ion battery.
8.- OPERATION:
8.1.-TURN ON/OFF THE TRANSCEIVER:
Rotate the [ON/OFF/Volume] knob clockwise until a beep sound is heard. All icons appeared on
the screen.
To turn off the transceiver, rotate the [ON/OFF/Volume] knob counter-clockwise. All the icons on
the display will disappear and the transceiver is off.
8.2.- VOLUME AJUST:
Rotate the [ON/OFF/Volume] knob clockwise to increase the volume and counter-clockwise to
decrease.
8.3.- TRANSMITTING/RECEIVING:
Firstly, hold down briefly the [Squelch] key to make sure that the channel or frequency is not busy
and then press and hold the [PTT] key. Speak 4/10cm far from the unit..
The status led indicator will be illuminated in red color.
Release the [PTT] key to receive.
English - 10 Παύλος Μεϊµάρης Ελπίδος 34 (ΒΑΟ) Συκιές, Θεσσαλονίκη τηλ 2310.634.513, 6977.38.38.73
URL: http://www.meimaris.com - Εmail: [email protected]
Παύλος Μεϊµάρης Ελπίδος 34 (ΒΑΟ) Συκιές, Θεσσαλονίκη τηλ 2310.634.513, 6977.38.38.73
URL: http://www.meimaris.com - Εmail: [email protected]
8.4.- ALARM FUNCTION:
Hold down the programmed side key with this function, the transceiver will sound alarm tone and
send “ANI” identification code to others transceiver of their group.
8.5.- EMERGENCY CHANNEL:
Press the [#T-R] key, in any case the transceiver can call up the emergency call
channel, and the display shows “CAL”.
8.6.- REVERSE FREQUENCY FUNCTION:
This function is possible only when you are linked to a repeater. It permits to invert the TX
frequency with the RX frequency.
In channel/frequency mode, hold down the [#T-R] key for two seconds until “T*R”
appears on the display.
The display shows the “REV” icon. Repeat the same procedure to return to the normal mode
operation.
8.7.- SCANNING:
The scan function is very useful to monitor the channels before transmitting.
1.- Scan channels or frequency:
In channel/frequency mode, press the [MENU] + [1SCAN] key, and then press the [ENTER] key to
start the scan from the channel or frequency in use. Whenever any signal is detected, the transceiver
will suspend the scan for 5 seconds. The transceiver will then continue to scan unless you press the
[PTT] or [ENTER] key to end scanning.
2.- Priority channel scan:
Priority scan is to scan the priority channel firstly and then scan other channel, if you set priority
channel 1, it will scan 1-2; 1-3; 1-4; and continue. In channel mode, press the [MENU] + [2PRI]
key, and then press the [ENTER] key to scan the priority channel. The transceiver begin to scan
priority channel. When any signal is detected, the transceiver will suspend the scan for 5 seconds. It
will then continue to scan unless you press the [PTT] or [ENTER] key to end scanning.
3.- Subtone scan:
In the frequency mode, press the [MENU] key and rotary the selector knob to select the “021 CTC
• S?” menu or the “022 DCS.S?” menu. Then press the [ENTER] key to enter the “CTCSS” (50
groups) scan or “DCS” (105 groups). When the transceiver scan to the same subtone or code, open
the “Squelch” and exit scan.
8.8.- SELECT SCAN TYPE:
Press the [MENU] key and rotate the selector knob until the display shows “013 SCANS”. Press the
[ENTER] key and turn the selector knob again to select the scan type “TO/CO/SE”.
- TO: Even though the transceiver stops on a busy channel or frequency and it will continue
scanning the other channels or frequency.
- CO: The transceiver stops on a busy channel or frequency until there is no activity, and then the
transceiver begins scanning the other channels.
English - 11 Παύλος Μεϊµάρης Ελπίδος 34 (ΒΑΟ) Συκιές, Θεσσαλονίκη τηλ 2310.634.513, 6977.38.38.73
URL: http://www.meimaris.com - Εmail: [email protected]
- SE: The transceiver stops on a busy channel or frequency and exits the scan mode.
8.9.- OPERATION MODE SELECTION:
This transceiver has three modes to choose from: Double-standby, channel mode and frequency
mode.
1.- Double-standby mode:
Long press the [A/B] key to enter or exit the double-standby mode. In double-standby mode, there
will be two channel A or B instructions. When “A” is displayed, the channel can receive and
transmit, while the other channel can only receive. When “B” is displayed, the channel can receive
and transmit, another channel can only receive. Short press the [A/B] key to switch “A” or “B”.
2.- Channel mode:
Press the [VFO/MR] key to switch channel mode or frequency mode .
1) Display the name of the current channel and channel number.
CH 1: Indicates that the current name of the channel, the user can edit it.
CH-001: Current channel number.
2) Display the channel number and frequency:
CH 1: Indicates the current channel, the user can edit the name.
430.700: Indicates the frequency of the current channel.
3) The receiver frequency and transmit frequency on the current channel:
R430.700: Indicates receiving frequency on the current channel.
T430.700: Indicates transmitting frequency on the current channel.
3.- Frequency mode:
R433.700: Indicates the receiving frequency.
T433.700: Indicated the transmitting frequency.
The difference between channel mode and frequency mode is whether the left side LCD displays
.
8.10.- FM RADIO:
Press the [MENU] + side key 2 to enter into the FM radio state, press the number keys or turn the
selector knob to select the radio frequency. Press the [*LOCK] key or the [#T-R] key to search the
broadcast station. Press the [MENU] + side key 2 to exit the FM radio mode.
8.11.- SIDE KEYS DEFINITION:
You distributor or salesperson will program in the side key 2 as follows: 1) Optional signaling call;
2) Emergency alarm; 3) 1750 Hz tone signaling; 4) Instantaneous squelch.
8.12.- “DTMF” ENCODE AND DECODE:
This transceiver can transmit and receive “DTMF” tones. In channel mode, press the [PTT] key and
enter the number on the keyboard, the corresponding “DTMF” code would be send out. “DTMF”
code corresponding function keys issued as follows:
English - 12 -
Παύλος Μεϊµάρης Ελπίδος 34 (ΒΑΟ) Συκιές, Θεσσαλονίκη τηλ 2310.634.513, 6977.38.38.73
URL: http://www.meimaris.com - Εmail: [email protected]
8.13- SIDE KEYS:
PTT: Press to transmit, release to
receive.
Side key programmed as follow:
1) Optional signaling call.
2) Alarm function.
3) 1750 MHz signaling tone.
4) Squelch.
8.14.- “DTMF/MSK/5-TONE” OPERATION:
Use “DTMF/5-Tone” to achieve selective calling, stun and disstun functions. Your distibutor or
salesperson will program the “DTMF/5-Tone” and the “ID code”, thet it will allow TX stun , cancel
TX stun, Rx/Tx stun, cancel Rx/Tx stun, etc. Defined side key as optional signaling call, and select
the “DTMF” or “5-Tone” as optional signaling on the channel, press the defined side key until
display shows “CALL?”, enter the “ID” code directly or input the number stored and press the
[PTT] key to transmit
If you make a mistake or want to cancel calling, rotate the selector knobr counter-clockwise to
delete it one by one. Rotate clockwise to exit.
■ “5-Tone” encode/decode:
1) “5-Tone” call: Use side key for optional signaling “5-Tone” call, or press the [MENU] key, the
display shows the “5-T”, then input the selective call/stun/disstun code, press the [PTT] key to
make a call.
2) “5-Tone” signaling encode: Up to 9 groups can be set by the distributor or salesperson.
■ “DTMF” call:
Use “DTMF” to achieve selective calling, group calling and all calling function.
“DTMF” selective call, group call, all call function is set by the distributor or salesperson.
■ “MSK” encode/decode:
“MSK” codec set by the distributor or salesperson, a total of 9 groups and you can enter: 0-9, A-F.
Each group can be set to 4 digits.
“MSK” call: Use side key for optional signaling “MSK” call or press the [MENU] key until the
display shows “MSK In”, enter the “ID” code and press the [PTT] key to make a call.
8.15.- “ANI” FUNCTION:
There are three methods to transmit “ANI” code: 1) Before transmitting, 2) After transmitting, 3)
Before and after transmitting.
Three signaling to choose from: “MSK”, “DTMF”, “5-Tone”, select the type of signaling formats,
decoding “ID” must also be same.
Your distributor or salesperson will program the above information. Use shortcuts [MENU] +
English - 13 Παύλος Μεϊµάρης Ελπίδος 34 (ΒΑΟ) Συκιές, Θεσσαλονίκη τηλ 2310.634.513, 6977.38.38.73
URL: http://www.meimaris.com - Εmail: [email protected]
Παύλος Μεϊµάρης Ελπίδος 34 (ΒΑΟ) Συκιές, Θεσσαλονίκη τηλ 2310.634.513, 6977.38.38.73
URL: http://www.meimaris.com - Εmail: [email protected]
[0ANI] key to turned on or off the “ANI” function.
8.16.- STORE:
To store a frquency and its settings (CTCSS, DCS, SHIFT REPEATERS, etc.) follow the procedure
below:
1.- At first, choose all the settings to store.
2.- Press the [MENU] key.
3.- Then, press the [VFO/MR] key.
4.- Rotate the selector knob and select the memory number where you want to store the frequency
and its settings.
5.- Confirm your selection by pressing the [VFO/MR] key.
Note:
- A triangle displayed underneath the channel number indicates that it has already been stored.
8.17.- EMERGENCY CALL CHANNEL STORAGE:
Select the necessary frequency for emergency call, press the [MENU] + [VFO/MR] + [#T-R] key,
the screen displays the word “CAL”. “CAL” character flashes if the emergency call channel have
been stored, you can press the [VFO/MR] key to overwrite the channel.
8.18.- DELETE A CHANNEL:
1.- Delete one store channel:
In channel mode, turn off the transceiver.
Press and hold the [VFO/MR] key, turn on the unit. “001DEL?” and stored channel
number will be displayed. Turn the selector knob or select by keypad the channel to
delete. Push the [ENTER] key, “YES?” appears on the display. Press the [ENTER]
key again to confirm.
2.- Reset (Delete all the settings in frequency mode):
Press and hold the [MENU] key and turn on the transceiver, “RESET?” is
displayed. Press the [ENTER] key, “VFO?” is shown on the display. Press the
[ENTER] key again for confirmation.
3.- Delete all settings (Delete the settings in both frequency and channel mode):
Press and hold the [MENU] key and turn on the transceiver, “RESET?” is
displayed. Press the [ENTER] key, “VFO?” is show on thw display. Turn the
selector knob to select “FULL?”, then press the [ENTER] key to delete all the
settings in frequency and channel mode.
9.- SHORTCUTS OPERATION:
[MENU] + [0ANI] + [ENTER]:
[MENU] + [1SCAN] + [ENTER]:
[MENU] + [2PRI] + [ENTER]:
[MENU] + [3VOX] + [ENTER]:
[MENU] + [4POW] + [ENTER]:
[MENU] + [5SQL] + [ENTER]:
[MENU] + [6SCR] + [ENTER]:
[MENU] + [7LED] + [ENTER]:
[MENU] + [8BEEP] + [ENTER]:
The “ANI” code selection.
Scan mode.
Priority channel scan mode.
“VOX” sensitivity setting.
Transmitting power setting.
Squelch setting.
Scrambler on/off setting.
Backlight color setting.
Beep tone setting.
English - 14 -
Παύλος Μεϊµάρης Ελπίδος 34 (ΒΑΟ) Συκιές, Θεσσαλονίκη τηλ 2310.634.513, 6977.38.38.73
URL: http://www.meimaris.com - Εmail: [email protected]
Παύλος Μεϊµάρης Ελπίδος 34 (ΒΑΟ) Συκιές, Θεσσαλονίκη τηλ 2310.634.513, 6977.38.38.73
URL: http://www.meimaris.com - Εmail: [email protected]
[MENU] + [9VOICE] + [ENTER]: Voice annunciation on/off.
[MENU] + [#T-R] + [ENTER]:
Transmitting/receiving “CTCSS/DCS” setting.
[MENU] + [*LOCK] + [ENTER]: Repeater shift setting.
10.- MENU OPERATION:
To operate with all the settings of the menu, you have to follow these general steps:
1.- Press the [MENU] key.
2.- Turn the selector knob or input keypad number to select the desired menu.
3.- Press the [ENTER] key and turn the selector knob to choose the desired settings.
4.- Press the [ENTER] key to confirm.
Menu no.
1
2
3
4
5
6
7
8
9
10
11
12
13
14
15
16
Menu content
SCAN (Channel scan).
PRI (Priority channel scan).
VOX (“VOX” sensitivity).
POW (Transmit power).
SQL (Squelch setting).
SCRM (Scrambler).
LIGHT (Backlight color).
BEEP (“Beep” tone).
VOICE (Voice prompt).
ANI (“ANI” code).
KEYBO (Keypad lock).
TOT (Time out timer).
SCANS (Scan selection).
N/W (Narrow/Wide band).
SHIFT (Repeater shift).
OFFSET (Frequency repeater offset).
17
18
19
20
21
22
23
24
25
Description
All channel scan.
Priority channel scan.
OFF~9.
HIGH/LOW.
0~9 level.
OFF/1~8 groups scrambler.
1/2/3.
ON/OFF.
OFF/English/…..
OFF/BOT/EOT/BOTH.
MANUAL/AUTO.
OFF~270.
CO/TO/SE.
WIDE/NARROW.
+/-/0.
0~2.000 (VHF).
0~10.000 (UHF).
OFF~254.1/D023~D754.
OFF~254.1/D023~D754.
OFF~254.1/D023~D754.
2.5K/5K/10K/6.25K/12.5K/25K/50K/100K.
CTCSS scan.
DCS scan.
OFF/ON/AUTO.
OFF/1~10.
OFF/ON.
C-CDC (Receive/Transmit CTCSS/DCS)
R-CDC (Receive CTCSS/DCS).
T-CDC (Transmit CTCSS/DCS).
STEP (Frequency step).
CTC.S (CTCSS scan).
DCS.S (DCS scan).
LED (Backlight setting).
ROGER (Transmission tail tone).
DW (Listen FM radio and monitor transceiver
status).
26
LOCK (Locking mode).
K+S/PTT/KEY/ALL.
27
SAVE (Battery save).
OFF/ON.
28
VOLUME (Volume adjust).
0~15 levels.
29
TX.SEL (TX respond select).
FIXED/CALLIN.
30
RPT (Repeater mode).
OFF/ON.
31
DUPLEX (Duplex mode).
OFF/ON.
32
SADD (Scan add).
ADD/DEL.
33
NAME (Channel name).
---------1~28 menu, is available in frequency mode operation only.
29~33 menu, is available in dual frequency/dual receive mode operation only.
32~33 menu, is available en channel mode operation only.
English - 15 Παύλος Μεϊµάρης Ελπίδος 34 (ΒΑΟ) Συκιές, Θεσσαλονίκη τηλ 2310.634.513, 6977.38.38.73
URL: http://www.meimaris.com - Εmail: [email protected]
Παύλος Μεϊµάρης Ελπίδος 34 (ΒΑΟ) Συκιές, Θεσσαλονίκη τηλ 2310.634.513, 6977.38.38.73
URL: http://www.meimaris.com - Εmail: [email protected]
11.- ADVANCED OPERATIONS:
11.1.- SCANNING:
Press the [MENU] key.
Turn the selector knob until the display shows “SCAN” (menu 001).
Press the [ENTER] key.
Press the [VFO/MR] to stop scanning and exit.
11.2.- PRIORITY CHANNEL SCAN:
In channel mode, press the [MENU] key.
Turn the selector knob until the display shows “PRI” (menu 002).
Press the [ENTER] key.
Press the [VFO/MR] key to exit.
11.3.- “VOX” FUNCTION SETTING:
The “VOX” function is deactivated by default. To activate this function, it follow the procedure
here below:
1.- Press the [MENU] key.
2.- Turn the selector knob until the display shows “VOX” (menu 003).
3.- Press the [ENTER] key.
4.- Turn again the selector knob and select the desired “VOX” level (you can
choose amongst 9 different levels).
5.- Press the [ENTER] key again.
6.- Press the [VFO/MR] key to exit.
To activate and select rapidly the “VOX” function, you can do it also by operating on the fast menu.
Press the [MENU] key, then press the [3VOX] key and follow the procedure above described.
11.4.- SETTING THE TRANSMISSION POWER:
To select desired power level:
1.- Press the [MENU] key.
2.- Turn the selector knob until the display shows “POW” (menu 004).
3.- Press the [ENTER] key.
4.- Turn again the selector knob and select the desired power level (you can choose
between 2 levels, “H” hight and “L” low).
5.- Press the [ENTER] key.
6.- Press the [VFO/MR] key to exit.
To activate and select rapidly the power level, you can also use the fast menu. Press
the [MENU] key, then press the [4POW] and follow the procedure above described.
11.5.- SETTING SQUELCH:
To select the squelch level:
1.-Press the [MENU] key.
2.- Turn the selector knob until “SQL” (menu 005) is displayed.
3.- Press the [ENTER] key.
4.- Turn the selector knob and select the desired squelch level (9 different levels
are available).
5.- Press the [ENTER] key.
English - 16 Παύλος Μεϊµάρης Ελπίδος 34 (ΒΑΟ) Συκιές, Θεσσαλονίκη τηλ 2310.634.513, 6977.38.38.73
URL: http://www.meimaris.com - Εmail: [email protected]
Παύλος Μεϊµάρης Ελπίδος 34 (ΒΑΟ) Συκιές, Θεσσαλονίκη τηλ 2310.634.513, 6977.38.38.73
URL: http://www.meimaris.com - Εmail: [email protected]
6.- Press the [VFO/MR] key to exit.
To activate and select rapidly the squelch level, you can also use the fast menu. Press the [MENU]
key, then press the [5SQL] key and follow the procedure above described.
11.6.- “SCRAMBLER” FUNCTION:
To turn on/off the scrambler function, follow this procedure:
1.- Press the [MENU] key.
2.- Turn the selector knob until “SCRM” (menu 006) is displayed.
3.- Press the [ENTER] key.
4.- Turn the selector knob to select 1-8 group scrambler or set it “OFF”.
5.- Press the [ENTER] key.
6.- Press the [VFO/MR] key to exit.
To select “Scrambler” function rapidly, you can also use the fast menu. Press the [MENU] key, then
press the [6SCR] key and follow the procedure above described.
Note:
- The “Scrambler” function will be automatically “OFF” if menu 31 “DUPLEX” was set “ON”.
11.7.- BACKLIGHT COLOR SELECTION:
To select the LCD backlight color, follow this procedure:
1.- Press the [MENU] key.
2.- Turn the selector knob until “LIGHT” (menu 007) is displayed.
3.- Press the [ENTER] key.
4.- Turn the selector knob to select 3 different color: Blue, orange and purple.
5.- Press the [ENTER] key.
6.- Press the [VFO/MR] key to exit.
To select rapidly the backlight color, you can also use the fast menu. Press the [MENU] key, then
press the [7LED] key and follow the procedure above described.
11.8.- “BEEP” ON/OFF:
The keypad “beep” is activated by default. To deactivate it:
1.- Press the [MENU] key.
2.- Turn the selector knob until “BEEP” (menu 008) is displayed.
3.- Press the [ENTER] key.
4.- Turn the selector knob to activate/deactivate the “beep” (ON = “beep” enabled;
OFF = “beep” disabled).
5.- Press the [ENTER] key.
6.- Press the [VFO/MR] key to exit.
To activate/deactivate rapidly the keypad “beep”, you can use the fast menu. Press
the [MENU] key, then press the [8BEEP] key and follow the procedure above
described.
11.9.- VOICE PROMPT:
With this function, you activate a voice that informs about any operation/selection
you are doing in your transceiver. To activate this function, follow these steps:.
1.- Press the [MENU] key.
2.- Rotate the selector knob until “VOICE” (menu 009) is displayed.
3.- Press the [ENTER] key.
4.- Turn the selector knob to disable or select the desired language.
English - 17 Παύλος Μεϊµάρης Ελπίδος 34 (ΒΑΟ) Συκιές, Θεσσαλονίκη τηλ 2310.634.513, 6977.38.38.73
URL: http://www.meimaris.com - Εmail: [email protected]
Παύλος Μεϊµάρης Ελπίδος 34 (ΒΑΟ) Συκιές, Θεσσαλονίκη τηλ 2310.634.513, 6977.38.38.73
URL: http://www.meimaris.com - Εmail: [email protected]
5.- Press the [ENTER] key again.
6.- Press the [VFO/MR] key to exit.
To select rapidly this function, you can also use the fast menu. Press the [MENU] key, then press
the [9VOICE] and follow the procedure above described.
11.10.- “ANI” FUNCTION:
You can set an automatic number identifier visible from the transceiver’s display of your partner
each time you send a call signal.
To activate this function, follow these steps:
1.- Press the [MENU] key.
2.- Turn the selector knob until “ANI” (menu 10) is displayed.
3.- Press the [ENTER] key.
4.- Turn the selector knob to select “OFF”, “BOT”, “EOT” or “BOTH”.
5.- Press the [ENTER] key.
6.- Press the [VFO/MR] key to exit.
To quickly select this function, you can also use the fast menu. Press the [MENU] key, then press
the [0ANI] and follow the procedure above described.
11.11.- KEYPAD LOCK:
To lock the keypad to prevent the wrong operation:
1.- Press the [MENU] key.
2.- Turn the selector knob until “KEYBO” (menu 011) is displayed.
3.- Press the [ENTER] key.
4.- Turn the selector knob to select “AUTO”, “MANUAL”.
5.- Press the [ENTER] key.
6.- Press the [VFO/MR] key to exit.
To unlock, it press and hold the [#T-R] key for 2 seconds.
11.12.- TIME OUT TIMER “TOT”:
To prevent continuous emission of the transceiver, the transceiver can be set of 30-270 seconds
continuous emission limits, a warning tone will be hear in the due time.
1.- Press the [MENU] key.
2.- Turn the selector knob until “TOT” (menu 012) is displayed.
3.- Press the [ENTER] key.
4.- Turn the selector knob to select from “OFF, 30, 60, 90, 120, 150, 180, 210, 240,
270”.
5.- Press the [ENTER] key.
6.- Press the [VFO/MR] key to exit.
11.13.- SCAN TYPE SELECTION:
1.- Press the [MENU] key.
2.- Turn the selector knob until “SCANS” (menu 013) is displayed.
3.- Press the [ENTER] key.
4.- Turn the selector knob to select from “TO, CO, SE”.
5.- Press the [ENTER] key.
6.- Press the [VFO/MR] key to exit.
English - 18 Παύλος Μεϊµάρης Ελπίδος 34 (ΒΑΟ) Συκιές, Θεσσαλονίκη τηλ 2310.634.513, 6977.38.38.73
URL: http://www.meimaris.com - Εmail: [email protected]
Παύλος Μεϊµάρης Ελπίδος 34 (ΒΑΟ) Συκιές, Θεσσαλονίκη τηλ 2310.634.513, 6977.38.38.73
URL: http://www.meimaris.com - Εmail: [email protected]
11.14.- WIDE AND NARROW BAND SELECTION:
1.- Press the [MENU] key.
2.- Turn the selector knob until “N/W” (menu 014) is displayed.
3.- Press the [ENTER] key.
4.- Turn the selector knob to select from “NARROW or WIDE”.
5.- Press the [ENTER] key.
6.- Press the [VFO/MR] key to exit.
11.15.- REPEATER SHIFT:
This function is used for communications through repeater.
To activate this function, follow these steps:
1.- Press the [MENU] key.
2.- Turn the selector knob until “SHIFT” (menu 015) is displayed.
3.- Press the [ENTER] key.
4.- Turn the selector knob and select the repeater shift. You can choose amongst the following
options “+”, “-” and “0”.
5.- Press the [ENTER] key again.
6.- Press the [VFO/MR] key to exit.
To select the repeater shift, you can also use the fast menu. Press the [MENU] key, then press the
[*LOCK] key and follow the procedure above described.
11.16.- REPEATER SHIFT ADJUSTMENT:
1.- Press the [MENU] key.
2.- Turn the selector knob until “OFFSET” (menu 016) is displayed.
3.- Press the [ENTER] key.
4.- Turn the selector knob and select the repeater shift.
You can also enable it by enter the frequency directly on the keypad
5.- Press the [ENTER].
6.- Press the [VFO/MR] key to exit.
11.17.- SELECT “CTCSS” AND “DCS” ON TRANSMITTING AND RECEIVING:
1.- Press the [MENU] key.
2.- Turn the selector knob until “C-CDC” (menu 017) is displayed.
3.- Press the [ENTER] key.
4.- Rotate the selector knob and select the desired “CTCSS” tone, or press the [*LOCK] key to
select “DCS” code. While selecting the “DCS” codes, if you press the [#T-R] key, you will select
the normal (N) or inverted (I) “DCS” codes.
5.- Press the [ENTER] to confirm.
You can use keypad or software to input or program a non-standard “CTCSS/DCS”.
11.18.- SELECT “CTCSS” AND “DCS” ON RECEIVING:
1.- Press the [MENU] key.
2.- Rotate the selector knob until “R-CDC” (menu 018) is displayed.
3.- Press the [ENTER] key.
4.- Turn the selector knob and select the desired “CTCSS” tone, or press the [*LOCK] key to select
“DCS” code. While selecting the “DCS” codes, if you press the [#T-R] key, you will select the
normal (N) or inverted (I) “DCS” codes.
English - 19 Παύλος Μεϊµάρης Ελπίδος 34 (ΒΑΟ) Συκιές, Θεσσαλονίκη τηλ 2310.634.513, 6977.38.38.73
URL: http://www.meimaris.com - Εmail: [email protected]
Παύλος Μεϊµάρης Ελπίδος 34 (ΒΑΟ) Συκιές, Θεσσαλονίκη τηλ 2310.634.513, 6977.38.38.73
URL: http://www.meimaris.com - Εmail: [email protected]
5.- Press the [ENTER] to confirm.
You can use keypad or software to input or program a non-standard “CTCSS/DCS”.
11.19.- SELECT “CTCSS” AND “DCS” ON TRANSMITTING:
1.- Press the [MENU] key.
2.- Turn the selector knob until “T-CDC” (menu 019) is displayed.
3.- Press the [ENTER] key.
4.- Rotate the selector knob and select the desired “CTCSS” tone, or press the [*LOCK] key to
select “DCS” code. While selecting the “DCS” codes, if you press the [#T-R] key, you will select
the normal (N) or inverted (I) “DCS” codes.
5.- Press the [ENTER] to confirm.
You can use keypad or software to input or program a non-standard “CTCSS/DCS”.
11.20.- SELECT THE FREQUENCY STEP:
1.- Press the [MENU] key.
2.- Turn the selector knob until “STEP” (menu 020) is displayed.
3.- Press the [ENTER] key.
4.- Rotate the selector knob to select desired frequency step. You can choose amongst: 2.5K, 5K,
10K, 6.25K, 12.5K, 25K, 50K and 100K.
5.- Press the [ENTER] key to confirm.
6.- Press the [VFO/MR] key to exit.
11.21.- “CTCSS” SCAN:
1- Press the [MENU] key.
2.- Rotate the selector knob until “CTC.S” (menu 021) is displayed.
3.- Press the [ENTER] key.
When the transceiver scan match “CTCSS” tone, open the squelch and exit scanning.
11.22.- “DCS” SCAN:
1- Press the [MENU] key.
2.- Rotate the selector knob until “DCS.S” (menu 022) is displayed.
3.- Press the [ENTER] key.
When the transceiver scan match “DCS” code, open the squelch and exit scanning.
11.23.- BACKLIGHT ON/OFF:
To turn on the backlight:
1.- Press the [MENU] key.
2.- Turn the selector knob until “LED” (menu 023) is displayed.
3.- Press the [ENTER] key.
4.- Turn the selector knob to select “ON, OFF, AUTO”.
5.- Press the [ENTER] key.
6.- Press the [VFO/MR] key to exit.
11.24.- END ROGER ALERT:
1.- Press the [MENU] key.
2.- Turn the selector knob until “ROGER” (menu 024) is displayed.
English - 20 Παύλος Μεϊµάρης Ελπίδος 34 (ΒΑΟ) Συκιές, Θεσσαλονίκη τηλ 2310.634.513, 6977.38.38.73
URL: http://www.meimaris.com - Εmail: [email protected]
Παύλος Μεϊµάρης Ελπίδος 34 (ΒΑΟ) Συκιές, Θεσσαλονίκη τηλ 2310.634.513, 6977.38.38.73
URL: http://www.meimaris.com - Εmail: [email protected]
3.- Press the [ENTER] key.
4.- Turn the selector knob and select “OFF” or 10 different tones.
5.- Press the [ENTER] key.
6.- Press the [VFO/MR] key to exit.
11.25.- FM RADIO AND MONITOR TWO WAY RADIO SIGNAL:
1.- Press the [MENU] key.
2.- Turn the selector knob until “DW” (menu 025) is displayed.
3.- Press the [ENTER] key.
4.- Turn the selector knob and select “OFF” or “ON” (OFF = disable monitor, ON
= enable monitor).
5.- Press the [ENTER] key.
6.- Press the [VFO/MR] key to exit.
11.26.- KEYPAD LOCK:
1.- Press the [MENU] key.
2.- Turn the selector knob until “LOCK” (menu 026) is displayed.
3.- Press the [ENTER] key.
4.- Turn the selector knob and select from “K+S”, “PTT”, “KEY”, “ALL” (“K+S”
lock the keypad and knob; “PTT” lock the transmitting key only; “KEY” lock the
keypad only; “ALL” lock all keys and knobs).
5.- Press the [ENTER] key.
6.- Press the [VFO/MR] key to exit.
11.27.- BATTERY SAVE FUNCTION:
1.- Press the [MENU] key.
2.- Turn the selector knob until “SAVE” (menu 027) is displayed.
3.- Press the [ENTER] key.
4.- Turn the selector knob and select “OFF” or “ON” (OFF= disable battery save,
ON= enable battery save).
5.- Press the [ENTER] key.
6.- Press the [VFO/MR] key to exit.
11.28.- A/B CHANNEL VOLUME ADJUSTMENT:
This function is useful for the dual receiving in A or B channel mode or frequency mode.
1.- Press the [MENU] key.
2.- Turn the selector knob until “VOLUME” (menu 028) is displayed.
3.- Press the [ENTER] key to open the “squelch”.
4.- Turn the selector knob to adjust volume level (0-15).
5.- Press the [ENTER] key.
6.- Press the [VFO/MR] key to exit.
After adjustment one channel, then you can process for another channel adjustment.
11.29.- SETTING TRANSMITTING CHANNEL WHEN IN THE STATUS OF DUAL
STANDBY:
1.- Press the [MENU] key.
2.- Turn the selector knob until “TX.SEL” (menu 029) is displayed.
English - 21 Παύλος Μεϊµάρης Ελπίδος 34 (ΒΑΟ) Συκιές, Θεσσαλονίκη τηλ 2310.634.513, 6977.38.38.73
URL: http://www.meimaris.com - Εmail: [email protected]
Παύλος Μεϊµάρης Ελπίδος 34 (ΒΑΟ) Συκιές, Θεσσαλονίκη τηλ 2310.634.513, 6977.38.38.73
URL: http://www.meimaris.com - Εmail: [email protected]
3.- Press the [ENTER] key.
4.- Turn the selector knob to select “FIXED” or “CALLIN”.
5.- Press the [ENTER] key.
6.- Press the [VFO/MR] key to exit.
“FIXED”: The transceiver always transmit in current channel.
“CALLIN”: In case of there is a single from other channel, the “A” or “B” icon
flash 3 seconds. If you press the [PTT], the transceiver will automatically reply to
this channel. If not [PTT] pressed after 3seconds flash, the transceiver return to
current channel.
11.30.- CROSS-BAND REPEATER MODE:
You can use this transceiver as a repeater, it enable other UHF transceiver to communicate with
other VHF transceiver.
1.- Press the [MENU] key.
2.- Turn the selector knob until “RPT” (menu 030) is displayed.
3.- Press the [ENTER] key.
4.- Turn the selector knob to select “OFF” or “ON”. (OFF= Repeater disabled, ON=
Repeater enabled).
5.- Press the [ENTER] key.
6.- Press the [VFO/MR] key to exit.
Notes:
- This function cannot use for same frequency repeater, the same frequency interfere would damage the
transceiver, this means it works with “U-V”, “V-U”, cannot work in “U-U” or “V-V”.
- Don’t use this function for a long time.
- While use this function, battery save function will be deactivated.
11.31.- DUPLEX MODE:
This transceiver can receive single when it was in the status of transmitting. It can to process two
communications at the same time.
1.- Press the [MENU] key.
2.- Turn the selector knob until “DUPLEX” (menu 031) is displayed.
3.- Press the [ENTER] key to open the “squelch”.
4.- Turn the selector knob to select “ON” or “OFF”.
5.- Press the [ENTER] key.
6.- Press the [VFO/MR] key to exit.
Note:
- If the function set to “ON”, the menu 06 “Scrambler” function will be deactivated automatically.
11.32.- SCAN ADD CHANNELS:
1.- Press the [MENU] key.
2.- Turn the selector knob until “SADD” (menu 32) is displayed.
3.- Press the [ENTER] key.
4.- Turn the selector knob and select “ADD” or “DEL”. (ADD= Add this channel to
scan list. DEL= Remove this channel in scan list).
5.- Press the [ENTER] key.
6.- Press the [VFO/MR] key to exit.
English - 22 Παύλος Μεϊµάρης Ελπίδος 34 (ΒΑΟ) Συκιές, Θεσσαλονίκη τηλ 2310.634.513, 6977.38.38.73
URL: http://www.meimaris.com - Εmail: [email protected]
Παύλος Μεϊµάρης Ελπίδος 34 (ΒΑΟ) Συκιές, Θεσσαλονίκη τηλ 2310.634.513, 6977.38.38.73
URL: http://www.meimaris.com - Εmail: [email protected]
11.33.- CHANNEL NAME EDIT:
1.- Press the [MENU] key.
2.- Turn the selector knob until “NAME” (menu 033) is displayed.
3.- Press the [ENTER] key.
4.- Turn the selector knob to select the wanted character.
5.- Press the [#T-R] key to edit the next character. Press the [*LOCK] key to return
last character.
6.- Press the [ENTER] key.
7.- Press the [VFO/MR] key to exit.
12.- “CTCSS” TABLE:
No.
1
2
3
4
5
6
7
8
9
10
Tone
(Hz)
67.0
69.3
71.9
74.4
77.0
79.7
82.5
85.4
88.5
91.5
No.
No.
11
12
13
14
15
16
17
18
19
20
Tone
(Hz)
94.8
97.4
100.0
103.5
107.2
110.9
114.8
118.8
123.0
127.3
No.
21
22
23
24
25
26
27
28
29
30
Tone
(Hz)
131.8
136.5
141.3
146.2
151.4
156.7
159.8
162.2
165.5
167.9
No.
22
23
24
25
26
27
28
29
30
31
32
33
34
35
36
37
38
39
40
41
42
Code
131
132
134
143
145
152
155
156
162
165
172
174
205
212
223
225
226
243
244
245
246
No.
31
32
33
34
35
36
37
38
39
40
Tone
(Hz)
171.3
173.8
177.3
179.9
183.5
186.2
189.9
192.8
196.6
199.5
No.
43
44
45
46
47
48
49
50
51
52
53
54
55
56
57
58
59
60
61
62
63
Code
251
252
255
261
263
265
266
271
274
306
311
315
325
331
332
343
346
351
356
364
365
No.
64
65
66
67
68
69
70
71
72
73
74
75
76
77
78
79
80
81
82
83
84
Code
371
411
412
413
423
431
432
445
446
452
454
455
462
464
465
466
503
506
516
523
526
No.
85
86
87
88
89
90
91
92
93
94
95
96
97
98
99
100
101
102
103
104
105
41
42
43
44
45
46
47
48
49
50
Tone
(Hz)
203.5
206.5
210.7
218.1
225.7
229.1
233.6
241.8
250.3
254.1
13.- “DCS” TABLE:
No.
1
2
3
4
5
6
7
8
9
10
11
12
13
14
15
16
17
18
19
20
21
Code
023
025
026
031
032
036
043
047
051
053
054
065
071
072
073
074
114
115
116
122
125
Code
532
546
565
606
612
624
627
631
632
654
662
664
703
712
723
731
732
734
743
754
English - 23 Παύλος Μεϊµάρης Ελπίδος 34 (ΒΑΟ) Συκιές, Θεσσαλονίκη τηλ 2310.634.513, 6977.38.38.73
URL: http://www.meimaris.com - Εmail: [email protected]
Παύλος Μεϊµάρης Ελπίδος 34 (ΒΑΟ) Συκιές, Θεσσαλονίκη τηλ 2310.634.513, 6977.38.38.73
URL: http://www.meimaris.com - Εmail: [email protected]
14.- TROUBLESHOOTING:
If your transceiver has problems, by following this table.
Problem
Cause/solution
Cannont power on the The battery pack has been exhausted, please change for a loaded battery
transceiver.
or recharge the battery.
The battery pack may be not installed correctly, re-install the battery
pack.
The battery used out The battery life is over, change a new battery of the same
soon after recharged.
characteristics that the one given with the transceiver.
The battery is not fully charged, be make sure fully charged before take
out.
The receiving led turn Make sure that the volume is the highest.
on but no sound into Make sure that the “CTCSS” tone or “DCS” code settings in your
transceiver, is the same with other members of their group.
speaker.
When transmit, unable Check the “CTCSS” tone or “DCS” code settings in your transceiver, is
to talk with other the same with other members of their group.
members in the same The distance between you and other group members may be too far.
You or the other member are in an area of bad propagation of
group.
radiofrequency signals.
The keypad do not Make sure that the keypad locked or not.
operate.
Make sure any other key is pressed.
In “standby” mode, it Verify that the “VOX” level function is set too low.
will
auto-transmit The “Cross-band repeater mode” is enabled.
without pressing the
[PTT].
Receiver other groups Change the frequency or channel.
signal
while Change another “CTCSS” tones or “DCS” codes of your group.
communicating
with
your group.
The
communication You or other member is too far or in an area of bad radiofrequency
with other members of propagation, example inside a tunnel, underground parking, in
your group is poor or of mountain area, among metallic big structures, etc.
bad quality.
Once carried out these confirmations, if it continues the transceiver problems, consult with their distributor,
sales person or Technical Service.
English - 24 Παύλος Μεϊµάρης Ελπίδος 34 (ΒΑΟ) Συκιές, Θεσσαλονίκη τηλ 2310.634.513, 6977.38.38.73
URL: http://www.meimaris.com - Εmail: [email protected]
Παύλος Μεϊµάρης Ελπίδος 34 (ΒΑΟ) Συκιές, Θεσσαλονίκη τηλ 2310.634.513, 6977.38.38.73
URL: http://www.meimaris.com - Εmail: [email protected]
16.- GUARANTEE:
WARRANTY CERTIFICATE
Brand name:
Model:
Serial no.:
Acquirer name:
Address:
Stamp and name of the establishment sales:
Country:
Postal code:
Telephone no.:
Date of purchase of the
equipment:
WARNING: The warranty is valid provided it is total
and properly executed in a readable and clear way,
presents the stamp and name of the establishment sales
and has attached the ticket of purchase of the
apparatus.
The suitable equipment presently in this Certificate is warranty by a period of TWO YEARS to
count from the sale date to the end user according to the Law of warranties in the Sale of Goods of
Consumption. This Certificate of warranty is only and nonnegotiable, not being able to be emitted again
neither in original neither in copy. The substitution for damage of the equipment or of any piece of the same
one it won't imply extension of the warranty.
The warranty covers the substitution and gratuitous reinstatement of all the pieces that present
defects in the materials and components employees in the production and/or assembly of the equipment.
The warranty doesn't cover the possible damages caused by accidents, installation and inadequate
use, discharge electrics (e.g. lightning’s), connection of a voltage different to the suitable one, investment of
polarity in the power supply, neither due reclamations to deterioration in the external aspect for the normal
use, neither to the quantity or condition of the accessories.
The confirmation of the accessories is the acquirer responsibility in the moment of the purchase of
the equipment.
The warranty doesn't cover the rechargeable batteries neither although these are part of the acquired
equipment since they are considered fungible material; its possible deterioration should be communicated in
a maximum term of 15 counted DAYS starting from the date of purchase of the equipment.
The warranty will be annulled in the following suppositions:
1.- Equipment that have been manipulated by third people or for personal unaware to the Technical
Authorized Service.
2.- Equipment and accessories in those that the serial number has been modified, erased or show up illegible.
3.- I use of the equipment different to which is dedicated.
To make use of the warranty it is necessary to surrender in the establishment sales or in some of the
Technical Authorized Services the equipment damaged together with their accessories and the following
documentation:
1.- Properly executed and sealed warranty certificate.
2.- Original ticket in the one that is identified the apparatus and the purchase date clearly.
3.- Description of the damage or opposing defects.
The contained warranty terms presently in this Warranty Certificate doesn't exclude, they modify or
they restrict the right that legally has the acquirer for application of the effective Laws in the moment of the
purchase, but rather they are added to the same ones.
Παύλος Μεϊµάρης Ελπίδος 34 (ΒΑΟ) Συκιές, Θεσσαλονίκη τηλ 2310.634.513, 6977.38.38.73
URL: http://www.meimaris.com - Εmail: [email protected]