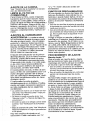
1
Operator's Manual
CRRFTSHRN_
3.3 cu. in.!54cc 2-Cycte
GASOLINE
Model No.
358.351202
CHAIN SAW
- 20 In. Bar
@
&
9
Hi
Sears,
WARNING:
Read and follow all Safety Rules and Operating
instructions before first use of this product.
For answers to your questions about this product:
Call 7 am-7 pm, Mon-Sat; Sun, 10 am-7 pm
1-800-235-5878
Roebuck
530--084339 01122/97
and Co., Hoffman
Estates,
IL 60179
USA
Warranty
Safety Rules
Assembly
Operation
Maintenance
Service and Adjustments
2
2
5
7
12
"15
Storage
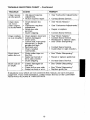
Trouble Shooting Chart
Parts List
Spanish
Parts & Ordering
FULL ONE YEAR WARRANTY
CHAIN SAW
ON CRAFTSMAN
17
18
20
23
Back
® GAS
For one year from the date of purchase, when this Craftsman Gas Chain Saw is
maintained, lubricated, and tuned-up according to the owner's manual, Sears will
repair, free of charge, any defect in material or workmanship.
This warranty does not include the bar, chain, spark plug, and air filter, which are
expendable parts and become worn during normal use.
if this Gas Chain Saw is used for commerciaF or rental purposes, this warranty
applies for only 30 days from the date of purchase.
WARRANTY SERVICE tS AVAILABLE BY RETURNING THIS CHAIN SAW TO
THE NEAREST SEARS SERVICE CENTER IN THE UNITED STATES.
This warranty gives you specific legat rights, and you may also have other rights
which vary from state to state.
Sears, Roebuck and Co,, D/817 WA, Hoffman Estates, IL 60179
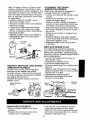
WAR NING: Always disconnect spark
plug wire when making repairs except
for carburetor adjustments. Because a
chain saw is a high-speed woodcutting
tool, careless or improper use of this
toot can cause serious injury.
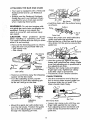
PLAN AHEAD
• Restrict the use of your saw to adult
users who understand and can follow
the safety rules, precautions, and operating instructions found in this
manual.
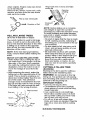
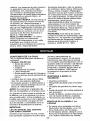
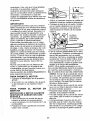
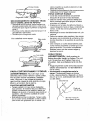
Hearing
Protection
Snug
Fitting -_-_
Clothing
-d_"_f"
Safety Hat
Eye
Protection
Heavy Duty
G!oves
/
Safety
Shoes
J
Safety Chaps
Nm
• Wear protective gear, Always use
steel4oed safety footwear with non-
g
g
slip soles; snug-fitting clothing; heavyduty, non-slip gloves; eye protection
such as non-fogging, vented goggles
or face screen; an approved safety
hard hat; and sound barriers (ear
plugs or mufflers) to protect your
hearing. Regular users should have
hearing checked regularly as chain
saw noise can damage hearing. Secure hair above shoulder length.
Keep all parts of your body away from
the chain when the engine is running.
Keep children, bystanders, and animals
at least 30 feet (10 meters) away from
work area when starting or usingsaw.
Do not handle or operate a chain saw
when you are fatigued, ill, or upset, or
if you have taken alcohol, drugs, or
medication. You must be in good
physica! condition and mentally alert.
If you have any condition that might
be aggravated by strenuous work,
check with doctor before operating.
Do not start cutting until you have a
clear work area, secure footing, and
especially if you are felling a tree, a
retreat path.
OPERATE
YOURSAWSAFELY
• Do not operate with one hand. Seri-
•
°
•
•
•
•
ous injury to the operator, helpers, or
bystanders may result from onehanded operation. A chain saw is intended for two-handed use.
Operate the chain saw only in a well
ventilated outdoor area.
Do not operate saw from a gadder or
in a tree, unless you are specifically
trained to do so.
Make sure the chain witl not make
contact with any object white starting
the engine. Never try to start the saw
when the guide bar is in a cut.
Do not put pressure on the saw at the
end of the cut. Applying pressure can
cause you to lose control when the
cut is completed.
Stop the engine before setting the
saw down.
Hand carry saw only when engine is
stopped. Carry with muffler away from
body; guide bar and chain projecting
behind you; guide bar preferably covered with a scabbard.
MAINTAIN
YOUR SAW IN GOOD
WORKING
ORDER
• Have all chain saw service performed
by a qualified service dealer except
the items listed in the maintenance
section of this manual.
, Make certain the saw chain stops
moving when the throttle trigger is released. For correction, refer to Carburetor Adjustmenls.
• Keep the handles dry, clean, and free
from oil or fuel mixture.
• Keep caps and fasteners securely
tightened.
• Use only Craftsman accessories and
replacement parts as recommended.
Never modify your saw.
leaves, straw, paper, etc. Slowly remove fuel cap and refuel unit.
• Store the unit and fuel in a coo!, dry
well ventilated space where fuel vapors cannot reach sparks or open
flames from water heaters, electric
motors or switches, furnaces, etc.
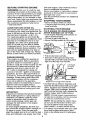
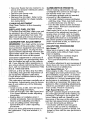
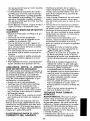
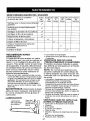
GUARD AGAINST KICKBACK
\,_\
'y_
Kickback Path
Avoid Obstructions
Clear The Working Area
WARNING:
Rotationaf Kickback can
occur when the moving chain contacts
an object at the upper portion of the tip
of the guide bar. This type of contact
can cause the chain to dig into the object, which stops the chain for an
instant. The result is a lightning fast, reverse reaction which kicks the guide bar
up and back toward the operator.
Pinch-Kickback and Pull-ln occur when
the chain is suddenly stopped by being
pinched, caught, or by contacting a foreign object in the wood. This sudden
stopping of the chain results in a reversal of the chain force used to cut wood
and causes the saw to move in the opposite direction of the chain rotation.
Pinch-Kickback drives the saw straight
back toward the operator. Pull-in pulls
the saw away from the operator.
REDUCE THE CHANCE OF
KICKBACK
HANDLE FUEL WITH CAUTION
• Recognize that kickback can happen.
• Do not smoke while handling fuel or
With a basic understanding of kickback,
while operating the saw.
you
can reduce the element of surprise
• Eliminate all sources of sparks or
which contributes to accidents_
flame in the areas where fuel is mixed
° Never let the moving chain contact
or poured.
any object at the tip of the guide bar.
• Mix and pour fuel in an outdoor area
° Keep work area free from obstrucand use an approved, marked contions such as other trees, branches,
tainer for all fuel purposes, Wipe up
rocks, fences, stumps, etc. Eliminate
all fuel spills before starting saw.
or avoid any obstruction that your saw
° Move at least !0 feet (3 meters) from
chain could hit while cutting.
fueling site before starting.
° Keep saw chain sharp and properly
tensioned, A loose or dull chain can
° Turn the engine off and let saw coo! in
increase the chance of kickback. Fola non-combustible area, not on dry
few manufacturer's chain sharpening
and maintenance instructions. Check
tension at regular intervals, but never
with engine running. Make sure bar
clamp nuts are securely tightened.
- Begin and continue cutting at full
speed. If the chain is moving at a
slower speed, there is greater chance
of kickback occurring.
o Use extreme caution when re-entering a cut.
° Do not attempt cuts starting with the
tip of the bar (plunge cuts).
• Watch for shifting logs or other forces
that could close a cut and pinch or fall
into chain.
° Use the specified Reduced-Kickback
Guide Bar and Low Kickback Chain.
Avoid Pinch-Kickback:
• Be extremely aware of situations or
obstructions that can cause material
to pinch the top of or otherwise stop
the chain.
• Do not cut more than one log at a
time.
° Do not twist the saw as the bar is withdrawn from an undercut when bucking.
Avoid Pult-ln:
at full speed and the saw housing
i against
lways begin
wood. cutting with the engine
Use wedges made of plastic or wood,
Never use metal to hold the cut open.
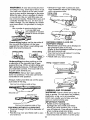
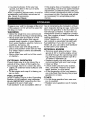
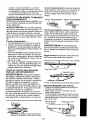
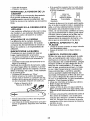
MAINTAIN CONTROL
Stand to the left of the saw
Thumbon
underside of
handlebar
t
Elbow
locked
Never reverse hand positions
• A good, firm grip on the saw with both
hands will help you maintain control.
Don't let go, Grip the rear handle with
your right hand whether you are right
or left handed. Wrap the fingers of
your left hand over and around the
front handlebar, and your left thumb
under the front handlebar. Keep your
left arm straight with the elbow locked.
• When making bucking cuts, position
your left hand on the front handlebar
so it is in a straight line with your right
hand on the rear handle. Stand slightfy to the left side of the saw to keep
your body from being in a direct line
with the cutting chain.
• Stand with your weight evenly balanced on both feet.
° Do not overreach. You could be drawn
or thrown off balance and lose control.
• Do not cut above shoulder height. It is
difficult to maintain control of saw
above shoulder height.
KICKBACK
SAFETY
FEATURES
WARNING: The following features are
included on your saw to help reduce
hazard of kickback; however, such features will not totally eliminate this danger, Do not rely only on safety devices.
Follow all safety rules to help avoid
kickback and other forces which can
result in serious injury.
° Handguard: designed to reduce the
chance of your left hand contacting
the chain if your hand slips off the
front handlebar.
• Position of front and rear handlebars,
designed with distance between handles and "in-line" with each other. The
spread and "in-line" position of the
hands provided by this design work
together to give balance and resistance in controlling the pivot of the
saw back toward the operator if kickback occurs.
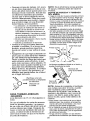
° Reduced-Kickback Guide Bar, de n
signed with a small radius tip which
reduces the size of the kickback danger zone on the bar tip. This type bar
has been demonstrated to significantly reduce the number and seriousness
of kickbacks when tested in accordance with ANSI B175.t.
Small Radius Tip
Large Radius Tip
• Low Kickback Chain, has met kickback performance requirements when
tested on a representative sample of
chain saws below 3,8 cubic inch
displacement specified in ANSI
B175.1.
4
Low-Kickback
Chain
must closely monitor their physical
condition and the condition of this tool.
CHAIN BRAKE If this saw is to be used
_;I_1_!,_-_._-_-_ Elongated Guard Link
for commercial logging, you must order
L.
_
Deflects Kickback Force
and install a chain brake to comply with
"-'_...
_
And Atlows Wood To
"-..F"
Graduai(y Ride into Cutter
Federal OSHA Regulations for Commercial Logging. Contact your Sears
Chain With High Kickback Potentia+
Service Center or call 1-800-235-5878.
SPARK ARRESTOR: Your saw is
_3_%,_...
Can Obstruct Material
equipped with a temperature limiting
muffler and spark arresting screen which
meets the requirements of California
Codes 4442 and 4443. Al! U.S. forest
SAFETY NOTICE: Exposure to
land and the states of California, Idaho,
vibrations through prolonged use of
Maine, Minnesota, New Jersey, Oregon,
gasoline powered hand tools could
cause blood vesse! or nerve damage in and Washington require by law that many
the fingers, hands, and joints of people
internal combustion engines be equipped
prone to circulation disorders or
with a spark arrestor screen. If you
abnormal swelling. Prolonged use in
operate a chain saw in a state or locale
cold weather has been linked to blood
where such regulations exist, you are
vessel damage in otherwise healthy
legally responsible for maintaining the
people. If symptoms occur such as
operating condition of these parts. Failure
numbness, pain, loss of strength,
to do so is a violation of the law. Refer to
change in skin color or texture, or toss
CUSTOMERRESPONSIBILITIESsection.
of feeling in the fingers, hands, or joints,
STANDARDS: This chain saw is listed
discontinue the use of this tool and
by Underwriters Laboratories, inc. in
seek medical attention. An
accordance with American National
anti-vibration system does not
Standards for Gasoline-Powered Chain
guarantee the avoidance of these
Saws Safety Requirements (ANSI
problems. Users who operate power
tools on a continual and regular basis
Bt75.1-1991).
/.-- Contoured
Depth Gauge
CARTON CONTENTS
Check carton contents against the foF
lowing list.
- Model: 358.351202
• Chain Saw
• Guide Bar
° Chain
• Bar tool
• Hex wrench
- 2-cycle engine oil. (Bar oil not
included)
• Examine parts for damage. Do not
use damaged parts.
• tf you need assistance or find parts
missing or damaged, please call
1-800-235-5878.
NOTE: It is normal to hear the fuel filter
rattle in an empty fuel tank.
Your unit has been factory tested and
the carburetor precisely adjusted. As a
result you may smell gasoline or find a
drop of oil/fuel residue on the muffler
when you unpack the unit.
ASSEMBLY
READ YOUR OPERATOR'S MANUAL
CAREFULLY
Your Operator's Manual has been
developed to help you prepare your
saw for use and to understand its safe
operation. It is important that you read
your manual completely to become
familiar with the unit before you begin
assembly or attempt operation. If you
have any questions or need further
assistance, cafl our CUSTOMER
ASSISTANCE HOTLINE at
1-800-554-6723.
HAVE THE FOLLOWING AVAILABLE:
•
•
•
•
°
Protective gloves
Approved, marked fuel container
One gallon regular unleaded gasoline
2 cycle, air-cooled engine oil (provided)
Bar and Chain Oil (See the Bar and
Chain Oil section)
° Bar tool (provided)
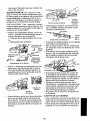
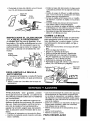
ATTACHING THE BAR AND CHAIN
• Your saw is equipped with a Reduced
Kickback Bar and a Low Kickback
Chain.
° Always use the Reduced Kickback
Guide Bar and Low Kickback Chain
specified for your chain saw model
when replacing these parts.
- Hold the chain with the cutters facing
as shown.
WARNING:
Do not start engine without guide bar and chain completely assembled. Doing so can cause the
clutch to come off, and serious injury
can result.
CAUTION:
Wear protective
gloves
when handling or operating your saw,
The chain is sharp and can cut you even
when it is not moving!
• Remove the foltowing parts as shown,
using the bar tool provided with unit.
• Bar clamp nuts.
• Bar clamp.
Saw
.I:
Drive Link
Cutters
---_Tip of
Bar
• Place the chain over and behind the
clutch and onto the sprocket
• Start at the top of the bar and fit chain
drive links into the groove around the
guide bar.
• Hold the guide bar against the saw
frame and install the bar clamp. Make
sure that adjusting pin is positioned in
the adjusting pin hole.
- Replace bar clamp nuts and tighten
finger tight only. Tighten bar clamp
nuts after chain is tensioned.
° Proceed to Chain Tension section.
Bar Clamp
° Remove and throw away the shipping
spacer on the bar studs.
° Turn the adjusting screw counterclockwise to move the adjusting pin
as far as it will go to the rear.
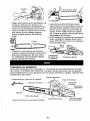
CHAIN TENSION
° Use the screwdriver end of the bar
tool to move chain around guide bar
to ensure kinks do not exist. The
chain should rotate freely.
Adjusting
Pin
Adjusting
Screw
° Mount the guide bar with slotted end
over the bar studs. Position the guide
bar so the adjusting pin is inserted
through the adjusting pin hole.
BarTool
Bar Clamp Nuts
• Loosen bar clamp nuts until they are
finger tight against the bar clamp,
• Turn adjusting screw clockwise until
chain barely touches the bottom of
guide bar.
6
Guide Bar .,,#a..--_.
Adjustment
Tool
• While lifting tip of guide bar, tighten
bar clamp nuts with the bar tool.
Torque to 10-t5 ft-lbs.
Bar
Clamp
Nuts
Adjusting Screw
• Using bar tool, rotl chain around guide
bar to ensure all links are in bar
groove.
Adjusling Screw - 1/4 Turn
* Use the screwdriver end of the bar
tool to move chain around guide bar.
* If chain does not rotate, it is too tight.
Stightty loosen bar clamp nuts and
turn adjusting screw 1/4 turn counterclockwise. Retighten bar clamp nuts.
, If chain is too loose, it will sag below
the guide bar. DO NOT operate the
saw if the chain is loose.
s
• Lift up tip of guide bar to check for
sag. Release tip of guide bar, then
turn adjusting screw 1/4 turn clockwise. Repeat until sag does not exist.
7
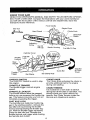
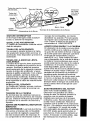
KNOW YOUR SAW
READ THIS OPERATOR'S MANUAL AND SAFETY RULES BEFORE OPERATING YOUR CHAIN SAW. Compare the illustrations with your unit to familiarize
yourself with the location of the various controls and adjustments. Save this
manual for future reference,
Front Handle
_._/Starter
Rope
L
Choke Knob
Starter Housing
Fuel Mix Fill Cap
Cylinder Cover
Throttle
Lockout
Fast Idle
Rear
Handle
\
Guide Bar
Throttle
Trigger
Bar Clamp
Direction
of Chain
Travel
Bar Clamp Nuts
ON/STOP SWITCH
The ON/STOP Switch is used to stop
the engine.
THROTTLE TRIGGER
The throttle trigger controls engine
speed.
THROTTLE LOCKOUT
The throttle lookout must be pressed
before you can squeeze the throttle trigget. This feature prevents you from accidentally squeezing the trigger.
FAST IDLE LOCK
The fast idle lock holds the throttle trigger in the starting position. Activate the
fast idle lock by pressing the throttle
lockout and squeezing the throttle trigger. With the throttle trigger squeezed,
press the fast idle lock. Release the
throttle lockout and trigger while holding
the fast idle lock button.
CHOKE KNOB
The Choke Knob activates the choke to
provide additional fuel to the engine
during cold starting.
CHAIN TENSION
It is normal for a new chain to stretch
during first 30 minutes of operation. You
should check your chain tension frequently, See Chain Tension under the
Service and Adjustments section,
8
BEFORE STARTING
ENGINE
WARNING:
Be sure to read the fuel
handling information in the safety rules
section of this manual before you begin.
If you do not understand the fuel handling information do not attempt to fuel
your unit. Seek help from someone that
does understand the information or call
the customer assistance help line at
1-800-235-5878.
GUIDE BAR AND CHAIN OIL
The chain oiler provides continuous lubrication to the chain and guide bar. Be
sure to fill the bar oil tank when you fill
the fuel tank (Capacity = 6.8 ft. oz.)
For maximum guide bar and chain life,
we recommend you use Craftsman chain
saw bar oil If Craftsman bar oil is not
available, you may use a good grade
SAE 30 oil until you are able to obtain
Craftsman brand. The oil output is automatically metered during operation. "{our
saw will use approximately one tank of
bar oil for every tank of fuel mix. Always
fill bar oil tank when you fill the fuel tank.
fuel next season. See STORAGE instructions for additional information.
Never use engine or carburetor cleaner
products in the fue! tank or permanent
damage may occur.
See the STORAGE section for additional
information.
STOPPING YOUR ENGINE
° Move On/Stop switch to STOP.
° if engine does not stop, pull choke
knob out fully.
STARTING YOUR ENGINE
COLD ENGINE OR WARM ENGINE
AFTER RUNNING OUT OF FUEL
• Fuel engine toUowing instructions under FUELING ENGINE.
• Fill bar oil tank with bar oil.
• Move On/Stop switch to ON position.
o STO
"_-_
,_"FUll
° Pull choke knob out fully,
FUELING ENGINE
° Set saw on the ground. Grip front
This engine is certified to operate on
handle with your left hand and place
unleaded gasoline, Before operation,
right foot through rear handle.
gasoline must be mixed with a good
quality 2-cycle air-cooled engine oil. We
.
_
\_/Z...._
Left Hand
recommend Craftsman brand oil. Mix
iJJ |bY
Xt
on Front
gasoline and oil at a ratio of 40:1 (A
40:1 ratio is obtained by mixing 3.2
ounces of oil with t gallon of unleaded
gasoline). DO NOT USE automotive oil
or boat oil, These oils will cause engine
damage. When mixing fuel follow the
instructions printed on the container.
Once oil is added to the gasoline,
Right Foot Through Rear Handle
shake container momentarily to assure
•
Set
fast idle as follows: Depress and
that the fuel is thoroughly mixed.
hold the throttle lockout with your right
Always read and follow the safety rules
hand. Squeeze and hold the throttle
relating to fuel before fueling your unit.
trigger. With your forefinger, depress
and hold the fast idle lock; release the
IMPORTANT
throttle trigger and IhrotBe lockout,
Experience indicates thai alcohol blended
NOTE: Ifthrottle trigger is squeezed accifuels (called gasohol or using ethanol or
dentally during sta_ng, it wilt be necessary
methanol) can attract moisture which
to reset the choke/fast idte control.
leads to separation and formation of
NOTE: When pulIing the starter rope,
acids during storage. Acidic gas can
do not use the furl extent of the rope,
damage the fuel system of an engine
Do not let starter rope snap back.
while in storage.
Hold handle. Let rope rewind slowly.
To avoid engine problems, the fuel system should be emptied before storage for * Pull starter rope handle with your right
30 days or longer. Drain the gas tank,
hand until engine attempts to start.
start the engine and let it run until the fuel • Push in the choke lever to Partial position.
lines and carburetor are empty. Use fresh
9
- Pull the starter rope handle until the
engine starts.
o Above 40 °, allow engine to run for
about 5 seconds. Push choke knob in
to the off position; then, squeeze and
relase throttle trigger to allow engine
to idle.
• Below 40 °, allow engine to run for 30
seconds to 1 minute with at partial
position. Push choke knob in to OFF
position; then, squeeze and release
throttle trigger to allow engine to idle.
• To stop engine, move On/Stop switch
to the STOP position.
• L
•
•
i
STARTING A WARM ENGINE
• Move On!Stop switch to ON.
* Activate fast idle lock.
, Make sure choke is in the OFF position.
• With saw on ground, grip front handle
with left hand and place right foot
through rear handle,
• Pull starter rope handle until the engine starts.
• Squeeze and release the throttle trigger to return engine to idle speed.
• To stop engine, move On/Stop switch
to the STOP position.
DIFFICULT STARTING OR
STARTING
A FLOODED
ENGINE
The engine may be flooded if it has not
started after 10 pulls, Flooded engines
can be cleared of excess fuel with the
following procedure:
• Activate fast idle lock.
• Verify that the On/Stop switch is in the
ON position.
• With saw on ground, grip front handle
with left hand and place right foot
through rear handle.
° Pull starter rope handle until the engine starts.
Starting could require many pulls depending on how badly unit is flooded. If
engine still fails to start, refer to TROUBLESHOOTING chart or call
1-800-235-5878.
OPERATING
TIPS
• Check chain tension before first use
and after 1 minute of operation. See
Chain Tension in the Assembly section,
• Cut wood only. Do not cut metal, plastics, masonry, non-wood building materials, etc.
• Stop the saw if the chain strikes a foreign object. Inspect the saw and repair parts as necessary',
• Keep the chain out of dirt and sand.
Even a small amount of dirt will quickly dull a chain and increase the possibility of kickback.
° Practice cutting a few small logs using
the following steps. This wilt help you
get the "feet" of using your saw before
you begin a major sawing operation.
• Squeeze the throttle trigger and allow the engine to reach full speed
before cutting.
• Begin cutting with the saw frame
against the log.
• Keep the engine at full speed the
entire time you are cutting.
• Allow the chain to cut for you. Exert
only light downward pressure.
° Release the throttle trigger as soon
as the cut is completed, allowing the
engine to idle. If you run the saw at
full throttle without a cutting load,
unnecessary wear can occur.
• To avoid losing control when cut is
complete, do not put pressure on
saw at end of cut.
• Stop the engine before setting the
saw down.
TREE
FELLING
TECHNIQUES
WARNING:
Check for broken or dead
branches which can fall while cutting
causing serious injury. Do not cut near
buildings or electrical wires if you do not
know the direction of tree fall, nor cut at
night since you will not be able to see
well, nor dudng bad weather such as
rain, snow, or strong winds, etc.
Carefully plan your sawing operation in
advance. Clear the work area, You
need a clear area all around the tree so
you can have secure footing. Study the
natural conditions that can cause the
tree to fall in a particular direction, such
conditions include:
° The wind direction and speed.
• The lean of the tree. The lean of a
tree might not be apparent due to uneven or sloping terrain. Use a plumb
or level to determine the direction of
tree lean.
• Weight and branches on one side.
• Surrounding trees and obstacles.
Look for decay and rot. If the trunk is
rotted, it can snap and fall toward the
operator.
Make sure there is enough room for the
tree to fall. Maintain a distance of 2-1/2
tree lengths from the nearest person or
I0
otherobjects.
Engine
noisecandrown
outa warning
call.
Remove
dirt,stones,
loosebark,nails,
staples,
andwirefromthetreewhere
cutsaretobemade.
Hinge holds tree on stump and helps
control fall
Opening
of felling
'_t, Plan
adearretreat
path
.......
t o0
45/
_-
FELLINGLARGE
TREES
(6 inches in diameter or larger)
The notch method is used to fell large
trees. A notch is cut on the side of the
tree in the desired direction of fall. After
a felling cut is made on the opposite
side o1tree, the tree should fall in the
direction of the notch.
NOTE: if the tree has large buttress
roots, remove them before making the
notch.
NOTCH CUT AND FELLING TREE
• Make notch cut by cutting the top of
the notch first, Cut through 1/3 of the
diameter of the tree. Next complete
the notch by cutting the bottom, See
illustration. Once the notch is cut remove the wedge of wood from the
tree.
° After removing the wood, make the
felling cut on the opposite side of the
notch. This is done by making a cut
about two inches higher than the center of the notch. This will leave
enough uncut wood between the felting cut and the notch to form a hinge.
This hinge will help prevent the tree
from falling in the wrong direction.
First cut
)
,.;
Closing of
notch
Direction
ofFall
{ Final cut here
l /
NOTE: Before felling cut is complete,
use wedges to open the cut when
necessary to control the direction of fall.
To avoid kickback and chain damage,
use wood or plastic wedges, but never
steel or iron wedges.
• Be alert of signs that the tree is ready
to fall: cracking sounds, widening of
the felling cut, or movement in the upper branches.
° As tree starts to fall, stop saw, put it
down, and get away quickly on your
planned retreat path.
• Be extremely cautious with partially
fallen trees that may be poorly supported. When a tree doesn't fa!l completely, set the saw aside and pul!
down the tree with a cable winch,
block and tackle, or tractor. Do not
use your saw to cut down a partially
fallen tree.
CUTTING A FALLEN TREE
(BUCKING)
Bucking is the term used for cutting a
fallen tree to the desired log size.
WARNING:
Do not stand on the log
being cut. Any portion can roll causing
loss of footing and control. Do not stand
downhill of the log being cut.
IMPORTANT POINTS
• Cut only one log at a time.
• Cut shattered wood very carefully;
sharp pieces of wood could be flung
toward operator.
° Use a sawhorse to cut small logs.
Never allow another person to hold
the tog while cutting and never hold
the log with your leg or loot.
• Do not cut in an area where logs,
limbs, and roots are tangled, Drag the
logs into a clear area before cutting
them,
BUCKING TECHNIQUES
11
WARNING:
tf saw becomes pinched
or hung in a log, don't try to force it out,
You can tose control of the saw resulting in injury and!or damage to the saw.
Stop the saw, drive a wedge of plastic
or wood into the cut until the saw can
be removed easily. Restart the saw and
carefully reenter the cut. Do not use a
metal wedge. Do not attempt to restart
your saw when it is pinched or hung in
a log.
Use a wedge to remove pinched saw
Turn saw OFF and
use a plastic or wooden
wedge to force cut open.
° Watch for logs with a pressure side.
See illustration above for cutting logs
with a pressure side.
Using a log
I st Cut
1st Cut
2 nd Cut
Overcutting begins on the top side of
the log with the bottom of the saw
against the tog. When overcutting use
light downward pressure.
Undercutting
Overcutting
Undercutting involves cutting on the
underside of the tog with topof saw
against the log. When undercutting use
light upward pressure. Hold saw firmly
and maintain control. The saw will tend
to push back toward you,
WARNING:
Never turn saw upside
down to undercut. The saw cannot be
controlled in this position.
BUCKING USING A LOG OR
SUPPORT STAND
, Remember your first cut is always on
the pressure side of the log.
(Refer to the illustration below for your
first and second cut)
- Your first cut should extend 1/3 of the
diameter of the log.
, Finish with your second cut.
Using a s/u_Cut
/
_
I st Cut
Always make your first cut on the pressure side of the log.
First cut on pressure side of log
LIMBING AND PRUNING
WARNING: Never climb into a tree to
limb or prune. Do not stand on ladders,
Second cut
platforms, a log, or in any position
which can cause you to lose your balance or control of the saw.
IMPORTANT POINTS
• Watch out for springpoles.
First cut on pressure side of log
Springpoles are small size limbs
BUCKING WITHOUT A SUPPORT
which can whip toward you, or pull
• Overcut through 1/3 of the diameter of
you off balance. Use extreme caution
the log,
when cutting small size limbs.
° Roll the tog over and finish with a sec- ° Be alert for springback. Watch out for
ond overcut,
branches that are bent or under pres12
sure,Avoidbeingstruck
bythe
branch
orthesawwhenthetension
in
thewoodfibersisreleased.
° Frequently
clearbranches
outofthe
waytoavoidtripping
onthem.
LIMBING
• Limb a tree only after it is cut down,
° Leave larger limbs underneath felled
tree to support tree as you work.
° Start at the base of the felled tree and
work toward the top, cutting branches
and limbs, Remove smafl limbs with
one cut.
= Keep tree between you and the chain.
° Remove larger, supporting branches
with the t/3, 2/3 cutting techniques described in the bucking section.
° Always use an overcut to cut small and
freely hanging limbs, Undercutting
could cause limbs to fall and pinch saw.
WARNING:
Limit pruning to limbs
shoulder height or below. Do not cut if
branches are higher than your shoulder. Get a professional to do the job,
• Make your first cut 1/3 of the way
through the bottom of the limb.
• Next make a second cut all the way
through the limb, Then cut a third
overcut 1 to 2 inches from the trunk of
the tree,
$ econ d cut
irst cut
1/3 of way
_"'\
3rdcuttrunk
from
I to2in.
of tree
PRUNING
CUSTOMER
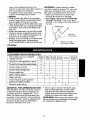
RESPONSIBILITIES
Fill in dates as you complete
regular service
Check for damaged!worn
parts
Check for loose fasteners/a__a___
Check chain tension
Check chain sharpness
Check guide bar
Clean unit & labels
Clean air fitter
Clean/inspect spark arrestor
screen & inspect muffler
Replace spark plug
GENERAL RECOMMENDATIONS
The warranty on this unit does not cover items that have been subjected to
operator abuse or negligence. To receive full value from the warranty, the
operator must maintain unit as instructed in this manual Various adjustments
will need to be made periodically to
properly maintain your unit.
° Once a year, replace the spark plug
and air filter element. A new spark
plug and air filter element assures
proper air/fuel mixture and helps your
engine run better and last longer,
WARNING; Disconnect the spark ptug
before performing maintenance except
for carburetor adjustments,
13
LUBRICATION
Bar Sprocket
Bar Oil ,_
* Lubricate the bar sprocket with
sprocket tube.
- Lubricate chain with Craftsman chain
saw bar oil.
CHECK FOR DAMAGED
OR
WORN PARTS
Replacement of damaged!worn parts
should be referred to your Sears Service Center.
NOTE: It is normal for a small amount
of oit to appear under the saw after engine stops. Do not confuse this with a
leaking oil tank.
* On!Stop Switch - Ensure On/Stop
switch functions properly by moving
the switch to the Stop position. Make
sure engine stops; then restart engine
and continue.
• Fuel Tank - Discontinue use of chain
saw if fuel tank shows signs of damage or leaks.
* Oil Tank - Discontinue use of chain
saw if oil tank shows signs of damage
or leaks.
CHECK FOR LOOSE
FASTENERS
AND PARTS
• Bar Clamp Nuts
• Chain
• Muffler
- Cylinder Shield
• Air Filter
° Clutch Drum!Sprocket
• Handle and Housing Screws
• Vibration Mounts
• Handguard
tools at Sears or go to a professional
chain sharpener.
CHECK GUIDE BAR
Conditions which require guide bar
maintenance:
• Saw cuts to one side or at an angle.
° Saw has to be forced through the cut.
• Inadequate supply of oil to the bar
and chain.
Check the condition of the guide bar
before each use and each time the
chain is sharpened. A worn guide bar
will damage the chain and make cutting
difficult. To maintain guide bar:
- Move On/Stop switch to Stop.
• Remove bar and chain from saw.
• Clean all sawdust and any other
debris from the guide bar groove and
sprocket hole after each use.
RemoveSawdust From
Guide Bar Groo_
V
_
Sprocket Hole
° Add lubricant to sprocket hole after
each use.
• Burring of guide bar rails is a normal
process of rai! wear. Remove these
burrs with a flat file.
° When rail top is uneven, use a flat file
to restore square edges and sides.
Correct Worn
Groove Groove
F[Ie Edges and sides
Square
Replace the guide bar when the groove
is worn, the guide bar is bent or
cracked, or when excess heating or
burring of the rails occurs. If replaceCHECK CHAIN TENSION
ment is necessary, use only the guide
if the chain is too loose it can come off
bar specified for your saw in the repair
bar and possibly cause injury. DO NOT
parts tist,also specified on the replaceoperate the saw if the chain is loose.
ment bar and chain decal located on
To set your chain to the proper tension, the chain saw.
refer to Chain Tension in the Assembly
CLEAN UNIT & LABELS
section.
• Clean the unit using a damp cloth with
CHECK CHAIN SHARPNESS
a mild detergent.
A sharp chain makes wood chips. A
° Wipe off unit with a clean dry cloth.
dull chain makes a sawdust powder
CLEAN AIR FILTER
and cuts slowly.
A dirty air filter decreases the life and
CHAIN SHARPENING
performance of the engine and inChain sharpening requires special
creases fuel consumption and harmful
tools. You can purchase sharpening
emissions. Atways clean your air filter
t4
after15tanksoffuelor5 hours
ofoperation, whichever comes first. Clean
more frequently in dusty conditions. It is
advisable to replace your air filter with a
new one after every 50 hours of operation, or annually, whichever comes first.
To clean filter:
• Loosen screw on air filter cover.
• Remove air filter cover.
• Remove air filter screw and retainers.
• Remove air filter.
• Clean the air filter using hot soapy
water. Rinse with clean cool water.
Air dry completely before reinstalling.
• Reinstall air filter.
• Tighten air filter screw and retainers.
• Reinstall air filter cover and screw
(15-20 in-lbs.).
Retainers
INSPECT
MUFFLER
AND SPARK
ARRESTOR
SCREEN
As the unit is used, carbon deposits
build up on the muffler and spark
arrestor screen, and must be removed
to avoid creating a fire hazard or affecting engine performance.
Replace the spark arrestor screen if
breaks occur.
CHAIN REPLACEMENT
• Move On/Stop switch to the Stop
position,
• Replace the old chain when it becomes worn or damaged,
CLEANING THE SPARK
ARRESTOR SCREEN
Clean every 25 hours of operation or
annually, whichever comes first.
, Loosen and remove the muffler cover
screws.
* Remove the muffler cover (cover
snaps off muffler body).
, Remove muffler diffuser and spark
arrestor screen assembly. Notice the
orientation of parts for reassembly.
, Clean the spark arrestor screen with a
wire brush. Replace screen if breaks
are found.
o Replace any broken or cracked muffler parts.
• Reinstall diffuser and spark arrestor
screen assembly with holes facing up
and toward muffler cover.
• Reinstall muffler cover and screws
(7-8 ft-lbs.).
REPLACE SPARK PLUG
The spark plug should be replaced
each year to ensure the engine starts
easier and runs better. Spark plug gap
should be .025 in. Ignition timing is fixed
and nonadjustable.
- Loosen and remove the screws on
the cylinder cover.
, Remove the cylinder cover,
- Pul! off the spark plug boot.
, Remove spark plug from cylinder and
discard.
o Replace with Champion CJ7Y spark
plug and tighten with a 3/4 inch socket
wrench (10-12 ft-lbs).
• Reinstall the spark plug boot,
o Reinstall the cylinder cover and
screws (15-20 in-tbs).
• Use only the Low Kickback replacement chain specified in the repair
parts list. The correct replacement bar
and chain is also specified on a decal
located on the chain saw,
15
• SeeyourSearsService
Center
toreplaceandsharpen
individual
cutters
onyourchain.
° Remove bar clamp nuts.
° Remove bar clamp.
• Remove the old chain. Refer to the
Assembly section for chain installation instructions.
CHAIN ADJUSTMENT
See Chain Tension in the Assembly
section.
REPLACE
FUEL FILTER
To replace the fuel filter, drain your unit
by running it dry of fue{; remove fue_
cap!retainer assembly from tank. Pull
filter from tank and remove from fuel
line. Install new filter; reassemble parts.
CARBURETOR
ADJUSTMENT
WARNING: The chain will be moving
during most of this procedure. Wear
your protective equipment and observe
all safety precautions. During the low
speed mixture adjustment recheck idle
speed after each turn of the screw The
chain must not move at idle speed.
Carburetor adjustment is critical and if
CARBURETOR
PRESETS
When making adjustments, do not
overtighten the screws as damage to
the needle seats can occuw:
If carburetor presets are not needed,
proceed to idle Adjustments.
° Turn both mixture screws clockwise
until they stop. Then, turn both screws
counterclockwise one full turn.
• Turn the idte speed screw clockwise
until it stops. Now turn counterclockwise 4-t/2 turns,
Start motor, let it run for 3 minutes, and
proceed to the adjustment section, tf
engine does not start, refer to troubleshooting chart or call 1-800-235-5878.
If engine performance is acceptable at
the preset positions and there is no
chain movement at idle, no further adjustment is necessary.
ADJUSTING
PROCEDURE
idle Speed "T"
Allow warm engine to idle. Adjust speed
until engine runs without chain movement or sta!ling.
° Turn clockwise to increase engine
speed if engine stalls or dies.
• Turn counterclockwise to decrease
speed.
No further adjustments are necessary if
tor.
you require
assistance
or
are tf
unsure
about further
performing
this procechain does not move at idle speed and
dure,
call
our
customer
assistance
help
done improperly can permanently dam- if performance is satisfactory.
age at
thet-800-235-5878.
engine as well as the carbureLow Speed Mixture _'L"
i line
:
Old fuel, a dirty air filter, dirty fuel filter,
Allow engine to idle. Then accelerate
or flooding may give the impression of
the engine and note performance. If enan improperly adjusted carburetor.
gine hesitates, bogs down, or smokes
: ...... Check these conditions before adjustduring acceleration, turn mixture screw
ing the carburetor.
clockwise in I/!6-turn increments untif
The carburetor has been carefully set at performance is satisfactory. Repeat this
the factory. Adjustments may be neces- procedure as necessary for proper adjustment. After completing adjustments,
sary if you notice any of the following
check for acceleration and chain moveconditions:
ment at idle, Reset if necessary.
° Chain moves at idle. See Idle Speed
under adjusting procedure.
High Speed Mixture "H"
• Saw will not idle. See Idle Speed and DO NOT operate engine at full throttle
Low Speed Mixture under adjusting
for prolonged periods while making adprocedure.
justments. Damage to the engine can
° Engine dies or hesitates when it
occur. Make a test cut. Based on pershould accelerate. See Acceleration
formance of the saw while cutting, adCheck under adjusting procedure.
just the high Speed mixture setting in
• Loss of cutting power. See High
1i16-tum increments as follows:
Speed Mixture H under adjusting
° Clockwise until the saw has good
procedure.
power in the cut with no hesitation.
There are three adjustment screws on
Do not adjust by sound or speed, but
judge by how well the saw performs in
the carburetor, They are labeled H, L,
the cut.
and T.
t6
• Counterclockwise
ifthesawhas
speed,
butdiesinthecutorlacks
powerinthecut.
Aftercompleting
adjustments,
check
for
acceleration
andchainmovement
at
idle.Resetifnecessary.
Acceleration Check
If the engine dies or hesitates instead of
accelerating, turn the low speed mixture
adjustment counterclockwise until you
have smooth acceleration with no chain
movement at idle. Recheck and adjust
as necessary for acceptable performance.
Prepare your unit for storage at the end
of the season or if it will not be used for
30 days or more.
WARNING:
• Allow the engine to cool, and secure
the unit before storing or transporting.
• Store chain saw and fuel in a well
ventilated area where fuet vapors
cannot reach sparks or open flames
from water heaters, electric motors or
switches, furnaces, etc.
• Store chain saw with all guards in
place and position chain saw so that
any sharp object cannot accidentally
cause injury.
• Store chain saw well out of the reach
o! children.
tive in minimizing the formation of fuel
gum deposits during storage. Add stabilizer to the gasoline in the fuel tank or
fuel storage container. Follow the mix
instructions found on stabilizer containers. Run engine at least 5 minutes after
adding stabilizer.
CRAFTSMAN 40:1, 2-cycte engine oil
(air cooled) is especially blended with
fuel stabilizer, If you do not use this
Sears oil, you can add a fuel stabilizer
to the fuel in your fuel tank.
INTERNAL
ENGINE
• Remove spark plug and pour 1 teaspoon of 40:1,2-cycle engine oil (air
cooled) through the spark plug opening, Slowly pult the starter rope 8 to
10 times to distribute oil,
EXTERNAL
SURFACES
° Replace spark plug with new one of
recommended type and heat range.
If your chain saw is to be stored for a
•Ciean air filter.
period of time, clean it thoroughly be• Check entire unit for loose screws,
fore storage. Store in a clean dry area.
° Lightly oil external metal surfaces and
nuts, and bolts. Replace any damaged, broken, or worn parts.
guide bar.
• Oil the chain and wrap it in heavy pa- • At the beginning of the next season,
per or cloth.
use only fresh fuet having the proper
gasoline to oil ratio.
FUEL SYSTEM
OTHER
Under Fueling Engine in the Operating
Section of this manual, see message
• Do not store gasoline from one season to another.
labeled IMPORTANT regarding the use
of gasohol in your chain saw.
• Replace your gasoline can if it starts
to rust.
Fuel stabilizer is an acceptable altema-
17
TROUBLE SHOOTING CHART
TROUBLE
Engine will not
start or wi!l run
only a few
seconds after
starting.
Engine will not
idle properly.
Engine will not
accelerate,
lacks power,
or dies under
a load.
CAUSE
REMEDY
• ignition switch off.
• Engine flooded.
• Fuel tank empty.
• Spark plug not firing.
• Fuel not reaching
carburetor.
•
•
•
•
•
° Carburetor requires
adjustment,
• None of the above.
• Idle speed set too high
or too low,
• Low Speed Mixture
requires adjustment.
• Crankshaft seals worn.
• Compression low.
• None of the above.
Air filter dirty.
Spark plug fouled.
°
Carburetor requires
adjustment,
• Exhaust ports or muftier outlets plugged.
, Compression low.
• None of the above.
Engine smokes • Choke partially on.
,, Fuet mixture incorrect.
excessively.
• Air filter dirty.
• High Speed Mixture
requires adjustment.
• Crankcase leak,
Engine runs
hot.
Oil inadequate
for bar and
chain
lubrication.
Move Ignition switch to ON,
See "Starting Instructions."
Fill tank with correct fuel mixture.
Install new spark plug.
Check for dirty fuel filter; replace.
Check for kinked or split fuel line
repair or replace.
• See"Carburetor Adjustments."
• Contact Sears Service,
• See "Carburetor Adjustments?
•
See "Carburetor Adjustments."
• Contact Sears Service.
• Contact Sears Service.
• Contact Sears Service.
• Ctea_ or replace air filter.
• Clean or replace plug
and regap.
° See "Carburetor Adjustments."
•
Contact Sears Service.
•
•
Contact Sears Service.
Contact Sears Service,
° Adjust choke.
• Empty fuel tank and refill with
correct fuel mixture,
° Clean or replace air filler.
° See "Carburetor Adjustments."
° Contact Sears Service.
Fuel mixture incorrect.
Sparkplug incorrect.
High Speed Mixture
set too lean.
• Exhaust ports or muffler outlets plugged.
• Carbon build-up on
° See "Fueling Your Unit."
• Replace with correct plug,
• See "Carburetor Adjustments."
o
•
',
•
•
l°
•
Contact Sears Service,
-
Clean spark arrestor screen.
muffler
outlet screen.
Fan housing/cylinder
fins dirty.
None of the above.
•
Clean area.
•
Contact Sears Service.
Oil tank empty.
Oil pump or oil filter
• Fill oil tank.
• Contact Sears Service,
clogged.
Guide bar oil hole
blocked.
°
18
Remove bar and clean.
TROUBLE SHOOTING CHART - Continued
TROUBLE
CAUSE
REMEDY
Chain moves
at idle speed,
•
•
•
Chain does
not move
when engine
is accelerated,
_d_espeed requires
adjustment.
Clutch requires repair.
• Chain tension too
tight.
° Carburetor requires
adjustment.
• Guide bar rails
pinched.
°
Clutch slipping.
•
°
cuts at
an angle.
° Contact Sears Service.
•
See "Chain Tension."
° See "Carburetor Adjustments."
•
Repairor
replace.
° Contact Sears Service.
Chain clatters
• Chain tension incorrect.
or cuts roughly.i • Cutters damaged.
Chain worn.
Cutters dull, improperly
sharpened, or depth
gauges too high.
o
Sprocket worn.
Chain installed
backwards.
Chain stops
within the cut.
See "Carburetor Adjustments."
Chain cutter tops not
filed flat.
Guide bar burred or
bent; rails uneven.
Clutch slipping
• Cutters damaged on
one side,
Chain dull on one side,
Guide bar bent or worn,
•
°
•
°
See "Chain Tension."
Contact Sears Service.
Resharpen or replace chain.
See"Chain Sharpening."
° Contact Sears Service,
• Install chain in right direction.
° See "Chain Sharpening."
•
Repair or replace guide bar.
° Contact Sears Service.
•
See "Chain Sharpening."
• See"Chain Sharpening."
° Replace guide bar.
If situations occur which are not covered in this manual, use care and good
judgement. If you need assistance, contact Sears Service or the CUSTOMER
ASSISTANCE HELPLINE at 1-800-235-5878.
t9
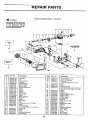
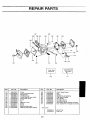
REPAIR PARTS
..........................
ill,llu
SEARS CHAINSAW
_
-
•
•
MODEL - 358.351202
WARNING
Alt repairs, adjustments
and
maintenance
not described
tn the
Operater*s
Manual
must be performed by qualified service personnel
45
35
36
37
38
42
43
19 47 52
49
39
31
t
23
27
25
24
2!
3
Ref
Part
No.
.
530039155
STD541337
3,
530015254
4,
530027163
5.
530036054
6,
530042067
7,
530037687
8,
53OO_4272
g.
530015709
10,
53OO_5441
I 11,
530015713
12.
530036055
13.
530027162
14.
STD610603
'f5.
530042056
16.
530069233
17.
530015720
t8,
530001516
19,
530015898
20, : 530010846
21.
530015708
22.
530039128
23,
24.
26.
26,
27,
530069487
5300"16306
530027264
530032093
530002595
4
Ret,
Description
F|ywheeI
Nut
Wave Washer
Retainer
Part
No,
28.
29.
30. !
630027143
530032111
53006954?
31,
32.
33.
34,
530015875
530027184
530019148
5300_4719
35.
36,
37.
38,
39,
40.
4"f,
42,
43.
44.
45,
46,
47.
48,
4g,
50,
51,
52.
53,
530015718
530015722
530028645
630047561
530047560
530021tlg
530023644
530012367
530030034
330030054
53O047625
530015697
530001624
530084339
530027216
530030176
530015707
530027285
530047488
Slarter Putiey
Statler Spring
Baffle P_ate
Fan Housing ASS'X.
Screw
Washer
Screw
Starter Cam
Starter Dog
Screw
Starter Hand]e
Rope Kit
Screw
Snap Ring
Clip
O;t Cap Ass'y. (IncL "O r R_g)
Screw
Ignition ModuIe
(lncL High Tension Lead Ass'F)
Gasket Se_
Screw
Clamp
Crankshaft Bearing
Flywheel Key
2O
Description
Craaksheft_od
Ass'y,
Piston Pin Bearing
PistOnKit
(_ncf: 29,46,60 & PisIon Pin)
Screw
Spur
Crankahalt Seal
Crankcase Ass'y. (Ir_ct.#t8, 26, 33,
"_25,126,127,137,138,t41
& 142,)
Screw
Washer
Muffler Cover
Spark Arrestor Screen
Muffler D;ftuser
Maffier Gasket
Muffler Body
Cylinder
Spark Ptug (CJ--4}
Sealant
MuI_ler Back Plate
Retainer
Screw
Operator's Manual
Cafb, Adapter
Piston Ring
S#rew
Clamp Ass'y.
Hea_,lr_sulstor
REPAIR
PARTS
92
186
I
72
91
81
83
97
189
185__
85
174
59
Pan
No.
530016057
830027733
530027399
830042080
530069928
530027394
530027187
530015123
530015702
$300t0845
80
81
82
83
84
85
86
87
88
I
_
_
_
I
_
I
I
}
530027191
530015598
530027139
530024772
530015716
530069704
530038995
530015871
530027134
530038993
530027271
630027121
530069487
530035201
530023664
530049562
530010892
530038994
530027207
530027073
530038982
530069384
Pa_
R_
Description
'_3oo27732Retainer
Mount
89
90
9l
92
93
94
95
Screw
Chain Catcher
Bumper-43arb. Cover
Lower Isolator
Reef Handle & Fuel Tank
CytindricaI Mount
Isolator Limiter
Washer
98
108
10t
102
103
104
106
174
177
178
180
t81
182
183
185
186
187
188
t89
"C" CI_p
Fuel Cap Aes'y.
(IncL _O" Ring)
Bracket
Ssrew
Throttle LoCk
Throttle Look Spring
Screw
Cylinder Shield Kit
Garb, Cover
Screw
Trigger Latch Sptirt 9
Throttle Trigger
Grommet
Bracket
Gasket Set
CarbLtretor (HDA-49)
Air Filter Plate
Carb, Mounting Stud
Air Filler Ass'y,
Throttle Lockout
Rear Handle Cover
Throttle Wire
Choke Knob
190
No,
534790500
530015701
530015724
J 530069910
:: 530049968
530049265
530069225
530027138
530015802
530027202
530024475
530026119
530031159
530027339
530025922
530027341
530047661
530029347
530015876
530015562
530037104
530037012
530015876
530047382
530015571
534235901
530049273
530049561
_ 530069216
Description
Nut
Dowel Pin
Screw
Fuel Line Kil
Fuel Filler Ass'y,
Grommet
Switch Kit
Lead Wire ASs'y
Screw
Screw Retaher
Vent Fiiting
Cheek Valve
Hex Wrench (5:32)
Vent Plug
Plug-Air Box
Clamp
Decal - Repl. Bat & Chain
Bracket
Screw
Washer
AV Strap
Strap Retainer Plate
Screw
Hsndguatd
Screw-Handgvard
Locknutq4andguard
Bra_ket-Carb,
Stud
Carb_ Nut
Line Kit (Bulk 530008133)
Not Shown
530047658
952706608
53O047779
Isolatot ASS'y.
21
Chah Brake Kit
Kickback Decat
3_struction Decal
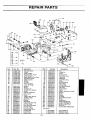
REPAIR PARTS
II
t37
138
115
t29
r,_
t4t
173
127
__
130
135
t24
I
138
I
132
133
120
!34
t21
I Raf,
106
107
I08
109
1t0
111
112
t13
114
115
116
118
119
120
121
122
t23
124
126
126
127
128
129
Part
No,
530027140
530019147
530089487
530027128
530014204
530027126
530069218
630015873
530015871
530027272
530027192
530032049
530048084
530027161
530014161
530027129
530019079
530047163
530023064
530038593
530016110
830015719
530015108
Oescriptien
Worm Gear
Seat
Gasket Set
Dust Plag
Plunger
Spring
OilPump Kit (fncL #'s 108,
107,109,t t0,111,113,!22,123
& 140)
Oiler Adjustment Screw
Screw
O_t Pickup & Fitter
Oiler Intake Line
Clutch 8earing
Drum Sprocket
Clulch Pla_.e
Clutch Ass'y.
Oiler Gear" Spur
"0" Ring
Handlebar Ass'y.
Bar Adjusting Pin
"E" Ring
Screw
Bar Stud
Vent Pin
Fief.
130
I31
132
133
134
135
136
137
138
139
140
141
t42
t43
172
173
22
Part
No,
713635
7136373
530014273
530015445
530031146
530027776
530018058
530021061
530002464
530015422
530015752
530027222
530027223
530015733
530025539
530029236
Description
Chain 20"
Bar 20"
Bar Clamp Ass'y. (lncL #142)
Nut
Bar Tool
Handlebar Grip
Sct'ew
Citer Discharge Line
Oiler Discharge Sleeve
Tubing Nut
Oiler Adj#stment P_n
Chaiih Pad- Top
Chain Pad
Thrust Washer
Impulse Fitting
Crankcase Plug
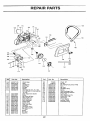
REPAIR PARTS
167
168
163
166 165
164
162
160
159
1
169
157
J
156
r
149
155
147
163
152
I oo,bwK*ikl
Diaphragm
i Csrb GeskeV I
Kit
T
170
Ref.
Part
147
149
150
15!
162
153
154
155
!56
!67
158
No.
530035237
*+ 530035229
+ 530035249
530035244
530035216
+ 530035106
+ 530035236
+ 530035250
+ 530035252
+ 530035241
530035021
*+ 530035230
"+ 530035228
_s9
16o
Description
Part No.
Sorew
Fuel Pump Diaphragm
rnlet Screen
ThroHIe Sp#ng
Choke Shaft & Lever Ass'y
Inlet Needte Valve
Screw
Pin
Metering Lever
Spring
Screw
Metering Diaphragm
Metering Diaphragm
Gasket
162
163
164
165
166
167
168
169
170
'f71
+ 530035124
530035226
530035240
530035243
530035245
530035246
530035238
530035242
530035209
6300352_3
171
Description
Check Valve Screen
Bali
Spring
Needle Adjusting Spr}ng
High Speed Needle
Id{e Needle
Idle Adjust Screw
Idle Adjust Sprir_g
Kw_k Repair Kit(+Ir_dicetes Contents)
Car#, Gasket Kit (*tr_disates Contents)
Not Shown
i
530035324
530035_25
!
23
Welch Pfug
Plug Cup
Garantfa
Reglas
deSegurJdad
Montaje
Uso
Mantenimiento
24
24
28
30
37
Servicio
yAjustes
39
Almacenamiento
41
Tabla
Diagn6stica
42
Repuestos
y EncargosContratapa
GARANTIA COMPLETA DE UN AI;,I!OPARA LA SIERRA
DE CADENA A GASOLINA CRAFTSMAN®
Por un a_o a contar de la fecha de compra, siempre que esta Sierra d Cadena a
Gasolina Craftsman est6 mantenida, lubricada y ajuslada de acuerdo al manual
del usuario, Sears reparar_ gratuitamente cualquier defecto de materiates o
mano de obra.
Esta garantia excluye la barra, la cadena, la bujia y et filtro de aire, que son
artfclos fungibles y se gastan durante el funcionamiento normal.
Si se usa esta Sierra de Cadena a Gasolina para prop6sitos comerciales o de
alquiler, esta garantia tendrA vafidez de 30 dias contdosa partir de la fecha de
compra.
EL SERVICIO BAJO GARANTtA ESTA A SU DISPOStCtON CON SOLO
DEVOLVER LA SIERRA DE CADENA AL CENTRO DE SERVtCIO SEARS MAS
CERCANO EN LOS ESTADOS UNfDOS.
Esta garantfa le confiere derechos jurfdicos especfficos; adem_.s ud. podr& tener
otros derechos que varian entre estados.
Sears, Roebuck and Co., D/817 WA, Hoffman Estates, tL 60179
ADVERTENCtA:
Desconecte
siempre el cable de la buj_a al reparar
el aparato, excepto en el caso de
ajustes al carburador. Debido a que las
sierras de cadena son instrumentos
para cortar madera a alta elocidad, el
uso descuidado o indebido de esta herramienta puede causar graves heridas.
PIENSE ANTES DE PROCEDER
• Limite et uso de la sierra a aquetlos
usuarios adultos que comprendan y
puedan implementar todas las precauciones, reglas de seguridad e
instrucciones de uso que se encuentran en este manual.
Proteci6n de O[dos
Ropa
Ajustada _
al Cuerpo
Zapatos
'dh'_1"
t__-_
Casco Duro
ProtecciSn de
Ojos
Guantes de
Uso
Industrial
Pantorrilleras
de Segud._d
J
de Seguridad
dNIIm
• Use equipo protector. Siempre use
calzado de seguridad con puntas de
acero y suelas anti-des{izantes; ropa
ajustada al cuerpo; guarantes grue-
24
sos de uso industrial
anti-deslu-
zanies; protecciSn
de ojos talescomo
galas de seguridad que no se la cara;
casco duro aprobado;
y barrera de
sonido (tapones de ofdo u orejeras
anti-sonido)
para proleger la audici6n.
Los que usan sierras de fuerza habilualmente
deber_.n hacerse revisar
ta audici6n freuentemente
ya que el
ruido de las sierras de cadena puede
daSar los ofdos. Mantenga el cabello
por encima del nivel de los hombros,
atAndoto para ta efecto si fuere necesario.
• Mantenga
todas las partes del cuerpo
alejadas de la cadena siempre que el
motor est6 en funcionamiento.
• Mantenga a los niSos, espectadores y
animales a una dislancia minima e t0
metros (30 pies) det Area de trabajo o
cuando est,. haciendo arrancar el motor.
• No levante ni opere las sierras de cadana cuando est& fatigado, enfermo,
ansioso o si ha tornado alcohol, drogas o remedios.
Es inprescindible
que ud. est_ en buenas condiciones
ffsicas y alerta mentalmente.
Si ud.
sufre de cualquier
condiciSn
que pueda empderorar
con el trabajo arduo,
aser6rese
con su m_dico.
° No ponga en marcha la sierra sin tener un ,_rea de trabajo despejada,
una
supefficie
estable para pararse y, si
est& derrubando
Arboles, un camino
predeterminado
de retroceso.
USE LA SIERRA OBSERVANDO
TODOS LOS PROCEDIMIENTOS
DE SEGURIDAD
• Mantenga las dos manos en Ias manijas
siempre qua et aparato est,, en marcha. Et
uso del aparato con una sola mano puede
causar graves heridas al usuafio, a los
asistentes o a los espectadores. Las sierras de cadena asian dise6adas para que
se las use con las dos manos en todo momento.
• Haga uso de Ia sierra de cadena tinicamanta en lugares exteriores bien ventilados.
• No haga uso de ta sierra desde las escaleras port&tiles ni los Arboles, a menos que
tenga el entrenamiento especffico para
haceflo.
• Aseg_rese de qua la cadena no vaya a
hacer contacto con ning0n objeto antes de
poner en marcha et motor. Nunca intente
hacer arrancar la sierra con la barra guia
dentro de un code.
• No aplique presiSn a la sierra aI final de los
cortes. Apticar presi6n puede hacer que
pierda el control at completarse el core.
• Pare el motor antes de apoyar la sierra en
ningt_n lade.
• Cuando traslade la sierra en la mano,
h#.galo 0nicamente con el motor parado.
Lt6vela con el silenciador apartado det
cuerpo y la barra y cadena hacia atr&s, con
la barra de preferencia cubierta por una
funda.
MANTENGA LA SIERRA EN BUENAS CONDICIONES DE FUNCiONAMIENTO
° Lleve la sierra de cadena a un proveedor
de servicio autorizade para qua haga todo
servicio menos aquetlos procedimientos
listados en la secci6n de mantenimiento de
este manual.
° Asegt3rese de qua la cadena se detenga
por completo cuando se suelta el gatillo.
Para hacer correcciones, yea los "Ajustes
al Carburador".
• Mantenga las manijas secas, _impias y
libres de aceite o de mezcla de combustible.
° Mantenga Ias tapas y los fijadores bien fijos.
- Use exclusivamente los accesofios y reo
puestos Craftsman recomendados. Nunca
modifique ta sierra.
MANEJE EL COMBUSTIBLE
EXTREMO CUIDADO
CON
• No fume mientras trabaja con el combustible ni cuando est_ haciendo uso de la
sierra.
• Elimine todas las posibles fuentes de chispaso llamas en las &reas donde se mezcla
o vierte el combustible.
• Mezcle y vierta el combustible afuera y use
siempre recipiente aprobado para combustibles y marcado como ta!. Limpie todos los
derrames de combustible antes de poner el
aparato en marcha.
• AI6jese a po_ 1omenos 3 metros (10 pies)
del lugar de abastecimiento antes de porter
el motor en marcha.
• Apague el motor y deje que ta sierra se
enfrie en un lugar libra de substancias
combustibles y no sobre hojas secas, paia,
papel, etc. Retire la tapa lentamente y reabastezca el aparato.
• Guarde e! aparato y el combustible en un
espacio fresco, seco y bien ventilado
donde los vapores del combustible no puedan entrar en contacto con chispas ni llamas abiertas provenientes de termotangues, motores o interruptores eI_ctricos,
calefactores centrales, etc.
25
PROTEJASE
CONTRA
LAS RECULADAS
Ud. debe seguir todas las precauciones
e instrucciones de seguridad para ayudar a evitar las recutadas y fas dem,_s
fuerzas que pueden causar graves heridas.
otros _.rboles, ramas, piedras, cercas,tocones, etc. Elimine o evite toda
obstrucci6n que la cadena pueda tocar mientras est& cortando.
° Mantenga la sierra afUada y con la
tensi6n correcta. Las cadenas con
oco file o flojas incrementan ta proabilidad de reculada. Siga las
instrucciones del fabricante para afilar
_,__/_
Trayectoria
y efectura mantenimiento de la cade_
na. Verifique la tensi6n a intervatos
regulares con el motor parado, nunca
en marcha. Aseg6rese de que las
tuercas de la abrazadera de la barra
Evite 1as
est6n ajustadas firmemente.
Obstrucciones
° Empiece y efect6e la totalidad de
cada corte con el acelerador a fondo.
Si la cadena se est_ moviendo a una
vetocidad menor que la m&xima, hay
m&s probabitidad de que la sierra recule.
Despeje elArea de Trabajo
• Use cuidado extremo al entrar de
ADVERTENCIA:
La Recutada Rotanuevo en un code ya empezado,
cional puede acontecer cuando la cade- • No intente hacer cortes empezando
na en movimiento entra en contacto con
con la punta de la barra (cortes de taladro).
alg_n objeto en la en la parte superior
• Tenga cuidado con troncos que se
de ta punta de la bara guia puede caudesplazan y con las dem&s fuerzas
sat que la cadena entre amateriat y se
tque podr/an cerrar un corte y apretardetenga por un instante. El resultado es
a cadena o bien caer sobre ella.
una reacci6n inversa, a velocidad de
• Use la Barra Guia Reducidora de Rerelampago, que hace recular la barra
culadas y la Cadena Minimizadora de
guia hacia arriba y hacia atr,_s hacia el
Reculadas recomendadas para su
usuario.
sierra.
La Reculada por Preci6n y la Impulsi6n
Evite La Reculada pot Presibn:
acontecen cuando la cadena se de° Mantdngase siempre al tanto de toda
tiene repentinamente porque esta apresituaci6n u obstrucci6n que pueda
tada, atrapada oen contacto con algL_n
apretar la cadena en ra parte superior
objeto extraSo a la madera. Esta delende _abarra o detener la cadena de cuci6n repentina de la cadena tiene como
alquier forma.
resuttado una inversiSn de la fuerza de
• No corte m,_s que un tronco a la viz.
ta cadena usada para cortar madera y
• A1seccionar troncos con corte ascencausa que Ia sierra se mueva en sentidiente, no tuerza la sierra al sacar la
barra det corte,
do opuesto al de la rotaci6n de la cadeEvite la Impulsibn:
ha. La Reculada por Presidn propulsa
la sierra directamente hacia atr&s en
• Empiece los cortes siempre con el
direcci6n ai usuario, La lmpulsi6n aleja
motor acelerado a fondo y la caja de
la sierra def usuario.
la sierra apoyada en la madera.
° use cuSas de pl&stico o demadera, no
REDUZCA
LAS
de metal, para mantener abierto et
PROBABILIDADES
DE
corte.
RECULADA
• Est6 consciente de la posibilidad de
reculada. Teniendo una buena comprensi6n basica de la reculada, ud.
podr& reducir el elemento de sorpresa que contribuye a los accidentes.
• Nunca permita que la cadena en movimiento toque ninq_n objeto en la
punta de la barra guia.
° Mantenga el &rea de trabajo libre de
obstrucciones como per ejemplo
26
MANTENGA EL CONTROL
llnea que este disedo provee se combinan para dar equilibrio y resistencia
para controlar ta propulsi6n de la sierra hacia el usuario si acontece una reculada.
° Barra Guia Reducidora de Reculadas,
diseSada con punta de radio pequer_o
que reduce el tama_ada con punta de
Elputgar
''
\I
__
radio pequer_o de la zona de peligro
en ta punta de la barra. Este tipo de
barra ha demostrade que reduce significativamente la cantidad y la serieffgido
dad de las reculadas cuando ha sido
Nuncainviertala posici6nde las manos
examinado de acuerdo con ANSI
, Sostener firmemente con las dos manos le
(American National Standards Instiayudar_,a mantener el control de la sierra.
tute, Inc.) B175.1,
No afloje. Mantenga la mano derecha envolviendo totalmente lamanija trasera, sea
ud. derecho o zurdo. Sostenga la manija
delantera con tamano izquierda, colocanunta de Radio
do el pulgar debajo de lamanija y rodean- _
PequeSo
do la manija con los fijo.
• Coloque ta mano izquierda en la manija delantera, de modo ue quede en
linea recta con la mano derecha en ta
manija trasera, cuando est& haciendo
cortes de seccionamiento. P_rese ie_
Punta de Rdio
vemente hacia la izquierda de la sierra
Grande
para evitar que el cuerpo est6 e linea • Las Cadenas Minimizadoras de Recudirecta con la cadena.
ladas han satisfecho los requisitos de
° P_rese con el peso distribuido igual_
rendimiento en pruebas con una
mente entre los dos pies.
muestra reparesentativa de sierras de
• No se extienda excesivamente. La
cadena con desptazamiento de mesierra puede impulsarlo o empujarlo y
nos de 3,8 pulgadas, como se espe*
ud. puede perder el equilibrio y el
cifica en ANSI B175,1.
control de la sierra.
Marcador de Profundidad
• No corte arriba del nivel de los hom_
Perfilado
bros0 puedsto que torna dificil mantener et control de la sierra.
Eslab6n Protector Alargado Desviata Fuerzade
DISPOSITIMIOS
DE SEGURIDAD
Reacci6n y Permite que Ia
Madera Entre GrandualCONTRA LAS RECULADAS
mente a la Cuchilla.
ADVERTENCIA:
Los siguientes dfsAVISO DE SEGURIDAD: El estar
positivos han sido incluidos en ta sierra
exuesto a tas vibracioens a trav6s del
para ayudar a reducir el riesgo de recu- uso prolongado de herramientas de
ladas; sin embargo, tales implementos
fuerza a gasolina puede causar daSos
no puedn eliminar totatmente esta reac- a tos vasos sanguineos o a los nervios
ciSn peligrosa. No se conffe exclusivade los dedos, las manos y las
mente en los dispositivos de seguridad.
coyunturas en aquetlas personas que
ud. debe seguir todas Ias precauciones
tienen propensidad a los trastornos de
e instrucciones de seguridad para ayula circulaci6n o a las hinchazones
dar a evitar las reculadas y las dem&s
anormales. El use prolongado en
fuerzad qaue pueden causar graves
tiempo fifo ha sido asociado con daSos
heridas,
a los vasos sanguineos de personas
° Protector de Mano, disefiado para re- que por otra parte se encuentran en
ducir la probabilidad que su mano iz- perfecto estado de salud. Si ocurren
uierda entre en contacto con la ca n sintomas tales como el
ena, si Imano se desprende de ta
entumecimiento, el dolor, la faffa de
tuerza, los cambios en e! color o la
manija delantera.
• La Posici6n de las manijas delantera y textura de la piel o faita de sentido en
trasera, disedadas con distancia entre los dedos, las manos o las coyunturas,
pare de usar esta m&quina
las manijas y "e Ifnea" la una con la
otra. La separaci6n y ta colocaci6n en inmediatamente y procure atenci6n
27
P&resehacia la izquierdade ta sierra
i
m6dica.
Lossistemas
deanti-vibraci6n
forestadas federates, m&s los estados
de California, Idaho, Maine, Minnesota,
nogarantizan
queseeviten
tales
problemas.
Losusuarios
quehacen Nueva Jersey, Oreg6n y Washington,
usocontinuo
yprolongando
delas
requieren pot ley que muchos motores
herramientas
defuerzadeben
fiscalizarde combusti6n interna est_n equipados
atentamente
suensado
fisicoy el
con rejitla antichispa. Si usted usa una
estado def aparato.
FRENO DE OADENA Siesta sierra ha
de usarse para e! fumbado comercial
de Arboles, ud. deber& encargar e
instalar un frenco de cadena para cumplir con los Reglamentos Federates del
OSHA para et Tumbado Comercial de
Arbole Entre en contacto con su Concesionario de Servicio Autorizado o
llame at t-800-235-5878.
REJILLA ANTICHISPA : Su sierra
viene equipada con silenciador
timitador de temperatura y con rejilla
antichispa que cumple con los
requisitos de los C6digos de California
4442 y 4443. Todas las tierras
sierra de cadena donde existen tales
reglamentos, usted tiene la
responsabilidad jur[dica de mantener
estas piezas en correcto estado de
funcionamiento. De Io contrario, estarA
en infracci6n de la ley. Vea la secci6n
de RESPONSAABILIDADES DEL
USUARIO.
PADRONES: Este sierra de cadena
consta en la lista de Underwriters Laboratories, inc., de acuerdo a los Reguiitos Nacionales de Seguridad Estadounidenses para Sierras de Cadena a
Gasolina (ANSI B175.1-1991).
CONTENIDO
DE LA CAJA
su uso y para entender su
funcionamiento seguro. Es de suma
Use la siguiente lista para verificar el
importancia que usted lea el manual
contenido,
• Modeto: 358.351202
pot completo para familiarizarse con et
• Sierra de cadena
aparatro antes de armarlo o de intentar
• Barra Gufa
ponerlo en funcionamiento, Si tiene
° Cadena
preguntas o necesita ayuda, Ilame al
• Herramienta de Ajuste
nemero de tel6fono 1-800 que se
encuentra en la portada de este
• Llave hexagonal
• Aceite para motores de 2 tiempos. manual.
(no se incluye aceite lubricante de MANTENGA A MANO LO
barra.)
SIGUIENTE:
• Verifique que no haya piezas da5a° Guantes protectores
das. No use piezas daSadas,
° Si necesita ayuda o si faltan piezas o • Recipiente aprobado para e! combustible
encuentra piezas daSadas, favcor de
Ilamar at t-800-235-5878.
• Un gar6n de gasotina sin plomo regular
AVISO: Es normal oir el golpeteo del
filtro de combustible en e! tanque vacio. • Aceite de motor de 2*ciclos enfriado a
aire (provisto)
Su aparato ha sido puesto a prueba en ° Aceite de Barra y cadena (Vea la secta fAbrica y se Ie ha ajustado con preciciSn de Aceite de Barra y Cadena)
si6n el carburador. Como resultado, es • Herramienta para la Barra (provista)
posible que se sienta un olor a gasolina
o que se encuentre una gota de resiMONTAJE DE LA BARRA Y LA
duo de adceite o combustible en le siCADENA
lenciador al desempacar el aparato.
• Su sierra viene equipada con Barra
MONTAJE
Reducidora de Reculadas y con CaLEA SU MANUAL DEL USUARIO
dena Reducidora de Reculadas.
CON SUMO CUIDADO
• At reemplazar piezas, siempre use la
Barra Guia Reducidora de Reculadas
Su Manual de] Usuario ha sido creado
para ayudarlo a preparar su sierra apra
y la Cadena Reducidora de Recula28
dasespecificadas
parausmodelo
de
sierradecadena.
ADVERTENCIA,
No ponga en marcha el motor sin antes asegurarse que
la barra gufa y la cadena se encuentren
comptetamente instaladas. De Io contrario, el mebrague se podrfa soltar resultando en accidentes de gravedad.
PRECAUCION:
Use guantes protectores cuando maneje o use su sierra, iLa
cadena tiene filo y lo puede cortar atfn no
estando en movimiento!
• Retire las siguientes piezas como se
iJustra, usando la herramienta para la
barra provista con su aparato.
• Tuercas de la abrazadera de Ia bar-
Tachonesde la Barra
Clavijade
Ajuste
• Sostenga la cadena de manera que
las cuchillas queden mirando como
muestra la ilustraciSn.
Cuchfllas
Sierra
-4-
._-__
Eslabones de RotaciSn
ra.
Punta
--_ de ta
Barra
• Abrazadera de la barra.
Herramienta
de
_
ta _arra
J
_-,_
Abrazad_ra
• Coloque la cadena sobre y por detr_s
del tambor de embraque.
Tuercas de la
• Fije la parte inferior de los es_abones
Abrazadera
de rotacidn entre los dientes en el enBarra
_ ,,
,-., ,_
granaje.
_'"
• Comience en la parte superior de la
__ f-,=_ "
barra y fije los eslabones de rotaci6n
_ I q,4,..,,._
"
de la cadena dentro de las ranuras
-k
Separador
alrededor de la bara gu_a.
para el Era"_
R_anura
ba_qe_(_)e
• Retire y deseche el separador de erabarque en los tachones de la barra.
• Cire del tornil!o de ajuste hacia Jaizquierda para mover la clavija cuanto
mAs pueda hacia atrt_s.
Clavija de
Ajuste
Tornil[o
de Ajuste
• Arme la barra gufa con la punta extrema con ranuras sobre !os tachones
de la barra. Coloque la barra gufa de
manera ta[ que la clavija de ajuste se
introduzca a trav6s de1hueco para la
misma,
• Sostenga la barra gufa en contra de
la armadura de la sierra e instale la
abrazadera de la barra. Aseg_rese de
que ta clavija de ajuste se encuentre
dentro del hueco para la misma.
• Vuelva a colocar las tuercas de ta
abrazadera y apri_telas manualmente
unicamente. Apriete fas tuercas de la
abrazadera de la barra despu#s de
que se haya ajusttado la cadena.
* Proceda con la secci6n de Ajuste de
[a Cadena.
AJUSTE DE LA OADENA
* Use el extremo en forma de destornitlador de la herramienta para la barra
para mover la cadena alrededor de ]a
barra guia para asegurarse de que la
cadena no se encuentre enroscada,
29
Tuercas de la Abrazadera de ]a Barra.
• Afloje las tuercas de la abrazadera de
la barra hasta que se estas se encuentren apretadas manualmente en
contra de ta abrazadera de la barra,
• Gire el torni}lo de ajuste hacia la derecha hasta que ta cadena apenas
toque la parte inferior de la barra
gula.
* Usando la herramienta de la barra,
ruede la cadena alrededor de la barra
guia para asegurarse de que todos
los eslabones se encuentren denlro
de las ranuras de la barra.
° Levanle la punta de la barra guia
para verificar que la cadena no se encuentre foloja. Suelte la punta de la
barrra guia, Iuego, gire et tornilto de
ajuste t/4 de vuella hacia la izquierda. Vuelva a apretar las tuercas de la
abrazadera de la barra.
• Si la cadena se encuentra demasiado
floja, cotgar,_ por debajo de la barra
gufa. NO USE su sierra si Ia cadeana
se encuentra floja.
Barra _ ...-'--.
Herraminta
de Ajuste de
la Cadena
/
v -...._.,_,_-_,.=...
Tomillode Ajuste
CONOZCA
EL APARATO
LEA ESTE MANUAL DEL USUARIO Y LAS REGLAS DE SEGURIDAD ANTES
DE USAR LA SIERRA DE CADENA. Compare Ias ilustraciones con su aparato
para familiaffzarse con la ubicaci6n de los varios controtes y ajustes. Guarde este
manuaJ para uso futuro.
Manija Delantera
Herramienta de Ajuste de la Cadena
Sofade Arranque
Protector de Mano
PeriI/adel
Interruptor
ON/STOP
Dadena
Tornillo de Ajuste
Caja del Arranque
Tapa dei Tanque de Lubricante de Barra
,i
3O
Tapa del Tanque
de Combustible
Traba de marcha Lenta
Traba del
Adceleracta,
Aceterador\
Tapa del Cilindro
(_;"_
de
ci6nProtade la
Direcci6n
Cadena
Manija _
Trasera "_
Gafillo
Aceferador
Abrazadera
de la Barra
/
Barra Gu_a
Tuercas de ta Abrazadera de la Barra
EN!'rOPE INTERRUPTOR
El EniTope Interruptor est_ acostumbrador a detener la m&quina.
GATILLO DE ACELERADOR
El Gatillo de Acelerador controla velocidad de m_quina.
TRABA DEL ACELERADOR
Es necesario apretar primero la traba
del acelerador para poder accionar el
acelerador. Este dispositivo previene e!
acelerador.
TRABA DE LA MARCHA LENTA
ACELERADA
La traba de la marcha tenta acelerada
mantiene el gatil!o en la posici6n de arranque. Accione la traba de marcha
lenta acelerada de la siguente manera;
Aprete la traba det acelerador y luego
aprete e! gatilto acelerador. Con el acelerador apretado, optima la traba de
marcha lenta aceleradao Suelte la traba
del acelerador y e! gatitlo mientras mantiene oprimida la traba de marcha lenta
acelerada.
PERILLA DEL CEBADOR
La Pedfla del Cebador provee combustible adicional al motor al arrancar en
frio
TENSION DE LA CADENA
Es normal que tas cadenas nuevas se
estiren durante los primeros 30 minutos
de uso. Deber_ verificarse la tensibn de
la Cadena en la secci6n de Servicio y
Ajustes.
ANTES DE PONER EL MOTOR EN
MARCHA:
ADVERTENCIA:
Lea toda la informaci6n sobre el manejo del combustible
en la secci6n de reglasd e seguridad
de este manual antes de empezar. Si
no comprende ta informaci6n sobre el
manejo del combustible, no intente
abastecer su aparato, Procure ayuda
de atguien que comprenda la informaci6n o llame al tef6fono de ayuda a}
consumidor al 1-800-235-5878.
ACEITE PARA BARRA Y LA CADENA
El tubricador de la cadena provee lubricaci6n continua a la cadena y a ta barra guia. No se otvide de Ilenar el tanque
de aceite para barra siempre que Uene
et tanque de combustible (Capacidad=6,8 fl. oz.). Para obtener la m_xima prolongaci6n de la vida de la bara y
la cadena, recomendarnos que use el
aceite para barras de sierra de cadena
Craftsman. Si el aceite Craftsman no
est_ dispondible, puede usarse un
aceite SAE 30 de buena calidad hasta
obtener el aceite marca Craftsman, La
cantidad de lubricaci6n es medida autom&ticamente durante el funcionamiento de la sierra, La sierra usar_ m&s
o menos un tanque de aceite para la
barra por cada tanque de combustible.
Siempre ltene el tanque de aceite de la
barra cuando Ilene el tanque de combustible.
ABASTECIMtENTO DEL MOTOR
Este motor est& habilitado para
funcionar con gasolina sin plomo.
Antes de usar, se deberA mezclar la
gasolina con un aceite de buena
calidad para motores de 2 tiempps
enfriados a aire. Recomendamos el
aceite marca Craftsman. Mezcle ta
gasolina con el aceite en ta proporci6n
de 40:1. (Se obtiene una proporci6n de
40:1 mezc_ando 3,2 onzas de aceite
con cada gal6n de gasolina sin piomo),
NO USE aceite para autom6vites ni
para barcos. Estos aceites dafiar_n el
motor. AI mezclar el combustible, siga
las instrucciones impresas en el
31
recipiente. Una vez que haya adadido
el aceite a la gasolina, agite el
recipiente brevemente para asegurar
queet combustible est6 completamente
mezclado. Lea siempre y siga tas
reglas de seguridad que tienen que ver
con el combustible antes de abastecer
el aparato.
_
!
• Active el cebador tirando la perilla del
cebador hasta su m#.xima extensi6n.
IMPORTANTE
• Coloque la sierra en el suelo. SostenLa experiencia indica que los combusga la manija delantera con la mano
tibles mezctados con alcohol (los llamaizquierda y coloque el pie derecho
dos gasohol o los que contienen etanol
atravesando el interior de la manija
o metanol) pueden atraer humedad, to
trasera.
que puede causar la separaci6n y la
formaci6n de &cidos durante et almaceLa Mano
namiento. La gasolina acidica puede
Izquierda
da5ar el sistema de combustible del
en la Manija
Delantera
motor durante el almacenamiento.
Para evitar promblemas con el motor,
deberA vaciarse el sistema de combustible antes de almacenar el aparato por
30 dfas o mAs. Vacfe el tanque de comEl Pie Derecho en el Interior de Ia Manija Trasera
bustible, ponga el motor en marcha y
° Fije la marcha adelantada de la mand6jelo en marcha hasta que Ias Ifneas
era siguiente: Presione y sostenga el
de combustible y el carburador queden
cierre del aceterador con su mano
vacios. Cuando vaya a usar el aparato
derecha. Optima y sostenga el gatilto
nuevamente, use combustible fresco.
Vea las instrucciones de ALMACENAacelerador. Con el dedo fndice, presione y sostenga el cierre de la marMtENTO para obtener mAs informaciones.
cha adelantada; suelte el gatitlo acelNunca use productos de limpieza de
erador y el cierre del aceterador.
AVISO: Si el gatillo aceterador se opmotor o carburador en el tanque de
combustible ya que hacerlo puede pro- rime accidenlalmente durante la puesta
en marcha, serA necesario I vvolver a
vocar daSos permanentes.
Vea la secci6n de ALMACENAMIENTO
fijar el control de la marcha adelanlada.
AVISO: AI tirar de la cuerda de arranpara m,_s informaciones.
que, no use la exlensi6n completa de
PARA PARAR EL MOTOR
ta cuerda. Ne permita que la cuerda
• Coloque et interruptor en la posici6n
de arranque cierre de goipe, sostenSTOP.
ga el mango. Permita que la cuerda
• Si el motor no se detiene, tire la perilrebobine lentamente.
la del cebador a su maxima extem
° Tire del mango de ]a cuerda de arransi6n.
que con su mano derecha hasta que
PARA PONER
EL MOTOR
EN
el motor intente arrancar.
MARCHA
• Presione hacia dentro la palanca dei
cebador a la posici6n Parcial.
MOTOR FRIO O MOTOR CALIENTE
° Tire del mange de la cuerda de arranDESPUES DE QUEDAR SIN COMBUSTIBLE
que hasta que el motor se ponga en
marcha.
* Llene et tanque de aceite de barra
usando el aceite correspondiente.
° A temperaturas mayores de los 40 °,
permita que el motor marche alrede* LIene el tanque con la mezcla 40:1 de
combustible.
dor de 5 segundos. Oprima ta perilla
del cebador a la posici6n OFF: Iuego,
° Prepare et motor apretando e! bombeador seis voeces,
apriete y sostenga el gatitto acelera-
i
32
dotparapermitir
queelmotormarche• Verifique la tensi6n de la cadena
enmarcha
lent&
antes del primer uso y despu6s de un
minuto de funcionamientoo Vea Ten° Atemperaturas
mayores
delos40°,
permita
queelmotormarche
alrede- si6n de la Cadena en la secci6n de
dorde5segundos.
Oprima
laperilla Manlenimeinto.
de1
cebador
a laposiciSn
OFF:tuego,• Corte madera 5nicamente. Nocorte metal,
apriete
ysostenga
elgatilto
acelera- pI_stico, tadritlos,cemento, otros mateddorparapermitir
queelmotormarche ales de construcci6n que no sean de madenmarcha
lent&
era, etc.
° Paradetener
elmotor,
mueva
elinter- • Pare la sierra si la cadena toca cualquier
ruptor
On/Stop
alaposiciSn
Stop.
objeto ajeno. Inspecciene la sierra y repare
las piezas segQnla necesidad.
° Mantengala eadena fuera de la arenay la
tierra. La menor cantidadde tierra desatita
rApidamentelas cadenas e incrementa la
posibilidad de reculadas.
• .Corte variostroncos pequefios como
pr_.ctica,usando la siguiente t_cnica, para
acostumbrarse al manejo de la sierra,
antes de ernpezar un proyectode grandes
dimensiones.
° Acelere el motor at m&ximo antes
de empezar a cortar apretando el
gatil!o acelerador a fondo.
° Empiece el code con el bastidor de
la sierra apoyada contra et tronco.
• Mantenga el motor con aceterador a
fondo censtantemente mientras corta.
, Deje que la cadena haga todo el
trabajo de cortar; no use m_s que
una muy ligera presiSn hacia abajo.
ARRANQUE
DtFICIL
0 ARRAN• Suelte el gatillo acelerador
QUE DE MOTOR AHOGADO
inmediatamente at terminar de corEl motor puede encontrarse ahogado si
tar, dejando que el motor funcione a
no marcha despu6s de/d6cimo tir6n de
marcha fenta. Si mantiene la sierra
la cuerda de arranque. Los motores
en marcha con acelerador a fondo
ahogados podr&n ser aclarados det exsin estar cortando, puede causar
ceso de combustible siguiende el prodesgaste inneeesario.
cedimiento a continuaci6n:
° Para no perder e! control cuando se
° Activie el cierre del acelerador.
haya compietado el corte, no le
• Verifique queet interruptor On/Stop
ponga presi6n a la sierra at final de1
se encuentre en la posici6n ON.
carte.
° Con la sierra en et suelo, agarre el
• Pare el motor antes de apoyar la
mango delantero con la mano izqufersierra al finalizar un corte.
day coloque el pie derecho a traves
TECNICAS
PARA TUMBAR
de1 mango trasero.
ARBOLES
• Tire det mango de la cuerda de arranADVERTENCtA:
Vea que no haya
que hasta que el motor se ponga en
marcha.
ramas rotas o muertas que pod#an
caerle encima mientras corta, causanEI arranque taf vez requiera muncos
tirones de la soga, dependiendo de la
do heridas graves. No code cerca de
edificios ni cables et#ctricos si no sabe
cantidad de combustible que ester ahota direcci6n de tumbado del Arbol, ne
gando el motor. Si el motor aun asi no
de noche ya que no podrA ver bien, ni
arranca, yea la TABLA D1AGNOSTICA
o Ilame a! 1-800-235-5878.
durante mat tiempo como !luvia, nieve,
o vientos fuertes, etc.
SUGERENCIAS PARA EL USO
° Planifique la operaci6n de corte
CORRECTO DEL APARATO
cuidadosamente por adelantado.
PUESTA EN MARCHA DE MOTOR
CALIENTE
• Mueva el interruptor On!Stop a la posici6n On.
• Active el cierre del acelerador.
• Aseg6rese de que el cebador se encuentre en la posici6n Off.
• Con la sierra en el suelo, agarre el
mango delantero con la mano izquierday cotoque el pie derecho a trav6s
del mango trasero.
• Tire del mango de la cuerda de arranque hasta que el motor se ponga en
marcha.
• Optima y suelte el gatillo acelerador
para que el motor regrese a ta marcha [enta.
• Para detener e! motor, mueva el interruptor On/Stop a la posici6n STOR
33
NOTE: Si el arbol tiene raices grandes
• Despeje al Area de trabajo. Ud. precide apoyo, retfretas antes de hacer la
sa un Area despejada en todo el contorno del Arbol donde pueda pisar con muesca.
firmeza entodo momento Estudie las CORTE DE MUESCA ¥ TUMBADO
DEL ARBOL
condiciones naturales que puedan
• Haga el code de muesca cortando pdmero
causar que el _trbol caiga en una dila parle superior de la muesca Haga que
recci6n determinada Entre las condiel corte atraviese un tercio del ancho del
ciones naturales que pueden causar
tronco. Luego complete el come de muesca
que el _rbo! caiga en una direcci6n
codando ta parte de abajo de ta muesca.
determinada, se encuentran:
Vea la ilustraci6n. Una vez completo el
• La direcci6n y la velocidad def viento.
corte de muesca, retire ta curia de madera
det arbol.
• Et &ngulo de inclinaci6n del &rbol. El
• Despu_s de retirada Ia cuba de madera,
&ngulo de los Arboles a veces no se
de! lado opuesto al come de muesca haga
nota debido al declive del terreno o a
et corte de tumbado. El come de tumbado
terreno desparejo. Use plana o cordeI
debe quedar a 5 cm (2 pulgadas) m&s arride sonda para determinarla direcci6n
ba que el centro del corte de muesca. Este
de la inclinaci6n del &rboI.
procedimiento dejarA suficiente madera sin
• El _rbol es m&s pesadoo t_enomucho
cortar entre el corte de tumbado y la rnuesm&s ramas de un lado.
ca para formar una bisagra Esta bisagra
ayudar#, a evitar que el _.rbol caiga en la
•Arbotes y obst&cufosen derredor.
direcci6n equivocada.
• Verifique si hay porciones descomCorte final aqui
puestas o podridas Si el tronco estA
Primer corte 1 z
/
podrido, puede partirse repentinamente sin aviso y caer sobre eI usuario
, Asegt_rese de que haya suficiente esMuesca-..,_.
. . iL'._-=
pacio para ta cafda del Arbol Mantenga una distancia equivalente a dos
veces y medio det largo det Arbol que
estA cortando entre el Arbot y la persona mAs cercana u otros objetos El
La bisagra sostiene et Arbol en el toc6n y
ruido del motor puede impedir que se
ayuda a controlar la cat da
escuchen las advertencias gritadas.
Abertura del
• Retire la tierra, las piedras, fa corteza
corte de tumbado
suelta, Ios clavos, las grampas y el
alambre que pueda haber en el Arbol
en el lugar del corte,
g
/
_,_%,,
predeterminada
Planifique una
y despejada
ruta
....... O
f 5o
'=""_-
Direcci6n
de
de retroceso
Ia Cafda
PARA TUMBAR ARBOLES
GRANDES
(con diAmetro
m_s)
de 15 cm (6 pulgadas)
Se usa el metodo
o
de corte de muesca
para los #,rboles grandes. La muesca
es un corte en el lado del arbol hacia el
cua! se desea que caiga. Despu6s de
hacer el corte de tumbado del lado opuesto, et Arbol tendr& la tendencia
de
caer hacia el lado en que se ha hecho
el corte de muesca.
Cierre de
la muesca
NOTE: Antes de completar
el tumbado,
use cu_,as para abrir el corte, cuando
sea necesario,
para controlar la
direcci6n de la caida, Use cutlas de
madera o de pl&stico, pero nunca de
acero o de hierro, para evitar que Ia
sierra recule y para evitar dafios a la
cadena
• Este alerta a los indicios de que el Arbol
este pot caer: los crujidos, et ensanchamiento del corte de tumbado y los movimientos de tas ramas superiores.
• En el instante en que et _rbol comienza a
caer, pare la sierra, ap6yeta en el suelo y
retroceda r,_pidamente, por la trayectoria
de retroceso prevista.
• Tenga extremo cuidado con los arboles
parciafmente tumbados que tienen apoyo
34
precario.
Cuando
elArbol
nocaetotal- Corte Descendiente empieza desde el
mente,
ponga
lasierra
deladeyuseun lade superior del tronco con la parte de
montacargas
acable,
unaparejo
depo{eas
abajo de la sierra apoyada contra el
ountractor
para
bajado.
Nocorte
los
haga una leve presi6n hacia
Arboles
parcialmente
caidos
conlasierra.tronco;
abajo,
CORTE DE UN ARBOL TUMBADO
(SECCIONAMIENTO)
El t_rmino seccionamiento significa cortar un Arbol tumbado en secciones del
largo deseado.
AIDVERTENClA:
No se pare encima
del tronco que est_ siendo cortado. Cualquier parte del tronco puede rodar haciendo que el usuario pierda el equilibrio y el control, No se posicione cuesta
abajo del tronco que est& siendo cortado,
Puntos importantes
, Corte_Jnicamente un tronco a la vez.
• Corte con sumo cuidado la madera
astitlada. La sierra puede arrojar pedazes punteadudos y fitosos hacia el
usuario.
• Use un caballete para cortar troncos
pequeSos. Nunca permita a otra persona que sostenga et tronco mientras
ud, corta ni sostenga el tronco con la
pierna o el pie.
• No corte en lugares donde haya troncos, ramas y raices entrelazadas. Arrastre los troncos hasta un lugar despejado antes de cortarios.
TIPOS DE CORTE QUE SE USAN
PARA EL SECCIONAMIENTO
ADVERTENCIA:
Si la sierra queda
apretada o atascada dentro det tronco,
no intente sacarla a la fuerza, Puede
perder el control de Ia sierra, causando
heridad o daSos al aparato. Pare la
sierra, martille una cuSa de plAstico o
de madera en el corte hasta que la sierra salga f&cilmente. Ponga la sierra de
nuevo en marcha y col6quela
cuidadosamente de nuevo en el corte,
No use cuSa de matal. No intente poner
en marcha la sierra de nuevo cuando
est& apretada o atascada en un tronco.
Corte descendiente Corte ascendiente
Corte Ascendiente empieza desde el
lade inferior del tronco con la parte de
arriba de la sierra apoyada contra et
tronco; haga una leve fuerza hacia arriba. Sujete la sierra firmemente para
mantener el control, La sierra tendr_, la
tendencia de empujar al usuario hacia
atr_s,
ADVERTENOIA:
Nunca invierta la
sierra para hacer cortes ascendientes,
No se puede controlar la sierra de esa
forma,
Haga siempre el primer corte del tado
del tronco que est_ bajo presi6n.
Primer corte del lade de1tronco bajo presi6n
Segundo co_e
Segundo co_e
Primer corte del lade dei tronco bajo presiSn
SECCIONAMIENTO
SIN APOYO
• Haga el corte descendiente atravesando
un tercio det d_melro.
• Haga rodar el tronco y termine con otro
corte descendiente.
, Tenga cuidado especialmente con los troncos presionados de un lade. Vea la ilustracidn anterior para cortar troncos presionados de un lade.
Use una cuSa para sacar la sierra atascada.
Uso de tronco
como apoyo
APAGUE la sierra y use una curia de
madera o de pl_stico para abrir el ta)o.
35
Segundo Corte
SECCtONAMIENTO
USANDO TRONCO O CABALLETE
DE APOYO
• Recuerde que el primer corte siempre es
del lado presionado del tronco. (Vea en la
ilustraci6n que sigue el primero y segundo
cone.)
* E[ primer corte deber& extenderse por 1/3
det didmetro del tronco.
. Termine por el segunco corte.
Con caballete como apoyo
v_,_ -_
2do corte
_,_
sierra cuando se suelte ]a tensi6n en ]as
fibras de madera.
• Despeie frecuentemente las ramas acumuIadas para no le hagan tropezar.
PARA CORTAR RAMAS
• Corte las ramas del arbol Qnicamente
despu_s de que se 1ohaya tumbado.
• Deje las ramas m6s guresas debajo del
_rbol tumbado para que apoyen el arbol
mientras ud. trabaja.
• Empiece per la base del _,rbol tumbado y
vaya trabajando hacia el tope, cortando ]as
ramas. Corte las ramas pequeBas de un
doso code.
• Mantenga el tronco det arbol entre ud, y la
cadena,
• Retire las ramas mas grandes y las ramas
de apoyo con ta t_cnica de un tercio y dos
tercios deserita en ta secci6n de seccionamiento.
• Use siempre un corte descendiente para
codar ramas pequefias y ramas que cuelgan Iibremente. Los codes acendientes
poddan hacer que Ias ramas caigan y
apreten la sierra.
PARA
PODAR
ADVERTENCIA:
Limit pruningto
limbs shoulder height or below. Do not
cut if branches are higher than your
shoulder. Get a professional to do the
job,
• Haga el primercorteen forma ascendiente atravesando
de la rama.
PARA CORTAR RAMAS Y PODAR
ADVERTENCIA: Nunce trepe a los
arboles para cortar ramas o para podar.
No se pare sobre escaleras,plataformas, troncos ni en ninguna posici6n
que podria causarle que pierda el equitibrio o el control de ta sierra.
t/3 del di&metro
• travesando
completamente
la
rama. Finalmente
haga un tercer
corte, descendiente,
dejando un toco
de 2,5 a 5 cm. sobresaliendo
de! tronco det &rbol.
PUNTOS IMPORTANTES
, Tenga cuidado con las ramas delgadas
bajo presi6n. El material de poco diametro
puede enredarse en la cadena, dando un
latigazo a! usuario o haciendo que pierda el
equilibrio. Use extremo cuidado al cortar
ramas pequefias.
* Est_ aleda contra los rebotes. Tenga cuidado at cortar ramas dobladas o bajo presi6n
para evitar ser golpeado pot la rama o Ia
Sec_nd cut
Srd
cut1to2in
from trunk of tree
36
RESPONSABILIDADES
DEL USUARIO
el servicio de rutina
t Anote las fechas al comptetar
de
Antes
Usar
Verifique que no haya piezas dafiada s/
gastadas
_'
verifique que no haya fijadoresipiezas sueltas
_"
Verifique
ta tensi6n de la cadena
v"
Verifique
el fito de la cadena
Inspeccione
Limpie
_abarra
el aparato
guia
de
Despu&,
Usar
horas
horas
[
Ser_f!#!o
p,'
v"
y las piacas
_,,
Limpie el filtro de aire
Limpie e inspeccione la rejilla anti_
chispas e inspeccione el
silenciador
Cambie ]a bujfa
I
RECOMENDACIONES
GENERALES
La garantfa de este aparato no cubre
los articutos que han sido sometidos
al
abuso o a ta negligencia
de parte del
usuario. Para poder recibir el valor total
de la garantia,
el usuario deber& hacer
el mantenimiento
tal como se indica en
este manual. Har_fi falta hacer varios
ajustes peri6dicos
para mantener el
aparato adecuadamente.
• Una vez pot afio, cambie la bujia y el elemento del filtro de aire e inspeccione la barra gufa y la cadena para ver que no est_n
gastadae. El reemplazo de la bujfa y det
elemento del filtro de aire asegura una
mezcta correcta de aire y combustible y
ayuda a que el motor marche mejor y que
dure m,_s.
ADVERTENCIA:
Desconecte
la bujia
antes de hacer cualquier
mantenimiento, con la excepci6n
de los ajustes at
carburador.
LUBRICACION
t_ub.oaci6n !apaaeJI[
del engranaje•
- Ia barra
ae
_anque
ee _,_'_ I
.....
Ace,l,e ae _a _ !
Barra
--_
!
_'
* Lubricadorde engranajes
- Aceite para barra de sierra de cadena
Craftsman
VERIFIQUE QUE NO HAYA
PIEZAS DANADAS O GASTADAS
Et cambio de piezas dafiadas o gastadas deber& ser efectuado por el Centro
de Servicio Sears.
NOTE; Es normal que aparezca una
peque_a cantidad de aceite debajo de
la sierra despu6s de parar el motor. No
confunda esto con p6rdidas del tanque
de aceite.
, lnterruptor-Asegarese
que el interruptor
est6 funcionando correctamente
coIoc&ndoJo en la posici6n STOP.
AsegSrese de que el motor se haya detenido por complelo, luego ponga el motor en
marcha nuevamente y continQe.
, Tanque de Combustible-Deie de usarta
sierra si hay sefiales de dafios o tugas del
tanque de combustible.
° Tanque de Aceite-Deje de usar la sierra si
el tanque de aceite da seSales de dafio o
fugas.
VERIFIQUE ClUE NO HAYA FIJABORES O PIEZAS SUELTAS
,
•
°
°
,
,
Tuerca de la Abrazadera de }a Barra
Caclena
Sitenciador
Protector del Ciffndro
Filtro de Aire
Cilindro ydientes de engranaje det embrague
° Tornillos de tas Manijas
° Fijadores Anti-Vibraci6n
37
• Caja del Arranque
• protector de Mane
VERIFIQUE
LA TENSION DE LA
CADENA
Si la cadena se encuentra demasiado
floja podr& soltarse de la barra y
posiblemente causar accidentes. NO
USE la sierra si ta cadena se encuentra
ftoja.
VERIFIQUE SI LA CADENA ESTA
AFtLADA
Las cadenas aflladas producen trocitos
de rnadera. Las cadenas desaliladas
producen polvo de aserdn y cortan
lentamente.
AFILACION DE LA CADENA
La afilaciSn de Jacadena requiere
herramientas especiales. Se puede
comprar las herramientas en Sears o
tlevar la cadena a un especialista de
afilaci6n.
INSPECClONE
LA BARRA
Condiciones que requieren qua se
haga mantenimiento a ta barra:
° La sierra corta para un lade oen _,ngulo.
° Hay que forzarla para que atraviese el
corte.
° Cantidad inadecuadade lubricante en ta
barra y la cadena.
Verifique ta condici6n de la barra carla
vez que haga afilar la cadena. Las barras gastadas dafian la cadena y roman
dif/cil el trabajo de cortar. Para mantener la barra gut'a:
• Coleque el interrupter en "Stop".
• Retire Ia barra y ta cadena del aparato.
• Limpie todo el aserrin y cualquier otro escombro de la ranura de la barra y det odflcio del engranaje despu_asde cada use.
Retire el Aserrin de la
• Si Ia superficie superior del riet est& des_ivelada, use una lima p!anapara restaurar
ta forma cuadrada.
Ranura
Gastada
bordes y los
lados en forma
Cuandrada
Ranura
Correcta
Cambie la barra si la ranura est& gastada, si la barra estA torcida o resquebrajada o si hay calentamiento excesivo o
formaci6n de protuberancias en los
deles. Si es necesario cambiar la barra,
use excfusivamente la barra gu/a especificada para su sierra en la lista de repuestos, especificada tambi_n en ta
calcoman[a de repuesto de barra y cadena que se encuentra en la sierra.
LIMPIE EL APARATO ¥ LAS
PLACAS
° Limpieel aparato usando un trapo h_medo
con detergentesuave.
° Seque el aparato con un trapo limpio y
seco.
LIMPIE EL FILTRO DE AIRE
El fiftro de aire sucio disminuir& la vida
_til y el rendimiento del motor e incrementar,_ el consume de combustible y
la producci6n de contaminantes. Limpie
siempre el filtro de airs despu_s de 15
tanques de combustible o 5 horas de
use, el que acontezca pdmero. Limpielo con m_,s frecuencia en condiciones
muy polvorientas. Los fillros usados
nunca quedan totalmente limpios. Se
aconseja reemplazar al filtro de aire per
uno nuevo despu_s de cada 50 heras
de use o anualmente, Io que acontezca
prJmero,Para limpiar e! filtro:
- Afioje los 3 tornittosen la tapa del citindro.
• Retirela tapa det cilindro.
• Retireel fittro de arie.
• Limpie et filtro de aire con agua caliente y
Ranura de la_
jab6n. Enjuaguebien con agua claray fr[a.
S6queloal airetotalmenteantes de reinsta\_"Orificfo deI Eng/anaje
larto.
• Coloqueuna pequefia cantidad de aceiteal
filtro antes de instatarlo.Use aceite para
motores de 2 tiempos o aeeite de rnotores
° Afiada tubricante al orificio dei engranaje
SAE 30. Escurrabien el exceso de aceite
despues de cada use.
apretando e]_tro para mejorar la eficiencia
• Los deles de la barra desarrollan protuberdef filtro de aire.
ancias aI gastarse. S&quelas con una lima
• Reinstale el fittro de aire.
ptana.
38
* Reinstale
latapadelcilindro
ylos3tornil+• Retire Ia tapa del silenciador (la tapa est_
colocada a presi6n en ta caja dei silencialos(15-20
tibras
porpurgada)+
dor)+
Tapa deI
Cirindro
_¢/
• Retire el iuego de difusor y rejilfa antichispas+ Tome nota de Ia odentacidn de estas
piezas para su reinsta_aciSn.
+ Limpie la rejilla antichispas con un cepil!o
de alambre+ Cambie Ia rejif/a si encuentra
roturas.
• Cambie todas Ias piezas de+silenciador
que esten rotas o resquebrajadas.
• vuelva a instalar et juego de difusor y rejitla
antichispas con los odficios redondos hacia
arriba, hacia la tapa del silenciador.
+ Reinstate la tapa deI siIenciador y los 2 torniltos (7 a 8 libras por pie).
Filtro
de Aire
CAMBIE LA BUJIA
INSPECCIONE
EL SILENCIADOR
¥ LA REJILLA ANTICHISPAS
A medida que se use el aparato, el silenciador y ia rejitla antichispas se van
carbonizando_ Es necesario sacar la
carbonizaci6n para evitar et riesgo de
incendio o afectar el rendimiento det
motor,
Deber_ cambiarse
la bujia anualmente
para asegurar que el motor arranque
m&s fAcilmente y mrche mejor. La cronometrizaci6n
del encendido
es fija e
inalterable.
• Afloje _os tres tornillos en la tapa del cilindro,
o Retire la tapa del c#indro,
° Saque la cubierta de la bujia+
• Retire ta bujfa del cilindro y des_ehela,
• Reempl_cela con una bujfa Champion
RCJ7Y ajt_stela con una llave de 3/4 de
pulgada (t0 a 12 libras pot pie),
• Reinst_Ie la cubierta de la buj[a,
• Reinstale la tapa de! cilindro y tos tres tornillos (15 a 20 libras por pulgada).
Rejilla
Antichispas
PARA LIMPIAR LA REJILLA
ANTICHISPAS
Se requiere fa limpieza a cada 25 horas
de uso o anualmente,
el que acontezca
primero+
, Afloje y retire Fos2 tornillos de ta tapa det
sitenciador.
PRECAUCION:
Use guantes protec*
totes para tocar la cadena+ La cadena es
muy fitosa y puede cortar aun no estando
en movimiento+
Es normal que las cadenas nuevas se
estiren durante los primeros 30 minutes
de uso. Ser_ necesario verificar la ten*
si6n de la cadena frecuentemente y
ajustar ta tensiSn segt_n sea necesario+
Vea la secciSn sobre Tensidn de la Cadena+
• Coloque el interruptor en ta posiciSnStop.
• Cambie ta cadena usada cuando est_ gastada o daSada.
• Useexclusivamentelacadenaderepuesto
•
•
,
•
Minimizadora de Reculadas especificada
en la Iista de repuestos. La cadena y barra
de repuesto correctas tambien estAn especificadas en una calcomanfa ubicada en ta
sierra de cadena.
Entre en contacto con el Centro de Servicio
Sears para cambiar y afiJar tas cuchillas
individuales de la caden&
Retire las tuercas de la abrazadera de +a
barra.
Retire ta abrazadera.
Retire Ia cadena usada.
PARA REEMPLAZAR
39
AJUSTE DE LA CADENA
Vea "Tensi6n de la Cadena" en la secci6n de Mantenimiento.
LIMPIE EL FILTRO DE
COMBUSTIBLE
Para limpiar el filtro, vacie el apareto
haciendo que el motor marche hasta
quedar sin combustible, luego retire el
juego de tapa del tittro de combustible y
retentor del tanque. Saque el flltro del
tanque y sep&reto de la I(nea. Limpelo
con un detergente suave y enju_.gueto.
S6queto completamente y vuelva a armarlo.
"L" y =T". Est&n ubicados arriba del
bombeador.
PUNTOS DE PRECALIBRAClON
AI hcer ajustes no fuerce tas tapas limitadoras de pl&sticom_.s atl_ de los retentores o puede haber dafios. Si no se
necesitan los puntos de precafibraci6n,
pase ata secci6n "Ajustes e la Marcha
Lenta".
• Gire los dos tornillos de ajuste de mezclaa
la izquierda (en contradel sentido del reloj)
haste que se paren.
° Gire el tomillo de marcha ]entaala derecha
(en el sentido del reloj) haste que se detem
ga. Ahora girelo hacia la izquierda 4 vuelAJUSTES AL CARBURADOR
tas y media.
ADVERTENClA:
La cadena estar&
Ponga el motor en marcha y d_jelo en
en movimiento durante la mayor parle
marcha por 3 minutos, tuego proceda a
de este prodecimiento, Use el equipo
la secci6n de ajustes. Si et motor no arprotector y observe todas las precauranca, vea ta Tabla Diagn6stica o flame
Si el funcionaclones de seguridad. En el "Ajuste de ta el 1-800-235_5878.
Mezcla de Bajas Revoluciones" verifimiento det motor es aceptable con las
que la marcha lenta despu_s de cada
posiciones anteriores y ta cadena no se
mueve en marcha lenta, no her& falta
ajuste. La cadena no debe moverse
con el motor en marcha lento.
hacer m&s ajustes.
El ajuste det carburador es de primorPROCEDtMIENTO
DE AJUSTE
dial importancia. Si seio hace incorrec* Marcha Lenta "T"
tamente, puede daSar tanto et motor
Deje el motor en mercha lenta. Ajuste
como el carbrador permanentemente.
las revoluciones haste que el motor se
Si necesita m&s ayuda o no esta segu- mantenga en marcha sin que la cadena
ro de c6mo hacer el procedimiento,
se mueva o que el motor se ahogue.
Itame a nuestro tet_fono de ayuda al
• Gire el tornillo a fa derecha (en el sentido
consumidor, a11800-235-5878.
deI reloj)pare aumentar tas revotucionessi
El combustible vencido, et filtro de aire
el motor se ahoga o se para.
sucio, el filtro de combustible sucio c el • Gire el tornillo ata izquierda (en contra del
motor ahogado pueden dar la impresentido deI reloj) parabajar las revotusiSn de carburaci6n desajustada. Verificiones.
que estas condiciones antes de hacer
No hace falta ning_n otto ajuste si la
cualquier ajuste.
cadena no se mueve en marcha lenta y
El carburador ha sido ajustado
si el rendimiento es satistactorio.Deje el
cuidadosamente en ta f_brica. Posiblemotor en marcha lenta, Luego acelere
monte se hagan necesarios ajustes si
el motor y tome nota del funcionamiense nota cualquiera de tas siguientes
' to. Si el motor se ahoga, o acelera bien
condiciones:
o targa humo el acelerar, gire el tomillo
• La cadena se mueve con el motor en mar- de ajuste a fa derecha (en el sentido
cha lenta. Vea "Marcha Lenta T" bajo pro- del reloj) en incrementos de t/16 de
vuelta _nicamente hasta obtener un
decimiento de ajuste.
• La sierra no anda a amrcha lenta. Vea
funcionamiento satisfactorio. Repita
"Marcha Lenta T" y "Mezcla de Bajas Reeste procedimiento las veces que sea
voluciones L".
necesario. Repita este procedimiento
• El motor se pareo se ahoga cuando debe las veces que sea necesario pare obacelerar. Vea "Verificaci6n de la Aceleratener rendimiento satisfactodo.
ci6n".
Despu6s de completer estos ajustes,
• Baja de potencia de corte. Vea "Mezcia de verifique la aceleraci6n y e! movimiento
Attas Revoluciones H" halo el procedimien- de la cadena en marcha lenta, Ajuste
nuevamente si es necesario.
to de ajuste.
Hay tres tornillos de ajuste en el
carburador. Est,_n marcados con "H",
4O
Mezcla pare Bajas Revoluciones "L"
Deje el motor en marcha lenta. Luego
acelere el motor y tome note del funcionamiento. Si et motor se ahoga, o acefera bien o large humo al acelerar, gire
el tornillo de ajuste ala derecha (an el
sentido del reloj) en incrementos de
1/16 de vuelta _nicamente hasta obtem
er un funcionamiento satisfactorio. Repita este procedimiento las veces que
sea necesario. Repita este procedimiente las veces que sea necesario
para obtener rendimiento satisfactorio.
Despu_s de completar estos ajustes,
verifique la aceteraci6n yet movimiento
de la cadena en marcha lenta. Ajuste
nuevamente si es necesario.
Mezcla pare Altas Revoluciones "H"
NO HAGA FUNCIONAR EL MOTOR
con el acelerador a fondo per mucho
tiempo at hacer los ajustes ya que
puede da6ar et motor. Haga un corte de
prueba. Basado en el funcionamiento
de la sierra durante el code, ajuste el
tornillo para la mezcla de altas revolu-
clones per incrementos de s61o 1/16 de
vuetta, come se detalla a continuaci6n:
* Ala derecha (eneI sentido del reloj) haste
que Ia sierra tenga buena potenciaalcortar
sin hesitaciones. Nohaga losajustes per el
sonido ni per las revoluciones, sine per el
buen funcionamiento alcortar.
, A Ia izquierda(en centredel sentido del
reloj) si la sierra tiene revotucionesaltas
pare se para o le falta potencia a! cortar.
Despu_s de completer los ajustes, verifique la aceteraci6n y el movimiento de
la cadena en marcha lenta. Ajuste nuevamenle si es necesario.
Verificaci6n de la Aceleraci6n
Si e! motor se para o hesita en vez de
acelerar, gire el tornillo de ajuste de la
mezcla pare bajas revoluciones ala izquierda (an contra del sentido del reloj)
haste conseguir una aceleraci6n pareja
sin movimiento de la cadena en marcha fenta. Verifique nuevamente y haga
los ajustes necesarios pare conseguir
un funcionamiento aceptable.
Prepare el aparato pare guardarlo al
final de Ia temporada
o si no se Io va a
user per m&s de 30 dfas o m&s.
seco.
• Apfique una pequefia cantidad de aceite a
las superficiesextemas met&licasy ala
barra guia.
ADVERTENCIA:
° Lubrique la cadena y envuelvala en papeI
• Deje que el motor se enfrie y fije bien el
grueso o teta.
aparato antes de guardarlo o de transporSISTEMA DE COMBUSTIBLE
tarlo.
• Guarde la sierra y et combustible en unloVea el mensaje marcado
cal bien ventitado donde los vapores de
"IMPORTANTE", qua se refiere al use
combustible no puedan entrar en contacto
de combustibles con mezcla de alcohol
con chispas ni llamas abiertas proveen su aparato, en Ia secci6n de Use,
nientes de los termotanques, los motores o
bajo Abastecimiento del Motor.
interruptores el_etricos, calefactores cenLos estabilizadores de combustible son
trales, etc.
una alternative aceptable para minimi° Guarde el aparato con todos los protectores en su lugar y cotoque el aparato de
zer la formaci6n de dep6sitos de goma
durante el almacenamiento. Afiada esmode que las piezas filosas no puedan
causer heridas per accidente.
tabifizador ala gasotina en el tanque de
• Guarde el aparato bien fuera del alcence
combustible o en el recipiente de almade los niSos.
cenado de combustible. Siga las
instrucciones de mezcla que se enSUPERFICIES
EXTERNAS
cuentran en los envases de estabitiza.
Siva a guarder el aparato durante mudor. Ponga el motor en marcha y dejelo
cho tiempo, ifmpie!o rigurosamente
en marcha unos 5 minutes despu6s de
primero. Gu&rdelo en un lugar limpio y
ponerle estabilizador.
41
TABLA DIAGNOSITCA
,,
,,,,,,,,,
........
PROBLEMA
CAUSA
,,,,,,,
El motor no
arranca o se
mantiene en
marcha sSIo
unos segundos
despu_s de
arrancar.
Elmotor
no
anda en marcha
[enta come
debe.
SOLUCION
i,4ierruptor
est o,1OFF•
.
•
El motor esta ahogado.
E! tanque de combustible
est& vac_o,
La bujfa no hace chispa.
El combustible no est&
ltegando al carburador.
°
•
El carburador requiere
ajuste.
Ninguno de los antedores
•
• [as
•
•
•
revoluciones de la
marcha lenta est&n muy
altos e muy bajas.
La Mezcla para Bajas
Revoluciones requier
ajuste,
Las juntas del cigOeSal
estan gastadas,
La compresiSn est_ baja,
Ninguno de los anteriores
,,,,
EI motor no
acelera, le fatta
potencia o se
para bajo carga,
E[ motor humea
excesivamente.
•
Entre en contacto con el Servicio
Sears,
,,
Limpieo'cambie
•
Limpie o cambie el filtro de aire.
•
Entre en contacto con el Servicio
Sears,
Entre en contacto con el Servicio
Sears.
Entre en contacto con el Servicio
Sears,
•
•
et filtro de airel
,,, ,,,,...........
•
.
Et filtro de aire est,, sucio.
La bujfa est#, carbonizada
;
,
•
•
.
El carburador requiere
ajuste,
Los puertos de escape o
las aberturas de salida de
sifenciador est&n tapados,
La compresiSn estA baja.
•
Ninguno delos antedores
•
Etcebador est&
parcialmente accionado,
La mezcla de combustible
se ha hecho
incorrectamente.
El filtro de aire estA sucio.
La Mezcla para Aitas
Revoluciones requiere
ajuste,
El carter estA perdiendo,
°
,,,,,.....
•
°
Cotoque el interrupter enoN'i '
Vea las Instrucciones de Arranque,
Llene el tanque con la mezoIa
correcta de combustible.
tnstale una bujfa nueva.
Verifique si el filtro de combustible
estA sucio; limpielo. Verifique si hay
dobleces en la linea de combustible
o si est& partida; rep_rla o c&mbiela.
Vea "Ajustes al Carburadof',
I_impie o cambie e t filtro de aire.
Limpie o cambie ia bujfa y calibre ta
separaci6n.
Vea "Ajustes al Carburadof'.
Entre en contacto con el Servicio
Sears.
.
,
Entre en contacto con et Servicio
Sears,
Entre en contacto con el Servicio
Sears.
_,,._ ..,,,.
°
•
°
-
42
Ajuste el cebador,
e
Vacie el tanque de combustible y
llenelo de combustible con la mezcla
correcta,
Limpie o cambie el filtro de aire.
Vea "Ajustes al Carburadof'.
Entre en contacto con et Service
Sears.
PROMBLEMA
CAUSA
Et motor
marcha con
temperature
elvada, :
:
insuficiencia ae
aceite pare
fubricar la barra y .
cadena,
•
La cadena se
mueve en
! marcha lent&
'
°
La cadena no se *
mueve cuando
se acelera el
motor.
•
•
Lacadena
golpetea o corta
desparejo,
:
°
•
•
•
:
•
La cadena
corta en
_,ngu]o.
° ""'Vea'_'Abastecimiento"clei Apara'to _;
* Cambiela por la bujia correcta.
•
Yea"Ajustes al Carburador",
•
Entre en oontacto con e! Servicio
Sears,
•
Limpie Ia rejilta antichispas.
•
Limpie el area.
•
Entre en contacto con el Servicio
Sears.
Eftanque de aceite est_
•
vacio.
El bombeador de aceite o et •
filtro de aceite est,, tapado.
El orificio pare aceite en _a
•
barra est,. tapado.
La marcha lenta requiere
•
ajuste,
El embrague requiere
•
reparaciones.
.,,=:., .....
La cadena estA
demasiado
tensionada,
Et carburador requiere
ajuste,
Los rieles de }a barra
gufa est_.n apretados.
El embrague est#,
patienando,
Lacadeanesi_ ..............
°
incorrectamente
tensionada.
Lee cuchillas est_m
daSadas,
: La cadean estA gastada.
°
Las euchillas est_n
•
desafiladas o mal afitadas
o los medidores de
profundidad est,_n muy
altos,
El engranaje estA gastado.
•
Uene el tanque de aceite.
Entre en contacto con el Servicio
Sears.
Saquela barray Ifmpiela.
Yea "Ajustes 'aI Carburadoi;;i ....
Entre en contacto con el Servicio
Sears.
Yea "Tensi6n de la cadean",
Vea "Ajustes aI Carburador".
Repare o reemplace.
Entre en contact<) con el Servicio
Sears,
Vea '3"ensiSn de ta Cadena".
Entre en contacto con el Servicio
Sears,
Afile o cambie la cadean.
Vea "Afilaci(_n de la Cadean",
Entre en contacto con el Servicio
Sears,
/nstale la cadena en la direcci6n
correcla,
I°
i
La cadena est_ instalada
af rev_s.
•
°
La parte de arriba de
las cuchitias no est_,n
planes.
La barratiene
protuberancias o est,_
torcida o los rieles
est_n desparejos,
El embragueestA
Patinando.
Las cuchillas est&n
•
Vea "Afilaci6n de la Cadena °.
•
Repare o cambie ta barra,
*
Entre en contacto con el Servicio
Sea(s ....
V_ "Afilae,i_,n dA INC_d_n_,
*
•
La cadenase
SOLUCION
• La mezcla de combustib'ie ......
se ha hecho
incorrectamente.
Se ha instalado la buj_'a
incorrect&
La Mezcla para Attas
Revoluciones esta
demasiado pobre.
ie
Los puertos de escape o
]as aberturas de salida del
silenciador estAn tapados.
La rejilla de escape del
silenciador est,_
carbonizada,
La caja de! ventilador o las
rebabas del cilindro estAn
su¢ias.
• Ninguno de los anteriores
•
,
43
For the repair or replacement parts you need
delivered directly to your home
Call 7 am - 7 pm, 7 days a week
1-800-366-PART
(1-800-366-7278)
Para ordenar piezas con entrega
domicilio1-800-659-7084
For in-house
a
major brand repair service
Call 24 hours a day, 7 days a week
1-800-4-REPAIR
(1-800-473-7247)
Para pedir servicio de reparaci6n
domiciiio - 1-800-676-5811
a
For the location of a Sears Parts and
Repair Center in your area
Call 24 hours a day, 7 days a week
1-800-488-1222
mmmmm
|mmm(
For information on purchasing a Sears
Maintenance Agreement or to inquire
about an existing Agreement
Call 9 am - 5 pm, Monday-Saturday
1-800-827-6655
.When requesting service or ordering
parts, always provide the following
information:
,
°
Product Type
Model Number
•
•
Part Number
Part Description
America's Repair Specialists
44