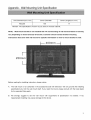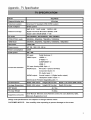
1
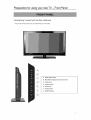
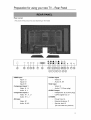
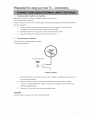
PROSCAN
®
T
USER'S
UAL
Model" 40LD45QC
UM No.: RN0340H2000
Class
B digital
This equipment
device
has been tested and found to comply with the limits for a class B digital device, pursuant
to part 15 of the FCC Rules. These limits are designed
interference
frequency
interference
a particular
reception,
in a residential
installation.
energy and, if not installed
This equipment
However,
If this equipment
which can be determined
to correct the interference
generates,
and used in accordance
to radio Communications.
installation.
to provide reasonable
there is no guarantee
harmful
may cause harmful
that interference
interference
by turning the equipment
against
uses and can radiate radio
with the instructions,
does cause harmful
by one or more of the following
protection
will not occur in
to radio or television
off and on, the user is encouraged
to try
measures:
- Reorient or relocate the receiving antenna.
- Increase the separation
between the equipment
- Connect
into an outlet on a circuit different
the equipment
and the receiver.
from that to which the receiver
is
connected.
- Consult the dealer or an experienced
radio/TV technician
for help.
Any changes or modifications not expressly approved by the party responsible for
compliance could void the user's authority to operate the equipment.
WARNING:
TO REDUCE THE RISK OF FIRE OR ELECTRIC SHOCK, DO NOT EXPOSE THIS
APPLIANCE
TO RAIN OR MOISTURE. DANGEROUS
INSIDE THE ENCLOSURE.
QUALIFIED PERSONNEL
HIGH VOLTAGES ARE PRESENT
DO NOT OPEN THE CABINET. REFER SERVICING TO
ONLY.
J
WARNING:
THE APPARATUS
SPLASHING
SHALL NOT BE EXPOSED TO DRIPPING OR
AND THAT NO OBJECTS
FILLED WITH LIQUIDS,
SUCH AS VASES SHALL BE PLACED ON THE APPARATUS.
CAUTION: TO PREVENT ELECTRIC SHOCK, MATCH WIDE BLADE OF PLUG TO WIDE SLOT IN
OUTLET.
CAUTION: THESE SERVICING INSTRUCTIONS
PERSONNEL
ARE FOR USE BY QUALIFIED SERVICE
ONLY.
TO REDUCE THE RISK OF ELECTRIC SHOCK, DO NOT PERFORM ANY SERVICING
ACTIVITIES, BUT CALL QUALIFIED ELECTRICIAN
PERSONNEL.
CAUTION: DANGER OF EXPLOSION IF BATTERY IS INCORRECTLY
WITH THE SAME OF EQUIVALENT
TYPE.
REPLACED, REPLACE ONLY
.&
CAUTION:
To red uce lhe dsk of electric shock,
do not remove cover or back.
No user- serviceable
Refer Servicing
parts inside.
to qualified
service
personnel
CAUTION:
Changes or modifications not
expressly approved by the party
responsible for compliance with the
FCC Rules could avoid the users'
authority to operate this equipment.
CAUTION:
The TV shall not be exposed to
dripping or splashing. No objects
filled with liquids, such as vases, shall
be placed on the TV.
CAUTION:
Do Not Place This TV on an
unstable cart, stand, or table. The
TV may fall, causing serious injury
to a child or adult, and serious damage
to the TV. Use only with a cart or stand
recommended
by the manufacturer,
or
sold with the TV.
CAUTION:
Installation on concrete wall has passed
UL safety test.
1.
READ THESE INSTRUCTIONS.
10.
2.
KEEP THESE INSTRUCTIONS.
3.
HEED ALL WARNINGS.
CONVENIENCE
4.
FOLLOW ALL INSTRUCTIONS.
WHERE THEY EXIT FROM THE APPARATUS.
5.
DO NOT USE THIS APPARATUS
ON OR PINCHED
NEAR WATER.
11.
6.
kitchen sink or laundry tub, in a wet
PARTICULARLY
RECEPTACLES,
AT PLUGS,
AND THE POINT
ONLY USE ATTACHMENTS/ACCESSORIES
SPECIFIED
BY THE MANUFACTURER.
Do not use this TV near water. For example, do not use near
a bathtub, washbowl,
PROTECT THE POWER CORD FROM BEING WALKED
12.
USE ONLY WITH CART, STAND, TRIPOD, BRACKET, OR
basement, or near a swimming pool, and the like. The TV set
TABLE SPECIFIED
shall not be exposed to dripping or splashing.
WITH THE APPARATUS.
No objects
BY THE MANUFACTURER,
OR SOLD
WHEN A CART IS USED, USE
filled with liquids, such as vases, shall be placed on the TV
CAUTION WHEN MOVING THE CART/
set.
APPARATUS
COMBINATION
TO AVOID
INJURY FROM TIP-OVER.
CLEAN ONLY WITH DRY CLOTH.
Do not place this TV on an unstable cart, stand, tripod,
Unplug the TV from the wall outlet before cleaning. Do
bracket, or table. The TV may fall, causing serious injury to
not use liquid cleaners or aerosol cleaners. Use a
someone, and serious damage to the appliance.
A TV and
damp cloth for cleaning.
cart combination
7.
DO NOT BLOCK
INSTALL
ANY VENTILATION
IN ACCORDANCE
MANUFACTURER'S
OPENINGS,
should be moved with care. Quick stops,
excessive force, and uneven surfaces may cause the TV and
WITH THE
cart combination
to overturn.
INSTRUCTIONS.
13.
UNPLUG THIS APPARATUS
DURING LIGHTNING
Slots and openings in the cabinet back or bottom are
STORMS OR WHEN UNUSED FOR LONG PERIODS
provided for ventilation,
OF TIME.
to ensure reliable operation of the TV
and to protect it from overheating.
These openings must not
For added Protection for this TV receiver during a lightning
be blocked or covered. The openings should never be
storm, or when it is left unattended and unused for long
blocked by placing the TV on a bed, sofa, rug, or other
period of time, unplug it from the wall outlet and disconnect
similar surface. This TV should never be placed near or over
the antenna or cable system. This will prevent damage to the
a radiator or heat resource. This TV should not be placed in a
TV due to Lightning and power line surges.
built-in installation such as a bookcase or rack unless proper
ventilation
is provided or the manufacturer's
instructions
have been adhered to.
8.
DO NOT INSTALL NEAR ANY HEAT SOURCES
14,
REFER ALL SERVICING
PERSONNEL.
SERVICING
APPARATUS
HAS BEEN DAMAGED
HEAT REGISTERS,
APPARATUS
(INCLUDE AMPLIFIERS)
SERVICE
IS REQUIRED
WHEN THE
IN ANY WAY, SUCH
SUCH AS
AS POWER-SUPPLY
RADIATORS,
TO QUALIFIED
STOVES, OR OTHER
THAT PRODUCE
CORD OR PLUG IS DAMAGED,
LIQUID HAS BEEN SPILLED OR OBJECTS HAVE
FALLEN INTO THE APPARATUS,
THE APPARATUS
HAS
HEAT.
BEEN EXPOSED
9.
TO RAIN OR MOISTURE,
DOES NOT
DO NOT DEFEAT THE PURPOSE OF THE POLARIZED
OPERATE
OR GROUNDING-TYPE
PLUG. A POLARIZED
NORMALLY,
OR HAS BEEN DROPPED.
PLUG HAS
Note: All figures in the manual are for reference only, please
TWO BLADES WITH ONE WIDER THAN THE OTHER. A
refer to the actual units to determine their appearance.
GROUNDING
TYPE PLUG HAS TWO BLADES AND A
THIRD GROUNDING
PRONG. THE WIDE BLADE OR THE
THIRD PRONG IS PROVIDED
THE PROVIDED
PLUG DOES NOT FIT INTO YOUR
OUTLET, CONSULT
REPLACEMENT
FOR YOUR SAFETY. IF
AN ELECTRICIAN
OF THE OBSOLETE
FOR
OUTLET.
of the same type, until the surface
The front of the display panel has been
specially
treated.
Wipe the panel surface
using only a cleaning
gently
Do not scratch or hit the surface
cloth or a soft, lint-free
fingernails
cloth.
If the surface
is particularly
cloth in a weak detergent
or other hard objects.
contact
with volatile
sprays,
solvents
solution
Furthermore,
avoid
such as insect
and thinner;
otherwise,
the quality
and then remove
liquid. Use this cloth to wipe the surface
the display
substances
of the panel with
dirty, soak a soft, lint-free
of the surface
excess
is dry.
may be adversely
affected.
of
panel, and then wipe it with a dry cloth,
Welcome
to the bright
and
vivid
enjoyment
from your new select.
To obtain
maximum
benefit from
retain them together
with purchase
world
your set. Please
TV set. We hope
read this manual
that you will have many
before
making
years
any adjustments
instructions
carefully
before
begin.
Registration
Please fill out the product registration card and return it Tmmed]ate y.Returningthe
card allows usto contact
you if needed. Keea your sales receipt to obtaTn warranty parts and service and for aroofof aurchase. Attach
i1"hereand record the serial and model numbers in case you need them.The numbers are located on the
DacKof the television.
Model No.
Serial No.
Purchase
Date.'
Dealer/Address/Phone:
Toll free call center
www.proscanus.com
1-888-977-6722
(888-9PROSCAN)
of
and
receipt for future reference.
Please read all the safety and operating
Product
of Proscan
Tableof contents
FCC NOTICE .............................................................................................
1
WARNING
1
AND CAUTION ...........................................................................
IMPORTANT
SAFETY
CLEANING
DEAR
AND
PROSCAN
SAFETY
INSTRUCTIONS
MAINTENANCE
CUSTOMER
PRECAUTIONS
TV STAND
for
using
.................................................................
.....................................................................
.............................................................................
INSTALLATION
Preparation
...........................................................
your
..........................................................................
new
TV .............................................................
3
4
4
6
8
9
FRONT PANEL .........................................................................................
9
REAR PANEL ............................................................................................
10
CONNECTIONS
11
AND EXTERNAL INPUT SETTINGS ..............................................
Using the Remote control ..........................................................................
12
LEARNING ABOUT REMOTE CONTROL ...........................................................
12
REMOTE CONTROL INSTRUCTIONS ...............................................................
13
Basic operation ........................................................................................
14
TURNING ON AND OFF THE TV ......................................................................
14
INITIAL SETUP ..............................................................................................
14
CHOOSING TV CHANNEL .............................................................................
14
VOLUME ADJUSTMENT ................................................................................
15
SELECTING
15
INPUT SOURCE .......................................................................................
Setup menu operation ................................................................................
16
ADJUST THE OSD SCREEN ..........................................................................
16
PICTURE MENU OPTIONS ............................................................................
17
SOUND MENU OPTIONS .............................................................................
19
CHANNELS
MENU OPTIONS .......................................................................
21
SETTINGS MENU OPTIONS .........................................................................
23
VGA MENU OPTIONS ...................................................................................
30
APPENDIX
...............................................................................................
Troubleshooting
.........................................................................................
32
32
Removing TV Stand ....................................................................................................
35
Wall Mounting Unit Specification ......................................................................
36
Safety Precautions ..........................................................................................
37
Universal Remote Control Code List .............................................................................
37
TV Specification .........................................................................................................
38
SafetyPrecautions
,_WARNING
KEEP UNNEEDED
SMALL PARTS AND OTHER OBJECTS OUT OF THE REACH OF
SMALL CHILDREN.
THESE OBJECTS CAN BE ACCIDENTALLY
BE CAREFUL ABOUT PACKAGING
SWALLOWED.
ALSO,
MATERIALS AND PLASTIC SHEETS.
Set up
Do not place the TV set on sloped or unstable surfaces.
Do not place any objects on top of the TV set. If water spills onto the TV set or foreign objects get inside it,
short-circuiting
may occur which could result in fire or electric shock. If any foreign objects get inside the TV set,
please consult an Authorized
Do not cover the ventilation
Service Center.
holes. Doing so may cause the TV set overheated and can cause fire or damage to the
TV set.
Avoid installing this product near electronic equipment
It may cause interference
that is readily affected by electromagnetic
waves.
in image, sound, etc. In particular, keep video equipment away from this
product.
AC Power Supply
Cord
Securely insert the power cord plug as far as it will go. If the plug is not fully inserted, heat may be generated which
could cause fire. If the plug is damaged or the wall socket plate is loose, they should not be used.
Do not handle the power cord plug with wet hands. Doing so may cause electric shocks.
Do not do anything that might damage the power cable. When disconnecting
the power cable, hold the plug, not the
cable.
Do not make any modifications
to, place heavy objects on, place near hot objects, heat, bend, twist or forcefully pull
the power cable. Doing so may cause damage to the power cable which can cause fire or electric shock. If damage
to the cable is suspected,
have it repaired at an Authorized
Service Center.
If the TV set will not be used for a long period of time, unplug the power cord from the wall outlet.
If Problems
Occur During Use
If a problem occurs (such as no picture or no sound), or if smoke or an abnormal odor is detected from the TV set,
unplug the power cord immediately.
Continued
use of the TV under these conditions might cause fire or permanent
damage to the unit. Have the TV evaluated at an Authorized
Service Center. Service to the TV by any unauthorized
personnel is strongly discouraged due to its high voltage dangerous
nature. If water or foreign objects get inside the
TV set, if the TV set is dropped, or if the cabinet becomes damaged, disconnect
Contact an Authorized
Service Center for any repairs that need to be made.
the power cord plug immediately.
SafetyPrecautions
When using the TV set
Do not bring your hands, face or objects close to the ventilation holes of the TV set. Top of the TV set is usually
very hot due to the high temperature
of exhaust air being released through the Ventilation
holes. Burns or personal
injuries can happen if any body parts are brought too close. Placing any object near the top of the TV could also
result in heat damage to the object as well as to the TV if its ventilation
Be sure to disconnect
holes are blocked.
all cables before moving the TV set. Moving the TV with its cables attached might damage
the cables which, in turn, can cause fire or electric shock.
Disconnect
the power plug from the wall outlet as a safety precaution before carrying out any cleaning.
electric shocks can result if this is not done.
Clean the power cable regularly to prevent it from becoming dusty. Built-up dust on the power cord plug can
increase humidity which might damage the insulation and cause fire. Unplug the cord from the wall outlet and
clean it with a dry cloth.
This TV set radiates infrared rays; therefore,
it may affect other infrared communication
infrared sensor in a place away from direct or reflected light from your TV set.
equipment.
Install your
TV STANDINSTALLATION
Place the TV faced
down on a soft cloth or cushion
to protect
the LCD panel
from damage.
1.
Put the stand body into the stand base in cabinet.
2.
Insert
the 6 black screws
(which
are completely
the same)
into TV holes
tighten.
6 black
screws
lIT
Selecting
1.
a location
Place the TV on the floor or on a sturdy
not directly
2.
for the TV
platform
in a location where
hit the screen.
Place the TV far enough from the walls to allow proper ventilation.
ventilation
light does
may cause overheating,
which may damage
Inadequate
the TV.
Wall Mounting
Please refer to the page 36 and contact a local dealer or professional for wall mounting
Preparationfor usingyour newTV- FrontPanel
Familiarizing
Yourself
with the Main Hardware
(The picture of the product may vary depending
on the model)
A. Select signal
input.
B. Main Menu display and menu selection
C. Channel up
D. Channel down
E. Volume up
F. Volume down
G. ON/OFF button
Preparationfor usingyour newTV- RearPanel
Rear panel
(The picture of the product may vary depending
HDMI Input
on the model)
S-Video
Input1: C
Input2: D
Input3: E
Component
Audio: M, M1
VGA Input
Video: G
Input 1
Video: H, I, J
Audio: K, L
Component
Audio: F (3.5mm plug)
AUDIO Output
Input 2
Headphone:
Video: H1, I1, J1
Audio: K1, L1
AV Input
Input
Video: N
Q (3.5mm plug)
COAX Digital Out: O
OTHERS
Video: N 1
Power Input: A
External Antenna:
Audio: M, M1
Service Jack: B
P
(Do not insert any device)
]0
Preparationfor usingyour newTV - Connections
1.
Checking
Items before Connecting
Please check the list below before
< Check
items before
connecting
Check the instruction
buttons
manual
the product
to other devices.
>
when connecting
external
devices.
External
products
sometimes
have different
and locations.
A.
Do not connect
damaged
2.
connecting
the power unless every connection
if turned
B.
Connect
C.
Check the terminals
the left (white)
Connecting
There are internal
< Connecting
on while still in the process
is well connected.
the product
may be
of being connected.
and right (red) cables correctly
to connect
The product
to the sound cable.
to on the rear panel.
an Antenna
and external
an Antenna
types of antenna.
>
The rear of LCD TV
Cable TV network
A.
Use a coaxial
cable to connect
mount or external
B.
to
the [CABLE]
[AIR] and [CABLE]
C.
Connect
terminals
and the wall
antenna.
When an Air signal is required,
connect
the rear panel of the TV's [AIR] or [CABLE]
connect
terminal.
to the [AIR] terminal.
If a Cable signal is required,
If both Air and Cable are available,
and then connect
both
terminals.
the TV power cord when connecting
everything
else.
CAUTION
Avoid bending
the copper tip at the center of the coaxial
cable.
]]
Usingthe remotecontrol- Learningaboutremotecontrol
_OWER
1.
POWER: Power on/off.
2.
SLEEP: Press to select a preset time interval to
EJ_,CT
automatically
©©
shut the TV.
3.
ASPECT: Press to adjust the screen size.
4.
DISPLAY: Press to Check your current mode.
5.
MTS: Press to select your favorite language in
digital broadcasting.
6.
CH.LIST: Press to display the channel list.
7.
FAV.: Add/delete
the current channel to your
favorite channel.
8.
FAV.+: Press to view the next favorite channel.
9.
FAV.-: Press
to
view
the
previous
favorite
channel.
@
,
10. Numeric Buttons: Press to change the channel
directly using the numeric buttons.
11. RECALL: Press to switch between the current
channel and the last channel.
12. -: When selecting a digital broadcast channel,
press
the number,
followed
by
"-" button,
followed by sub channel number.
13. EPG: One of signal
channel
EPG or Multi
channel EPG.
FREEZ_
CC
14. PICTURE: Press to change to a preset picture
mode.
15. SOUND: Press to change to a preset sound
mode.
_TOP
®®®®
PN_V
N_g,T
F',R
ZOOM
AoB
DVD_
_ETUP
R_PEA_
@U_-T
F_
16. INPUT: Press to Display a menu of all available
input sources, Also used to confirm your choice
T_TLE
in the on-screen menu.
17. ENTER/TIME:
Enter and confirm
button,
or
AU#_O
press to display
I I:_.
0 SC A N
/ hide time on screen (see
page 27).
18. UP/DOWN
LEFT/RIGHT:
The direction
Also used to adjust channel (UP/DOWN)
keys.
and
volume (LEFT/RIGHT).
19. MENU: Press to display main menu.
20. MUTE: Press to temporarily
Note: The remote control may differ from the above picture.
switch the sound
off.
21. FREEZE: Press to freeze the current picture.
22. CC: Press to select closed caption.
23. VOL+/-: Volume control buttons.
24. CH+/-: Channel control buttons.
]2
Usingthe remotecontrol- Remotecontrolinstructions
Inserting the batteries
into the remote control
1.
Open the cover of battery cabin on the back of the remote
2.
Insert two AAA 1.5V batteries,
3.
Close the cover.
ensuring
•
If the remote
•
Are the polarities
of the batteries
•
Are the batteries
worn out?
•
Is there an AC power failure?
•
Is the power cable plugged
•
Is any special fluorescent
Remote Control
Use the Remote
the correct polarity
control is not working,
Reception
control within
control.
(+/-).
see the checkpoints
below.
(+, -) correct?
in?
or neon sign board turned on?
Angle
a range of 7~10m
and at an angle of 30 ° to either side of the receiver.
CAUTION
Used batteries
should
Kept out of children's
be recycled.
reach.
Do NOT use new and old batteries
Change
both batteries
together.
at the same time.
When not using the remote
control over a long time, remove
the batteries
from the unit.
]3
Basicoperation- Turningon and off the TV
TURN ON LCD TV
1.
Connect the AC input cable to power to the LCD TV. At this time the TV will enter standby mode and indicator show red.
2.
User POWER
3.
Wait 5 second after switching off LCD TV then you can turn on LCD TV again.
button or
button on the remote
control.
NOTE: When turn on TV first time, or clear channel list function,
please do the initial setup. The initial setup menu
will display in the two conditions below:
A.
The TV is turned on first time.
B.
After clearing channel map, the TV will shut down automatically.
menu will display automatically
When user turns on again, the initial set up
(see page 26, instruction of Clear Channel List function).
Language
Press A / v
Tuning
button to select it and then use ENTER / _ to adjust the OSD language.
Band
Select tuning band: Air, Cable.
Auto
Channel
Search
Press A / v button to select it and then use ENTER / _ to enter the Auto Channel Search program.
1.
2.
Using the CH + / CH - on the top panel or on the remote control.
•
Press CH + to increase channel number.
•
Press CH - to decrease channel number.
•
When no OSD menu is used, the arrow keys A / v can also work as CH + / CH - buttons.
Using 0-9 digital buttons and - button.
You can select the channel number by pressing 0 to 9.
]4
Basicoperation- Selectinginputsource
3.
For example:
IN ANALOG SIGNAL:
To select channel (e.g. Channel 22): Press 2 -> 2 ->ENTER,
It will jump to 22-0 directly.
IN DIGITAL SIGNAL:
To select digit channel (e.g. Channel 22-1 ): Press 2 -> 2 -> - > 1 ->ENTER, the program will appear immediately.
NOTE: Sub channel number of analog channel is always zero. But when you in the digital signal, if you enter
physical
channel
number and not end with "ENTER",
channel
selection
will be made if there
is no
operation within a few seconds.
1.
Press VOL+/- to adjust the volume.
2.
If you want to switch the sound OFF, press the MUTE.
3.
You can cancel the mute function by pressing MUTE or VOL+/-.
4.
When OSD menu is not used, the arrow keys .t. / _ can also work as VOL - / VOL + buttons.
Press the INPUT button to select TV, AV, S-Video, Component,
VGA, HDMI inputs. Use the A / v to move
the cursor and ENTER button to confirm the source.
INPUT Menu
]5
Setupmenuoperation-Adjust the OSDscreen
Press the MENU button to display the main menu.
Use _
/ _- / A / v
buttons to select and adjust the available menus.
T
1
NOTE: The OSD (On Screen Display) function enables you to adjust the screen status conveniently
since it provides
graphical presentation.
When the cursor stays on a main menu function (Picture, Sound, Channels
use ENTER or _ button to activate
it. After activating,
which you can use to choose the concrete
or Settings), you need to
the cursor will go forward into the submenu,
functions with • / v
button. After adjusting,
you can use
MENU button to return to the upper level of OSD menu or exit the menu.
The images in this document
the instruction
manual
may vary from your TV's menu depending
for better understanding
pictures here are for reference
and operation
on the model. We provide
to the TV set. Therefore,
all the
only.
]6
Setupmenuoperation- Picturemenuoptions
NOTE: In this manual, the OSD (On Screen Display) may be different from your TV's in colors.
Press MENU button on the front panel or on the remote control and then use A / v to select the PICTURE menu.
1.
Use _ / ENTER to enter Picture menu.
2.
Use A / v to select what you want to adjust in the Picture Menu.
3.
Press ,4 / D, / ENTER button to adjust.
4.
When you are satisfied with your adjustment, press EXIT to exit the main menu.
Picture
Mode
Press ,1, / •
button to select it and then use <
/ _. to set the picture mode: Standard, Vivid, Bright, User.
You can also select the picture mode directly by pressing the PICTURE button on the remote control.
Brightness
Press •
/ •
button to select it and then use <
/ _ to adjust the brightness of picture.
Contrast
Press A / • button to select it and then use ,i / _. to adjust the contrast of picture.
Color
Press _, / •
button to select it and then use ,4 / _- to adjust the color saturation.
Tint ( NTSC Input only)
Press A / •
button to select it and then use <
/ _, to adjust the tint of picture.
button to select it and then use <
/ _. to adjust the sharpness level of picture.
Sharpness
Press A / •
Press ENTER button to select it and then use <. / D, to adjust the contrast of picture.
]7
Setupmenuoperation- Picturemenuoptions
Advanced
Video
Press A / v button to select it and use _ / ENTER to enter advanced video menu.
Aspect Ratio
Press A / v button to select it and then use ENTER / _. to select the aspect ratio of picture: Normal, Zoom, Wide,
Cinema.
Color Temperature
Press _ / v
button to select it and then use ENTER / =, to select the color temperature:
Cool, Normal, Warm.
Noise Reduction
Press A / v button to select it and then use ENTER / =- to set the noise reduction level: Off, Low, Medium, High.
3D Y/C
Press J, / •
Gradient
button to select it and then use ENTER / _ to set the 3D comb filter on/off.
Enable
Press A / •
button to select it and then use ENTER / D. to select the gradient enable on/off.
This function can improve the picture's quality.
Blue Screen
Press A / •
button to select it and then use ENTER / =, to set the blue screen on/off.
Note: If the blue screen function is turned on, the TV will display a full-screen
blue image when there is no signal. And a
long-time displaying of this may shorten the LCD TV panel life.
]8
Setupmenuoperation- Soundmenuoptions
Press MENU on the front panel or on the remote control and then use A / v to select the SOUND menu.
1. Use _. / ENTER to enter Sound menu.
2. Use A / v to select what you want to adjust in the Sound Menu.
3. Press ,i. / _ / ENTER button to adjust.
4. When you are satisfied with your adjustment, press EXIT to exit the main menu.
Equalizer
Mode
Press A / v button to select it and then use ENTER / _ to select the equalizer mode: User, Standard, Movie, Music, News.
Balance
Press _, / v
button to select it and then use ENTER / _ to adjust the audio output deflection
between
left and right
speakers.
Audio Channel
Press ,1, / •
button to select it and then use ENTER / _ to select the audio channel: Mono, Stereo, SAP.
Audio Language
Press A / •
button to select it and then use ENTER / _ to select the first audio language.
Audio Language
Press A / •
Advanced
Press A / •
1
2
button to select it and then use ENTER / b to select the second audio language.
Audio
button to select it and use _. / ENTER to enter advanced audio menu (see next page).
]P
Setupmenuoperation- Soundmenuoptions
Digital Audio Output
Press A / v
button to select it and then use ENTER / b to select the digital audio output mode: Off, RAW, PCM.
5-Band Equalizer
Press A / T
Set
button to select it and use _- / ENTER to enter 5-band equalizer set. To use this function, Equalizer mode
(page 19) should be "User".
Press ,q. / b button to select the audio frequency
component
and use A / v
to adjust. When you are satisfied with
your adjustment, press MENU to exit.
Audio Only
Press A / v button to select it and use _, / ENTER to activate audio only (hold POWER button 3 seconds to restore.).
If you select this function, TV will not display any video, but there is audio only.
20
Setupmenuoperation- Settingsmenuoptions
Press MENU on the front panel or on the remote
1. Use _. /
control and then use A / v to select the CHANNELS menu.
ENTER to enter Channels menu.
2. Use A / v to select what you want to adjust in the Channels Menu.
3. Press .,i / _ / ENTER button to adjust.
4. When you are satisfied with your adjustment, press EXIT to exit the main menu.
Tuning Band
Press A / v button to select it and then use ENTER / =, to select the tuning band: Air, Cable.
Auto Channel
Search
Press ,= / v button to select it and then use ENTER / _. to enter the auto channel search program.
Note: If you want to exit the Auto Channel
Search in the searching process, press MENU twice.
2]
Setupmenuoperation- Settingsmenuoptions
Manual Add Channel
Press A / •
button to select it and then use ENTER / =. to enter.
This menu wilt show the intensity of DTV signal. User can adjust the direction and orientation of external antenna by checking
Signal Level.
Manual Channel
Press A / •
Set
button to select it and then use ENTER / _. to enter the manual channel set program.
This function will add the channels not found before, remaining the channels unavailable at present.
Press ENTER / _ button to select skipped or viewable.
22
Setupmenuoperation- Settingsmenuoptions
Favorite Channels
Press A / v button to select it and then use ENTER / =. to enter the favorite channels program.
Press ENTER / _. to set the current channel to your favorite channel. If the current channel is already one of your favorite
channels, press ENTER / _ to set it as a normal channel.
Channel
Labels
Press ,= / v
button to select it and then use ENTER / _- to enter.
Press .q / _. to select the position of letter, then press A / v to set the name.
Press ENTER to confirm you selection.
Press MENU on the front panel or on the remote
control and then use <
/ =, to select the SETTINGS menu
@
23
Setupmenuoperation- Settingsmenuoptions
1. Use _, / ENTER to enter Settings menu.
2. Use A / v to select what you want to adjust in the Settings Menu.
3. Press ,i
/ _. / ENTER button to adjust.
4. When you are satisfied with your adjustment, press EXIT to exit the main menu.
Parental
Control
Menu
Press A / v button to select it and then use ENTER / D. to enter parental control menu.
Input the password to enter, and the default password is 0000.
US Ratings
Press A / v button to select it and then use ENTER / =, to enter the US Ratings menu.
24
Setupmenuoperation- Settingsmenuoptions
MPAA
Press ENTER to lock or unlock: NONE, G, PG, PG-13, R, NC-17, X.
And here is some additional information about each aarental control level.
NONE: No restrictions.
G: General Audience. This contains little or no violence, no strong language, and little or no sexual dialog or
situations.
PG: Children under 13 should be accompanied
by an adult.
PG-13: Parental guidance suggested. Children under 13 should be accompanied
by an adult.
R: Restricted. Viewers should be 17 or older.
NC-17: Not classified. Viewers should be 17 or older.
X: Hardcore. Viewers should be 17 or older.
TV Rating
Press ENTER to lock or unlock one of NONE, TV-MA, TV-14, TV-PG, TV-G, TV-Y7, TV-Y.
•
TV-MA: Mature audiences only. This program may contain mature themes, profane language, graphic violence and
explicit and explicit sexual content.
•
TV-14: Parents
strongly
cautioned.
This program
may contain
sophisticated
themes,
sexual content,
strong
language and more intense violence.
•
TV-PG: Parents guidance suggested. The program may contain infrequent coarse language, limited violence, some
suggestive sexual dialog and situations.
•
TV-G: General audience. This contains little or no violence, no strong language, and little or no sexual dialog or
situations.
•
TV-Y7: Directed for older children. Themes and elements in this program
may include mild physical or comedic
violence, or may frighten children under the age of seven.
•
TV-Y: All children. The themes and elements
in this program are specifically
designed for a very young audience,
including children from ages two six.
•
NONE: No restrictions.
Canadian
Ratings
Press A / v button to select it and then use ENTER / _. to enter the Canadian Ratings menu.
25
Setupmenuoperation- Settingsmenuoptions
Canadian
English
Press ENTER to lock or unlock: NONE, C, C8+, G, PG, 14+, 18+.
•
NONE: No restriction.
•
C: Children.
•
C8+: Viewers should be 8 or order.
•
G: GeneralAudience.
•
PG: Parental guidance suggested.
•
14+: Restricted. Viewers should be 14 or older.
•
18+: Restricted. Viewers should be 18 or older.
Canadian
French
Press ENTER to lock or unlock: NONE, G, 8 ans+, 13 ans+, 16 ans+, 18 ans+.
•
NONE: No restriction.
•
G: For all.
•
8 ans+: Restricted. Viewers should be 8 or older.
•
13 ans+: Restricted. Viewers should be 13 or older.
•
16 ans+: Restricted. Viewers should be 16 or older.
•
18 ans+: Restricted. Viewers should be 18 or older.
Advanced
Rating
Press A / v button to select it, then press ENTER / _ button to set advanced rating on/off.
Advanced
Parental
Lock
Only available when the advanced rating is turned on.
Press A / T button to select this item, then press ENTER / _ button to enter.
Password
Set
To set the new password.
Clear Channel
List
To clear the present channels. The TV will shut off automatically after this operation. When user turns on the TV again,
the Auto Channel Search in initial setup menu wilt help to rebuild the channel state (see page 14).
Time Set
26
Setupmenuoperation- Settingsmenuoptions
Time Set Mode
Press A / v button to select this item, then press ENTER / _ button to select: Auto, Manual.
Customer needs to choose Manual before adjusting Time Zone, Year, Date and Time.
Time Zone
Press A / v button to select this item, then press ENTER / _ button to select the time zone for your TV.
Year, Date, Time
Press A / v button to select this item, then press ENTER / _ button to set the date and time for your TV.
Note: Press ENTER on remote control, the current time which has been set wilt display on screen for 5 seconds.
Press ENTER again, the time will disappear (see page 12 remote control instruction about ENTER button).
Closed
Caption
Press A / • button to select this item, then press ENTER / _ button to enter.
CC Mode
Press ,L / • button to select this item, then press ENTER / _ button to select TV CC mode.
Analog CC
Press ,L / • button to select this item, then press ENTER / _. button to select: CC1, CC2, CC3, CC4, TEXT1,TEXT2,
TEXT3, TEXT4.
Digital
CC
Press • / • button to select this item, then press ENTER / _ button to select: CS1, CS2, CS3, CS4, CS5, CS6.
Advanced
CC Settings
Press ,= / • button to select this item, then press ENTER / _, button to enter.
2"7
Setupmenuoperation- Settingsmenuoption
•
Style: press <
/ _ to select: Automatic and Custom, when you select automatic, the other functions are disabled.
•
Size: press <
/ _
•
Font: press < / _- to select: Default and from Front 1 to Font 7.
•
Text Color: press < / b. to select: Red, Green, Blue, Yellow, Magenta, Cyan, Black, White.
•
Text Opacity: press <
•
Background
Color: press < / _
•
Background
Opacity: press <
•
Edge Effect: press <
/ _ to select: None, Raised, Depressed,
•
Edge Color: press <
/ _. to select: Red, Green, Blue, Yellow, Magenta, Cyan, Black, White.
to select: Normal, Large, Small.
/ _
to select: Solid, Flashing, Transparent,
Translucent.
to select: Red, Green, Blue, Yellow, Magenta, Cyan, Black, White.
/ b. to select: Solid, Flashing, Transparent, Translucent.
Uniform, Left Shadow, Right Shadow.
Menu Setting
Press A / v button to select this item, then press ENTER / _, button to enter.
Language
Press A / v button to select this item, then press ENTER / _, button to set the OSD language.
Transparency
Press A / v button to select this item, then press ENTER / _, button to adjust the transparency
28
Setupmenuoperation- Settingsmenuoption
Sleep Timer
Press A / v button to select this item, then press ENTER button to select: Off, 5min, 10 min, 15min, 30min, 60min,
90min, 120min, 150min, 180min, 240min.
Input Labels
Press A / v button to select this item, then press ENTER / _ button to enter.
Press ENTER / _. button to set the input label.
Reset
Reset all items to default value.
The functions of OSD menu for Component/AV/S-Video
functions
(such as Channels
For the detailed information,
inputs are similar with TV mode except that some
menu and several Setting menu functions)
please attend to the instructions
are unavailable
in these modes.
for TV mode OSD menu for reference.
29
Setupmenuoperation- VGAmenuoptions
Press INPUT on the front panel or on the remote control and then enter VGA mode.
Use MENU and A / T
buttons to select the Settings menu in VGA mode.
1. Use _ / ENTER to enter Settings menu.
2. Use A / v to select what you want to adjust in the Settings Menu.
3. Press _ / =. / ENTER button to adjust.
4. When you are satisfied with your adjustment, press EXIT to exit the main menu.
PC Settings
Press A / v button to select this item, then press ENTER / =- button to enter.
Horizontal
Position
Press ENTER button to select it and then use <
/ _ to adjust the horizontal position of the picture.
Vertical Position
Press ENTER button to select it and then use <
/ _ to adjust the vertical position of the picture.
Phase
Press ENTER button to select it and then use ,q / _- to adjust the phase of the picture.
3O
Setupmenuoperation- VGAmenuoptions
Clock
Press ENTER button to select it and then use _
/ _ to adjust the clock of the picture.
Note:
Phase -- This function allows you to remove any horizontal noise and clear or sharpen the image of characters.
Clock -- This function is to minimize any vertical bars or stripes visible on the screen background. And the horizontal
screen size also will change.
Horizontal Position & Vertical Position -- This function is to adjust the picture to Left/Right
and Up/Down
as you wish.
Auto Adjust
Press ENTER button to select it and then use _ / b- to do auto adjust that automatically
adjusts the available options
for the best viewing configuration.
Reset
Press ENTER button to select it and then use D,/ ENTER to reset all the PC settings.
3]
Appendix- Troubleshooting
Identifying
Problems
If there are any problems
Customer
Setup
Service
using the product,
If the list below does not solve the problem,
call our
Center immediately.
and Connection
The TV won't turn on. Check
your power cable connection.
•
I can't view the Basic channels.
•
I want to view cable channels.
•
I want to view satellite
•
Digital broadcasting
connected
The Remote
Change
Check
Check
the connection
of the antenna
cable.
Register with your local cable company
channels.
Setup your Satellite
is not functioning.
to your antenna
Menu and Remote
•
please first consult the list below.
parabola
Check your antenna
then connect
antenna
then connect
cable connection.
Check
their receiver
your satellite
to your TV.
receiver
if the digital channel
to the TV.
selection
is correctly
cable.
Control
Control
isn't functioning
well.
the batteries.
the polarity of the batteries.
Check the angle of the remote
control from the product
or if there are any obstacles
between
the remote
control and the
product.
Check
if you have pressed
the correct key for the correct option.
Try to a bright light position
•
I cannot change
Press [TV/AV]
channels
near TV's which
transmit
External
Check
•
receiver>
window.
with the remote control.
and select <TV>.
Try to use the remote control for the cable or satellite
•
a strong light source on TV <remote
input channels
your external
receiver
to change
the channel.
cannot be selected.
input connection
cable.
A Menu cannot be selected.
Check
if the menu is grayed
out, and if it is, that menu cannot be selected.
Screen
•
Poor picture
Is the power cord unplugged?
Make sure the power cable is plugged
in correctly,
and then press the power of the remote
control.
•
Black picture
Check
the LED light being blue.
Press input button repeatedly
•
Lined and flickering
and check caption for mode in panel.
picture.
Try to finely adjust the channel.
Are there any TV waves
flowing
or cordless
radio transmitting
stations?
Avoid using cordless
phones,
hairdryers
or electrical
drills.
32
Appendix- Troubleshooting
•
Disfunctioning
Check
if the channel
Try changing
•
channels.
has been selected
correctly.
the position of the antenna.
Picture with white and black dots.
Check
if your antenna
is damaged
or any connections
are broken.
Replace your antenna.
•
Only certain channels
Check
are in black and white
if the program
is being broadcast
in black and white.
Try to check the hue or contrast.
•
The Sub-Screen
Check
is black.
the power of the external
If the power cord is disconnected,
•
Automatic
device connected
to the TV.
the screen will be black.
turn-on is inactive.
When turning
off your TV, you need to use the remote
control or press the power button on the TV. (If you pull the plug on the
TV, the settings will be deleted.)
Sound
•
Poor quality sound
Check
•
if the program
is in stereo. Stereo may not work well in areas with bad reception.
Sound is malfunctioning
while using a cable.
Check your sound connecting
Check
•
if other channels
cable.
also have no sound
I can see images,
but there is no sound.
Press the volume
buttons
Try watching
to increase
the sound.
a video (if the video has sound,
call our customer
Try using Mono for these areas.
check your cable company).
If there
is no problem
with the cable receiver,
then
service.
Check if press MUTE on the remote control..
•
There is a malfunction
after the volume
Try to adjust the external
devices
is increased
connected
to the TV (Digital channel
If you can adjust your sound, try to balance
receiver,
the volume of the TV and the external
DTV, DVD, Cable channel
receiver,
video)
device.
Channel
•
The channels
Connect
are not functioning.
the antenna
Set to memorize
channels
Query the particular
•
A limited number
Change
connectors
in the automatic
broadcasting
of channels
the location
Try to select a few channels
•
Only UHF (14~69)
Check
setting again.
station.
of the antenna.
using numbers
and memorize
them using the add/delete
button.
station.
Channels
if the antenna
channel
are not functioning.
or direction
Query the broadcasting
again.
are unavailable.
is able to receive
UHF.
33
Appendix- Troubleshooting
Monitor
•
The PC Screen continually
Check the connection
•
appears
between
the TV and the computer
A "There is no signal "message
This happens
maximum
and disappears.
or frequency
The screen looks like there is water flowing
Check
•
the connector
The screen is unclear
Change
•
Unstable
and flickering
of the TV. Try to set the
properly.(This
is deactivated
when any key is pressed
or the mouse is moved)
to the TV.
Change
the Resolution
and frequency
to the standard
limit.
screen.
of the PC's Graphics
Card should
be set within the TV's range. Check the TV menu's
current
mode and set it up again.
Some modes in standard
Check the compatibility
If it is not working
or frequency
on it.
and phase adjustment.
and frequency
mode and standard
resolution
and blurry.
the frequency
The resolution
•
connected
for the maximum
for the TV.
See if power save mode of the PC functions
•
is locked.
appears.
if the signal from the video card is exceeded
resolution
and see if the connector
mode are not working.
of the video card.
for compatible
hardware,
try to upgrade
the driver of the graphics
card.
34
Appendix- RemovingTV Stand
If you decide to install the wall mount your LCD TV, always use a VESA standard wall mount appropriate
for the size and weight of the LCD TV.
CAUTION
•
Be sure to follow
TV falling
•
Before
•
Unplug
the instructions.
Incorrect
installation
of the stand/wall
mount
may result in the
over.
detaching
(or attaching)
and remove
any cables
the stand,
and/or
unplug
the AC cord from the AC input terminal.
other component
connectors
from the rear of the TV.
NOTES
Before proceeding,
described
make sure the appropriate
in the instructions
bracket(s)
are attached to the wall and the back of the TV as
provided with the wall bracket. Extreme care should always be used when
removing the stand/wall mount to avoid damage to the LCD panel.
As shown below:
(The picture may vary depending
on the model.)
Loose 6
PROCEDURE
Place the TV set on a surface
that is totally stable, flat and smooth,
1. Loose the 6 black rear screws
(The 6 black rear screws
such as a table.
in TV.
are completely
the same.)
2. Draw out the stand gently.
35
Appendix- Wall MountingUnitSpecification
Unit Dimension(unit:
mm)
Screw Diameter
400x250
M6
Remark: The specification
NOTE:
instructions
mm)
14
of screw is just used on the back cabinet.
Wall mount bracket is not included
vary depending
Screw Length(unit:
with TV and mounting
on brand and size of bracket, Customer
that came with wall mount for specific
of wall mount bracket to wall may
should consult bracket mounting
information
on how to mount bracket to wall,
400mm
250mm
Before reading the installing instruction,
A,
The wall mount is not contained
specifications
please notice:
in the accessories
sold with television.
We only provide the installing
but not the wall mount itself. If you need the mount, please consult with the local dealer
for the assorted fitting parts.
B.
We strongly
suggest
to set the wall
mount with equipments
inappropriate
installing may cause damage to the device.
of specification
we ordered.
If not,
36
Appendix- SafetyWarnings
1.
Do not set up the wall mount by yourself. Please contact qualified professionals
2.
The TV should not be mounted on walls or surfaces which have an angle more than 10 degrees with
vertical direction.
3.
Otherwise
The walls for mounting
for installation.
the TV set may fall.
must have enough strength to hold the whole weight of TV set. For example,
concrete wall and brickwork
are eligible. Do not place the mount on soft walls such as earth walls and
plasterboard.
4.
If spare
parts of different
qualified professionals
5.
Before attaching
Otherwise
specifications
(such as screws)
are used during
mounting,
consult
with
to make sure these parts are safe and effective.
the base to wall, ensure the holes for anchors are in keeping with the installing rules.
there may exist some potential problems.
6.
Do not place any heating source under your television.
7.
Do not place the TV near anything
dripping.
Or else, it can cause fire.
Transducers
and high voltage wires should be kept far
away from the apparatus too. Or else, it may cause creepage,
electric shock or bad resonance.
8.
Do not place TV in a location where collision or vibration is liable to happen.
9.
In order to avoid unexpected
falling of the TV set, do not put any strong force on TV or wall mount after
installing.
10. Be sure to unplug the TV before installing.
Keep anything hard or sharp away from the screen panel to
prevent the scuffing.
11. After installing,
For Universal
Remote
to your Universal
Proscan
if there is any need to move the cabinet, please contact the qualified
Control
Remote
brands listed below, please use accompanying
Control
User Manual
for basic instruction
professionals.
Proscan codes and refer
for changing
TV code to operate
model.
•
Proscan
codes for Sony TV = 8003, 8012, 8058
•
Proscan
codes for Philips TV = 1005, 1006, 1007, 1035, 1064, 1216, 0015
•
Proscan
codes for other universal
remotes
= 272, 132, 134, 116, 040, 016, 024,056,019,
262,
363.
•
Proscan
codes for DIRECTV
•
Proscan
codes for Comcast
= 10178
•
Proscan
codes for Dish Network
= 10178
= 627
37
Appendix- TV Specification
Model
40LD45QC
Diagonal display size
40 inches
Television system
American TV standard ATSC/NTSC
Audio multiplex
BTSC system
VHF: 2~13
Channel coverage
UHF: 14~69
system
CATV:1~125
Digital Terrestrial Broadcast (8VSB): 2~69
Digital cable (64/256 QAM): 1~135
PC mode
YPbPr/YCbCr
640x480/60Hz,
mode
800x600/60Hz,
1024x768/60Hz
480i/60Hz, 480p/60Hz, 720p/60Hz, 1080i/60Hz
HDMI Mode
480i/60Hz, 480p/60Hz, 720p/60Hz, 1080i/60Hz, 1080p/60Hz
Resolution
1920x1080
Power source
AC 100 - 240 V, 50 - 60 Hz
Power consumption
230W
Audio power
8W + 8W
RF input:
Cable/Antenna
VIDEO input:
VIDEO xl
xl
S-VIDEO xl
COMPONENT
x2
HDMI x3
PC input: Analog RGB 15pin xl
Connection Interface
AUDIO Input:
AV Audioxl
(shared S-Video)
Component Audio x2
PC Audio Input xl
AUDIO output:
Coaxial output xl (Digital audio output)
Headphone audio output xl
Service jack: Firmware Upgrading Jack xl
TV Dimensions
Width: 38.9 inches
Height: 26.5 inches
Depth: 11.5 inches (With stand)
Package Dimensions
Width: 49.4 inches
Height: 30.3 inches
Depth: 9.6 inches
NET Weight
40.1 Ibs
Package Weight
51.8 Ibs
User Manual, Warranty Card, Remote control, AC cord, Batteries, QSG,
Supplied accessories
Warranty Registration Card
Design and specifications
CUSTOMER
NOTICE:
are subjects
to change without
notice,
Use carefully when operating to prevent damage to the screen,
38