1
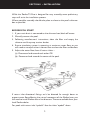
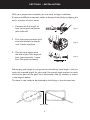
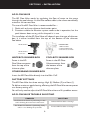
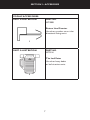
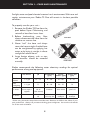
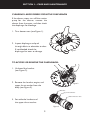
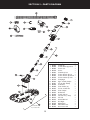
Owner’s Manual WELCOME TO ZODIAC Congratulations on your purchase from the Zodiac range of pool care products. A trusted name in aeronautical and marine sectors, Zodiac now delivers its expertise to a full range of pools, automatic pool cleaners and water treatment systems. Backed by world famous Baracuda technology, the Zodiac T5 Duo is your assurance of top quality in terms of design and performance. All Zodiac products are designed so you can spend more time enjoying your pool and less on maintenance. The result is a simply sparkling pool. IMPORTANT INFORMATION YOU MUST READ THIS INFORMATION BEFORE INSTALLATION. ALWAYS READ THE OPERATION MANUAL BEFORE USING. REMEMBER TO REGISTER YOUR WARRANTY WITHIN FOURTEEN (14) DAYS FROM DATE OF PURCHASE. i This Kit Contains Qty: Description: 1Zodiac T5 Duo machine head, complete with disc set 1 Hose protector mesh 12 Genuine Zodiac long life Twist-Lock Hose Section 1 Wheel Deflector 1 Blue hose weight 1 T5 Quick Connector 1 AD Flow Valve 1 Universal Weir Cuff 1 Pool Pulse Cleaner Head Disc Twist-Lock Hose Section Hose protector mesh AD Flow Valve Hose Weight AD Flow Valve Quick Connector Valve Cuff Pool Pulse 6 5 4 3 2 1 0 0 1 2 3 4 5 6 ii Wheel Deflector QUICK Start INSTALLATION GUIDE Page section 1 – installation 2 section 2 – ACCESSORIES 7 section 3 – CARE AND MAINTenance 8 section 4 – Pool PULSE 12 section 5 – parts diagram 13 section 6 – troubleshooting 14 section 7 – warranty Information 15 1 section 1 – installation While the Zodiac T5 Duo is designed for easy assembly, some preliminary steps will assist the installation process. Where possible, assembly should take place as close to the pool’s skimmer box as possible. Before You Start 1. If your main drain is connected to the skimmer box, block off access. 2. Manually vacuum the pool. 3. Following manufacturer’s instructions, clean the filter and empty the skimmer and the pump strainer basket. 4. Ensure circulation system is operating at maximum water flow, or you will need to re-adjust when it comes time to clean the filter and baskets. 5. Adjust the water flow, from all return inlets: – (a) Downward and toward each other OR (b) Downward and toward the centre of the pool. If return inlet directional fittings can’t be directed far enough down to prevent water flow affecting the natural movement of the Zodiac hose, you will need to install Zodiac return line diverters.These are available from your local Zodiac dealer. For pools with return inlet “eyeballs” face the inlets “eyeball” down. 2 section 1 – installation With your preparation complete, you are ready to begin installation. If hoses are difficult to connect, soften and expand the plastic by dipping the end in a bucket of warm water. 1.Connect the first length of hose to the quick connector joint male cuff. Step 1 2.Push the quick connector joint onto the head of the cleaner, until it locks into place. Step 2 3.Clip the hose weight onto the end of your first length of hose (approximately 1 metre from the quick connector). Step 3 Submerging each length as you go, continue attaching hose lengths until you reach the required length for your pool. Use enough hose sections to reach the farthest point of the pool, then add another two (2) sections as shown in the diagram below. The hose is now ready to be attached to the fittings in the skimmer box. Skimmer Box 3 section 1 – installation Wheel Deflector The Deflector ring can be used to help direct the T5 Duo around steps and other obstacles in the pool. Attach the ring by inserting the end of the cleaner hose through the outer ring and push the quick connector over the hose. Attach the ring just above the first hose cuff. Connect the Cleaner 1. Submerge the cleaner and flood it with water. 2. When bubbles stop coming out of the extension pipe, connect the hose to the cleaner by pushing the quick connector onto the outer extension pipe until it locks into position with a clicking sound. 3. Allow the cleaner to drift to the bottom of the pool. Installation is complete. Turn on the pool pump and begin cleaning. 4 section 1 – installation Fine Tuning Cleaner Performance The T5 Duo™ cycles on/off with the pool filtration pump vacuuming and cleaning all surfaces randomly throughout the pool. The coverage of the cleaner is dependent on the pool’s shape and available water flow. In some applications, adjustments may be necessary to optimize cleaning coverage. A properly balanced hose will create a 45º angle to the cleaner and the bottom of the pool. Incorrect Correct Balance Incorrect POOL COVERAGE While the return line water flow should not affect the natural movement of the hose, there are occasions where it can be beneficial. Return line pressure can be used to balance cleaning coverage, and guide the cleaner away from steps and corners. A return line located anywhere along the shaded area, can gently push the hose – allowing the unit to free itself from any in-pool obstacles. 5 section 1 – installation AD FLOW VALVE The AD Flow Valve works by regulating the flow of water to the pump through the pool cleaner. As the filter collects debris, the valve automatically maintains the correct flow. The use of the AD Flow Valve is recommended for: – 1. Pools with only one skimmer box/suction point. 2.Situations where the filtration system needs to be in operation, but the pool cleaner does not e.g. whilst the pool is in use. The installation of the AD Flow Valve will depend upon the type of skimmer box. It is either installed from the top or the bottom of the skimmer. See below. AD Flow Valve 1 2 3 DESCRIPTION 1. AD Flow Valve 2. Universal Weir Cuff 3. Hose Protector Mesh AD Flow Valve Connector Waterco Skimmer Box Screw in the AD Flow Valve connector from the top of the skimmer plate. Poolrite Skimmer Box Screw in the AD Flow Valve connector from the bottom of the skimmer plate. Other Brand Skimmer Box Insert the AD Flow Valve directly into the Weir Cuff. Factory Settings The AD Flow Valve has three settings. High (3) Medium (2) and Low (1). To deliver maximum pool cleaning efficiency, the AD Flow Valve comes preset at a factory setting of 2. You will only need to adjust the AD Flow Valve when and if a problem occurs. AD Flow Valve Trouble Shooting PROBLEM SOLUTION The Zodiac Pool Cleaner is performing too fast and/or climbing above the level of the water. Reduce AD Flow Valve to Setting 1 The Zodiac Pool Cleaner is performing slowly and/or is not climbing the pool walls. Increase AD Flow Valve to Setting 3 6 section 2 – Accesories ZODIAC ACCESSORIES: PART ILLUSTRATION PART NO. W22800 Return Line Diverter Use when no other return inlet directional fittings exist 1 PART ILLUSTRATION PART NO. W70116 The Leaf Eater Use when heavy debris or leaf situations exist 2 7 section 3 – CARE AND MAINTeNaNCE Sunlight, water and pool chemical create a harsh environment.With care and regular maintenance your Zodiac T5 Duo will remain in the best possible condition. To properly care for your unit: – 1. Remove the Zodiac T5 Duo from the pool before Super Chlorinating and reinstall at least four hours later. 2. Before backwashing your filter, always disconnect the hose from the skimmer or vacuum line. 3. Never “coil” the hose and always store the hose straight. A coiled hose can be straightened by applying hot water or by laying it straight, in direct sunlight for several hours. 4. Large foreign objects, such as toys and branches should be removed manually. correct X incorrect Zodiac recommends the following water chemistry readings for optimal performance of any pool equipment Total Alkalinity Calcium (ppm) Hardness (ppm) Cyanuric Acid (ppm) Free Chlorine pH Australian Standard 1 – 3 ppm 7.2 – 7.8 80 – 300 90 – 300 30 – 50 Ideal reading/range 1 – 3 ppm 7.5 80 – 140 150 – 175 50 To increase* Add chlorine or increase output of equipment Add buffer or soda ash (sodium carbonate) Add sodium bicarbonate Add sodium calcium chloride Add cyanuric acid Add muriatic acid Add muriatic acid or dry acid Partially drain & refill pool Partially drain & refill pool To decrease* * When using chemicals, always follow manufacturers directions and follow the advice of your pool professional. Always use protective clothing, gloves and glasses. Store and use chemicals out of the reach of children. 8 section 3 – CARE AND MAINTeNaNCE Clearing large debris from the Diaphragm If the cleaner stops, turn off the suction pump for the cleaner, remove the cleaner from the water, and then check the diaphragm for blockage. 1. Turn cleaner over (see Figure 1). 2. Inspect diaphragm and push through debris or obstacles to clear. If not blocked, check the diaphragm for wear or damage. Figure 1 To access or remove the diaphragm: 1. Unthread the handnut (see Figure 2). 2. Remove the handnut, engine, and upper thrust washer from the body (see Figure 3). Figure 2 Handnut Upper Thrust Washer Outer Extension Tube 3. Set aside the handnut and the upper thrust washer. Figure 3 9 section 3 – CARE AND MAINTeNaNCE 4. Unscrew the outer extension tube from the cup assembly (see Figure 4). 5. Separate the inner extension tube and pull out the diaphragm (see Figure 5). Figure 4 Outer Extension Tube Cup Assembly 6. Inspect the diaphragm for wear and rinse it thoroughly with water. Replace it if necessary. Figure 5 To reinstall diaphragm: Notch Tab 1. Attach diaphragm to inner extension tube. Figure 6 Cup Assembly 2. Insert inner pipe and diaphragm into cup assembly. Align diaphragm tabs with notchesand pull straight through (do not twist) until the edge of the diaphragm is visible (see Figures 6 and 7). Edge of Diaphragm Figure 7 Handnut Upper Thrust Washer 3. Thread on the outer extension tube and slide the thrust washer and the handnut over the outer extension tube (see Figure 8). Outer Extension Tube Figure 8 10 section 3 – CARE AND MAINTeNaNCE 4. Insert the engine into the body and thread the handnut down tight (see Figure 9). Figure 9 5. Make sure the extension tube swivels freely by spinning it (see Figure 10). Figure 10 11 section 4 – POOL PULSE 6 5 4 3 2 1 0 0 1 2 3 4 5 6 The Pool Pulse® is a flow meter that measures the volume of water flowing through your Zodiac cleaner. It can be a useful diagnostic tool for when the cleaner isn’t running properly. The Pool Pulse® can only be used if the filtration system is on. IDEAL TOO HIGH TOO LOW Showing Setting 3 Showing Setting 4 Showing Setting 2 To set the Pool Pulse: 1. Disconnect the quick connector from cleaner. 2. Attach the Pool Pulse® to the quick connector and keep it under water. 0 1 2 3 4 5 6 6 5 4 3 2 1 0 3.Ensure the Pool Pulse® is in the ideal range (Setting = Number 3) when viewed from the side. 3.Keeping the quick connector and hose under water, remove the Pool Pulse® 4.Submerge the cleaner head. When the bubbles stop coming from the extension pipe, attach the hose. 12 section 5 – PARTS DIAGRAM No. Part # 1 W78009 2 W78004 3 W78006 4 W78014 5 W78003 6 W78017 7 W78065 8 W78018 9 W73010 10 W78029 11 W78001 12 W78038 13 W78008 14 W70007 15 W70008 16 W70281 17 W78034 18 W30160 19 W70335 20 W70263 21 W70105 22 W78070 23 W78005 24 W33900 Includes 12, 13 and 14 13 Description Qty T5 Hand Nut 1 T5 Thrust Washer Upper/Lower 1 T5 Float Cover 1 T5 Float 1 T5 Main Body Cover 1 T5 Outer Extension Pipe Top 1 T5 Outer Extension Pipe Bottom 1 T5 Inner Extension Pipe Tube 1 T5 Diaphragm 1 Engine Assembly Complete 1 T5 Lower Body Assembly 1 T5 Skid Plate 1 T5 Duo Flexifeet (set) 2 T5 Front and Rear Discs 1 T5 Disc Complete 1 AD Flow Valve 1 T5 Quick Connector 1 Twist Lock Hose (1 metre) 12 Pool Pulse 1 Universal Weir Cuff 1 Hose Weight 1 Wheel Deflector 1 Thrust Washer Lower 1 Hose Protector Mesh 1 section 6 – TROUBLESHOOTING Note: If the automatic pool cleaner is climbing the walls excessively, that is an indication that the flow is too high. Review the installation procedures and ensure the AD Flow Valve is set at setting #1. For additional assistance contact our customer service department on 1800 688 552. TROUBLESHOOTING PROBLEM SOLUTION Cleaner stops and starts Check diaphragm for blockage or damage. Use Pool Pulse® to determine proper flow. Check hoses for leaks. Divert return inlets downward. Cleaner is patterning Lay hose in a straight line in the sun to relax memory. Confirm proper hose length – add 1 or 2 extra hose sections. Cleaner isn’t covering opposite end of pool Divert return inlets downward. Use flow to move cleaner to opposite end. Check if sufficient hose and add if necessary. Cleaner flips over Use Pool Pulse® to ensure proper flow. Check swivel on cleaner is not jammed. Use Pool Pulse® to ensure proper flow. Cleaner climbs walls Ensure AD Flow Valve is on setting #1. excessively Reduce flow to cleaner head. Use Pool Pulse® and increase flow to setting #3 on AD Flow Valve. Cleaner won’t climb Confirm proper hose length. walls Adjust hose weight, so it is further away from the cleaner head. Use Pool Pulse® and lower flow to low setting #1. Cleaner won’t leave Utilise return flow to move cleaner. edge or rim of pool Adjust hose weight. Note: In cold water of 12 degrees or less, water flow through the cleaner must be increased to compensate for the reduced flexibility of the hose and diaphragm. IF ASSISTANCE IS REQUIRED, PLEASE CALL OUR CUSTOMER SERVICE DEPARTMENT ON 1800 688 552 14 section 7 – WARRANTY INFORMATION Your Zodiac Warranty This ZODIAC T5 Duo was carefully inspected before shipment from our warehouse. ZODIAC GROUP AUSTRALIA WARRANTS THE ZODIAC T5 DUO POOL CLEANER TO BE FREE FROM DEFECTS IN MATERIALS AND WORKMANSHIP FOR A PERIOD OF TWO (2) YEARS FROM DATE OF PURCHASE. THE ZODIAC HOSE IS WARRANTED FOR TWO (2) YEARS AGAINST MANUFACTURING DEFECTS AND ULTRAVIOLET BREAKDOWN. Upon unpacking, if any part is missing or found to be defective, please notify your dealer immediately. Only the original purchaser may submit a claim under this limited warranty. Purchaser’s claims against Zodiac Group Australia Pty Ltd shall be limited to those claims that may be asserted under the limited warranty relating to any defect, malfunction or wear of the ZODIAC T5 Duo. Repairs To obtain warranty replacement or repair, the unit should be returned to the place of purchase. When submitting a claim, always produce evidence of purchase date, retailer and a brief description of the problems/defects encountered. Exclusions This limited warranty excludes the following: – 1.Discolouration of the Zodiac pool cleaner caused by reaction to chemicals used in the pool water. As discolouration does not affect the operating ability of the pool cleaner, this limited warranty does not cover the replacement of discoloured parts. 2.Damage to or malfunction of the unit resulting from excess chlorination or improper water chemistry balance. 3. Replacement of parts, which fail or become defective as a result of improper installation, negligence, misuse, abuse or tampering by unauthorised repair personnel. 4.Age, pool water imbalance, and improper installation can cause pool liners to become brittle or unduly wrinkled. Corrosion of the supporting walls and/or irregularities in the pool base may also cause liner failure. The use of this product in such an environment is at the pool owner’s risk. Therefore, the pool owner hereby releases the manufacturer from any and all claims for damage where these conditions exist. 5. Abrasion to the hose or damage caused by misuse or improper installation. 6.If parts other than ‘genuine’ parts as supplied by Zodiac have been used, or if repairs or alterations have been made without Zodiac’s authority. Zodiac Group Australia Pty. Ltd. reserves the right to repair or replace all defective or worn parts covered by this warranty, through the place of purchase. Where the purchaser sends units to the place of purchase by post or courier for repair or replacement, freight is the responsibility of the purchaser. W90076 Zodiac Group Australia Pty. Ltd. assumes no responsibility for any warranties or representations made by other individuals or businesses beyond the express terms contained in this limited warranty. This warranty gives you specific legal rights, and you may also have other rights which vary from state to state. This warranty will remain the property of Zodiac Group Australia Pty. Ltd. 15 Zodiac is a registered trademark of Zodiac Group Australia Pty Ltd ABN 87 002 641 965 Zodiac Customer Service Centre Zodiac Group Australia: 219 Woodpark Rd, Smithfield, NSW 2164 Australia Tel: 1800 688 552 Fax: 1300 781 688 Email: [email protected]. www.zodiac.com.au Due to constant developments and improvements, specifications may change without notice. Improper use could affect performance and void warranty. W90076 © Copyright Zodiac Australian Ltd 2010