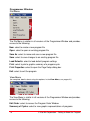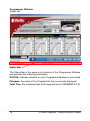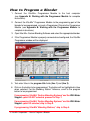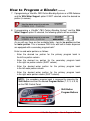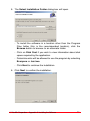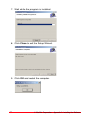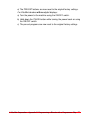
1
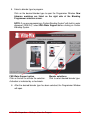
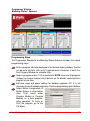
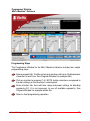
F O O D S E R V I C E
Owner’s Manual
Read And Save These Instructions
CUSTOM
BLENDING
Software
for all
Programmable Vita-Mix Machines
Table of Contents
Support Information . . . . . . . . . . . . . . . . . . . . . . . . . . . . . . . . . . . . . . . . . . . . . . . .3
Overview . . . . . . . . . . . . . . . . . . . . . . . . . . . . . . . . . . . . . . . . . . . . . . . . . . . . . . . .4
System Requirements . . . . . . . . . . . . . . . . . . . . . . . . . . . . . . . . . . . . . . . . . . . . . .4
Before Using the Program . . . . . . . . . . . . . . . . . . . . . . . . . . . . . . . . . . . . . . . . . . .5
Getting to Know the Program . . . . . . . . . . . . . . . . . . . . . . . . . . . . . . . . . . . . . . . .6
How to Program a Blender . . . . . . . . . . . . . . . . . . . . . . . . . . . . . . . . . . . . . . . . .17
Saving Blending Programs . . . . . . . . . . . . . . . . . . . . . . . . . . . . . . . . . . . . . . . . .25
Printing/Viewing Blending Programs . . . . . . . . . . . . . . . . . . . . . . . . . . . . . . . . . .26
Appendices
Appendix A: Installing the Software . . . . . . . . . . . . . . . . . . . . . . . . . . . . . . . .28
Appendix B: Working with the Programmer Module . . . . . . . . . . . . . . . . . . . .31
Appendix C: Programming a Blender with a Programmer Chip . . . . . . . . . . .32
2
© Vita-Mix Corporation – Custom Blending Software
Support Information
This manual supports Vita-Mix® Custom Blending Software v 2.0.
For the most up-to-date detailed instructions, go to:
www.vitamix.com/foodservice/products/instruction_manuals
and go to the Blending Programmer section.
For additional information, please contact:
VITA-MIX® CORPORATION
Foodservice Division
8615 Usher Road
Cleveland, Ohio 44138-2103 USA
www.vitamix.com/foodservice
In the U.S., Canada and Latin America
Toll Free: 800-4DRINK4 (800-437-4654)
Phone: 440-235-0214
Fax: 440-235-9670
E-mail: [email protected] or [email protected]
All other countries:
Contact your local Vita-Mix distributor or contact Vita-Mix International at
Tel.: +1.440.782.2450
Fax: +1.440.782.2220
Email: [email protected]
© Vita-Mix Corporation – Support Information
3
Overview
Vita-Mix® Custom Blending Software facilitates fast, easy
programming of the following via PC or laptop:
• Vita-Mix PBS Portion Blending Systems®
• Vita-Mix PBS H20 ®
• Vita-Mix Blending Stations®
• Vita-Mix BarBoss® Advance and Drink Machine Advance
• Vita-Mix Mix’n MachineTM Advance
• Programmer Chips used with both of the above units
System Requirements
Operating System
Microsoft Windows Server 2003 (32-Bit)
Windows XP Professional (32-bit)
Windows XP Home Edition
Windows 2000
Windows Millennium Edition (Windows Me)
Windows 98*
Microsoft Windows NT 4.0 Service Pack 6a*
*Requires Internet Explorer V5.01 or higher. USB support may not be available
Processor
Required: 450 MHz, Recommended: 600 MHz or higher
Memory
Required: 64 MB, Recommended: 256 MB or higher
Hard Disk
Required: 40 MB, Recommended: 200 MB or higher
Interface
Required: USB
Monitor
Required: Super VGA (1024x768) or higher resolution display with 256 colors
Recommended: Super VGA (1024x768) or higher resolution display with 32-bit color
IMPORTANT!
Monitor resolution on the host computer should be at the default setting.
Alternate settings may cause the program to display incorrectly.
Windows is registered trademarks of the Microsoft Corporation.
4
© Vita-Mix Corporation – Overview
Before Using the Program
1. Vita-Mix® Custom Blending Software must be installed on the host computer
before use. See Appendix A: Installing the Software for complete installation
instructions.
2. The Vita-Mix Programmer Module must be connected to a USB port on the
host computer before use. See Appendix B: Working with the
Programmer Module for complete instructions.
© Vita-Mix Corporation – Before Using the Program
5
Getting to Know the Program
Vita-Mix® Custom Blending Software is powerful, yet exceptionally easy to use.
Please take a few moments now to read the following overview of the available
features and functions. If you have not already installed the program, please see
Appendix A: Installing the Software.
1. Open Vita-Mix® Custom Blending Software using either of the following two
methods:
- Double-click on the Vita-Mix Programmer shortcut icon, shown
at right. The shortcut is located on the Windows desktop.
- Open the program via the Windows Program Menu.
2. If the Programmer Module is not connected to the host computer, or if the
Programmer Module is improperly connected, the following message will be
displayed:
3. Click OK, then check all hardware connections (see Appendix B: Working
with the Programmer Module).
4. If the Programmer Module is properly connected and configured, the
Programmer window will be displayed:
6
© Vita-Mix Corporation – Getting to Know the Program
5. Select a blender type to program.
Click on the desired blender type to open the Programmer Window. New
Advance machines are listed on the right side of the Blending
Programmer selection screen.
NOTE: If you are programming a Portion Blending System® with built-in water
dispenser (PBS H20), select With Water Support before clicking on Portion
Blending System.
PBS Water Support option
Click on the box to activate the selection.
Activation is indicated by a checkmark.
Blender selections
Click to select desired blender type.
6. After the desired blender type has been selected, the Programmer Window
will open.
© Vita-Mix Corporation – Getting to Know the Program
7
Programmer Window
Portion Blending System® and PBS Advance (Water Support not selected)
PRE BLEND power setting
Ice portion setting
Programming Steps
The Programmer Windows for Portion Blending System and PBS Advance (Water
Support not selected) include options for programming the desired ice portion and
a power setting for a PRE BLEND segment of the blending cycle.
Programming Steps include:
Enter a program title.
Click on a button to program (1-4, A-B).
Enter the desired ice portion
(portion units are approx. 0.5 oz. /14.7 ml).
Enter a button title, then edit the power setting for the PRE BLEND segment.
Next, edit time, ramp and power settings for blending segments A-D (it is not
necessary to use all available segments).
Select a final programming operation.
8
© Vita-Mix Corporation – Getting to Know the Program
Programmer Window
Portion Blending System® H20 (Water Support selected)
Ice and Water Support Options
Programming Steps
The Programmer Window for Portion Blending System® H20 (Water Support
selected) includes options for programming the desired ice portion, water portion
and a power setting for a PRE BLEND segment of the blending cycle.
Programming Steps include:
Enter a program title.
Click on a button to program (1-4, A-B).
Enter desired ice and water portions
(portion units are approx. 0.5 oz. / 15 ml).
Enter a button title, then edit the power setting for the PRE BLEND segment.
Next, edit time, ramp and power settings for blending segments A-D (it is not
necessary to use all available segments).
Select a final programming operation.
© Vita-Mix Corporation – Getting to Know the Program
9
Programmer Window
Blending Station® MP and Touch and Go® Blending Station®
THE BEST 4 U
SMOOTHIE #1
1 DRINK 14 OZ
Programming Steps
The Programmer Window for Blending Station MP and Touch and Go Blending
Station includes four simple programming steps:
Enter a program title to be displayed in the blender display window. The title
can be up to two lines, with up to 16 alphanumeric characters in each line.
See Program Window for example titles.
Click on a button to program (1-6). NOTE: button selections
correspond to Buttons on blender control panel.
Enter a button title, then edit time, ramp and power settings for
blending segments A-D (it is not necessary to use all available
segments). See Program Window for example button title.
Select a final programming operation.
10
© Vita-Mix Corporation – Getting to Know the Program
Programmer Window
Blending Station® Advance
Programming Steps
The Programmer Window for the Blending Station Advance includes four simple
programming steps:
Enter a program title to be displayed in the blender display window. The title
can be up to two lines, with up to 16 alphanumeric characters in each line.
See Program Window for example titles.
Select a program recipe (1-34) to customize. NOTE: there are 34 programs
(recipes) to choose from but only 6 buttons on the blender control panel to
program at one time.
Edit time, ramp and power settings for blending segments A-D (it is not
necessary to use all available segments). Continue programming up to 6 buttons.
Select Button Assignments &
Button Names to enter button
titles. Then select either
Program Module or Program
Blender as a final programming operation. To Save or
Print the program, go to the
File Menu.
© Vita-Mix Corporation – Getting to Know the Program
11
Programmer Window
BarBoss® / Drink Machine Advance
Programming Steps
The Programmer Window for the BarBoss Advance and Drink Machine Advance
includes four simple programming steps:
Enter a program title. The title can be up to two lines, with up to 16 alphanumeric
characters in each line. See Program Window for example titles.
Click on a button to program (1-6). NOTE: button selections correspond to
the dial settings on the blender control panels.
Enter a button title, then edit time, ramp and power settings for blending
segments A-D (it is not necessary to use all available segments). See
Program Window for example button title.
Select a final programming operation.
12
© Vita-Mix Corporation – Getting to Know the Program
Programmer Window
Mix’n Machine Advance
TM
Programming Steps
The Programmer Window for the Mix’n Machine Advance includes four simple
programming steps:
Enter a program title. The title can be up to two lines, with up to 16 alphanumeric
characters in each line. See Program Window for example titles.
Click on a button to program (1-6). NOTE: button selections correspond to
the dial settings on the machine’s control panel.
Enter a button title, then edit time, ramp and power settings for blending
segments A-D (it is not necessary to use all available segments). See
Program Window for example button title.
Select a final programming operation.
© Vita-Mix Corporation – Getting to Know the Program
13
Programmer Window
File Menu
The File Menu is similar in all versions of the Programmer Window and provides
access to the following:
New: select to create a new program file
Open: select to open an existing program file
Save As: select to name and save a new program file
Save: select to save changes to an existing program file
Load Defaults: select to load default program settings
Print: select to print a graphic summary of a program cycle
Print Properties: select to open the Page Setup dialog box
Exit: select to exit the program
View Menu
(for complete details about using the options in the View Menu, see pages 21)
The View Menu is similar in all versions of the Programmer Window and provides
access to the following:
Edit Order: select to access the Program Order Window
Summary of Cycles: select to view graphic representations of programs
14
© Vita-Mix Corporation – Getting to Know the Program
Programmer Window
Module Menu
(for complete details about using the options in the Module Menu, see pages 22-24)
The Module Menu is similar in all versions of the Programmer Window and
provides access to the following:
Program Module: select to program the module (default)
Program Blender: select to program a blender
Load from Programmer: select to download programs from a blender to the host
computer
Load from External Module: select to download programs from a Programmer
Chip to the host computer
Program External Module: select to program a Programmer Chip
Erase Module: select to erase a Programmer Chip
Help Menu
The Help Menu is similar in all versions of the Programmer Window and provides
access to the following:
Programmer Manual: select for a PDF of the
manual
Programmer Updates: select to go to Vita-Mix
website for programmer updates and most
current manual
About Programmer: select to view information
about the software
© Vita-Mix Corporation – Getting to Know the Program
15
Programmer Window
Status Bar
Status Bar
The Status Bar is the same in all versions of the Programmer Window
and provides the following information:
STATUS: indicates whether or not a Programmer Module is connected
Filename: the name of the Program File that is currently displayed
Total Time: the combined total of all segment times (SEGMENTS A-D)
16
© Vita-Mix Corporation – Getting to Know the Program
How to Program a Blender
1. Connect the Vita-Mix® Programmer Module to the host computer
(see Appendix B: Working with the Programmer Module for complete
instructions).
2. Connect the Vita-Mix® Programmer Module to the programming port of the
blender to be programmed, or insert a Programmer Chip into the Programmer
Module (see Appendix B: Working with the Programmer Module for
complete instructions).
3. Open Vita-Mix® Custom Blending Software and select the appropriate blender.
4. If the Programmer Module is properly connected and configured, the Vita-Mix
Programmer window will be displayed:
5. Text-enter titles in the program title fields (line 1) and (line 2).
6. Click on the button to be programmed. The button will be highlighted in blue
when selected. For the Blending Station® Advance, scroll to the program
button to be programmed.
If programming Vita-Mix® Portion Blending Systems® and the With Water
Support option IS NOT selected, proceed to Step 7.
If programming Vita-Mix® Portion Blending Systems® and the With Water
Support option IS selected, skip to Step 8.
If programming Vita-Mix® Blending Stations,® skip to Step 9.
© Vita-Mix Corporation – How to Program a Blender
17
How to Program a Blender (continued)
7. If programming a Vita-Mix® PBS Portion Blending System® or a PBS Advance
and the With Water Support option IS NOT selected, enter the desired ice
portion (in ounces).
8. If programming a Vita-Mix® PBS Portion Blending System® and the With
Water Support option IS selected, the following options will be available:
As you will see, there are four available fields – two for ice portion and two
for water portion. This is because PBS Units with built-in water dispenser
are equipped with a secondary program bank*.
Enter ice and water portions as follows:
- Enter the desired ice portion for the primary program bank in
the left ice portion column.
- Enter the desired ice portion for the secondary program bank
in the right ice portion column (SHIFT column).
- Enter the desired water portion for the primary program bank
in the left water portion column.
- Enter the desired water portion for the primary program bank
in the right water portion column (SHIFT column).
* NOTE: the secondary program bank is accessed by pressing the
Shift Button and then the desired Program Button (1, 2, 3, 4, A, B)
on the PBS Control Panel.
Shift Button
Program Buttons
18
© Vita-Mix Corporation – How to Program a Blender
How to Program a Blender (continued)
9. Enter a button title in the button title field.
slider handles
ramp speed segments
If programming Vita-Mix® Blending Stations,® skip to Step 11.
10. Edit the power setting for the PRE BLEND segment, using either of the
following methods:
a) enter a numeric value in the power field.
b) click on the gray handle in the slider field and hold the left mouse button
down while moving the slider up or down with the mouse.
11. Edit time, ramp and power settings for blending segments A-D.
NOTE: It is not necessary to use all available segments.
Perform the following steps for each segment to be programmed:
- Enter the segment time (seconds) in the segment time field.
NOTE: the combined total of all segment times (SEGMENTS
A-D) will be displayed in the total program time field.
- Set the ramp speed by clicking on the desired ramp speed segment or by
moving the slider handle with the mouse.
- Edit the power setting for the segment, via any of the following:
a) enter a numeric value in the power field.
b) click on the gray handle in the slider field and hold the left mouse
button down while moving the slider up or down with the mouse.
c) click on the desired value in the slider field.
12. Repeat Steps 6-11 for each button to be programmed.
© Vita-Mix Corporation – How to Program a Blender
19
How to Program a Blender (continued)
13. Select one of the following options:
(For Blending Station Advance options, see pg. 11)
- program module
- program blender
- save
- print
To Program a Module:
a) Insert a Programmer Chip into the Programmer Module (see Appendix B:
Working with the Programmer Module for details).
b) Click on the program module button*.
c) Enter the number of modules to program, then click OK.
d) The following dialog boxes will displayed.
e) If programming more than one Programmer Chip, remove the newly
programmed chip from the Programmer Module and insert the next chip.
Step d) will repeat for each chip to be programmed.
f) To use a programmed chip to program a blender, see Appendix C:
Programming a Blender with a Programmer Chip.
* NOTE: Modules can also be programmed by selecting
Program External Module from the Module Menu.
20
© Vita-Mix Corporation – How to Program a Blender
How to Program a Blender (continued)
14. There are several other functions not shown in the main section of the
Programmer Window, which are available in the View and Module Menus:
In the View Menu
To Edit Program Order:
Select Edit Order to open the Program Order window, which allows you to
assign saved programs to new button positions.
Program
number
Left column
To edit program assignments, select the desired program, and click on the
UP or DOWN buttons to move the selected program as desired. Each click
on the UP or DOWN buttons moves the program one by position. Click on
the CLOSE button when finished.
NOTES:
Blending Stations®
Numbers 1-6 in the left column correspond to Buttons 1-6 on the blender
control panel.
Portion Blending Systems®
Numbers 1-4 in the left column correspond to Buttons 1-4 on the blender
control panel. Numbers 5 and 6 correspond to Buttons A and B on the
blender control panel, respectively.
© Vita-Mix Corporation – How to Program a Blender
21
How to Program a Blender (continued)
In the Module Menu
To Program a Blender: see page 23.
To Load from a Programmer:
a) Insert the Programmer Module firmly into the blender Programmer Port.
The words, THIS SIDE FACING TO THE FRONT OF THE
MACHINE must be facing you. NOTE: Reference the product Owner’s
Manual for the exact location of the Programmer Port.
b) Select Load from Programmer.
c) The following dialog box will displayed.
d) Remove the Programmer Module from the Programmer Port.
To Load from an External Module:
a) Insert a Programmer Chip firmly into the Programmer Module (see
Appendix C: Programming a Blender with a Programmer Chip for
details).
b) Select Load from External Module.
c) The following dialog box will displayed.
d) Remove the Programmer Chip from the Programmer Module. NOTE:
Store the chip in its original packaging when not in use.
22
© Vita-Mix Corporation – How to Program a Blender
How to Program a Blender (continued)
To Program a Blender:
Plug a chip into the blender (see Appendix C: Programming a Blender
with a Programmer Chip for details).
OR
Insert the Programmer Module into the blender Programmer Port (see
Appendix B: Working with the Programmer Module for location).
a)The DISPLAY WINDOW on blenders with digital displays will read NEW
MODULE.
b)Click on the program blender button* in the Programmer Window.
c)The following dialog boxes will displayed on blenders with digital displays.
d)Within 10 seconds, the DISPLAY will read SAVED, then READY.
e)Remove the Programmer Module from the Programmer Port.
If the preceding does not work, then reset the blender buttons to original
factory settings.
WARNING: resetting will erase any custom programs saved in the
blender memory. To save programs before resetting, see To Load from a
Programmer, page 22.
For Vita-Mix blenders with digital displays:
a) Press the Shift Button on the blender control panel to
access OWNER CONTROLS.
b) When the the display reads MODE:
On Vita-Mix® PBS Portion Blending Systems®, press PRE-SET
Button 1, then PRE-SET Button B.
On Vita-Mix Blending Stations®, press PRE-SET button 1, then PRESET button 6.
c) Next, access the instructions for resetting the PRE-SET buttons:
On Vita-Mix PBS Portion Blending Systems, press the Shift Button
three times.
On Vita-Mix Blending Stations, press the Shift Button twice.
(continued on next page)
© Vita-Mix Corporation – How to Program a Blender
23
How to Program a Blender (continued)
d) Finally, press and hold the #4 Button until the DISPLAY WINDOW
reads RESTORING PLEASE WAIT.
e) The PRE-SET buttons are now reset to the original factory settings.
For Vita-Mix blenders with no digital displays:
a) Turn the power to the machine OFF using the ON/OFF switch.
b) Hold down the PULSE button while turning the power back on using
the ON/OFF switch.
c) The pre-set programs are now reset to the original factory settings.
*NOTE: Blenders can also be programmed by selecting Program
Blender from the Module Menu.
To Erase a Module:
a) Insert a Programmer Chip into the Programmer Module (see Appendix
B: Working with the Programmer Module for details).
b) Select Erase Module.
c) The following dialog box will displayed.
d) Remove the Programmer Module from the blender Programmer Port.
24
© Vita-Mix Corporation – How to Program a Blender
Saving Blending Programs
To Save a Program File:
a) Click on the save file button*.
b) The standard Windows Save File dialog box will open:
c) Enter a file name and select a destination for the file as you would when
saving a file in any normal Windows program.
Program files are saved as follows:
Vita-Mix® PBS Portion Blending Systems® save programs as *.PBS files.
Vita-Mix Blending Station® MP and Touch and Go® save programs as
*.BLS files.
Vita-Mix Blending Station Advance saves programs as *.BLA files.
Vita-Mix BarBoss® Advance and Drink Machine Advance save programs
as *.BBA files.
Vita-Mix Mix’n MachineTM Advance saves programs as *.MMA files.
*NOTES:
Files can also be saved using Save and Save As options in the File
Menu.
Saved program files can be distributed via e-mail or on digital media
such as CD-ROM, floppy disk, etc.
© Vita-Mix Corporation – Saving Blending Programs
25
Printing/Viewing Blending Programs
To Print a File:
Files printed by the program are graphic representations of
program cycles, which are called Cycle Summaries.
a) Click on the print file button*.
b) The Print preview window will displayed:
c) Select from among the standard Windows print options
available in the menu bar:
* NOTE: Print preview
click to print the preview
click to enlarge the preview
can also be accessed
via the Print command
in the File Menu.
click on the desired layout icon
to configure the page layout
click to close the Print preview window
use the scroll-edit menu to
select a page to view/print
26
© Vita-Mix Corporation – Printing/Viewing Blending Programs
Printing/Viewing Blending Programs
In the View Menu
To View and/or Print Summary of Cycles:
Select Summary of Cycles to view graphs of saved programs.
Cycle Summaries can be printed individually or all at once.
- Click on Print All to print all cycle summaries at once.
- Click on Print 1, Print 2, etc., to print summaries individually.
- Click on the close box (
) to close the window.
© Vita-Mix Corporation – Printing/Viewing Blending Programs
27
Appendix A:
Installing the Software
Before installing Vita-Mix® Custom Blending Software, please refer to
system requirements on page 4.
1. Insert the Vita-Mix® Custom Blending Software disk into the CD-ROM
drive of the host computer and open SETUP.EXE.
2. When the following dialog box opens, click OK to continue, or
Cancel to discontinue the installation.
3. The following messages will be displayed as the setup takes place.
4. When the Setup Wizard opens, click Next to continue, or Cancel
to discontinue the installation.
28
© Vita-Mix Corporation – Appendix A: Installing the Software
5. The Select Installation Folder dialog box will open.
- To install the software in a location other than the Program
Files folder (this is the recommended location), click the
Browse button to browse to an alternate folder.
- Click on Disk Cost if you wish to view information about disk
space required by the application.
- Determine who will be allowed to use the program by selecting
Everyone or Just me.
- Click Next to continue the installation.
6. Click Next to confirm the installation.
© Vita-Mix Corporation – Appendix A: Installing the Software
29
7. Wait while the program is installed.
8. Click Close to exit the Setup Wizard.
9. Click OK and restart the computer.
30
© Vita-Mix Corporation – Appendix A: Installing the Software
Appendix B:
Working with the Programmer Module
Connecting the Programmer Module to a Computer
The Programmer Module can be connected to a computer in either of two ways:
1. Plug the USB connector of a standard USB Cable into the input on the
Programmer Module, then plug the USB Cable into the USB port on the host
computer.
Connecting the Programmer Module to a Blender
Insert the Programmer Chip firmly into the blender Programmer
Port. The words, THIS SIDE FACING TO THE FRONT OF THE
MACHINE (located on the top side of the Programmer Insert
Section) must be facing you. NOTE: Reference the product
Owner’s Manual for the exact location of the Programmer Port.
Inserting a Programmer Chip into the Programmer Module
Insert the Programmer Chip firmly into the Programmer Module
as follows: With the USB port facing to the right (as shown) the
words, THIS SIDE FACING TO THE FRONT OF THE MACHINE
(printed on the the Programmer Chip) must be facing you.
Programmer Chip
Imprints:
THIS SIDE FACING
TO THE FRONT OF
THE MACHINE
To blender
USB port
Programmer Module
© Vita-Mix Corporation – Appendix B: Working with the Programmer Module
31
Appendix C:
Programming a Blender with a
Programmer Chip
Insert the Programmer Chip firmly into the
blender Programmer Port. The words, THIS SIDE
FACING TO THE FRONT OF THE MACHINE
must be facing you. NOTE: Reference the product
Owner’s Manual for the exact location of the
Programmer Port.
a) The DISPLAY WINDOW on blenders with
digital displays will read NEW MODULE.
b) Within 10 seconds, the DISPLAY WINDOW
on blenders with digital displays will read
SAVED, then READY. If this does not
happen, remove the chip, turn it over over,
and try again. If the problem persists, try resetting the blender controls a second time.
c) Remove the Programmer Chip from the
Programmer Port and return it to the original packaging.
If the preceding does not work, reset the blender buttons to orginal factory settings.
WARNING: resetting will erase any custom programs saved in the blender memory.
To save programs before resetting, see To Load from a Programmer, page 22.
For Vita-Mix blenders with digital displays:
a) Press the Shift Button on the blender control panel to
access OWNER CONTROLS.
b) When the the display reads MODE:
On Vita-Mix® PBS Portion Blending Systems®, press PRE-SET
Button 1, then PRE-SET Button B.
On Vita-Mix Blending Stations®, press PRE-SET button 1, then PRESET button 6.
c) Next, access the instructions for resetting the PRE-SET buttons:
On Vita-Mix PBS Portion Blending Systems, press the Shift Button
three times.
On Vita-Mix Blending Stations, press the Shift Button twice.
d) Finally, press and hold the #4 Button until the DISPLAY WINDOW
reads RESTORING PLEASE WAIT.
32 © Vita-Mix Corporation – Appendix C: Programming a Blender with a Programmer Chip
e) The PRE-SET buttons are now reset to the original factory settings.
For Vita-Mix blenders with no digital displays:
a) Turn the power to the machine using the ON/OFF switch.
b) Hold down the PULSE button while turning the power back on using
the ON/OFF switch.
c) The pre-set programs are now reset to the original factory settings.
© Vita-Mix Corporation – Appendix C: Programming a Blender with a Programmer Chip 33
F O O D S E R V I C E
VITA-MIX® CORPORATION
Foodservice Division
8615 Usher Road, Cleveland, Ohio 44138-2103 USA
©2006 Vita-Mix Corporation. No part of this publication may be reproduced or transmitted in any form
or by any means, electronic or mechanical, including photocopy, recording or any information storage
and retrieval system without the written permission of the Vita-Mix Corporation.
Printed in U.S.A.
XIN003 07/06