1
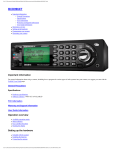
Special Report
The RadioShack PRO106 Digital Scanner
Features, Operation and Competition
A Scanner Master Ultimate Review
Copyright 2009, Richard Carlson/Scanner Master Corporation
Introduction
GRE has produced scanners for the US market for decades, but they are a new name in the industry here.
How’s that? Well, remember the Radio Shack PRO2004, PRO2005 or PRO2006? How about the PRO96 or
its mobile brother PRO2096? These were all built by GRE and sold by Radio Shack. While some scanners
sold by Radio Shack were built by Uniden, most of the big sellers were GRE built.
At the 2007 Dayton Hamvention GRE snuck in a couple of their rumored new line of scanners for direct
sales in the USA. A privileged few (including the author) got to check them out for a few minutes each. It
was apparent immediately that GRE had produced a winner, or better yet, several winners.
What GRE did was introduce three lines of scanners, each line consisting of a handheld and a base/mobile
version. Radios within each line are electronically identical, even to the extent that they can clone to each
other.
After the GRE line of scanners were unveiled to the public and readied for sale Radio Shack announced a
new line of scanners that mysteriously mirrored the specs of some of the GRE’s. The Radio Shack PRO106
turned out to be a GRE PSR500 with a rearranged front panel. The Radio Shack PRO197 was a clone of the
PSR600 base/mobile. The PSR300 and 400 radios are closely related to Radio Shacks PRO97, 2055, 163
and 164 scanners.
The three lines are:
Basic
Advanced
Digital
GRE
GRE
Radio Shack
GRE
Radio Shack
PSR100 Handheld and PSR200 Desktop
PSR300 Handheld and PSR400 Base/Mobile,
PRO164 Handhelds and PRO163 Base/Mobiles
PSR500 Handheld and PSR600 Base/Mobile
PRO106 Handheld and PRO197 Base/Mobile
While the Radio Shack and GRE versions of the various scanners are visually and electronically similar in
most respects there is one difference that one must remember, and that is that the firmware updates are not
interchangeable between Radio Shack and GRE versions. Programming files are interchangeable, which
makes sharing files easier.
While the Basic and Advanced lines use conventional programming methods such as defined banks and
channel arrangements, the Digital line uses an entirely different structure called “Object Oriented User
Interface” or more succinctly, “Scannable Objects”. Basically what this means is that you program things
(Objects) into your radio and then select the things you want to scan (Scannable Objects). These Scannable
Objects could be regular frequencies, talkgroups on a trunked system or one of several types of searches.
The Advanced line of scanners are fine for many areas if you do not need to monitor digital
communications but want more memory and features than the Basic line provides. The Basic Line is fine if
you only need to monitor a few conventional channels such as aircraft, railroads or local public safety
channels and don’t need any advanced features of the Advanced or Digital lines.
Both the Advanced and Digital lines provide large channel capacity, support for several methods of
trunking and PL/DPL capability. Both lines support the 800 MHz Rebanding.
(You can read a great deal more about Rebanding elsewhere on the web but, in short, in order to separate
certain NEXTEL/cellular radio channels from public safety channels as a means to limit interference
between the two, many public safety agencies operating on 800 MHz radio systems are being compensated
to move to new 700/800 MHz frequencies. For Motorola trunking radio systems this requires a change to
the data structure of the system and therefore newer trunking scanners require a firmware upgrade to be
able to continue to properly “trunk.” Older trunking scanners, such as the Bearcat 780XLT and many
RadioShack models, are not upgradeable and therefore need to be replaced.)
RadioShack PRO106 Handheld Digital Scanner
The PRO106 handheld digital scanner provides the user with up to 1800 Scannable Objects that can be
scanned. The radio features the “V-Scanner” system that allows the user to store 20 additional sets of
scanner memories. While only one V-Scanner can be used at a time, with 1800 memory locations, you
should be able to monitor all the local action without much trouble. If you travel or share the radio between
work and home for example, you can load multiple V-Scanners as needed.
The PRO106 comes with several accessories, including RadioShack’s standard set of two separate battery
holders, a black one for alkaline batteries and a yellow one for rechargeable Ni-Cad or Li-Ion cells. Not
included with the PRO106 is a USB programming cable, it can be purchased for about $35. This can be
used with several different programming applications, such as Butel’s ARC-500. Also included is a CDROM with the Owner’s Manual as well as a printed manual.
The PRO106 has the speaker at the bottom of the front panel, below the keyboard, with the keypad below
the display. The top of the radio has a pair of concentric rotary controls, the inner knob for volume and the
outer for squelch. This is more conventional and user-friendly than the arrangement used on current
Unidens. Also on the top of the radio you’ll find the headphone jack and antenna jack. The PRO106 uses a
standard BNC connector and includes a BNC rubber antenna. The headphone jack has a rubber weather
boot to protect it.
On one side of the radio is the power jack where the included AC power supply can be connected to power
the radio or charge the batteries. You can also use an automotive power adaptor that produces 9 VDC to a
center positive Type C connector.
On the opposite side of the radio is a jack for the computer programming cable. While older GRE built
radios (such as the PRO96) could use RS232 cables, the Digital Line radios are only capable of working
with the GRE or Radio Shack USB programming cables. This cable allows you to read and write
programming files to the radio and to control the radio with a computer with, again, the proper software
such as Butel’s ARC-500 available through Scanner Master.
Before trying to connect the radio to the computer remember to install the drivers for the USB cable on
your computer which are found on the included CD-ROM. After you install the drivers and plug in the
cable the computer will assign a Comm Port and you will need that to enter into your programming
software so that it can find your radio. Some software packages will look for a radio and assign the proper
Comm Port if you don’t already know it.
The USB cable can also be used to retrieve special data signals from certain trunked systems to be decoded
by programs like the fascinating (and free!) PRO96Com application. When set up to do so the radio sends
decoded data to a computer that tells all kind of interesting details about the system such as frequencies
used, talkgroup and radio ID’s and other information. Until the introduction of Uniden’s XT line, only
certain GRE built radios provided this data, the PRO106 continues the ability to retrieve this information.
On the rear of the radio is a removable (and fragile) belt clip. It could break off if you lean over when it is
on your belt, so you will probably want to use a carry case instead. The belt clip comes off easily to fit the
case, just pull the little plastic tab away from the radio and gently pull up on the clip.
Also on the rear of the radio is the required warning label and serial number. Write the serial number down
someplace safe so that if the radio is stolen it can be entered into police databases. This will help return the
radio to you if it is recovered by the police.
Below the label is the battery door. If you remove the door and battery holder you will see that there are
three battery holder contacts. Next look at the contacts on the yellow and black battery holders. You will
see that they are slightly different. This is how the radio knows if you are using rechargeable batteries or
not. Only use the yellow holder for rechargeable cells, if you use the black one they will not be charged in
the radio. Conversely, only use the black holder for alkaline cells.
If you put alkaline cells in the yellow holder the radio will send charging current to the batteries when
connected to an outside power source. Alkaline cells tend to leak, swell, blow up or all kinds of nasty
things when they are charged, don’t risk your expensive radio to save a dollar or two to charge nonrechargeable batteries.
Also included in the box is the owners manual, “rubber duck” antenna, a disk with the owner’s manual and
some demo applications and both battery holders. The PSR-500 also comes with a listing of the preloaded
files in the V-Scanner memories. The USB programming cable can be purchased separately.
Comparison to the BCD396T and XT
You can’t talk about this radio without discussing the competition from Uniden Bearcat. The Uniden
BCD396XT is the direct competition to the PRO106. Many of the comparisons are pretty much the same
amongst all of the GRE and Uniden scanners.
The 396 is markedly smaller and uses a lot less buttons than the RadioShack. On the Uniden one uses
modifier keys on the side of the radio and a multi-function knob on the top for programming while the
PRO106 uses the keypad much more intensely. Essentially you’re trading size for ease-of-use. The Uniden
is a lot nicer to carry around because it’s so much smaller but it take more effort to operate the radio
because with fewer keys you have to remember what many consider to be difficult key combinations. The
PRO106 has more keys so it’s easier to operate, but some consider it’s much bigger size a detriment.
While both radios use forms of dynamic memory architecture, they go about it differently. The Uniden is a
bit more conventional in that you create Systems instead of Banks and turn them on or off while the
PRO106 has you enter the objects once and let’s you create multiple scan lists (unfortunately only up to 20)
to choose the items you want to scan.
The Uniden has many features that some might want while others may not need. These include the ability
to connect to a GPS unit and use that to control what you want to listen to (a fantastic feature for mobile
use that is described elsewhere on Scanner Master’s site). In addition, the Uniden has Fire Tone Out, the
ability to use Remote Heads and other fun to use and explore features.
The PRO106 is well regarded as having better audio, especially on digital signals. While the Uniden XT
series has improved the digital decoding over its predecessors, the PRO106 is still superior.
I will discuss the comparison of the two radios in more detail later in this article.
How many Channels
The first question many people ask about a scanner is: How many channels can you program? The answer
with the PRO106 is “Well, it depends.” Depends on what? Well, it depends on how you define channels
and how you program your radio. The PRO106 uses GRE/RadioShack’s Object Oriented User Interface
(OOUI) programming method. While older radios use defined channels and banks, the PRO106 OOUI has
the user enter channels into memory along with trunked system parameters (including Talkgroups) and
various types of searches. The user then creates up to 20 Scan Lists that point to the various channels,
talkgroups and searches. This allows you to select what you want to listen to at the time. Scan Lists can
include any of the programmed operations, and any of the programmed operations may be included in
multiple Scan Lists. This is somewhat similar to Uniden’s Quick Key system of enabling different sets of
channels, search ranges, service searches, etc.
RadioShack advertises the radio as “Over 1800” Scannable Objects. This basically means that you can scan
around 1800 objects at a time. This number can be affected by the type of object you program and how you
use Text labels, and other parameters. With the 21 available V-Scanners this works out to over 37,000
available memories. Will you be able to program 37,000 channels? Probably not, but you might if you try
hard enough!
If you want to see how much memory you have used or have left you can press “0” twice during the startup screen.
V-Scanners
The RadioShack (as well as GRE) digital radios have a feature called V-Scanners. These are basically 21
sets of scanner memories available to be loaded into your scanner.
Imagine it like having 21 different scanners in one, but you can only listen to one at a time. This is useful
for people that travel often between several locales or have multiple scanning targets. You can also use this
to back up variations in your programming so that if you really mess something up you can restore the
radio to a prior configuration. Think of this idea as sort of a manually saved Restore Point.
While it takes a couple minutes for the V-Scanners to load it is not difficult to do. When you Save to a VScanner the entire radio contents are saved, including frequencies, talkgroups and searches, any startup
configurations and settings as well as anything else you have in the radio.
To use the V-Scanner feature press the FUNC then PGM buttons. From there you can load, store or erase
V-Scanners.
Banks & Channels, Nuh uh!
On older scanners with defined banks the user entered channels into the banks. If your radio has 10 banks
of 100 channels each (for a total of 1000 channels) and you only used 10 channels in a specific bank the
extra 90 channels would be wasted. You could lose use of a great deal of the available memories this way.
In addition, most older radios were limited to 10 banks. This normally limited you to up to 10 trunked
systems or sites, with further limitations on programming methods since you could usually only have a
single trunked system per bank. If a trunked system only had 5 or 6 frequencies the other channels in the
bank were probably wasted. While most recent scanners allow you to program in conventional channels to
use up some of the wasted channel space in banks with trunked systems, in practice this was not often done.
Once you set up the trunked frequencies you would then program in trunked talkgroups. While these would
not take away from regular channel memory, there was usually a strict limit to the amount of talkgroups
allowed in scan lists.
The PRO106’s OOUI allows you to program many more trunked systems into the radio, and, with proper
use of the Scan Lists you can pick and choose the channels or talkgroups you want, in many different
combinations. With the 10 bank limit of older scanners you had few choices of how to scan, with the
PRO106 method the choice is almost limitless.
The PRO106’s method is different than Uniden’s in that the PRO106 Scan Lists point to various channels,
talkgroups or searches programmed into a single pool of memories. Uniden has the user program separate
Systems that contain either conventional or trunked systems and you switch Systems on or off
(enable/disable). While Uniden scanners have more available channel memory, the PRO106 method allows
you to share a single frequency or talkgroup among multiple Scan Lists.
Sadly, however the PRO106 limits one to 20 Scan Lists. While this is sufficient for most users, power users
may want the ability to program in more Scan Lists than this. In this way the Uniden is far more flexible.
Search & Scan
With older radios, searches were almost always exclusive to scanning. You could scan or you could search,
but not both at the same time. The PSR-500 allows you to add not only conventional channels and trunked
talkgroups but also several types of searches to your scan lists so you can monitor all of these at the same
time.
Some of the Search Options include limit searches (checking each frequency between an upper and lower
limit), Service Searches or Signal Stalker. You can add any of these search types to a Scan List and run the
searches while scanning other channels or talkgroups. As far as the radio is concerned it is just another
Scannable Object, it really doesn’t care what type of Object it is.
Keyboard
The Keyboard of the radio is how you program the radio manually and control most of its actions. While
most users will eventually use a computer to do most of the programming (almost a requirement these days
of scanners with thousands of memories and complicated architectures) the ability to program your radio
from the keyboard is essential. You will not always have access to a computer with the programming
software and a programming cable so you need to know how to do it on the fly.
The PRO106 keyboard has 34 different buttons. The buttons are organized 4 groups:
The 5 Way Pad allows one to navigate the curser around the screen in 4 directions (up, down, left and
right) and the center Select key completes the action.
Three Soft Keys (F1, F2 and F3) are used to select menu items on the bottom line of the display, directly
above these keys. In some modes the arrow keys from the 5 Way Pad can be used to scroll thru selections
available on these Soft Keys.
Operation Keys along the right side of the keyboard provide specific or modified commands to the scanner.
These include standard scanner keys like Scan, Manual, Priority, etc. as well as some unique-toRadioShack/GRE keys like Tune, FAV and PSE.
The Numeric Keypad allows you to enter specific frequencies or talkgroups and other programming
commands to the radio.
The entire keyboard is well backlit and the same light illuminates the display. Press and hold the light key
and the dial light will stay on until you turn it off. While this would run down the batteries faster, when the
radio is connected to outside power this might be desirable.
Display
The PRO106’s display is roughly the same height as the Uniden BC396XT but slightly wider. On the
PRO106 the radio’s display is identical to that of the corresponding mobiles, the Uniden mobile scanner
displays are wider than their portables. The PRO106 display has 4 text lines plus the top line, which is
reserved for specific symbols like signal strength, battery level and other items.
The display uses a dot-matrix LCD display, each character is up to 7 dots high and 5 wide, and there are 16
characters per line.
During scanning operations the text lines display the pertinent information about the operation, such as the
frequency, talkgroup ID, Tone Code, Scan List, Mode and other information. What information is listed
where depends on the operational mode currently in place on the radio. The bottom line is often given over
to display the current selections available on the Soft Keys (F1 thru F3).
Along the top edge of the radio is a multi-colored LED light. Remarkably bright, this may be used to
indicate many things, like the use of a specific channel or group of channels, a search hit or almost anything
else. Set it to white and you can just about use it to replace a broken headlight. Used in conjunction with
audible alerts and you can pretty much have any type of activity set to a different alert and tell at a quick
glance what the radio is doing.
Frequency Ranges
The PRO106 receives all of the contemporary scanner bands, from 25 to 54, 108 thru 174, 216 thru 512,
764 thru 960 and 1240 thru 1300 MHz. The cellular frequencies are of course blocked. What the PRO106
does not pick up are some non-traditional bands, such as the FM Broadcast band and the occasionally
interesting 72-76 MHz band. It also does not pick up most of the frequencies assigned to domestic
television broadcast. Even though the new Digital TV mode can not be decoded on any scanners, there are
many wireless mics and occasionally other unusual operations found here.
The PRO106 can hear communications in the AM, FM, NFM and P25 modes as well as decode PL
(CTCSS), DPL (DCS) and NAC (Network Access Codes, used on P25 digital channels). The ability to
swap between FM and NFM will become more important over the next few years, the FCC has mandated
that most communications in the various UHF and UHF scanner bands switch over to narrowband soon.
One very nice feature of the PSR600 which the Uniden scanners cannot match is the ability to decode
CTCSS/DCS and P25 during searches at the same time. With the Uniden it’s one or the other, but not both.
Trunking
Like all digital scanners these days, the PRO106 can monitor several types of trunking. The most common
are Motorola (3600 baud data channels), APCO25 (9600 baud data channels), EDACS Wide and EDACS
Narrow and LTR.
Many wide are statewide and regional systems are coming online that use either the APCO P25 protocol or
variants of the analog Motorola trunking format. These systems have several to hundreds of cells (called
“Sites”) that are all interconnected and share the same Talkgroup and user lists. While on Uniden radios
you would program each Site separately as part of a larger System, the PRO106 takes a different tack. You
program in the known Control Channels in “MultiSite Roam” mode and the radio will lock onto strong
signals. When the decode quality is reduced to a certain level the radio will automatically rescan to look for
stronger signals. In contrast the Uniden method has users program individual sites and allows one to turn
on and off each Site, either manually, by Quick Keys or GPS.
The PRO106 method of MultiSite Trunking requires no user intervention, just the active control channels
need to be programmed into the radio. If you want to you can still program different sites into separate
trunked systems. You are however limited to a maximum of 28 channels for the system, if there are more
than that you need to decide what channels to use or duplicate the system with the additional channels. The
Uniden method requires extra programming steps but allows you to program Site names so you can tell
what site is active.
The PRO106 also supports several flavors of standard Motorola and EDACS trunking as well as LTR.
Motorola modes (in addition to multi-site SmartZone and P25 systems described above) include older Type
I, Type II and Type IIi modes (both with analog or digital modulation). Both the Wide and Narrow modes
of EDACS systems are supported. No scanner can decode EDACS Provoice or Aegis used in selected areas
such as San Antonio and some others.
LTR, very popular on UHF and 800 business systems, is supported along with a neat feature called LTR
Home Repeater AutoMove. While the name is clunky, the feature is not. LTR systems are difficult to
program since they rely on knowing the channel order or position within the system. LTR Home Repeater
AutoMove, when enabled, allows you to program in the system’s frequencies without regard as to the order
and the radio automatically determines the proper positioning.
The basic method of programming a Trunked radio system in the PRO106 radio is pretty simple. Following
the instructions in the manual, enter the frequencies and other parameters as a TSYS (Trunked System).
Then program in Talkgroups pointing to the TSYS as part of Scan Lists. You can also program in a search
of a TSYS by use of the “Wild Card” option. This works in a similar fashion to Uniden’s Trunked Search
feature in that it allows one to listen to all active Talkgroups instead of just the ones in a Scan List. You can
lockout talkgroups as they become active and you no longer wish to monitor them.
When programming various types of trunked systems you need to know some of the basic information
about these systems. This information varies somewhat depending on the type of system. For many
Motorola and P25 systems all you really need are the Control Channels and system type. For rebanded 800,
most UHF and VHF systems as well as some odd 800 and 900 Motorola or P25 systems you may also need
further parameters, such as base channels, offsets or other technical details. For EDACS and LTR systems
each of the frequencies used as well as the order in which they are programmed are needed.
Most of the information needed for individual trunked systems is freely available on the
RadioReference.com website, paid members can even program the systems directly into their radios using
software such as ARC500. Thus, if you are not a scanner expert capable of figuring out technical details of
complex trunked radio systems you can share in the work of the rest of the scanner community to program
your radio.
Conventional Scanning
Remember the old days when you could enter in the local police and fire channels into your scanner, hit the
scan button and enjoy listening? While those days still exist in some areas, the new generation of scanners
are more complicated to program, even for the Plain-Jane conventional channels still used by many
agencies.
“Conventional Channels” mean voice channels that do not use some sort of trunking. Mostly you just need
to know the frequency in use and you can monitor the action. These days however even these need a bit
more knowledge or at least trial and error. Things such as CTCSS, DCS and the modulation Mode make
programming even conventional channels a challenge sometimes.
If you just want to listen to these basic analog channels then high-end models such as the PRO106 are not
for you. It’s like buying a Ferrari to drive two streets to pick up milk. It’s far too complicated and costly
when a simple low-cost model will work equally as well for basic channels. In much of the country
nowadays though you must have the Ferrari or otherwise you can’t listen any longer. There’s no such thing
as a simple (and low-cost) scanner that can monitor advanced radio systems.
FM vs. NFM vs. WFM
When you program in a conventional channel you need to know the proper Modulation Mode. If you are
listening to aircraft in the 108-136 or 225 thru 400 MHz. bands then AM is the proper mode. Beyond that
most communications are either regular FM or Narrow FM (NFM). Since the PRO106 does not include the
FM broadcast band it also does not include the WFM mode.
Over the last few years, and continuing until 2013, most conventional channels have been or will be
converted from what scanners usually call “FM” to a narrower format called Narrow FM. This allows
additional channels to be squeezed into the same amount of spectrum.
Until recently most VHF High Band (150 to 162 MHz) channels have been 15 KHz. apart, for example, the
next frequency used after 155.250 was 155.265, then 155.280. With the Narrowband initiative the channels
are now closer together, 7.5 KHz. apart. 155.250 is followed by 155.2575, then 155.265, then 155.2725 and
followed by 155.280. All users of the new channels in-between older channels must use NFM, and users of
the existing older channels must convert to NFM by 2013.
UHF is affected the same way, but some of the rules are different. Originally regular channels were 25
KHz. apart, for example, 460.275 was followed by 460.300 and then 460.325. The in-between channels
(called “Interstitials”) 12.5 KHz. apart from the main channels (460.275, 460.2875, 460.3000, 460.3125,
460.325) were restricted to low power use only. With the new rules these “12.5 KHz. Channels” or
Interstitials were allowed to use the same power levels as the original main channels (subject to certain
rules of course) and new 6.25 KHz. offset channels were allowed for use at low power.
In many areas the available pool of original VHF and UHF channels were used up and this method of
refarming the available spectrum allows more channels to be squeezed in. It is not without precedent, the
same thing has been done several times in the past, when VHF channels were changed to 15 KHz.
separation from 30, and 60 was the norm before that.
How will I know whether to use FM or NFM?
While the new channels are almost always going to be using the NFM mode, older channels could use
either, at least for now. Unless you know for sure you may have to try both methods and see which works
best. If you select FM now, your local agency might switch over any time, requiring you to adjust your
programming. If you chose the wrong mode you will still hear the communication, but at a reduced volume
or with distortion. If the volume is low, compared to other nearby stations, then you are likely programmed
to FM on a NFM channel. If the conversation sounds distorted or over-driven (like many CB operations)
then you may have a channel programmed in narrow mode still using regular FM.
Since many channels are shared among many users, some may have switched over to NFM while others
have not, at least not yet. If listening to both NFM and FM users on the same scanner channel is not
working for you then you could use the CTCSS or DCS feature and program in a separate channel for each.
PL, DPL, CTCSS, DCS, NAC, etc.
Years ago radio manufactures hit on a great idea. Transmit a low level tone on a radio channel so that
radios equipped with a special decoder would only hear radios transmitting that tone. This way users would
not have to listen to all the rest of the users of the channel, either local or when “Skip” comes in. Eventually
dozens of different tones were developed by manufacturers and 38 of them were more or less standardized.
The various manufacturers had different trade names for this feature, Motorola’s “PL” (Private Line) was
the most used. It kind of became a generic name for the feature even though it was offered by GE,
Kenwood and many other vendors, much like Kleenex has become a generic name for facial tissue. Since
Motorola owns the trade name however, the scanner manufacturers call the feature by it’s technical name
of Continuous Tone Coded Signal Squelch, or more succinctly, CTCSS. These are expressed in Hz., with
one digit right of the decimal point, ranging from 67.0 to 254.1 Hz.
CTCSS served the industry well, and eventually scanner users wanted this feature on their scanners.
Eventually it became a standard feature on higher end scanners.
As the radio bands became more crowded the few dozen CTCSS tones became inadequate and a new
method of achieving the same results was developed. Motorola called it Digital PL (DPL) and the industry
name was called DCS for Digital Coded Squelch. These are continuous digital words transmitted in a
similar fashion to CTCSS. They are expressed in a three digit number, and there are about 100 codes in
common use. Some references express DCS codes as Dxxx (D023, D251 etc.) but the PRO106 only
displays the 3 numbers.
When P25 was introduced it was not compatible with CTCSS or DCS codes so a new format was devised,
called Network Access Codes (NAC). NAC’s work the same as CTCSS and DCS codes do, and newer
GRE/RadioShack digital scanners, such as the PRO106, can display or decode them. As mentioned earlier,
a great thing is that the PRO106 will display any one of these three codes (CTCSS, DCS or NAC) when the
channel is active during a Search Event.
What can you use CTCSS, DCS or NAC codes for? Well, pretty much the same reasons they are used in
the field. The most common use is to screen out unwanted radio traffic, either on repeaters or on simplex
(non-repeater) channels. Is the same fire frequency in your area also used in the next county? Figure out the
code used by your local agency and program it in to your scanner to exclude the other unwanted users of
the same frequency.
Some agencies also use multiple codes to separate traffic on multi-site repeater systems to avoid
interference and expensive steering equipment systems while only needing a single channel. On one system
in my area, there is one code used for operations and another used only to contact emergency services, so
the 9-1-1 Center does not need to listen to the day-to-day operations. You need help, you use the
emergency code. This allows a single channel to be used but keeps the 9-1-1 center from having to pick out
emergency requests from the routine communications.
How do I find these codes?
OK, you have convinced me to use a CTCSS, DCS or NAC code. How do I figure out what codes are used
in my area? Well, there are a couple ways. You can find them yourself by using the Tone Search feature on
your scanner, you could look them up on RadioReference or another source, or you could ask the users if
they could tell you. Chances are the third option would be laughed at by the local users, if they had any idea
what you were talking about so the first two options are more realistic.
To have the radio decode the code for you program the Squelch type to “Search”. Once you find the correct
tone change the type to CTCSS, DCS or P25 as appropriate and enter in the proper code.
RadioReference.com and other websites will often already have the proper codes listed so a little research
may be all you need.
Searching and Sweeping
All scanners allow you to search between a set of frequencies in order to find new (to you at least)
channels. Some, including the PRO106, also have preset search protocols, called Service Search, which
scan thru a set of commonly used channels for specific types. The PRO106 has a limited set of Service
Searches that include a generic “Public Safety” group, Aircraft, Marine, Ham Radio, CB and a group of
miscellaneous radio channels called FRS/GMRS/MURS/DOT. This last group is often used by families,
small businesses and others for low power local communications.
Surprisingly RadioShack did not include any type of Service Search for racing operations, race fans are
among the biggest buyers of scanners. The generic nature of the Public Safety Service Search reflects the
modern use of many of these channels by different types of agencies. Gone are the days of segregated
Police, Fire, Conservation, Highway and Special Emergency allocations, now all the frequencies are in a
single pool that has reduced the segregation of use. Uniden has a more extensive list of service search
options.
Service Searches (“SRVC”) are entered into a Scan List just like any other Scannable Object. The Service
Search frequencies themselves are not editable by the user but you can lock out freqs when scanning a
Service Search.
The PRO106 also has the standard Limit Search that allows you to search all channels between a pair of
frequencies. You can also lock out frequencies in Limit Searches.
Signal Stalker is a nearfield frequency detector that allows you to find nearby transmitters. There are a
couple different modes. All-Band allows you to search all frequencies the radio is capable of while the
Public Safety Mode allows you to concentrate your search on the bands commonly assigned to police, fire
etc. These bands are parts of the Low and High VHF bands, part of the UHF band and part of the 800 band.
The ZeroMatic option allows you to set the radio to look for the actual frequency used by the transmitter
instead of stopping on the first valid hit it finds. Let’s say there is a strong transmitter on 155.4750 in your
area. A strong signal might cause a hit on 155.470 and the radio would stop there with the hit. ZeroMatic
checks to see if the same signal is actually on a nearby or adjacent frequency and causes the radio to go to
the actual frequency.
The PRO106 also displays any received CTCSS, DCS or NAC code received during a Search Event.
Let there be Light (and it was pretty cool…)
The PRO106 has an LED on the upper right corner of the radio that is visible from above or in front. In fact
it is really visible from the next county. This is actually 3 LED’s (red, green and blue) that sit behind a
single prism, These LED’s combined can make almost any color light, depending on your settings. At its
maximum brightness you can just about use it to read by.
Combined with an audible alert tone you can create innumerable combinations to advise you of different
activities. For example, you can set the LED to flash red when a CloseCall hit is found and green if your
favorite channel comes up. You can even set it to stay on indefinitely after activation, so if a rarely used
channel pops up you will know that it was active, even if you weren’t around to hear it.
There are so many settings for the Alert System (LED and audible) that as you use the radio you can add
different combinations as you learn the radio. While it seems daunting at first, it can come in handy
eventually. Like so many other advanced features this might never be useful for some but indispensable for
others.
Batteries and Power
Like most handheld scanners these days the PRO106 uses AA cells for primary power. As previously
mentioned, there are 2 battery holders. The yellow one, intended for rechargeable cells such as Nickelmetal-hydride or Lithium-Ion, allows the radio to send a charging current to the cells when the radio is
plugged into an external power adaptor. The black one, intended for non-rechargeable cells like Alkaline,
does not send the charging current to the cells.
On the left side of the radio is a “Type C” coaxial power connector so you can plug in an external power
source to run the radio and/or charge the battery (when using the yellow battery holder). The external
power should be 9 VDC, with at least 500 mA. The PRO106 comes with an AC power supply and you can
also buy them at Radio Shack, Best Buy or other stores.
The radio does not come with an automotive power adaptor, you can purchase these at local stores as well,
just remember that it requires 9 VDC with at least 500 mA. Don’t skimp on the power adaptor. Unregulated
power supplies can provide incorrect voltages and damage your radio.
One question that arises often is whether to use rechargeable or alkaline cells. While this is a personal
preference there are issues to consider. Alkaline cells can be found cheaply at drug stores or other shops if
you watch for them. Rechargeable cells are more expensive at the start but eventually will end up cheaper.
The PRO106 uses 4 AA cells, the Uniden uses three. I have found that battery life is pretty similar between
them, the PSR apparently uses a bit more power for the improved audio circuits.
The PRO106 also has a battery strength indicator. While this provides a pretty good relative indication of
the amount of power left in the cells, there is a setting (in the “GLOB” menu) needed to be made in order to
make it more accurate when using rechargeable cells. While alkaline cells produce about 1.5 VDC,
rechargables produce slightly less voltage, about 1.25 volts. The PRO106 allows you to set the battery type
so that the meter is more accurate and, more importantly, so that the radio produces the proper charging
current for NiMH or LI cells.
The batteries will last longer if you follow these suggestions:
Turn off the lights.
If you really don’t need it then don’t use the LED light or backlight as they really suck up power.
Keep the volume down.
Use of earbuds or an external amplified speaker will allow you to keep the volume level down,
and the lower you can keep the volume, the longer the batteries will last.
It all starts at the antenna…
The most important part of a scanner is the antenna. This determines how well the scanner will perform.
While in many instances the included antenna will work just fine, if you are doing any type of serious
monitoring from a building or vehicle an external antenna is required. While there are dozens of available
scanner or two-way antennas that will work fine, the antenna that works best for you depends on many
factors. This includes the frequencies you want to monitor, the distances and power levels involved, you
location and elevation and more. Entire books have been written to help you decide what works best. See
Scanner’s Master’s antenna section for a variety of excellent options.
The PRO106 comes with a standard rubber coated spring type antenna, commonly referred to as a “Rubber
Duck”. It connects onto the BNC connector on top of the radio. You can also use this to connect another
antenna, either directly or with coaxial cable. You can use an antenna geared toward a specific band or one
more generalized over the range of frequencies.
…and continues with the radio…:
With like antennas the PRO106 and it’s competition, the Uniden BCD396XT, perform similarly as far as
sensitivity is concerned. If you read the Yahoo, RadioReference and other user groups and web sites online
you’ll find a spirited debate over which radio is the better receiver. It seems as though it depends on the
environment you’re in (urban, suburban, rural), how close you are to nearby unwanted transmitters
(cellular, paging, broadcast and the like), among other factors. There is no definitive answer on this. I
personally did get a bit more intermod type interference from the PRO106 when comparing them in a high
RF environment (in a city or when you’re close by the aforementioned types of transmitter sites). I have
also heard of cases where in a high RF environment, when you connect an outdoor/base station antenna, the
PRO106 will tend to become overloaded but you can remedy this by enabling attenuation. The problem
with this is that it lessens the impact of the time, money and effort you put into putting up an outdoor
antenna in an effort to receive distant signals. Now suddenly you’re attenuating them. All radios are subject
to this problem to some degree but the Uniden less so than the PRO106.
Your results may vary, and results can vary from radio to radio.
… and ends up at the speaker.
The PRO106 provides a quarter watt of audio into a built-in speaker. This provides pretty good audio
punch for a handheld scanner and the audio sounds good across the board. The PRO106 really shines over
the competition when listening to digital P25 signals, the digital decoder circuits (called a vocoder) handle
digital audio well and cements the PRO106’s reputation as superior for digital decoding. While Uniden has
improved with the XT line, the PRO106 still wins out.
The PRO106 has an earphone jack that provides limited audio power so as not to blast your eardrums. If
you want to use an external speaker then you should look for an amplified speaker, the audio presented may
not be loud enough without one. The earphone jack works fine with iPod style earbuds or other standard
earphones and devices.
Programming
If you have never programmed a scanner before you will want to take time to read the manual thoroughly.
This is a complicated radio and there are a lot of things to learn. That said, it isn’t really hard to learn if you
have patience and are willing to take the time. The same goes for the Uniden scanners. There’s a learning
curve with these radios and if you’re not up for spending some quality time with the manual and, if you’re
not an experienced radio hobbyist or professional, also prepare yourself for some quality time with web
sites and forums which explain and provide information on trunking and other types of radio systems. If
you’d rather not go through this process, a process which will help you understand and make better use of
your scanner in the long run, then you can have Scanner Master program the radio for you for a fee. A good
percentage of Scanner Master’s customers do this very thing.
If you have dealt with programming scanners before, you will still need to know that this PRO106 works
markedly different than any other scanner. While a lot of the familiar GRE and Radio Shack scanner
protocols remain, there is enough left over that will make your head spin if you try to dig into it without
reading up on it.
The basics are that you create “Objects”, then tell the scanner what Objects you want to scan by using Scan
Lists. Objects can be conventional scanner frequencies, trunked system talkgroups, Limit Searches,
Spectrum Sweeps or Service Searches. While conventional channels and the various searches can pretty
much be entered directly, trunked Talkgroups have to be identified with a Trunked System (“TSYS”).
The PRO106 manual advises to start off slow and work towards more complicated items later. This is good
advice, since it takes a while to learn the various nuances of this radio. For example, start off with
conventional radio channels first. The learn how to add names (called Tags) to these channels. Then learn
how to create Scan Lists. Finally learn how to program Trunked Systems and talkgroups into Scan Lists.
Along the way you can take side trips and learn how to program limit searches and Signal Stalker events as
well as adding these and Service Searches to Scan Lists.
RTFM (Read The Flippin’ Manual) or Not
The RadioShack scanners come with a very inclusive printed Owners Manual as well as a copy on an
included CD-ROM. While it is good it isn’t perfect. There are some typos and formatting errors, and there
are several instances of the sister PRO197 being identified instead of the PRO106. This really isn’t a big
deal since both radios are functionally identical and share firmware, programming files and the rest.
If you don’t understand or like the PRO106 manual you may want to try other sources to help learn the
radio. One of the best sources for scanner techniques and tips is the MarksScanners pages. Mark has
detailed instructions on how to program and operate many scanners, the PSR500/PSR600 and sister Radio
Shack PRO106 and PRO197 instructions are found here:
http://marksscanners.com/106_197/106_197.shtml
You can also draw a lot of information from the relevant RadioReference.com and YahooGroups forums.
RadioReference also has an inclusive Wiki system that covers these scanners.
Since the Firmware updates that RadioShack/GRE produces as needed may change how some of the
features work it is a good idea to check for more current editions of the Manual on RadioShack’s website.
Updated manuals are a free download. They come in a PDF format so you can read or print them with free
software.
Basic Programming techniques
To program Conventional (non-trunked) channels, talkgroups or searches you go into the Program mode
by pressing the PGM button then select the proper soft key. For conventional channels you enter in the
frequency and then if you then press the soft key (F1) labeled Save the channel will be stored into a
memory slot. If instead you press the down button on the 5-way pad you can then edit more parameters
such as the text tag, Squelch type (CTCSS, DCS, NAC, or Search) Priority, how the LED and display
backlight reacts with the channel and more. Keep on going you can go into the “Expert” menu items where
you can change the modulation from the default to another mode, set the attenuator, the delay settings,
AGC settings and a couple others.
In this Expert Menu are a couple unusual items. The first is called “SuperTrack”. This is a method of
changing the way the radio processes digital signals. Since each digital system has slightly different
parameters, this adjustment can help make decoding a bit more reliable. If you are having difficulties with a
channel or system’s digital decoding toggle the SuperTrack setting on or off to see if it helps.
Another Expert Menu item is AudioBoost. This pumps up the audio on that channel by 6dB. Since some
systems use lower modulation levels than others, this will allow you to adjust weaker audio to match the
rest of the channels.
Lastly there is a Hit Count item in the Expert Menu. This allows you to keep track of how many times that
particular channel received traffic.
Similar methods are used to program Trunked Talkgroups. First however you need to program the actual
Trunked System unless you already have it programmed and stored in the radio. When you select TGRP
(Talkgroup) the next menu allows you to select an existing Trunked System or create a new one. Select
New and you will be able to scroll thru the various trunked types until you come across the type you want.
Scroll down once more and you can label the system with a descriptive name. One more scroll down and
you can start entering frequencies used by that system. Remember that on standard 800 and 900 MHz.
Motorola systems and P25 systems you usually only need to enter the Control Channels. EDACS and LTR
systems not only need all the channels used by the system but they have to be in the correct order or
position number.
The Expert Menu for trunked systems have a few different options, such as “Narrow FM” in case your
system uses NFM on a band that is defaulted to regular FM, “Dwell” which controls how long the scanner
waits for activity, the “MultiSite” feature for networked trunked systems and the ability to set custom tables
and fleet maps as needed.
Trunked Systems can also be programmed with a “Wildcard”. This allows you to search the trunked system
and hear any traffic on the system even if the talkgroups are not programmed specifically. Otherwise you
would hear only traffic specified in your Scan Lists.
When programming Search events (SRCH) you can then select one of 3 options, Limit, Service and
Sweeper.
When you select Limit Search you enter the lower and upper limits of your desired search along with a
name (Tag). You can then enter more detailed specifications, such as the LED, Alarm and backlight
settings and Expert Menu items like the modulation type (if different than the default), attenuator, delays,
Zeromatic setting, hit count and the direction you want to search.
If you select Service Search you can choose the Service you want to search from the options presented
(such as Public Safety, CB, Railroad Aircraft etc.) as well as the LED, Alarm and backlight options and
other parameters.
For Signal Stalker searches you can select to search all bands or just the Public Safety allocations. You can
also turn on and off specific band segments, called Sub Bands. The LED, Alarm and Backlight parameters
and other options work the same as with other searches.
If you want to store a Search Hit look for the “Stor” (Store) soft key when the radio stops. This will send
that hit’s information to memory as a separate Scannable Object that can then be assigned to any of the
Scan Lists in the radio.
While searching you can press the PSE (Pause) key to stop the search and stay on that channel until you
want to move on.
Special Programming Features
The PRO106 has several unique features that you can use to make programming easier once you learn how
to use them. One of these is the “Dupe” (“Duplicate”) option. This works like a Cut & Past operation on a
computer, you copy a channel, talkgroup etc. to a clipboard and paste it where needed. This is useful when
you have a lot of similar objects to program.
If you remember programming in a specific channel but can’t remember where you left it, you can search
the radio for it. Using the FIND feature is pretty easy. Press the Program key, then the Edit soft key and
lastly the Find soft key. Select how you want to search, such as by locked out status or the text tag. Select
the method you want. If finding Locked Out channels then you can scroll thru them and unlock any of them
you wish.
There are many different features that you may or may not be interested in. Some of them include:
Object Lockout: Locks out a channel or the like no matter what scan list it is a member of. If you have a
frequency in more than one Scan List, and lock it out of one, it still can be heard of you are scanning
another List it resides in. This allows you to lock it out entirely, even if it is in multiple Scan Lists.
Temporary Lockout. This feature works differently than Uniden’s. On the PRO106 there is a menu setting
in the Global menu that allows you to select Temporary or Permanent Lockouts. If you choose Temporary
then the radio will remove the Lockout when you turn off the radio. If you set it to Permanent then the
channel will stay locked out until you unlock it specifically. You can still set a channel to a permanent
Lockout by pressing the Func key then Lockout.
To unlock a channel just press Manual and scroll to or use the Find feature to get to the Object and press
the Lockout key to unlock it.
Search & Talkgroup Lockouts: During Search or when scanning a trunked system events one of the Soft
Keys will display L/Out and you can use this button to lock out a frequency or talkgroup.
Tune Mode: If you want to go to a specific frequency quickly, press the Tune key on the keypad then enter
in the frequency you want to monitor. From there you can search up or down and let the radio stop on
received signals. You can store hits to a memory slot, it then becomes a Scannable Object.
When, if in Tune Mode, you come across a trunked channel the radio will display information about that
channel. For example on Motorola and P25 systems the System ID and Site number will be displayed.
This functionality of quickly “pumping in” a frequency into a scanner and listening to it, and to nearby
channels, is a great tactical scanning feature that is lacking on the Uniden scanners.
Weather Alert: The PRO106 can be used as a Weather Radio Receiver. The most simple method is to press
the WX button and find an active NOAA weather station in your area. You can then enter SAME Codes to
have the radio open on weather or emergency messages for your county. If you do not enter a SAME code
then the radio will display any SAME messages it decodes. Press the “stby” soft key to enter the SAME
Standby Mode, the Soft key switches to upper case (STBY) when in that mode. Press the SAME soft key
and you can enter SAME codes for your area. You can get these codes from the National Weather Service
website.
If you want to use the older 1050 Hz. alert tone activation method (now called the All Hazards Alert) press
the WX button, go to an active weather channel for your area and press the Priority button. The radio will
then activate when it detects the proper code.
Favorite: The PRO106 “Favorite” feature allows you to tag an Object as a “Favorite” by pressing the FAV
button. This is essentially a special scan list that allows you instant access to that group of channels. You
can tag any type of object, trunked or conventional, sweeper, search etc. When scanning just press the FAV
button and any of those tagged channels are now active, regardless of whether they are in other scan lists.
Cloning
You can clone your radio to another PSR500, PSR600, PRO106 or PRO197 with a simple cable. This cable
is the same one used to connect iPods to car stereos and other uses, a 3 conductor “Mini” cable. Connect
the cables to both radio’s PC-IF jacks, turn them on and enter the proper keystrokes on the Master (Source)
radio and Slave (Target) radio. The information from the Master radio will be programmed into the Slave
radio in a matter of a minute or two. The Radio Shack model 42-2387A or any similar stereo cable can be
used.
Object Numbers
When you enter a Scannable object into memory it gets assigned a sequential number. This number can be
used to go directly to that object and for your reference. This number is displayed when the scanner stops
on that object or when editing it. The number also contains what scan list(s) it may be assigned to. 01-1282
indicates that the object is in Memory position 1282 and a member of Scan List #1. While viewing this
object you can scroll up or down and view other members of the same list.
When in the Manual or Program mode you can press the 4 digit memory address and the Enter key to go
directly to that Object.
Text Entry
The PRO106 allows you to add text Tags to just about everything, from conventional channels to trunked
talkgroups and systems to search types. If you have had high-end GRE-made scanners like the Pro96 in the
past the PRO106 method will be easy to learn. After you have entered the frequency, talkgroup or whatever
scroll until you see the “Tag” menu option. Select the Tag menu and scroll to the character you want to
change. Each number key on the keyboard is assigned to various characters, you then press the
corresponding key to select it. This works out to a 2-digit number is assigned to each character you can
enter into the Text Tag. While it sounds confusing perhaps, once you start using it it gets pretty easy.
Of course it is a lot easier to enter tags from the computer, but that comes later. You will want to know how
to do it from the radio so you can make changes on the fly and impress your friends.
The PRO106 manual has complete instructions and a code chart. If you are going to enter a lot of text tags
manually you may want to copy this chart and keep it with the radio.
Quick Text allows you to store 10 tags that are commonly used. You can change these to fit your needs and
paste them into the names of the tags you are editing; it’s a nice touch.
Scan Lists
Scan Lists are the heart of the radio. This is how you determine what you are going to listen to when. While
you can listen to individual channels or search events without Scan Lists, if you want to do more than that
then you need to set up Scan Lists.
When you first program a Scannable Object it will be assigned to Scan List 1 by default. You can assign it
to others later as well or you can further edit Scan List 1 to remove it.
There are 20 regular Scan Lists as well as a couple of special ones. Regular Scan Lists can include any type
of Scannable Object, conventional channels, trunked talkgroups, searches, etc. You can use Scan Lists in
much the same way as you would use Banks on older radios. Set up Scan Lists by agency, location, for
specific types of incidents, or any other reason you might want to group channels together.
Scannable Objects of any type can be in any scan list. Get creative with them and you can create different
Scan Lists for any mood. Like to listen to fire calls? Set one up for fire channels. Going to the airport? Set
one up with aircraft channels.
You can add newly created Scannable Objects to existing Scan Lists or create new ones. When you press
the PGM key to enter programming mode and select a type of Object, use the left and right arrows to select
a Scan List. If the Scan List number shown when scrolling has an asterisk next to it then that Scan List
already this object as a member. Scroll thru the Scan Lists until you come across the one you want to use
and then press the Down Arrow key to go to the next field. When you save your Object the Scan List will
have the object you just added.
Don’t forget to add names to your Scan Lists. Press the GLOB soft key and scroll down to the Scan Lists
menu. Use the arrow keys to move the curser and use the standard RadioShack/GRE Text Tag procedures
to edit the names.
To turn on or off the various Scan Lists go to the Scan Mode by pressing the Scan button then press one of
the number keys (for Lists 1 thru 10, the Zero activates Scan List 10) or Func then a digit for Lists 11 thru
20 (Func-2 for List 12, Func-0 for List 20…). When scanning the radio will display the Scan List number
on the third and fourth lines of the display, the third line displays Lists 1 thru 10 and the fourth line displays
Lists 11 thru 20.
Power On Options
The PRO106 allows you to perform some special tasks by pressing specific keys during the Welcome
Message on the display. These include bringing the radio to specific menu setting locations, clearing
memories, resetting the radio or getting ready for firmware updates.
Firmware Updates
The PRO106, in common with most high-end scanners these days, allows you to download and update the
Firmware version in the radio. The Firmware is the basic operational language and user interface of the
radio, kind of like what “Windows” is to a computer. With such a complicated system there are bound to be
bugs, mistakes, or changes to be made. These updates are free from the RadioShack website and are
applied with a Windows computer using the regular RadioShack/GRE USB programming cable.
There is a separate firmware for the DSP (Digital Signal Processor) that can also be upgraded. These
updates may or may not help your specific situation, as digital systems vary. Check the message boards on
the Yahoo and RadioReference forums before updating your DSP firmware, occasionally older versions
work better on some systems.
CC-Dump
The various RadioShack digital radios (and now the Uniden XT digital scanners) support a special feature
called CC-Dump. This inelegant name for such an elegant feature refers to the porting of Control Channel
data to the serial port of the scanner. This data is used by programs that decode it and display and log
pertinent information about P25 radio systems.
The most popular of the programs that use the CC-Dump data is Pro96Com,
(http://www.psredit.com/pro96com/index.html) a free utility that decodes the CC-Dump data and displays
all the information you could ever want on the system being monitored. This program is used even by
System Administrators to watch their systems.
This program will not only display the active talkgroups, frequencies, radio ID’s and site information, it
will allow you to control a second radio to monitor the voice traffic.
Computer Programming
There are several programs available to program your PRO106. Since most offer some sort of demo mode
it is a good idea to try them until you find the one you like best. Programs that work with a PRO106 also
work with the sister radios, the PSR600, PRO197 and PSR500.
The Pro106 does not include a USB programming cable, you can purchase it separately. While this cable
can be used for many GRE and Radio Shack scanners, the older RS-232 serial cable used for the PRO96
and 2096 will not work with the newer radios.
My favorite program is ARC500 available at Scannermaster.com. ARC is also available for most other
scanners and it offers easy to understand methods of creating Scannable Objects and other parameters as
well as a Virtual Control option.
Comparisons with the Uniden BCD396XT
The obvious competition for the PRO106 is the Uniden BCD396XT and its predecessor BCD396T. Both
radios offer new style programming, digital decoding and hundreds of features. As a user of the various
Uniden DMA scanners (BCD396XT and BCD996XT and predecessors) I have gotten used to the
programming methods used by the Unidens so I was apprehensive about learning the PRO106 method of
Scannable Objects, it all sounded pretty strange to me. As I worked with the PRO106 I learned how to
program various Scan Lists, Scannable Objects and Searches and discovered that it really wasn’t all that
difficult. It is no harder to learn than the Uniden method and some people may find the PRO106 method
more intuitive. If you have not already learned one method or the other you might find the PRO106 method
easier to learn.
The real question will likely be the feature set and comfort level you develop with the radio. If you have a
chance to play with both for a while do so. Download the manuals for both and see how well you
understand them.
While the PRO106 is a fantastic radio everyone will have ways they would have done it. A couple things I
would have preferred would include a smaller case. The PRO106 is a bulky radio for a handheld. It also
appears to be less sturdy that the Uniden. I would also have created a quick reference card to allow
explanations of the basic features that fit on a pocket or wallet. The BCD396XT is smaller than the
PRO106 and seems to reject strong signal interference better.
Operations on large networked trunked systems using the Roaming feature on the PRO106 is pretty good
but I think Uniden’s method of individual defined sites is better, especially on larger systems that have
more than 28 control channels altogether. On smaller scale systems however, the PRO106 is easier to
program.
A few of the Uniden features that I really like are the Fire Tone Out, GPS and Remote Head system. These
are not available on the PRO106. The PRO106 however handles some items better, such as during Search
Events it will display the CTCSS, DCS or NAC code without having to select either Analog or Digital like
you do on the Uniden. Also, the received code will remain on the display until there is another code
decoded, the frequency changes or the radio is put into another mode.
The PRO106 is a bit larger and uses more conventional keyboard activity and volume/squelch controls. It
has better audio, especially on digital systems and has the unique V-Scanner feature. If you listen to LTR
systems, AutoMove system helps immeasurably to decipher the unusual channel locations.
Normal retail price for these scanners are from $450 to $500, a similar price as Uniden’s BCD396XT.
The PRO106 is better if these are most important to you:
* Better digital decoding, especially on simulcast systems.
* You prefer a larger radio with better audio.
* If you prefer separate volume and squelch controls.
* If you don’t want or need the extra features of the BCD396XT
* If you are not bothered by excessive strong-signal interference.
* If you need higher sensitivity.
* You like to have Virtual Scanners available to you.
You will want the BCD396XT if these are more important:
* You prefer a smaller, compact radio.
* You prefer a simpler but more detailed display.
* If you want the amazing feature-set of the BCD396XT
* You prefer the Banks/Systems/Groups method of programming.
* You need or want the GPS features.
* You will use the radio in a high interference area.
* You want to have a lot of channels available all the time.
* When fire tone-out capability is important.
* You monitor a large networked system with multiple sites.
Recommended Accessories
When people invest $500 for a scanner, they probably want to protect it, get some accessories to go with it
or otherwise add to the experience. Scanner Master (http://www.scannermaster.com) has a full line of
scanner accessories such as cases, antennas, cables, power adaptors and references to make your scanner
more enjoyable.
Probably the most important accessory will be a copy of the ARC500 software, which are available at
www.scannermaster.com. If you're going to program this scanner on your own, or even if you have Scanner
Master or a friend do the programming for you, it's a great benefit to back up a copy of the programming to
your PC. Furthermore, once you've backed it up, you might also want a copy that you can tweak and add to
over time as you get more familiar with the scanner and scanning. Then you can tailor the programming
just for your tastes. The software is easy to use and extremely powerful and it will help you understand all
that the radio can do.
Many of the accessories for the other GRE and Radio Shack scanners will work for the PRO106 as well.
Here are a few that you might be interested in:
Cases: Spend this much on a radio and you will want to protect it from scratches, drops and dings. Nylon
and soft leather cases are available.
Since GRE does not provide a car charger for these radios you can use this Scanner Master power adaptor.
Lose your AC adapter/charger? Want a second one to keep for travel? Use this adapter from Scanner
Master.
You can also buy an assortment of remote speakers (amplified or not), headphones, antennas and more. Just
go to http://www.scannermaster.com/Accessories_s/3.htm and chose what you want.