1
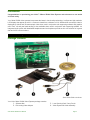
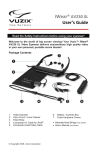
iWear
®
VR920
Video Eyewear
User’s Manual
Table of Contents
Important Safety Instructions ........................................................................................................... 2 Battery Safety Instructions......................................................................................................... 2 FCC Statement ................................................................................................................................ 2 Vuzix Hardware Product Limited Warranty ...................................................................................... 3 Introduction ...................................................................................................................................... 4 Package Contents ............................................................................................................................ 4 System Requirements .................................................................................................. 5 3D Stereoscopic Video Support Requirement.............................................................. 5 Tracking Requirements ................................................................................................ 5 Installation & Setup .......................................................................................................................... 5 Installation Overview ................................................................................................................. 5 Installation ........................................................................................................................................ 6 Install the iWear Software.......................................................................................................... 6 Connect the Video Eyewear ...................................................................................................... 7 Configure your Graphic Card..................................................................................................... 9 Graphics Settings Recap ............................................................................................ 10 Calibrate your VR920 Head Tracker ....................................................................................... 10 Using your iWear ............................................................................................................................ 11 Compatibility ............................................................................................................................ 11 Audio........................................................................................................................... 11 Video........................................................................................................................... 11 Tracking ...................................................................................................................... 12 iWearMonitor .................................................................................................................................. 12 iWear Calibrator ............................................................................................................................. 13 On Screen Display ......................................................................................................................... 13 Audio System ................................................................................................................................. 15 Microphone ................................................................................................................. 15 Headphone Speakers ................................................................................................. 15 Comfort & Fit .................................................................................................................................. 15 Nose Bridge Adjust .................................................................................................................. 15 AccuTilt® Viewer Adjustment .................................................................................................. 16 Tether Strap ............................................................................................................................. 16 Care & Maintenance ...................................................................................................................... 16 Cleaning...................................................................................................................... 16 Powering Down Your Eyewear ................................................................................... 16 Technical Support ....................................................................................................... 16 Vuzix iWear VR920 User’s Manual
Page 1
Important Safety Instructions
3. Close supervision is needed when this product is by or
near children.
8. Always be aware of the world around you. This product
will immerse you in realistic sights and sounds, possibly
causing you to forget about the real world around you and
the threats to your well being and the well being of others.
DO NOT use this product near stairs, balconies, or other
things that can be tripped over, run into, knocked down or
fallen over. This product should only be used while you are
seated and never while using sharp or potentially dangerous
objects, operating any form of mechanical device, driving
motor vehicles, or performing any act that normally requires
you to see what you are doing.
4. Children under the age of seven (7) are still learning to
focus and track with their eyes. Their vision is still immature.
For these reasons, THIS PRODUCT SHOULD NOT BE
USED BY CHILDREN UNDER THE AGE OF SEVEN (7).
9. This product may be tethered to a power outlet and cables
may extend between components. Be careful that these
cords do not tangle around you or pose a potential threat to
the safety of others.
5. A very small portion of the population may experience
epileptic seizures when viewing certain kinds of flashing
lights or patterns that are commonly present in our daily
environment. These persons may also experience seizures
while watching some kinds of television pictures or playing
certain video games on regular monitors, including the use
of a display system such as this. These effects can be
increased due to the large size of the video screens in this
device. As a result consult a physician if you have any
epileptic condition before using this device or if you
experience any of the following symptoms while using this
device: altered vision, muscle twitching, other involuntary
movements, loss of awareness of your surroundings, mental
confusion, and/or convulsions.
10. Do not disassemble this product. If service work is
required, contact VUZIX using the Support contact
information shown in this manual.
Follow these safety instructions when using or handling your
VUZIX Video Eyewear to reduce the risk of fire, electric
shock, and injury to persons and property.
1. READ ALL OF THE INSTRUCTIONS AND SAFETY
INFORMATION PROVIDED BEFORE USING THIS
PRODUCT.
2. Use the product only for its intended use, as described in
this manual.
6. Immersive video, whether viewed on a regular TV, a
movie theater screen or a VUZIX video display, can
potentially have adverse effects on the user including motion
sickness, perceptual after effects and disorientation, and
decreased postural stability and eye strain. Take frequent
breaks to lessen the potential of these effects, as is
commonly suggested for other items, such as keyboards and
computer monitors, that you may tend to fixate or
concentrate on. If your eyes show signs of fatigue or dryness
or if any of the above symptoms is noted, immediately
discontinue use of this device and do not resume using it for
at least 30 minutes after the symptoms have fully subsided.
7. Permanent or temporary hearing loss or impairment can
result from excessive volume levels emitted from the
headphones. Always adjust the volume to a safe level
BEFORE wearing the product or headphones.
11. Do not pull or yank on the cable, kink any of the cables
or tie them in sharp or tight knots. Do not hang the product
or allow it to be suspended by any of its cables. To
disconnect cables, pull on the cable connector. Cables
damaged by such actions are not covered by the product’s
limited warranty.
12. Do not drop, strike, or cause any portion of the product to
be struck or shaken aggressively. Such actions may damage
the product and void your warranty.
13. Save these instructions.
Immediately unplug the product from external power
sources if:
• The power adaptor, power cord or USB cord is damaged
or frayed.
• Liquid has been sprayed, splashed or poured on the
product.
• Any component of the product has been dropped or
damaged.
• The product exhibits any distinct change in performance.
Battery Safety Instructions
• Batteries contain toxic materials. Do not burn,
disassemble, mutilate, or puncture the batteries.
• Do not dispose of batteries in a fire.
• Dispose of batteries in a method that is consistent with
your local laws and regulations.
FCC Statement
NOTE: This equipment has been tested and found to comply with the limits for a Class B digital device, pursuant to Part 15 of the
FCC Rules. These limits are designed to provide reasonable protection against harmful interference in a residential installation. This
equipment generates, uses and can radiate radio frequency energy and, if not installed and used in accordance with the
instructions, may cause harmful interference to radio communications. However, there is no guarantee that interference will not
occur in a particular installation. If this equipment does cause harmful interference to radio or television reception, which can be
determined by turning the equipment off and on, the user is encouraged to try to correct the interference by one or more of the
following measures: 1) Increase the separation between the equipment and receiver or 2) Connect the equipment into an outlet on a
circuit different from that to which the receiver is connected.
Vuzix iWear VR920 User’s Manual
Page 2
Vuzix Hardware Product Limited Warranty
Vuzix warrants that your Vuzix hardware product shall be
free from defects in material and workmanship for the length
of time specified in the Warranty Period (one year),
beginning from the date of purchase. If your Vuzix hardware
product is used for commercial purposes (including rental or
lease) the Warranty Period shall be reduced to only ninety
(90) days from date of purchase. Except where prohibited by
applicable law, this warranty is nontransferable and is limited
to the original purchaser and does not apply to anyone else,
including anyone to whom You later make any transfer or
sale. This warranty gives you specific legal rights, and you
may also have other rights that vary under local laws, some
of which are not affected by the warranties in this Limited
Warranty.
This Limited Warranty does not cover, and no warranty of
any kind is provided with respect to any subjective or
aesthetic aspects of the hardware product. Vuzix does not
Remedies
Vuzix’s entire liability and Your exclusive remedy for any
breach of warranty shall be, at Vuzix’s option, (1) to repair or
replace all or part of the hardware, 2) exchange the
hardware with a product that is new or which has been
manufactured from new or serviceable used parts and is at
least functionally equivalent to the original product, or (3) to
refund the price paid by You less reasonable depreciation
based on your actual use, provided that the hardware is
returned to the point of purchase or such other place as
Vuzix may direct with a copy of the sales receipt or dated
itemized receipt. Except where prohibited by applicable law,
all shipping and handling costs associated with transport
(including packaging) for warranty service shall be at Your
expense. Vuzix may, at its option, use new or refurbished or
used parts in good working condition to repair or replace any
hardware product. Any replacement hardware product will be
warranted for the remainder of the original warranty period or
thirty (30) days, whichever is longer or for any additional
period of time that may be applicable in Your jurisdiction.
This warranty does not cover problems or damage resulting
from (1) Acts of God, power surge, misuse, abuse,
negligence, accident, wear and tear, mishandling,
misapplication, or other causes unrelated to defects in the
hardware device (2) any unauthorized repair, modification,
tampering or disassembly; (3) improper operation or
maintenance, usage not in accordance with product
instructions or connection to improper voltage supply; or (3)
use of consumables, such as replacement batteries, not
supplied by Vuzix except where such restriction is prohibited
by applicable law.
How to Obtain Technical Support
Technical support is defined as assistance with questions on
issues about the Vuzix hardware product. Technical support
for hardware and its software is available for the first ninety
(90) days from date of product purchase. Your dated sales
or delivery receipt, showing the date of purchase or lease of
the product, is Your proof of the purchase or lease date. You
may be required to provide proof of purchase or lease as a
condition of receiving software technical support. The
addresses and technical service contact information for
Vuzix can be found in the documentation accompanying
Vuzix iWear VR920 User’s Manual
warrant that the operation of the product will be
uninterrupted or error-free. The limited warranty stated
above is the only warranty made to You and is provided in
lieu of all other express or implied warranties and conditions
(except for any non-disclaimable implied warranties that
exist), including any created by any other documentation or
packaging. No information or suggestions (oral or in a
record) given by Vuzix, its agents, affiliates, dealers or
suppliers or its or their employees or agents, shall create a
warranty or condition or expand the scope of this Limited
Warranty.
Any software distributed with the hardware product by Vuzix
with or without the Vuzix brand name is not covered under
this Limited Warranty. Refer to the licensing agreement
accompanying the software (viewable upon its installation),
for details of your rights with respect to its use.
your product and on the
www.vuzix.com.
web at
our
global site:
How to Obtain Warranty Support
Vuzix is the warrantor under this Limited Warranty. Before
submitting a warranty claim, we recommend You visit the
support section at www.Vuzix.com for technical assistance.
Warranty claims cannot be processed through the point of
purchase and any other product related questions should be
addressed directly to Vuzix. The addresses and customer
service contact information for Vuzix can be found in the
documentation accompanying Your product and on the web
at our global site at www.vuzix.com, which will also identify
any Vuzix subsidiary or branch serving Your country and its
local address. You may also write to: Vuzix Sales Support,
75 Town Centre Drive, Rochester, NY 14623, USA.
Limitation of Liability
VUZIX SHALL NOT BE LIABLE FOR ANY SPECIAL,
INDIRECT,
INCIDENTAL
OR
CONSEQUENTIAL
DAMAGES WHATSOEVER, INCLUDING BUT NOT
LIMITED TO LOSS OF PROFITS, REVENUE OR DATA
(WHETHER DIRECT OR INDIRECT) OR COMMERCIAL
LOSS FOR BREACH OF ANY EXPRESS OR IMPLIED
WARRANTY ON YOUR PRODUCT EVEN IF VUZIX HAS
BEEN ADVISED OF THE POSSIBILITY OF SUCH
DAMAGES. Some jurisdictions do not allow the exclusion or
limitation of special, indirect, incidental or consequential
damages, so the above limitation or exclusion may not apply
to You, but the remainder of this Limited Warranty shall
remain in full force and effect.
Duration of Implied Warranties
EXCEPT TO THE EXTENT PROHIBITED BY APPLICABLE
LAW, ANY IMPLIED WARRANTY OR CONDITION OF
MERCHANTABILITY OR FITNESS FOR A PARTICULAR
PURPOSE ON THIS HARDWARE PRODUCT IS LIMITED
IN DURATION TO THE LIMITED WARRANTY PERIOD
STATE ABOVE FOR YOUR PRODUCT. Some jurisdictions
do not allow limitations on how long an implied warranty
lasts, so the above limitation may not apply to You. Please
note that in the European Union, any warranty period less
than two years shall be increased to two years except in the
case of use for commercial purposes.
Page 3
Introduction
Congratulations on purchasing your Vuzix™ iWear® VR920 Video Eyewear and welcome to a new world
of virtual reality.
Your iWear VR920 video eyewear incorporates the latest in virtual reality technology. It utilizes two high resolution
LCD displays that appear as a 62 in. screen as viewed from a distance of 9 ft. Standard 2D monoscopic video is
displayed by default and 3D stereoscopic video when used in conjunction with supporting software and graphics
card. Pitch, roll and yaw head tracking is also available when used in conjunction with supporting software. An
integrated audio system with detachable headphones and a microphone provide an all-in-one solution for in-game
chat and VOIP communications.
D o no t con ne ct yo u r V R 9 20 vid e o e yew ear un t i l aft er i t s s of tw a re has bee n in sta l led .
Package Contents
Quick Start Guide not shown.
Your Vuzix iWear VR920 Video Eyewear package contains:
1. Software disc
2. DVI Analog Video Adapter
Vuzix iWear VR920 User’s Manual
3. Lens Cleaning Cloth / Carry Pouch
4. Video Eyewear & Cable Assembly
Page 4
System Requirements
• Standard PC or laptop computer with VGA or DVI graphics port
• 32-bit Windows XP or Windows Vista operating system*
• USB 2.0 port
* May function as a 2D wearable display system with other operating systems such
as Macintosh, 64-bit Windows and Linux. Some features are not supported or
available on these non-supported operating systems.
3D Stereoscopic Video Support Requirement
• Native Vuzix 3D Driver support in application
• Vuzix 3D Drivers enabled through an iWearMonitor Extension
• Nvidia graphics card and compatible Nvidia 3D drivers
Tracking Requirements
• iWear native tracking support in the application
• iWearMonitor Extension enabled tracking support
Installation & Setup
Installation Overview
n
o
p
q
Install the iWear Software. The iWear VR920 software MUST be installed prior to connecting
the video eyewear. Doing it the other way around will not damage your eyewear but Windows
will likely install the wrong drivers causing it to not function as intended.
Connect the eyewear. This part is fast and easy, but some steps vary depending upon your
operating system. Some installation steps have separate Windows XP and Vista instructions.
Configure your graphics card. In order for the eyewear displays to function, your display
properties must be configured correctly.
Calibrate your head-tracking. The tracking system uses magnet sensors and accelerometers
to generate tracking data. The magnetic sensors must be calibrated periodically to adjust for
magnetic fluctuations that occur naturally all around us.
If you encounter difficulties during the installation or when using your eyewear, please refer back to this
User’s Manual. You can also discuss eyewear issues with others by visiting the Vuzix VR920 Forum.
If you are an experienced computer user, you may choose to follow the information provided ojn the
Quick Start Guide included in your iWear VR920 Video Eyewear package. We recommend all users,
regardless of experience, follow the instructions provided below.
Vuzix iWear VR920 User’s Manual
Page 5
Installation
n
Install the iWear Software
► DO NOT connect your eyewear hardware yet – install the software first.
Tip:
A newer version of iWear VR920 software may have been
released since your VR920 was manufactured and packaged.
Now would be a good time to check the “Downloads and
Drivers” section of the Vuzix website for a free download of
our latest software. The version number of your current
software is indicated on the label on the back of your iWear
VR920 software disk envelope – the numbers following the
dash.
If you connect your eyewear
hardware before installing the
software, Windows will install
inappropriate drivers. If that
happens, those drivers must be
uninstalled and the correct ones
for the eyewear to function
correctly.
► Insert the iWear VR920 software CD to launch the installation program.
If Auto Run is disabled for your CD/DVD player, the install program will not start automatically. If this
occurs, double-click your CD/DVD player in My Computer to view its contents and run the “autorun.exe”
program.
► Click on “Install VR920 Software” to start the
installation.
► Follow the onscreen instructions.
We suggest you temporarily disable your anti-virus
software during the installation process to minimize
potential false alarms and blocked component
installations. Don’t forget to turn it back on immediately
after the software installation has been completed.
Tip:
You may have to be signed on as an Administrator or provide administrator authorization to install
new software on your computer.
During the software installation, your operating system may advise you that the some drivers have not
passed Windows Logo testing (Windows XP) or that Windows cannot verify the publisher (Windows Vista).
These screens are a normal part of Windows security measures and have no practical relevance in
respect to this installation.
Vuzix iWear VR920 User’s Manual
Page 6
► For Windows XP, press the “Continue Anyway” button and for Vista, press the “Install this
driver software anyway” button. These messages may appear a couple of times.
► When the installer advises you that it is finished, press the “Finish” button and proceed to
step 2.
The above process will have installed the drivers required to support your video eyewear, calibration
software to adjust its tracking system, and the iWearMonitor with Extensions to enable tracking and/or 3D
stereoscopic video in several applications without native iWear support.
Two or more iWear icons will have been placed on your desktop, one for the iWearMonitor and another
for the iWear VR920 Calibrator application. If you don’t want these on your desktop.
Your software disc may also contain free bonus software.
► Click “Install Bonus Software” and follow the onscreen instructions to install these programs.
o
Connect the Video Eyewear
If you have not already done so, remove and discard the clear plastic protective sheet applied to the face
of each display.
Your eyewear has a cable that splits into two with a UBS connector on one and a VGA connector on the
other. The USB can be connected to any USB 2.0 port on your computer or on a powered USB 2.0
compliant hub. How you connect the VGA connector varies dependent upon the configuration of your
computer but, in general, can be connected to any available VGA or DVI graphics port. If your graphics
card only has one connector, use a splitter cable or box (not included) to provide an additional connector.
Common cable connection scenarios:
Cable Option 1: Single Graphics Port w/splitter
Cable Option 2: Dual Graphics Ports
If you are installing your eyewear on a laptop with an external monitor port, it is essentially the same as
Cable Option 1.
Tip:
If your target graphics port has a DVI connector, use the provided VGA to DVI adaptor to mate it
with the eyewear’s VGA connector.
Vuzix iWear VR920 User’s Manual
Page 7
The eyewear can also be connected to a single VGA port as the only monitor. To do this, ensure the
display device settings are for 1024 x 788 resolutions or lower at a refresh rate of 60 Hz.
► Connect the eyewear’s USB connector to a USB 2.0 port on your computer.
One or more information balloons will appear momentarily
above your System Tray, advising you that devices are being
installed.
Windows Vista will then post a window advising you when the
devices are ready to be used.
Windows XP will post a series of Found New Hardware
Wizard windows requiring the following actions.
Vista driver install confirmation.
► Windows XP only: Choose the “No, not at this time” option and then press the “Next” button.
► Windows XP only: In the second window (install VR920 3D Stereo Control) select “Install the
software automatically (Recommended)”, and then press the “Next” button.
► Windows XP only: When Windows finds the correct drivers, it may present the Windows Logo
test message again. If so, press the “Continue Anyway” button.
► Windows XP only: The last of this series of windows will advise you that the wizard has
completed installing the software. Press its “Finish” button.
Vuzix iWear VR920 User’s Manual
Page 8
► Close any open windows or message balloons and then connect the eyewear’s video
connector to a graphics port on your PC.
► Now would be good time to remove the clear protective film off the lenses and outside face of
the display.
Your iWear VR920 video eyewear may display a blank blue screen. This is normal as your graphics
setting are likely not configured for a second display and/or a compatible resolution.
p
Configure your Graphic Card
► Open your graphic card’s control panel
► For Windows XP:
Right-click on the desktop and select “Properties”.
In the Display Properties window, select the “Settings” tab.
In the Settings, press the “Advanced” button.
► For Windows Vista:
Right-click on the desktop and select “Personalize”.
From the Control Panel’s Personalization window, select “Display Settings”.
In the Display Settings window, press the “Advanced Settings…” button.
From here, you should be able to access the control panel for your graphics card. The two most common
brands, ATI and Nvidia, may display a tab to access their brand specific control panel.
The look and command options provided by your graphics card’s control panel will vary based upon its
make and model. You may have to refer to your graphics card’s manual for detailed instructions on
accessing the correct configuration options.
If you are using a single graphics port, as in Cable Option 1, skip the following Display Configuration step
and proceed to setting your screen resolution. If you are using dual port graphics card, you must enable a
second display through your graphics card’s control panel.
► Open your graphics card control panel’s Display Configuration controls.
► Enable both your desktop monitor and the iWear VR920 display monitor to show the same
image. This is often referred to as the “Clone” mode.
Tip:
If your video card’s control panel offers a configuration wizard option, decline it and choose to
manually select the “Clone” configuration option.
Tip:
Improved performance and compatibility can sometimes be achieved by setting your eyewear as
the primary monitor.
Now let’s set the resolution. This must be set correctly for both single and dual port graphics cards.
The eyewear supports resolutions of 1024 x 764, 800 x 600 and its native resolution of 640 x 480. If your
display resolution is set to 1024 x 768 or 800 x 600, the video scaling engine will automatically adjust it to
its native resolution.
Vuzix iWear VR920 User’s Manual
Page 9
► Open your graphics card control panel’s Resolution controls.
► Set your resolution to any of those supported; 1024 x 768, 800 x 600, or 640 x 480.
► Set your eyewear’s Refresh Rate to “60 Hertz.”
Graphics Settings Recap
If your VR920 does not display your desktop image, recheck your graphics settings. They should be as
follows:
Display Configuration:
Resolution:
Refresh Rate:
q
Clone (same on both displays) with eyewear set as the ‘primary’ display.
1024 x 764, 800 x 600, or 640 x 480
60 Hertz
Calibrate your VR920 Head Tracker
The last step is calibrating the head tracker. The iWear VR920 video eyewear computes head tracking
data through a series of 3 magnetic sensors and 3 accelerometers mounted inside the display enclosure.
As the magnetic fields around us change constantly and your eyewear must be periodically calibrated to
adjust for these fluctuations and their effect on the magnetic sensors. If you change the location of your
eyewear, even from one side of room to another or if you reposition items
that emit an electromagnetic field in its proximity, it should be recalibrated.
Magnetic fluctuations caused the rotation of the earth, will affect its magnetic
sensors slowly over a period of time. If you find its accuracy has changed –
recalibrate.
Tip:
Do not position items with a large electromagnetic signature near
your video eyewear. Items like a sub-woofer sitting under a desk may
impact its tracking accuracy. These items do not cause damage and
accuracy will be regained by moving the affecting items several feet
away and recalibrating your eyewear.
► Open the iWear VR920 Calibrator application.
► Press the “Begin Calibration” button.
► Hold the eyewear facing your monitor, with the temples fully open.
Tip:
Keep the temples fully open through the calibration process. The temple mounted headphones
contain magnets that can affect the calibration if their positional
relationship to the sensor changes.
► Rotate the eyewear fully through each axis; pitch, roll and yaw.
Tip:
When moving the VR920 through its calibration movements it is
better to over rotate than under rotate. Less than full range
movement will lessen the accuracy of the calibration.
As you rotate the eyewear through each axis, the green indicator bars will
expend partially across the yaw, pitch and roll fields – they will not fill the panels completely.
Vuzix iWear VR920 User’s Manual
Page 10
► When you have completed rotating the eyewear fully through all 3 axes, and then press the
“Lock Calibration” button.
The last step in the calibration process is to set a center point -- the forward direction you normally face
when using your eyewear.
► Place the eyewear on your face as you would normally wear it.
► Face your desktop monitor and press the “Set Zero” button.
If you wish to experiment with your eyewear’s calibration, rotate your head and watch the graphical and
numeric positioning indicators respond in the calibration software. You may note that the same degree of
motion does not translate directly to what you experience in some games. This is due to filtering applied
to tracking data in some games to reduce over sensitivity.
Using your iWear
Compatibility
One of the first questions many people ask is, “What programs does it work with?” The answer is,
“Virtually everything, but to varying degrees depending upon which features and capabilities you have in
mind.”
To understand compatibility, you have to look at each of the eyewear’s primary features separately and
understand that for some, compatibility is measured in degrees.
Note:
A listing of many 3D stereo video and head tracking titles is available on the iWear VR920
product page of the Vuzix website. Scroll down and click on the “Supported Titles List” button.
Audio
The iWear VR920 video eyewear incorporates a complete audio system that installs on your PC as a
separate audio device. This audio system is compatible with all standard PC applications, including
games and can be enabled or disabled through your Sound and Audio Devices Control Panel.
Video
By default, the video eyewear works as a 2D monitor with all applications able to run at resolutions
between 640 x 480 and 1024 x 768 at 60 Hz.
The best 3D stereoscopic video is experienced with applications that incorporate native Vuzix 3D Driver
support in the program. These applications enable improved visual quality and performance and work
with virtually and graphics card running on a 32-bit Windows XP or Vista computer system.
Following that are applications enabled to use the Vuzix 3D Drivers through an iWearMonitor Extension.
These applications work with virtually and graphics card running on a 32-bit Windows XP or Vista
computer system.
There are hundreds games and applications that support Nvidia graphics cards, enabled with Nvidia 3D
drivers. These titles will also be displayed in 3D, but only with the above mentioned Nvidia graphics card
and 3D drivers installed and correctly configured.
Vuzix iWear VR920 User’s Manual
Page 11
Tracking
Head tracking can be enabled in two ways; either through an iWearMonitor Extension or through native
iWear support contained in an application. Applications with head tracking enabled through an iWear
Extension are listed in the iWearMonitor.
iWearMonitor
iWearMonitor is an application populated with iWear Extensions that adds 3D stereoscopic video and/or
head tracking support to applications that do not have native iWear support.
When iWearMonitor opens it compares its
iWear Extensions to programs installed on
your computer. When a match is found, the
required drivers and other files required 3D
stereoscopy and/or head tracking are
installed.
Tip:
You can double-click on any
Extension to see exactly what support
it adds and what files are installed,
moved or altered.
When an Extension is enabled, it moves from
the Supported Titles list to the Enabled Titles.
If you do not want support enabled for a given title, select it from the Enabled Titles list and press the
“<==== Remove” button. You can re-enable its iWear Extension at any time by selecting it from the
Supported Titles list and pressing the “Add ====>” button.
If you have a listed title installed on your
computer and iWearMonitor has not
automatically moved it to the Enabled Titles
list, you can manually find and enable that
application. This sometimes occurs when
applications have been installed in a location
other than their default directory. To manually
enable a title’s iWear Extension, select it from
the Supported Titles list and press the
“Browse For Target” button to locate its install
directory and enable its iWear Extension.
iWearMonitor
also
displays
technical
information on your eyewear and its software
in an information panel along bottom of its
window, below the Browse For Target button. If you click on the information panel an information window
is displayed providing additional information on the iWearMonitor.
Detailed information about each iWear Extension can be accessed by double-clicking on any Supported
Title name. Press the “Page UP” and “Page Down” buttons to view additional content. These technical
Vuzix iWear VR920 User’s Manual
Page 12
notes sometimes refer to files that must moved be added. The iWearMonitor does it all automatically for
you when it Enables a Title and adds it into the Enabled Titles list.
The list of iWear Extensions is updated frequently and made available to eyewear users free of charge.
Go to the Vuzix website’s “Downloads and Drivers”
Drivers page to get the latest version of the installation
software, including iWearMonitor and all available Extensions.
If you have a favorite title that does not have the desired level of iWear support, be sure to let us and the
applications publisher know about it. Our Vuzix iWear Forum includes a forum for listing those titles. For
the best possible level of support you want to have the game’s author add native support.
Vuzix provides a free SDK (software development kit), engineering support and other developer support
services to assist game developers in embedding native iWear support in their applications. To make this
happen, they need to hear that you, their customers, want iWear support.
iWear Calibrator
Note:
For detailed calibration instructions, see installation step 4.
The iWear Calibrator’s main function is to calibrate your iWear head tracker. It also
provides a visual means for checking the tracking system’s accuracy.
Typically, its positioning data will not be spot-on due to variations in the magnetic
fields around you. These slight variations will not have a noticeable impact on
performance or accuracy.
If tracking is not accurately represented:
1. Recalibrate your iWear
2. Look for items nearby items that may produce a strong
electromagnetic field.
The iWear Calibrator also provides a quick and convenient means of
checking its version number and that of your iWear firmware. This
information is accessed by pressing the iWear icon in the top-left
corner of the iWear Calibrator window and selecting the “About iWear
Calibrator…” command.
On Screen Display
An OSD / Volume Control is located under the right-front corner of your
eyewear viewer. It is a multi-function adjustment wheel and switch for
adjusting the volume of the iWear Headphones and accessing the On Screen
Display (OSD).
Turning the wheel adjusts the headphone volume, a quick press and release
mutes the iWear Microphone and pressing and holding the wheel for more
Vuzix iWear VR920 User’s Manual
Page 13
than 3 seconds brings up the OSD along the bottom of the iWear displays.
Note:
The OSD automatically closes if the OSD Control is unused for more than 5 seconds.
When the On Screen Display (OSD) is shown, the OSD Control wheel is used to access and select OSD
menu items. Pressing the wheel accesses menu and sub-menu options and adjustments or executes
menu commands.
Brightness
Contrast
Display
Modes
Brightness
Balance
Backlight
Adjustment
Default Reset
Exit OSD
When the Brightness menu is selected and the OSD Control wheel is pressed, an
adjustment indicator bar is displayed. Use the OSD Control wheel to adjust the
display brightness and press the wheel again to exit the brightness control.
Selecting the Contrast menu works the same as Brightness; press the OSC Control
wheel to select it, turn the wheel to adjust contrast, and then press the wheel again
to exit the Contrast adjustment.
When viewing 2D applications, the Display Mode should be set to 2D monoscopic
video; the sub-menu icon furthest to the left.
When using 3D stereoscopic applications choose one of the 2D stereoscopic
display modes. Most applications use the Left eye setting, indicated by the icon
with the “L”. If its 3D imagery does not appear correct, select the Right eye setting.
Some people find that one display appears darker or lighter than the other due to
differences in InterPupilary Distance (IPD). The Brightness Balance function allows
you to compensate for this. Access the function and rotate the wheel to adjust
brightness between the two displays until both appear equally bright.
This menu items allows you to adjust the amount of backlighting in the display. An
increased amount of backlighting helps in bright conditions while lower backlighting
provides superior quality in low light conditions.
This command resets all of the OSD menus to their original values.
Press this menu item to exit the OSD or simply don’t use the OSD Control wheel
for 5 second and the OSD will automatically be closed.
Vuzix iWear VR920 User’s Manual
Page 14
Audio System
The iWear VR920 video eyewear contains a complete audio system. It
installs as a separate USB audio device on your PC.
VR920 Video Eyewear will appear in your sound and audio control panel
and can be selected as your default audio device or you can select any
alternate audio device listed.
Microphone
The built-in microphone is located under the left-front of the eyewear.
It functions the same as other USB microphones and is ideal for VOIP
communications, such as chatting with friends while playing network or
online games.
Press the OSD / Volume Control wheel to toggle the microphone on or off.
Headphone Speakers
The iWear VR920 includes removable stereo headphones designed to sit outside your ear. Their flexible
stems can be bent and twisted to adjust to your particular needs or removed if you wish to use an
alternate audio source.
To remove the headphones, grasp the headphone stem near its base, where it joins the temple, and pull
straight back. Reverse the process to re-install them.
Comfort & Fit
The iWear VR920 video eyewear is designed to enable long hours of use. It is visually focused at a
distance of 7 ft., so as not to cause eye strain, its headphones sit outside your ears for improved comfort
and it weighs only 3 oz.
Nose Bridge Adjust
Your video eyewear is equipped with an adjustable nose bridge that offers hours of comfort and provides
an extensive range of adjustment. Prescription eyeglass wearers can adjust their nose bridge to wear
their video eyewear over and in front of their glasses.
To adjust the nose bridge, grasp a nose bridge pad
between your thumb and forefinger and bend the arm
to an appropriate position. Repeat with the other nose
pad and then make minor adjustments until a
comfortable position has been achieved.
Vuzix iWear VR920 User’s Manual
Page 15
The nose bridge is designed to be adjusted to your personal needs – not to be readjusted repeatedly for
multiple users. Sharp angles and excessive bending can result in metal fatigue and premature failure of
the nose bridge stems.
AccuTilt® Viewer Adjustment
AccuTilt viewer adjustment is a Vuzix technology that allows you to adjust the angle of
the display housing 15 degrees to ensure optimum alignment.
Grasp the iWear viewer’s front display on both either side and tilt it up or down to
aligned the displays.
Tether Strap
Your VR920 eyewear package contains a tether or retainer strap to help secure the iWear.
Slide its rubber ends around the stem of your eyewear and tighten the sliding collar. While wearing your
eyewear, fit the tether over your head and move the adjustment retainer to provide a comfortable and
stable fit.
Care & Maintenance
Your eyewear is designed to provide trouble free, low-maintenance use.
Cleaning
Abrasive cleaners such as glass cleaner, paper towels and facial tissues can scratch the coating on your
iWear lens. To clean the lens, fog it with your breath and use the provided microfiber pouch. If you
choose to use a liquid cleaner, only use solutions designed for optical lens and apply the cleaner to a
microfiber cleaning cloth, not directly onto the iWear. Spraying cleaners directly onto the iWear may result
in permanent damage, not cover by the warranty.
Powering Down Your Eyewear
The iWear VR920 video eyewear does not have an on/off switch and leaving it powered up will not harm
it. If you feel more comfortable powering it down when it’s not in use, simple unplug its USB connector.
Technical Support
If you encounter a technical problem with your eyewear please check the Vuzix VR920 Forum for a
solution and/or our VR920 Frequently Asked Questions (FAQs). If you are still unable to resolve your
difficulty, you can also contact our technical support staff through the Support / Contact page of our web
site.
Vuzix iWear VR920 User’s Manual
Page 16
© 2008 Vuzix Corporation
All rights reserved. All trade names are registered trademarks of their respective owners.
Designed by Vuzix in New York.
Made in USA.
227PB0002-E
Rev: 080619
Vuzix iWear VR920 User’s Manual
Page 17