1
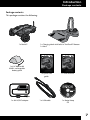
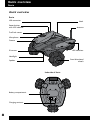
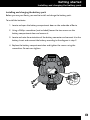
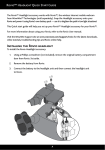
User
manual
Item No. 8033
Copyrights and acknowledgements
Copyrights and acknowledgements
Skype, Skype logo and S logo are trademarks or registered trademarks of Skype Limited.
Microsoft, Windows and Windows NT are registered trademarks of Microsoft Corporation in the United
States and other countries.
Windows Vista is a trademark of the Microsoft group of companies.
Windows Live is a registered trademark of Microsoft Corporation.
Mac and Mac OS are trademarks of Apple Inc.
MPEG4
This product is licensed under the MPEG-4 visual patent portfolio license for the personal and noncommercial use of a consumer for (i) encoding video in compliance with the MPEG-4 VISUAL standard
(“MPEG-4 VIDEO”) and/or (ii) decoding MPEG-4 video that was encoded by a consumer engaged in a
personal or non-commercial activity and/or was obtained from a video provider license by MPEG LA to
provideMPEG-4 video. No license is granted or shall be implied for any other use. Additional information
including that relating to promotional, internal and commercial uses and licensing may be obtained from
MPEG LA, LLC. See HTTP://WWW.MPEGLA.COM.
All other nationally and internationally recognized trademarks and tradenames are hereby acknowledged.
© Copyright 2008 WowWee Group Ltd. All rights reserved.
2
Contents
Contents
Thank you for purchasing Rovio™ from WowWee™!. . . . . . . . . . . . . . . . . . . . . . 6
Package contents. . . . . . . . . . . . . . . . . . . . . . . . . . . . . . . . . . . . . . . . . . . . . . . . . . . . . . . . . . 7
Getting started. . . . . . . . . . . . . . . . . . . . . . . . . . . . . . . . . . . . . . . . . . . . . . . . . . . . . . 10
Battery and power requirements. . . . . . . . . . . . . . . . . . . . . . . . . . . . . . . . . . . . . . . . . . . . 10
Rovio. . . . . . . . . . . . . . . . . . . . . . . . . . . . . . . . . . . . . . . . . . . . . . . . . . . . . . . . . . . . . . . . . . . . . . . . . 10
Charging dock and TrueTrack™ Beacon . . . . . . . . . . . . . . . . . . . . . . . . . . . . . . . . . . . . . . . . . . . 10
Assembling the charging dock. . . . . . . . . . . . . . . . . . . . . . . . . . . . . . . . . . . . . . . . . . . . . . 10
Location. . . . . . . . . . . . . . . . . . . . . . . . . . . . . . . . . . . . . . . . . . . . . . . . . . . . . . . . . . . . . . . . . 10
Assembling the charging dock. . . . . . . . . . . . . . . . . . . . . . . . . . . . . . . . . . . . . . . . . . . . . . 11
Disassembling the charging dock. . . . . . . . . . . . . . . . . . . . . . . . . . . . . . . . . . . . . . . . . . . . . . . . . 12
Installing and charging the battery pack. . . . . . . . . . . . . . . . . . . . . . . . . . . . . . . . . . . . . 13
Low battery . . . . . . . . . . . . . . . . . . . . . . . . . . . . . . . . . . . . . . . . . . . . . . . . . . . . . . . . . . . . . . . . . . . 14
Installing the Rovio Setup software . . . . . . . . . . . . . . . . . . . . . . . . . . . . . . . . . . . . . . . . . 15
PC users. . . . . . . . . . . . . . . . . . . . . . . . . . . . . . . . . . . . . . . . . . . . . . . . . . . . . . . . . . . . . . . . . . . . . . . 15
For advanced PC users. . . . . . . . . . . . . . . . . . . . . . . . . . . . . . . . . . . . . . . . . . . . . . . . . . . . . . . . . . 16
Mac users. . . . . . . . . . . . . . . . . . . . . . . . . . . . . . . . . . . . . . . . . . . . . . . . . . . . . . . . . . . . . . . . . . . . . 17
Rovio basics. . . . . . . . . . . . . . . . . . . . . . . . . . . . . . . . . . . . . . . . . . . . . . . . . . . . . . . . . 21
Rovio charging dock. . . . . . . . . . . . . . . . . . . . . . . . . . . . . . . . . . . . . . . . . . . . . . . . . . . . . . .
TrueTrack Beacons. . . . . . . . . . . . . . . . . . . . . . . . . . . . . . . . . . . . . . . . . . . . . . . . . . . . . . . .
Power switch LED light indicator. . . . . . . . . . . . . . . . . . . . . . . . . . . . . . . . . . . . . . . . . . . .
Rovio’s interface. . . . . . . . . . . . . . . . . . . . . . . . . . . . . . . . . . . . . . . . . . . . . . . . . . . . . . . . . .
21
22
22
22
Overview of the Rovio interface . . . . . . . . . . . . . . . . . . . . . . . . . . . . . . . . . . . . . . . 23
Using Rovio’s interface. . . . . . . . . . . . . . . . . . . . . . . . . . . . . . . . . . . . . . . . . . . . . . . . . . . . 23
System requirements. . . . . . . . . . . . . . . . . . . . . . . . . . . . . . . . . . . . . . . . . . . . . . . . . . . . . . . . . . . 23
Web browser supported features . . . . . . . . . . . . . . . . . . . . . . . . . . . . . . . . . . . . . . . . . . . 23
Description of interface . . . . . . . . . . . . . . . . . . . . . . . . . . . . . . . . . . . . . . . . . . . . . . . . . . . 24
Navigation controls. . . . . . . . . . . . . . . . . . . . . . . . . . . . . . . . . . . . . . . . . . . . . . . . . . . . . . . . . . . . . 25
Camera controls . . . . . . . . . . . . . . . . . . . . . . . . . . . . . . . . . . . . . . . . . . . . . . . . . . . . . . . . . . . . . . . 26
Camera capture control. . . . . . . . . . . . . . . . . . . . . . . . . . . . . . . . . . . . . . . . . . . . . . . . . . . . . . . . . 26
Headlight control . . . . . . . . . . . . . . . . . . . . . . . . . . . . . . . . . . . . . . . . . . . . . . . . . . . . . . . . . . . . . . 26
Auxiliary controls . . . . . . . . . . . . . . . . . . . . . . . . . . . . . . . . . . . . . . . . . . . . . . . . . . . . . . . . . . . . . . 27
Indicators . . . . . . . . . . . . . . . . . . . . . . . . . . . . . . . . . . . . . . . . . . . . . . . . . . . . . . . . . . . . . . . . . . . . . 29
Settings. . . . . . . . . . . . . . . . . . . . . . . . . . . . . . . . . . . . . . . . . . . . . . . . . . . . . . . . . . . . . . . . . . . . . . . 30
Rovio online help. . . . . . . . . . . . . . . . . . . . . . . . . . . . . . . . . . . . . . . . . . . . . . . . . . . . . . . . . . . . . . . 36
3
Contents
Video display contextual menu. . . . . . . . . . . . . . . . . . . . . . . . . . . . . . . . . . . . . . . . . . . . . 36
Accessing the interface from your internal network. . . . . . . . . . . . . . . . . . . . . . 37
Setting up port forwarding . . . . . . . . . . . . . . . . . . . . . . . . . . . . . . . . . . . . . . . . . . . . . . . . . . . . . . 38
Using a domain name with Rovio. . . . . . . . . . . . . . . . . . . . . . . . . . . . . . . . . . . . . .
Creating, saving and playing back paths . . . . . . . . . . . . . . . . . . . . . . . . . . . . . . . .
Updating the Rovio firmware. . . . . . . . . . . . . . . . . . . . . . . . . . . . . . . . . . . . . . . . . .
Restoring Rovio to factory defaults . . . . . . . . . . . . . . . . . . . . . . . . . . . . . . . . . . . .
Caring for Rovio. . . . . . . . . . . . . . . . . . . . . . . . . . . . . . . . . . . . . . . . . . . . . . . . . . . . .
39
41
43
44
45
Precautions. . . . . . . . . . . . . . . . . . . . . . . . . . . . . . . . . . . . . . . . . . . . . . . . . . . . . . . . . . . . . . 45
Safety. . . . . . . . . . . . . . . . . . . . . . . . . . . . . . . . . . . . . . . . . . . . . . . . . . . . . . . . . . . . . . . . . . . 45
Use and handling. . . . . . . . . . . . . . . . . . . . . . . . . . . . . . . . . . . . . . . . . . . . . . . . . . . . . . . . . 45
FAQs. . . . . . . . . . . . . . . . . . . . . . . . . . . . . . . . . . . . . . . . . . . . . . . . . . . . . . . . . . . . . . . 46
Appendix A . . . . . . . . . . . . . . . . . . . . . . . . . . . . . . . . . . . . . . . . . . . . . . . . . . . . . . . . . 48
Rovio browser and platform compatibility. . . . . . . . . . . . . . . . . . . . . . . . . . . . . . . . . . . 48
Appendix B . . . . . . . . . . . . . . . . . . . . . . . . . . . . . . . . . . . . . . . . . . . . . . . . . . . . . . . . . 49
Terminology . . . . . . . . . . . . . . . . . . . . . . . . . . . . . . . . . . . . . . . . . . . . . . . . . . . . . . . . . . . . . 49
Index. . . . . . . . . . . . . . . . . . . . . . . . . . . . . . . . . . . . . . . . . . . . . . . . . . . . . . . . . . . . . . . 50
Limited warranty. . . . . . . . . . . . . . . . . . . . . . . . . . . . . . . . . . . . . . . . . . . . . . . . . . . . 52
4
Introduction
5
Introduction
Thank you for purchasing Rovio™ from WowWee™!
With Rovio™, you will always be just a click away from the people and places that are
important to you. Rovio is the Wi-Fi equipped mobile webcam that enables you to
view and interact with its environment through streaming video and audio, wherever
it is! Easily control Rovio remotely 24/7 from anywhere in the world! Use any webequipped device: PC or Mac, cell phone, smartphone, PDA or even your video game
console.
The TrueTrack™ Navigation System allows you to use the Rovio interface to store
waypoints — with one click Rovio will automatically navigate itself to the chosen
point. Rovio’s built-in LED headlight will help you guide it even in dimly lit locations,
so you’ll always know what is going on at home or at the office. Rovio’s self-docking
function allows you to send Rovio back to the charging dock to recharge, with the
click of a button on your browser!
6
Introduction
Package contents
Package contents
This package contains the following:
1 x Rovio™
1 x Charging dock with built-in TrueTrack™ Beacon
1 x Mast
1 x 6 V 3000 mAH
NiMH rechargeable
battery pack
1 x Quick start
guide
1 x 8 V AC/DC adapter
1 x USB cable
1 x User manual
1 x Rovio Setup
CD
7
Quick overview
Rovio
Quick overview
Rovio
USB connector
Neck
Power button
with LED indicator
Antenna
TrueTrack sensor
Microphone
Camera
LED indicators
IR sensors
Headlight
Omni-directional
wheels
Speaker
Underside of Rovio
Battery compartment
Charging contacts
8
Quick overview
Charging dock
Charging dock
Charging dock mast
TrueTrack Beacon
Metal rim
Charging contacts
LED indicator
8 V AC/DC adapter
Back view of charging dock
Dock
Power connector
(From power adapter)
9
Getting started
Battery and power requirements
Getting started
This section describes how to get your Rovio up and running.
Battery and power requirements
This section describes the battery and power requirements for Rovio and its charging
dock with built-in TrueTrack Beacon.
Rovio
Rovio uses a rechargeable 6 V NiMH battery pack (included).
Charging dock and TrueTrack™ Beacon
The charging dock with built-in TrueTrack™ Beacon requires power from an 8V AC/DC
adapter.
Assembling the charging dock
When you first open the Rovio package the charging dock will be in two parts. You
will need to put the parts together and then set up the built-in TrueTrack Beacon.
Location
In order for Rovio to accurately self-dock, the charging dock should ideally be placed
where it will not be disturbed and preferably against a wall. Ideally, the room should
have a flat ceiling no higher than about 10-12 feet (3-3.6 meters) with a clear space
onto which the built-in TrueTrack Beacon can project its infrared beams. Air vents,
large light panels or chandeliers, tall objects or furniture might prevent Rovio from
detecting the signal that is projected onto the ceiling.
Important power adapter information
• Examine the AC/DC adapter regularly for damage to the cord, plug, enclosure and other parts.
• The AC/DC adapter is not a toy.
• Equipment liable to be cleaned with liquid are to be disconnected from the transformer
before cleaning.
10
Getting started
Assembling the charging dock
Assembling the charging dock
To assemble the charging dock:
1. Place the charging dock on the floor in the room you want to use as Rovio’s
home base.
2. Attach the mast to the charging dock by slotting it into position as illustrated.
3. Plug the power cable into the port on the back
of the charging dock and then plug the power
adapter into the electrical outlet.
The LED indicator on the charging dock will
light up, and the TrueTrack Beacon attached to
the dock will light up red.
If the LED indicator on the base does not light
up, it means that there is a problem with the
connection between the mast and the base.
Unplug the power adapter, and detach the mast. To learn how, refer to the
section Disassembling the charging dock. Next, reattach the mast and then
reconnect the adapter.
If the Beacon is not lit, touch the metal rim on the Beacon and it will light up.
11
Getting started
Assembling the charging dock / Disassembling the charging dock
4. Two red dots will project light onto the ceiling. To optimize the signal, point
the red dots at the center of the ceiling away from unsmooth surfaces such as
lighting fixtures, fans, air vents and corners.
NOTES:
The red dots are a guide to help you set up the charging dock. If the light turns
off while you are positioning the dots, touch the metal rim to reactivate it. During
normal operation the red light will not be lit.
In order for Rovio to be able to self-dock and recharge, you must power the charging
dock at all times.
Important battery information
• Use only fresh batteries of the required size and recommended type.
• Rechargeable batteries are only to be charged under adult supervision.
• Respect the correct polarity, (+) and (-).
• Do not throw batteries into the fire.
• The supply terminals are not to be short-circuited.
• Batteries should be replaced by adults.
• Remove batteries if the product is not going to be used for some time.
• This user manual should be kept because it contains important information.
Disassembling the charging dock
To disassemble the charging dock:
1. Unplug the power cable from the back of the charging dock and from the
electrical outlet.
2. Turn the charging dock over and locate the two tabs that hold the mast in
place. Using two fingers, squeeze both tabs towards each other and remove
the mast
12
Getting started
Installing and charging the battery pack
Installing and charging the battery pack
Before you use your Rovio, you need to install and charge the battery pack.
To install the batteries:
1. Locate and open the battery compartment door on the underside of Rovio.
2. Using a Phillips screwdriver (not included) loosen the two screws on the
battery compartment door and remove it.
3. Locate and note the orientation of the battery connector and connect it to the
battery. Insert and connect the battery according to the diagram in step 2.
4. Replace the battery compartment door and tighten the screws using the
screwdriver. Do not over-tighten.
13
Getting started
Installing and charging the battery pack
To charge the batteries:
1. Ensure that the power to the electrical outlet is turned on and that Rovio is
turned on by pressing the power button; Rovio’s LEDs will light up.
2. Place Rovio in its assembled charging dock as illustrated.
The LEDs on Rovio will pulse quickly to indicate that it has begun charging.
3. During charging, the LEDs on Rovio will pulse
slowly; a single charge takes approximately two
hours.
When Rovio has finished charging the LEDs will
remain lit. It is safe to leave Rovio on its charging
dock after the charge has completed.
Low battery
When Rovio’s batteries begin to run low, it will warn you with the following:
• Rovio interface warning message.
• Power switch LED light indicator flashes green, orange or red (refer to the
section Power switch LED light indicator).
If Rovio is in the same room as its charging dock and the interface indicates that it
has a navigation signal, it will automatically try to return to the charging dock when
its batteries are running low after you click on the low battery warning message.
Otherwise, you can send it back to its charging dock by clicking on the Home
button on the interface. Refer to the Auxiliary controls table in the Description of
interface section for details.
If you ignore the request to drive Rovio back to its charging dock and continue to use
it, Rovio will shut off automatically when its batteries are drained, and you might not
be able to drive it back to the charging dock to recharge.
NOTE: Rovio must detect the charging base before it can navigate home.
14
Configuring your Rovio the first time
Installing the Rovio Setup software
Configuring your Rovio the first time
Before you use Rovio for the first time, you will need to configure your Rovio.
To install the Rovio Setup software, your computer set-up must have the following:
• Windows XP™ or Window Vista™
• USB connectivity
• Wireless access point (WAP) device (for example, your wireless router)
• A CD/DVD drive
• A Wi-Fi card (for Ad hoc setup)
NOTE: If you are a Mac user, refer to the subsection Mac users in the section Installing
the Rovio Setup software to learn how to configure Rovio without the Rovio Setup CD.
IMPORTANT: Rovio does not support WPA passwords on wireless access points;
it only supports WEP passwords. For instance, if your wireless router uses a WPA
password, you will need to change it to a WEP password. Refer to your
router’s user manual.
Please go to www.wowweesupport.com to check if a firmware update supporting
WPA has become available.
Installing the Rovio Setup software
This section describes setting up Rovio on PC and Mac computers.
PC users
NOTE: To run the Rovio Setup CD, you need a PC computer running Windows XP™ or
Windows Vista™ equipped with a CD drive.
To run the Rovio Setup:
1. Verify that your wireless router is turned on and working. Also ensure that
Rovio is fully-charged and ON.
2. Insert the Rovio Setup CD in your CD drive on your computer.
15
Configuring your Rovio the first time
Installing the Rovio Setup software
3. If Autoplay is enabled on your computer, the
Rovio Setup installation dialog will appear. If it
does not, locate the RovioSetup.exe file on the
CD and click on it to begin installation.
The Rovio Setup wizard will appear.
4. Follow the onscreen instructions for installing the Rovio Setup software.
NOTE: If you are using the Rovio Setup CD, you should not turn Rovio on while it is
connected to your computer via USB.
For advanced PC users
You can install the Rovio Setup software without the Rovio Setup CD (Ad hoc mode).
Note that you need a WiFi card on your PC. To do so:
NOTE: These instructions for advanced PC users can only be used to first configure
Rovio or after you restore it to its default factory settings.
1. Ensure that Rovio is fully-charged and ON.
2. From your Windows Control Panel, select Network Connection or Network
and Sharing Center (Windows Vista), and then click on the option to create a
new connection.
3. Follow the onscreen instructions to create an advanced connection, that is,
you want to connect directly to another computer.
4. Connect to the ROVIO_WOWWEE network (Rovio’s default SSID).
5. In the Local Area Connection Properties dialog, select the TCP/IP option, and
then click on Properties.
The TCP/IP Properties option appears.
16
Configuring your Rovio the first time
Mac users
6. Select the option Use the following IP address and enter the following
information:
IP address
192.168.10.5
Subnet mask
255.255.255.0
Default gateway
Leave blank
7. Once your Ad hoc connection is established, you can interface directly with
Rovio to change its settings from the Settings button (refer to the Settings
subsection in the Description of interface section). Enter http://192.168.10.18
in the address bar of your Internet browser.
Your Rovio is now configured to work on your internal network.
NOTES:
Once configured on your internal network, or if you have changed Rovio’s settings,
you can reset Rovio to Ad hoc mode via its interface.
You can configure Rovio to be accessible from an external network; follow the links in
the setup wizard for further details, refer to the WowWee Support site
(www.wowweesupport.com), or refer to the section Using Rovio from an external
network.
Mac users
If you are running a Mac you will need to configure your Rovio without the Rovio
Setup CD.
NOTE: You need to be logged in with administrative privileges.
To do so:
1. Verify that your AirPort is on and
connected to your wireless router
(this should also be turned on and
working). Ensure that Rovio is fully
charged and ON.
17
Configuring your Rovio the first time
Mac users
2. Note your current Wi-Fi settings.
a. From the Apple menu, select System Preferences.
b. Select the Network option and then select AirPort located in the Network
Status pane.
c. Click on the Advanced button, and then select the TCP/IP tab. Note all
the network settings that appear, as you will need them throughout the
configuration.
3. You need to verify the IP address that you will use for Rovio. From the Finder
select Applications, then Utilities, then select Terminal.
a. Type ping -c2 and then
type the first three sets
of numbers from the IP
address you noted in
step 2c (e.g. ping -c2
210.172.15)
followed by 6 (e.g. ping -c2 210.172.15.6) and press Enter.
b. If the application returns with a data message containing
0 packets received, note the IP address and continue to step 4.
c. If the application
returns with 1 packet
received or 2 packets
received the IP address
is not available. To try
a different IP address,
repeat step 3a adding
1 to the final digit (e.g.
ping -c2 210.172.15.7).
Continue to add 1 to the final figure until you receive the data message
0 packets received. Note the IP address.
18
Configuring your Rovio the first time
Mac users
4. You need to connect directly to your Rovio (Ad hoc connection). Click on
AirPort in the menu bar on top of the screen. Select the ROVIO_WOWWEE
network (your Rovio).
5. You now need to adjust the TCP/IP settings for your computer to work with
Rovio. To do so:
a. From the Apple menu, select System Preferences.
b. Select the Network option and then select AirPort located in the Network
Status pane.
c. Click on the Advanced button, and then select the TCP/IP tab.
d. From the Configure IP options, change the setting to Manually.
e. In the IP Address field, enter 192.168.10.2 and then click on OK. This will
be the IP address of your computer.
6. In the address bar of your preferred web browser, enter http://192.168.10.18;
this is default the IP address for your Rovio. You should now be able to view
the Rovio interface.
If you do not see Rovio’s interface, try resetting your Rovio by turning it OFF
and then ON again. Wait until the LED on the power button turns from orange
to green and then refresh the web browser.
19
Configuring your Rovio the first time
Mac users
7. Now you will configure Rovio’s
network settings to work with your
router. In the Rovio interface, click
on the Settings button located at
the top right. Select the Network
tab.
8. In the SSID field, type in the name
of your wireless network (i.e. your
router).
9. Change the mode to Infrastructure.
10.Next, if you use a wireless network
password, you will need to enter it.
Select the type of Encryption (e.g.
WEP 64) and then select the type
of Key (e.g. ASCII). Enter the router’s
password in the field.
11.In the IP Setup section select
Manually
12.In the IP address field, enter the IP
address you noted down at step 3.
13.Using the settings you noted at step 2c, enter the Subnet mask, Default
gateway (this is your router’s IP) and DNS (if any) information, and then click
on Update.
14.You now need to connect to your wireless network. From the System
Preferences item of your Apple menu, select Network, then AirPort, and then
re-enter the settings details you noted at step 2c for your wireless network.
Your Rovio is now connected to your internal wireless network.
20
Rovio basics
15.In the address bar of your web browser, enter in the IP address you entered in
the Rovio settings from step 11 (e.g. 210.172.15.7). You can now control your
Rovio using its interface.
NOTE: If you want to set a password for your Rovio, turn the security settings on or
off, or add a new user, click on the Settings button in the Rovio interface, and then
select the Security tab. Enter the information for a new user.
Uninstalling the Rovio Setup software
To uninstall the Rovio Setup software (Windows users only):
• From Program Files, locate the WowWee/Rovio directory, and then select Uninstall.
Follow the onscreen instructions to uninstall the software.
Rovio basics
Rovio charging dock
The charging dock is used as Rovio’s home base where it can recharge and be stored
when it is not being used. Using Rovio’s interface, you can click on the Home button
and Rovio will automatically navigate itself back to the charging dock to recharge.
NOTE: You need to set the home position before you can use the send home function.
To set the home position:
1. Place Rovio in its charging dock.
2. Click on the Save Home button
. Rovio will drive away from the charging
dock, record the home position, and then automatically dock itself in the
charging dock
NOTES:
Ensure that Rovio’s neck is down (i.e. horizontal) while you save its home position.
Rovio will automatically lower its neck when returning to its charging dock while selfdocking.
21
Rovio basics
TrueTrack Beacons
Rovio uses TrueTrack Beacons to help it locate its charging dock (home base). The
charging dock comes with a built-in TrueTrack Beacon. The Beacon projects two IR
signals on the ceiling that Rovio uses as its guiding lights to track the location of the
Beacon.
To extend Rovio’s navigation distance, you can install additional TrueTrack Room
Beacons (sold separately) to help it locate additional rooms to which you want Rovio
to navigate.
Power switch LED light indicator
The following table describes the power switch LED light indicator colors:
Power switch light
color
Description
Green
Network connection is functioning properly.
Green (blinking)
Low battery. Network connection is functioning properly.
Orange
Rovio is booting and/or trying to connect to a network.
Orange (blinking)
Low battery. Rovio is booting and/or trying to connect to
a network.
Red
Network connection is functioning properly and Rovio is
being accessed.
Red (blinking)
Low battery. Network connection is functioning properly
and Rovio is being accessed.
Rovio’s interface
Rovio’s interface is entirely browser-based, which means you can access Rovio via
the Internet using any web-enabled device. Refer to the section Overview of Rovio
interface for more details.
22
Overview of the Rovio interface
Using Rovio’s interface
Overview of the Rovio interface
This section describes Rovio’s user interface.
Using Rovio’s interface
To control Rovio you must have a web-enabled device.
System requirements
Your web-enabled device must meet the following system requirements:
• Device running one of the following browsers:
• Internet Explorer 6 or higher*, or
• Mozilla Firefox 1.5 or higher, or
• Safari 3.0, or
• Mobile Safari, or
• Internet Explorer Mobile, or
• Opera Mobile.
• Wireless access point (WAP) device connected to your PC
(for example, a wireless router)
• High-speed Internet connection
*Internet Explorer 6 or higher required for two-way audio feature.
Web browser supported features
The following table describes Rovio’s supported features according to the web
browser.
Browser
Video
Audio
Internet Explorer
(6.0 and up)
MPEG4
Mono, 8-bit
Mozilla Firefox
(1.5 and up)
M-JPEG (motion JPEG)
Not available
Safari
M-JPEG (motion JPEG)
Not available
Opera
M-JPEG (motion JPEG)
Not available
For a more complete list of browser features, refer to Appendix A.
23
Overview of Rovio’s interface
Description of interface
Description of interface
This section outlines the main controls in the Rovio user interface.
1. Navigation controls
2. Camera position controls
3. Camera capture control
4. Headlight control
5. Auxiliary controls
6. Indicators
7. Settings
8. Video display pane
9. Rovio online help
24
Overview of Rovio’s interface
Navigation controls
The following tables outline the main controls in the Rovio user interface.
NOTE: Depending on the web browser you use, some of these options might not be
available.
Navigation controls
Command
Description
Rotation buttons
Allows you to rotate Rovio on the spot in increments.
Rotate Rovio counter-clockwise. Click on the button and hold
for continuous turning.
Rotate Rovio clockwise. Click on the button and hold for
continuous turning.
Rotate Rovio a set number of degrees relative to its current
position: around 45, 90, 135, 180 degrees clockwise or counterclockwise.
Direction arrows
Directs Rovio left (left arrow), right (right arrow), forward (up
arrow) and backward (down arrow).
You can also use the following keyboard buttons to direct
Rovio: a or left keyboard arrow (strafe left), d or right keyboard
arrow (strafe right), w or up keyboard arrow (forwards), s or
back keyboard arrow (backwards), q (turn left), e (turn right),
Space bar (to stop driving autonomously), -/+ (to toggle
speeds).
Joystick pad
Moves Rovio in the direction in which you drag the Rovio icon
on the joystick pad.
25
Overview of Rovio’s interface
Camera controls, Camera capture control, Headlight control
Camera controls
Command
Description
Camera position low
Positions the neck at the lowest position.
You can also use the keyboard button 1.
Camera position mid-way
Positions the neck mid-way.
You can also use the keyboard button 2.
Camera position high
Positions the neck at full height.
You can also use the keyboard button 3.
Camera capture control
Command
Description
Camera
Allows you to take a still photo screen capture and send it to a
specified email address.
NOTE: To send the screen capture to a specified email, you
need to first configure the screen capture settings. Refer to the
description of the Photo tab in the Settings section.
Headlight control
26
Command
Description
Headlight
Toggles Rovio’s headlight.
Overview of Rovio’s interface
Auxiliary controls
Auxiliary controls
Command
Description
Paths tab
Allows you to set path of way points to which Rovio will
navigate.
Refer to the section Creating and saving paths for more
details.
Record/Save
Records a path and then saves it to Rovio’s memory using
a path name.
When you record a path, all commands are recorded
including head positions, photo, and headlight commands..
Delete
Deletes the selected path.
Reset All
Deletes all paths.
Stop
Stops Rovio’s driving while moving along the current path.
Save Home
Saves the current location as Rovio’s home position (home
base).
Home
Send Rovio back to charging dock. Note that you need to
first set the home position (home base).
You can also use the keyboard button H for this function
NOTE: Rovio must be able to detect its charging dock (i.e.
Room 0) in order to navigate home..
Visual Tab
Allows you to toggle the speed and quality of the
streaming video.
Use the slider to adjust the video quality. Move the slider
to the left to decrease the video quality, that is, stream
faster video (less frames/second and lower resolution);
move the slider to the right to increase the video frame
rate and resolution.
27
Overview of Rovio’s interface
Auxiliary controls
Command
Video priority
slider
Description
Adjusts Rovio’s video quality by adjusting video frame rate
and quality. Move the slider to the left to lower the frame
rate and quality; move the slider towards the right to
increase the frame rate and quality.
Video
Adjusts the brightness of the video stream from Rovio.
brightness slider Move the slider to the left to lower the brightness; move
the slider towards the right to increase brightness.
Maintain Ratio
Audio tab
Enable this option to maintain the aspect ratio of the
video stream when it is resized. This option is enabled by
default.
Allows you to adjust Rovio’s output audio levels.
NOTE: Depending on the web browser you use, some of
these options might not be available.
28
Rovio’s Speaker
Volume
Use the slider to adjust Rovio’s speaker level. Move the
slider to the left to lower the output level; move the slider
towards the right to increase the output level.
Rovio’s Mic
Volume
Use the slider to adjust Rovio’s microphone levels. Move
the slider to the left to lower the microphone input
levels; move the slider towards the right to increase the
microphone input levels.
Overview of Rovio’s interface
Indicators
Indicators
Indicator
Description
Nav
Indicates the strength of the navigation signal received from the
charging dock or a TrueTrack Room Beacon.
Full bars indicate a strong signal.
0-9
Indicates the room ID number assigned to a room, as set on the
TrueTrack Room Beacon (sold separately).
0 is always assigned to the charging dock.
Note that the room ID numbers only appear when the Beacon is
in range.
Battery
Indicates the strength of Rovio’s battery.
Full bars indicate a fully charged battery.
Status
Indicates Rovio’s current driving status.
Options: Roaming, Saving Home, Home Saved, Going Home,
Docked, Recording Path, Following a [name of a path], Low
navigation signal, No navigation signal.
Wi-Fi
Indicates the strength of the wireless Internet connection
(Wi-Fi signal).
Full bars indicate a strong signal.
29
Overview of Rovio’s interface
Settings (Video and Movement tab)
Settings
This button allows you to specify various settings for Rovio including video
preferences, router information and security settings.
NOTE: Changes in the Settings menu are not recordable.
Command
Description
Video tab
Allows you to adjust video settings.
Resolution
Set the video resolution to the required size (in pixels).
Options: 176x144, 320x240, 352x288 (default),
640x480
Quality
Set the quality of the video stream.
Options: Low, Medium (default), High
Frame Rate
Set the video frame rate (fps).
Options: 1 to 30 frames per second (fps). Default is 30
fps.
Brightness
Movement tab
Movement speed
Adjust the brightness of the video stream. Move the
slider to the left to decrease the brightness; move the
slider to the right to increase brightness.
Allows you adjust movement settings
Adjust the speed of Rovio’s movements.
Move the slider to the left to decrease the speed
of the movement; move the slider to the right to
increase speed of the movement.
30
Overview of Rovio’s interface
Settings (Movement and Photo tab)
Command
Turn speed
Description
Adjust the speed of Rovio’s turning movements.
Move the slider to the left to decrease the turning
speed; move the slider to the right to increase turning
speed.
Angle Turn Speed
Adjust the speed of Rovio’s turning angle.
Move the slider to the left to decrease the speed
of the turning angle; move the slider to the right to
increase the speed of the turning angle.
IR Radar
Toggles Rovio’s obstacle detection feature.
When enabled, Rovio’s viewing area lights up light
blue on the joystick pad. When it is playing back a
path and detects an obstacle, a flashing block appears
at the top of the joystick pad and Rovio will stop
moving towards the object and attempt to find a path
around the obstacle.
NOTE: When you manually drive Rovio, it can only
detect obstacles as it approaches them, but not avoid
them.
Photo tab
Specify settings for emailing screen captures from
Rovio’s interface.
Enable Email Photo
Toggles the screen capture emailing function. Enable
the option to allow the screen capture emailing
function.
SMTP settings
Specify an SMTP server.
Refer to your email client settings for reference.
SMTP Port
Specifies the port to use for your SMTP server.
Default is 25.
Username
Enter the username you use for your mail server, if
required..
31
Overview of Rovio’s interface
Settings (Photo and Security tab)
Command
Description
Password
Enter the password you use for your mail server, if
required..
Confirm Password
Enter the same password you use in the Password
field, if required..
Email Settings
Specify email settings to which you send video screen
captures.
Sender Email
Address
Specify an email address from which to send video
screen captures.
Receiver Email
Address
Specify a destination email address to which to email
video screen captures.
Email Subject
Specify a subject line for your video screen capture
email.
Email body
Enter the text you want to appear in the body of the
email you want for your video screen capture email.
Security tab.
Enable User
Authentication
Allows you to adjust security settings
Toggles the user authentication option.
Click on the Update button to save the setting.
User Accounts
New User
Username
Create a username for a new user on your Rovio.
Password
Create a password for the user being created for your
Rovio.
Confirm
Enter the same password you entered in the password
field.
Admin Access
Allows you to create and manage accounts for
administrative use.
Also allows user acess permission settings.
Add User
32
Click to add additional new users.
Overview of Rovio’s interface
Settings (Network tabs)
Command
Description
Network tab
Allows you to specify network options and settings
Wi-Fi Settings
Specify the wireless connection settings.
SSID
Specify the name of the wireless router (SSID) you
will use with Rovio. Also, in Ad hoc mode, it indicates
the name of the Ad hoc network to which you are
connected.
Refer to your router settings for reference.
MAC Address
Specify the MAC address of Rovio.
Mode
Specify an Infrastructure or Ad hoc mode of
networking. Default is Ad hoc.
Channel
Selects a Wi-Fi channel on the router used to
communicate with Rovio (used for Ad hoc mode).
Note: No router is used in Ad hoc mode.
Encryption
Specify the type of encryption used for your router.
Disable
No encryption used.
WEP 64
Use the 64-bit encryption key used for your router.
Refer to your router settings for reference.
WEP 128
Use the 128-bit encryption key used for your router.
Refer to your router settings for reference.
Key
Specify a password key (WEP key) used on your router
(in ASCII or HEX).
Web Port
Specify a communication channel on the router on
which to use Rovio. Default channel is 80.
33
Overview of Rovio’s interface
Settings (Network tab)
Command
Description
IP Setup
Allows you specify IP settings for your Rovio and
router.
Automatically Automatically select an IP address based on the
from DHCP
router’s DHCP settings.
Select this option if you do not want to specify an IP
address.
NOTE: Selecting this option disables the options
for manually setting Rovio’s IP address (i.e. Rovio IP
address, Subnet mask, Default gateway, and DNS
options).
Manually
Specify an explicit IP address for your Rovio.
Rovio IP address
Specify an IP address for Rovio.
Subnet mask
Specify a range of addresses to use with Rovio.
Use 255.255.255.0 if you do not have a specific
subnet mask.
Default gateway
Specify a default network node (gateway) to use with
Rovio.
The default gateway address should be the IP address
of your router.
DNS
Specify the DNS server. Used to resolve DNS names to
IP addresses for DNS names.
Refer to your router’s settings for reference.
34
Update
Save all settings specified on this tab.
Reset
Erase all settings on this tab.
Overview of Rovio’s interface
Settings (Network tab)
Command
Description
Domain tab
Allows you to specify a dynamic domain name
system.
Refer to section Using a domain name with Rovio for
more information.
Enable
Toggle whether you to want to use a dynamic domain
name system to access Rovio.
Server
Specifies the server.
Domain
Specifies the domain name.
Username
Specifies the username for your account.
Password
Specifies the password for your account.
Confirm
Enter the password from the Password field.
Overwrite IP
Allows you to overwrite and specify the IP address
that is sent to your dynamic DNS server.
Proxy Settings
(optional)
Allows you to specify settings for a proxy server, if you
use one.
Server
Specifies the server..
Port
Specifies the port to use..
Username
Specifies the username for your account.
Password
Specifies the password for your account.
Update
Saves all settings specified on this tab.
Reset
Erases all settings on this tab.
Check Status
Allows you to verify Rovio’s status and its connection
with your DNS server.
35
Overview of Rovio’s interface
Settings (System tab), Rovio online help, Video display contextual menu
Command
Description
System tab
Allows you to reboot Rovio, restore system defaults,
and update Rovio’s firmware.
Reboot system
Click on the Reboot button to reboot Rovio.
Restore Default
Settings
Click on the Restore button to restore default settings
to Rovio.
Update Firmware
Image
Allows you to update the Rovio firmware.
Refer to Updating the Rovio firmware for more
information.
Rovio online help
Command
Description
Help
Accesses contextual help for the Rovio interface. Click on the
Help button to access.
Video display contextual menu
The table below outlines the options available in the contextual menu (right-click) for
the video display window.
NOTE: This contextual menu is only available for Internet Explorer on a PC platform.
Command
Description
Quality
Allows you to toggle the quality of the video stream.
Low
Low image quality video stream.
Medium
High image quality video stream.
High
Highest image quality video stream.
Resolution
Allows you to adjust the resolution of the video stream, in pixels.
176 x 144, 320 x 240, 352 x 288, 640 x 480
36
Accessing the interface from your internal network
Command
Description
Save Current
Image As
Allows you to save screen capture in JPEG format.
Start/Stop Mic
Toggle the microphone on your computer.
To save the screen capture, select this option, then name and
save the file to your computer.
NOTES:
This option only available on Internet Explorer on a PC
(i.e. supports two-way audio streams).
You should avoid using your computer microphone in the same
room as Rovio as it will create audio feedback.
Accessing the interface from your internal network
To access Rovio’s interface:
• In address bar of your browser window, enter the IP address of your Rovio
(e.g. 192.168.10.18).
NOTE: If you do not have the required ActiveX component installed in your Internet
Explorer browser, you will be prompted to install it when you access Rovio’s interface
(otherwise you will not be able to view the streaming video). When prompted, install
the required ActiveX.
To be able to access Rovio’s interface from outside your internal network, you will
need to set up port forwarding. Refer to the section, Using Rovio from an external
network.
37
Using Rovio from an external network
Setting up port forwarding
Using Rovio from an external network
To be able to use Rovio outside your internal network, you will need to set up port
forwarding on your wireless router to be able to communicate with Rovio.
Setting up port forwarding
To be able to access Rovio over the internet from any internet access point, you will
need to open up the required ports on your router (port forwarding).
Refer to your router’s user manual on how to set up port forwarding. If you do not
have a user manual for your router, you will need to refer to external sources to set
up your router for port forwarding.
To do so:
1. Determine and note the make and model of your wireless router.
2. Refer to the WowWee Support site (www.wowweesupport.com) for
information on locating port forwarding information for your router. You will
need this information to set the port forwarding details in Rovio’s settings.
For Rovio, you will need to open up 2 ports: port 80 and port 554. Port 80 is
for the M-JPEG stream and control over the Rovio; port 554 is for the MPEG4
and audio stream.
Configure your ports with the following options:
Port 80
Port 554
Protocol
TCP
TCP
External TCP/IP Port
80
554
IP Address
[Rovio’s internal IP address]* [Rovio’s internal IP address]*
Internal TCP/IP Port
80
554
*Refer to the description of the Network tab in the section Overview of Rovio’s
interface to determine your Rovio’s internal IP adress.
38
Using a domain name with Rovio
4. Save your router’s port forwarding settings.
5. Test your configuration using a computer or other web-enabled device outside
your internal network. You can also test your Rovio using port forwarding
tools. Refer to the WowWee Support site for more details.
Your Rovio is now set up for access outside your internal network.
NOTE: Some Internet service providers do not allow for outbound traffic on port 80,
in which case you might need to choose another port (other than 80) that is open
for outbound traffic, for example, 8080. To do so, access Rovio’s network settings ,
enter the new port number in the Web Port field and then save your changes. In this
case, to access Rovio, you will need to enter the full web address including the port
number, for example http://192.168.10.18:8080.
Using a domain name with Rovio
Once you have your external port forwarding configured, you can use a dynamic
domain name system (DNS) with your Rovio, for instance abc.myrovio.com.
If you have previously registered a domain name you want to use with Rovio, you can
configure Rovio to use the domain name instead of an IP address.
If you do not have a domain name previously registered, you can do so from a
number of dynamic DNS service providers.
39
Using a domain name with Rovio
Once your ports are set up for forwarding, you can log onto Rovio to set up your
domain name. To set up your domain name to be used with Rovio:
1. From the Rovio interface, select Settings, then select the Domain tab.
2. On the Domain tab, enable the Enable option.
3. Enter the server information for your domain in the Server field.
4. Enter the domain name information for your domain in the Domain field (for
example, abc.myrovio.com).
5. Enter the user name for your account in the Username field.
6. Enter the password for your account in the Password field.
If you use a proxy server (optional), you can enter the information in the
Proxy Settings area.
7. Click on Update to save your settings.
Your Rovio is now configured to use your registered domain name. You can now enter
your domain name in the address bar of your browser to access Rovio.
NOTES:
If you created a login and password for Rovio, you will be prompted to enter this
information when you access it.
If you used a port other than 80 for outbound traffic (see the section Using Rovio
from an external network), you will need to use the port number in your web address.
40
Creating, saving and playing back paths
Creating, saving and playing back paths
You can create up to ten paths for Rovio to remember and play back. A path can be
made up of several actions in any order, including:
• A route that Rovio drives
• Moving the camera position
• Taking and emailing a photo
To create a path:
1. On the Paths tab in the Rovio interface, click on the Record button to begin
recording your path.
2. Drive your Rovio to the location you want the path go to.
3. Click on the Save Path button to stop recording and save the path. You will
be prompted to name the path (default name is New Path). The path will be
saved in Rovio’s memory.
4. Repeat for any other paths you want to create.
NOTES:
Do not click Stop while recording a path. This will reset the record function and Rovio
will not save the path.
For large areas, multiple rooms, and/or areas with many walls, you should set up
multiple TrueTrack Room Beacons (sold separately).
To rename a path, click on the path from the list and then edit the name.
To play back a path:
• On the Paths tab in the Rovio interface, doubleclick on the name of the path you want to play.
When it has played back the path, it will await a new
command.
41
Using Rovio with VoIP applications
To delete a path:
1. On the Paths tab in the Rovio interface, select the name of the path you want
to delete.
2. Click on the Delete button to delete the path.
Using Rovio with VoIP applications
You can use Rovio as your mobile webcam with VoIP applications in Windows® XP™
or Windows® Vista on PC platforms (such as Skype™ or Windows Live Messenger
Call) after you install the Rovio Setup software; this allows you to use Rovio for
streaming video. You first need to configure your application to use Rovio as your
webcam in video chats.
NOTE: When you use Rovio for your VoIP webcam, there is no audio stream. In this
case, for audio, you should use a separate computer microphone (not included).
To do so:
1. Locate the video settings options in your VoIP application.
2. Select Rovio IP Camera as your default camera and then confirm your
selection.
3. Locate the camera properties dialog in the VoIP application. Enter your the
IP address of the Rovio you want to use. You will also need to enter your
username and password, if security is enabled, and then click on OK.
You should test and preview the camera’s video stream; most VoIP applications allow
you to preview the video using the application’s interface.
You can now use Rovio as your webcam when you have video chats with your
contacts.
For any updates to the Rovio VoIP application plugins, refer to the Rovio site
(www.myrovio.com) or to the WowWee Support site (www.wowweesupport.com).
42
NOTE: There is no audio support for third party applications. Refer to the product
support or WowWee Support sites for more information.
Updating the Rovio firmware
Updating the Rovio firmware
When firmware updates are available, you can download them and update the Rovio.
NOTES:
Ensure that Rovio is on and connected to your network. Also make sure that Rovio
has enough battery power before updating it.
All your settings will be overwritten when you update the firmware image. You will
need to manually reconfigure them after updating firmware.
IMPORTANT: Do not unplug Rovio from your computer (if plugged to the computer)
nor turn it off while the firmware is being updated. Ensure Rovio is on. To update the
Rovio firmware image:
1. From the Rovio product site (www.myrovio.com) or the WowWee Support
site (www.wowweesupport.com), locate the link for the latest Rovio
firmware image and download it to your computer.
2. Make sure Rovio is ON. In the Rovio interface, click the Settings button.
3. In the System tab, locate the Select Firmware Image field, and click on the
Browse button. A Choose file dialog appears.
4. Locate the Rovio firmware image file you downloaded (*.bin) and then click
on Open.
5. Click on Update to update the firmware image. Wait for Rovio to reboot.
Your Rovio should be updated with the latest firmware. You can verify the version
number of the firmware in Rovio’s interface (located on the System tab of the
Settings menu).
IMPORTANT: Do not turn off Rovio until it has finished updating. The update will not
take effect until you reboot Rovio. Ensure you have a full battery so that it does not
lose power during the update.
You can also restore Rovio’s default firmware using the Rovio Restore wizard. Refer to
the section Restoring Rovio to factory defaults for more information.
43
Restoring Rovio to factory defaults
Restoring Rovio to factory defaults
You can restore Rovio to its factory defaults, including its firmware, using the Rovio
interface or the Rovio Restore wizard (using a PC), for instance, if you need to change
the security settings.
To do so:
• From the Program Files directory, locate and run the Rovio Restore wizard
(on a PC) and then follow the onscreen instructions.
OR
1. In the Rovio interface, click on the Settings button.
2. Select the System tab.
3. Click on the Restore defaults button.
Rovio will be restored to the original factory settings.
You can then run the Rovio Setup wizard again to reconfigure Rovio.
44
Caring for Rovio
Safety
Caring for Rovio
This section outlines various precautions, instructions and warnings on caring for
Rovio.
Precautions
Before using this product, read this user manual and retain it for future reference.
Safety
This product has been designed with the highest concern for safety. However,
note that any electrical device if used improperly has the potential of causing fire,
electrical shock or personal injury. To help ensure accident-free operation, you should
follow the guidelines outlined below:
• Observe all warnings, precautions, and instructions.
• If the device functions in an abnormal manner, produces unusual sounds or odors,
or if it becomes hot to the touch, stop use, unplug the AC adapter (if used) from the
electrical outlet, and disconnect any other cables to the object immediately.
Use and handling
• Do not use Rovio near water.
• Do not immerse Rovio or any parts of it in water.
• Do not expose Rovio to high temperatures, high humidity, or direct sunlight.
• Do not expose Rovio to dust, smoke or steam.
• Do not allow liquid or small particles to get into Rovio.
• Do not place Rovio on surfaces that are unstable or subject to vibrations.
• Do not throw or drop Rovio, or subject Rovio to strong physical shock.
• Do not place Rovio close to items with a magnetic strip, such as a credit card.
• Do not touch the TrueTrack sensors.
• Avoid touching the camera lens as much as possible.
• When required, gently clean the camera lens surface with a soft,
non-abrasive cloth.
• Never manually force Rovio’s neck up or down.
45
FAQs
FAQs
This section lists frequently asked questions about Rovio.
Q: I clicked on the Home button, but Rovio can’t seem to find its charging dock properly.
What’s wrong?
A: There are number of reasons why Rovio can’t find its home base properly including:
• You did not properly set Rovio’s home base to begin with. Verify that you have
saved Rovio’s home base first.
• There are obstacles in the way.
• The charging dock is not properly placed.
• The navigation signal of the charging dock is too weak or there is no signal.
• Too many infrared signals or direct sunlight on the sensors causing interference.
Q: Rovio’s interface is loaded but I do not see the video stream … what’s wrong?
A: Possible causes and solutions:
• Make sure that Rovio is turned on. It might have been turned off while you
were logging into Rovio’s interface.
• The port forwarding settings are incorrect. Verify your port forwarding settings
in your router’s firmware interface.
• The required ActiveX is not installed for Internet Explorer. To install the required
ActiveX component, click on the link that appears in the Rovio display panel
or in the bar that appears at the top of the Internet Explorer window when
you are prompted. Follow the onscreen instructions for installing the ActiveX
component. If the link does not appear, verify that your pop-up blocker is
turned off, and your security settings are NOT set to High.
Q: Why is there no audio stream from Rovio?
A: Possible causes and solutions:
• Two-way audio streaming is only supported on PC platforms running Internet
Explorer 6.0 and up. Refer to Appendix A for a list of browser
compatibility features.
• If you are using Internet Explorer on a PC, your volume levels might be low.
46
FAQs
Q: I am trying to play back a path that I previously saved but Rovio doesn’t seem to play
it back properly... What’s wrong??
A: There might be a few reasons why Rovio won’t play back a path, including:
• Rovio’s batteries are weak or depleted and need recharging.
• Rovio cannot detect the Room Beacons, for instance, they might have been
moved from their original location or are not powered.
• There are obstacles in the way.
• The navigation signal is too weak or there is no signal.
• Too many infrared signals or direct sunlight on the sensors causing interference.
For more answers to questions, refer to www.myrovio.com or the WowWee Support
site at www.wowweesupport.com.
47
Appendix A
Rovio browser and platform compatibility
Appendix A
Rovio browser and platform compatibility
This table outlines Rovio browser and platform compatibility.
Safari
o
o
o
o
embedded browser
o
Mobile devices with
Mozilla
Firefox
o
Nintendo Wii
Mac computer
*
iPhone/ Pod Touch
PC computer
Internet
Explorer
x
Opera
Internet browser
Platform
√o
o
o
o
x = Two-way mono audio streaming* and MPEG4 video streaming.
o = Supports M-JPEG (motion JPEG) streaming. No audio.
√ = For Internet Explorer Mobile, image must be requested manually (i.e. not automatic streaming
video). No audio.
* Note on Mac platforms,Internet Explorer is no longer supported as of version 5.2.3.
48
Appendix B
Terminology
Appendix B
Terminology
Some of the terms used in this manual are specific to Rovio.
• ActiveX: Used to create software components for a specific function or set of
functions for Windows platforms. Rovio uses ActiveX in Internet Explorer to allow
streaming video and audio.
• Ad hoc: In networking, a type of protocol in which the network is created “on-thefly” or decentralized. When you connect directly to Rovio using your computer,
you are connecting to it using an Ad hoc connection (vs. connecting to it through a
router).
• DHCP: Dynamic host Configuration Protocol. A type of networking protocol for
computer which determines the IP address when using dynamic IP addressing.
• IP address: Internet Protocol address. A unique address for electronic devices such
as computers or routers to identify the device over a computer network.
• MAC address: Media Access Control address. An identifier for most network
adapters that distinguishes hardware devices from each other on a network.
Sometimes referred to as an Ethernet address.
• Ports: A virtual data connection to exchange data, especially between computers
and the Internet.
• SSID: Service set identifier. Used to identify a router.
• Subnet mask: A range of logical addresses for which all devices in the network are
members.
• Way points: In navigation, a reference point or location reference. For Rovio, a way
point can be a location in your home which it can save to memory and to which it
will drive when playing back paths..
• Wi-Fi: Wireless technology.
49
Index
Index
A
accounts
managing 32
ActiveX 46, 49
Ad hoc 49
Ad hoc setup
Mac users 17
PC users 16
administrative privileges 17
aspect ratio 28
audio levels
output 28
audio stream
troubleshooting 46
B
batteries
charging 14
installing 13
battery
indicator 29
requirements 10
brightness 28, 30
browser compatibility 48
browsers
Internet Explorer 48
Mozilla Firefox 48
Opera 48
Safari 48
C
channel
Wi-Fi 33
charging dock 14, 21
assembling 10–11
disassembling 12
location 10
overview 9
powering 11, 12
setup 12
connection
Ad hoc 17, 19
D
DHCP 49
DHCP settings 34
DNS server 34, 35
domain name 40
domain name system. See DNS sever
50
E
encryption 33
router 33
F
frame rate 30
H
Home button 14, 27, 46
home position. See Home button; See also Save
Home button
setting 21
I
infrared beams 10
interface 19
Internet Explorer 46, 48
IP addres
Rovio 34
IP address 49
pinging 18
Rovio default 19
IR Radar 31
M
MAC address 33, 49
Mac user 15
modes
Ad hoc 33
infrastructure 20, 33
movements
turning 31
movement settings 30
Mozilla Firefox 48
N
navigation
signal strength 29
network settings 33
O
obstacle detection 31
Opera 48
P
package contents 7
paths 27
deleting 27
deleting all saved 27
interrupting driving 27
recording 27
saving 27
platform compatibility 48
port 80 38
Index
port 554 38
port forwarding 38
Ports
definition 49
power
requirements 10
power switch 22
R
Room Beacon. See True Track Room Beacon
room ID number 29
Rovio
configuring the first time 15
default IP address 19
overview 8
reconfiguring 44
Rovio Setup CD 15, 16
Rovio Setup software 15
installing on PC 15
uninstalling 21
S
U
USB 15, 16
V
video
quality 27
speed 27
video quality 30
W
way points 27
definition 49
web port 33
WEP 64 33
WEP 128 33
WEP key 33
WEP password 15. See WEP key
wireless
signal strength 29
wireless connection settings 33
WPA password 15
Safari 48
Save Home button 21, 27
screen captures
emailing 31
security settings 32
self-docking function 10, 12
settings
DHCP 34
email 32
movement 30
network 33
security 32
video 30
wireless connection 33
SMTP server 31
software
setup 15
speaker level 28
SSID 33, 49
status
indicator
driving 29
subnet mask 34
Subnet mask 49
T
TCP/IP port
external 38
internal 38
True Track Beacon 11–12
TrueTrack Beacon 22
TrueTrack Room Beacon 29
51
Limited warranty
WOWWEE 180-DAY LIMITED WARRANTY
WowWee’s warranty obligations for this Rovio (this “Product”) are limited to the terms set forth below.
WowWee Group Limited (“WowWee”) warrants to the original end-user purchaser that this Product will be free from defects in
materials and workmanship under normal use for a period of 180 days from the date of retail purchase (the “Warranty Period”).
This warranty is extended only to the original end-user purchaser of a new product that was not sold “as is”.
If a defect arises:
(1) you may within 30 days from the date of retail purchase (or such other period specified by the return policies of the place of
purchase) return this Product to the place of purchase, together with the original proof of purchase and either the original box
or the UPC code label from the box, and this Product will be replaced or, in the event that a replacement for this Product is not
available at the place of purchase, either a refund of the purchase price for this Product or an store credit of equivalent retail value
will be provided; or
(2) you may after the day that is 30 days from the date of retail purchase (or such other period specified by the return policies of
the place of purchase) and within the Warranty Period contact WowWee Customer Support to arrange for the replacement of this
Product. In the event that a replacement for this Product is not available this Product will be replaced by WowWee with a product
of equivalent or greater retail value.
A purchase receipt or other proof of the date of retail purchase is required in order to claim the benefit of this warranty.
If this Product is replaced, the replacement product becomes your property and the replaced Product becomes WowWee’s
property. If the place of purchase refunds the purchase price of this Product or issues a store credit of equivalent retail value, this
Product must be returned to the place of purchase and becomes WowWee’s property.
EXCLUSIONS AND LIMITATIONS
This warranty covers the normal and intended use of this Product. This warranty does not apply: (a) to damage caused by
accident, abuse, unreasonable use, improper handling and care or other external causes not arising out of defects in materials or
workmanship; (b) to damage caused by power line surge, lightning or acts of God; (c) to damage caused by service performed by
anyone who is not an authorized representative of WowWee; (d) to any hardware, software or other add-on components installed
by the end-user; (e) if this Product has been disassembled or modified in any way; (f) to faulty installation or set-up adjustments;
(g) to consumable parts, such as batteries, unless damage has occurred due to a defect in materials or workmanship; (h) to
cosmetic damage, including but not limited to scratches, dents or broken plastic, or normal wear and tear. Regardless of whether
the camera is in use or not,exposure to extremely bright lights or objects can damage the CMOS camera sensor. This warranty
specifically excludes any damage to the CMOS sensor resulting from exposure to extremely bright lights or objects, whether
accidental or deliberate.
THIS WARRANTY GIVES YOU SPECIFIC LEGAL RIGHTS AND YOU MIGHT ALSO HAVE OTHER RIGHTS THAT VARY FROM STATE
TO STATE. WOWWEE’S RESPONSIBITLITY FOR PRODUCT DEFECTS IS LIMITED TO THE REPLACEMENT OF THIS PRODUCT OR
THE REFUND OF THE PURCHASE PRICE FOR THIS PRODUCT. ALL EXPRESS AND IMPLIED WARRANTIES, INCLUDING BUT NOT
LIMITED TO ANY IMPLIED WARRANTIES AND CONDITIONS OF MERCHANTABILITY AND FITNESS FOR A PARTICULAR PURPOSE,
ARE LIMITED IN TIME TO THE TERM OF THIS LIMITED WARRANTY. NO WARRANTIES, WHETHER EXPRESS OR IMPLIED, WILL APPLY
AFTER THE EXPIRATION OF THE LIMITED WARRANTY PERIOD. If any term of this warranty is held to be illegal or unenforceable,
the legality or enforceability of the remaining terms shall not be affected or impaired.
EXCEPT AS PROVIDED IN THIS WARRANTY AND TO THE EXTENT PERMITTED BY LAW, WOWWEE IS NOT RESPONSIBLE FOR
DIRECT, SPECIAL, INCIDENTAL OR CONSEQUENTIAL DAMAGES HOWSOEVER CAUSED RESULTING FROM BREACH OF WARRANTY
OR CONDITION OR UNDER ANY OTHER LEGAL THEORY, INCLUDING BUT NOT LIMITED TO LOSS OF USE. THE FOREGOING
LIMITATION SHALL NOT APPLY TO DEATH OR PERSONAL INJURY CLAIMS, OR ANY STATUTORY LIABILITY FOR INTENTIONAL AND
GROSS NEGLIGENT ACTS AND/OR OMISSIONS.
SOME STATES DO NOT ALLOW THE EXCLUSION OR LIMITATION OF INCIDENTAL OR CONSEQUENTIAL DAMAGES, OR
LIMITATIONS ON HOW LONG AN IMPLIED WARRANTY LASTS, SO THESE LIMITATIONS MIGHT NOT APPLY TO YOU.
Valid only in U.S.A.
52
Limited warranty
For more information on Rovio, go to
www.myrovio.com
If you have any questions that are not answered in this manual, refer to
www.wowweesupport.com
To see the full range of WowWee products, go to
www.wowwee.com
Register your Rovio at
www.wowwee.com
53
This device complies with Part 15 of the FCC Rules. Operation is subject to the
following two conditions: (1) This device may not cause harmful interference, and (2)
This device must accept any interference received, including interference that may
cause undesired operation.
For these purposes, the party responsible is:
WowWee USA Inc.
875 Prospect Suite #202
La Jolla, CA 92037
NOTE
This equipment has been tested and found to comply with the limits for a class B digital device, pursuant to part
15 of the FCC rules. These limits are designed to provide reasonable protection against harmful interference in a
residential installation. This equipment generates, uses and can radiate radio frequency energy and, if not installed
and used in accordance with the instructions, may cause harmful interference to radio communications.
However, there is no guarantee that interference will not occur in a particular Installation. If this equipment does
cause harmful interference to radio or television reception, which can be determined by turning the equipment off
and on, the user is encouraged to try and correct the interference by one or more of the following measures:
- Reorient or relocate the receiving antenna
- Increase the separation between the equipment and receiver
- Connect the equipment into an outlet on a circuit different from that to which the receiver is connected
- Consult the dealer or experienced radio/TV technician for help
CAUTION
Changes or modifications not expressly approved by the party responsible for compliance could void the user’s
authority to operate the equipment.
Manufactured and distributed by © 2007 WowWee Group Limited.
Product names, designations, and logos are trademarks or registered
trademarks of WowWee Group Limited. All rights reserved.
Energy Plaza, 3/F
92 Granville Road
T.S.T. East, Hong Kong
3500 de Maisonneuve West
Suite 800
Montreal, QC H3Z 3C1 Canada
Consumer Hotline: 1-800-310-3033
Customer Service: www.wowweesupport.com
www.wowwee.com
We recommend that you retain our address for
future reference.
Product and colors may vary.
Packaging printed in China.
This product is not suitable for children under 3 years
because of small parts - choking hazard.
8033US01TOP