1
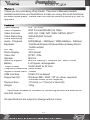
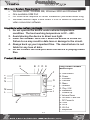
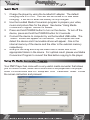
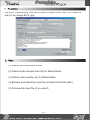
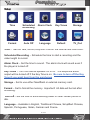
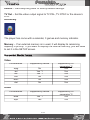
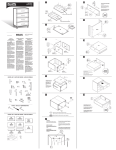
Welcome Thank you for purchasing Zling Studio. This User’s Manual provides detailed instructions and illustrations to help you enjoy this multi-functional portable media player. Please read the manual carefully before you start to operate it. Features Video Display Video Playback Video Formats Video Recording Voice Recording Audio Playback Equalizer :3.6” TFT LCD :ASF Format(320x240) at 30fps :ASF, AVI, VOB, DAT, WMV, MPEG, MOV** :320x240(ASF format) :MP3 :MP3(8Kbps - 320Kbps) / WMA(24Kbps - 28Kbps) :Flat/Rock/Pop/Jazz/Classic/Dance/Heavy/Disco/ Soft/Live/Hall ID3 Tag :ID3v1 Photo Display :JPG format Video Out :NTSC / PAL Speaker :Built-in Memory Support :Built-in memory + External SD / MMC Cards Battery :Li-Polymer rechargeable Output Power :5mW+5mW at 32 ohm Frequency Response :20Hz-20kHz Signal to Noise Ratio :>85dB USB Interface :USB 2.0 Full Speed Supported OS :Windows ME / 2000 / XP (no driver required) Windows 98SE (driver required) Physical Size :101mm(L) x 71mm(H) x16mm(D) Weight :120g ** Transcoder software is included for converting different file extensions into ASF format. All specifications are subject to change without notice. P.2 Minimum System Requirement Windows 98SE, Windows ME, Windows 2000 and Windows XP One available USB Port CD ROM drive required for driver installation (Windows 98SE only) Windows Media Player 9 and Direct X 9.0c or above is required for video conversion software Important notes before you begin 1. Do not operate the device under extreme temperature condition. The best working temperature is 0C – 40C. 2. Avoid placing the device to direct sun light. 3. Insert the SD/MMC card ONLY when the device is turned off. Failure to so may result in data loss or damage to the circuit. 4. Always back up your important files. The manufacturer is not liable for any loss of data. 5. Do not connect the USB port while the device is playing media files. Product Illustration A B C D E Zling Studio Portable Media Player F P O N G M L H I J K P.3 A. Hold Switch B. Power C. B Button D. A Button E. Menu F. Forward G. Play / OK H. Backward I. Volume Up J. Volume Down K. SD/MMC Card Slot L. DC Power In M. USB N. AV In O. AV Out P. Earphones Quick Start! 1. 2. 3. 4. 5. Charge the player by using the bundled AC adapter. The default charging time is 2-3 hrs. The LED will be turned on in Red while charging. It will be off when the battery is fully charged. Use the bundled Media Conversion program to prepare your video, music and picture files for the player. See below “Using Media Conversion Program” section for details. Press and hold POWER button to turn on the device. To turn off the device, press and hold the POWER button for 2 seconds. Connect the device to computer by via the bundled USB cable. The “MSDC” screen will appear on the device. The computer will now detect the device and 2 removable drives will appear. One is the internal memory of the device and the other is the external memory respectively. Now you can drag and drop the video files or audio files to the appropriate folders in the device. For optimal result, please use Media Conversion Program to convert the files before copying to the player. Using the Media Conversion Program Your PMP Player has come with a very useful media converter that allows you to convert Video, Music and Picture files to be played with the player. Insert CD ROM driver and run “Setup.exe” from “Transcoder” folder. Follow the screen instruction and proceed. P.4 1. Function The PMP Transcoding Tool can convert a video file to .asf, CD Tracks to .mp3 or an image file to .jpg. 2. Step (1) Select the conversion mode (2) Select audio sample rate only for Media Mode (3) Select video quality only for Media Mode (4) Browse and select the input file (include the full file path) (5) Preview the input file (if you want) P.5 (6) Browse and select the output file (you may write it by yourself but include the full file path) and designate it to the correct folder of the player. For example, Video files --- D:\Video Picture files --- D:\DCIM\100MEDIA MP3 files --- D:\MP3 ** Assumed C: is your only HDD then D: will be assigned for the device’s internal memory. And E: will be assigned to external memory card if it is in used. (7) Start conversion (8) Stop conversion when converting (if you want) (9) Play the output file when conversion ended (if you want) (10) End program (if you want to exit) Now you have successfully converted the media files into the player. To Play Video 1. In the main menu screen, select VIDEO and click “OK” to confirm and enter. 2. In the video selection screen, select the video file that you wish to play and press “OK” to start playing. To pause the video, simply press “OK” button again. 3. To display the video file information, select the video file and press “B” button in the video selection screen. 4. Press “UP” and “Down” button to control the volume up/down. 5. To exit the current section, press the “MENU” button. P.6 To Play Audio 1. In the main menu screen, select AUDIO and click “OK” to confirm and enter. 2. In the audio selection screen, press “B” button to cycle through repeat once, repeat all and random play settings. 3. Select the audio file that you wish to play and press “OK” to start playing. 4. During audio playback, press “B” button to cycle through various EQ settings. 5. Press “A” button to set A/B repeat. 6. To exit the current section, press the “MENU” button. To Display Pictures 1. In the main menu screen, select PHOTO and click “OK” to confirm and enter. 2. In the Picture selection screen, select the picture file that you wish to display and press “OK” to start. 3. The player supports “Picture Bridge” function.** In the full screen picture display, press “B” to bring up the Printing menu. Select either 3R, 4R or print default and click “OK” to execute. 4. During the full screen picture display, press “A” button to set the picture as boot up screen. 5. Press “UP” and “DOWN” buttons to zoom in/out of the picture. And press OK” to enable navigation mode. You can then press <<, >>, UP and DOWN” to navigate the picture. P.7 6. To exit the current section, press the “MENU” button. ** Your printer needs to support Picture Bridge function. To delete a file - Under Video, Audio or Photo main selection screen, simply press button B. The delete menu will appear with options of:-> Cancel -> Delete Current -> Delete All. Recording The device is capable of recording your favorite TV program into MPEG 4 format. It can also record voice via its microphone and record audio signal only via AV in. AV in(video & audio) – In the main menu screen, select RECORD and press “OK” to confirm and enter. 1. Select “Av in” and press “OK”. 2. Plug in the bundled AV cable to the device and connect the RCA connectors to your video device (For example TV). 3. Press “OK” to start recording. The yellow icon on the upper left corner will start blinking to red to indicate the recording is in progress. 4. Press “OK” again to stop a recording. Mic only(audio) 1. Select “Mic Only” and press “OK”. 2. Press “OK” to start recording. The time meter will appear to indicate the recording is in progress. 3. Press “OK” again to stop a recording. P.8 Line in(audio only). 1. Select “Audio Only” and press “OK”. 2. Press “OK” to start recording. The time meter will appear to indicate the recording is in progress. 3. Press “OK” again to stop a recording. Press “Menu” button to exist the current section. Note: • It is recommended that the volume of the audio source to be adjusted to its louder level to achieve the optimal recording result. Scheduled Recording The device is able to perform scheduled recording function by setting the internal recording timer. 1. 2. 3. 4. Go to Setup menu and press “OK”. Select “OnTimeRec” and press “OK”. Switch to “ON” by pressing “Up” button. Set “Hour” and “Min” for which you wish the player to start recording automatically. 5. In the “Length” section, set how many minutes you wish the player to record. And click “OK” to confirm. 6. Press “Menu” button to exist. The player’s timer is now on and will start recording automatically based on your scheduled setting. Note: It is highly recommended that the player is connected to AC power in order to avoid battery runs out. P.9 Setup Time Scheduled Recording Alarm Clock Key Tones Storage Format Auto Off Language Default TV_Out Time – Set the Year, Month, Day and Time for the internal real time clock. Scheduled Recording – Schedule the time to start a recording and the video length to record. Alarm Clock – Set the time to sound. The alarm clock will sound even if the player is turned off. Key Tones – Turn the internal speaker on or off. The earphone audio output will be turned off if the Key Tone is on. Be sure to turn off the Key Tone if you want hear from the earphones Storage – Set to use either Nandflash or external memory card. Format – Set to format the memory. Important! All data will be lost after formatting. Auto Off – Set the time to automatically power off after certain period of idle. Language – Available in English, Traditional Chinese, Simplified Chinese, Spanish, Portuguese, Italian, German and France. P.10 Default – Set everything back to factory default settings. TV Out – Set the video output signal to TV PAL, TV NTSC or the device’s LCD. Accessory The player has come with a calendar, 3 games and memory indicator. Memory – If an external memory is in used, it will display its remaining capacity in priority. If you want to display the internal memory, you will need to set it in the SETUP screen. Supported Media Format Video File extension Supported by device .mpg .avi .asf .vob .wmv .dat No Yes *1 Yes *1 No No No File extension Supported by device .wma .mp3 Yes *1 Yes Supported by PC conversion *2 Yes Yes Yes Yes Yes Yes Audio P.11 Supported by PC conversion *2 Yes Yes Picture File extension Supported by device .jpg .bmp .tiff .gif Yes *1 No No No Supported by PC conversion *2 Yes Yes Yes Yes Note: *1 – Only applies to some specific encode format. *2 – Must comply with the decode/encode requirement of the conversion program. P.12