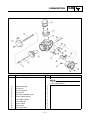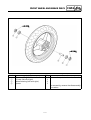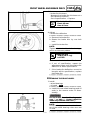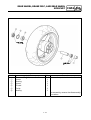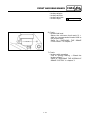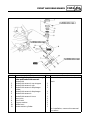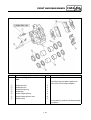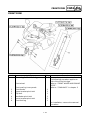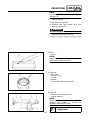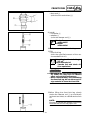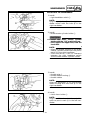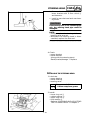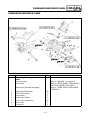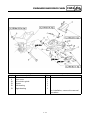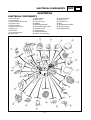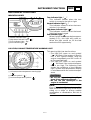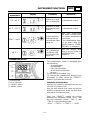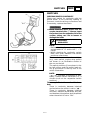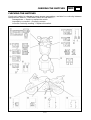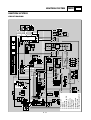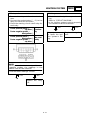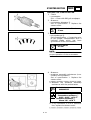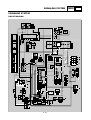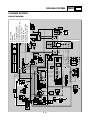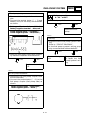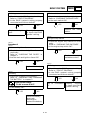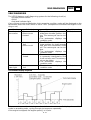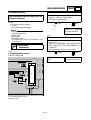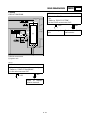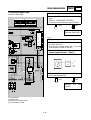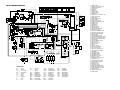
1
YZF-R1 ’98 4XV1-AE1 SERVICE MANUAL EB000000 YZF - R1 SERVICE MANUAL 1997 by Yamaha Motor Co., Ltd. First edition, October 1997 All rights reserved. Any reproduction or unauthorized use without the written permission of Yamaha Motor Co., Ltd. is expressly prohibited. EB001000 NOTICE This manual was produced by the Yamaha Motor Company, Ltd. primarily for use by Yamaha dealers and their qualified mechanics. It is not possible to include all the knowledge of a mechanic in one manual. Therefore, anyone who uses this book to perform maintenance and repairs on Yamaha vehicles should have a basic understanding of mechanics and the techniques to repair these types of vehicles. Repair and maintenance work attempted by anyone without this knowledge is likely to render the vehicle unsafe and unfit for use. Yamaha Motor Company, Ltd. is continually striving to improve all of its models. Modifications and significant changes in specifications or procedures will be forwarded to all authorized Yamaha dealers and will appear in future editions of this manual where applicable. NOTE: Designs and specifications are subject to change without notice. EB002000 IMPORTANT MANUAL INFORMATION Particularly important information is distinguished in this manual by the following. The Safety Alert Symbol means ATTENTION! BECOME ALERT! YOUR SAFETY IS INVOLVED! WARNING CAUTION: NOTE: Failure to follow WARNING instructions could result in severe injury or death to the motorcycle operator, a bystander or a person checking or repairing the motorcycle. A CAUTION indicates special precautions that must be taken to avoid damage to the motorcycle. A NOTE provides key information to make procedures easier or clearer. EB003000 HOW TO USE THIS MANUAL This manual is intended as a handy, easy-to-read reference book for the mechanic. Comprehensive explanations of all installation, removal, disassembly, assembly, repair and check procedures are laid out with the individual steps in sequential order. 1 The manual is divided into chapters. An abbreviation and symbol in the upper right corner of each page indicate the current chapter. Refer to “SYMBOLS”. 2 Each chapter is divided into sections. The current section title is shown at the top of each page, except in Chapter 3 (“PERIODIC CHECKS AND ADJUSTMENTS”), where the sub-section title(-s) appears. 3 Sub-section titles appear in smaller print than the section title. 4 To help identify parts and clarify procedure steps, there are exploded diagrams at the start of each removal and disassembly section. 5 WATER PUMP COOL 4. Measure: • impeller shaft tilt Out of specification → Repeat steps (3) and (4). CAUTION: ACHTUNG: Make sure that the rubber damper and rubber damper holder are flush with the impeller. Max. impeller shaft tilt 0.15 mm 1 Straightedge 2 Impeller 5 - 17 COOL 5 - 18 CARB 6 CARB CHAPTER 6. CARBURETORS CARBURETORS ............................................................................................6-1 CHECKING THE CARBURETORS .........................................................6-6 ASSEMBLING THE CARBURETORS ...................................................6-8 INSTALLING THE CARBURETORS ....................................................6-10 MEASURING AND ADJUSTING THE FUEL LEVEL ..........................6-11 CHECKING AND ADJUSTING THE THROTTLE POSITION SENSOR ..........................................................................................6-12 CHECKING THE FUEL PUMP .............................................................6-15 CARB CARBURETORS CARB EB600001 CARBURETORS CARBURETORS Order Job/Part Removing the carburetors Rider seat and fuel tank Q’ty Air filter case and rubber baffle 1 2 3 4 5 6 7 8 9 Starter cable Fuel hose Throttle position sensor coupler Float chamber air vent hose Throttle stop screw Carburetor joint clamp screw Throttle cable Carburetor assembly Carburetor joint 1 1 1 2 1 8 2 1 4 Remarks Remove the parts in the order listed. Refer to “SEATS” and “FUEL TANK” in chapter 3. Refer to “AIR FILTER CASE AND IGNITION COIL PLATE” in chapter 3. Disconnect. For installation, reverse the removal procedure. 6-1 CARBURETORS CARB EB600010 Order 1 2 3 4 5 6 7 8 9 10 11 12 13 Job/Part Separating the carburetors Starter plunger link Connecting bolt Copper washer Connecting bolt Spacer Spacer Spacer Hose joint Float chamber air vent hose Float chamber air vent hose Spring Vacuum chamber air vent hose Vacuum chamber pipe Q’ty 1 1 1 1 1 1 1 2 1 1 2 2 1 6-2 Remarks Remove the parts in the order listed. R = 245 mm R = 270 mm R = 43 mm R= 38 mm R = 36 mm R= 250 mm R = 355 mm CARBURETORS Order 14 15 16 17 18 19 20 21 22 23 Job/Part Fuel feed pipe Fuel feed pipe Fuel feed pipe Pipe Pipe Pipe Throttle stop screw Throttle position sensor Throttle position sensor bracket Carburetor Q’ty 1 1 1 1 1 1 1 1 1 4 CARB Remarks R = 37 mm R = 32 mm R= 29 mm R = 73 mm R= 68 mm R = 66 mm For installation, reverse the removal procedure. 6-3 CARBURETORS CARB EB600021 Order Job/Part Disassembling the carburetor Q’ty Remarks Remove the parts in the order listed. NOTE: The following procedure applies to all of the carburetors. 1 2 3 4 5 6 7 8 9 0 A Starter plunger Air funnel Air funnel joint Pilot air jet Vacuum chamber cover Piston valve spring Jet needle holder Jet needle kit Piston valve Pilot screw Fuel drain bolt 1 1 1 1 1 1 1 1 1 1 1 6-4 CARBURETORS Order B C D E F G H I Job/Part Float chamber Float pivot pin Float Needle valve Needle valve seat Main jet Main jet holder Pilot jet Q’ty 1 1 1 1 1 1 1 1 CARB Remarks For assembly, reverse the disassembly procedure. 6-5 CARBURETORS CARB EB600031 CHECKING THE CARBURETORS The following procedure applies to all of the carburetors. 1. Check: • carburetor body • float chamber Cracks/damage → Replace. 2. Check: • fuel passages Obstruction → Clean. ▼▼▼▼▼▼▼▼▼▼▼▼▼▼▼▼▼▼▼▼▼▼▼▼▼▼▼ a. Wash the carburetor in a petroleumbased solvent. Do not use any caustic carburetor cleaning solution. b. Blow out all of the passages and jets with compressed air. ▲▲▲▲▲▲▲▲▲▲▲▲▲▲▲▲▲▲▲▲▲▲▲▲▲▲▲ 3. Check: • float chamber body Dirt → Clean. 4. Check: • float chamber rubber gasket 1 Cracks/damage/wear → Replace. 5. Check: • float Damage → Replace. 6. Check: • needle valve 1 • needle valve seat 2 Damage/obstruction/wear → Replace the needle valve, needle valve seat and O-ring as a set. 7. Check: • O-ring 3 Damage/wear → Replace the needle valve, needle valve seat and O-ring as a set. 6-6 CARBURETORS CARB 8. Check: • piston valve 1 Damage/scratches/wear → Replace. • piston valve diaphragm 2 Cracks/tears → Replace. 9. Check: • vacuum chamber cover 1 • piston valve spring 2 • jet needle holder 3 • jet needle spring 4 Cracks/damage → Replace. 10.Check: • jet needle kit 1 • main jet 2 • main jet holder 3 • pilot jet 4 • pilot screw 5 • starter plunger 6 • pilot air jet 7 Bends/damage/wear → Replace. Obstruction → Clean. Blow out the jets with compressed air. 11.Check: • piston valve movement Insert the piston valve into the carburetor body and move it up and down. Tightness → Replace the piston valve. 12.Check: • fuel feed pipes 1 • pipes 2 • hose joints 3 Cracks/damage → Replace. Obstruction → Clean. Blow out the pipes with compressed air. 6-7 CARBURETORS CARB 13.Check: • fuel hoses Cracks/damage/wear → Replace. Obstruction → Clean. Blow out the hoses with compressed air. EB600043 ASSEMBLING THE CARBURETORS The following procedure applies to all of the carburetors. CAUTION: ACHTUNG: • Before assembling the carburetors, wash all of the parts in a petroleumbased solvent. • Always use a new gasket. 1. Install: • pilot screw kit 1 Pilot screw setting 2-1/2 turns out 2. Install: • piston valve 1 • jet needle • jet needle holder • piston valve spring • vacuum chamber cover NOTE: • Install the end of the piston valve spring onto the spring guide on the vacuum chamber cover. • Align the tab a on the piston valve diaphragm with the recess b in the carburetor body. 6-8 CARBURETORS CARB 3. Install: • pipes • fuel feed pipes • vacuum chamber pipe • vacuum chamber air vent hose • springs • float chamber air vent hoses • hose joints • spacers • copper washer • connecting bolts NOTE: • Do not tighten the connecting bolts, yet. • Install the throttle valve lever 1 onto carburetors #1, #2, and #4 between the spring 2 and synchronizing screw 3. 4. Install: • starter plunger link 1 NOTE: Install the starter plunger link 1 onto each starter plunger. T. R. 5. Tighten: • connecting bolts 7 Nm (0.7 m · kg) NOTE: • Place the carburetor assembly on a surface plate with the intake manifold side down. Then, tighten the connecting bolts while pushing down the carburetor assembly with an even force. • After tightening the connecting bolts, check that the throttle valve lever and starter plunger link operate smoothly. 6. Install: • starter cable 1 NOTE: Install the starter cable holder 2 onto the starter cable. 6-9 CARBURETORS CARB EB600051 INSTALLING THE CARBURETORS 1. Adjust: • carburetor synchronization Refer to “SYNCHRONIZING THE CARBURETORS” in chapter 3. 2. Adjust: • engine idling speed Engine idling speed 1,050 ~ 1,150 r/min Refer to “ADJUSTING THE ENGINE IDLING SPEED” in chapter 3. 3. Adjust: • throttle cable free play Throttle cable free play (at the flange of the throttle grip) 3 ~ 5 mm Refer to “ADJUSTING THE THROTTLE CABLE FREE PLAY” in chapter 3. 6 - 10 CARBURETORS CARB EB600063 MEASURING AND ADJUSTING THE FUEL LEVEL 1. Measure: • fuel level a Out of specification → Adjust. Fuel level (below the line on the float chamber) 4.1 ~ 5.1 mm ▼▼▼▼▼▼▼▼▼▼▼▼▼▼▼▼▼▼▼▼▼▼▼▼▼▼▼ a. Stand the motorcycle on a level surface. b. Place the motorcycle on a suitable stand to ensure that the motorcycle is standing straight up. c. Install the fuel level gauge 1 onto the fuel drain pipe 2. Fuel level gauge 90890-01312 d. Loosen the fuel drain bolt 3. e. Hold the fuel level gauge vertically next to the line 4 on the float chamber. f. Measure the fuel level a. NOTE: Fuel level readings should be equal on both sides of the carburetor assembly. ▲▲▲▲▲▲▲▲▲▲▲▲▲▲▲▲▲▲▲▲▲▲▲▲▲▲▲ 2. Adjust: • fuel level ▼▼▼▼▼▼▼▼▼▼▼▼▼▼▼▼▼▼▼▼▼▼▼▼▼▼▼ a. Remove the carburetor assembly. b. Check the needle valve seat and needle valve. c. If either is worn, replace them as a set. d. If both are fine, adjust the float level by slightly bending the float tang 1. e. Install the carburetor assembly. f. Measure the fuel level again. g. Repeat steps (a) to (f) until the fuel level is within specification. ▲▲▲▲▲▲▲▲▲▲▲▲▲▲▲▲▲▲▲▲▲▲▲▲▲▲▲ 6 - 11 CARBURETORS CARB EB600072 CHECKING AND ADJUSTING THE THROTTLE POSITION SENSOR NOTE: Before adjusting the throttle position sensor, the engine idling speed should be properly adjusted. 1. Check: • throttle position sensor (installed on the carburetor) ▼▼▼▼▼▼▼▼▼▼▼▼▼▼▼▼▼▼▼▼▼▼▼▼▼▼▼ a. Disconnect the throttle position sensor coupler. b. Connect the pocket tester (Ω × 1k) to the throttle position sensor. Tester positive probe → blue 1 Tester negative probe → black/blue 2 c. Measure the throttle position sensor maximum resistance. Out of specification → Replace the throttle position sensor. Throttle position sensor maximum resistance 4.0 ~ 6.0 kΩ at 20 ˚C (blue — black/blue) d. Connect the pocket tester (Ω × 1k) to the throttle position sensor. Tester positive probe → yellow 3 Tester negative probe → black/blue 2 e. While slowly opening the throttle, check that the throttle position sensor resistance is within the specified range. NOTE: Check mainly that the resistance changes gradually when turning the throttle, since the readings (from closed to wide-open throttle) may differ slightly from those specified. Out of specification or the resistance changes abruptly → Go to step (2). Throttle position sensor resistance 0 ~ 5 ± 1.0 kΩ at 20 ˚C (yellow — black/blue) ▲▲▲▲▲▲▲▲▲▲▲▲▲▲▲▲▲▲▲▲▲▲▲▲▲▲▲ 6 - 12 CARBURETORS CARB 2. Check: • throttle position sensor (removed from the carburetor) ▼▼▼▼▼▼▼▼▼▼▼▼▼▼▼▼▼▼▼▼▼▼▼▼▼▼▼ a. Disconnect the throttle position sensor coupler. b. Remove the throttle position sensor from the carburetor. c. Connect the pocket tester (Ω × 1k) to the throttle position sensor. Tester positive probe → blue 1 Tester negative probe → black/blue 2 d. Measure the throttle position sensor maximum resistance. Out of specification → Replace the throttle position sensor. Throttle position sensor maximum resistance 4.0 ~ 6.0 kΩ at 20 ˚C (blue — black/blue) e. Connect the pocket tester (Ω × 1k) to the throttle position sensor coupler. Tester positive probe → yellow 3 Tester negative probe → black/blue 2 f. While slowly opening the throttle, check that the throttle position sensor resistance is within the specified range. The resistance does not change or it changes abruptly → Replace the throttle position sensor. The slot is worn or broken → Replace the throttle position sensor. NOTE: Check mainly that the resistance changes gradually when turning the throttle, since the readings (from closed to wide-open throttle) may differ slightly from those specified. Throttle position sensor resistance 0 ~ 5 ± 1.0 kΩ at 20 ˚C (yellow — black/blue) ▲▲▲▲▲▲▲▲▲▲▲▲▲▲▲▲▲▲▲▲▲▲▲▲▲▲▲ 6 - 13 CARBURETORS CARB 3. Adjust: • throttle position sensor angle ▼▼▼▼▼▼▼▼▼▼▼▼▼▼▼▼▼▼▼▼▼▼▼▼▼▼▼ a. Set the main switch to “ON”. b. Disconnect the throttle position sensor coupler. c. Reconnect the throttle position sensor coupler. NOTE: After reconnecting the throttle position sensor coupler, the tachometer switches to the throttle position sensor adjustment mode. d. Loosen the throttle position sensor screws 1. e. Adjust the throttle position sensor angle according to the following table. NOTE: The angle of the throttle position sensor is indicated by the r/min which are displayed on the tachometer. Tachometer reading Throttle position sensor angle 0 r/min Too small 5,000 r/min 2 Correct 10,000 r/min Too large f. After adjusting the throttle position sensor angle, tighten the throttle position sensor screws. NOTE: To exit the throttle position sensor adjustment mode, start the engine or set the main switch to “OFF”. ▲▲▲▲▲▲▲▲▲▲▲▲▲▲▲▲▲▲▲▲▲▲▲▲▲▲▲ 6 - 14 CARBURETORS CARB EB600090 CHECKING THE FUEL PUMP 1. Check: • fuel pump 1 ▼▼▼▼▼▼▼▼▼▼▼▼▼▼▼▼▼▼▼▼▼▼▼▼▼▼▼ a. Remove the fuel tank. Refer to “FUEL TANK” in chapter 3. b. Disconnect the fuel-pump-to-carburetor fuel hose 2 from the carburetor. c. Connect the fuel-tank-to-fuel-pump fuel hose to the fuel tank and then set the fuel cock to “ON”. d. Place a container under the end of the fuel hose 2. e. Start the engine and check if fuel flows from the fuel hose 2. Fuel flows. Fuel pump is OK. Fuel does not flow. Replace the fuel pump. f. Stop the engine and check if the fuel stops flowing from the fuel hose 2. Fuel stops flowing. Fuel pump is OK. Fuel flows. Replace the fuel pump. ▲▲▲▲▲▲▲▲▲▲▲▲▲▲▲▲▲▲▲▲▲▲▲▲▲▲▲ 6 - 15 CARB 6 - 16 CHAS 7 CHAS CHAPTER 7. CHASSIS FRONT WHEEL AND BRAKE DISCS ............................................................7-1 REMOVING THE FRONT WHEEL .........................................................7-3 DISASSEMBLING THE FRONT WHEEL ..............................................7-3 CHECKING THE FRONT WHEEL ..........................................................7-4 CHECKING THE BRAKE DISCS ............................................................7-5 ASSEMBLING THE FRONT WHEEL ....................................................7-6 INSTALLING THE FRONT WHEEL .......................................................7-7 ADJUSTING THE FRONT WHEEL STATIC BALANCE .......................7-7 REAR WHEEL, BRAKE DISC, AND REAR WHEEL SPROCKET ................7-10 REMOVING THE REAR WHEEL .........................................................7-13 CHECKING THE REAR WHEEL ..........................................................7-13 CHECKING THE REAR WHEEL DRIVE HUB ......................................7-14 CHECKING AND REPLACING THE REAR WHEEL SPROCKET ........7-14 INSTALLING THE REAR WHEEL .......................................................7-15 ADJUSTING THE REAR WHEEL STATIC BALANCE ........................7-15 FRONT AND REAR BRAKES ......................................................................7-16 REPLACING THE FRONT BRAKE PADS ............................................7-18 REPLACING THE REAR BRAKE PADS ..............................................7-20 DISASSEMBLING THE FRONT BRAKE MASTER CYLINDER ..........7-28 DISASSEMBLING THE REAR BRAKE MASTER CYLINDER .............7-28 CHECKING THE FRONT AND REAR BRAKE MASTER CYLINDERS .....................................................................7-28 ASSEMBLING AND INSTALLING THE FRONT BRAKE MASTER CYLINDER .......................................................................7-29 ASSEMBLING THE REAR BRAKE MASTER CYLINDER ...................7-31 DISASSEMBLING THE FRONT BRAKE CALIPERS ...........................7-37 DISASSEMBLING THE REAR BRAKE CALIPER ................................7-38 CHECKING THE FRONT AND REAR BRAKE CALIPERS ...................7-39 ASSEMBLING AND INSTALLING THE FRONT BRAKE CALIPERS ......................................................7-40 ASSEMBLING AND INSTALLING THE REAR BRAKE CALIPER ......7-42 FRONT FORK ..............................................................................................7-44 REMOVING THE FRONT FORK LEGS ...............................................7-47 DISASSEMBLING THE FRONT FORK LEGS .....................................7-47 CHECKING THE FRONT FORK LEGS ................................................7-49 ASSEMBLING THE FRONT FORK LEGS ...........................................7-50 INSTALLING THE FRONT FORK LEGS .............................................7-55 CHAS HANDLEBARS .............................................................................................7-56 REMOVING THE HANDLEBARS ........................................................7-58 CHECKING THE HANDLEBARS .........................................................7-58 INSTALLING THE HANDLEBARS ......................................................7-59 STEERING HEAD ........................................................................................7-61 REMOVING THE LOWER BRACKET ..................................................7-63 CHECKING THE STEERING HEAD .....................................................7-63 INSTALLING THE STEERING HEAD ..................................................7-64 REAR SHOCK ABSORBER ASSEMBLY .....................................................7-66 HANDLING THE REAR SHOCK ABSORBER AND GAS CYLINDER ......................................................................7-67 DISPOSING OF A REAR SHOCK ABSORBER AND GAS CYLINDER ......................................................................7-67 REMOVING THE REAR SHOCK ABSORBER ASSEMBLY ................7-68 CHECKING THE REAR SHOCK ABSORBER ASSEMBLY AND GAS CYLINDER ......................................................................7-68 CHECKING THE RELAY ARM AND CONNECTING ARM .................7-69 INSTALLING THE REAR SHOCK ABSORBER ASSEMBLY ..............7-69 SWINGARM AND DRIVE CHAIN ...............................................................7-70 REMOVING THE SWINGARM ...........................................................7-72 REMOVING THE DRIVE CHAIN .........................................................7-73 CHECKING THE SWINGARM .............................................................7-73 CHECKING THE DRIVE CHAIN ...........................................................7-74 INSTALLING THE SWINGARM ..........................................................7-76 6 FRONT WHEEL AND BRAKE DISCS CHAS EB700002 CHASSIS FRONT WHEEL AND BRAKE DISCS Order Job/Part Q’ty Remarks Removing the front wheel and brake Remove the parts in the order listed. discs NOTE: Place the motorcycle on a suitable stand so that the front wheel is elevated. 1 2 3 4 5 6 7 8 Brake hose holder (left and right) Brake caliper (left and right) Wheel axle pinch bolt Front wheel axle Front wheel Collar (left and right) Oil seal cover (left and right) Brake disc (left and right) 2 2 1 1 1 2 2 2 Loosen. For installation, reverse the removal procedure. 7-1 FRONT WHEEL AND BRAKE DISCS CHAS EB700010 Order 1 2 3 Job/Part Disassembling the front wheel Oil seal (left and right) Wheel bearing (left and right) Spacer Q’ty Remarks Remove the parts in the order listed. 2 2 1 For assembly, reverse the disassembly procedure. 7-2 FRONT WHEEL AND BRAKE DISCS CHAS EB700102 REMOVING THE FRONT WHEEL 1. Stand the motorcycle on a level surface. WARNING WARNING Securely support the motorcycle so that there is no danger of it falling over. NOTE: Place the motorcycle on a suitable stand so that the front wheel is elevated. 2. Remove: • left brake caliper • right brake caliper NOTE: Do not squeeze the brake lever when removing the brake calipers. 3. Elevate: • front wheel NOTE: Place the motorcycle on a suitable stand so that the front wheel is elevated. EB700110 DISASSEMBLING THE FRONT WHEEL 1. Remove: • oil seals • wheel bearings ▼▼▼▼▼▼▼▼▼▼▼▼▼▼▼▼▼▼▼▼▼▼▼▼▼▼▼ a. Clean the outside of the front wheel hub. b. Remove the oil seals 1 with a flathead screwdriver. NOTE: To prevent damaging the wheel, place a rag 2 between the screwdriver and the wheel surface. c. Remove the wheel bearings with a general bearing puller. ▲▲▲▲▲▲▲▲▲▲▲▲▲▲▲▲▲▲▲▲▲▲▲▲▲▲▲ 7-3 FRONT WHEEL AND BRAKE DISCS CHAS EB700400 CHECKING THE FRONT WHEEL 1. Check: • wheel axle Roll the wheel axle on a flat surface. Bends → Replace. WARNING WARNING Do not attempt to straighten a bent wheel axle. 2. Check: • tire • front wheel Damage/wear → Replace. Refer to “CHECKING THE TIRES” and “CHECKING THE WHEELS” in chapter 3. 3. Measure: • radial wheel runout 1 • lateral wheel runout 2 Over the specified limits → Replace. Max. radial wheel runout 1.0 mm Max. lateral wheel runout 0.5 mm 4. Check: • wheel bearings Front wheel turns roughly or is loose → Replace the wheel bearings. • oil seals Damage/wear → Replace. 5. Replace: • wheel bearings • oil seals New New ▼▼▼▼▼▼▼▼▼▼▼▼▼▼▼▼▼▼▼▼▼▼▼▼▼▼▼ a. Clean the outside of the front wheel hub. b. Remove the oil seals 1 with a flathead screwdriver. NOTE: To prevent damaging the wheel, place a rag 2 between the screwdriver and the wheel surface. 7-4 FRONT WHEEL AND BRAKE DISCS CHAS c. Remove the wheel bearings 3 with a general bearing puller. d. Install the new wheel bearings and oil seals in the reverse order of disassembly. CAUTION: ACHTUNG: Do not contact the wheel bearing center race 4 or balls 5. Contact should be made only with the outer race 6. NOTE: Use a socket 7 that matches the diameter of the wheel bearing outer race and oil seal. ▲▲▲▲▲▲▲▲▲▲▲▲▲▲▲▲▲▲▲▲▲▲▲▲▲▲▲ EB700416 CHECKING THE BRAKE DISCS The following procedure applies to both of the brake discs. 1. Check: • brake disc Damage/galling → Replace. 2. Measure: • brake disc deflection Out of specification → Correct the brake disc deflection or replace the brake disc. Max. brake disc deflection Front: 0.1 mm Rear: 0.1 mm ▼▼▼▼▼▼▼▼▼▼▼▼▼▼▼▼▼▼▼▼▼▼▼▼▼▼▼ a. Place the motorcycle on a suitable stand so that the wheel is elevated. b. Before measuring the front brake disc deflection, turn the handlebars to the left or right to ensure that the front wheel is stationary. c. Remove the brake caliper. d. Hold the dial gauge at a right angle against the brake disc surface. e. Measure the deflection 2 ~ 3 mm below the edge of the brake disc. ▲▲▲▲▲▲▲▲▲▲▲▲▲▲▲▲▲▲▲▲▲▲▲▲▲▲▲ 7-5 FRONT WHEEL AND BRAKE DISCS CHAS 3. Measure: • brake disc thickness Measure the brake disc thickness at a few different locations. Out of specification → Replace. Min. brake disc thickness Front: 4.5 mm Rear: 4.5 mm 4. Adjust: • brake disc deflection ▼▼▼▼▼▼▼▼▼▼▼▼▼▼▼▼▼▼▼▼▼▼▼▼▼▼▼ a. Remove the brake disc. b. Rotate the brake disc by one bolt hole. c. Install the brake disc. NOTE: Tighten the brake disc bolts in stages and in a crisscross pattern. T. R. Brake disc bolt 18 Nm (1.8 m • kg) LOCTITE d. Measure the brake disc deflection. e. If out of specification, repeat the adjustment steps until the brake disc deflection is within specification. f. If the brake disc deflection cannot be brought within specification, replace the brake disc. ▲▲▲▲▲▲▲▲▲▲▲▲▲▲▲▲▲▲▲▲▲▲▲▲▲▲▲ EB700711 ASSEMBLING THE FRONT WHEEL 1. Install: • wheel bearings • oil seals New ▼▼▼▼▼▼▼▼▼▼▼▼▼▼▼▼▼▼▼▼▼▼▼▼▼▼▼ a. Install the new wheel bearings and oil seals in the reverse order of disassembly. CAUTION: ACHTUNG: Do not contact the wheel bearing center race 1 or balls 2. Contact should be made only with the outer race 3. NOTE: Use a socket 4 that matches the diameter of the wheel bearing outer race and oil seal. ▲▲▲▲▲▲▲▲▲▲▲▲▲▲▲▲▲▲▲▲▲▲▲▲▲▲▲ 7-6 FRONT WHEEL AND BRAKE DISCS CHAS EB700725 INSTALLING THE FRONT WHEEL 1. Lubricate: • wheel axle • oil seal lips Recommended lubricant Lithium soap base grease 18 Nm (1.8 m · kg) T. R. 2. Install: • brake discs NOTE: • Apply LOCTITE 648 to the threads of the brake disc bolts. • Tighten the brake disc bolts in stages and in a crisscross pattern. T. 3. Tighten: 72 Nm (7.2 m · kg) • wheel axle 1 • wheel axle pinch bolt 2 R. T. R. 23 Nm (2.3 m · kg) CAUTION: ACHTUNG: Before tightening the wheel axle nut, push down hard on the handlebars several times and check if the front fork rebounds smoothly. T. R. 4. Install: • brake calipers 40 Nm (4.0 m · kg) WARNING WARNING Make sure that the brake hose is routed properly. EB700901 ADJUSTING THE FRONT WHEEL STATIC BALANCE NOTE: • After replacing the tire, wheel or both, the front wheel static balance should be adjusted. • Adjust the front wheel static balance with the brake discs installed. 7-7 FRONT WHEEL AND BRAKE DISCS CHAS 1. Remove: • balancing weight(-s) 2. Find: • front wheel’s heavy spot ▼▼▼▼▼▼▼▼▼▼▼▼▼▼▼▼▼▼▼▼▼▼▼▼▼▼▼ a. Place the front wheel on a suitable balancing stand. b. Spin the front wheel. c. When the front wheel stops, put an “X1” mark at the bottom of the wheel. d. Turn the front wheel 90˚ so that the “X1” mark is positioned as shown. e. Release the front wheel. f. When the front wheel stops, put an “X2” mark at the bottom of the wheel. g. Repeat steps (a) through (d) several times until all the marks come to rest at the same spot. h. The spot where all the marks come to rest is the front wheel’s heavy spot “X”. ▲▲▲▲▲▲▲▲▲▲▲▲▲▲▲▲▲▲▲▲▲▲▲▲▲▲▲ 3. Adjust: • front wheel static balance ▼▼▼▼▼▼▼▼▼▼▼▼▼▼▼▼▼▼▼▼▼▼▼▼▼▼▼ a. Install a balancing weight 1 onto the rim exactly opposite the heavy spot “X”. NOTE: Start with the lightest weight. b. Turn the front wheel 90˚ so that the heavy spot is positioned as shown. c. If the heavy spot does not stay in that position, install a heavier weight. d. Repeat steps (b) and (c) until the front wheel is balanced. ▲▲▲▲▲▲▲▲▲▲▲▲▲▲▲▲▲▲▲▲▲▲▲▲▲▲▲ 7-8 FRONT WHEEL AND BRAKE DISCS CHAS 4. Check: • front wheel static balance ▼▼▼▼▼▼▼▼▼▼▼▼▼▼▼▼▼▼▼▼▼▼▼▼▼▼▼ a. Turn the front wheel and make sure that it stays at each position shown. b. If the front wheel does not remain stationary at all of the positions, rebalance it. ▲▲▲▲▲▲▲▲▲▲▲▲▲▲▲▲▲▲▲▲▲▲▲▲▲▲▲ 7-9 REAR WHEEL, BRAKE DISC, AND REAR WHEEL SPROCKET CHAS EB701000 REAR WHEEL, BRAKE DISC, AND REAR WHEEL SPROCKET Order 1 2 3 4 5 6 7 8 9 10 Job/Part Removing the rear wheel Q’ty Brake caliper Locknut (left and right) Adjusting bolt (left and right) Wheel axle nut Washer Rear wheel axle Left adjusting block Right adjusting block Rear wheel Brake caliper bracket 1 2 2 2 1 1 1 1 1 1 Remarks Remove the parts in the order listed. NOTE: Place the motorcycle on a suitable stand so that the rear wheel is elevated. Loosen. Loosen. NOTE: Make sure that the tapered side of the right adjusting block faces the wheel. For installation, reverse the removal procedure. 7 - 10 REAR WHEEL, BRAKE DISC, AND REAR WHEEL SPROCKET CHAS EB701010 Order 1 2 3 4 5 6 7 8 9 Job/Part Removing the brake disc and rear wheel sprocket Brake disc Rear wheel sprocket Oil seal cover (left and right) Spacer (left and right) Oil seal Bearing Rear wheel drive hub Rear wheel drive hub damper Rear wheel Q’ty Remarks Remove the parts in the order listed. 1 1 2 2 1 1 1 6 1 For installation, reverse the removal procedure. 7 - 11 REAR WHEEL, BRAKE DISC, AND REAR WHEEL SPROCKET Order 1 2 3 4 5 6 Job/Part Disassembling the rear wheel Spacer Bearing Spacer Oil seal Circlip Bearing Q’ty CHAS Remarks Remove the parts in the order listed. 1 1 1 1 1 1 For assembly, reverse the disassembly procedure. 7 - 12 REAR WHEEL, BRAKE DISC, AND REAR WHEEL SPROCKET CHAS EB701100 REMOVING THE REAR WHEEL 1. Stand the motorcycle on a level surface. WARNING WARNING Securely support the motorcycle so that there is no danger of it falling over. NOTE: Place the motorcycle on a suitable stand so that the rear wheel is elevated. 2. Remove: • brake caliper NOTE: Do not depress the brake pedal when removing the brake caliper. 3. Remove: • wheel axle nut • washer • wheel axle • adjusting blocks • rear wheel NOTE: Push the rear wheel forward and remove the drive chain from the rear wheel sprocket. EB701400 CHECKING THE REAR WHEEL 1. Check: • wheel axle • rear wheel • wheel bearings • oil seals • brake disc Refer to “FRONT WHEEL”. 2. Check: • tire • rear wheel Damage/wear → Replace. Refer to “CHECKING THE TIRES” and “CHECKING THE WHEELS” in chapter 3. 7 - 13 REAR WHEEL, BRAKE DISC, AND REAR WHEEL SPROCKET CHAS 3. Measure: • radial wheel runout • lateral wheel runout Refer to “FRONT WHEEL”. Over the specified limits → Replace. Max. radial wheel runout 1.0 mm Max. lateral wheel runout 0.5 mm EB701430 CHECKING THE REAR WHEEL DRIVE HUB 1. Check: • rear wheel drive hub 1 Cracks/damage → Replace. • rear wheel drive hub dampers 2 Damage/wear → Replace. EB701440 CHECKING AND REPLACING THE REAR WHEEL SPROCKET 1. Check: • rear wheel sprocket More than 1/4 tooth a wear → Replace the rear wheel sprocket. Bent teeth → Replace the rear wheel sprocket. b Correct 1 Drive chain roller 2 Rear wheel sprocket 2. Replace: • rear wheel sprocket ▼▼▼▼▼▼▼▼▼▼▼▼▼▼▼▼▼▼▼▼▼▼▼▼▼▼▼ a. Remove the self-locking nuts and the rear wheel sprocket. b. Clean the rear wheel drive hub with a clean cloth, especially the surfaces that contact the sprocket. c. Install the new rear wheel sprocket. T. R. Rear wheel sprocket self-locking nut 150 Nm (15.0 m • kg) NOTE: Tighten the self-locking nuts in stages and in a crisscross pattern. ▲▲▲▲▲▲▲▲▲▲▲▲▲▲▲▲▲▲▲▲▲▲▲▲▲▲▲ 7 - 14 REAR WHEEL, BRAKE DISC, AND REAR WHEEL SPROCKET CHAS EB701710 INSTALLING THE REAR WHEEL 1. Lubricate: • wheel axle • wheel bearings • oil seal lips Recommended lubricant Lithium soap base grease 2. Adjust: • drive chain slack a Drive chain slack 40 ~ 50 mm Refer to “ADJUSTING THE DRIVE CHAIN SLACK” in chapter 3. T. R. 3. Tighten: • wheel axle nut • brake caliper bolts 150 Nm (15.0 m · kg) T. R. 40 Nm (4.0 m · kg) WARNING WARNING Make sure that the brake hose is routed properly. EB701900 ADJUSTING THE REAR WHEEL STATIC BALANCE NOTE: • After replacing the tire, wheel or both, the rear wheel static balance should be adjusted. • Adjust the rear wheel static balance with the brake disc and rear wheel drive hub installed. 1. Adjust: • rear wheel static balance Refer to “FRONT WHEEL”. 7 - 15 FRONT AND REAR BRAKES CHAS EB702001 FRONT AND REAR BRAKES Order 1 2 3 4 5 6 Job/Part Removing the front brake pads Q’ty Brake pad clip Brake pad pin Brake pad spring Brake pad Brake pad shim Bleed screw Remarks Remove the parts in the order listed. The following procedure applies to both of the front brake calipers. 2 1 1 2 2 1 For installation, reverse the removal procedure. 7 - 16 FRONT AND REAR BRAKES CHAS EB702002 Order 1 2 3 4 5 6 Job/Part Removing the rear brake pads Brake pad clip Brake pad pin Brake pad spring Brake pad Brake pad shim Bleed screw Q’ty Remarks Remove the parts in the order listed. 4 2 1 2 2 2 For installation, reverse the removal procedure. 7 - 17 FRONT AND REAR BRAKES CHAS EB702100 CAUTION: ACHTUNG: Disc brake components rarely require disassembly. Therefore, always follow these preventive measures: • Never disassemble brake components unless absolutely necessary. • If any connection on the hydraulic brake system is disconnected, the entire brake system must be disassembled, drained, cleaned, properly filled, and bled after reassembly. • Never use solvents on internal brake components. • Use only clean or new brake fluid for cleaning brake components. • Brake fluid may damage painted surfaces and plastic parts. Therefore, always clean up any spilt brake fluid immediately. • Avoid brake fluid coming into contact with the eyes as it can cause serious injury. First aid for brake fluid entering the eyes: • Flush with water for 15 minutes and get immediate medical attention. EB702112 REPLACING THE FRONT BRAKE PADS The following procedure applies to both brake calipers. NOTE: When replacing the brake pads, it is not necessary to disconnect the brake hose or disassemble the brake caliper. 1. Remove: • brake hose holder bolt 1 • brake caliper 2 7 - 18 FRONT AND REAR BRAKES CHAS 2. Remove: • brake pad clips 1 • brake pad pin 2 • brake pad spring 3 • brake pads (along with the brake pad shims) 3. Measure: • brake pad wear limit a Out of specification → Replace the brake pads as a set. Brake pad wear limit 0.5 mm 4. Install: • brake pad shims (onto the brake pads) • brake pads • brake pad spring NOTE: Always install new brake pads, brake pad shims, and a brake pad spring as a set. ▼▼▼▼▼▼▼▼▼▼▼▼▼▼▼▼▼▼▼▼▼▼▼▼▼▼▼ a. Connect a clear plastic hose 1 tightly to the bleed screw 2. Put the other end of the hose into an open container. b. Loosen the bleed screw and push the brake caliper pistons into the brake caliper with your finger. c. Tighten the bleed screw. T. Bleed screw 6 Nm (0.6 m • kg) R. d. Install a new brake pad shim onto each new brake pads. e. Install new brake pads and a new brake pad spring. NOTE: The arrow a on the brake pad spring must point in the direction of disc rotation. ▲▲▲▲▲▲▲▲▲▲▲▲▲▲▲▲▲▲▲▲▲▲▲▲▲▲▲ 7 - 19 FRONT AND REAR BRAKES T. R. 5. Install: • brake pad pin • brake pad clips • brake caliper CHAS 40 Nm (4.0 m · kg) 6. Check: • brake fluid level Below the minimum level mark a → Add the recommended brake fluid to the proper level. Refer to “CHECKING THE BRAKE FLUID LEVEL” in chapter 3. 7. Check: • brake lever operation Soft or spongy feeling → Bleed the brake system. Refer to “BLEEDING THE HYDRAULIC BRAKE SYSTEM” in chapter 3. EB702113 REPLACING THE REAR BRAKE PADS NOTE: When replacing the brake pads, it is not necessary to disconnect the brake hose or disassemble the brake caliper. 1. Remove: • brake caliper 1 • brake pad cover 2. Remove: • brake pad clips 1 • brake pad pins 2 • brake pad spring 3 • brake pads (along with the brake pad shims) 7 - 20 FRONT AND REAR BRAKES CHAS 3. Measure: • brake pad wear limit a Out of specification → Replace the brake pads as a set. Brake pad wear limit 0.5 mm 4. Install: • brake pad shims (onto the brake pads) • brake pads • brake pad spring NOTE: Always install new brake pads, brake pad shims, and a brake pad spring as a set. ▼▼▼▼▼▼▼▼▼▼▼▼▼▼▼▼▼▼▼▼▼▼▼▼▼▼▼ a. Connect a clear plastic hose 1 tightly to the bleed screw 2. Put the other end of the hose into an open container. b. Loosen the bleed screw and push the brake caliper pistons into the brake caliper with your finger. c. Tighten the bleed screw. T. Bleed screw 6 Nm (0.6 m • kg) R. d. Install a new brake pad shim onto each new brake pad. ▲▲▲▲▲▲▲▲▲▲▲▲▲▲▲▲▲▲▲▲▲▲▲▲▲▲▲ 7 - 21 FRONT AND REAR BRAKES T. R. 5. Install: • brake pad pins • brake pad clips • brake pad cover • brake caliper CHAS 40 Nm (4.0 m · kg) 6. Check: • brake fluid level Below the minimum level mark a → Add the recommended brake fluid to the proper level. Refer to “CHECKING THE BRAKE FLUID LEVEL” in chapter 3. 7. Check: • brake pedal operation Soft or spongy feeling → Bleed the brake system. Refer to “BLEEDING THE HYDRAULIC BRAKE SYSTEM” in chapter 3. 7 - 22 FRONT AND REAR BRAKES CHAS EB702200 Order 1 2 3 4 5 6 7 8 9 10 11 12 Job/Part Removing the front brake master cylinder and brake fluid reservoir Brake fluid Brake fluid reservoir cap stopper Brake fluid reservoir cap Brake fluid reservoir diaphragm holder Brake fluid reservoir diaphragm Brake fluid reservoir Brake fluid reservoir hose Circlip Hose joint Brake lever Front brake switch connector Union bolt Copper washer Q’ty Remarks Remove the parts in the order listed. Drain. 1 1 1 1 1 1 1 1 1 2 1 3 7 - 23 Disconnect. FRONT AND REAR BRAKES Order 13 14 15 16 Job/Part Brake hose Brake master cylinder holder Brake master cylinder Front brake switch Q’ty 2 1 1 1 CHAS Remarks For installation, reverse the removal procedure. 7 - 24 FRONT AND REAR BRAKES CHAS EB702201 Order 1 2 3 4 Job/Part Disassembling the front brake master cylinder Dust boot Circlip Brake master cylinder kit Brake master cylinder Q’ty Remarks Remove the parts in the order listed. 1 1 1 1 For assembly, reverse the disassembly procedure. 7 - 25 FRONT AND REAR BRAKES CHAS EB702202 Order 1 2 3 4 5 6 7 8 9 10 11 Job/Part Q’ty Remarks Removing the rear brake master cylRemove the parts in the order listed. inder and brake fluid reservoir Brake fluid Drain. Brake fluid reservoir cap stopper 1 Brake fluid reservoir cap 1 Brake fluid reservoir diaphragm 1 holder Brake fluid reservoir diaphragm 1 Brake fluid reservoir 1 Brake fluid reservoir hose 1 Hose joint 1 Union bolt 1 Copper washer 2 Brake hose 1 Brake master cylinder 1 For installation, reverse the removal procedure. 7 - 26 FRONT AND REAR BRAKES CHAS EB702203 Order 1 2 Job/Part Disassembling the rear brake master cylinder Brake master cylinder kit Brake master cylinder Q’ty Remarks Remove the parts in the order listed. 1 1 For assembly, reverse the disassembly procedure. 7 - 27 FRONT AND REAR BRAKES CHAS EB702210 DISASSEMBLING THE FRONT BRAKE MASTER CYLINDER NOTE: Before disassembling the front brake master cylinder, drain the brake fluid from the entire brake system. 1. Remove: • union bolt 1 • copper washers 2 • brake hoses 3 NOTE: To collect any remaining brake fluid, place a container under the master cylinder and the end of the brake hose. EB702220 DISASSEMBLING THE REAR BRAKE MASTER CYLINDER 1. Remove: • union bolt 1 • copper washers 2 • brake hose 3 NOTE: To collect any remaining brake fluid, place a container under the master cylinder and the end of the brake hose. EB702243 Å CHECKING THE FRONT AND REAR BRAKE MASTER CYLINDERS The following procedure applies to both of the brake master cylinders. 1. Check: • brake master cylinder Damage/scratches/wear → Replace. • brake fluid delivery passages (brake master cylinder body) Obstruction → Blow out with compressed air. ı Å Front ı Rear 7 - 28 FRONT AND REAR BRAKES CHAS 2. Check: • brake master cylinder kit Damage/scratches/wear → Replace. Å Å Front ı Rear ı Å 3. Check: • brake fluid reservoir 1 Cracks/damage → Replace. • brake fluid reservoir diaphragm 2 Cracks/damage → Replace. ı 4. Check: • brake hoses Cracks/damage/wear → Replace. EB702283 ASSEMBLING AND INSTALLING THE FRONT BRAKE MASTER CYLINDER WARNING WARNING • Before installation, all internal brake components should be cleaned and lubricated with clean or new brake fluid. • Never use solvents on internal brake components. Recommended brake fluid DOT 4 7 - 29 FRONT AND REAR BRAKES CHAS 1. Install: • brake master cylinder 1 T. R. 13 Nm (1.3 m · kg) NOTE: • Install the brake master cylinder holder with the “UP” mark facing up. • Align the end of the brake master cylinder holder with the punch mark a in the right handlebar. • First, tighten the upper bolt, then the lower bolt. New T. R. 2. Install: • copper washers • brake hose • union bolt 30 Nm (3.0 m · kg) WARNING WARNING Proper brake hose routing is essential to insure safe motorcycle operation. Refer to “CABLE ROUTING”. NOTE: • While holding the brake hose, tighten the union bolt as shown. • Turn the handlebars to the left and to the right to make sure that the brake hose does not touch other parts (e.g., wire harness, cables, leads). Correct if necessary. 3. Fill: • brake fluid reservoir (with the specified amount of the recommended brake fluid) Recommended brake fluid DOT 4 WARNING WARNING • Use only the designated brake fluid. Other brake fluids may cause the rubber seals to deteriorate, causing leakage and poor brake performance. • Refill with the same type of brake fluid that is already in the system. Mixing brake fluids may result in a harmful chemical reaction, leading to poor brake performance. • When refilling, be careful that water does not enter the brake fluid reservoir. Water will significantly lower the boiling point of the brake fluid and could cause vapor lock. 7 - 30 FRONT AND REAR BRAKES CHAS CAUTION: ACHTUNG: Brake fluid may damage painted surfaces and plastic parts. Therefore, always clean up any spilt brake fluid immediately. 4. Bleed: • brake system Refer to “BLEEDING THE HYDRAULIC BRAKE SYSTEM” in chapter 3. 5. Check: • brake fluid level Below the minimum level mark a → Add the recommended brake fluid to the proper level. Refer to “CHECKING THE BRAKE FLUID LEVEL” in chapter 3. 6. Check: • brake lever operation Soft or spongy feeling → Bleed the brake system. Refer to “BLEEDING THE HYDRAULIC BRAKE SYSTEM” in chapter 3. EB702290 ASSEMBLING THE REAR BRAKE MASTER CYLINDER New T. R. 1. Install: • copper washers • brake hoses • union bolt 30 Nm (3.0 m · kg) WARNING WARNING Proper brake hose routing is essential to insure safe motorcycle operation. Refer to “CABLE ROUTING”. CAUTION: ACHTUNG: When installing the brake hose onto the brake master cylinder, make sure that the brake pipe touches the projection a as shown. 7 - 31 FRONT AND REAR BRAKES CHAS 2. Fill: • brake fluid reservoir Recommended brake fluid DOT 4 WARNING WARNING • Use only the designated brake fluid. Other brake fluids may cause the rubber seals to deteriorate, causing leakage and poor brake performance. • Refill with the same type of brake fluid that is already in the system. Mixing brake fluids may result in a harmful chemical reaction, leading to poor brake performance. • When refilling, be careful that water does not enter the reservoir. Water will significantly lower the boiling point of the brake fluid and could cause vapor lock. CAUTION: ACHTUNG: Brake fluid may damage painted surfaces and plastic parts. Therefore, always clean up any spilt brake fluid immediately. 3. Bleed: • brake system Refer to “BLEEDING THE HYDRAULIC BRAKE SYSTEM” in chapter 3. 4. Check: • brake fluid level Below the minimum level mark a → Add the recommended brake fluid to the proper level. Refer to “CHECKING THE BRAKE FLUID LEVEL” in chapter 3. 5. Adjust: • brake pedal position Refer to “ADJUSTING THE REAR BRAKE” in chapter 3. Brake pedal position (from the top of the brake pedal to the bottom of the rider footrest bracket) 35 ~ 40 mm 6. Adjust: • rear brake light operation timing Refer to “ADJUSTING THE REAR BRAKE LIGHT SWITCH” in chapter 3. 7 - 32 FRONT AND REAR BRAKES CHAS EB702301 Order 1 2 3 4 Job/Part Removing the front brake calipers Q’ty Brake fluid Union bolt Copper washer Brake hose Brake caliper Remarks Remove the parts in the order listed. The following procedure applies to both of the front brake calipers. Drain. 1 2 1 1 For installation, reverse the removal procedure. 7 - 33 FRONT AND REAR BRAKES CHAS EB702303 Order Job/Part Disassembling the front brake calipers Q’ty Remarks Remove the parts in the order listed. The following procedure applies to both of the front brake calipers. 1 2 3 4 5 6 7 Brake pad clip Brake pad pin Brake pad spring Brake pad Brake caliper piston Brake caliper piston seal Bleed screw 2 1 1 2 4 8 1 For assembly, reverse the disassembly procedure. 7 - 34 FRONT AND REAR BRAKES CHAS EB702304 Order 1 2 3 4 Job/Part Removing the rear brake caliper Brake fluid Union bolt Copper washer Brake hose Brake caliper Q’ty Remarks Remove the parts in the order listed. Drain. 1 2 1 1 For installation, reverse the removal procedure. 7 - 35 FRONT AND REAR BRAKES CHAS EB702305 Order 1 2 3 4 5 6 7 Job/Part Q’ty Remarks Disassembling the rear brake caliper Remove the parts in the order listed. Brake pad clip 4 Brake pad pin 2 Brake pad spring 1 Brake pad 2 Brake caliper piston 2 Brake caliper piston seal 4 Bleed screw 2 For assembly, reverse the disassembly procedure. 7 - 36 FRONT AND REAR BRAKES CHAS EB702317 DISASSEMBLING THE FRONT BRAKE CALIPERS The following procedure applies to both of the brake calipers. NOTE: Before disassembling either brake caliper, drain the brake fluid from the entire brake system. 1. Remove: • union bolt 1 • copper washers 2 • brake hose NOTE: Put the end of the brake hose into a container and pump out the brake fluid carefully. 2. Remove: • brake caliper pistons 1 • brake caliper piston seals 2 ▼▼▼▼▼▼▼▼▼▼▼▼▼▼▼▼▼▼▼▼▼▼▼▼▼▼▼ a. Secure the right side brake caliper pistons with a piece of wood a. b. Blow compressed air into the brake hose joint opening b to force out the left side pistons from the brake caliper. WARNING WARNING • Never try to pry out the brake caliper pistons. • Do not loosen the bolts 3. c. Remove the brake caliper piston seals. d. Repeat the previous steps to force out the right side pistons from the brake caliper. ▲▲▲▲▲▲▲▲▲▲▲▲▲▲▲▲▲▲▲▲▲▲▲▲▲▲▲ 7 - 37 FRONT AND REAR BRAKES CHAS EB702322 DISASSEMBLING THE REAR BRAKE CALIPER NOTE: Before disassembling the brake caliper, drain the brake fluid from the entire brake system. 1. Remove: • union bolt 1 • copper washers 2 • brake hose NOTE: Put the end of the brake hose into a container and pump out the brake fluid carefully. 2. Remove: • brake caliper pistons 1 • brake caliper piston seals 2 ▼▼▼▼▼▼▼▼▼▼▼▼▼▼▼▼▼▼▼▼▼▼▼▼▼▼▼ a. Secure the right side brake caliper piston with a piece of wood a. b. Blow compressed air into the brake hose joint opening b to force out the left side piston from the brake caliper. WARNING WARNING • Never try to pry out the brake caliper pistons. • Do not loosen the bolt 3. c. Remove the brake caliper piston seals. d. Repeat the previous steps to force out the right side piston from the brake caliper. ▲▲▲▲▲▲▲▲▲▲▲▲▲▲▲▲▲▲▲▲▲▲▲▲▲▲▲ 7 - 38 FRONT AND REAR BRAKES CHAS EB702343 CHECKING THE FRONT AND REAR BRAKE CALIPERS Recommended brake component replacement schedule Brake pads If necessary Piston seals Every two years Brake hoses Every two years Brake fluid Every two years and whenever the brake is disassembled 1. Check: • brake caliper pistons 1 Rust/scratches/wear → Replace the brake caliper. • brake caliper cylinders 2 Scratches/wear → Replace the brake caliper. • brake calipers Cracks/damage → Replace. • brake fluid delivery passages (brake caliper body) Obstruction → Blow out with compressed air. Å WARNING WARNING Whenever a brake caliper is disassembled, replace the brake caliper piston seals. Å Front ı Rear ı 2. Check: • rear brake caliper bracket 1 Cracks/damage → Replace. 7 - 39 FRONT AND REAR BRAKES CHAS EB702376 ASSEMBLING AND INSTALLING THE FRONT BRAKE CALIPERS The following procedure applies to both of the brake calipers. WARNING WARNING • Before installation, all internal brake components should be cleaned and lubricated with clean or new brake fluid. • Never use solvents on internal brake components as they will cause the piston seals to swell and distort. • Whenever a brake caliper is disassembled, replace the brake caliper piston seals. Recommended brake fluid DOT 4 New T. R. 1. Install: • brake caliper 1 (temporarily) • copper washers • brake hose 2 • union bolt 3 30 Nm (3.0 m · kg) WARNING WARNING Proper brake hose routing is essential to insure safe motorcycle operation. Refer to “CABLE ROUTING”. CAUTION: ACHTUNG: When installing the brake hose onto the brake caliper 1, make sure that the brake pipe a touches the projection b on the brake caliper. 2. Remove: • brake caliper T. 3. Install: • brake pads • brake pad spring 40 Nm (4.0 m · kg) • brake caliper • brake hose holder 7 Nm (0.7 m · kg) Refer to “REPLACING THE FRONT BRAKE PADS”. R. T. R. 7 - 40 FRONT AND REAR BRAKES CHAS 4. Fill: • brake fluid reservoir (with the specified amount of the recommended brake fluid) Recommended brake fluid DOT 4 WARNING WARNING • Use only the designated brake fluid. Other brake fluids may cause the rubber seals to deteriorate, causing leakage and poor brake performance. • Refill with the same type of brake fluid that is already in the system. Mixing brake fluids may result in a harmful chemical reaction, leading to poor brake performance. • When refilling, be careful that water does not enter the brake fluid reservoir. Water will significantly lower the boiling point of the brake fluid and could cause vapor lock. CAUTION: ACHTUNG: Brake fluid may damage painted surfaces and plastic parts. Therefore, always clean up any spilt brake fluid immediately. 5. Bleed: • brake system Refer to “BLEEDING THE HYDRAULIC BRAKE SYSTEM” in chapter 3. 6. Check: • brake fluid level Below the minimum level mark a → Add the recommended brake fluid to the proper level. Refer to “CHECKING THE BRAKE FLUID LEVEL” in chapter 3. 7. Check: • brake lever operation Soft or spongy feeling → Bleed the brake system. Refer to “BLEEDING THE HYDRAULIC BRAKE SYSTEM” in chapter 3. 7 - 41 FRONT AND REAR BRAKES CHAS EB702378 ASSEMBLING AND INSTALLING THE REAR BRAKE CALIPER WARNING WARNING • Before installation, all internal brake components should be cleaned and lubricated with clean or new brake fluid. • Never use solvents on internal brake components as they will cause the piston seals to swell and distort. • Whenever a brake caliper is disassembled, replace the brake caliper piston seals. Recommended brake fluid DOT 4 New T. R. 1. Install: • brake caliper 1 (temporarily) • copper washers • brake hose 2 • union bolt 3 30 Nm (3.0 m · kg) WARNING WARNING Proper brake hose routing is essential to insure safe motorcycle operation. Refer to “CABLE ROUTING”. CAUTION: ACHTUNG: When installing the brake hose onto the brake caliper 1, make sure that the brake pipe a touches the projection b on the brake caliper. 2. Remove: • brake caliper T. 3. Install: • brake pads • brake pad springs • brake caliper 40 Nm (4.0 m · kg) 7 Nm (7.0 m · kg) • brake hose holder Refer to “REPLACING THE REAR BRAKE PADS”. R. T. R. 7 - 42 FRONT AND REAR BRAKES CHAS 4. Fill: • brake fluid reservoir (with the specified amount of the recommended brake fluid) Recommended brake fluid DOT 4 WARNING WARNING • Use only the designated brake fluid. Other brake fluids may cause the rubber seals to deteriorate, causing leakage and poor brake performance. • Refill with the same type of brake fluid that is already in the system. Mixing brake fluids may result in a harmful chemical reaction, leading to poor brake performance. • When refilling, be careful that water does not enter the brake fluid reservoir. Water will significantly lower the boiling point of the brake fluid and could cause vapor lock. CAUTION: ACHTUNG: Brake fluid may damage painted surfaces and plastic parts. Therefore, always clean up any spilt brake fluid immediately. 5. Bleed: • brake system Refer to “BLEEDING THE HYDRAULIC BRAKE SYSTEM” in chapter 3. 6. Check: • brake fluid level Below the minimum level mark a → Add the recommended brake fluid to the proper level. Refer to “CHECKING THE BRAKE FLUID LEVEL” in chapter 3. 7. Check: • brake pedal operation Soft or spongy feeling → Bleed the brake system. Refer to “BLEEDING THE HYDRAULIC BRAKE SYSTEM” in chapter 3. 7 - 43 FRONT FORK CHAS EB703001 FRONT FORK Order Job/Part Removing the front fork legs Q’ty Front wheel 1 2 3 4 5 6 Front cowling inner panels Front fender Upper bracket pinch bolt Cap bolt Handlebar pinch bolt Lower bracket pinch bolt Front fork leg Remarks Remove the parts in the order listed. The following procedure applies to both of the front fork legs. Refer to “FRONT WHEEL AND BRAKE DISCS”. Refer to “COWLINGS” in chapter 3. 1 1 1 1 2 1 For installation, reverse the removal procedure. 7 - 44 FRONT FORK CHAS EB703002 Order 1 2 3 4 5 6 7 8 9 0 A B Job/Part Disassembling the front fork legs Q’ty Cap bolt O-ring Spacer Nut Spring seat Fork spring Damper adjusting rod Outer tube Dust seal Oil seal clip Oil seal Washer 1 1 1 1 1 1 1 1 1 1 1 1 7 - 45 Remarks Remove the parts in the order listed. The following procedure applies to both of the front fork legs. FRONT FORK Order C D E F Job/Part Damper rod assembly bolt Copper washer Damper rod assembly Inner tube Q’ty 1 1 1 1 CHAS Remarks For assembly, reverse the disassembly procedure. 7 - 46 FRONT FORK CHAS EB703100 REMOVING THE FRONT FORK LEGS The following procedure applies to both of the front fork legs. 1. Stand the motorcycle on a level surface. WARNING WARNING Securely support the motorcycle so that there is no danger of it falling over. NOTE: Place the motorcycle on a suitable stand so that the front wheel is elevated. 2. Loosen: • upper bracket pinch bolt 1 • cap bolt 2 • handlebar boss pinch bolt 3 • lower bracket pinch bolts WARNING WARNING Before loosening the upper and lower bracket pinch bolts and handlebar pinch bolt, support the front fork leg. 3. Remove: • front fork leg EB703113 DISASSEMBLING THE FRONT FORK LEGS The following procedure applies to both of the front fork legs. 1. Remove: • cap bolt 1 (from the damper adjusting rod) • spacer 2 • nut 3 ▼▼▼▼▼▼▼▼▼▼▼▼▼▼▼▼▼▼▼▼▼▼▼▼▼▼▼ a. Press down on the spacer with the fork spring compressor 4. b. Install the rod holder 5 between the nut 3 and the spacer 2. Fork spring compressor 90890-01441 Rod holder 90890-01434 7 - 47 FRONT FORK CHAS NOTE: Use the side of the rod holder that is marked “B”. c. Loosen the nut. d. Remove the cap bolt. e. Remove the rod holder and fork spring compressor WARNING WARNING The fork spring is compressed. f. Remove the spacer and nut. ▲▲▲▲▲▲▲▲▲▲▲▲▲▲▲▲▲▲▲▲▲▲▲▲▲▲▲ 2. Drain: • fork oil NOTE: Stroke the damper rod 1 several times while draining the fork oil. 3. Remove: • dust seal • oil seal clip 1 • oil seal • washer (with a flat-head screwdriver) 4. Remove: • damper rod assembly bolt • copper washer NOTE: While holding the damper rod with the damper rod holder 1, loosen the damper rod assembly bolt. Damper rod holder 90890-01423 7 - 48 FRONT FORK CHAS EB703401 CHECKING THE FRONT FORK LEGS The following procedure applies to both of the front fork legs. 1. Check: • inner tube 1 • outer tube 2 Bends/damage/scratches → Replace. WARNING WARNING Do not attempt to straighten a bent inner tube as this may dangerously weaken it. 2. Measure: • spring free length a Out of specification → Replace. Spring free length limit 255 mm 3. Check: • damper rod 1 Damage/wear → Replace. Obstruction → Blow out all of the oil passages with compressed air. CAUTION: ACHTUNG: • The front fork leg has a built-in damper adjusting rod and a very sophisticated internal construction, which are particularly sensitive to foreign material. • When disassembling and assembling the front fork leg, do not allow any foreign material to enter the front fork. 7 - 49 FRONT FORK CHAS 4. Check: • cap bolt O-ring Damage/wear → Replace. EB703702 ASSEMBLING THE FRONT FORK LEGS The following procedure applies to both of the front fork legs. WARNING WARNING • Make sure that the oil levels in both front fork legs are equal. • Uneven oil levels can result in poor handling and a loss of stability. NOTE: • When assembling the front fork leg, be sure to replace the following parts: - inner tube bushing - outer tube bushing - oil seal - dust seal • Before assembling the front fork leg, make sure that all of the components are clean. 1. Install: • damper rod assembly 1 WARNING WARNING Always use new copper washers. CAUTION: ACHTUNG: Allow the damper rod assembly to slide slowly down the inner tube 2 until it protrudes from the bottom of the inner tube. Be careful not to damage the inner tube. 2. Lubricate: • inner tube’s outer surface Recommended lubricant Yamaha fork and shock oil 01 or equivalent 7 - 50 FRONT FORK CHAS 3. Tighten: • damper rod assembly bolt 1 T. R. 40 Nm (4.0 m · kg) NOTE: While holding the damper rod with the damper rod holder 2, tighten the damper rod assembly bolt. Damper rod holder 90890-01423 4. Install: • dust seal 1 • oil seal clip 2 • oil seal 3 • washer 4 CAUTION: ACHTUNG: Make sure that the numbered side of the oil seal faces up. NOTE: • Before installing the oil seal, lubricate its lips with lithium soap base grease. • Lubricate the outer surface of the inner tube with fork oil. • Before installing the oil seal, cover the top of the front fork leg with a plastic bag 5 to protect the oil seal during installation. 5. Install: • outer tube (onto the inner tube) 6. Install: • washer • oil seal 1 (with the fork seal driver 2) Fork seal driver 90890-01442 7. Install: • oil seal clip 1 NOTE: Adjust the oil seal clip so that it fits into the outer tube’s groove. 7 - 51 FRONT FORK CHAS 8. Install: • dust seal 1 (with the fork seal driver 2) 9. Install: • rod puller 1 • adapter 2 (onto the damper rod 3) Rod puller 90890-01437 Adapter 90890-01436 10.Fully compress the front fork leg. 11.Fill: • front fork leg (with the specified amount of the recommended fork oil) Quantity (each front fork leg) 477 cm3 Recommended oil Yamaha fork and shock oil 01 or equivalent CAUTION: ACHTUNG: • Be sure to use the recommended fork oil. Other oils may have an adverse effect on front fork performance. • When disassembling and assembling the front fork leg, do not allow any foreign material to enter the front fork. 12.After filling the front fork leg, slowly stroke the damper rod 1 up and down (at least ten times) to distribute the fork oil. NOTE: Be sure to stroke the damper rod slowly because the fork oil may spurt out. 7 - 52 FRONT FORK CHAS 13.Slowly stroke the outer tube 1 up and down to distribute the fork oil once more (1 stroke = about 100 mm). NOTE: Be careful not to stroke the inner tube over 100 mm as this will cause air to enter. If the inner tube is stroked more than 100 mm, repeat steps (12) and (13). 14.Before measuring the fork oil level, wait ten minutes until the oil has settled and the air bubbles have dispersed. NOTE: Be sure to bleed the front fork leg of any residual air. 15.Measure: • front fork leg oil level a Out of specification → Correct. Front fork leg oil level (from the top of the inner tube, with the inner tube fully compressed, and without the spring) 78 mm 16.Install: • nut 1 • fork spring 2 • spring seat 3 • spacer 4 • damper adjusting rod 5 • cap bolt 6 ▼▼▼▼▼▼▼▼▼▼▼▼▼▼▼▼▼▼▼▼▼▼▼▼▼▼▼ a. Remove the rod puller and adapter. b. Install the nut. 7 - 53 FRONT FORK CHAS c. Install the rod puller and adapter onto the damper rod. Rod puller 90890-01437 Adapter 90890-01436 d. Install the fork spring, spring seat, and spacer. NOTE: Install the spring with the smaller pitch a facing up Å. e. Press down on the spacer with the fork spring compressor 7. f. Pull up the rod puller and install the rod holder 8 between the nut 1 and the spacer 4. NOTE: Use the side of the rod holder that is marked “B”. Fork spring compressor 90890-01441 Rod holder 90890-01434 g. Remove the rod puller and adapter. h. Install the nut 1 and position it as specified b. Distance b 11 mm i. Install the damper adjusting rod and cap bolt, and then finger tighten the cap bolt. j. Hold the cap bolt and tighten the nut to specification. T. Nut 15 Nm (1.5 m • kg) R. k. Remove the rod holder and fork spring compressor. WARNING WARNING • The fork spring is compressed. • Always use a new cap bolt O-ring. ▲▲▲▲▲▲▲▲▲▲▲▲▲▲▲▲▲▲▲▲▲▲▲▲▲▲▲ 7 - 54 FRONT FORK CHAS 17.Install: • outer tube (onto the inner tube) NOTE: Temporarily tighten the cap bolt. EB703710 INSTALLING THE FRONT FORK LEGS The following procedure applies to both of the front fork legs. 1. Install: • front fork leg Temporarily tighten the upper and lower bracket pinch bolts. NOTE: Make sure that the inner fork tube is flush with the top of the handlebar holder. 2. Tighten: • lower bracket pinch bolt T. R. 23 Nm (2.3 m · kg) • handlebar pinch bolt 1 T. R. 17 Nm (1.7 m · kg) T. • cap bolt 2 23 Nm (2.3 m · kg) • upper bracket pinch bolt 3 R. T. R. 23 Nm (2.3 m · kg) WARNING WARNING Make sure that the brake hoses are routed properly. 3. Adjust: • spring preload • rebound damping • compression damping Refer to “ADJUSTING THE FRONT FORK LEGS” in chapter 3. 7 - 55 HANDLEBARS CHAS EB704001 HANDLEBARS Order 1 2 3 4 5 6 7 8 9 10 11 12 Job/Part Removing the handlebars Left grip end Handlebar grip Clutch switch connector Left handlebar switch Starter cable Starter lever Clutch cable Clutch lever Right grip end Throttle cable housing Throttle cable Throttle grip Q’ty 1 1 2 1 1 1 1 1 1 1 2 1 7 - 56 Remarks Remove the parts in the order listed. Disconnect. Disconnect. Disconnect. HANDLEBARS Order 13 14 15 16 17 18 19 20 21 22 23 Job/Part Front brake switch connector Right handlebar switch Brake master cylinder holder Brake master cylinder Handlebar pinch bolt Upper bracket bolt Upper bracket pinch bolt Steering stem nut Upper bracket Left handlebar Right handlebar CHAS Q’ty Remarks 2 Disconnect. 1 1 1 2 2 2 1 1 1 1 For installation, reverse the removal procedure. 7 - 57 HANDLEBARS CHAS EB704101 REMOVING THE HANDLEBARS 1. Stand the motorcycle on a level surface. WARNING WARNING Securely support the motorcycle so that there is no danger of it falling over. 2. Remove: • handlebar grip NOTE: Blow compressed air between the left handlebar and the handlebar grip, and gradually push the grip off the handlebar. 3. Remove: • throttle cable housing 1 • throttle grip 2 NOTE: Pull back the rubber cover 3 when removing the throttle cable housing. EB704401 CHECKING THE HANDLEBARS 1. Check: • left handlebar • right handlebar Bends/cracks/damage → Replace. WARNING WARNING Do not attempt to straighten bent handlebars as this may dangerously weaken them. 7 - 58 HANDLEBARS CHAS EB704704 INSTALLING THE HANDLEBARS 1. Install: • right handlebar switch 1 NOTE: Align the projection a on the right handlebar switch with the hole b in the right handlebar. 2. Install: • brake master cylinder holder 1 CAUTION: ACHTUNG: • Install the brake master cylinder holder with the “UP” mark facing up. • First, tighten the upper bolt, then the lower bolt. NOTE: • Align the mating surfaces of the brake master cylinder holder with the punch mark a in the right handlebar. • There should be 2 mm of clearance between the right handlebar switch and the brake master cylinder holder. 3. Install: • throttle grip 1 • throttle cable housing 2 • throttle cables NOTE: Align the projection a on the throttle cable housing with the hole b in the right handlebar. 4. Install: • clutch lever holder 1 NOTE: Align the slit in the clutch lever holder with the punch mark a in the left handlebar. 7 - 59 HANDLEBARS CHAS 5. Install: • left handlebar switch 1 NOTE: Align the projection a on the left handlebar switch with the hole b in the left handlebar. 6. Install: • handlebar grip ▼▼▼▼▼▼▼▼▼▼▼▼▼▼▼▼▼▼▼▼▼▼▼▼▼▼▼ a. Apply a thin coat of rubber adhesive onto the end of the left handlebar. b. Slide the handlebar grip over the end of the left handlebar. c. Wipe off any excess rubber adhesive with a clean rag. WARNING WARNING Do not touch the handlebar grip until the rubber adhesive has fully dried. ▲▲▲▲▲▲▲▲▲▲▲▲▲▲▲▲▲▲▲▲▲▲▲▲▲▲▲ 7. Adjust: • clutch cable free play Refer to “ADJUSTING THE CLUTCH CABLE FREE PLAY” in chapter 3. Clutch cable free play (at the end of the clutch lever) 10 ~ 15 mm 8. Adjust: • throttle cable free play Refer to “ADJUSTING THE THROTTLE CABLE FREE PLAY” in chapter 3. Throttle cable free play (at the flange of the throttle grip) 3 ~ 5 mm 7 - 60 STEERING HEAD CHAS EB705001 STEERING HEAD Order 1 2 3 4 5 6 7 8 9 10 11 Job/Part Removing the lower bracket Front wheel Q’ty Front fork legs Main switch coupler Upper bracket bolt Left handlebar assembly Right handlebar assembly Steering stem nut Upper bracket Lower bracket panel Brake hose holder bolt Lock washer Upper ring nut Rubber washer 2 2 1 1 1 1 1 2 1 1 1 7 - 61 Remarks Remove the parts in the order listed. Refer to “FRONT WHEEL AND BRAKE DISCS”. Refer to “FRONT FORK”. Disconnect. STEERING HEAD Order 12 13 14 15 16 17 18 19 Job/Part Lower ring nut Lower bracket Bearing cover Bearing inner race Upper bearing Lower bearing Dust seal Bearing outer race Q’ty 1 1 1 2 1 1 1 2 CHAS Remarks For installation, reverse the removal procedure. 7 - 62 STEERING HEAD CHAS EB705100 REMOVING THE LOWER BRACKET 1. Stand the motorcycle on a level surface. WARNING WARNING Securely support the motorcycle so that there is no danger of it falling over. 2. Remove: • lower ring nut 1 (with the special tool 2) Ring nut wrench 90890-01403 WARNING WARNING Securely support the lower bracket so that there is no danger of it falling. EB705401 CHECKING THE STEERING HEAD 1. Wash: • bearing balls • bearing races Recommended cleaning solvent Kerosine 2. Check: • bearing balls 1 • bearing races 2 Damage/pitting → Replace. 3. Replace: • bearing balls • bearing races ▼▼▼▼▼▼▼▼▼▼▼▼▼▼▼▼▼▼▼▼▼▼▼▼▼▼▼ a. Remove the bearing races from the steering head pipe with a long rod 1 and hammer. 7 - 63 STEERING HEAD CHAS b. Remove the bearing race from the lower bracket with a floor chisel 2 and hammer. c. Install a new dust seal and new bearing races. CAUTION: ACHTUNG: If the bearing race is not installed properly, the steering head pipe could be damaged. NOTE: • Always replace the bearing balls and bearing races as a set. • Whenever the steering head is disassembled, replace the dust seal. ▲▲▲▲▲▲▲▲▲▲▲▲▲▲▲▲▲▲▲▲▲▲▲▲▲▲▲ 4. Check: • upper bracket • lower bracket (along with the steering stem) Bends/cracks/damage → Replace. EB705700 INSTALLING THE STEERING HEAD 1. Lubricate: • upper bearing • lower bearing • bearing races Recommended lubricant Lithium soap base grease 2. Install: • lower ring nut 1 • rubber washer 2 • upper ring nut 3 • lock washer 4 Refer to “CHECKING AND ADJUSTING THE STEERING HEAD” in chapter 3. 7 - 64 CHAS STEERING HEAD 3. Install: • upper bracket • steering stem nut NOTE: Temporarily tighten the steering stem nut. 4. Install: • front fork legs Refer to “FRONT FORK”. NOTE: Temporarily tighten the upper and lower bracket pinch bolts, and handlebar pinch bolts. 5. Tighten: • steering stem nut T. R. 115 Nm (11.5 m · kg) • lower bracket pinch bolt T. R. 23 Nm (2.3 m · kg) • upper bracket pinch bolt T. R. 23 Nm (2.3 m · kg) • upper bracket bolt T. R. 13 Nm (1.3 m · kg) • handlebar pinch bolt T. R. 7 - 65 17 Nm (1.7 m · kg) REAR SHOCK ABSORBER ASSEMBLY CHAS EB706000 REAR SHOCK ABSORBER ASSEMBLY Order 1 2 3 4 5 6 7 8 9 10 11 Job/Part Removing the rear shock absorber assembly Self-locking nut/bolt Self-locking nut/bolt Self-locking nut/bolt/spacer Rear shock absorber assembly Spacer/oil seal/bearing Self-locking nut/bolt Relay arm Spacer/oil seal/bearing Self-locking nut/bolt/spacer Connecting arm Spacer/oil seal/bearing Q’ty Remarks Remove the parts in the order listed. 1/1 1/1 1/1/1 1 1/2/1 1/1 1 1/2/2 1/1/1 1 2/4/2 Bolt R= 54 mm Bolt R = 80 mm Bolt R = 65 mm Bolt R = 54 mm Bolt R = 65 mm For installation, reverse the removal procedure. 7 - 66 REAR SHOCK ABSORBER ASSEMBLY CHAS EB706101 HANDLING THE REAR SHOCK ABSORBER AND GAS CYLINDER WARNING WARNING This rear shock absorber and gas cylinder contain highly compressed nitrogen gas. Before handling the rear shock absorber or gas cylinder, read and make sure you understand the following information. The manufacturer cannot be held responsible for property damage or personal injury that may result from improper handling of the rear shock absorber and gas cylinder. • Do not tamper or attempt to open the rear shock absorber or gas cylinder. • Do not subject the rear shock absorber or gas cylinder to an open flame or any other source of high heat. High heat can cause an explosion due to excessive gas pressure. • Do not deform or damage the rear shock absorber or gas cylinder in any way. If the rear shock absorber, gas cylinder or both are damaged, damping performance will suffer. EB706111 DISPOSING OF A REAR SHOCK ABSORBER AND GAS CYLINDER Gas pressure must be released before disposing of a rear shock absorber and gas cylinder. To release the gas pressure, press on the gas valve needle with a suitable tool as shown, until all of the gas is released (the hissing has stopped). WARNING WARNING Wear eye protection to prevent eye damage from released gas or metal chips. 7 - 67 REAR SHOCK ABSORBER ASSEMBLY CHAS EB706204 REMOVING THE REAR SHOCK ABSORBER ASSEMBLY 1. Stand the motorcycle on a level surface. WARNING WARNING Securely support the motorcycle so that there is no danger of it falling over. NOTE: Place the motorcycle on a suitable stand so that the rear wheel is elevated. 2. Remove: • rear shock absorber assembly lower bolt 1 • relay-arm-to-swingarm bolt 2 NOTE: While removing the rear shock absorber assembly lower bolt, hold the swingarm so that it does not drop down. 3. Remove: • rear shock absorber assembly upper bolt 1 • rear shock absorber assembly NOTE: Raise the swingarm and then remove the rear shock absorber assembly from between the swingarm. EB706401 CHECKING THE REAR SHOCK ABSORBER ASSEMBLY AND GAS CYLINDER 1. Check: • rear shock absorber rod Bends/damage → Replace the rear shock absorber assembly. • rear shock absorber Gas leaks/oil leaks → Replace the rear shock absorber assembly. • spring Damage/wear → Replace the rear shock absorber assembly. • gas cylinder Damage/gas leaks → Replace. • bushings Damage/wear → Replace. • dust seals Damage/wear → Replace. • bolts Bends/damage/wear → Replace. 7 - 68 REAR SHOCK ABSORBER ASSEMBLY CHAS CHECKING THE RELAY ARM AND CONNECTING ARM 1. Check: • relay arm 1 • connecting arm 2 Damage/wear → Replace. • bearings • oil seals Damage/pitting → Replace. • spacers Damage/scratches → Replace. EB706701 INSTALLING THE REAR SHOCK ABSORBER ASSEMBLY 1. Lubricate: • bearings • oil seals • spacers Recommended lubricant Lithium soap base grease 2. Install: • connecting arm • relay arm • rear shock absorber assembly NOTE: When installing the rear shock absorber assembly, lift up the swingarm. 3. Tighten: • connecting-arm-to-frame nut T. R. 40 Nm (4.0 m · kg) • relay-arm-to-connecting-arm nut T. R. 40 Nm (4.0 m · kg) • relay-arm-to-swingarm nut T. R. 40 Nm (4.0 m · kg) • rear shock absorber assembly upper nut T. R. 40 Nm (4.0 m · kg) • rear shock absorber assembly lower nut T. R. 7 - 69 40 Nm (4.0 m · kg) SWINGARM AND DRIVE CHAIN CHAS EB707000 SWINGARM AND DRIVE CHAIN Order Job/Part Removing the swingarm and drive chain Drive sprocket Rear wheel Q’ty Refer to “ENGINE” in chapter 4. Refer to “REAR WHEEL, BRAKE DISC, AND REAR WHEEL SPROCKET”. Refer to “REAR SHOCK ABSORBER ASSEMBLY”. Rear shock absorber assembly 1 2 3 4 5 6 7 Adjusting bolt/locknut Drive chain guard Rear fender Brake hose holder Pivot shaft nut/washer Pivot shaft Swingarm Remarks Remove the parts in the order listed. 2/2 1 1 2 1/1 1 1 7 - 70 SWINGARM AND DRIVE CHAIN Order 8 9 10 11 12 13 Job/Part Drive chain Dust cover Drive chain guide Spacer Left bearing Right bearing Q’ty 1 2 1 1 1 1 CHAS Remarks For installation, reverse the removal procedure. 7 - 71 SWINGARM AND DRIVE CHAIN CHAS EB707100 NOTE: Before removing the drive sprocket, drive chain, and rear wheel, measure the drive chain slack and the length of a tenlink section of the drive chain. EB707111 REMOVING THE SWINGARM 1. Stand the motorcycle on a level surface. WARNING WARNING Securely support the motorcycle so that there is no danger of it falling over. NOTE: Place the motorcycle on a suitable stand so that the rear wheel is elevated. 2. Measure: • swingarm side play • swingarm vertical movement ▼▼▼▼▼▼▼▼▼▼▼▼▼▼▼▼▼▼▼▼▼▼▼▼▼▼▼ a. Measure the tightening torque of the pivot shaft nut. T. Pivot shaft nut 125 Nm (12.5 m • kg) R. b. Measure the swingarm side play Å by moving the swingarm from side to side. c. If the swingarm side play is out of specification, check the spacers, bearings, washers, and dust covers. Swingarm side play (at the end of the swingarm) 1.0 mm d. Check the swingarm vertical movement ı by moving the swingarm up and down. If swingarm vertical movement is not smooth or if there is binding, check the spacers, bearings, washers, and dust covers. ▲▲▲▲▲▲▲▲▲▲▲▲▲▲▲▲▲▲▲▲▲▲▲▲▲▲▲ 7 - 72 SWINGARM AND DRIVE CHAIN CHAS EB707120 REMOVING THE DRIVE CHAIN 1. Remove: • drive chain (with the drive chain cutter) Drive chain cutter 90890-01286 NOTE: Only cut the drive chain if it or the swingarm is to be replaced. EB707400 CHECKING THE SWINGARM 1. Check: • swingarm Bends/cracks/damage → Replace. NOTE: If the swingarm must be replaced, the drive chain must be cut with a drive chain cutter. 2. Check: • pivot shaft Roll the pivot shaft on a flat surface. Bends → Replace. WARNING WARNING Do not attempt to straighten a bent pivot shaft. 3. Wash: • pivot shaft • dust covers • spacer • bearings Recommended cleaning solvent Kerosine 7 - 73 SWINGARM AND DRIVE CHAIN CHAS 4. Check: • dust covers • spacer • oil seals Damage/wear → Replace. • bearings Damage/pitting → Replace. EB707410 CHECKING THE DRIVE CHAIN 1. Measure: • ten-link section a of the drive chain Out of specification → Replace the drive chain. Max. ten-link drive chain section 150.1 mm NOTE: • While measuring the ten-link section, push down on the drive chain to increase its tension. • Measure the length between drive chain roller 1 and A as shown. • Perform this measurement at two or three different places. 2. Check: • drive chain Stiffness → Clean and lubricate or replace. 3. Clean: • drive chain ▼▼▼▼▼▼▼▼▼▼▼▼▼▼▼▼▼▼▼▼▼▼▼▼▼▼▼ a. Wipe the drive chain with a clean cloth. b. Put the drive chain in kerosine and remove any remaining dirt. 7 - 74 SWINGARM AND DRIVE CHAIN CHAS c. Remove the drive chain from the kerosine and completely dry it. CAUTION: ACHTUNG: This motorcycle has a drive chain with small rubber O-rings 1 between the drive chain side plates. Never use highpressure water or air, steam, gasoline, certain solvents (e.g., benzine), or a coarse brush to clean the drive chain. High-pressure methods could force dirt or water into the drive chain’s internals, and solvents will deteriorate the Orings. A coarse brush can also damage the O-rings. Therefore, use only kerosine to clean the drive chain. ▲▲▲▲▲▲▲▲▲▲▲▲▲▲▲▲▲▲▲▲▲▲▲▲▲▲▲ 4. Check: • O-rings 1 Damage → Replace the drive chain. • drive chain rollers 2 Damage/wear → Replace the drive chain. • drive chain side plates 3 Cracks/damage/wear → Replace the drive chain. 5. Lubricate: • drive chain Recommended lubricant Engine oil or chain lubricant suitable for O-ring chains 6. Check: • drive sprocket • rear wheel sprocket More than 1/4 tooth a wear → Replace the drive chain sprockets as a set. Bent teeth → Replace the drive chain sprockets as a set. b Correct 1 Drive chain roller 2 Drive chain sprocket 7 - 75 CHAS SWINGARM AND DRIVE CHAIN EB707700 INSTALLING THE SWINGARM 1. Lubricate: • bearings • spacers • dust covers • pivot shaft Recommended lubricant Lithium soap base grease T. R. 2. Install: • swingarm • pivot shaft • washer • pivot shaft nut 125 Nm (12.5 m · kg) 3. Install: • rear shock absorber assembly • rear wheel Refer to “REAR SHOCK ABSORBER ASSEMBLY” and “REAR WHEEL”. 4. Adjust: • drive chain slack Refer to “ADJUSTING THE DRIVE CHAIN SLACK” in chapter 3. Drive chain slack 40 ~ 50 mm 7 - 76 – ELEC + 8 ELEC CHAPTER 8. ELECTRICAL ELECTRICAL COMPONENTS .......................................................................8-1 INSTRUMENT FUNCTIONS .........................................................................8-2 INDICATOR LIGHTS .............................................................................8-2 OIL LEVEL/COOLANT TEMPERATURE WARNING LIGHT .................8-2 COMBINATION METER ........................................................................8-3 SWITCHES ....................................................................................................8-5 CHECKING SWITCH CONTINUITY ......................................................8-5 CHECKING THE SWITCHES .........................................................................8-6 CHECKING THE BULBS AND BULB SOCKETS ..........................................8-8 TYPES OF BULBS .................................................................................8-8 CHECKING THE CONDITION OF THE BULBS ....................................8-8 CHECKING THE CONDITION OF THE BULB SOCKETS ...................8-10 CHECKING THE LEDs .........................................................................8-10 IGNITION SYSTEM .....................................................................................8-11 CIRCUIT DIAGRAM .............................................................................8-11 TROUBLESHOOTING .........................................................................8-12 ELECTRIC STARTING SYSTEM .................................................................8-16 CIRCUIT DIAGRAM .............................................................................8-16 STARTING CIRCUIT CUTOFF SYSTEM OPERATION ......................8-17 TROUBLESHOOTING .........................................................................8-18 STARTER MOTOR ......................................................................................8-22 CHECKING THE STARTER MOTOR ...................................................8-24 ASSEMBLING THE STARTER MOTOR .............................................8-25 CHARGING SYSTEM ..................................................................................8-26 CIRCUIT DIAGRAM .............................................................................8-26 TROUBLESHOOTING .........................................................................8-27 LIGHTING SYSTEM ....................................................................................8-29 CIRCUIT DIAGRAM .............................................................................8-29 TROUBLESHOOTING .........................................................................8-30 CHECKING THE LIGHTING SYSTEM ................................................8-31 – + ELEC SIGNALING SYSTEM .................................................................................8-35 CIRCUIT DIAGRAM .............................................................................8-35 TROUBLESHOOTING .........................................................................8-37 CHECKING THE SIGNALING SYSTEM .............................................8-38 COOLING SYSTEM .....................................................................................8-44 CIRCUIT DIAGRAM .............................................................................8-44 TROUBLESHOOTING .........................................................................8-45 FUEL PUMP SYSTEM .................................................................................8-48 CIRCUIT DIAGRAM .............................................................................8-48 FUEL PUMP CIRCUIT OPERATION ...................................................8-49 TROUBLESHOOTING .........................................................................8-50 CHECKING THE FUEL PUMP .............................................................8-52 EXUP SYSTEM ...........................................................................................8-53 CIRCUIT DIAGRAM .............................................................................8-53 TROUBLESHOOTING .........................................................................8-54 SELF-DIAGNOSIS .......................................................................................8-57 TROUBLESHOOTING .........................................................................8-58 – + ELECTRICAL COMPONENTS ELEC EB800000 ELECTRICAL ELECTRICAL COMPONENTS 1 Wire harness 2 Main switch 3 Front brake light switch 4 Ignition coils 5 Clutch switch 6 EXUP servomotor 7 Relay unit 8 Fuse box 9 Turn signal relay 0 Ignitor unit A Starter relay B Main fuse C Oil level relay D Battery E Rectifier/regulator F Rear brake light switch G Neutral switch H Speed sensor I Sidestand switch J Stator coil assembly 8-1 K Oil level switch L Pickup coil M Radiator fan N Horn O Temperature sender P Thermo switch Q Headlight relay – + INSTRUMENT FUNCTIONS ELEC – + INSTRUMENT FUNCTIONS INDICATOR LIGHTS 1 Neutral indicator light “ ” 2 High beam indicator light “ 3 Turn indicator light “ ” 4 Fuel indicator light “ ” Turn indicator light “ ” This indicator flashes when the turn switch is moved to the left or right. Neutral indicator light “ ” This indicator comes on when the transmission is in neutral. High beam indicator light “ ” This indicator comes on when the headlight high beam is used. Fuel indicator light “ ” When the fuel level drops below approximately 5.5 L, this light will come on. When this light comes on, fill the fuel tank at the first opportunity. ” OIL LEVEL/COOLANT TEMPERATURE WARNING LIGHT This warning light has two functions. • The light will come on and symbol “ ” will flash if the engine oil level is low. If this symbol flashes, stop the engine immediately and fill it with oil to the specified level. • The light will come on and symbol “ ” will flash if the coolant temperature is too high. The following chart shows the conditions of the indicator light, symbol and temperature display in accordance with the coolant temperature. 1 Oil level/coolant temperature warning light “ ” 2 Oil level symbol “ ” 3 Coolant temperature symbol “ ” CAUTION: ACHTUNG: • Do not run the motorcycle until you know it has sufficient engine oil. • Do not run the motorcycle if the engine is overheated. NOTE: Even if the oil is filled to the specified level, the warning light may flicker when riding on a slope or during sudden acceleration or deceleration, but this is normal. 8-2 INSTRUMENT FUNCTIONS Coolant temperature Display Conditions ELEC – + What to do 0 ˚C ~ 40 ˚C Symbol is on and Go ahead with riding. “LO” is displayed. 41 ˚C ~ 117 ˚C Symbol is on and temperature is dis- Go ahead with riding. played. 118 ˚C ~ 140 ˚C Stop the motorcycle and allow it to idle until Symbol and tem- the coolant temperature perature flashes goes down. and indicator light If the temperature does comes on. not go down, stop the engine. Refer to “OVERHEATING” in chapter 9. 141 ˚C ~ Symbol flashes, “HI” is displayed and flashes, and the indicator light comes on. Stop the engine and allow it to cool. Refer to “OVERHEATING” in chapter 9. COMBINATION METER This combination meter is equipped with the following. • A speedometer • An odometer • Two trip odometers • A fuel reserve tripmeter • A clock For GB and USA models only: To change the speedometer display from kilometers to miles, press the “SELECT” button for at least two seconds. 1 Speedometer 2 Clock, odometer 3 “SELECT” button 4 “RESET” button Odometer and trip meters Use the trip meters to estimate how far you can ride on a tank of fuel. Use the fuel reserve trip meter to see the distance traveled from when the fuel level dropped to the reserve level. Push the “SELECT” button to change between the odometer mode “ODO” and the trip odometer modes “TRIP 1” and “TRIP 2” in the following order: “ODO” → “TRIP 1” → “TRIP 2” → “ODO” 8-3 INSTRUMENT FUNCTIONS ELEC – + When the fuel level indicator light comes on the odometer display will automatically change to the fuel reserve trip meter mode “TRIP F” and start counting the distance traveled from that point. Push the “SELECT” button to change between the fuel odometer, trip odometer and odometer modes in the following order: “TRIP F” → “TRIP 1” → “TRIP 2” → “ODO” → “TRIP F” To reset a trip odometer to 0.0, select it by pushing the “SELECT” button and push the “RESET” button for at least one second. To reset the fuel reserve trip meter, select it by pushing the “SELECT” button and push the “RESET” button for at least one second. The display will return to “TRIP 1”. If you do not reset the fuel reserve trip meter manually, it will automatically reset and return to “TRIP 1” after refueling and the motorcycle has traveled both 5 km and for approximately 3 minutes. Clock To change the display to the clock mode, push both the “SELECT” and “RESET” buttons. To set the clock: 1. Push both the “SELECT” and “RESET” buttons for at least two seconds. 2. When the hour digits start flashing, push the “RESET” button to set the hours. 3. Push the “SELECT” button to change the minutes. 4. When the minute digits start flashing, push the “RESET” button to set the minutes. 5. Push the “SELECT” button to start the clock. NOTE: After setting the clock, be sure to push the “SELECT” button before turning the main switch to “OFF”, otherwise the clock will not be set. 8-4 SWITCHES ELEC – + EB801000 SWITCHES CHECKING SWITCH CONTINUITY Check each switch for continuity with the pocket tester. If the continuity reading is incorrect, check the wiring connections and if necessary, replace the switch. CAUTION: ACHTUNG: Never insert the tester probes into the coupler terminal slots 1. Always insert the probes from the opposite end of the coupler, taking care not to loosen or damage the leads. Pocket tester 90890-03112 NOTE: • Before checking for continuity, set the pocket tester to “0” and to the “Ω × 1” range. • When checking for continuity, switch back and forth between the switch positions a few times. The terminal connections for switches (e.g., main switch, engine stop switch) are shown in an illustration similar to the one on the left. The switch positions a are shown in the far left column and the switch lead colors b are shown in the top row in the switch illustration. NOTE: “ ” indicates a continuity of electricity between switch terminals (i.e., a closed circuit at the respective switch position). The example illustration on the left shows that: There is continuity between blue/red and red when the switch is set to “ ”. There is continuity between blue/red and blue, between brown/blue and red, and between blue/yellow and blue/black when the switch is set to “ON”. 8-5 CHECKING THE SWITCHES ELEC – + EB801010 CHECKING THE SWITCHES Check each switch for damage or wear, proper connections, and also for continuity between the terminals. Refer to “CHECKING SWITCH CONTINUITY”. Damage/wear → Repair or replace the switch. Improperly connected → Properly connect. Incorrect continuity reading → Replace the switch. 8-6 CHECKING THE SWITCHES 1 Main switch 2 Pass switch 3 Dimmer switch 4 Turn signal switch 5 Horn switch 6 Clutch switch 7 Light switch 8 Engine stop switch 9 Start switch 0 Front brake light switch A Fuse B Sidestand switch C Rear brake light switch D Neutral switch E Oil level switch 8-7 ELEC – + CHECKING THE BULBS AND BULB SOCKETS ELEC – + EB801020 CHECKING THE BULBS AND BULB SOCKETS Check each bulb and bulb socket for damage or wear, proper connections, and also for continuity between the terminals. Damage/wear → Repair or replace the bulb, bulb socket or both. Improperly connected → Properly connect. Incorrect continuity reading → Repair or replace the bulb, bulb socket or both. TYPES OF BULBS The bulbs used on this motorcycle are shown in the illustration on the left. • Bulbs A and B are used for headlights and usually use a bulb holder which must be detached before removing the bulb. The majority of these bulbs can be removed from their respective socket by turning them counterclockwise. • Bulb C is used for turn signal and tail/ brake lights and can be removed from the socket by pushing and turning the bulb counterclockwise. • Bulbs D and E are used for meter and indicator lights and can be removed from their respective socket by carefully pulling them out. CHECKING THE CONDITION OF THE BULBS The following procedure applies to all of the bulbs. 1. Remove: • bulb 8-8 CHECKING THE BULBS AND BULB SOCKETS ELEC – + WARNING WARNING Since the headlight bulb gets extremely hot, keep flammable products and your hands away from the bulb until it has cooled down. CAUTION: ACHTUNG: • Be sure to hold the socket firmly when removing the bulb. Never pull the lead, otherwise it may be pulled out of the terminal in the coupler. • Avoid touching the glass part of the headlight bulb to keep it free from oil, otherwise the transparency of the glass, the life of the bulb and the luminous flux will be adversely affected. If the headlight bulb gets soiled, thoroughly clean it with a cloth moistened with alcohol or lacquer thinner. 2. Check: • bulb (for continuity) (with the pocket tester) No continuity → Replace. Pocket tester 90890-03112 NOTE: Before checking for continuity, set the pocket tester to “0” and to the “Ω × 1” range. ▼▼▼▼▼▼▼▼▼▼▼▼▼▼▼▼▼▼▼▼▼▼▼▼▼▼▼ a. Connect the tester positive probe to terminal 1 and the tester negative probe to terminal 2, and check the continuity. b. Connect the tester positive probe to terminal 1 and the tester negative probe to terminal 3, and check the continuity. c. If either of the readings indicate no continuity, replace the bulb. ▲▲▲▲▲▲▲▲▲▲▲▲▲▲▲▲▲▲▲▲▲▲▲▲▲▲▲ 8-9 CHECKING THE BULBS AND BULB SOCKETS ELEC – + CHECKING THE CONDITION OF THE BULB SOCKETS The following procedure applies to all of the bulb sockets. 1. Check: • bulb socket (for continuity) (with the pocket tester) No continuity → Replace. Pocket tester 90890-03112 NOTE: Check each bulb socket for continuity in the same manner as described in the bulb section; however, note the following. ▼▼▼▼▼▼▼▼▼▼▼▼▼▼▼▼▼▼▼▼▼▼▼▼▼▼▼ a. Install a good bulb into the bulb socket. b. Connect the pocket tester probes to the respective leads of the bulb socket. c. Check the bulb socket for continuity. If any of the readings indicate no continuity, replace the bulb socket. ▲▲▲▲▲▲▲▲▲▲▲▲▲▲▲▲▲▲▲▲▲▲▲▲▲▲▲ CHECKING THE LEDs The following procedure applies to all of the LEDs. 1. Check: LED (for proper operation) ▼▼▼▼▼▼▼▼▼▼▼▼▼▼▼▼▼▼▼▼▼▼▼▼▼▼▼ a. Disconnect the meter assembly coupler (meter assembly side). b. Connect two jumper leads 1 from the battery terminals to the respective coupler terminals as shown. WARNING WARNING • A wire that is used as a jumper lead must have at least the same capacity of the battery lead, otherwise the jumper lead may burn. • This check is likely to produce sparks, therefore make sure that no flammable gas or fluid is in the vicinity. c. When the jumper leads are connected to the terminals the respective LED should illuminate. Does not light → Replace the meter assembly. ▲▲▲▲▲▲▲▲▲▲▲▲▲▲▲▲▲▲▲▲▲▲▲▲▲▲▲ 8 - 10 8 - 11 L Br/L Br/L Br/L Br/L L/R Br/L L/Y B B B L j k l (Option) m n B L B B L i h Br B B B B B B B (BLACK) R/Y Br B B B B B B B B B B B B B B B B B R/W R Br/L R Br/L B B L/Y L/R L 3 L/Y L/B L L/R Br L B R W W W Br Y (BLACK) B B R/Y L Y B R/Y B A Y L/R R/Y R/Y Y B B B/Y W/Y R/Y B/Y B R/Y W/Y L/R B A f A L/R L/B u B A L/R B Br G e L/R B d B/W L/R B/L B/Y B B/Y Br B Br G B/Y B/L B/L — [ B B e G W/Y W/G Y B B L/W B B \ c B B Ch Ch ] L/B B B B Dg L/Y B b B B Ch O O Br/W Br B B Dg Dg Dg b Br/W a Br Ch A OFF Dg Dg A B B C (BLUE) (BLUE) ` B L/Y G B (GREEN) (GREEN) G/W B (BLACK) (BLACK) c Ch L/Y B B B B/L L/B B/L B L/R R/B L/W L/B L/Y Sb B/Y B L/R L/B B/Y Sb L/Y 0A B R/G A L A B/R G/W G/Y A A A R/L Br A D G/W HEADLIGHT SUB-WIRE HARNESS WIRE HARNESS R/B G/R L R/G Dg G/W Br W W/Y R/Y Br/L L/R Sb Ch Y/B B/R G/Y B L/Y W/G R/Y A R/Y W/Y W Br G/W Dg R/G L G/R R/Y W/G L/Y B G/Y R/L Y/B Ch Sb L/R Br/L 9 L/B — v B/Y A Z R/B R/W B/L B/Y B L/R B/L B R/Y W/G f R/Y Br/R — PASS Y Br/R L B B/L W/G R/Y L/B Br/W R/Y Br B Br/W L/B Br/R B Br Dg Y Ch G B/Y L/Y X Br • (BLUE) G/Y Br s t L/W R/W (BLUE) g B B 6 8 7 R/Y L G/Y L/B (BROWN) R/W Br R/B B G/Y L/W (BROWN) r B B B R R R R L/W R/W B B Y L/R (BROWN) Br/R L L/B (BROWN) Br R/W B R/B B G/Y B 5 R R R R q Br o Br W W W R/G W/Y Dg W/G O L/Y B/Y p W W W W W W R/L 4 W R/L Br B (BLACK) W W W (BROWN) (BROWN) W W W 1 Main switch A 5 Battery 6 Main fuse C Sidestand switch G Ignitor unit H Ignition coils I Spark plugs J Pickup coil K Neutral switch n Ignition fuse u Engine stop switch P OFF ON 1 R R R/G 2 L L Dg Ch Y N Y B/L E Y/L B/R W/B B/Y R/B O Gy W V U T S R Q P O F B/L L Y B/L L Gy W W/R Y B/Y B/R L/R G/Y B B/L G/R W L/Y Y/B Sb Y A A A B/L L W/R B L B/L B/R B Y/B O G/Y Sb B/Y R/W L/R Gy Sb A L/Y Y/B B B/L G/R L/Y W B/L B Y/B Sb W A A W B G R/W R/B IGNITION COIL SUB-WIRE HARNESS B R/G B L/Y W B/L G/R B/R Y/B Br G/W G/Y Sb Y Ch Dg L G/Y G/W R/G B/R Br B/R L B/Y B/L WIRE HARNESS R/B O Gy L B B M B/L G/R B/L L/Y W B/W P O/R O/R P B/W Gy Gy O R/B Gy B/L Gy Sb K Gy B H H J Sb R/B R/B O Gy B/L I I IGNITION SYSTEM ELEC – + EB802001 IGNITION SYSTEM CIRCUIT DIAGRAM IGNITION SYSTEM ELEC – + EB802401 EB802011 TROUBLESHOOTING 2.Battery The ignition system fails to operate (no spark or intermittent spark). • Check the condition of the battery. Refer to “CHECKING AND CHARGING THE BATTERY” in chapter 3. Check: 1. main and ignition fuses 2. battery 3. spark plugs 4. ignition spark gap 5. spark plug cap resistance 6. ignition coil resistance 7. pickup coil resistance 8. main switch 9. engine stop switch 10. neutral switch 11. sidestand switch 12. relay unit 13. wiring (of the entire ignition system) Min. open-circuit voltage 12.8 V or more at 20 ˚C • Is the battery OK? • Clean the battery terminals. • Recharge or replace the battery. NOTE: • Before troubleshooting, remove the following part(-s): 1) rider seat 2) fuel tank 3) air filter case 4) ignition coil plate and ignition coils 5) front cowling inner panel (left) 6) windshield • Troubleshoot with the following special tool(-s). EB802403 3.Spark plugs The following procedure applies to all of the spark plugs. • Check the condition of the spark plug. • Check the spark plug type. • Measure the spark plug gap. Refer to “CHECKING THE SPARK PLUGS” in chapter 3. Ignition checker 90890-06754 Pocket tester 90890-03112 Standard spark plug CR9E (NGK) U27ESR-N (DENSO) Spark plug gap 0.7 ~ 0.8 mm • Is the spark plug in good condition, is it of the correct type, and its gap within specification? EB802400 1.Main and ignition fuses • Check the main and ignition fuses for continuity. Refer to “CHECKING THE FUSES” in chapter 3. • Are the main and ignition fuses OK? YES NO YES YES NO Re-gap or replace the spark plug. NO Replace the fuse(-s). 8 - 12 IGNITION SYSTEM ELEC – + EB802405 Spark plug cap resistance 10 kΩ at 20 ˚C 4.Ignition spark gap • • • • • • The following procedure applies to all of the spark plugs. Disconnect the spark plug cap from the spark plug. Connect the ignition checker 1 as shown. 2Spark plug cap Set the main switch to “ON”. Measure the ignition spark gap a. Crank the engine by pushing the start switch and gradually increase the spark gap until a misfire occurs. • Is the spark plug cap OK? NO YES Replace the spark plug cap. EB802409 6.Ignition coil resistance The following procedure applies to all of the ignition coils. • Disconnect the ignition coil connectors from the ignition coil terminals. • Connect the pocket tester (Ω × 1) to the ignition coil as shown. Tester positive probe → red/black Tester negative probe → orange (gray) Min. ignition spark gap 6 mm • Is there a spark and is the spark gap within specification? NO YES The ignition system is OK. • Measure the primary coil resistance. EB802407 Primary coil resistance 1.87 ~ 2.53 Ω at 20 ˚C 5.Spark plug cap resistance • Connect the pocket tester (Ω × 1k) to the ignition coil as shown. • Measure the secondary coil resistance. The following procedure applies to all of the spark plug caps. • Disconnect the spark plug cap from the spark plug. • Connect the pocket tester (Ω × 1k) to the spark plug cap as shown. • Measure the spark plug cap resistance. Tester positive probe → spark plug lead 1 Tester positive probe → spark plug lead 2 8 - 13 IGNITION SYSTEM – ELEC + EB802411 8.Main switch • Check the main switch for continuity. Refer to “CHECKING THE SWITCHES”. • Is the main switch OK? YES NO Replace the main switch. Secondary coil resistance 12 ~ 18 kΩ at 20 ˚C • Is the ignition coil OK? EB802412 9.Engine stop switch NO YES • Check the engine stop switch for continuity. Refer to “CHECKING THE SWITCHES”. • Is the engine stop switch OK? Replace the ignition coil. YES EB802410 NO 7.Pickup coil resistance Replace the right handlebar switch. • Disconnect the pickup coil coupler from the wire harness. • Connect the pocket tester (Ω × 100) to the pickup coil terminal. EB802413 Tester positive probe → gray 1 Tester negative probe → black 2 10.Neutral switch • Check the neutral switch for continuity. Refer to “CHECKING THE SWITCHES”. • Is the neutral switch OK? NO YES Replace the neutral switch. EB802414 • Measure the pickup coil resistance. 11.Sidestand switch Pickup coil resistance 248 ~ 372 Ω at 20 ˚C (between gray and black) • Check the sidestand switch for continuity. Refer to “CHECKING THE SWITCHES”. • Is the sidestand switch OK? • Is the pickup coil OK? YES NO NO YES Replace the pickup coil. Replace the stand switch. 8 - 14 side- IGNITION SYSTEM ELEC – + EB802416 EB802415 12.Relay unit 13.Wiring • Remove the relay unit from the wire harness. • Connect the pocket tester (Ω × 1) to the relay unit terminals as shown. • Check the starting circuit cutoff relay for continuity. • Check the entire ignition system’s wiring. Refer to “CIRCUIT DIAGRAM”. • Is the ignition system’s wiring properly connected and without defects? NO Tester positive probe → sky blue 1 Continuity Tester negative probe → blue/yellow 2 Properly connect or repair the ignition system’s wiring. Tester positive probe → blue/yellow 2 No continuity Tester negative probe → sky blue 1 NOTE: When you switch the tester’s positive and negative probes, the readings in the above chart will be reversed. • Are the tester readings correct? NO YES Replace unit. the relay 8 - 15 YES Replace the ignitor unit. 8 - 16 L Br/L Br/L Br/L Br/L L/R Br/L L/Y B B j k l (Option) m n B L B B Br B B B B B B B L i (BLACK) R/Y Br B B B B B B B B B B B B B B B B B R/W R Br/L R Br/L B B L/Y L/R L 3 L/Y L/B L L/R Br L B R W W W Br Y B B L (BLACK) B R/Y Y L Y B B R/Y Y L/R R/Y R/Y B B B/Y W/Y R/Y B/Y B R/Y W/Y L/R B A L/R L/B u B A L/R B Br G e L/R B d B/W L/R B/L B/Y B B/Y Br B Br G B/Y B/L B/L — [ B B e G W/Y W/G Y B B L/W B B \ c B B Ch Ch ] L/B B B B Dg L/Y B b B B Ch O O Br/W Br B B Dg Dg Dg b Br/W a Br Ch A OFF Dg Dg A B B C (BLUE) (BLUE) ` B L/Y G B (GREEN) (GREEN) G/W B (BLACK) (BLACK) c Ch L/Y B B B B/L L/B B/L B L/R R/B L/W L/B L/Y Sb B/Y B L/R L/B B/Y Sb L/Y 0A B R/G A L A B/R G/W G/Y A A A R/L Br A D G/W HEADLIGHT SUB-WIRE HARNESS WIRE HARNESS R/B G/R L R/G Dg G/W Br W W/Y R/Y Br/L L/R Sb Ch Y/B B/R G/Y B L/Y W/G R/Y A R/Y W/Y W Br G/W Dg R/G L G/R R/Y W/G L/Y B G/Y R/L Y/B Ch Sb L/R Br/L 9 L/B — v B/Y A Z R/B R/W B/L B/Y B L/R B/L B R/Y W/G f R/Y Br/R — PASS Y Br/R L B B/L W/G R/Y A f L/B Br/W R/Y Br B Br/W L/B Br/R B Br Dg Y Ch G B/Y L/Y X Br • (BLUE) G/Y Br s t L/W R/W (BLUE) g B B 6 8 7 R/Y L G/Y L/B (BROWN) R/W Br R/B B G/Y L/W (BROWN) r B B B R R R R L/W R/W B B Y L/R (BROWN) Br/R L L/B (BROWN) Br R/W B R/B B G/Y B 5 R R R R q Br o Br W W W R/G W/Y Dg W/G O L/Y B/Y p W W W W W W R/L 4 W R/L Br B (BLACK) W W W (BROWN) (BROWN) W W W 1 Main switch h 5 Battery A A 6 Main fuse 7 Starter relay 8 Starter motor 0 Starting circuit cutoff relay C Sidestand switch K Neutral switch ] Clutch switch n Ignition fuse u Engine stop switch v Start switch P OFF ON 1 R R R/G 2 L L Dg Ch Y N Y B/L E Y/L B/R W/B B/Y R/B O Gy W V U T S R Q P O F B/L L Y B/L L Gy W W/R Y B/Y B/R L/R G/Y B B/L G/R W L/Y Y/B Sb Y A A A B/L L W/R B L B/L B/R B Y/B O G/Y Sb B/Y R/W L/R Gy Sb A L/Y Y/B B B/L G/R L/Y W B/L B Y/B Sb W A A W B G R/W R/B IGNITION COIL SUB-WIRE HARNESS B R/G B L/Y W B/L G/R B/R Y/B Br G/W G/Y Sb Y Ch Dg L G/Y G/W R/G B/R Br B/R L B/Y B/L WIRE HARNESS R/B O Gy L B B M B/L G/R B/L L/Y W B/W P O/R O/R P B/W Gy Gy O R/B Gy B/L Gy R/B O Sb K Gy B H H J Sb R/B Gy B/L I I ELECTRIC STARTING SYSTEM ELEC – + EB803000 ELECTRIC STARTING SYSTEM CIRCUIT DIAGRAM ELECTRIC STARTING SYSTEM ELEC – + EB803010 STARTING CIRCUIT CUTOFF SYSTEM OPERATION If the engine stop switch is set to “ ” and the main switch is set to “ON” (both switches are closed), the starter motor can only operate if at least one of the following conditions is met: • The transmission is in neutral (the neutral switch is closed). • The clutch lever is pulled to the handlebar (the clutch switch is closed) and the sidestand is up (the sidestand switch is closed). The starting circuit cutoff relay prevents the starter motor from operating when neither of these conditions has been met. In this instance, the starting circuit cutoff relay is open so current cannot reach the starter motor. When at least one of the above conditions has been met the starting circuit cutoff relay is closed and the engine can be started by pressing the start switch. WHEN THE TRANSMISSION IS IN NEUTRAL WHEN THE SIDESTAND IS UP AND THE CLUTCH LEVER IS PULLED TO THE HANDLEBAR 1 Battery 2 Main fuse 3 Main switch 4 Ignition fuse 5 Engine stop switch 6 Starting circuit cutoff relay 7 Diode 8 Clutch switch 9 Sidestand switch 0 Neutral switch A Start switch B Starter relay C Starter motor 8 - 17 ELECTRIC STARTING SYSTEM ELEC – + EB802401 EB803020 TROUBLESHOOTING 2.Battery The starter motor fails to turn. • Check the condition of the battery. Refer to “CHECKING AND CHARGING THE BATTERY” in chapter 3. Check: 1. main and ignition fuses 2. battery 3. starter motor 4. starting circuit cutoff relay 5. relay unit 6. starter relay 7. main switch 8. engine stop switch 9. neutral switch 10. sidestand switch 11. clutch switch 12. start switch 13. wiring (of the entire starting system) Open-circuit voltage 12.8 V or more at 20 ˚C • Is the battery OK? NO YES • Clean the battery terminals. • Recharge or replace the battery. NOTE: • Before troubleshooting, remove the following part(-s): 1) rider seat 2) fuel tank 3) air filter case 4) front cowling inner panel (left) 5) windshield • Troubleshoot with the following special tool(-s). EB803400 3.Starter motor • Connect the battery positive terminal 1 and starter motor lead 2 with a jumper lead 3. Pocket tester 90890-03112 EB802400 1.Main and ignition fuses • Check the main and ignition fuses for continuity. Refer to “CHECKING THE FUSES” in chapter 3. • Are the main and ignition fuses OK? YES WARNING WARNING • A wire that is used as a jumper lead must have at least the same capacity of the battery lead, otherwise the jumper lead may burn. • This check is likely to produce sparks, therefore make sure that no flammable gas or fluid is in the vicinity. NO Replace the fuse(-s). • Does the starter motor turn? YES NO Repair or replace the starter motor. 8 - 18 ELECTRIC STARTING SYSTEM ELEC – + EB803403 EB803402 4.Starting circuit cutoff relay 5.Relay unit • Disconnect the relay unit from the coupler. • Connect the pocket tester (Ω × 1) and battery (12 V) to the relay unit terminals as shown. • Disconnect the relay unit from the coupler. • Connect the pocket tester (Ω × 1) to the relay unit terminals as shown. • Measure the starting circuit cutoff relay for continuity as follows. Battery positive terminal → red/black 1 Battery negative terminal → black/yellow 2 Tester positive probe → sky blue 1 Tester negative probe → black/yellow 2 Continuity Tester positive probe → Tester positive probe → blue/white 3 Tester negative probe → black 4 sky blue 1 Tester negative probe → blue/yellow 3 Tester positive probe → black/yellow 2 Tester negative probe → sky blue 1 No continuity Tester positive probe → blue/yellow 3 Tester negative probe → sky blue 1 • Does the starting circuit cutoff relay have continuity between black and blue/ white? NO YES Replace unit. the relay NOTE: When you switch the tester’s positive and negative probes, the readings in the above chart will be reversed. • Are the tester readings correct? NO YES Replace unit. 8 - 19 the relay ELECTRIC STARTING SYSTEM – ELEC + EB802412 EB803404 6.Starter relay 8.Engine stop switch • Disconnect the starter relay from the coupler. • Connect the pocket tester (Ω × 1) and battery (12 V) to the starter relay coupler as shown. • Check the engine stop switch for continuity. Refer to “CHECKING THE SWITCHES”. • Is the engine stop switch OK? YES Battery positive terminal → red/white 1 Battery negative terminal → blue/white 2 NO Replace the right handlebar switch. Tester positive probe → red 3 Tester negative probe → black 4 EB802413 9.Neutral switch • Check the neutral switch for continuity. Refer to “CHECKING THE SWITCHES”. • Is the neutral switch OK? NO YES Replace the neutral switch. • Does the starter relay have continuity between red and black? YES NO EB802414 10.Sidestand switch Replace the starter relay. • Check the sidestand switch for continuity. Refer to “CHECKING THE SWITCHES”. • Is the sidestand switch OK? EB802411 7.Main switch • Check the main switch for continuity. Refer to “CHECKING THE SWITCHES”. • Is the main switch OK? YES NO YES Replace the stand switch. side- NO EB803405 11.Clutch switch Replace the main switch. • Check the clutch switch for continuity. Refer to “CHECKING THE SWITCHES”. • Is the clutch switch OK? YES NO Replace the clutch switch. 8 - 20 ELECTRIC STARTING SYSTEM EB803406 12.Start switch • Check the start switch for continuity. Refer to “CHECKING THE SWITCHES”. • Is the start switch OK? YES NO Replace the right handlebar switch. EB803408 13.Wiring • Check the entire starting system’s wiring. Refer to “CIRCUIT DIAGRAM”. • Is the starting system’s wiring properly connected and without defects? NO Properly connect or repair the starting system’s wiring. YES The starting system circuit is OK. 8 - 21 ELEC – + STARTER MOTOR ELEC – EB803500 STARTER MOTOR Order 1 2 3 4 Job/Part Removing the starter motor Rider seat Fuel tank Left side cowling EXUP servomotor Throttle stop screw Starter motor lead Starter motor assembly Q’ty Remarks Remove the parts in the order listed. Refer to “SEATS” in chapter 3. Refer to “FUEL TANK” in chapter 3. Refer to “COWLINGS” in chapter 3. 1 1 1 1 For installation, reverse the removal procedure. 8 - 22 + STARTER MOTOR ELEC – + EB803501 Order 1 2 3 4 5 6 7 8 9 0 A B Job/Part Q’ty Remarks Disassembling the starter motor Remove the parts in the order listed. Starter motor front cover 1 Lock washer 1 Oil seal 1 Bearing 1 Washer set 1 Starter motor rear cover 1 Washer set 1 Armature assembly 1 Brush seat (along with the brushes) 1 Brush holder (along with the brushes) 1 O-ring 2 Starter motor yoke 1 For assembly, reverse the disassembly procedure 8 - 23 STARTER MOTOR ELEC – + EB803511 CHECKING THE STARTER MOTOR 1. Check: • commutator Dirt → Clean with 600 grit sandpaper. 2. Measure: • commutator diameter a Out of specification → Replace the starter motor. Min. commutator diameter 27 mm 3. Measure: • mica undercut a Out of specification → Scrape the mica to the proper measurement with a hacksaw blade which has been grounded to fit the commutator. Mica undercut 0.7 mm NOTE: The mica must be undercut to ensure proper operation of the commutator. 4. Measure: • armature assembly resistances (commutator and insulation) Out of specification → Replace the starter motor. ▼▼▼▼▼▼▼▼▼▼▼▼▼▼▼▼▼▼▼▼▼▼▼▼▼▼▼ a. Measure the armature assembly resistances with the pocket tester. Pocket tester 90890-03112 Armature assembly Commutator resistance 1 0.025 ~ 0.035 Ω at 20 ˚C Insulation resistance 2 Above 1 MΩ at 20 ˚C b. If any resistance is out of specification, replace the starter motor. ▲▲▲▲▲▲▲▲▲▲▲▲▲▲▲▲▲▲▲▲▲▲▲▲▲▲▲ 8 - 24 STARTER MOTOR ELEC – + 5. Measure: • brush length a Out of specification → Replace the brushes as a set. Min. brush length 5 mm 6. Measure: • brush spring force Out of specification → Replace the brush springs as a set. Brush spring force 7.03 ~ 10.63 N (717 ~ 1,084 gf) 7. Check: • gear teeth Damage/wear → Replace the gear. 8. Check: • bearing • oil seal Damage/wear → Replace the defective part(-s). EB803701 ASSEMBLING THE STARTER MOTOR 1. Install: • brush seat 1 NOTE: Align the tab a on the brush seat with the slot b in the starter motor rear cover. T. 2. Install: • starter motor yoke 1 New • O-rings 2 • starter motor front cover 3 • starter motor rear cover 4 • bolts 5 Nm (0.5 m · kg) R. NOTE: Align the match marks a on the starter motor yoke with the match marks b on the front and rear covers. 8 - 25 – ELEC CHARGING SYSTEM + EB804000 CHARGING SYSTEM CIRCUIT DIAGRAM 2 R/G R/G R W W W W W W R R R R R R R R L/W R/W 6 5 R/W B B R W W W R 3 P OFF ON L/R Br/L L/Y L Br/L L/Y L/B L L/R B L/Y L/R L R Br/L R Br/L W W W W 4 B 1 W W B n 8 B B B B B B B B B B B B B B B B B B B B B W R/L Br B (BLACK) R/L r Br o W (BROWN) Br/R L L/B B B B B (BROWN) (BLACK) l Br R/W B R/B B G/Y R/W Br R/B B G/Y L/W (BROWN) s t • B (Option) Br/L B R/W m Br/L B L/W B B B B Br/L 7 B R/Y L G/Y L/B (BROWN) Br G/Y Br W Br/R L Br k R/Y W j p Br Br L Br i q L X 3 Rectifier/regulator 4 Generator W/Y Dg Dg Y 5 Battery W/G O 6 Main fuse Ch G L/Y B/Y Br 8 - 26 B B/Y L/Y Y — PAS CHARGING SYSTEM ELEC – + EB802401 EB804010 TROUBLESHOOTING 2.Battery The battery is not being charged. • Check the condition of the battery. Refer to “CHECKING AND CHARGING THE BATTERY” in chapter 3. Check: 1. main fuse 2. battery 3. charging voltage 4. stator coil assembly resistance 5. wiring (of the entire charging system) Open-circuit voltage 12.8 V or more at 20 ˚C • Is the battery OK? NO YES NOTE: • Before troubleshooting, remove the following part(-s): 1) rider seat 2) fuel tank • Troubleshoot with the following special tool(-s). • Clean the battery terminals. • Recharge or replace the battery. Engine tachometer 90890-03113 Pocket tester 90890-03112 EB804400 3.Charging voltage • Connect the engine tachometer to the spark plug lead of cylinder #1. • Connect the pocket tester (DC 20V) to the battery as shown. Tester positive probe → battery positive terminal Tester negative probe → battery negative terminal EB802400 1.Main fuse • Check the main fuse for continuity. Refer to “CHECKING THE FUSES” in chapter 3. • Is the main fuse OK? YES NO • Start the engine and let it run at approximately 5,000 r/min. • Measure the charging voltage. Replace the fuse. Charging voltage 14 V at 5,000 r/min 8 - 27 CHARGING SYSTEM ELEC – + EB804404 5.Wiring NOTE: Make sure that the battery is fully charged. • Check the wiring connections of the entire charging system. Refer to “CIRCUIT DIAGRAM”. • Is the charging system’s wiring properly connected and without defects? • Is the charging voltage within specification? NO YES NO The charging circuit is OK. Properly connect or repair the charging system’s wiring. EB804401 4.Stator coil assembly resistances • Remove the generator cover. • Connect the pocket tester (Ω × 1) to the stator coil assembly coupler as shown. Tester positive probe → white 1 Tester negative probe → white 2 Tester positive probe → white 1 Tester negative probe → white 3 • Measure the stator coil assembly resistances. Stator coil resistance 0.45 ~ 0.55 Ω at 20 ˚C • Is the stator coil assembly OK? YES NO Replace the stator coil assembly. 8 - 28 YES Replace the rectifier/regulator. P OFF ON 1 L 8 - 29 Br/L Br/L Br/L Br/L L/R Br/L L/Y R B B B L j k l (Option) m n L i B h Br B B B B B B B (BLACK) B B R/Y Br (BLACK) B L B B B B B B B B B B B B B B B B B R/W R Br/L R Br/L B B L/Y L/R L 3 L/Y L/B L L/R Br L B R W W W R Br Y B R/Y A • L Y B R/Y B A Y L/R R/Y R/Y Y B B B/Y W/Y R/Y B/Y B R/Y W/Y L/R B A L/R L/B u B A d B e L/R B Br G B/W L/R B/L B/Y B B/Y Br L/R B Br G B/Y B/L B/L — [ B B e G W/Y W/G Y B B L/W B B \ L/R c B B Ch Ch ] B/L B L/B B B B Dg L/Y B b B B Ch O O Br/W Br B B Dg Dg Dg b Br/W a Br Ch A OFF Dg Dg A B B C (BLUE) (BLUE) ` B L/Y G B (GREEN) (GREEN) G/W B (BLACK) (BLACK) c Ch L/Y B B B B/L L/B L/B B/Y Sb L/Y 0A L/R R/B L/W L/B L/Y Sb B/Y B B R/G A L A B/R G/W G/Y A A A R/L Br A D G/W HEADLIGHT SUB-WIRE HARNESS WIRE HARNESS R/B G/R L R/G Dg G/W Br W W/Y R/Y Br/L L/R Sb Ch Y/B B/R G/Y B L/Y W/G R/Y R/Y W/Y W Br G/W Dg R/G L G/R R/Y W/G L/Y B G/Y R/L Y/B Ch Sb L/R Br/L 9 L/B — v B/Y A Z R/B R/W B/L B/Y B L/R B/L B R/Y W/G f R/Y Br/R — PASS Y Br/R L B B/L W/G R/Y A f L/B Br/W R/Y Br B Br/W L/B Br/R B Br Dg Y Ch G B/Y L/Y X Br Br s t L/W (BLUE) G/Y R/Y L G/Y L/B (BROWN) R/W Br R/B B G/Y L/W (BROWN) B B 8 7 R/W (BLUE) g B r B 6 R R B R B B Y L/R (BROWN) Br/R L L/B (BROWN) Br R/W B R/B B G/Y B 5 R R R R R L/W R/W q Br o Br W W W R/G W/Y Dg W/G O L/Y B/Y p W W W W W W R/L 4 W R/L Br B (BLACK) W W W 2 (BROWN) (BROWN) W W W R/G A L L Dg Ch Y N Y B/L E Y/L B/R W/B B/Y R/B O Gy W V U T S R Q P O F B/L L Y B/L L Gy W W/R Y B/Y B/R L/R G/Y B B/L G/R W L/Y Y/B Sb A A L/Y Sb Y/B A Y A B/L L W/R B L B/L B/R B Y/B O G/Y Sb B/Y R/W L/R Gy B/L G/R L/Y W B/L B Y/B Sb W A A W B R/W R/B L M B/L G/R B/L L/Y W B/W P O/R O/R P B/W Gy Gy O R/B Gy B/L Gy Sb Sb R/B R/B O K Gy B Gy B/L 1 Main switch 5 Battery 6 Main fuse U High beam indicator light B light W Meter Y Pass switch Z Dimmer switch B d Headlight H I e Auxiliary light f HeadlightBrelay G g Tail/brake light H I k Headlight fuseJ l Signaling system fuse t Lights switch IGNITION COIL SUB-WIRE HARNESS R/G B L/Y W B/L G/R B/R Y/B Br G/W G/Y Sb Y Ch Dg L G/Y G/W R/G B/R Br B/R L B/Y B/L WIRE HARNESS R/B O Gy B LIGHTING SYSTEM ELEC – + EB805000 LIGHTING SYSTEM CIRCUIT DIAGRAM LIGHTING SYSTEM ELEC – + EB802401 EB805010 TROUBLESHOOTING 2.Battery Any of the following fail to light: headlight, high beam indicator light, taillight, auxiliary light or meter light. • Check the condition of the battery. Refer to “CHECKING AND CHARGING THE BATTERY” in chapter 3. Open-circuit voltage 12.8 V or more at 20 ˚C Check: 1. main, signaling system, and headlight fuses 2. battery 3. main switch 4. lights switch 5. dimmer switch 6. pass switch 7. wiring (of the entire charging system) • Is the battery OK? YES • Clean the battery terminals. • Recharge or replace the battery. NOTE: • Before troubleshooting, remove the following part(-s): 1) seats 2) fuel tank 3) air filter case 4) front cowling inner panels 5) front cowling 6) rear cowling • Troubleshoot with the following special tool(-s). EB802411 3.Main switch • Check the main switch for continuity. Refer to “CHECKING THE SWITCHES”. • Is the main switch OK? Pocket tester 90890-03112 YES NO Replace the main switch. EB802400 1.Main, signaling system, and headlight fuses • Check the main, signaling system, and headlight fuses for continuity. Refer to “CHECKING THE FUSES” in chapter 3. • Are the main, signaling system, and headlight fuses OK? YES NO EB805400 4.Lights switch • Check the lights switch for continuity. Refer to “CHECKING THE SWITCHES”. • Is the lights switch OK? NO YES Replace the fuse(-s). NO The lights switch is faulty. Replace the right handlebar switch. 8 - 30 LIGHTING SYSTEM EB805401 ELEC – + EB805410 CHECKING THE LIGHTING SYSTEM 1. The headlight and the high beam indicator light fail to come on. 5.Dimmer switch • Check the dimmer switch for continuity. Refer to “CHECKING THE SWITCHES”. • Is the dimmer switch OK? YES 1.Headlight bulb and socket • Check the headlight bulb and socket for continuity. Refer to “CHECKING THE BULBS AND BULB SOCKETS”. • Are the headlight bulb and socket OK? NO The dimmer switch is faulty. Replace the left handlebar switch. NO YES Replace the headlight bulb, socket or both. EB805403 6.Pass switch • Check the pass switch for continuity. Refer to “CHECKING THE SWITCHES”. • Is the pass switch OK? YES 2.High beam indicator light LED • Check the LED of the high beam indicator light. Refer to “CHECKING THE LEDs”. • Is the high beam indicator light LED OK? NO The pass switch is faulty. Replace the left handlebar switch. NO YES Replace the motor assembly. EB805404 7.Wiring 3.Voltage • Check the entire lighting system’s wiring. Refer to “CIRCUIT DIAGRAM”. • Is the lighting system’s wiring properly connected and without defects? • Connect the pocket tester (DC 20V) to the headlight and high beam indicator light couplers as shown. YES Check the condition of each of the lighting system’s circuits. Refer to “CHECKING THE LIGHTING SYSTEM”. Å When the dimmer switch is set to “ ı When the dimmer switch is set to “ NO Headlight coupler (wire harness side) Properly connect or repair the lighting system’s wiring. 8 - 31 ” ” LIGHTING SYSTEM ELEC – + Headlight Tester positive probe → black/yellow 1 or black/blue 2 Tester negative probe → black 3 High beam indicator light Tester positive probe → yellow 4 Tester negative probe → black 5 Meter assembly coupler (wire harness side) • Does the headlight relay have continuity between white/yellow (white/green) and black? NO YES This circuit is OK. • Set the main switch to “ON”. • Set the light switch to “ ”. • Set the dimmer switch to “ ” or “ ”. • Measure the voltage (12 V) of black/yellow (black/blue) 2 on the headlight coupler (headlight side). • Is the voltage within specification? YES Replace the headlight relay. EB805411 2. A meter light fails to come on. 1.Meter light bulb and socket • Check the meter light bulb and socket for continuity. Refer to “CHECKING THE BULBS AND BULB SOCKETS”. • Are the meter light bulb and socket OK? NO The wiring circuit from the main switch to the headlight coupler is faulty and must be repaired. NO YES Replace the meter light bulb, socket or both. 4.Headlight relay 2.Voltage • Disconnect the headlight relay from the coupler. • Connect the pocket tester (Ω × 1) and battery (12 V) to the headlight relay terminals as shown. • Connect the pocket tester (20 V) to the meter assembly coupler (wire harness side) as shown. Tester positive probe → blue 1 Tester negative probe → black 2 Battery positive terminal → red/yellow 1 Battery negative terminal → black/yellow (black/blue) 2 Tester positive probe → white/yellow (white/green) 3 Tester negative probe → black 4 8 - 32 LIGHTING SYSTEM This circuit is OK. – + • Set the main switch to “ON”. • Set the light switch to “ ” or “ ”. • Measure the voltage (12 V) of blue/red 1 on the tail/brake light coupler (wire harness side). • Is the voltage within specification? • Set the main switch to “ON”. • Set the light switch to “ ” or “ ”. • Measure the voltage (12 V) of blue 1 on the meter assembly coupler (wire harness side). • Is the voltage within specification? NO YES ELEC NO YES This circuit is OK. The wiring circuit from the main switch to the meter assembly coupler is faulty and must be repaired. The wiring circuit from the main switch to the tail/ brake light coupler is faulty and must be repaired. EB805413 EB805412 3. A tail/brake light fails to come on. 4. The auxiliary light fails to come on. 1.Tail/brake light bulb and socket 1.Auxiliary light bulb and socket • Check the tail/brake light bulb and socket for continuity. Refer to “CHECKING THE BULBS AND BULB SOCKETS”. • Are the tail/brake light bulb and socket OK? • Check the auxiliary light bulb and socket for continuity. Refer to “CHECKING THE BULBS AND BULB SOCKETS”. • Are the auxiliary light bulb and socket OK? YES NO YES NO Replace the auxiliary light bulb, socket or both. Replace the tail/ brake light bulb, socket or both. 2.Voltage 2.Voltage • Connect the pocket tester (DC 20V) to the tail/brake light coupler (wire harness side) as shown. • Connect the pocket tester (DC 20V) to the auxiliary light couplers (wire harness side) as shown. Tester positive probe → blue/red 1 Tester negative probe → black 2 Tester positive probe → blue/red 1 Tester negative probe → black 2 8 - 33 LIGHTING SYSTEM • Set the main switch to “ON”. • Set the light switch to “ ” or “ ”. • Measure the voltage (12 V) of blue/red 1 on the auxiliary light couplers (wire harness side). • Is the voltage within specification? YES This circuit is OK. NO The wiring circuit from the main switch to the auxiliary light connectors is faulty and must be repaired. 8 - 34 ELEC – + P OFF ON 1 L 8 - 35 Br/L Br/L Br/L Br/L L/R Br/L L/Y R B B B L j k l (Option) m n L i B h Br B B B B B B B (BLACK) B B R/Y Br (BLACK) B L B B B B B B B B B B B B B B B B B R/W R Br/L R Br/L B B L/Y L/R L 3 L/Y L/B L L/R Br L B R W W W R Br Y B R/Y A • L Y B R/Y B A Y L/R R/Y R/Y Y B B B/Y W/Y R/Y B/Y B R/Y W/Y L/R B A L/R L/B u B A L/R B Br G e L/R B d B/W L/R B/L B/Y B B/Y Br B Br G B/Y B/L B/L — [ B B e G W/Y W/G Y B B L/W B B \ L/R c B B Ch Ch ] B/L B L/B B B B Dg L/Y B b B B Ch O O Br/W Br B B Dg Dg Dg b Br/W a Br Ch A OFF Dg Dg A B B C (BLUE) (BLUE) ` B L/Y G B (GREEN) (GREEN) G/W B (BLACK) (BLACK) c Ch L/Y B B B B/L L/B L/B B/Y Sb L/Y 0A L/R R/B L/W L/B L/Y Sb B/Y B B R/G A L A B/R G/W G/Y A A A R/L Br A D G/W HEADLIGHT SUB-WIRE HARNESS WIRE HARNESS R/B G/R L R/G Dg G/W Br W W/Y R/Y Br/L L/R Sb Ch Y/B B/R G/Y B L/Y W/G R/Y A R/Y W/Y W Br G/W Dg R/G L G/R R/Y W/G L/Y B G/Y R/L Y/B Ch Sb L/R Br/L 9 L/B — v B/Y A Z R/B R/W B/L B/Y B L/R B/L B R/Y W/G f R/Y Br/R — PASS Y Br/R L B B/L W/G R/Y A f L/B Br/W R/Y Br B Br/W L/B Br/R B Br Dg Y Ch G B/Y L/Y X Br Br s t L/W (BLUE) G/Y R/Y L G/Y L/B (BROWN) R/W Br R/B B G/Y L/W (BROWN) B B 8 7 R/W (BLUE) g B r B 6 R B R R R L/W R/W B B Y L/R (BROWN) Br/R L L/B (BROWN) Br R/W B R/B B G/Y B 5 R R R R q Br o Br W W W R/G W/Y Dg W/G O L/Y B/Y p W W W W W W R/L 4 W R/L Br B (BLACK) W W W (BROWN) (BROWN) W W W R/G 2 L L Dg Ch Y N Y B/L E Y/L B/R W/B B/Y R/B O Gy W V U T S R Q P O F B/L L Y B/L L Gy W W/R Y B/Y B/R L/R G/Y B B/L G/R W L/Y Y/B Sb A A L/Y Sb Y/B A Y A B/L L W/R B L B/L B/R B Y/B O G/Y Sb B/Y R/W L/R Gy B B/L G/R L/Y W B/L B Y/B Sb W A A W B G R/W R/B IGNITION COIL SUB-WIRE HARNESS B R/G B L/Y W B/L G/R B/R Y/B Br G/W G/Y Sb Y Ch Dg L G/Y G/W R/G B/R Br B/R L B/Y B/L WIRE HARNESS R/B O Gy L B B M B/L G/R B/L L/Y W B/W P O/R O/R P B/W Gy Gy O R/B Gy B/L Gy Sb K Gy B H H J Sb R/B R/B O Gy B/L I I SIGNALING SYSTEM ELEC – + EB806000 SIGNALING SYSTEM CIRCUIT DIAGRAM SIGNALING SYSTEM 1 Main switch 5 Battery 6 Main fuse D Fuel sender K Neutral switch O Fuel level indicator light P Oil level/coolant temperature warning light Q Neutral indicator light R Tachometer S Combination meter V Turn signal indicator light [ Horn switch \ Horn _ Turn signal switch a Turn signal relay b Rear turn signal light c Front turn signal light g Tail/brake light l Signaling system fuse o Oil level relay p Oil level switch q Rear brake light switch s Front brake light switch 8 - 36 ELEC – + SIGNALING SYSTEM ELEC – + EB802401 EB806010 TROUBLESHOOTING 2.Battery • Any of the following fail to light: turn signal light, brake light or an indicator light. • The horn fails to sound. • Check the condition of the battery. Refer to “CHECKING THE BATTERY” in chapter 3. Open-circuit voltage 12.8 V or more at 20 ˚C Check: 1. main and signaling system fuses 2. battery 3. main switch 4. wiring (of the entire signaling system) • Is the battery OK? YES NO • Clean the battery terminals. • Recharge or replace the battery. NOTE: • Before troubleshooting, remove the following part(-s): 1) seats 2) fuel tank 3) air filter case 4) front cowling inner panels 5) bottom cowling 6) left side cowling 7) windshield 8) rear cowling • Troubleshoot with the following special tool(-s). EB802411 3.Main switch • Check the main switch for continuity. Refer to “CHECKING THE SWITCHES”. • Is the main switch OK? YES Pocket tester 90890-03112 NO Replace the main switch. EB802400 1.Main and signaling system fuses EB806400 • Check the main and signaling system fuses for continuity. Refer to “CHECKING AND CHARGING THE FUSES” in chapter 3. • Are the main and signaling system fuses OK? YES 4.Wiring • Check the entire signaling system’s wiring. Refer to “CIRCUIT DIAGRAM”. • Is the signaling system’s wiring properly connected and without defects? NO YES NO Replace the fuse(-s). Check the condition of each of the signaling system’s circuits. Refer to “CHECKING THE SIGNALING SYSTEM”. 8 - 37 Properly connect or repair the signaling system’s wiring. SIGNALING SYSTEM ELEC – + EB806410 3.Horn CHECKING THE SIGNALING SYSTEM 1. The horn fails to sound. • Disconnect the black connector at the horn terminal. • Connect a jumper lead 1 to the horn terminal and ground the jumper lead. • Set the main switch to “ON”. • Push the horn switch. • Does the horn sound? 1.Horn switch • Check the horn switch for continuity. Refer to “CHECKING THE SWITCHES”. • Is the horn switch OK? YES NO Replace the left handlebar switch. 2.Voltage • Connect the pocket tester (DC 20V) to the horn connector at the horn terminal as shown. NO Tester positive probe → black/white 1 Tester negative probe → ground YES The horn is OK. 4.Voltage • Connect the pocket tester (DC 20V) to the horn connector at the black terminal as shown. Tester positive probe → black 1 Tester negative probe → ground • Set the main switch to “ON”. • Push the horn switch. • Measure the voltage (12V) of black/white at the horn terminal. • Is the voltage within specification? YES NO The wiring circuit from the main switch to the horn connector is faulty and must be repaired. • Set the main switch to “ON”. • Measure the voltage (12V) of black 1 at the horn terminal. • Is the voltage within specification? YES Repair or replace the horn. 8 - 38 NO Replace the horn. SIGNALING SYSTEM ELEC – + EB806411 • Set the main switch to “ON”. • Pull in the brake lever or push down on the brake pedal. • Measure the voltage (12 V) of yellow at the tail/brake light coupler (wire harness side). • Is the voltage within specification? 2. A tail/brake light fails to come on. 1.Tail/brake light bulb and socket • Check the tail/brake light bulb and socket for continuity. Refer to “CHECKING THE BULBS AND BULB SOCKETS”. • Are the tail/brake light bulb and socket OK? YES NO YES NO This circuit is OK. Replace the tail/ brake light bulb, socket or both. The wiring circuit from the main switch to the tail/ brake light coupler is faulty and must be repaired. 2.Brake light switches • Check the brake light switches for continuity. Refer to “CHECKING THE SWITCHES”. • Is the brake light switch OK? YES EB806413 3. A turn signal light, turn signal indicator light or both fail to blink. NO 1.Turn signal light bulb and socket • Check the turn signal light bulb and socket for continuity. Refer to “CHECKING THE BULBS AND BULB SOCKETS”. • Are the turn signal light bulb and socket OK? Replace the brake light switch. 3.Voltage • Connect the pocket tester (DC 20V) to the tail/brake light coupler (wire harness side) as shown. NO YES Tester positive probe → yellow 1 Tester negative probe → black 2 Replace the turn signal light bulb, socket or both. 2.Turn signal indicator light LED • Check the LED of the turn signal indicator light. Refer to “CHECKING THE LEDs”. • Is the turn signal indicator light LED OK? YES NO Replace the meter assembly. 8 - 39 SIGNALING SYSTEM – + Tester positive probe → brown/white 1 Tester negative probe → ground 3.Turn signal switch • Check the turn signal switch for continuity. Refer to “CHECKING THE SWITCHES”. • Is the turn signal switch OK? YES ELEC NO Replace the left handlebar switch. • Set the main switch to “ON”. • Set the turn signal switch to “ ” or “ ”. • Measure the voltage (12V) of brown/ white at the turn signal relay coupler (wire harness side). • Is the voltage within specification? 4.Voltage • Connect the pocket tester (DC 20V) to the turn signal relay coupler (wire harness side) as shown. Tester positive probe → brown 1 Tester negative probe → ground NO YES The turn signal relay is faulty and must be replaced. 6.Voltage • Connect the pocket tester (DC 20V) to the turn signal light connectors or the meter assembly coupler (wire harness side) as shown. • Set the main switch to “ON”. • Measure the voltage (12V) of brown 1 at the turn signal relay coupler (wire harness side). • Is the voltage within specification? YES Å Turn signal light ı Turn signal indicator light Left turn signal light Tester positive probe → chocolate (orange) 1 Tester negative probe → ground Right turn signal light Tester positive probe → dark green 2 Tester negative probe → ground NO The wiring circuit from the main switch to the turn signal relay coupler (turn signal relay side) is faulty and must be repaired. Å 5.Voltage • Connect the pocket tester (DC 20V) to the turn signal relay coupler (wire harness side) as shown. 8 - 40 ı SIGNALING SYSTEM + • Connect the pocket tester (DC 20V) to the meter assembly coupler (wire harness side) as shown. Tester positive probe → brown 1 Tester negative probe → sky blue 2 NO YES The wiring circuit from the turn signal switch to the turn signal light connector is faulty and must be repaired. • Set the main switch to “ON”. • Measure the voltage (12 V) of brown 1 and sky blue 2 at the meter assembly coupler. • Is the voltage within specification? EB806414 4. The neutral indicator light fails to come on. 1.Neutral indicator light LED NO YES • Check the LED of the neutral indicator light. Refer to “CHECKING THE LEDs”. • Is the neutral indicator light LED OK? YES – 3.Voltage • Set the main switch to “ON”. • Set the turn signal switch to “ ” or “ ”. • Measure the voltage (12V) of chocolate (orange) 1 or dark green 2 at the turn signal light connector (wire harness side). • Is the voltage within specification? This circuit is OK. ELEC This circuit is OK. NO Replace the meter assembly. The wiring circuit from the main switch to the meter light bulb coupler is faulty and must be repaired. EB806416 5. The oil level warning light fails to come on. 2.Neutral switch 1.Oil level warning light LED • Check the neutral switch for continuity. Refer to “CHECKING THE SWITCHES”. • Is the neutral switch OK? YES • Check the LED of the oil level warning light. Refer to “CHECKING THE LEDs”. • Is the oil level warning light LED OK? NO YES Replace the neutral switch. NO Replace the meter assembly. 8 - 41 SIGNALING SYSTEM ELEC – + 2.Oil level switch 4.Voltage • Drain the engine oil and remove the oil level switch from the oil pan. • Check the oil level switch for continuity. Refer to “CHECKING THE SWITCHES”. • Is the oil level switch OK? • Connect the pocket tester (DC 20V) to the meter assembly coupler (wire harness side) as shown. YES Tester positive probe → brown 1 Tester negative probe → black/red 2 NO Replace the oil level switch. 3.Oil level relay • Disconnect the oil level relay from the coupler. • Connect the pocket tester (Ω × 1) and battery (12 V) to the oil level relay terminals as shown. • Set the main switch to “ON”. • Measure the voltage (12 V) of brown 1 and black/red at the meter assembly coupler. • Is the voltage within specification? Battery positive terminal → brown 1 Battery negative terminal → white 2 NO YES Tester positive probe → red/blue 3 Tester negative probe → black 4 This circuit is OK. The wiring circuit from the main switch to the meter assembly coupler is faulty and must be repaired. EB806417 6. The fuel level indicator light fails to come on. • Does the oil level relay have continuity between red/blue and black? YES 1.Fuel level indicator light LED NO • Check the LED of the fuel level indicator light. Refer to “CHECKING THE LEDs”. • Is the fuel level indicator light LED OK? Replace the oil level relay. YES NO Replace the meter assembly. 8 - 42 SIGNALING SYSTEM • Disconnect the fuel sender coupler from the wire harness. • Drain the fuel from the fuel tank and remove the fuel sender from the fuel tank. • Check the fuel sender for continuity. YES This circuit is OK. Tester positive probe → green 1 Tester negative probe → black 2 • Is the fuel sender OK? NO Replace sender. the – + • Set the main switch to “ON”. • Measure the voltage (12V). • Is the voltage within specification? 2.Fuel sender YES ELEC fuel 3.Voltage Connect the pocket tester (DC 20V) to the meter assembly coupler (wire harness side) as shown. Tester positive probe → brown 1 Tester negative probe → green/red 2 8 - 43 NO The wiring circuit from the main switch to the meter assembly coupler is faulty and must be repaired. P OFF ON 1 L 8 - 44 Br/L Br/L Br/L Br/L L/R Br/L L/Y R B B B L j k l (Option) m n L i B h Br B B B B B B B (BLACK) B B R/Y Br (BLACK) B L B B B B B B B B B B B B B B B B B R/W R Br/L R Br/L B B L/Y L/R L 3 L/Y L/B L L/R Br L B R W W W R Br Y B R/Y A • L Y B R/Y B A Y L/R R/Y R/Y Y B B B/Y W/Y R/Y B/Y B R/Y W/Y L/R B A f A L/R L/B u B A L/R B Br G e L/R B d B/W L/R B/L B/Y B B/Y Br B Br G B/Y B/L B/L — [ B B e G W/Y W/G Y B B L/W B B \ L/R c B B Ch Ch ] B/L B L/B B B B Dg L/Y B b B B Ch O O Br/W Br B B Dg Dg Dg b Br/W a Br Ch A OFF Dg Dg A B B C (BLUE) (BLUE) ` B L/Y G B (GREEN) (GREEN) G/W B (BLACK) (BLACK) c Ch L/Y B B B B/L L/B L/B B/Y Sb L/Y 0A L/R R/B L/W L/B L/Y Sb B/Y B B R/G A L A B/R G/W G/Y A A A R/L Br A D G/W HEADLIGHT SUB-WIRE HARNESS WIRE HARNESS R/B G/R L R/G Dg G/W Br W W/Y R/Y Br/L L/R Sb Ch Y/B B/R G/Y B L/Y W/G R/Y R/Y W/Y W Br G/W Dg R/G L G/R R/Y W/G L/Y B G/Y R/L Y/B Ch Sb L/R Br/L 9 L/B — v B/Y A Z R/B R/W B/L B/Y B L/R B/L B R/Y W/G f R/Y Br/R — PASS Y Br/R L B B/L W/G R/Y L/B Br/W R/Y Br B Br/W L/B Br/R B Br Dg Y Ch G B/Y L/Y X Br Br s t L/W R/W (BLUE) G/Y R/Y L G/Y L/B (BROWN) R/W Br R/B B G/Y L/W (BROWN) B B 8 7 6 (BLUE) g B r B B R R R R L/W R/W B B Y L/R (BROWN) Br/R L L/B (BROWN) Br R/W B R/B B G/Y B 5 R R R R q Br o Br W W W R/G W/Y Dg W/G O L/Y B/Y p W W W W W W R/L 4 W R/L Br B (BLACK) W W W 2 (BROWN) (BROWN) W W W R/G A L L Dg Ch Y N Y B/L E Y/L B/R W/B B/Y R/B O Gy W V U T S R Q P O F B/L L Y B/L L Gy W W/R Y B/Y B/R L/R G/Y B B/L G/R W L/Y Y/B Sb Y A A A B/L L W/R B L B/L B/R B Y/B O G/Y Sb B/Y R/W L/R Gy Sb A L/Y Y/B B/L L/Y W B/L B G/R W Y/B Sb G A A W B R/B R/W L M B/L G/R B/L L/Y W B/W P O/R O/R P B/W Gy Gy O R/B Gy B/L Gy Sb K Gy B H J Sb R/B R/B O Gy B/L I 1 Main switch 5 Battery 6 Main fuse M Temperature sender B S Combination meter T Coolant temperature meter h Radiator fan motor B i Thermo switch H I j Radiator fan motor fuse l Signaling system fuse B IGNITION COIL SUB-WIRE HARNESS R/G B L/Y W B/L G/R B/R Y/B Br G/W G/Y Sb Y Ch Dg L G/Y G/W R/G B/R Br B/R L B/Y B/L WIRE HARNESS R/B O Gy B COOLING SYSTEM ELEC – + EB807000 COOLING SYSTEM CIRCUIT DIAGRAM COOLING SYSTEM – ELEC + EB807010 • Is the battery OK? TROUBLESHOOTING • The radiator fan motor fails to turn. • The coolant temperature meter needle fails to move when the engine is warm. NO YES • Clean the battery terminals. • Recharge or replace the battery. Check: 1. main, signal system, and radiator fan motor fuses 2. battery 3. main switch 4. radiator fan motor 5. thermo switch 6. temperature sender 7. wiring (the entire cooling system) EB802411 3.Main switch • Check the main switch for continuity. Refer to “CHECKING THE SWITCHES”. • Is the main switch OK? NOTE: • Before troubleshooting, remove the following part(-s): 1) rider seat 2) bottom cowling 3) front cowling inner panels 4) left side cowling 5) windshield • Troubleshoot with the following special tool(-s). NO YES Replace the main switch. EB807400 4.Radiator fan motor (test 1) • Disconnect the radiator fan motor coupler from the wire harness. • Connect the battery (12 V) as shown. Pocket tester 90890-03112 EB802400 Battery positive lead → blue 1 Battery negative lead → black 2 1.Main, signal system and radiator fan motor fuses • Check the main, signal system, and radiator fan motor fuses for continuity. Refer to “CHECKING THE FUSES” in chapter 3. • Are the main, signal system, and radiator fan motor fuses OK? NO YES • Does the radiator fan motor turn? Replace the fuse(-s). YES EB802401 NO 2.Battery The radiator fan motor is faulty and must be replaced. • Check the condition of the battery. Refer to “CHECKING AND CHARGING THE BATTERY” in chapter 3. Open-circuit voltage 12.8 V or more at 20 ˚C 8 - 45 COOLING SYSTEM – ELEC + EB807400 5.Radiator fan motor (test 2) • Disconnect the thermo switch coupler. • Set the main switch to “ON”. • Connect the brown 1 and blue 2 terminals with a jumper lead 3 as shown. Test step Coolant temperature 1 0 ~ 98 ˚C NO 2 More than 105 ± 3 ˚C YES 3* 105 to 98 ˚C YES 4* Less than 98 ˚C NO Continuity Thermo switch Test steps 1 & 2: Heating phase Test steps 3* & 4*: Cooling phase • Does the radiator fan motor turn? YES NO The wiring circuit from the main switch to the radiator fan motor coupler is faulty and must be repaired. EB807402 6.Thermo switch • Remove the thermo switch from the radiator. • Connect the pocket tester (Ω × 1) to the thermo switch 1 as shown. • Immerse the thermo switch in a container filled with coolant 2. WARNING WARNING • Handle the thermo switch with special care. • Never subject the thermo switch to strong shocks. If the thermo switch is dropped, replace it. NOTE: Make sure that the thermo switch terminals do not get wet. T. • Place a thermometer 3 in the coolant. • Slowly heat the coolant, then let it cool to the specified temperature as indicated in the table. • Check the thermo switch for continuity at the temperatures indicated in the table. R. Thermo switch 23 Nm (2.3 m • kg) Three bond sealock 10 Å The thermo switch circuit is open and the radiator fan is off. ı The thermo switch circuit is closed and the radiator fan is on. 8 - 46 COOLING SYSTEM ELEC – + • Does the thermo switch operate properly as described above? NO YES Replace the thermo switch. 7.Temperature sender WARNING WARNING • Remove the temperature sender from the radiator. • Connect the pocket tester (Ω × 10) to the temperature sender 1 as shown. • Immerse the temperature sender in a container filled with water 2. • Place a thermometer 3 in the water. • Slowly heat the water, then let it cool down to the specified temperature. • Check the temperature sender for continuity at the temperatures indicated below. Handle the temperature sender with special care. Never subject the temperature sender to strong shocks. If the temperature sender is dropped, replace it. T. R. Temperature sender 15 Nm (1.5 m • kg) Three bond sealock 10 YES Temperature sender resistance 47.5 ~ 56.8 Ω at 80 ˚C 16.5 ~ 20.5 Ω at 115 ˚C NO Replace the temperature sender. EB807403 8.Wiring • Check the entire cooling system’s wiring. Refer to “CIRCUIT DIAGRAM”. • Is the cooling system’s wiring properly connected and without defects? YES This circuit is OK. 8 - 47 NO Properly connect or repair the cooling system’s wiring. 8 - 48 L Br/L Br/L Br/L Br/L L/R Br/L L/Y R B B B L j k l (Option) m n Br L L i B h Br B B B B B B B (BLACK) B B R/Y Br (BLACK) B L B B B B B B B B B B B B B B B B B R/W R Br/L R Br/L B B L/Y L/R L L/Y L/B L L/R 3 Br Y B R/Y A • L Y B R/Y B A Y L/R R/Y R/Y Y B B B/Y W/Y R/Y B/Y B R/Y W/Y L/R B A L/R L/B u B A d B e L/R B Br G B/W L/R B/L B/Y B B/Y Br L/R B Br G B/Y B/L B/L — [ B B e G W/Y W/G Y B B L/W B B \ L/R c B B Ch Ch ] B/L B L/B B B B Dg L/Y B b B B Ch O O Br/W Br B B Dg Dg Dg b Br/W a Br Ch A OFF Dg Dg A B B C (BLUE) (BLUE) ` B L/Y G B (GREEN) (GREEN) G/W B (BLACK) (BLACK) c Ch L/Y B B B B/L L/B L/B B/Y Sb L/Y 0A L/R R/B L/W L/B L/Y Sb B/Y B B R/G A L A B/R G/W G/Y A A A R/L Br A D G/W HEADLIGHT SUB-WIRE HARNESS WIRE HARNESS R/B G/R L R/G Dg G/W Br W W/Y R/Y Br/L L/R Sb Ch Y/B B/R G/Y B L/Y W/G R/Y A R/Y W/Y W Br G/W Dg R/G L G/R R/Y W/G L/Y B G/Y R/L Y/B Ch Sb L/R Br/L 9 L/B — v B/Y A Z R/B R/W B/L B/Y B L/R B/L B R/Y W/G f R/Y Br/R — PASS Y Br/R L B B/L W/G R/Y A f L/B Br/W R/Y Br B Br/W L/B Br/R B Br Dg Y Ch G B/Y L/Y X Br Br s t L/W R/W (BLUE) G/Y R/Y L G/Y L/B (BROWN) R/W Br R/B B G/Y L/W (BROWN) B B 8 7 6 (BLUE) g B r B B R R R R L/W R/W B B Y L/R (BROWN) Br/R L L/B (BROWN) Br R/W B R/B B G/Y B 5 R R R R q Br o Br W W W R/G W/Y Dg W/G O L/Y B/Y p W W W W W W R/L 4 W R/L Br B (BLACK) W W W (BROWN) (BROWN) W W W 1 Main switch 5 Battery 6 Main fuse A Fuel pump relay B Fuel pump G Ignitor unit n Ignition fuse u Engine stop switch P OFF ON 1 B R W W W R R/G 2 L L Dg Ch Y N Y B/L E Y/L B/R W/B B/Y R/B O Gy W V U T S R Q P O F B/L L Y B/L L Gy W W/R Y B/Y B/R L/R G/Y B B/L G/R W L/Y Y/B Sb A A L/Y Sb Y/B A Y A B/L L W/R B L B/L B/R B Y/B O G/Y Sb B/Y R/W L/R Gy B B/L G/R L/Y W B/L Y/B Sb W B A A W B G R/W R/B IGNITION COIL SUB-WIRE HARNESS B R/G B L/Y W B/L G/R B/R Y/B Br G/W G/Y Sb Y Ch Dg L G/Y G/W R/G B/R Br B/R L B/Y B/L WIRE HARNESS R/B O Gy L B B M B/L G/R B/L L/Y W B/W P O/R O/R P B/W Gy Gy O R/B Gy B/L Gy Sb K Gy B H H J Sb R/B R/B O Gy B/L I I FUEL PUMP SYSTEM ELEC – + EB808000 FUEL PUMP SYSTEM CIRCUIT DIAGRAM FUEL PUMP SYSTEM EB808010 FUEL PUMP CIRCUIT OPERATION The ignitor unit includes the control unit for the fuel pump. 1 Battery 2 Main fuse 3 Main switch 4 Ignition fuse 5 Engine stop switch 6 Ignitor unit 7 Fuel pump relay 8 Fuel pump 8 - 49 ELEC – + FUEL PUMP SYSTEM ELEC – + EB802401 EB808020 TROUBLESHOOTING 2.Battery The fuel pump fails to operate. • Check the condition of the battery. Refer to “CHECKING AND CHARGING THE BATTERY” in chapter 3. Check: 1. main and ignition fuses 2. battery 3. main switch 4. engine stop switch 5. fuel pump relay 6. fuel pump 7. wiring (the entire fuel pump system) Open-circuit voltage 12.8 V or more at 20 ˚C • Is the battery OK? YES NOTE: • Before troubleshooting, remove the following part(-s): 1) rider seat 2) fuel tank 3) air filter case 4) front cowling inner panel (left) • Troubleshoot with the following special tool(-s). NO • Clean the battery terminals. • Recharge or replace the battery. EB802411 3.Main switch • Check the main switch for continuity. Refer to “CHECKING THE SWITCHES”. • Is the main switch OK? Pocket tester 90890-03112 YES EB802400 NO 1.Main and ignition fuses Replace the main switch. • Check the main and ignition fuses for continuity. Refer to “CHECKING THE FUSES” in chapter 3. • Are the main and ignition fuses OK? YES EB802412 4.Engine stop switch NO • Check the engine stop switch for continuity. Refer to “CHECKING THE SWITCHES”. • Is the engine stop switch OK? Replace the fuse(-s). YES NO Replace the right handlebar switch. 8 - 50 FUEL PUMP SYSTEM ELEC – + • Measure the fuel pump resistance. 5.Fuel pump relay Fuel pump resistance 4 ~ 30 Ω at 20 ˚C • Disconnect the relay unit from the coupler. • Connect the pocket tester (Ω × 1) and battery (12 V) to the relay unit terminals as shown. • Is the fuel pump OK? YES Battery positive terminal → red/black 1 Battery negative terminal → blue/red 2 NO Replace the fuel pump. Tester positive probe → red/black 1 Tester negative probe → blue/black 3 EB808401 7.Wiring • Check the entire fuel pump system’s wiring. Refer to “CIRCUIT DIAGRAM”. • Is the fuel pump system’s wiring properly connected and without defects? YES • Does the fuel pump relay have continuity between red/black and blue/black? Replace the ignitor unit. NO YES Replace unit. the relay EB808400 6.Fuel pump resistance • Disconnect the fuel pump coupler from the wire harness. • Connect the pocket tester (Ω × 1) to the fuel pump coupler (fuel pump side) as shown. Tester positive probe → black/blue 1 Tester negative probe → black 2 8 - 51 NO Properly connect or repair the fuel pump system’s wiring. FUEL PUMP SYSTEM ELEC – + EB808410 CHECKING THE FUEL PUMP WARNING WARNING Gasoline is extremely flammable and under certain circumstances there can be a danger of an explosion or fire. Be extremely careful and note the following points: • Stop the engine before refuelling. • Do not smoke and keep away from open flames, sparks or any other source of fire. • If you do accidentally spill gasoline, wipe it up immediately with dry rags. • If gasoline touches the engine when it is hot, a fire may occur. Therefore, make sure that the engine is completely cool before performing the following test. 1. Check: • fuel pump operation ▼▼▼▼▼▼▼▼▼▼▼▼▼▼▼▼▼▼▼▼▼▼▼▼▼▼▼ a. Fill the fuel tank. b. Put the end of the fuel hose into an open container. c. Connect the battery (12V) to the fuel pump coupler as shown. Battery positive lead → blue/black 1 Battery negative lead → black 2 d. If fuel flows out of the fuel hose, the fuel pump is OK. If fuel does not flow, replace the fuel pump. ▲▲▲▲▲▲▲▲▲▲▲▲▲▲▲▲▲▲▲▲▲▲▲▲▲▲▲ 8 - 52 8 - 53 L Br/L Br/L Br/L Br/L L/R Br/L L/Y R B B B L j k l (Option) m n Br L L i B h Br B B B B B B B (BLACK) B B R/Y Br (BLACK) B L B B B B B B B B B B B B B B B B B R/W R Br/L R Br/L B B L/Y L/R L L/Y L/B L L/R 3 Br Y B R/Y A • L Y B R/Y B A Y L/R R/Y R/Y Y B B B/Y W/Y R/Y B/Y B R/Y W/Y L/R B A L/R L/B u B A d B e L/R B Br G B/W L/R B/L B/Y B B/Y Br L/R B Br G B/Y B/L B/L — [ B B e G W/Y W/G Y B B L/W B B \ L/R c B B Ch Ch ] B/L B L/B B B B Dg L/Y B b B B Ch O O Br/W Br B B Dg Dg Dg b Br/W a Br Ch A OFF Dg Dg A B B C (BLUE) (BLUE) ` B L/Y G B (GREEN) (GREEN) G/W B (BLACK) (BLACK) c Ch L/Y B B B B/L L/B L/B B/Y Sb L/Y 0A L/R R/B L/W L/B L/Y Sb B/Y B B R/G A L A B/R G/W G/Y A A A R/L Br A D G/W HEADLIGHT SUB-WIRE HARNESS WIRE HARNESS R/B G/R L R/G Dg G/W Br W W/Y R/Y Br/L L/R Sb Ch Y/B B/R G/Y B L/Y W/G R/Y A R/Y W/Y W Br G/W Dg R/G L G/R R/Y W/G L/Y B G/Y R/L Y/B Ch Sb L/R Br/L 9 L/B — v B/Y A Z R/B R/W B/L B/Y B L/R B/L B R/Y W/G f R/Y Br/R — PASS Y Br/R L B B/L W/G R/Y A f L/B Br/W R/Y Br B Br/W L/B Br/R B Br Dg Y Ch G B/Y L/Y X Br Br s t L/W R/W (BLUE) G/Y R/Y L G/Y L/B (BROWN) R/W Br R/B B G/Y L/W (BROWN) B B 8 7 6 (BLUE) g B r B B R R R R L/W R/W B B Y L/R (BROWN) Br/R L L/B (BROWN) Br R/W B R/B B G/Y B 5 R R R R q Br o Br W W W R/G W/Y Dg W/G O L/Y B/Y p W W W W W W R/L 4 W R/L Br B (BLACK) W W W (BROWN) (BROWN) W W W 1 Main switch 5 Battery 6 Main fuse E EXUP servomotor G Ignitor unit n Ignition fuse P OFF ON 1 B R W W W R R/G 2 L L Dg Ch Y N Y B/L E Y/L B/R W/B B/Y R/B O Gy W V U T S R Q P O F B/L L Y B/L L Gy W W/R Y B/Y B/R L/R G/Y B B/L G/R W L/Y Y/B Sb Y A A A B/L L W/R B L B/L B/R B Y/B O G/Y Sb B/Y R/W L/R Gy Sb A L/Y Y/B B B/L G/R L/Y W B/L Y/B Sb W B A A W B G R/W R/B IGNITION COIL SUB-WIRE HARNESS B R/G B L/Y W B/L G/R B/R Y/B Br G/W G/Y Sb Y Ch Dg L G/Y G/W R/G B/R Br B/R L B/Y B/L WIRE HARNESS R/B O Gy L B B M B/L G/R B/L L/Y W B/W P O/R O/R P B/W Gy Gy O R/B Gy B/L Gy Sb K Gy B H H J Sb R/B R/B O Gy B/L I I EXUP SYSTEM ELEC – + EB811000 EXUP SYSTEM CIRCUIT DIAGRAM EXUP SYSTEM ELEC – + EB811010 TROUBLESHOOTING When the engine speed changes, the EXUP servomotor does not operate. Procedure 1 Check: 1. Exup servomotor operation (with the EXUP servomotor coupler connected to the wire harness) 2. voltage 3. Exup servomotor operation 4. (with the EXUP servomotor coupler disconnected from the wire harness) 5. Exup servomotor resistance 6. wiring (the entire EXUP system) Procedure 2 Check: 1. main and ignition fuses 2. battery 3. main switch 4. engine stop switch 5. wiring (the entire EXUP system) • Does the EXUP servomotor pulley turn? NO YES Check that the EXUP cables are properly installed. If OK, check the EXUP valve and cables. Refer to “ENGINE” in chapter 4. EB811401 NOTE: • Before troubleshooting, remove the following part(-s): 1) rider seat 2) fuel tank 3) bottom cowling • Troubleshoot with the following special tool(-s). 2.Voltage • Connect the pocket tester (DC 20V) to the EXUP servomotor coupler (wire harness side) as shown. Tester positive probe → black/red 1 Tester negative probe → black/yellow 2 Pocket tester 90890-03112 EB811400 Procedure 1 1.EXUP servomotor operation (with the EXUP servomotor coupler connected to the wire harness) • Disconnect the EXUP cables from the EXUP servomotor pulley. • Start the engine and rev it to 2,000 r/min. • Set the main switch to “ON”. • Measure the voltage (12V) between black/red 1 and black/yellow 2 (wire harness side). • Is the voltage within specification? YES NO Go to Procedure 2. 8 - 54 EXUP SYSTEM ELEC – + EB811402 3.EXUP servomotor operation (with the servomotor coupler disconnected from the wire harness) • Disconnect the EXUP cables from the EXUP servomotor pulley. • Disconnect the EXUP servomotor coupler from the wire harness. • Connect the battery leads to the EXUP servomotor coupler (servomotor side) as shown. • Measure the EXUP servomotor resistance. Battery positive terminal → black/yellow 1 Battery negative terminal → black/red 2 EXUP servomotor resistance 5.3 ~ 9.8 kΩ (between white/black and yellow/blue) • Connect the pocket tester (Ω × 1k) to the EXUP servomotor coupler. Tester positive probe → white/black 1 Tester negative probe → white/red 3 • Check that the EXUP servomotor pulley rotates several times. CAUTION: ACHTUNG: To prevent damaging the EXUP servomotor, perform this test within a few seconds of connecting the battery. • While slowly turning the EXUP servomotor pulley by hand, measure the EXUP servomotor resistance. • Does the EXUP servomotor pulley turn? NO YES EXUP servomotor resistance (when the pulley is turned one full rotation) 0 ~ approximately 7.5 kΩ (between white/black and white/red) Replace the EXUP servomotor. EB811403 4.EXUP servomotor resistance • Is the EXUP servomotor OK? • Disconnect the EXUP servomotor coupler from the wire harness. • Connect the pocket tester (Ω × 1k) to the EXUP servomotor coupler. YES NO The EXUP servomotor is faulty and must be replaced. Tester positive probe → white/black 1 Tester negative probe → yellow/blue 2 8 - 55 EXUP SYSTEM ELEC – + EB802411 EB811404 5.Wiring 3.Main switch • Check the entire EXUP system’s wiring. Refer to “CIRCUIT DIAGRAM”. • Is the EXUP system’s wiring properly connected and without defects? • Check the main switch for continuity. Refer to “CHECKING THE SWITCHES”. • Is the main switch OK? YES NO YES Replace the ignitor unit. NO Replace the main switch. Properly connect or repair the EXUP system’s wiring. EB802412 4.Engine stop switch • Check the engine stop switch for continuity. Refer to “CHECKING THE SWITCHES”. • Is the engine stop switch OK? EB811410 Procedure 2 EB802400 1.Main and ignition fuses YES • Check the main and ignition fuses for continuity. Refer to “CHECKING THE FUSES” in chapter 3. • Are the main and ignition fuses OK? NO Replace the right handlebar switch. NO YES EB811411 5.Wiring Replace the fuse(-s). • Check the entire EXUP system’s wiring. Refer to “CIRCUIT DIAGRAM”. • Is the EXUP system’s wiring properly connected and without defects? EB802401 2.Battery • Check the condition of the battery. Refer to “CHECKING AND CHARGING THE BATTERY” in chapter 3. YES Open-circuit voltage 12.8 V or more at 20 ˚C Go to “Procedure 1”. • Is the battery OK? YES NO • Clean the battery terminals. • Recharge or replace the battery. 8 - 56 NO Properly connect or repair the EXUP system’s wiring. SELF-DIAGNOSIS ELEC – + EB812000 SELF-DIAGNOSIS The YZF-R1 features a self-diagnosing system for the following circuit(-s): • throttle position sensor • EXUP • fuel level indicator light If any of these circuits are defective, their respective condition codes will be displayed on the tachometer when the main switch is set to “ON” (irrespective of whether the engine is running or not) Circuit Throttle position sensor Defect(-s) • Disconnected • Short-circuit • Locked • • EXUP • Improper connection • Short-circuit • • • Servomotor is locked. • • Fuel level indi- • Improper connec- • tion cator light System response Condition code The ignitor unit stays set to the 3,000 r/min wide-open throttle ignition timing. The motorcycle can be ridden. The tachometer displays the condition code. The EXUP valve stays in the 7,000 r/min open position for three seconds and then the servomotor shuts off. The motorcycle can be ridden. The tachometer displays the condition code. The servomotor’s power supply is constantly interrupted so that it will not burn out. The motorcycle can be ridden. The tachometer displays the condition code. The tachometer displays the 8,000 r/min condition code. Tachometer display sequence When more than one item is being monitored, the tachometer needle displays the condition codes in ascending order, cycling through the sequence repeatedly. If the engine is stopped, the engine speed 3 is 0 r/min. 8 - 57 SELF-DIAGNOSIS ELEC – + EB812010 1.Wire harness TROUBLESHOOTING • Check the wire harness for continuity. Refer to “CIRCUIT DIAGRAM”. • Is the wire harness OK? The tachometer starts to display the selfdiagnosis sequence. Check: 1. throttle position sensor 2. Exup 3. fuel level indicator light Repair or replace the wire harness. NOTE: • Before troubleshooting, remove the following part(-s): 1) rider seat 2) fuel tank 3) air filter case • Troubleshoot with the following special tool(-s). EB812401 2.Throttle position sensor • Check the throttle position sensor for continuity. Refer to “CHECKING AND ADJUSTING THE THROTTLE POSITION SENSOR” in chapter 6. • Is the throttle position sensor OK? Pocket tester 90890-03112 EB812020 YES 1. Throttle position sensor CIRCUIT DIAGRAM R/B B/L B/R B Y/B O G/Y Sb B/Y R/W L/R Gy Gy W W/R Y B Replace the ignitor unit. R/B R/W R/B B L O B L/R G/Y B/R L B/Y B/L L E Y B/L Gy B Gy G L W/R B/L B/L F L O R/B B/Y B/R Y/L B/R W/B B/Y L Y Y Gy Gy B/L B/L B NO YES Y/B Sb W B F Throttle position sensor G Ignitor unit 8 - 58 NO Replace the throttle position sensor. SELF-DIAGNOSIS EB812030 ELEC – + EB812402 2. EXUP CIRCUIT DIAGRAM 2.EXUP servomotor R/B B/L B/R B Y/B O G/Y Sb B/Y R/W L/R Gy Gy W W/R Y B • Check the EXUP servomotor for continuity. Refer to “EXUP SYSTEM”. • Is the EXUP servomotor OK? R/B R/W B L O B L/R G/Y B/R L B/Y B/L L E Y Gy B Replace the ignitor unit. G G L W/R B/L B/L F L YES L Y B/L Y Gy G B B/L B Y/B Sb W B E EXUP servomotor G Ignitor unit EB812400 1.Wire harness • Check the wire harness for continuity. Refer to “CIRCUIT DIAGRAM”. • Is the wire harness OK? YES NO R B/Y B/R Y/L B/R W/B B/Y O NO Repair or replace the wire harness. 8 - 59 Replace the EXUP servomotor. SELF-DIAGNOSIS EB812040 – ELEC + EB812403 3. Fuel level indicator light CIRCUIT DIAGRAM 1.Fuel level indicator light LED • Check the LED of the fuel level indicator light. Refer to “CHECKING THE LEDs”. • Is the fuel level indicator light LED OK? A R/Y W/Y W Br G/W Dg R/G L G/R R/Y W/G L/Y B G/Y R/L Y/B Ch Sb L/R Br/L G/R L R/G Dg G/W Br W W/Y R/Y Br/L L/R Sb Ch Y/B B/R G/Y B L/Y W/G R/Y WIRE HARNESS HEADLIGHT SUB-WIRE HARNESS NO YES R/B B/L B/R B Y/B O G/Y Sb B/Y R/W L/R Gy Gy W W/R Y R R/B L/W B L/Y Sb B/Y B B R/B R/W B L Repair the fuel level indicator light LED. O L/R G/Y B/R L B/Y B/L B/Y B/R Y/L B/R W/B B/Y L E B/L B L/B B G/W G/W B B/L G B • Disconnect the fuel sender coupler from the wire harness. • Connect the pocket tester (W × 1) to the fuel sender coupler as shown. Gy Y L Y B/L (GREEN) (GREEN) D L/Y B B C B B 2.Fuel sender B/L F Y EB812404 B/L (BLACK) (BLACK) L Gy G L W/R Y/B Sb W B Tester positive probe → green 1 Tester negative probe → black 2 L/Y B (BLUE) (BLUE) B N O Br a Br/W Br P A Br A Br/W R/L Q Br R R/G A A A ` Sb A Sb Y/B A Y/B L/Y A L/Y B/R G/W G/Y R/G B/R OFF S G/Y G/W Ch W G/R B/L T O A U G/R B/L L • Check the fuel sender for continuity. • Is the fuel sender OK? M Dg L O Dg Dg Ch Dg B B B b B W A A B V Ch A Dg c O/ P B/ Dg Y Dg A L/Y W B/L A L R/G B L/Y W B/L G/R B/R Y/B Br G/W G/Y Sb Y Ch Dg L Replace sender. b B NO YES A W B D Fuel sender G Ignitor unit O Fuel level indicator light S Combination meter 8 - 60 the fuel SELF-DIAGNOSIS EB812405 3.Wire harness • Check the wire harness for continuity. Refer to “CIRCUIT DIAGRAM”. • Is the wire harness OK? YES Replace the ignitor unit. NO Replace or replace the wire harness. 8 - 61 ELEC – + ELEC 8 - 62 – + TRBL SHTG 9 TRBL SHTG CHAPTER 9. TROUBLESHOOTING STARTING PROBLEMS ................................................................................9-1 ENGINE .................................................................................................9-1 FUEL SYSTEM ......................................................................................9-1 ELECTRICAL SYSTEMS .......................................................................9-1 INCORRECT ENGINE IDLING SPEED ..........................................................9-2 ENGINE .................................................................................................9-2 FUEL SYSTEM ......................................................................................9-2 ELECTRICAL SYSTEMS .......................................................................9-2 POOR MEDIUM-AND-HIGH-SPEED PERFORMANCE ................................9-2 ENGINE .................................................................................................9-2 FUEL SYSTEM ......................................................................................9-2 FAULTY GEAR SHIFTING ............................................................................9-2 SHIFTING IS DIFFICULT .......................................................................9-2 SHIFT PEDAL DOES NOT MOVE .........................................................9-2 JUMPS OUT OF GEAR .........................................................................9-2 FAULTY CLUTCH ..........................................................................................9-3 CLUTCH SLIPS ......................................................................................9-3 CLUTCH DRAGS ...................................................................................9-3 OVERHEATING .............................................................................................9-3 ENGINE .................................................................................................9-3 COOLING SYSTEM ...............................................................................9-3 FUEL SYSTEM ......................................................................................9-3 CHASSIS ...............................................................................................9-3 ELECTRICAL SYSTEMS .......................................................................9-3 OVERCOOLING .............................................................................................9-3 COOLING SYSTEM ...............................................................................9-3 POOR BRAKING PERFORMANCE ...............................................................9-4 FAULTY FRONT FORK LEGS .......................................................................9-4 LEAKING OIL .........................................................................................9-4 MALFUNCTION ....................................................................................9-4 TRBL SHTG UNSTABLE HANDLING ................................................................................9-4 FAULTY LIGHTING AND SIGNALING SYSTEMS ......................................9-5 HEADLIGHT DOES NOT LIGHT ...........................................................9-5 HEADLIGHT BULB BURNT OUT ..........................................................9-5 TAIL/BRAKE LIGHT DOES NOT LIGHT ...............................................9-5 TAIL/BRAKE LIGHT BULB BURNT OUT ..............................................9-5 TURN SIGNAL DOES NOT LIGHT .......................................................9-5 TURN SIGNAL BLINKS SLOWLY ........................................................9-5 TURN SIGNAL REMAINS LIT ..............................................................9-5 TURN SIGNAL BLINKS QUICKLY ........................................................9-5 HORN DOES NOT SOUND ..................................................................9-5 STARTING PROBLEMS TRBL SHTG EB900000 TROUBLESHOOTING NOTE: The following guide for troubleshooting does not cover all the possible causes of trouble. It should be helpful, however, as a guide to basic troubleshooting. Refer to the relative procedure in this manual for checks, adjustments, and replacement of parts. STARTING PROBLEMS FUEL SYSTEM Fuel tank • Empty fuel tank • Clogged fuel filter • Clogged fuel tank breather hose • Clogged rollover valve (California only) • Clogged rollover-valve-to-fuel-tank hose (California only) • Deteriorated or contaminated fuel Fuel pump • Faulty fuel pump • Faulty fuel pump relay Fuel cock • Clogged or damaged fuel hose Carburetors • Deteriorated or contaminated fuel • Clogged pilot jet • Clogged pilot air passage • Sucked-in air • Damaged float • Worn needle valve • Incorrectly installed needle valve seat • Incorrect fuel level • Incorrectly installed pilot jet • Clogged starter jet • Faulty starter plunger • Incorrectly adjusted starter cable ENGINE Cylinders and cylinder head(-s) • Loose spark plug • Loose cylinder head • Damaged cylinder head gasket • Worn or damaged cylinder • Incorrect valve clearance • Incorrectly sealed valve • Incorrect valve-to-valve-seat contact • Incorrect valve timing • Faulty valve spring • Seized valve Pistons and piston rings • Incorrectly installed piston ring • Damaged, worn or fatigued piston ring • Seized piston ring • Seized or damaged piston Air filter • Incorrectly installed air filter • Clogged air filter element Crankcase and crankshaft • Incorrectly assembled crankcase • Seized crankshaft ELECTRICAL SYSTEMS Battery • Faulty battery • Discharged battery Fuses • Blown, damaged or incorrect fuse • Incorrectly installed fuse Spark plugs • Incorrect spark plug gap • Incorrect spark plug heat range • Fouled spark plug • Worn or damaged electrode • Worn or damaged insulator • Faulty spark plug cap Ignition coils • Damaged ignition coil • Broken or shorted primary or secondary coils • Faulty spark plug lead Ignition system • Faulty ignitor unit • Faulty pickup coil Switches and wiring • Faulty main switch • Faulty engine stop switch • Broken or shorted wiring • Faulty neutral switch • Faulty start switch • Faulty sidestand switch • Faulty clutch switch • Incorrectly grounded circuit • Loose connections Starting system • Faulty starter motor • Faulty starter relay • Faulty starting circuit cutoff relay • Faulty starter clutch 9-1 INCORRECT ENGINE IDLING SPEED/POOR MEDIUM-ANDHIGH-SPEED PERFORMANCE/FAULTY GEAR SHIFTING TRBL SHTG EB901000 INCORRECT ENGINE IDLING SPEED ENGINE Cylinders and cylinder head • Incorrect valve clearance • Damaged valve train components Air filter • Clogged air filter element ELECTRICAL SYSTEMS Battery • Faulty battery • Discharged battery Spark plugs • Incorrect spark plug gap • Incorrect spark plug heat range • Fouled spark plug • Worn or damaged electrode • Worn or damaged insulator • Faulty spark plug cap Ignition coils • Broken or shorted primary or secondary coils • Faulty spark plug lead • Damaged ignition coil Ignition system • Faulty ignitor unit • Faulty pickup coil FUEL SYSTEM Carburetors • Faulty starter plunger • Loose or clogged pilot jet • Loose or clogged pilot air jet • Damaged or loose carburetor joint • Incorrectly synchronized carburetors • Incorrectly adjusted engine idling speed (throttle stop screw) • Incorrect throttle cable free play • Flooded carburetor EB902000 POOR MEDIUM-AND-HIGH-SPEED PERFORMANCE Refer to “STARTING PROBLEMS”. ENGINE Air filter • Clogged air filter element FUEL SYSTEM Carburetors • Faulty diaphragm • Incorrect fuel level • Loose or clogged main jet Fuel pump • Faulty fuel pump EB903000 FAULTY GEAR SHIFTING JUMPS OUT OF GEAR Shift shaft • Incorrect shift pedal position • Incorrectly returned stopper lever Shift forks • Worn shift fork Shift drum • Incorrect axial play • Worn shift drum groove Transmission • Worn gear dog SHIFTING IS DIFFICULT Refer to “CLUTCH DRAGS”. SHIFT PEDAL DOES NOT MOVE Shift shaft • Incorrectly adjusted shift rod • Bent shift shaft. Shift drum and shift forks • Foreign object in a shift drum groove • Seized shift fork • Bent shift fork guide bar Transmission • Seized transmission gear • Foreign object between transmission gears • Incorrectly assembled transmission 9-2 FAULTY CLUTCH/OVERHEATING/OVERCOOLING TRBL SHTG EB904000 FAULTY CLUTCH CLUTCH SLIPS Clutch • Incorrectly assembled clutch • Incorrectly adjusted clutch cable • Loose or fatigued clutch spring • Worn friction plate • Worn clutch plate Engine oil • Incorrect oil level • Incorrect oil viscosity (low) • Deteriorated oil CLUTCH DRAGS Clutch • Unevenly tensioned clutch spring plate • Warped pressure plate • Bent clutch plate • Swollen friction plate • Bent clutch pull rod • Damaged clutch boss • Burnt primary driven gear bushing • Match marks not aligned Engine oil • Incorrect oil level • Incorrect oil viscosity (high) • Deteriorated oil EB905001 OVERHEATING ENGINE Clogged coolant passages Cylinder head(-s) and piston(-s) • Heavy carbon buildup Engine oil • Incorrect oil level • Incorrect oil viscosity • Inferior oil quality FUEL SYSTEM Carburetors • Incorrect main jet setting • Incorrect fuel level • Damaged or loose carburetor joint Air filter • Clogged air filter element CHASSIS Brakes • Dragging brake COOLING SYSTEM Coolant • Low coolant level Radiator • Damaged or leaking radiator • Faulty radiator cap • Bent or damaged radiator fin Water pump • Damaged or faulty water pump Thermostat • Thermostat stays closed Oil cooler • Clogged or damaged oil cooler Hoses and pipes • Damaged hose • Incorrectly connected hose • Damaged pipe • Incorrectly connected pipe ELECTRICAL SYSTEMS Spark plugs • Incorrect spark plug gap • Incorrect spark plug heat range Ignition system • Faulty ignitor unit EB906000 OVERCOOLING COOLING SYSTEM Thermostat • Thermostat stays open 9-3 POOR BRAKING PERFORMANCE/FAULTY FRONT FORK LEGS/UNSTABLE HANDLING TRBL SHTG EB907000 POOR BRAKING PERFORMANCE • • • • • Worn brake pad Worn brake disc Air in hydraulic brake system Leaking brake fluid Faulty brake caliper piston seal • • • • • Loose union bolt Damaged brake hose Oil or grease on the brake disc Oil or grease on the brake pad Incorrect brake fluid level EB908001 FAULTY FRONT FORK LEGS MALFUNCTION • Bent or damaged inner tube • Bent or damaged outer tube • Damaged fork spring • Worn or damaged outer tube bushing • Bent or damaged damper rod • Incorrect oil viscosity • Incorrect oil level LEAKING OIL • Bent, damaged or rusty inner tube • Damaged outer tube • Incorrectly installed oil seal • Damaged oil seal lip • Incorrect oil level (high) • Loose damper rod assembly bolt • Damaged damper rod assembly bolt copper washer • Damaged cap bolt O-ring EB909001 UNSTABLE HANDLING Handlebars • Bent or incorrectly installed right handlebar • Bent or incorrectly installed left handlebar Steering head components • Incorrectly installed upper bracket • Incorrectly installed lower bracket (incorrectly tightened ring nut) • Bent steering stem • Damaged ball bearing or bearing race Front fork legs • Unevenoil levels (both front fork legs) • Unevenly tensioned fork spring (both front fork legs) • Damaged fork spring • Bent or damaged inner tube • Bent or damaged outer tube Swingarm • Worn bearing or bushing • Bent or damaged swingarm Rear shock absorber assembly • Faulty rear shock absorber spring • Leaking oil or gas Tires • Uneven tire pressures (front and rear) • Incorrect tire pressure • Uneven tire wear Wheels • Incorrect wheel balance • Deformed cast wheel • Damaged wheel bearing • Bent or loose wheel axle • Excessive wheel runout Frame • Bent frame • Damaged steering head pipe • Incorrectly installed bearing race 9-4 FAULTY LIGHTING AND SIGNALING SYSTEMS TRBL SHTG EB910000 FAULTY LIGHTING AND SIGNALING SYSTEMS TURN SIGNAL BLINKS SLOWLY • Faulty turn signal relay • Faulty main switch • Faulty turn signal switch • Wrong turn signal bulb HEADLIGHT DOES NOT LIGHT • Wrong headlight bulb • Too many electrical accessories • Hard charging • Incorrect connection • Incorrectly grounded circuit • Poor contacts (main or light switch) • Burnt-out headlight bulb TURN SIGNAL REMAINS LIT • Faulty turn signal relay • Burnt-out turn signal bulb HEADLIGHT BULB BURNT OUT • Wrong headlight bulb • Faulty battery • Faulty rectifier/regulator • Incorrectly grounded circuit • Faulty main switch • Faulty light switch • Headlight bulb life expired TURN SIGNAL BLINKS QUICKLY • Incorrect turn signal bulb • Faulty turn signal relay • Burnt-out turn signal bulb HORN DOES NOT SOUND • Incorrectly adjusted horn • Damaged or faulty horn • Faulty main switch • Faulty horn switch • Faulty battery • Blown, damaged or incorrect fuse • Faulty wire harness TAIL/BRAKE LIGHT DOES NOT LIGHT • Wrong tail/brake light bulb • Too many electrical accessories • Incorrect connection • Burnt-out tail/brake light bulb TAIL/BRAKE LIGHT BULB BURNT OUT • Wrong tail/brake light bulb • Faulty battery • Incorrectly adjusted rear brake light switch • Tail/brake light bulb life expired TURN SIGNAL DOES NOT LIGHT • Faulty turn signal switch • Faulty turn signal relay • Burnt-out turn signal bulb • Incorrect connection • Damaged or faulty wire harness • Incorrectly grounded circuit • Faulty battery • Blown, damaged or incorrect fuse 9-5 TRBL SHTG 9-6 YZF-R1 WIRING DIAGRAM A 2 R/G R/G R R B R/Y W/Y W Br G/W Dg R/G L G/R R/Y W/G L/Y B G/Y R/L Y/B Ch Sb L/R Br/L G/R L R/G Dg G/W Br W W/Y R/Y Br/L L/R Sb Ch Y/B B/R G/Y B L/Y W/G R/Y WIRE HARNESS HEADLIGHT SUB-WIRE HARNESS R/B O Gy R/B O Gy WIRE HARNESS IGNITION COIL SUB-WIRE HARNESS R R L/W R/W R R R R/B B R/B R/B W W W R W W W R 6 5 9 B B R W W W R 3 P OFF ON L/Y L/B L L/R B L/Y L/R L R Br/L R Br/L W W W W 4 B 1 W W 7 B B B/L B/R B Y/B O G/Y Sb B/Y R/W L/R Gy L/W B B B L Br/L B/R L B/Y B/L B/Y B/R Y/L B/R W/B B/Y L R/W B B B B B B B B B B B B B B B m B B G/W B B B B W R/L Br B (BLACK) R/L R/B R/W r Br o Br R/W B R/B B G/Y W (BROWN) R/W Br R/B B G/Y L/W (BROWN) t s u (BROWN) (BLACK) R/Y L G/Y L/B (BROWN) Br G/Y Br B Br/R L W N B L/B O Br/L R/Y a W j p Br W/Y Dg W/G O L/Y B/Y q B B Br Y (BROWN) (BROWN) B L Y h (BLACK) B R/Y A R/Y R/Y A P A Br Br/R L/B A B/Y Br L/Y Br/W R/L Br i L B L Br/W Br \ X Br L Dg Y Ch G B/Y L/Y (BLUE) (BLUE) Br/W L/B Br/R B Br L/B Br/W R/Y Br B Y Z [ — PASS Y A G/Y G/W Ch B O Y Ch A Ch Dg A B/L L B/L B/L B/Y B/Y B/L B/Y B L/R e e B g L/R B B U A d Br G L/R B Ch Dg O Dg Ch Dg Ch Dg B B B B c c B b B V A L R/G B L/Y W B/L G/R B/R Y/B Br G/W G/Y Sb Y Ch Dg L b B B B Sb ..........sky blue W ...........white Y ............yellow B/L .........black/blue B/R .........black/red B/W........black/white B/Y .........black/yellow Br/L ........brown/blue Br/R .......brown/red Br/W ......brown/white B/L L/Y W M B/L W G/R........ green/red G/W ...... green/white G/Y........ green/yellow L/B ........ blue/black L/R ........ blue/red L/W ....... blue/white L/Y ........ blue/yellow O/R........ orange/red R/B ........ red/black R/G........ red/green R/L......... red/blue R/W ....... red/white R/Y ........ red/yellow W/B ....... white/black W/G....... white/green W/Y ....... white/yellow Y/B ........ yellow/black Y/L......... yellow/blue Sb B/W G/R G/R COLOR CODE B ............black Br...........brown Ch ..........chocolate Dg..........dark green G............green Gy..........gray L ............blue O............orange P ............pink R ............red P O/R W A A B B Br G A L B/L L/R B/L B/Y B L/Y O/R P B/W Dg B/L B B W G/R A Sb L/Y W B/L Dg A L/R B Y/B L/Y S f B/Y B L Y Sb A R/G B/R G B B/L W/G R/Y A A T R/Y W/G L/R R R/G Sb Y/B B/R G/W G/Y OFF f B ` B ] R/Y W/Y Y L/R B/W — R/Y B B/Y W/Y R/Y Q Br A A A R/Y W/Y W/G Y L/R B L/Y B Br k Y/B Sb W Br Br/L Gy B/L (BLUE) (BLUE) B Br/R L L/B I D B B B H Gy J Gy Y L Y B — I B/L C v • B/L G B L/Y B Y B Gy G L W/R B/L F L G/W B (GREEN) (GREEN) B B l L/B B H B/L (BLACK) (BLACK) B (Option) B B B/L B B B Br/L E O R/B L/B 8 B/L B B B O L/R G/Y B n R/B B L L/R Sb L/Y B/Y Gy W W/R Y L/R R/B L/W L/B L/Y Sb B/Y B 0A L/W B L/B L/R Br/L L/Y R/W R/W K Gy B Gy B/L 1 2 3 4 5 6 7 8 9 0 A B C D E F G H I J K L M N O P Q R S T U V W X Y Z [ \ ] ^ a b c d e f g h i j k l m n o p q r s t u v Main switch Backup fuse (odometer) Rectifier/regulator Generator Battery Main fuse Starter relay Starter motor Relay unit Starting circuit cutoff relay Fuel pump relay Fuel pump Sidestand switch Fuel sender EXUP servomotor Throttle position sensor Ignitor unit Ignition coil Spark plug Pickup coil Neutral switch Speed sensor Temperature sender Meter assembly Fuel level indicator light Oil level warning light Neutral indicator light Tachometer Combination meter Coolant temperature meter High beam indicator light Turn signal indicator light Meter light Left handlebar switch Pass switch Dimmer switch Horn switch Horn Clutch switch Turn signal switch Turn signal relay Rear turn signal light Front turn signal light Headlight Auxiliary light Headlight relay Tail/brake light Radiator fan motor Thermo switch Radiator fan motor fuse Headlight fuse Signaling system fuse CYCLELOCK (option) Ignition fuse Oil level relay Oil level switch Rear brake light switch Right handlebar switch Front brake light switch Lights switch Engine stop switch Start switch