1
Installation
Model
and Operating
Numbers
I P42W34,
Guide
P42W34H
I PLASMATV
zenith
Warning
f
CAUTION
WA R N IN G"
TO REDUCE
THE
SERVICEABLE
RISK OF ELECTRIC
PARTS
INSIDE.
SHOCK
REFER
DO NOT REMOVE
TO QUALIFIED
COVER
SERVICE
(OR BACK).
NO USER
PERSONNEL.
the presence of uninsu_ated "dangerous
voffage _ wffhin the product's enclosure that may be of suffi=
The lightning flash with arrowhead
symbol, within an equi_atera_ triangle, is intended to aierf the user to
cier_ magnffude to constit_e
a dsk of electnc shock to persons.
The exclamation
importat_t
point within an equiiaterai
operating
and maintenance
tdangie
(servicing)
is intended
instructions
to aJerf the user to the presence
in the literature
accompanying
of
the appli-
ance.
WA R N IN G
TO PREVENT
FiRE OR SHOCK
NOTE TO CABLE/TV
This reminder
Code
DO NOT EXPOSE
THIS PRODUCT
TO RAIN OR MOISTURE
INSTALLER:
is provided to call
(U.S.A.)
ground
tical
HAZARDS,
The code
the CATV system
provides
shale be connected
gui_lines
to the grounding
instaJ_er's _ention
for proper
system
grounding
of the building
to Article
_d,
820-40
of the National
in particular,
specifies
Electric
that the cable
as dose to the point of the cable entry as prac-
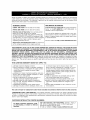
REGULATORY INFORMATION
This equipment
has been tested
15 of the FCC Rules
a residential
installed
installation
there
T]_is equipment
is no guarantee
harmfut
and on
and found to comply
interference
with the limits for a Class
limits are designed to provide reasonable
and used in accordance
However,
cause
These
generates,
with the instructions,
that interference
to radio or television
the user is encouraged
uses
radiate
may cause harmful
will not occur
reception
to try to correct
and can
B digffat device,
protection
against
radio
frequency
interference
in a particular
the interference
by one or more
the dealer
Any changes
user's
or an experienced
or modifications
authority
to oper_e
radio!TV
not expressly
technician
approved
of the following
the equipment
Corporation,
to modify
this product
modification
in any way wffhout
could
by the party
The responsible
p_y
for this product's
Zenith Electronics
Corporation
2000 Mil]brook Drive
Lincolnshire,
H 60069_ USA
Phone: 1-847-941-8000
2
Plasma
TV
written
void the user's
COMPLIANCE:
compliance
is:
off
is connected
for help,
responsible
for compliance
could
the equipment_
Una_horized
does
measures:
CAUTION:
Do not attempt
in
and_ if not
ff this equipment
by turning
- Reorient or relocate the receiving antenna,
- _ncrease the separation
between the equipment and receiver,
- Connect the equipment
into an out_et on a circuit different from that to which the receiver
- Consult
interference
energy
to radio communications
instatl_ion
which can be determined
pursuant to Part
harmful
a_horization
authority
from Zenith
to operate
Electronics
this product,
void the
Safety
Instru;_ions
Im_rtant
safeguards
for you
and your new product
Your product has been manufactured
and tested with your safety [n mind However, improper use can result in pctential electrical shock or fire hazards, To avoid defeating
the safeguards
that have been built into your new product, please read and
observe the fo{iowing safety points when installing and using your new product, and save them for future reference.
Observing
the simple
prece_ions
discussed
in this booklet
con help you get many
al] applicebie
U.S
safety
instructions
shouid
years of enjoyment
and safe
operation
that are bu#t into your new product
This product
Association_
1. Read
complies
with
Instructions
3. Retain
be read
Instructions
Al_ operating
should
be followed
instructions
shouJd be retained
for
4. Heed Warnings
A{_ w_nings
on the preduct
shou{d be adhered to.
and in the o_rating
instructions
of the
Canadian
Standards
Do not use attachments
not recommended
manufacturer
as they" may cause hazards.
by the product
or covered. Time openings
ing ti_e product on a bed
should never be blocked
sofa, rug, or other similar
by placsurface,
This product should not be placed in a built-in installation
such as a bookcase
or rack unless proper ventil_ion
is provided or the m_ufacturer's
instructions
have been adhered
to.
5, Cleaning
Unplug this product from the waJI outlet before cleaning. Do
not use liquid cleaners
or aeroso_ cleaners.
Use a damp
cloth for cleaning.
and Moisture
11, Power Sourc_
This product
should
operating
ment, or near a swimming
12, Power-Cord
pool
This
and Stands
Do not place this product on a slippery or tilted surface, or on
an un_able cart, stand, tdpod, bracket or table The product
may slide or falt causing serious injury to a child or adult,
and serious _mage
to the product,
Use only with a cart,
be operated
only from the type of power
source indicated on the marking label, tf you are not sure of
the type of _wer supply to your home consult your product
denier or local power company.
For products
intended to
operate from battery power, or other sources,
refer to the
Do not use this product near wa_er, for example, near a bath
tub, wash bowt kitchen sink, or laundry tub in a wet ba_e -
Carts,
those
Stets and openings in the c_inet
are provided for ventilation
and to ensure reliable operation of the product and to protect
it from overheating,
and these openings must not be blocked
|nat_ructions
7_ Acc_sorles,
and
10, Ventilation
and use instructions
The _fety
and operating
future reference
6. Water
requirements
9. Attaeh_nts
AlE time safety and operating
before the product is operated
2. Follow
Federa]
instructions.
product
Polarization
is equipped
with a three-wire
grounding
type
plug, a plug having a third (grounding)
pin. This plug wilt on_y
fit into the grounding4ype
power out_et. This is a _fety feao
ture, ff you are unable to insert the plug into the outlet, con_
tact your electrician
to replace your obsolete outlet, Do not
defeat the safety purpose of the grounding-type
plug.
stand tripod, bracket
or table recommended
by the manufacturer, or sold with the product. Any mounting of the product should follow the manufacturerts
instructions,
and shouid
l&
use a mounting
turer
likely to be walked on or pinched by _ems placed upon or
against them
paying particular attention to cords at p_ugs
accessory
recommended
& Transporting
Product
A product and cart combination
by the manufac-
convenience
the product,
should
CART
cords
should
receptacles
be routed
so that they are not
and the point where
they exff from
be moved with care
Quick stops, excessive force, and uneven
surfaces
cause the product and cart combination
to overturn,
t"_ORI'AB_
Power-C'._ord Protection
Power-supply
may
WARNING
(Continued
on next page)
Owner's
Manual
3
Safety
Instructions
Safety Instructions: continued
f
14, Outdoor
ff an outside
Antenna
antenna
Grounding
or cable system
19, _rvicing
is connected
te the
product:, be sure the antenna or cable system is grounded so
as to provide some pretection
against voltage surges and
buiLtoup static charges,
Cede (U,SA.)
ANSI/
Article 810 of the NafionaJ Electrical
NFPA 70 provides
information
with
Do not attempt to service this product yourself _ opening or
removing
covers may expose you to dangerous
voltage or
other hazards
Refer al_ servicing
to qualified service personnel.
regard to proper grounding of the mast and supporting structure, grounding
of the [eadoin wire to an antenna discharge
20, Damage Requiring SeP¢ice
Unplug this product from the waJ[ outlet and refer servidng
unit, size of grounding
conductors
location of antenna-discharge
unit, connection
to grounding
electrodes,
and
requirements
for the grounding
electrode,
qualified service personnel
under the following conditions:
a. ff the power-supply
cord or plug is damaged
b ff liquid has been spi_[ed_ or objects have fallen into the
c.
d.
Example of Grounding According to National
Electrical Code _nstructions
product
If the preduct has been expend
to rain or water.
If the product does not operate normally by feilowing
operating
instructions.
Adju_
only those controls
te
the
tllat are
covered
by the operating
instr_ctiens
as an improper
adjustment
of other controls may result in cLamage and
wilt often require extensive work by a qualified technician
_NEC
A_t _,
Cec_r_
or when _ is [eft unattended
to restore the product to its normal operation.
If the product has been dropped orthe cabinet
damaged.
f
ff the product
_)t
during a _ight o
and unused
exhibits
a distinct
change
has been
in performance,
21. Replacement
Parts
When replacement
parts are required
be sure the service
technidan
has used replacement
parts spedfied
by the man-
P_rt H)
NEC - Na:tional Electrical C_e
15, Lightning
For a_ed protection for this product (receiver)
Ring storm
8
e.
ufacturer
or have the same cha#actefistics
as the original
part Unautherized
substitutions
may resutt in fire, eiectric
shock or other h_ards.
for long
perieds of time unplug [t from the wa_l outlet and disconnect
the antenna or cabfe system,
This will prevent
damage
to the
product due to lightning and power-line
surges
22, £aJety Check
Upon completion
of any service or repairs to filis product,
ask the service technician te perform safety checks to determine that the product
is in proper operating
cond_ion.
16, Power Lines
An
eutside
vicinity
power
antenna
system
shoutd
not be
_ocated
of oved_ead
power lines or cther electric
circuits, or where it can fall into such power
in the
light or
_ines or
circuffs. When installing an outside antenna system, extreme
care should be taken to keep from touching such power lines
er circuits as contact with them might _ fatal
23, Wall
or Ceiling
Mounting
The product sheu[d be mounted to a wall or ceiling only as
recommended
by the manufacturer
The product may slide
or fail, causing sedeus injury, to a child or adult,
_mage
to the product.
and serious
24, Heat
17, Overloading
Do not overload
result
The
walt outlets
and extension
in a risk of fire or electric
cords as this can
shock,
18, Object: and Liquid Entry
Never push obits
of any kind
into this product
through
openings
as they may touch dangerous
voltage points or
short-out
parts that coutd resuff in a fire or e[ectdc shock.
Never spill liquid of any kind on the producL
4
Plasma
TV
product
should
be situated
such as radiators,
heat registers,
(including amplifiers)
that preduce
away
stoves,
heat
from
heat
sources
or oti_er products
Contents
Warnings
............................
Safety tnstrudions
.......................
Introduction
Controls
2
3"_4
.............................
Specia_ Menu Options
Key Lock
ISM Method
.........................
Low power
Caption!Text
7
Connection
Options
......................
Remote Control Key Fun_ions
............
8
9
VCR
Setup
13
14
DVD Setup .............................
DTV Setup .........................
Monitor Out Setup
...................
14
14
15
PC Setup
Operation
Turning
.........................
17
with Auto program..
,18
, .18
18
18
Picture Menu Options
APC (Auto Picture Control)
..........
Manual Picture Control
.................
Processing)
.....
AVL (Auto Vo{ume Leveler)
............
Manual Sound Control
..................
Stereo/SAP
Broadcasts
Setup
.............
Time Menu Options
Auto Clock Setup
.......................
29
29
29
External
Control
20
20
IR Code
(NEC format)
20
Troubleshooting
22
_d
atl external
video
operational
Setup
33._38
................
.......................
Checklist
39~40
...................
41 _42
...................................
................................
43
44
setup options.)
5 Turn video
and audio
Device
31 _32
Checklist
the TV and all accessories
2, Connect
30
30
30
20
Sleep
connection
30
Lock Menu Options
Lock Setup ....................
19
19
Specifications
and Operation
............
Sub Picture Size Adjustment
..........
Swapping the Double Window
...........
Selecting a Source for the Double Window
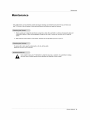
Maintenance
Setup and Operation
Checklist
(See pages 12~15 for available
1, Unpack
TV Program selection for PiP ...........
Selecting an Input Signal Source for P_P ....
PIP Aspect Ratio ....................
21
21
22
Setup
29
29
29
21
...........................
28
28
Swapping
P_P .........................
f/loving PIP .....................
Manuai Clock Setup
......................
On/Off Timer Setup
..................
Auto Off ...........................
Timer
27
27
.........
Double Window Setup Options
Watching the DouMe Window
19
19
Auto Color Temperature
Control
.............
Manual Color Temperature
Control
.........
......
P_P (Picture-in-Picture)
Feature
W,__chin g PtP ......................
Memorizing the Chan_ls
with Manu_at Program
Fine Tuning Adjustment
...............
Favorite Channe_ Memory
.............
Sound Menu Oplions
DASP (Digital Auto Sound
Selecting Wide VGA mode
Sp_it Zoom
.................
17
..............
Position
26
26
26
Screen Adjustments
.....................
27
Initializing
................................. 27
Luminance
Noise Reduction
...............
28
15_16
on the TV ......................
Menu Language Selection
Channel Menu Options
Memorizing
the Channels
Adjusting
Horizonta_/Verlical
Manual Configure
..............
13
Cable TV Setup
......................
E_ern_
A/V Source Setup
..................
25
Auto Adjustment
..................
Setting Picture Format
...................
Picture Size Zoom
...............
12~16
12
...........................
23
25
....................
.........................
Captions
.............................
Screen Menu Options
Installation
External Equipment
Connections
.........
Antenna Connection
..................
23
23
equipment,
see pages 13 - 15.
3 Install batteries in remote control,
source
6, Select viewing
See page 9,
equipment
source
on,
for the TV_
7_ Fine4une source image and _und
or as required by source.
See pages 19 _ 20,
See page 9,
to persona_ preference
4, Tum the TV on.
See page
17,
8. Additional features Setup
See Contents above,
After reading
this manual
keep it handy for future
reference,
Owner's
Manual
5
Introduction
What is a Plasma Display Panel (PDP)?
if voltage
instan_
is applied
to gas within g_ass panels
_ight is emitted,
160 ° - Wide
angle
A Plasma
range
Display
ultraviolet
flat Display
and fused
with a fluoreccent
substance,
At that
using this phenomenon,
of vision
Your flat panel plasma screen offers an exceptionaJly
dear and visible to viewers anywhere in the room.
Wide
rays are produced
is a next generation
broad
viewing
angle
°= over
160 degrees.
This means
that the display
is
_reen
The screen
of the Plasma
Display
is 42" so wide th_
your viewing
experience
is as if you are in a theater
Multimedia
Connect your plasma display 1o a PC and you can use it for conferencing,
feature allows you to view your PC and video images simultaneously,
games,
and internet browsing.
The Picture-in-Picture
Versatile
The light weight
The
and thin size makes
it easy to install your pl_ma
Manufacturing Process: Why
PDP
minute
colored
display
dots
in a variety
may
be
of locations
present
on the
where
PDP
conventional
TVs wil_ not
screen
The PDP (Plasma Display Pane[) whicl_ is the display device of this product is composed
of 0_9 _o Z2 million cem[s, A few ceil
defects will normaily occur in the PDP manufacturing
process. Several minute colored dots visible on the screen should _ acceptable. This also occurs in other PDP manufacturers
_ products and the tiny dots appearing
does not mean that this PDP is defective.
Thus a few ceif defects are not sufficient cause for the PDP to be exchanged
or returned. Our production technology
is designed
to minimize ceJ] defects during the manufacture
and operation of this product=
WARNING
TO
RAIN
6
REDUCE
OR
Plasma
THE
MOISTURE.
TV
RISK
OF
FIRE
AND
ELECTRIC
SHOCK,
DO
NOT
EXPOSE
THIS
PRODUCT
TO
Introduction
Main
Power
Button
Remote Control _nsor
Power Standby
Indicator
_l[uminates red in standby mode,
Illuminates
green when the TV is
turned on
MENU
INPUT
SELECT
Button
V, & Buttons
Button
VOLUME
(<,l_)
Buttons
Owner's
Manual
7
Introduction
3
4
5
R°°°°°° ooooi
_a
U_
m
8
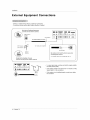
1. AI'_ENNA
INPUT
2, AV (EXPANDED)
Connection
9
PORT
or terrestrial
antenna
your
INPUT
Connection
for a second
11
RGB OUTPUT
out from external
equipment,
TV or monitor.
control to the remote
5, EXPANDED
OUTPUT
Connect the TV to the TV w_h the tuner
controt port
12. REMOTE
SPEAKER
(8 ohm
output)
8
Plasma
TV
connector
JACKS
jacks.
CONTROL
VIDEO input
AUDIO/VIDEO
8, Speaker
Interl_e)
INPUT/
INPUT JACKS
the TV output
priate input port.
INPUT
video device to these
remote
control
to the remote
control
box cable
7, RS_232C INPLFr (CONTROL;SERVICE)
PORT
Connect to tile RS-232C port on a PC,
Conned
connect
to the Tuner with the tuner box
INPUT/AUDIO
Connect your wired
port on ti_e TV,
Connect to optional external speaker(s)
For _rther information,
refer to 'Speaker
Stand' manual
8. DVI (Digital
Visual
RGB INPUT/AUDIO
display
a component
13. S-VIDEO
INPU_
Connect S-Video
6. EXTERNAL
14
INPUT
Connect the plasma
cable supplied,
Connect
Conn_
your wired remote
on the TV.
13
PORT
1% COMPONENT
CONTROL
12
"You can watch the RGB signal on anofl_er monitor,
RGB OUTPUT to another monffor's
PC input pert,
10, EXPANDED
for audio/vi_o
3. AV OUTPUT
4, REMOTE
10
9.
Connection for an over-the-air
cable TV wire or cable box
m_
t
!
from a PC to the appro-
Connect
jacks
14, POWER
out from
INPUT
audioNideo
CORD
an S-V_DEO
VCR to tile S =
JACKS
out from extema_ equipment
to these
SOCKET
This TV ope_es
on an AC power, The voffape is indicated
on the Speoific-3tions page. Never attempt to operate the
TV on DC power.
Introduction
Remote
-
When
Control
using the remote
Under certain
as necessary:
control
conditions
aim it at the remote
such
as if the remote
POWER
Switches
Key Functions
-.
the TV between ON _"\_
and STANDBY. "-,
control
sensor on tile TV.
JR signa_ is interrupted,
the remote
control
may not function.
INPUT
Press the key again
SELECT
Video _p_)
%
MULTIMEDIA.
Selects
source:
Adiusts
ComponenL
_B,
or "_
DVI mode,
the factory preset picture
according to the room
ARC
Changes
the picture
format.
PIP
Switches
the sub picture
Video, SoWdeo
Component,
RGB, or DVI mode
DASP
Selects
the sound
your viewing
_at, Music,
User,
appropriate
to
program character:
Movie,
Sports,
or
Sets the sleep timer.
DW (Double Window)
Sells
Double Window
mode_
on and off
PIP INPUT
SWAP
Exchanges
main and sub picture
Sells
the input source
tl_e sub picture.
mode for
images.
MENU
Displays on screen menus,
Exits the current menu,
MUTE
Switches
the sound
on or off
ENTER
CH _ / _ (Channel; button)
Selects the desired channel,
NUMBER
buttons
WIN, POSITION
Moves
fhe sub picture on the screen,
SPLIT
ZOOM
Enlarges
the picture
AUTO
PROGRAM
Selects
VOL _11 / _ (Volume bu_on)
Increases/decreases
sound level,
Adjusts
for availabJe
channels
see
page
18
MEMORY/ERASE
Memorizes
or erases setected
channet
menu settings
WIN, SIZE
Adjusts
Searches
menu options
the sub picture size.
ZOOM./ZOOM+
Enlarges
size,
or reduces
PIP OH A
_ec3s
the main picture
/_
the channel
for the sub
picture.
Sells
Control
CAMION
CAPTION
mode
VCR BUTTONS
some video cassette
recorders,
MTS
Selects
the MTS sound: Me_o,
Stereo,
or SAP.
FAV OH
Sells
favorite
channels.
• Open the battery compartment
cover on the back side and
insert the batteries with correct polarity.
• Instal_ two 1,5V batteries of AAA type, Don't mix used batteries
with new batteries,
Owner's
Manual
9
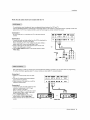
Instaflation
Instal
Ensure
that the following
purchased
accessories
are included
witl_ your TV
tf an acces_ry
is missing,
p_ease contact
the _er
where
the produd.
Owner's
Manual
Batteries
Dosub 15 pin Cable
BNC-RCA
Power Cord
Installation
Adapter
DVIoD Cable
Remote
Control
Tuner
Box Cable
Instructions
GROUNDING
Ensure
ele_ric
Power
Supply
that you connect the grounding
/ earth wire to prevent _ssible
shock, ff grounding
methods are not possible have a qualified
electrician
instai_ a separate
unit by connecting
circuit
it to telephone
breaker.
wires,
Do not try to ground
Figh_ening rods
the
or gas pipes_
Short-circuil
Breaker
10
Plasma
TV
you
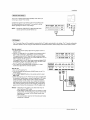
Installation
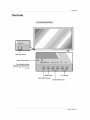
• The TV can _
instailed
• The TV i:s designed
in various
to be mounted
ways such as on a wall, or on a desktop
horizontally.
Tile
speakers
etc.
shown are optionat
For proper ve_i[ation,
aJlow a clearance of 4 '_on each
side and 2 _ from the wall Detailed installation
instructions are included in the optional Wa_l Mounting
Installation
and Setup Guide see your dealer,
Bracket
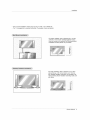
For proper ventilation
allow a clearance of 4" on each
side and the top 2.36 on the bottom, and 2" from the
waE Detailed installation instructions
are included inthe
optional Desktop
your dealer
Stand
Installation
and Setup
Guide
Ownet°s
Manual
see
11
Instaflation
Externa!
Antenna
Equipment
or Cabte Service
For optimum
without
picture quality,
adiust
a Cable
antenna
Connections
Box Connections
direction
if needed
f
Multi-family
,
DweltingsiApartments
ss_ ...............
,_,%_(C°nnect to wall antenna
socket)
RF Coaxial
i
_
Wire (75 ohm)
_
_
__
l
I
t
Turn clock a_ise to tighten.
U F F Antenna
VNF Antenna
B_onze Wi_e
Outdoor
Antenna
Be careful
connecting
not to bend the bronze
wire when
the antenna.
* RF ooaxial cable is nor included with 1he TV
Single4amily
DweBings/Houses
(Connect to wall jack for outdoor
antenna)
k._
•
In a poor signal area, purchase
for better picture quality.
•
If the antenna
Signal
-
12
Plasma
TV
j
Splitter"
tf the antenna
for assis_nce.
and install a signal
needs to be split for two TV, include
amplifier
a "2J_Vay
in the connections.
is not installed
properly,
contact
your dealer
Insla/lation
NOTE: Not all;cables shown are included with the TV.
-
To avoid picture
noise (interference)
leave
an adequate
distance
between
the VCR and TV,
Use the ISM Me{hod feature to avoid having a fixed image remain on the screen for a long period of time
picture from a VCR, if the 4:3 picture format is used the fixed image may remain visible on tile screen,
Connection
a frozen
still
1
_t VCR switch
number.
Connection
to 3 or 4 and then
tune TV to the same channel
2
®
1. Connect the audio and video cables from the VCR's output lacks to
the TV input jacks, as shown in tl_e figure.
When connecting the TV to VCR, match tile iack colors (Video =
yellow, Audio Left = white and Audio Right = red).
2. Insert a video t_e into the VCR and press PLAY on the VCR,
(Refer to the VCR owner's manual.)
3. Use the INP_
SELECT button on the remote control to select
Video
Typically
0 @@0
¢00
o
©
(Exp.).
VCR
° After
*
subscribing
For further
to a came TV service
information
regarding
Connection
1
1. Select 3 or 4 w_th channel switch
box.
2. Tune the TV channel to the _me
cable
from a local provider
TV service,
2
the audio
and installing
a converter,
your _ocal cable TV service
you can watch came TV programming.
provider(s).
on cable
selected
output channel of cable box.
3. Select channels at the cable box or w_h the
cable box remote control
Connection
1. Connect
contact
and video cables
®
o
_......
"° o
®
o
o
0
@@@ @@@ o
from the
cable box's output jacks to the TV input
jacks as shown in the figure.
When connecting the TV to cable box, match
the jack co_ors (Video = yellow, Audio Left =
white and Audio Right =red).
2. Use the |NPUT SELECT button on the
remote contro_ to select Video (Exp.).
3. Select channels wilh the cable box remote
control
or
Cable
Box
Owners
Manual
13
Installation
How to connect
Connect
the e_udioand video ceJNes from the external
equipment's
output
jacks to the TV input jacks, as sbown in the figure+
When connecting the TV to external equipment
ma_ch the iack colors
= yellow+ Audio
How
Left = white,
and Audio
(Video
_
O
O
O
® e oee
O
O
O
oee
O
e
Right = red)
to use
1. Use the _NPUT SELECT
2. Operate the corresponding
operating guide.
button
on the remote
external
control
equipment.
to select
Video (Exp.).
Refer to externa_ equipme_
Video Ga_
How
® •
OO@ OOO
to connect
1, Connect the DVD video outputs to the COMPONENT
iNPUT
jacks (Y, PB PR) and connect the DVD audio outputs to the
AUDiO iNPUT jacks.
2 ff your DVD only has an S-Video output jack, conne_ this to the
S-VIDEO input on the TV and connect the DVD audio outputs to
the AUD[O iNPUT jacks,
e
How
to use
1. Turn on the DVD player, insert a DVD
2. Use the INPUT SELECT button on the remote
Component
(if connected
to S-VIDEO_
control
_+
e
+
To watch digitally broadcast programs
purchase and connect a digita_ set4op box
This TV supports HDCP (High-bondwidfl_
DigffaJ
Contents Protection) protocol for D_
How
720p,1080i)
modes_
to connect
1. Use the TVs COMPONENT
(Y, P_, PR) HNPUT,
RGS, or DW jack for video conn_ions,
depending
on your set4op box connedor.
Then
make the corresponding
audio connections.
How
to use
1. Turn on the d[gitat set4op box (Refer to the
owner's manu_
for the digital set-top box.)
2. Use INPUT SELECT on the remote control to
_lect
Component,
RGB or DVL
Digital Set4op
14
Plasma
TV
box
to select
select the S-Video
DVD
(480p
Sei
"+ o o ;/
=,
,==
Inslalla#on
The TV has a spec_ai signal output capability
to hook up a second TV or monitor.
Connect
the second
TV or monitor
which allows
to the TV' AV OUTPUT.
rite Operating
Manual of the _cond
TV or monitor
detai_s regarding that device's input settings
NOTE:
-
* Component
RGB-PCiDTV
480pi720pi1080i
sources cannot be used for Monitor out,
you
See
for further
input
This TV provides
Plug and Play capability;
meaning that the PC adjusts automaticai[y
to its settings, The TV sends configuration
inform_ion
(EDtD) to the PC using the Video Electronics
Standard Association
(VESA) Display Data Channel (DDC) protocol.
How to connect
1. To get the best picture qua_ity_ adjust the PC graphics card to a
640x480, 60Hz,
2. Use the TWs RGB iNPUT or DW (Digita_ Visua_ Ir4erface) INPUT
port for video connections
depending on your PC connector.
If the graphic card on the PC does not o_put anatog and digital
RGB simultan_usly
connect only one of both RGB iNPUT
INPUT to dispray the PC on the TV.
or DVI
®
•
000
O@O
@ _
I
If the graphic card on the PC does output analog and dig_a] RGB
simuffaneous[y,
set the TV to either RGB or DW: (the other mode
is set to Plug and Piny automatically
by the TV,)
3. Then_ make the corres_nding
audio connections
sound card, adjust the PC sound as required,
How
ff using a
,
'
i ....
to use
1. Turn on the PC and the TV.
2 Turn on the display by pressing the POWER button on the TV's
remote control
3, Use the INPUT SELECT button on the remote control to se[eot
RGB or DVI,
4_ Check the image on your TV. There may be noise ass_iated
with
the resolution,
verticat pa_ern, cor_rast or brightness
in PC mode,
ff noise is present, change the PC mode to another resolution
change the refresh rate to another rate or adjust ti_e brightness
and contrast on the menu until the picture is dear, if the refresh
rate of the PC graphic card can not be changed, change the PC
graphic card or consult the manufacturer
of the PC graphic card
NOTES:
• Depending on the graphics card DOS mode may not
work if you use a DVi-I cabie.
• Avoid keeping a fixed image on the TV's screen for a long
period of time The fixed image may become permanently
imprinted on the screen Use the Orbiter screen saver
when _ssible.
• The synchronization
input form for Horizontal and Vertical
frequendes
is separate,
Owners
Manual
15
Installation
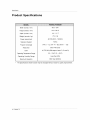
Monitor Display Specifications (RGB-PC/DVI-PC
Resolution
Horizontal
Frequency(KHz)
Vertical
Frequency(Hz)
Mode)
Resolution
Horizontal
Frequency(KHz)
Vertical
Frequency(Hz)
31.468
70.09
35.156
56.25
37.861
85.08
37.879
60.31
31.469
70.08
48.077
72.18
37.927
85.03
46.875
75.00
31.469
59.94
53.674
85.06
35.000
66.66
49.725
74.55
37.861
72.80
48.363
60.00
37.500
75.00
56.476
70.06
43.269
85.00
60.023
75.02
31.500
60.00
54.348
60.05
35.00
70.00
63.995
70.01
37.500
75.00
67.500
75.00
31.500
60.00
1152x870
63.681
75.06
35.000
70.00
1280x960
60.000
60.00
37.500
75.00
1280x1024
63.981
60.02
840x350
800x600
720×400
832x624
640x480
848x480
852x480
16
Plasma
iV
1024x768
1152x864
Operation
Turning
1_ Connect
on the TV
power
cord correctly.
2, Press the (_) ON/OFF
SELECT, A iV
Number
button
button on time TV, At this moment
1. If the TV was turned
off with the
• Press the O ON/OFF
button
2, If the TV was turned
oft
•
the TV is switched
button on the _,./or press the POWER, INPUT
on time remote controt to switch the TV on.
O ON/OFF
button
on the TV to turn the _
with the remote
control
SELECT
to sta#dby
MULTIMEDIA
mode,
Press the INPUT
OH (,L !f),
FAV OH
on the TV
on,
and the
OONiOFF
button
on the TV
Press the (DON/OFF
button on the TV and then press the INPUT SELECT
button on the TV. Or, on
the remote control press either POWER
INPUT SELECT
MULTIMEDIA,
CH (A t V), FAV CH,
Number to turn the TV on
• CAUTION
If you connect
or disconnect
the Tuner
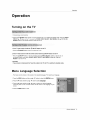
Language
-
The menus can be shown on the screen
1, Press the MENU
button
and then
Box cable
to the TV, the TV is switched
to standby
_e,
Selection
in the selected
use A / V button
Janguage
First select
to select the _I_C_L
your language
menu,
2. Press the !_ button and then use A / V button to select Lengt_ge
3. Press the I_ button and then use A / Y button to select your desired language.
From this point on, the on-screen
menus wiJt be shown in the language
of your
choice.
4. Press the MENU
button
to save,
Ownet°s
Manual
17
Operation
C hanne ! Me nu
Auto Programming
is used to memorize aiI the active channeis in your area before you can use the TV.
_ere are two ways of storing channels in the Tuner's memory. You can use either.
One is called AUTO PROGRAM and the other is ca_ied MANUAL PROGRAM.
In AUTO
channels
-
PROGRAM
mode, the TV will memonze the channels in ascending
numerical order. [[there are additional
you want to add or deiete, you can manually add or delete those channels with Manual Program
Redo Auto Program if the TV is ever moved to another location.
Auto Program wi_[ onty operate with the ANT. connected
If channels numbers for broadcast over-the air TV and cable TV are duplicated
where different channets have the _me
number, press the same number buttons
again to toggie
I
between:
Broa astTV
Chaonels
: (For example,
ed channeL)
[ Cab eTV
Channels
1
press 17 to go to the channel,
1. Press the A.PR_
AUTO PROGRAM
press
17 again to go to the dup[icat _
button and then pre_ the I_ b_ton.
starts the channet search.
If you want to stop auto programming,
press the ENTER button. _ty the channels searched
• You can also select the Auto program
option and de a channe_ search in the CHANNEL
You can memorize
or erase channeJs
1
U_
the ,I[I,/ V or NUMBER
2
Press the MEMORY!ERASE
3. Use the MEMORY/ERASE
4. Press the ENTER
adjusts
1. Press the MENU
2
manua4_y.
to select
the channel
number
button
to select
IMtemory
progrema
with the C_NN"=_,
the pictures stability
button
and condition
menu_
when
and then use A ,,V button to select
it is poor,
the CHANh_
and then use & iV button
to setect Memu_
and then use _11/ I_ button
to select
the A iV button
5. Press the ENTER
to adjust the picture
button
button
and then
and then
3
Press the I_ button and then use ,_, iV button
tion.
5. Repeat
use A/V
to set the desired
steps 3 to 4 to memodze
the ENTER
button
that lets you quickty scan up to 5 channels
all the in-between
cI_annels.
use ,L _V button
Press the I_ button
6. Press
ptogrem't,
Fine.
to your preference,
2
4. Use the _1 / I1_button
menu
to save.
Favorite channe_ memory is a convenient feature
without having to wait for the TV to scan through
1 Press the MENU
other
button
to select
the CHANN_
to select Favorite
to _ect
the first favorite
channel
number
favorffe
channets.
menu.
ch,.
channel
for first favorite
Plasma
TV
posi-
channel.
to save
• To tune to a favorite channel, press the FAV OH (Favorite channel) b_on
edly, The five favorite channels appear on the screen in numerical or_r.
18
or erase,
or _¢tse,
Press the I_ button
U_
you want to memorize
button,
3. Press the I_ button
4
time are memorized.
button.
• You can also do Manual
This function
buttons
up to th_
menu.
repeat-
of your choice
Operation
Menu Options
-
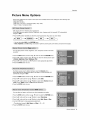
Picture menu adjustment
sour_
as preferred
we unique
to each input source.
, RGB (PC) / DVI (PC)
, RGB (DTV) / DVl (DTV) / Component
, Video/SWideo
/ Component
(480i)
(480p
720p
repeatedly
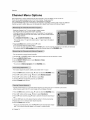
Picture
menu settings
color,
to selec_ tile picture
sharpness
appearance
and tint) manually,
setup option
* _,
-
OptLrtlum_
You can adjust
you prefer.
picture
1. Press the MENU
2. Press
(Co_
contrast,
b_on
brightness
4 Press the ENTER
-q
color,
for optimum
sharpness
and then use A / V button
and then use _11/ I_ button
button
to select
picture quality
the PICTURE
to setect the desired
to make
changes
1. Press the MENU
-
You can adjust
appropriate
and then use ,l=/'V'
button
use & _,'_' button
to select
to select
adjustments.
button
and btue to _y
the PIC_E
menu.
_¢
color temperature
(Defau_),
3. Press the II_ button
and then use ,t, ,_V button to select
4. Use the _11/l_-button
to make
appropriate
range for Red,, Gree_,
button
you prefer.
and then use & ,,V button to select the PItCTURZ
and then use & / V button
, The adjustment
ACC
bl-¢_on to save.
2. Press the I_ button
5. Press the ENTER
option
to save.
and then
red, green
1. Press the MENU
be changed.
menu.
picture
3, Press the I_ button and then use A ,'T button to select either Ne_c_
Cool (Preset) Warm
(Preset) or User (Manual Adjustment).
4, Press the ENTER
and cannot
to User.
button
2. Press the I_ b_ton
at the factory
and tint to the _eve[s
To initialize values (reset to default settings), select the Normal
option.
When a_usting
color temperature
options (red, green, or blue) manually
aulomaticaJIy
be_ow.
menu.
are preset
the I_ button and then use A / V button
Brightness
Color, _ttarpness
_t)
3. Press the i_ button
-
in the PICTURE
and Son settings
input
APC automatically
as shown
Cso,
, You can a_so adjust APC
for each following
10801)
APC adjusts the TV for the best picture appearance,
When adjusting picture options (contrast
brightness,
changes to User,
1. Press the APC button
Readjust
to select
menu.
Color letup
Red,
Green
or Blue.
adiustments.
and l_',le
is -20 _ +20.
to save.
Ownet°s
Manual
19
Operation
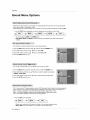
Me nu 0 pt io ns
-
DASP lets you enjoy the best sound wffhout any special adjustment
sound option based on the program content,
o When adjusting sound options (treble, bass, and balance) manually,
1. Press the DASP
button
repeatedly
to select
the appropriate
because
DASP
sound
the TV has time appropnate
automatically
setup as shown
changes
to !]set.
below,
l- 7
• You can Nso
• _,
Music,
adjust D_P
in the ,_UND
menu,
Movie and 5pOrtS are preset for good sound quality
at the factory
and cannot
be
changed.
AVL maintains
an equal
1. Press the MENU
2
button
volume
level
and then
even if you change
use A/V
Press the I1_ button
and then
use &/V
3. Press the i_ button
and then
use A IV button
4. Press the ENTER
You can adjust
button
button to select
button
4 Press the ENTER
to set_
bass
and then
_d
balance
On or _.
use ,&/V
to the levels
button
to set_
to select
and then use _11fll,, button to make
button
menu,
to setect A11,'_,
the I_ button and then use A .t V button
"l_eble Bass).
3. Press time I1_ button
time 5OUND
to save,
sound treble,
1, Press the MENU
2. Press
(_,
button
channels
you prefer.
the $OUN:ID menu.
the desired
appropriate
sound
option
adjustments
to save
The TV can receive MTS stereo prog_ms and any SAP (S_ondary
Audio Program) that accompanies
time
stereo program
_ the system to be transmitted
one additional sound signaf as well as the origina_ one.
Mono : The p_imasy language is heard from left and right s_kers.
Signal mode is mono.
Stereo : The primary language is heard from left and right speakers
Signal mode is stereo
SAP : The secon_ry
I_guage
is heard from left _d right speakers
1. Press the MTS button
• Select
mono sound
• Stereo,
20
Plasma
TV
repeatedly
mode if the signaE is not dear
SAP mode are avaiJaMe
only if included
or in poor signat reception
on the broadcast
signal,
areas.
Operation
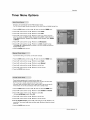
Timer
-
Menu
The time is set automatically
from the PBS broadcast signal
The PBS channel signaJ includes information
for the correct time _d
1 Press the MENU
button
and then
use & / V b_on
to select
the _E1R
2. Press the i1_ button
and then use A/V
button
to select
Cle.'J{.
3. Press the I_ button
and then use A zV button
to select
Auto.
4
saving time
menu.
Press the I_ button and then use A/V
button to select your viewing area time
zone. "four choices are: ES.T, (Eastern Standard Time), CST. (Central Standard
Time), MS.T
(Mountain
Standard 3qme), P$.T. (Pacific Standard Time), Alaska,
or H_e_].
5. Press the I1_ button
and then use A fV button
6
Press the 11_button and then use A zV button
3]me) A'JIo, _,
or _t_ depending on whether
Daylight Savings _me,
7
Press the ENTER
o If current
button
button
to set _
c_,._1_
to set D.,&T. (Daylight Savings
or not your viewing area observes
to _ve.
time -._etting is not correct
1. Press the MENU
and then
set the dock
use A/V
b_on
to select
the _
and then use AtT
3. Press the I1_ button
and then use A _1' button
to select
4. Press the I_ button
and then use A V
button
to set the hour.
5, Press the I_ button
and then use A/V
button
to set the minutes
6_ Press the ENTER
button
button
manu_ly.
2, Press the I_ button
-
daylight
menu.
to setect _.
M_I.
to save.
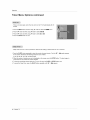
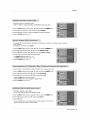
Timer function operates onJy if current time has been set.
OffoT_mer function overrides On-Timer function if they are set to the same time.
The TV must be in standby mode for the On _mer to work
If you _n't
press any button within 2 hours after turning on the set wffh the On
Timer function the set will automatically
switch back to standby mode.
1, Press the MENU
button
and then use A/V
button
to select the T_
2. Press the I_ b_._ton and then use A _Y button
to select
_
3
to select
On.
Press the I1_ bt_tton and then use _ / _ button
• To cancel Or_'Of_ t_c, er function select Of L
4. Press the I_ b_ton
5, Press the I_ b_tton
6. For only On tL_er
so_nd level
at turmon,
Then
7, Press the ENTER
timer
and then use ,L /'_' button
to set the hoar.
and then use A / Y button
to set the minutes.
function;
Press the I_ b_tton
press the II_ button and then u_
b_ton
and then
menu.
or On _%
use A / _ button
to set
& _V button to select the channel
to save
Owners
Manual
21
Operation
Timer
Menu Options
If there is no input signal
minutes.
1. Press the MENU
button
continued
Auto off can be set to turn the TV off autom_ical_y
and then
use A/V
button to select
the T_ER
2_ Press the I_ bulton and then use A / V button to sew
AutooZf
3. Press the I_ butten and then use A / V bt_on
On or Off
4
Press the ENTER
button
button
repeatedly
to select
followed
by the following
10, 20, 30 60
90, 120, 180, and 240 minutes
2. When the number of minutes
count down from the number
To check the remaining
4
To cancel
22
time. Note that this setting
on the screen,
3
Plasma
the humor
before
of preset
is cleared
minutes
when the TV is turned
First time _--
_n
off.
option
appears
sleep timer turn off times:
you wan_ is displayed
of minutes selected
minutes
the Sleep _mer,
TV
menu.
to save
Steep Timer turns time TV off at a preset
1. Press the SLEEP
to sew
after 10
the TV turns
press time SLEEP
button
on the screen,
press
off, press the SLEEP
repeatedly
until _--
the ENTER
or ENTER
M_
button. The timer begins
button
appears.
once.
to
Operation
Menu Options
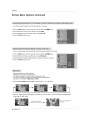
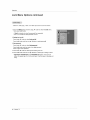
- The TV can be set up so that it can only be used w_th the remote control
- This feature can be used to prevent unauthorized
viewing by locking out the front pane_ controls_
o This TV is programmed
to remember which option it was last set to even if you turn the TV off,
1. Press the MENtJ
bu_ton and then
2. Press the I_ button
3
Press the I_ button
4
Press the ENTER
use A / V
-
to seled
and then use A/V
button
to select On or Hf,
button
menu
Key leek
to save,
on the front panel
_Z_ Key ],',,_k' appears
on the screen
if any
is pressed.
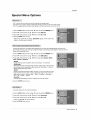
A frozen still picture from a PC/video game displayed on the screen for prolonged
ghost image remaining
even when you change the image. Avoid allowing a fixed
screen for a tong period of time.
1. Press the MENU
2
the SPECIAL
button
• Witl_ the KEY LOCK ON, the display
button
bb_tton to select
and then use A tV
button
Press time I1_ button
and then
use A / V
and then use A ,_V button
3, Press the I_ button and then use A i V button
wash,
Orbiter
or Inversion
button to select
to seted
_
the SPECIAL
periods will result in
image to remain on the TV's
menu.
_n4;xf,
to select either Normal,
_Jte
• Normal
If image sticking
• White
wash
is never a problem
ISM is not necessary
_ set to Normal.
White Wash removes permanent
images from the screen Note An excessive permanent image may be impossibJe to clear entirely with White Wash
To return to
normal viewing,
• Orbiter
Orbiter
press the any button
may hetp prevent
ghost
images
However_ it is best net to a_mowany fixed
image to remain on the screen To avoid a permanent
image on the screen
image will move every 1 minutes: Right -:_ Right =_ Downside => Downside
Left --> Left --_ Upside --> Upside.
• Inversion
Inversion
will automatically
4. Press the ENTER
-
Low power
button
reduces
1 Press the MENU
bu_on
3. Press the I_ button
you select
4, Press the ENTER
30 minutes,
to save.
the TV power
2. Press the I_ button
• When
invert the TV panel color every
the
=>
and then
consumption.
use A / V button to select
the SPEC_L
and then use ,Ik tV
button
to selec_ _)w_we,t.
and then use ,&/V
button
to select On or C_;[
menu
On, the screen darkens
button
to save,
Ownet°s
Manual
23
Operation
Special
Menu Options
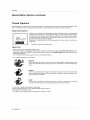
Closed
Captions
continued
C_osed captioning is a process which converts the audio portion of a television program into written words wi_ich then appear
titles on the television screen Closed captions allow viewers to read tile dialogue and n_ration
of television progr_s.
as sub-
Using Closed Captions
Captions are the subtffles of the dialogue
and narration of television programs,
For prerecorded
programs, program diatogue can be arranged into captions in advance.
Its possible to caption a
live program by using a process called reaFtime captioning
which creates captions instantly.
ReaI4ime captioning
is normally done by professional
reporters using a machine shorthand
system and computer for translation
into English.
Captioning
is _ effective system for the hearing-impaired,
and it can also aid in tead-lirtg tan°
guage skills.
•
Tile picture
at left shows a typical
caption.
Caption Tips
Not a_l TV broadcasts
include dosed caption signals.
Sometimes
TV stations broadcast four different caption signals on tile same channel.
By selecting
choose which signal you view. CC l is usually the signal with the captions, wile
Another
mode
programming
information
Your TV might not receive caption signals normally in the following situations.
1. Poor reception
conditions
YTem
might
¢¢ ! to ¢¢ 4, you can
show demonstration
or
are encountered:
IGNITION:
Picture may flutter, drift
ference from automobile
ances.
suffer from black spots, or Ilodzontal
streaking. Usually caused by interignition systems,
neon I_ps
electrical
ddlls, and other electrical appli-
GHOSTS:
Ghosts are caused when the TV signal splits and follows
other is reflected off t,all buitdings,
hi}Is or other obiects.
antenna may improve reception
two paths. One is the direct path and the
Changing the direction or position of the
SNOW:
If your receiver is }ocated at the we_,
fringe area of a TV signal your picture may be marred
small dots. tt may be necessary
to instat_ a special antenna to improve the picture.
2.
3.
4
5.
24
An old, bad, or illegally recorded tape is being played
Strong, random signals from a car or airplane interfere with file TV signal
The signal from the antenna is weak
Tile program wasn't: captioned
when it was produced, transmilted,
or taped.
Plasma
TV
by
Operation
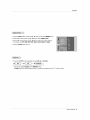
1, Press the MENU
button
2, Press the I_ button
and then
use A / V
and then use A tV
b_on
button
to select
the SPECIAL
menu,
to setect Caption/Text
3, Press the I_ button and then use A _V button to setect your caption selection.
Your choices are: CC], CC2, _3
C_
Text 1, Text2
Text3 _nd Text4,
4
Press the ENTER
1_ Press the CAPTION
button
to save_
button
relatedly
to select
Off
On
or _
• You can atso adiust CapUons
in the SPECLAL menu,
• _ mute shows the selected captions option (if avaiiabge
mute
on program)
when the TV sound
is muted.
Owners
Manual
25
Operation
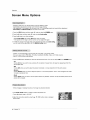
Screen
-
Menu Options
RGB (PC) mode only; This function doesn't work for RGB-DTV
mode.
Automatically
adjusts picture position and minimizes image shaking
After adjustment
if the image is sti_[ not correct, your TV is functioning
Auto ¢edrJlg, and _u_cerd_,
are not active in DVI mode.
1. Press the MENU
button
and tllen
use A _V
button to select
propedy
the _
but needs further
adjustment
menu.
2. Press the I_ button and then use & / V button to select Auto cotl_lg,.
& Press _be i_ button
to run Auto configure.
• When Auto _8,
has finished, OK witU be shown on screen,
• If the position of the image is still not correct, try Auto adjustment
again.
4. Jn RGB (PC) mode_ if the image needs to bie adjusted more after using Auto m_r_,,
you _n make further adjustments
w_h the M_rmu_ ¢o_g,
option
Caution: If a 4:3 fixed image is on the screen for a long time, it may remain visible.
Set every aspect ratio for RGB 480p.. DVI 480p, Component
480i/480p, 'Video, and SoVideo sources_
Use 4:3, or I6:9 for other input sources.
1. Press the ARC
button
repeatedly
1o select the desired
picture format
You can also adjust ARC
in the $CR_
menu.
• 4:3
- Choose 4:3when you want to ,view a picture
left and right sides.
with an originat
4:3 aspect
ratio, with gray bars appearing
at both the
• 16_9
° Choose
16,,9 when
you
want
to adjust
the picture
horizontal_y_
in a _inear proportion
to ill[ the entire
screen.
• Horizon
Choose
to cre_e
when
Horizon
a spectacul_
you want to adiust the picture
in a non4inear
proportion,
° Choose Zoom when you want to view the picture
picture will be cropp_
without
any a_teration.
However,
tu
o When
enlarging
or reducing
1. Use ZOOM+/ZOOM, Zoom adjustment
button
range
2. Adjust the main picture
picture mode
26
Plasma
TV
that is more
enlarged
at both sides
view.
the picture,
to enlarge
the image
or reduce
may become
the picture
distorted.
size.
is 100~300.
position
using the A / V/41
/ I_ buttons
while
in enlarged
the top and bottom
portions
of the
Operation
° This function works in the fo_[owing mode:
RGB-PC
RGB-DTV
(480p,720p
1080i) COMPONENT
1. Press the MENU
button
and then use & / T
button
(480p,720p
to select
1080i).
the SC]_N
2. Press the I_ button
and then use A i V bt_lton to select
3. Press the I_ b_ton
and then use A ,'V _4,1_ll_button to adjust the position.
4. Press the ENTER
-
button
the screen
1, Press the MENU
after auto adjustme_
size, adjust
button
Position,
to save.
if the image stiil isnt dear
Phase manualiy.
o To correct
and then
and espedaJ_y if characters
use A / V
b_on
to select
the _PJ_
and then use A _ V button to select Mem_uafl co_tg,.
3. Press the I_ button
and then use A/T
• The Phase
• The Clock
adjustment
adjustment
5. Press the ENTER
°
to make
Use this fundion
_tton
appropriate
to to select
Phase
to _ve,
to correct
bt._on
j_ttering or picture
and then
use &
instability while
V b_ton
to select
and then use A/V
button to select Screen
3. Press the I_ button
and then use A/V
button to sel_
the VCR option if watching
a VCR.
the 'rV option for other equipment.
4. Press the ENTER
button
1 Press the MENU
button
(Except
_
viewing
a video tape,
the SCP_!_I
menu,
adJ,
or VCR
VCR)
to save,
- This function operates in every mode,
- Use the Reset option to initialize the adjusted
2. Press the I_ button _d
or Clock
adiustments.
2. Press the I_ button
• _lect
• _ect
menu,
range is 0 _ 31,
range is -50 _- ÷5&
button
1 Press the MENU
are stilJ .iitter¥ adiust the picture
CI_.
2. Press the I1_button
4. Use the 41 / I_ button
menu.
and then
then u_
use & ,,V
_/V
settings
bu4ton to select
the ._CR_
menu.
button to select Re_.
3, Press the I_ button,
• You can initialize Zoom inio_, Manual config
Position
position and sub picture size for double window,
Sprit zoom, PiP size, PIP
Owners
Manual
27
Opera#on
Screen
continued
Menu Options
Use YNR to reduce
1, Press the MENU
the picture
button
2. Press the I_ button
noise that may @pear
and then
use _i, _II'
and then use ,I, _V button
on the screen,
button to select
the _i!_
menu.
to select YNR
& Press the I_ button and tllen use A _V button to select On or
4. Press the ENTER
To see a normal
button
picture,
1. Press the MENU
button
to save.
match
tile resolution
of RGB mode and selection
and then use ,& / Y button
to select
2
Press the I_ button and then use ,I. /V
button to select V_
3
Press the I_ button
and then
button to select
4
Press the E_ER
button
u_
&/T
the SCRE_
of VGA mo_,
menu,
mode.
the _sired
VGA resolution,
to save,
EnJarges the picture in co_ect proportions
Split Zoom c_ be used for all input sources.
In 2-Split Zoom mode you can only move the image up or down,
if an image is en_argod a section can be viewed without using Split Zoom
Split Zoom is not available if OSD rotate is rotale,
1, Press the SPL_
2. Press the number
ZOOM
button
button
repeatedly
corresponding
to select
either 2, 4, or 9 Split Zoom
to the section
you wish to enlarge.
You can move within the enlarged
picture
using the A _V/_11 _ I_ button,
Exam#e of choking
28
Plasma
TV
5,
Sect on 5 s er_rged to fill
the _reen.
Operation
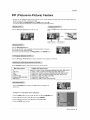
PIP: (Picture-In-Picture)Feature
-
PIP Jets you view 2 different
-
the other source will show a smaller inset image_
PIP is not avail_e
if the lock on/off option in LOCK menu is set to On
You can atso adjust the PiP features in the PJP!DW menu (Except Swap function).
Press the PIP button
inputs
repeatedly
pictures
(sources)
on your
monitor
screen
at the same
Press the SWAP
tures
to turn PIP on or off,
button
Main Picture
Press the WIN.POSITION
Use the PIP INPUT
Main
Picture
One source
to exchange
/ Sub Picture
wilJ be large
and
the main and sub pic-
I
button,
Press the A sV/41 /I_ button re_atedJy
until desired
The sub picture moves up/down/lefllright,
You can also move the P_P posffion with Win.posi_on
Press the PIP CH A/
time
PIP OH V button
button
to select
Source
Available
is achieved.
inthe PIP/DW
a channel
to select the input source
TV
position
menu.
for the sub picture
in PiP mode.
for the sub picture.
Sub Picture
Sources
Video _Exp.)_ V!deo, s-video,
€omj)onent
480i/480_0r_/1080i,
RGB and DVI
.......
Y!#_ !#_) .......................................................................................................
_YL...............................................................
......
V!deo.....................................................................................................................................
.................
S-Video
TV, Video (Exp,). V!d_ _C£mpone_
480i480£t[Z20p/!080i
BGB ane D'_!!.........................................
......
£0mpon_
_80! ..........................................................................
_ _!_£
(_e
_v!_._!_£
..............................................................................................................................................................
Com_pon_.480p_{Z20p/l£80i
TV, Video {Exp )__V!de 9 an# S-_#!de£ ..................................
RG8 and DV_
TV, Video (Exp.), Video, SoVideo, Component
480i
-
Press the WIN.SIZE
picture size,
-
To watch
4:3
button
and then use _11/ I_ button
or 16:9 aspect
1_ Press the MENU
2, Press the I_ button
button
to change
the sub
ratio for sub picture
and then
use A _Y
and then use a, V
b_tton to select
the PIP/DW
menu.
bLr_on to select _A_.
3. Press the I_ button
and then use & .,V button to select
4. Press the ENTER
button
4.*3 or 1_=9
to save,
Ownet°s
Manual
29
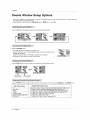
Operation
Double
Window
Setup
Options
As the name suggests_ this mode splits tile screen into 2_ allowing
time. Each source is given half the screen
Double Window is not available if the lock on/off option in LOCK
Press the DW button
Press
repeatedly
the WIN,SIZE
to select
one of ti_e Double
Window
2 picture
_urces
to be shown on the TV screen at the same
menu is set to On,
options.
button,
• Use the _11/ I_ button
to change
the sub picture
size,
• Using the Win size Unction in Double Window mode, main and sub picture sizes are
changed simultaneously.
Using the Win.size function in PIP mode, sub picture size is changed
• Win position is not functional
in Double Window mode
Use the SWAP
button
[ Main Picture
Use the PiP iNPUT
Main
Picture
to switch
I
the main and sub pi_ures
I Sub Picture
Window
mode.
]
bu4ton to select the input source
_urce
in Double
Available
for the sub picture, You can also _ect
Sub Picture
PIP Input
in the PIP/DW
menu,
Sources
video(E×p_
Component
480i
RG8 and DVI
30
Plasma
TV
.............
TV Video
......................................................................................................................................................
(Exp,),
Video,
SoVideo, Component
480i
Operation
Lock Menu Options
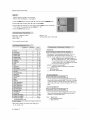
Parenta_ Controt can be used to block specific channels,
ratings and other viewing
The password will be required to gain access to Parental Control
sources.
Ttle Parental Control Function (V-Chip) is used to block program viewing ba_d
on the ratings sent by tile broadcasting
station.
The default setting is to allow art programs to be viewad
Viewing can be blocked by the type of program and by the categories
chosen to be bfocked It is _so possible to block all program viewing for a time perod. To use this function, the following must be
set :
1. Ratings and categories
2. Specifying
a password
3 Enabling the lock
V-Chip
rating
to be blocked.
and categories
Rating guidelines are provided by broa_asting
stations. Most television programs
R_ing and/or individual Categories.
Movies that llave been shown at the the_ers
System (MPAA) only.
For Movies
previously
Movie Ratings
Blocking off
G
PG
PGo13
R
NC-17
X
(genera[ audience)
(parental guidance suggested)
(13 years and up)
(restricted)
(18 years and up)
(aduff)
and Above : G and PG movies will be available,
programs
General TV Ratings
• Blocking off
• TV-G
• TVoPG
• TV-14
• TV-MA
Children
in theaters;
:
ff you set PG-13
For Television
shown
including
made4or=TV
TV Ratings
R NC_17 and X wi# be b[ocked_
categories
do not apply)
;
(youth)
(youth,
(individu_
_ntent
7 years and up)
• Language
- adult _anguage
• Sex scenes o sexual situations
, Violence
- fantasy
violence
• No Rating
(applies
(applies
(applies
(applies
(applies
c_egories
do not apply)
to TV-PG, TV-14)
to TV-PG, TV_14, TV-MA)
to TVo PG, TV- 14, TV-M A)
to TV-PG, TV-14, TV-MA)
only to TV-Y7)
(blocks a]l viewing)
Aux, Block Ratings
• Video (ExF)
;
• Video
• SoVideo
Canadian
PGq3,
:
(generai audience) (individual
(parental guidance suggested)
(i4 years and up)
(mature audience)
Content
Categorl_
:
• Dialog - sexual dialogue
For
movi_
;
• B_ocking off
• TV-Y
• TV-Y7
• F Violence
and television movies can be btocked by TV
or direct4o-video
movies use the Movie Rating
English!French
Canadian
• C
• C8+
• G
• PG
• 14+
• 18+
English
Canadian
" G
,8 ans+
o 13 ans+
• 16 ans+
, 18 ans+
French
language
language
(Blocking
On/off)
(Blocking
(Blocking
On/off)
On/off)
language
rating
system:
rating system;
(Children)
(8 years and up)
(Generat programming
Suitable
(Parental guidance suggested)
(Viewer 14 years and up)
(Aduff programming)
for aft audiences.)
rating system;
(General)
(8 years and up)
(13 years and up)
(16 years and up)
(Aduits only)
Owners
Manual
31
Operation
Lock Menu Options
Se_ed TV, Video (ExF)
1. Press the MENU
Then,
Video,
button
continued
or S-video
and then
input source to use this function.
use ,i,/T
button to se[ed
the Lock
menu,
press the I_ button,
• if Lock is already set, enter the password then requested.
• The TV is set wffh the instal password "0_0-0-0 '_
2. S_ting
lock on/off:
Press the A V
button to select
Press the I_ button
_
on/oil
and then use A _V button
to sel_
on or off
3. Set password:
Press the A .,'V button to select
Set _sword
Press the I_ button and then enter
Enter it again when requested.
4. Press the & _V
button to select
5. Press the i_ button
a four digit password,
type of blocking
and then use A/V
button
to be set_
to select type of ratings to block
• Age block
Content
block
and Canadian
opt, options
also have sub
menus So repeat s4ep 4 to 5 in the sub menu., to set the types of blocking and
rating,
32
Plasma
TV
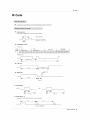
EXternal
Control
Device
Setup
External
Contro!
Device
Setup
-
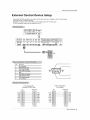
Conn_t
the RS-232C input jack to an externaE control device (such as a computer or an A/V controJ system)
and control the TV's functions externally,
° Connect the ser_aJ port of the controm device to the RS-232C jack on the TV back panel
- RS_232C conn_ion
_bles
are not supplied with the TV
e •
e@e
eeo
e
__/
PC
No
Pin name
1
1
2
No connection
RXD (Receive
4
DTR (DTE
5
GND
5
data)
side ready)
@
6
7
3
RTS
send)
TXD (Ready
(Transmit to data)
8
9
CTS (Clear to send)
No Connection
96
7-Wire Configu_tions
(Standard
RS°232C cable)
PC
Plasma TV
RXD
TXD
GND
DTR
DSR
RTS
CTS
................................
D-Sub
3-Wire Configurations
(Not standard)
D-Sub 9
PC
TXD
RXD
GND
DSR
DTR
CTS
RXD
TXD
GND
DTR
DSR
RTS
RTS
CTS
Piasma
TV
TXD
RXD
GND
DTR
6
DSR
RTS
CTS
D-Sub 9
D-Sub 9
Owners
Manual
33
Externa!
Contro!
Device
Setup
Use this function to specify a TV _D number.
Refer to 'Rea_ Data Mapping 1 '. See page 35
1. Press the MENU
button
and then
use A ,'V
button to sele_
2. Press the I_ button and then use A / V button to select _
3. Press the I1_button and then use _1._I_ button
TV _D number.
The adjustment
to adjust
button to save.
• Baud rate : 115200
bps (UART)
the desired
code : ASCii
code
cable.
COMMAND
01, Pcwer
02 !nput _!_
Set ID to choose
• Stop bit : 1 bit
• Communication
• Data length : 8 bits
• Parity : None
(reverse)
menu.
range of Set m is 1 - 99.
4. Press the ENTER
* Use a crossed
the _£CL&t-
_.
..................
! COMMAND
k
a
2
DATA
(Hexa_cirnal_
Transrrfissien
0 -_ 1
k ..............
b ..............
03, Aspect Ratio
04, Screen Mute
k
k
c
d
0 -_ 3
0 _ 1
.....
05, Volume Mute
k
e
0 '- 1
06. Volume Control
k
f
0 _ 64
07 Corrirasf
k
,q
0 '_ 64
08 Br_htness
09. Octet
k
k
h
i
0 _ 64
0 "- 64
10. Tint
k
i
0 ._ 64
1I, Sharpness
k
k
0 _ 64
12, OSD _
k
I
0 _ 1
13, Remote Control Lock M_
k
m
0 _ 1
14 PIP/DW
k
n
0 _ 3
15, PIP Aspect Ratio
k
o
0 _ 1
16, Split Zoom
k
_
21 -_99
17, PIP Posifi_
18 TreNe
k
k
q
r
0 - 3
0 '- 64
[Commandl][Command2][
[Command
* [
]: ASCII
code 'space
][Set ID][
0_64
0 "- 64
21, Coior Temperd_re
k .....
y ......
0,:-3
22 Red Adju_ent
k
v
0 _ C8
23. Green Adjustment
k
w
0 _ C8
24 Blue Adjustment
k
$
0 -- C8
Error Acknowledgement
25 PIP Input Source
26 A_ormal
State
k
k
y
z
0 _ 6
0 ~ a
[[Command2][
27, ISM Matl_od
i
p
0 _ 3
28. Low Power
j
q
0 _ 1
29 O_iter
Time Setti_
j
r
I '_FE
30. _iter
Pixel Se_ng
i
s
0 _9
31. P_ture
Size Setting
j
t
0 ,_64
j
u
1
34
Plasma
TV
when setting
the 4
][OKl[Data][x]
I
* The TV transmits ACK (acknowiedgement)
based on this
format when receiving normal data. At this time, if the data
is data read mode, it indicates present status data, If the
data is data write mede, if returns the data of the PC com-
t
.....
(Ox20)'
OK Acknowledgement
l[Command2l[
s
on _reen
(OxO.-Ox63)
[C_: Carriage Return
ASCH code 'OxOD'
k
• Menu doesn't display
12 13, and 26 ~ 32
]
on transmission/receiving
protocol.
* [DATA]: To transmit command data.
Transmit 'FF' data to read status of command.
k
32. Auto _figure
][Data][Cr]
(1 .-99) on menu and as Hexa decimal
20. _ance
Window mode
tD}[
to contro_ the TV. (j or Ix)
[Command
2]: _cond
command to control the TW
[Set _D]: You can adjust the set ID to choose desired TV tD
number in Special menu, Adjustment
range is 1 "_
99. When selecting
Set iD '0' every connected
the
TV is co_rolled.
Set tD is indicated as decima_
19. _s
for Doub_
][_t
1]: First command
puter
][Set
_DI[ ][NGl[Data][x
I
l
* The TV transmits ACK (acknowledgement)
based on this
format when receiving abnormal data from nonviable
fundions
or communication
errors
Da_
1 : tliegat Code
2: Not supported
function
3: Wait more time
External
Control
Device
Setup
01.
•
Power
(Command2:a)
To control
Power On/Off
04.
of the TV.
•
Transmission
Screen
Mute
To select
screen
Transmission
[[kl[a][
][Set Ig][
Data
0 :Power
][gata][Cr]
]
Off
[[k][d][
1 • Power On
Data
][Set Ig][
][OK][gata][x]
To show
Data
][gata][Cr]
]
mute off (Picture
mute on (Picture
on)
off)
][Set ID][
][OK][Data][x]
]
Power On/Off.
Transmission
[[kl[a][
ID][
Acknowledgement
]
[[d][
•
][Set
0 : Screen
1 : Screen
Acknowledgement
[[a][
(Command2:d)
mute on/off.
05. Volume Mute (Command2:e)
][Set ID][
0 :Power
][FF][Cr]
]
Off
•
To control volume
1 " Power On
mute on/off.
You can also adjust mute using the MUTE
remote control.
Acknowledgement
button
on
Transmission
[[a][
][Set Ig][
][OK][gata][x]
* In a like manner,
if other functions
]
transmit
based on this format, Acknowledgement
presents status about each function•
'FF' data
IN[e][
][Set ID][
Data
0 : Volume
mute on (Volume
off)
1 : Volume
mute off (Volume
on)
data feedback
][Data][Cr]
]
Acknowledgement
I[e][
02.
•
Input
Select
(Command2:b)
(Main
Picture
06.
•
Transmission
][Data][Cr]
4
:DVI
][Set
Ig][
Volume
][Set
Data
ID][ ][Datal[Cr]
I
Min :0~Max:64
• Refer to 'Real data mapping
1' as shown
below.
Acknowledgement
][OK][gata][x]
I[f][
]
][Set
ID][ ][OK][Data][x]
•
]
(Command2:g)
07. Contrast
To adjust screen
contrast.
You can also adjust contrast
Aspect Ratio (Command2:c) (Main picture format)
03.
(Command2:f)
Control
To adjust volume.
You can also adjust volume with the volume buttons
on remote control.
I[kl[f][
5 :TV
6 : Video (Exp.)
Acknowledgement
[[b][
]
Transmission
]
1 : Component
2 : Video
3 : S-Video
][OK][gata][x]
Input)
To select input source for the TV.
You can also select an input source using the INPUT
SELECT button on the TV's remote control•
[[k][b][ ][Set ID][
Data 0 :RGB
][Set ID][
in the Picture
menu.
Transmission
•
To adjust the screen format.
You can also adjust the screen format using the ARC
(Aspect Ratio Control) button on remote control or in the
Screen menu.
[[k][g][
Data
][Set ID][
][Data][Cr]
]
Min :0-Max:64
• Refer to 'Real data mapping
Transmission
1' as shown
below.
Acknowledgement
[[k][c][
Data
][Set ID][
0
1
2
3
•
:
"
:
][Data][Cr]
]
[[g][
Wide screen (16:9)
Normal screen (4:3)
Full screen (Zoom)
Horizon
][Set
ID][ ][OK][Data][x]
* Real data mapping
]
1
0
Step 0
A
Step 10 (SET
ID 10)
F
10
Step 15 (SET
Step 16 (SET
ID 15)
ID 16)
64
Step 100
Acknowledgement
[[c][
][Set Ig][
][OK][gata][x]
• You select either 16:9 or 4:3 screen
PC, DTV 720p/1080i.
]
aspect
ratio using the
Owner's
Manual
35
External
Control
Device
Setup
08. Brightness
•
(Command2:h)
To adjust screen
13. Remote
brightness.
•
You can also adjust brightness
in the Video
menu.
Transmission
[[k][h][
Data
Control
Lock
Mode
(Command2:m)
To lock the remote control and the front panel
the TV.
controls on
Transmission
][Set Ig][
][gata][Cr]
]
[[k][m][ ][Set Ig][ ][gata][Cr]
Data 0: Lock off
1 '. See page 35.
Acknowleclqement
Min:0~Max:64
• Refer 1o 'Real data mapping
]
1: Lock on
Acknowledgement
I[m][
[[h][ ][Set
Ig][
][OK][gata][x]
][Set
Ig][
• If you're
09.
•
Color
(Command2:i)
•
][Set Ig][ ][Data][Cr]
Min:0~Max64
]
• Refer to 'Real data mapping
1 '. See page 35.
control
and front panel
con-
main power
is
Tocontrolthe PIP (Picture in picture)/DW (Double Window).
You can also control the PIP!DW using the PIP or DW button on the remote control or in the PIP!DW menu.
Transmission
Acknowledgement
][Set ID][
not using the remote
14. PIP / DW (Command2:n)
menu.
Transmission
[[i][
I
trols on the monitor, use this mode. When
on/off, remote control lock is released.
To adjust the screen color.
You can also adjust color in the Video
[[k][i][
Data
][OKl[gata][x]
]
][OK][gatal[x]
I[k][n][
][Set ID][
Data
O: PIP/DW
1 : PIP
]
I
][Data][Cr]
off
2:DW1
3:DW2
Acknowledgement
10. Tint
•
I[n][
(Command2:j)
To adjust the screen
15. PIP
•
Transmission
][Set ID][
Data
][Data][Cr]
Transmission
• Refer to 'Real data mapping
][Set ID][
1 '. See page 35.
I[k][o][
Data
][OK][Data][x]
•
Sharpness (Command2:k)
To adjust the screen sharpness.
You can also adjust sharpness
][Set ID][
][Data][Cr]
I
0:4:3
1:16:9
Acknowledgement
]
[[o][
11.
Aspect Ratio (Command2:o)
To select the PIP picture format.
You can also select the PIP picture format using WIN.SIZE
on the remote control.
]
Red:O~Green:64
Acknowledgement
[[j][
][OK][Data][x]
tint.
You can also adjust tint in the Video menu.
[[k][j][
][Set ID][
][Set ID][
][OK][Data][x]
]
16. Split Zoom (Command2:p)
in the Video
menu.
Transmission
•
To operate split zoom function
zoom section number.
and select
Transmission
[[k][k][
Data
][Set
ID][
][Data][Cr]
I
Min: 0 ~ Max: 64
• Refer to 'Real
[[k][p][
data mapping
1'. See page 35.
Data
Acknowledqement
[[k][
][Set ID][
][Set ID][
][gata][Cr]
• Refer to 'Real
][OK][Data][x]
I
Min: 21 ~ Max: 99
data mapping
2'
I
Acknowledgement
[[p][
12. OSD Select
(Command2:l)
Transmission
][Set ID][
O:OSDoff
][Data][Cr]
]
l:0SDon
Acknowledgement
I[I][
36
][Set ID][
Plasma
][OK][Data][x]
TV
][OK][Data][x]
* Real data mapping
• To select OSD (On Screen Display) on/off.
[[k][I][
Data
][Set ID][
I
2
21 : Selection
1 of 2 split zoom
24: Selection
41 : Selection
42: Selection
4 of 2 split zoom
1 of 4 split zoom
2 of 4 split zoom
44: Selection
45: Selection
91 : Selection
4 of 4 split zoom
5 of 4 split zoom
1 of 9 split zoom
99: Selection
9 of 9 split zoom
I
the split
External
17.
PIP
Position
(Command2:q)
21.
Color
Temperature
Control
I_ To adjust color temperature.
You can also adjust ACC in the Video
Transmission
[[k][u][ ][Set ID][
Data 0: Normal
Data
][Set ID][
][Data][Cr]
J
Setup
(Command2:u)
I_ To select sub picture position for PIP.
You can also adjust the sub picture position using
WIN.POSITION on the remote control or in the PIPIDW
menu.
[[k][q][
Device
menu.
Transmission
][Data][Cr]
1: Cool
I
2: Warm
3: User
Acknowledgement
0: Right down on screen
1 Left down on screen
[[u][
][Set ID][
][OK][Data][x]
I
2: Left up on screen
3: Right up on screen
Acknowledgement
I[q] [ ][Set ID][
22. Red
][OK][Data][x]
]
Adjustment (Command2:v)
I_ To adjust
red in color temperature.
Transmission
(Command2:r)
18. Treble
[[k][v][
You can also adjust treble in the Audio
]
• Refer 1o 'Real data mapping
3' as shown
below.
Acknowledgement
][Set Ig][
Data
][Data][Cr]
Min: 0 ~ Max: C8
menu.
Transmission
[[kl[r][
][Set ID][
Data
I_ To adjust treble.
][gata][Cr]
[[v][
J
][Set Ig][
][OK][gata][x]
J
Min: 0 ~ Max: 64
• Refer to 'Real data mapping
1 '. See page 35.
Acknowledgement
23. Green
[[r][
I_ To adjust green
][Set ID][
][OK][Data][x]
]
Adjustment
(Command2:w)
in color temperature.
Transmission
[[k][w][
19. Bass
(Command2:s)
!_ To adjust
Data
bass.
You can also adjust bass in the Audio menu.
Transmission
[[k][s][
Data
][Data][Cr]
]
• Refer 1o 'Real data mapping
Acknowledgement
[[w][
][Set ID][ ][Data][Cr]
Min: 0 _ Max: 64
][Set ID][
Min: 0 ~ Max: C8
][Set ID][
][OK][Data][x]
3' as shown
below.
J
J
• Refer to 'Real data mapping
1 '. See page 35.
24. Blue
Adjustment (Command2:$)
Acknowledgement
I_ To adjust blue in color temperature.
[[s][
][Set ID][
][OK][Data][x]
]
Transmission
[[k][$][
Data
20.
(Command2:t)
Balance
I_ To adjust balance.
You can also adjust balance
Data
in the Audio
][Data][Cr]
J
Min: 0 _ Max: 64
• Refer to 'Real data mapping
1 '. See page 35.
Acknowledgement
[[t][
][Set ID][
][OK][Data][x]
]
J
3' as shown
below.
menu.
[[$][
][Set ID][
][Data][Cr]
• Refer to 'Real data mapping
Acknowledgement
Transmission
[[k][t][
][Set ID][
Min: 0 ~ Max: C8
][Set ID][
][OK][Data][x]
* Real data mapping
J
3
0 :-20
5 :-19
A : -18
5F:
-1
64:0
69:+1
!
C3:+19
C8:+20
Owner's
Manual
37
External
Control
Device
Setup
25. PIP Input Select (Command2:y)
29.
•
•
To select
input source for sub picture
in PIP mode.
Data
Time
][Set Ig][
][Data][Cr]
]
_][r][
0
:RGB
4 :DVI
1
2
3
" Component
: Video
: S-Video
5 " TV
6 : Video
[[y][ ][Set ID][
][Set
Data
(Exp.)
Ig][
State
•
an abnormal
To recognize
Acknowledgement
][Set Ig][
Pixel Setting
(Command2:s)
Transmission
state.
_][s][
][FF][Cr]
][Set ID][ ][Datal[Cr ]
J
Data Min:0_Max:9
]
FF:Read
Acknowledgement
Acknowledgement
][Set ID][
I
][OK][Data][x]
O: Normal (Power on and
1 : No signal (Power on)
2: Turn the monitor off by
3: Turn the monitor off by
4: Turn the monitor off by
5: 5V down
6: AC down
signal
7:
8:
9:
a:
Fan Alarm function
off time function
auto off function
AV board defect
Turn
Turn
Turn
Turn
J
• To adjust pixel number in orbiter function.
(Command2:z)
Transmission
Data
][gata][Cr]
][OK][Data][x]
26. Abnormal
I[z][
time term.
Min: 1 -- Max: FE
30. Orbiter
Data
(Command2:r)
[[r][ ][Set ID][ ][OK][Data][x]
Acknowledgement
[[k][z][
Setting
orbiter operation
Transmission
Transmission
[[k][y][
Orbiter
To adjust
the
the
the
the
monitor
monitor
monitor
monitor
off
off
off
off
by
by
by
by
[[s][
][Set ID][
31.
Picture
][OK][Data][x]
exist)
remote control
sleep time function
RS-232C function
mode
•
Size
Setting
for
Double
Window
(Command2 :t)
To adjust main window size in Double
Window
mode.
Transmission
[u][tl[][SefID][
Data
][Data][Cr]
J
Min: 0 ~ Max: 64
• Refer to 'Real data mapping1'.
See page 35.
Acknowledgement
[[t][
27. ISM Method
][Set ID][
][OK][Data][x]
J
(Command2:p)
• To avoid having a fixed image remain on screen.
Transmission
_][p][
Data
32. Auto
][Set ID][ ][Dafal[Cr]
O: Normal
1 : White wash
J
2: Orbiter
3: Inversion
Acknowledgement
[[p][
][Set
28.
•
Low
ID][
Power
][Set
Ig][
][gata][Cr]
O: Low power
1 : Low power
][Set
ID][
on/off.
J
off
on
38
Plasma
iV
][OK][Data][x]
_][u][
][Get ID][
Data
1 : To set
][Data][Cr]
Acknowledgement
Acknowledgement
[[q][
To adjust picture position and minimize image shaking
automatically.
It works only in RGB (PC) mode.
J
(Command2:q)
To control the low power function
Data
(Command2:u)
Transmission
][OK][Data][x]
Transmission
_][q][
•
Configure
J
[[u][
][Set ID][
][OK][Data][x]
J
IR Code
IR Code
I_
I_
_nr_ect
O_p_
your wired remote
control to the Remote control port on the TV,
wavefo_m
Sir_gle pun_,
modulated
with
37.917KHz
sig'_al at 455KHz
TC
Ca_der
__i
__¢__
lrequency
FCAR = 1iTC = lOSe/12
Duty ratio
I_
Configuration
= TI/Tc
= !/3
of Ir_me
" 1st flame
ICOI C1 Ic2tc31c41G5!C6tC71C01
" Repeat
G1 IC21G31C4 IC51C6tc71D01
D1 ID21D31©4 IDSID61DTI_I_I_I_[_I_I_I
frame
Repeat
code
--
T_
IP
[
9 ms
J
_1_[ _
4 5 ms
_[I
i_ Repeat code
9 ms
225
ms
• Bt
"t"
224
I_
Frame
intervat
The waveform
I_
ms
: -If
is transmitted
Tf
as long as a key
is depressed
T_
_1_
Tf=i
08ms
@455KHz
Owners
Manual
39
IR Code
IR Code
continued
Code
(Hexa)
OOH
01H
02H
03H
08H
C4H
Function
.
.
POWER
MUTE
i0H
I1H
12H
13H
i4H
i5H
I6H
i7H
18H
19H
0BH
98H
D5H
C6H
BFH
5AH
Number Key 0
Number Key 1
Number Key 2
Number Key 3
Number Key 4
Number Key 5
Number Key 6
Number Key 7
Number Key' 8
Number Key 9
INPUT SELECT
MULTIMEDIA
RGB
DW
Com_nent
Video
D0H
0EH
44H
43H
52H
4DH
Plasma
UP (1)
DOWN (T)
VOL+ (I,.)
VOL- i<)
POWER ON/OFF
POWER ON
C5H
09H
.
.
,
.
D8H
D6H
40
Note
.
,
.
OFF
R/C
R/C
R!C
R!C
. R/C
Button
Button
B,ttOn
Button
Button
S-video
TV
Video (Exp.)
SLEEP
ENTER (111)
MENU
DASP
APC
Discrete IR Code (Inp_
. R/C Button
R/C Button
. R!C Button
. R/C Button
R/C Button
PtP
PIP INPUT
R/C Button
R/C Button
63H
64H
SWAP
PIP ARC
R/C B#_gn
6BH
40H
41H
69H
DOUBLE WINDOW
ZOOM +
ZOOM Window Size
FL/C
R/C
R/C
R/C
6AH
7BH
79H
76H
.
77H
AFH
99H
54H
55H
1EH
39H
.
,
,
,
Window Position
Split Zoom
ARC
ARC (4:3)
(P!P/DW
Expanded
p!#t#re
Video _ledion)
Exchen#e}
Button
Button
Button
Button
. R/C Button
R!C Button
RC B#### (4:3/16:9/Zoom
Discrete (Only 4:3 mode}
ARC (i6:9)
ARC (Zoom)
AUTO CONFIG
AUTO PROGRAM
MEMORY/ERASE
FAVORITE CH
CAPTION
Discrete (Only !6;9 re#de)
Discrete (Only Zoom model
Discrete IR Code
R/C Button
R/C Button
RiC Button
R/C Button
0AH
71H
,
MTS
PIP UP (A)
R/C Button
R/C Button
72H
.......P!P DOWN
(v} ................... R!C Button
TV
Power On}
Power Off}
R_C Button
R/C Button
R/C Button
R/C Button
R/C Button
R/C Button
R/C Button
R/C Button
R/C Button
R/C Button
. R/C Button (VdeoiSwdeo/Component/RGB!DV!)
R[C Button _Compone#VRGB/DV!)
Discrete IR Code (!n#u_ RGB Se!ecli#n)
Discrete IR Code (Input DW Selection)
Discrete IR Code (Input Component
Selection)
. D!screte IR C_e (!nput V!deo Select!on)
Discrete
!RCode
_ln£#_ S-video _lection)
D!screte
_
!R Code (!nput TV Se!e_ien)
60H
61H
,
(Power On/Off)
. D[scre!e IR C_e (Only
Discrete IR Code (Only
R/C Button
mode Sel_ion)
Troubleshooting
Checkfist
Troubleshooting
Checklist
" Check
/
|
/
NO
picture &
whether
the TV is turned
on.
" Powercord insertedinto wall outlet?
NO sound.
Test the wa]_ power
where
the TV's
outlet
power
p_ug other
* Check to see if there is any object
causing
doesn't work
in,
between
the TV and the remote
J
control
obstruction,
• Are batteries instaJled
(Refer to p.9)
•
product's power cord into the wall out_et
cord was plugged
Insta]t new batteries.
with correct
(Refer
potadty
(+ to +, - to -)?
to p.9_
Owners
Manual
41
Troubleshooting
Checklist
Troubleshooting
42
Plasma
TV
Checklist
continued
Maintenance
Earty malfunctions
can be preventS,
Careful and regular cJeaning can extend the amount of time you wile have your
new "FV, _ sure to turn the power off and unplug the power cord before you begin any cleaning.
1, Here's a great way' to keep the dust off your screen for a wMe
Wet a soft cloth in a mixture of tukewarm water and
a little fabric softener or dish washing detergent. Wring the cloth until it's a_most dry, and tl_en use it to wipe the
screen
2. Make sure the excess
water
is off the screen,
To remove dirt or dust_ wipe the cabinet
Please be sure not to use a wet cloth.
and then let it air-dry
before
you turn on your TV,
wffh a soft, dry. lintofree cloth,
If you expect to leave your TV dormant for a long time (such as a vacation), it's a good idea to unplug
the power cord to protect against possible damage from lightning or power surges,
Owners
Manual
43
Specification
Product
Specifications
Width (inches / mm)
48.9 / 1241
Height (inches / mm)
31.6 / 801.5
Depth (inches / ram)
4_4 / 111.7
Weight (pounds / kg)
77.2 / 35
Power requirement
AC100
240V ~ 50/60Hz
Television System
NTSC
Program Coverage
VHF 2-. 13, UHF 14 ~ 69, CATV 1 ~ 125
Resolution
852 x 480 (DOt)
Color
16,770_000 (256 steps of each R, G and B)
Operating Temperature Range
32 ~ 104°F (0 ~ 40_._)
Operating Humidity Range
Less than 80%
Maximum Elevation
6561 feet (2000m)
The specifications shown above may be changed without notice for quality improvement,
44
Plasma TV
Zenith
will
repair
under
normal
consumer/end
effective
only
or replace
your
product,
at Zenith's
option,
use, during
the warranty
period
("Warranty
user purchase.
This warranty
is good only
when used in the United
States.
WARRANTY
if it proves
to be defective
Period")
listed
to the original
HOW SERVICE
PERIOD:
in material
below,
effective
consumer/end
IS HANDLED:
LABOR:
ONE
YEAR
from
the
Date
of Purchase.
In Home
PARTS:
ONE
YEAR
from
the
Date
of Purchase.
Center
at 1-877-9ZENITH
schedule a service appointment.
Effective
Date of Warranty:
Your warranty
period
Begins
on the date of sale to the original
consumer/end
user. KEEP THE DEALER'S
DATED BILL
OF SALE OR PROOF OF DELIVERY
as evidence
of the
Your
purchase
date. You will be required
to submit
a legible
copy of your bill of sale or proof of delivery
when
requesting
warranty
service.
Repair
for
THIS
Parts
the
and
Replacement
remaining
period
WARRANTY
LIMITATION,
EXTENT
ANY
WARRANTY
INDIRECT,
PROFITS,
CONTRACT,
Units
of the
IS IN
LIEU
original
are
OR
OF ANY
or replaced
reconditioned
used in the
• service
including
WARRANTIES,
caused
in shipping
manual
Some
DOES
states
do
NOT
APPLY
or transit
caused
caused
The costs of repair
supply
systems,
cable
supplied
equipment,
system
on consumer
controls,
con-
or other
or
by improper
adjustments
by other system
components
• any unit that
has been
into any other
product
• replacement
of batteries
(including
for power
of antenna
verters,
cable company
components
in a video
• set-up
or adjustment
• damage
website
EXPRESS
NOT
BE LIABLE
OF ANY NATURE,
OR DATA,
OR
required
as a result
of improper
installation,
incorrect
or insufficient
AC supply
(please
consult
the owner's
requirements)
• installation
or repair
damage
• damage
our
modified
or incorporated
on the remote
cosmetic
damage),
or replacement
Interactive
(1-877-993-6484)
with
to
a new,
sub-
unit,
at Zenith's
repair
may be new
at http://www.zenithservice.com
warranted
OTHER
OTHERWISE.
WARRANTY
Call the Zenith
warranty.
PERIOD
ABOVE.
ZENITH
WILL
SPECIAL,
OR PUNITIVE
DAMAGES
LOST OR CORRUPTED
PROGRAMMING
TORT,
Please
be repaired
Visit
will
OR
ANY WARRANTY
OF MERCHANTABILITY
OR FITNESS
FOR
IMPLIED
WARRANTY
IS REQUIRED
BY LAW,
IT IS LIMITED
LIMITED
• damage
Service.
stitute
model
or factory
option.
If repaired,
parts
or remanufactured.
not
allow
quential
damages
or limitations
on how long an implied
warranty
apply
to you. This warranty
gives you specific
legal rights
and
to state.
THIS
unit
or workmanship
from
the date of original
user of the product
and is
control.
failure,
loss
under these
the
IMPLIED,
FOR ANY
INCIDENTAL,
INCLUDING,
WITHOUT
ANY OTHER
DAMAGE
exclusion
lasts, so the
you may also
INCLUDING
A PARTICULAR
IN DURATION
or limitation
WITHOUT
PURPOSE.
TO THE
TO THE EXPRESS
CONSEQUENTIAL,
LIMITATION,
LOST
WHETHER
BASED
IN
of incidental
above exclusion
or limitation
have other
rights
that vary
or consemay not
from
stat
TO:
or personal injury due to misuse, abuse, negligence, improper maintenance
or storage, or to acts
of nature or other causes beyond Zenith's control.
(Causes beyond Zenith's control include but are not
limited to lightning strike, power surges, power outages and water damage.)
• Image burn-in
• repair or replacement
of warranted
parts by other
than Zenith Authorized
Service Centers.
• units purchased or serviced outside of the U.S.A.
• product
where the original factory serial numbers
have been removed, defaced or changed in any
way.
• product sold and labeled as "as is, where is" or similar disclaimer.
excluded
circumstances
shall
be borne
by the consumer.
CONCERNING
PIXEL FUNCTIONALITY:
Your Plasma Television contains about one million individual
pixels.
Plasma TVs typically contain a small number of pixels that do not function normally. Your display has been inspected and is in compliance with manufacturer's
specifications,
indicating that any pixel defects do not affect the operation or use of your display.
CUSTOMER
INTER-ACTIVE
CENTER
To obtain customer
assistance,
product information,
or Dealer
or Service
locations
NUMBERS:
Call 1-877-gZenith
(1-877-993-6484)
(Monday - Friday, 7
AM - 8 PH CT; and Saturday, 8 AM - 5 PM CT) and select
appropriate
options from the menu.
Or visit our website at http'//www,zenithservice,com
BEFORE
CALLING
FOR
SERVICE:
• Please
• Please
check your operating
guide - you
have your product
model number,
original installation
• If a replacement
available.
unit is required,
under
may avoid a service
call.
serial number
and the date
some
circumstances
you
may
of purchase
or the
be asked
to provide
reserve
deposit
to Zenith
against
a credit card number
as surety for advanced
shipment.
card will not be charged
if you return
the defective
unit within
10 working
days.
• If a replacement
unit is received,
please use the carton
and packaging
from that unit
the defective
unit to Zenith.
• Parts and service
in accordance
provided
without
charge.
Other
with the Zenith
warranty
service
requirements
will
are Zenith's
responsibility
be at the owner's
expense.
date
of
a
Your
credit
in returning
and will be
If you have
problems
in obtaining
satisfactory
warranty
service,
write
Center.
Service
may be provided
by independently
owned
• To assure
proper
credit and avoid unnecessary
charges,
or call the Zenith
Customer
Interactive
and operated
service
organizations.
you must obtain
a Return Authorization
before
returning
any product
for Zenith
rized Zenith
repair facility
for details.
Contact
IMPORTANT:
to register
cover
Please
your
a safety
fill
out
product
or reliability
and
online.
Warranty
mail
your
This
information
problem
that
Service.
Product
could
Registration
allows
affect
Zenith
the
Card
to
number
below
or your
autho-
or go to www.zenithservice.com
reach
you
promptly
should
we
dis-
you.
TO CONTACT
ZENITH
BY MAIL:
Zenith
Customer
Interactive
Center
P.O. Box 240007
201
James
Record
Road
Huntsville,
AL 35824
A-i-rN: CIC Plasma -I-V, Building
P/N : 3828VA0415E
3
206-3895