1
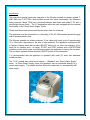
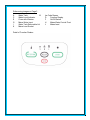
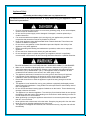
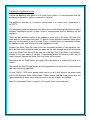
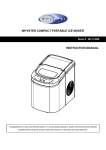
WHYNTER SNO Portable Ice Maker – Stainless Steel Series MODEL# : T-2M/A / T-2C/A Instruction Manual Thank you for your purchase of this WHYNTER product. Please read this Instruction Manual carefully before using product to ensure proper use. Keep this manual in a safe place for future reference. Introduction This instruction manual covers the operation of the Whynter portable ice maker models T2M/T-2MA and T-2C/T-2CA. Both models provide the same functionality, the difference being cosmetic. Model T2-M has a brushed/stainless steel finish and model T-2C has a shiny/bright chrome finish. The “A” designation refers the units equipped with the optional functionality of the “Direct Water Supply” mode. Please read these instructions carefully and retain them for reference. The appliance must be connected to a (nominally) 110V AC 60Hz earthed electrical supply and be protected with a fuse. The Whynter portable ice maker produces 12 ice cubes with each cycle of approximately 12 to 18 minutes, depending on the size of cube selected. The appliance is equipped with a Function Display panel that includes SELECT buttons for ice cube size selection (S for small, M for medium and L for large), START and STOP buttons and a WATERTANK condition monitor which gives a visual warning when the appliance is running low on water. The unit has a separate mains electricity ON/OFF switch on the back panel. It is recommended that the appliance is operated with small (S) cube size whenever conditions allow. The T-2“A” models has a dual mode design – “Standard” and “Direct Water Supply” mode. In Direct Water Supply mode, the appliance can be connected directly to a mains water supply. This added function allows the water tank to automatically refill when empty. E D A B H I C F G K J Referencing images on Page 3 A C E G I K Water Tank B Water Level Indicator Cover with Window Mains Water Input Water Tank Removable Lid Mains Lead Socket Detail of Function Display: Ice Cube Drawer D Function Display F On/Off Switch H Mains Water Control Float J Mains Lead Appliance Safety Your safety and the safety of others are very important to us. To reduce the risk of fire, electrical shock, or injury when using your appliance, follow these basic precautions Plug into a grounded 3-prong outlet, do not remove grounding prong, do not use an adapter, and do not use an extension cord. Do not use if the power supply cord is damaged. If damaged, it must be replaced by a qualified electrician. It is recommended that a separate circuit, serving only your appliance be provided. Use receptacles that cannot be turned off by a switch or pull chain. Never clean appliance parts with flammable fluids or harsh chemicals. These fumes can create a fire hazard or explosion. Do not store or use gasoline or other flammable vapors and liquids in the vicinity of the appliance or any other appliance. Before proceeding with cleaning and maintenance operations, make sure to unplug the appliance. Do not connect or disconnect the electric plug with wet hands. Do not attempt to repair or replace any part of your appliance unless it is specifically recommended in this manual. All other servicing should be referred to a qualified technician. FOLLOW WARNING CALL OUTS BELOW ONLY WHEN APPLICABLE TO YOUR MODEL Make sure all Ventilation Openings (B) have a minimum clearance of 10” (25cm.) from surrounding walls and other appliances. Choose a well-ventilated area with temperatures above 60°F (16°C) and below 90°F (32°C). This appliance must be installed in an area protected from the element, such as wind, rain, water spray or drips. The appliance should not be located next to ovens, grills or other sources of high heat. It is important for the appliance to be leveled in order to work properly. For a stable installation, make sure the appliance is placed on a flat, level and solid surface. Ensure that the surface on which the appliance is placed is strong enough to hold the appliance. This appliance is not intended for use by young children or physically-challenged persons without supervision/assistance. Young children must be supervised to ensure safety around this or any appliance. Do not use solvent-based cleaning agents of abrasives on the interior. These cleaners may damage or discolor the interior. The appliance is an electrical appliance. To avoid injury from electrical shock do not operate the appliance with wet hands, while standing on a wet surface or while standing in water. Do not use outdoors or in wet conditions. When positioning or moving the appliance ensure that it is not turned upside down or greater than 45° or more off level. Never pull the cord to disconnect it from the outlet. Grasp the plug and pull it from the outlet. Never lift, carry or drag the appliance by the power cord. This appliance is designed for household, non-commercial use only. Any other use will void the warranty. Preparing the Appliance for Use Unpack the appliance and place it on a sturdy level surface. It is recommended that the packaging is retained for secure movement or transport. The appliance operates at its optimum performance in a normal room temperature of o o 68 F/20 C. The refrigerant inside the appliance must have time to settle following transportation and a minimum stabilization period of three hours is recommended prior to switching on the appliance. There are two ventilation grilles in the appliance cover, one in the lower left hand side panel and one in the upper rear panel. To ensure correct appliance operation these grilles must not be obstructed. A gap of at least 10 cm. (4 inches) must be maintained between the appliance sides, rear and top and other appliances or walls. Remove the Water Tank (the lower of the two removable drawers on the appliance front face) and pour fresh drinkable mains tap water into the tank through the larger rectangular hole in the Water Tank lid and fill the tank up to the MAX line of the Water Level Indicator situated in the front centre of the tank. Commercially bottled still drinking water may be used if desired. Replace the Water Tank fully home into its recess. Ensure that the Ice Cube Drawer, the upper of the two drawers, is pushed fully home in its recess. Ensure that the clear Window on the top of the appliance is closed as the freezing element gets very cold during operation. For the T-2MA / T-2CA units, please make sure to use a ¾ inch fitting for the mains water inlet to the drinkable mains water supply. Please ensure that the hose connections are tightly connected to water mains and to the rear of the unit to avoid any leakage. Note: If a replacement hose is required, a food grade hose is recommended. Appliance Operation Plug the appliance mains electricity lead into a suitable supply and switch on the ON/OFF switch situated on the rear of the appliance. The ON/OFF switch is illuminated and will light up. The appliance should be positioned for easy access to the ON/OFF switch and mains plug to facilitate rapid switch off and appliance isolation when required. For the T-2MA / T-2CA models Direct Water Supply mode. Please i) connect a hose to the water mains and to the unit, ii) turn the unit on. and iii) turn on your water mains. The appliance may beep several times whilst internal components that may have moved during transportation reset themselves. If this does happen the beeping should last no longer than 20 seconds. If beeping continues for a longer period pull the Water Tank and the Ice Cube Drawer out slightly and re-insert them ensuring that they are fully home in their recesses. When the Water Tank is withdrawn the WATER TANK indicator on the Function Display should change color from green to red or red/orange, and when reinserted it should go back to green. If the indicator stays red or red/orange this could indicate that the appliance internal water level detector is not operating correctly. Remove the Water Tank and check that the black float inside the transparent water level indicator on the right hand side of the rear of the Water Tank is free. If the float is stuck gently tap the indicator to free the float and the re-insert the Water Tank fully into its recess. For the T-2MA / T-2CA models, in Direct Water Supply mode, users do not need to remove the water tank. The unit will automatically draw the water supply into the water tank. The unit will stop drawing water once the water tank is filled. At this point you may choose to shut off the water mains or leave it on. Once the water tank has been filled, you will be able to select your ice size and start the ice making cycle. If you have chosen to leave the water mains on, the unit will start to draw water into the tank again once it is empty. A low water level indicator float will be apparent if the water supply has been interrupted. Then the appliance may also be operated in manual mode. Ice cube size S (small) of the SELECT display should be illuminated red as this is the default setting. If it isn’t depress the S button to illuminate it. Press the START button on the Function Display and keep it pressed for a couple of seconds. The appliance will start with the water pump, cooling fan and compressor starting to operate. Looking through the right hand side of the clear Window in the top of the appliance water will be seen entering the water tray. After approximately 12 minutes ice cubes will be deposited in the Ice Cube Drawer and the appliance will beep four times. Do not attempt to remove ice cubes until after the four beeps have finished otherwise the appliance will beep continuously and the cubes may be Appliance Operation (Continued) deposited into the Ice Drawer recess rather than the Ice Drawer itself. If the appliance does beep continuously ensure the Ice Cube Drawer is fully in its recess. The appliance will continue to produce ice cubes at approximately 12 minute intervals. Some variation in ice cube size should be expected on initial switch on however variation should be minimized once the appliance has stabilized. Other variables such as water temperature and ambient operating temperature can affect ice cube size. When the Ice Cube Drawer is full the appliance will detect this and beep 10 times. The S, M and L lights will flash for 5 minutes and, if the Ice Cube Drawer is not emptied, the appliance will go into sleep mode. Emptying the Ice Cube Drawer and replacing it into its recess will re-start the ice cube making process. If the Ice Cube Drawer is not emptied the cubes will melt and the water produced will drain back into the Water Tank through the Ice Cube Drawer drain valve/hole. When sufficient cubes have melted the ice cube making process will re-start automatically. As water is drawn from the Water Tank the level will drop and eventually the WATER TANK indicator on the Function Display will turn from green to red, indicating that the tank requires topping up. It is not necessary to top up the tank immediately. The ideal time to top up the tank is a couple of minutes after water has stopped being pumped into the water tray. The reason for this is that towards the end of the cube production cycle the water tray inverts and any unfrozen water in the tray drains back into the Water Tank. If the Water Tank is removed for the purposes of topping up during this period then water will be deposited into the base of the appliance and then leak onto the surface on which the appliance is standing. Care is needed when topping up an appliance that has operated for more than one cycle. The water top up level should be to approximately 5 mm (¼ inch) below the MAX line of the Water Level Indicator situated in the front centre of the is Water Tank. This is to allow the Water Tank to accommodate the contents of the water tray when it inverts without the Water Tank overflowing. The appliance can be stopped at any time by pressing the STOP button on the Function Display. If this is done the START indicator will flash. After Use When the appliance is not to be used for some time, for example for periods exceeding 48 hours, it is recommended that it be disconnected from the electrical supply and any remaining ice cubes and water be removed. Excess water in the Ice Cube Drawer, the Water Tank and water tray should be removed using kitchen towels or similar absorbent material. It is also recommended that the appliance is cleaned on a regular basis, perhaps once every three months or more frequently in areas where chalky deposits can be a problem. Two cleaning solutions may be used. One is 1 part vinegar to 10 arts water, the other is 1 part bicarbonate of soda to 5 parts water. In both cases the appliance should be allowed to complete one ice making cycle, then left to stand for 6 hours before being thoroughly rinsed with fresh water and dried as detailed in the previous paragraph. Solvents, detergents and abrasives must not be used for cleaning. The appliance exterior can be cleaned with a damp cloth and then polished with a soft, dry lint free cloth. Hints and Tips Do not place the appliance on its side or upside down. Pay particular attention to this when the appliance is being moved or transported. Ventilation grilles must not be obstructed. Do not immerse the appliance in water or other liquids. The appliance has internal moving parts. Do not open the Window whilst it is connected to the electricity supply and take particular care to prevent children from getting access to or playing with the appliance. The ice making element gets very cold and touching them could result in ice burns. o o Do not use water below 46 F/8 C for filling as this may cause the ice cubes to fuse into one large block of ice, particularly if medium (M) or large (L) ice cube size is selected. Always try small (S) ice cube selection first as this may give cubes of sufficient size. As with all electrical appliances if used outdoors ensure that it is protected from the elements and use an earth leakage contact breaker for safety. Do not expose the appliance to rain and do not use or store it where it could get damp or wet. Do not put the appliance near sources of heat. In case of damage to the appliance or its lead we advise not using it and to return it for authorized repair and parts replacement. Using parts not recommended by the manufacturer can be dangerous. Only use the appliance for its intended purpose, the production of ice cubes. The refrigerant gas used in the appliance may be a chemical waste. Disposal of the appliance must be done in a proper environmentally friendly way. Inquire about proper disposal with your local waste processing department. Problems and Malfunctions If the indicator light on WATERTANK is illuminated red the water tank level is low and requires topping up. If the L and START indicator lights flash and the appliance beeps then the Ice Cube Drawer is not positioned correctly and should be removed and replaced firmly into its recess. There are a number of sensors associated with the Ice Cube Drawer and the Water Tank and faulty positioning of these units is the most common cause of malfunction. Always ensure that the Ice Cube Drawer and the Water Tank are correctly positioned in their recesses. If the M indicator is illuminated and the appliance beeps, or the M indicator is flashing and the appliance is not beeping, the ice cube production process is stuck. It may be that ice cubes are stuck to the freezing element, an ice cube is stuck in the mechanism or the ice cubes have fused into one large block of ice. If this happen switch off the appliance, unplug it from the mains electricity, open the Window and leave until all ice blockages melt. Once everything has melted close the Window, plug the appliance in to the supply, switch it on and depress START. In the event of any appliance stoppages, malfunctions or indicator light sequences not covered in these instructions switch the appliance off for one minute and then switch it on again. This should clear any spurious faults. For faults which cannot be cleared and for further assistance and service the contact information is shown on the next page. Appliance Technical Data Voltage and Frequency: Maximum Power: Water Tank Capacity: Ice Cube Cycle Time: Dimensions: Net weight: 110V AC 60Hz 200W 4.5 liters (1.02 gallons) approximately S (Small) ≈ 12 minutes M (Medium) ≈15 minutes L (Large) ≈ 18 minutes 360 x 390 x 440 (mm) 14.2 x 15.4 x 17.4 (inch) 19.5Kg / 43 Lbs The number of ice cubes produced per cycle is 12. The Ice Cube Drawer holds approximately 60 cubes or 1 Kg of ice. The appliance produces between 16 and 20 Kg. of ice in a 24 hour period dependent on water temperature and ambient conditions. ONE YEAR LIMITED WARRANTY This WHYNTER ice maker is warranted, to the original owner within the 48 continental states, for one year from the date of purchase against defects in material and workmanship under normal use and service. Should your WHYNTER ice maker prove defective within one year from the date of purchase, return the defective part or unit, freight prepaid (within two months of purchase; after two months to one year, customer will be responsible for freight cost to Whynter’s service department), along with an explanation of the claim to Whynter LLC. Please package the ice maker carefully in its original packaging material to avoid damage in transit. Please retain original box and packaging material. Under this warranty, Whynter will repair or replace any parts found defective. This warranty is not transferable. After the expiration of the warranty, the cost of labor and parts will be the responsibility of the original owner of the unit. THIS WARRANTY DOES NOT COVER: Acts of God, such as fire, flood, hurricanes, earthquakes and tornadoes. Damage, accidental or otherwise, to the ice maker while in the possession of a consumer not caused by a defect in material or workmanship; Damage caused by consumer misuse, tampering, or failure to follow the care and special handling provisions in the instructions. Damage to the finish of the case, or other appearance parts caused by wear. Damage caused by repairs or alterations to the ice maker by anyone other than authorized by the manufacturer. Freight and Insurance cost for the warranty service. To obtain service or information, contact Whynter LLC via Email at [email protected] or call 866-WHYNTER.