1
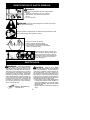
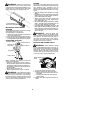
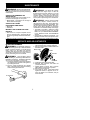
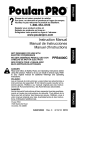
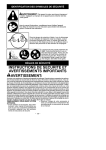
ENGLISH
R
Please do not return product to retailer.
Por favor, no devuelva el producto al lugar de compra.
Veuillez ne pas retourner le produit au détaillant.
1--800--554--6723
Register your product online at:
Registre su producto en línea en:
Enregistrez votre produit en ligne à l’adresse :
www.poulanpro.com
Instruction Manual
Manual de Instrucciones
Manuel d’Instructions
Poulan PRO
7349 Statesville Road
Charlotte, NC 28269
545167665 Rev. 3
6/15/10 BRW
FRANÇAIS
WARNING:
Read and follow all Safety Rules and Operating Instructions before
using this product. Failure to do so can result in serious injury. Refer
to your original manual for additional Warnings and Operating
Instructions.
ADVERTENCIA:
Lea el manual de instrucciones y siga todas las advertencias e
instrucciones de seguridad. El no hacerlo puede resultar en lesiones
graves. Refiera a su manual original para las Instrucciones de Funcioniamiento y las Advertencias adicionales.
AVERTISSEMENT:
Lire le manuel d’instructions et bien respecter tous les avertissements et toutes les instructions de sécurité. Tout défaut de le faire
pourrait entraîner des blessures graves. Référez--vous à votre
manuel original pour des Avertissements et des Instructions d’Utilisation additionnels.
ESPAÑOL
PPB1000E
IDENTIFICATION OF SAFETY SYMBOLS
DANGER:
Blade moves momentarily after the trigger switch is
released.
S The blade can seriously cut your or others.
S Allow blade to stop before removing it from
the cut.
S Do not overreach.
WARNING: This unit can be dangerous! Careless or improper
use can cause serious injury.
Read the operator’s manual before use. Failure to follow instructions could
result in serious injury. Save operator’s manual.
Hazard zone for thrown objects.
S Blade can throw objects violently.
S You and others can be blinded/injured.
S Keep children, bystanders, and animals
50 feet (15 meters) away.
Blade can throw objects violently. You
can be blinded or injured. Always wear
hearing protection and safety glasses
marked Z87. Always wear head protection, heavy, long pants, long sleeves,
boots and gloves.
SAFETY RULES
OPERATOR SAFETY
WARNING: When using gardening
appliances, basic safety precautions must always be followed to reduce the risk of fire and
serious injury. Read and follow all instructions.
This power unit can be dangerous! Operator
is responsible for following instructions and
warnings on unit and in manual. Read entire
instruction manual before using unit! Be thoroughly familiar with the controls and the proper use of the unit. Restrict the use of this unit
to persons who have read, understand and
will follow the instructions and warnings on
the unit and in the manual. Never allow children to operate this unit.
DANGER: RISK OF CUT. KEEP
HANDS AND FEET AWAY FROM BLADE
AND CUTTING AREA. Do not attempt to
clear away cut material or hold material to be
cut when the blade is in motion. Make sure
powerhead is stopped and spark plug wire is
disconnected (or powerhead is disconnected
from power source) when removing jammed
material from the cutting blade. Do not grab or
hold attachment by the cutting blade.
S Dress properly. Always wear safety glasses
or similar eye protection when operating, or
performing maintenance on your unit (safety
glasses are available). Eye protection should
be marked Z87.
S Always wear face or dust mask if operation is
dusty.
SAFETY INFORMATION
ON THE UNIT
2
S Always wear heavy, long pants, long sleeves,
boots, and gloves.
S Always wear foot protection. Do not go barefoot or wear sandals.
S Secure hair above shoulder length. Secure
or remove loose clothing or clothing with
loosely hanging ties, straps, tassels, etc.
They can be caught in moving parts.
S Being fully covered also helps protect you
from debris and pieces of toxic plants thrown
by spinning blade.
S Stay alert. Do not operate when you are tired,
ill, upset, or under the influence of alcohol,
drugs, or medication. Watch what you are doing; use common sense.
S Wear hearing protection.
S Never start or run inside a closed room or
building. Breathing exhaust fumes can kill.
S Keep handles free of oil and fuel.
S Keep hands and feet away from cutting area.
S Never direct discharge of material toward bystanders nor allow anyone near the area of
operation. Use care in directing discharge to
avoid glass enclosures, automobiles, and the
like.
S
FUEL SAFETY (for gas powerheads)
S
S
S
S
S
S
S
S
Mix and pour fuel outdoors.
Keep away from sparks or flames.
Use a container approved for fuel.
Do not smoke or allow smoking near fuel or
the powerhead.
Avoid spilling fuel or oil. Wipe up all fuel spills
before starting the powerhead.
Move at least 10 feet (3 meters) away from
fueling site before starting powerhead engine.
Stop engine and allow to cool before removing fuel cap.
Remove fuel cap slowly.
S
S
S
ELECTRICAL SAFETY (for electric
powerheads)
WARNING: Avoid a dangerous environment. To reduce the risk of electrical shock,
do not use in rain, in damp or wet locations, or
around swimming pools, hot tubs, etc. Do not
expose to snow, rain, or water to avoid the possibility of electrical shock. Do not use on wet
surfaces. Do not handle extension cord plug or
unit with wet hands.
S Use only a voltage supply as shown on the
nameplate of the unit.
S Avoid dangerous situations. Do not use in
presence of flammable liquids or gases to
avoid creating a fire or explosion and/or
causing damage to unit.
S Avoid dangerous environments. Do not use
in unventilated areas or where dust or explosive vapors can build up.
S To reduce the risk of electric shock, the
powerhead may have a polarized plug (one
blade is wider than the other); if so, it will require the use of a polarized extension cord.
The appliance plug will fit into a polarized
extension cord only one way. If the plug
does not fit fully into the extension cord, reverse the plug. If the plug still does not fit,
obtain a correct polarized extension cord.
A polarized extension cord will require the
S
S
S
S
S
S
3
use of a polarized wall outlet. This plug will
fit into the polarized wall outlet only one
way. If plug does not fit fully into the wall
outlet, reverse the plug. If it still does not fit,
contact a qualified electrician to install the
proper wall outlet. Do not change the equipment plug, extension cord receptacle, or
extension cord plug in any way.
To reduce risk of electrical shock, use extension cords specifically marked as suitable for outdoor appliances having electrical rating not less than the rating of unit.
Cord must be marked with suffix “W--A” (in
Canada “W”). Make sure your extension
cord is in good condition. Inspect extension
cord before use and replace if damaged. Do
not use a damaged cord. Cord insulation
must be intact with no cracks or deterioration. Plug connectors must be undamaged.
The extension cord used to reach the power source must be heavy enough to carry
current from the power source the full length
of the extension cord to the unit. An undersized extension cord will cause a drop in
line voltage resulting in loss of power and
overheating. If in doubt, use the next heavier gauge. The lower the gauge number, the
heavier the cord.
Do not use multiple cords.
Do not abuse cord. Never carry the unit by
the extension cord or yank extension cord
to disconnect unit. To unplug, grasp the
plug, not the cord. Do not use cord as a handle, close a door on cord, or pull cord
around sharp edges or corners. Do not expose cords to heat, oil, or water.
Keep the extension cord clear of operator and
obstacles at all times. Tie cord to cord retainer and connect to recessed plug as shown
in this manual to prevent damage to unit
and/or extension cord and to reduce the
possibility of the extension cord disconnecting from the unit during operation.
Do not attempt to repair unit. Inspect the insulation and connectors on the powerhead and
extension cord before each use. If there is
any damage, do not use until damage is repaired by your authorized service dealer.
Do not use the powerhead if the switch
does not turn the unit on and off properly.
Have the unit repaired by your authorized
service dealer.
Do not use with damaged cord or plug. If
powerhead is not working as it should, has
been dropped, damaged, left outdoors, or
dropped into water, return it to your authorized service dealer for repair.
Avoid unintentional starting of the unit. Never carry unit with your finger on the switch.
Be sure the switch is in the OFF position
and never touch the switch when connecting extension cord.
Unplug the unit from the power source when
not in use, before servicing, and when changing accessories and/or attachments.
Avoid any body contact with any grounded
conductor, such as metal fences, or pipes,
to avoid the possibility of electric shock.
S Ground Fault Circuit Interrupter (GFCI)
protection should be provided on the circuit
or outlet to be used for the powerhead. Receptacles are available having built-in
GFCI protection and may be used for this
measure of safety.
S Keep firm footing and balance. Do not overreach or stand on unstable surfaces.
S Always keep the wheel in contact with the
ground.
S Keep all parts of your body away from the
blade and muffler.
S Always push the unit slowly over the ground.
Stay alert for uneven sidewalks, holes in the
terrain, large roots, etc.
S Do not force the unit. Use only for jobs explained in this manual. Use only for edging.
Do not abuse unit. Do not use in rain or wet
locations.
S To reduce the risk of fire, do not allow excessive grass, leaves, or grease to accumulate
on the attachment.
S Objects struck by the cutting member can
cause serious injuries to persons. The lawn
should always be carefully examined and
cleared of all objects prior to edging.
S Never operate without blade shield in place
and in good working order.
UNIT/MAINTENANCE SAFETY
WARNING: Disconnect powerhead
spark plug (or disconnect powerhead from
power source) before performing maintenance.
S Inspect entire unit before each use. Replace
damaged parts. Check for fuel leaks. Make
sure all fasteners are in place and securely
fastened.
S Maintain unit according to recommended procedures.
S Throw away blades that are bent, warped,
cracked, broken, or damaged in any other
way. Replace parts that are cracked, chipped,
or damaged before using the unit.
S Use only recommended Poulan PRO parts
and accessories. Never use wire, wire
rope, string, flailing devices, etc.
S Be sure blade stops turning when engine
idles (see CARBURETOR ADJUSTMENTS section of powerhead manual).
S Remove the blade before making carburetor
adjustments. Hold the unit by hand. Do not
make carburetor adjustments from the blade
side of the unit.
S Keep others away when making carburetor
adjustments.
S Never start the unit with the clutch housing removed. The clutch can fly off and cause serious injury.
S Have all maintenance and service not explained in this manual performed by an authorized service dealer.
S If blade strikes a foreign object, follow these
steps: stop unit and disconnect spark plug
wire (or disconnect from power source), inspect for damage, and repair any damage before resuming operation of the unit.
TRANSPORTING AND STORAGE
S Do not grasp or hold exposed blade.
S Stop powerhead before leaving work area.
S Allow powerhead and gearbox to cool before
storing or transporting it in a vehicle.
S Store unit and fuel in area where fuel vapors
cannot reach sparks or open flames from water heaters, electric motors or switches, furnaces, etc.
S Store attachment so blade cannot accidentally cause injury.
S Store attachment indoors, out of reach of
children.
If situations occur which are not covered in
this manual, use care and good judgment. If
you need assistance, call 1-800-554-6723.
SPECIAL NOTICE: Exposure to vibrations through prolonged use of gasoline powered hand tools could cause blood vessel or
nerve damage in the fingers, hands, and
joints of people prone to circulation disorders
or abnormal swellings. Prolonged use in cold
weather has been linked to blood vessel damage in otherwise healthy people. If symptoms
occur such as numbness, pain, loss of
strength, change in skin color or texture, or
loss of feeling in the fingers, hands, or joints,
discontinue the use of this tool and seek medical attention. An anti-vibration system does
not guarantee the avoidance of these problems. Users who operate power tools on a
continual and regular basis must monitor
closely their physical condition and the condition of this unit.
EDGING SAFETY
WARNING: Inspect the area to be
edged before each use. Remove objects
(rocks, broken glass, nails, wire, string, etc.)
which can be thrown by the blade or can wrap
around the shaft.
S Keep others including children, animals, bystanders, and helpers at least 50 feet (15 meters) away. Stop the unit immediately if you
are approached.
S Hold the unit firmly with both hands.
SAVE THESE INSTRUCTIONS
4
OPERATION
KNOW YOUR EDGER ATTACHMENT
READ THIS INSTRUCTION MANUAL AND SAFETY RULES BEFORE OPERATING YOUR EDGER ATTACHMENT. Compare the illustrations with your attachment to familiarize yourself with the
location of the various controls and adjustments. Save this manual for future reference.
Hanger
Depth Adjustment Knob
Shaft
Blade Shield
Wheel
Gearbox
Edger Blade
BLADE
DEPTH ADJUSTMENT KNOB
OPERATING THE COUPLER
2. Press and hold the locking/release button.
The BLADE is designed to cut sod.
The DEPTH ADJUSTMENT KNOB is used
to adjust the wheel for blade cutting depth.
Your powerhead is equipped with a coupler
which enables optional attachments to be
installed. The optional attachments are:
MODEL:
Cultivator . . . . . . . . . . . . . . . . . . PPB2000T
Blower . . . . . . . . . . . . . . . . . . . . PPB3000B
Pruner . . . . . . . . . . . . . . . . . . . . PPB5000P
Brushcutter* . . . . . . . . . . . . . . . PPB4000C
*not designed for use with electric powerheads
Locking/Release
Button
Attachment
Upper Shaft
3. While securely holding the upper shaft,
pull the attachment straight out of the coupler.
WARNING: Always disconnect powerhead spark plug (or disconnect powerhead
from power source) before removing or installing attachments.
INSTALLING ATTACHMENT
1. Remove the shaft cap from the attachment
(if present) and discard.
2. Position locking/release button of attachment into guide recess of upper shaft coupler.
3. Push the attachment into the coupler until
the locking/release button snaps into the
primary hole.
4. Before using the unit, tighten the knob securely by turning clockwise.
REMOVING ATTACHMENT
CAUTION: When removing or installing at-
tachments, place the powerhead and attachment on a flat surface for stability.
1. Loosen the coupler by turning the knob
counterclockwise.
Coupler
Attachment
Coupler
Coupler Primary Hole
Guide Recess
LOOSEN
Upper
Shaft
Knob
TIGHTEN
5
Locking/
Release Attachment
Button
EDGING
WARNING:
Make sure the locking/
release button is locked in the primary hole
and the knob is securely tightened before operating the unit. Using the wrong hole could
lead to serious injury or damage to the unit.
As you become familiar with use of your edger
attachment, you will be able to determine your
own operating pace. Conditions such as
depth of cut and material being cut will regulate the speed and time required for your edging job.
S Allow the engine to warm up before you begin
edging.
S Increase the engine speed before placing the
blade in the cut. For best results, run the engine at full throttle while cutting.
S Always work going away from people and
solid objects such as walls, large stones,
trees, automobiles, etc.
S Be careful when edging near trees or valuable
plants. The high speed metal blade may cut
roots and cause damage to the plants.
S If the blade stalls, immediately move the unit
back slightly to allow the blade to restart. If the
blade continues to stall, stop the engine, disconnect the spark plug, and inspect for blockage or damage.
Locking/Release
Button in Primary Hole
INSTALLING ATTACHMENT
HANGER
An attachment hanger is provided for storage
when attachment is not in use.
To install hanger on attachment:
1. Remove the shaft cap from the attachment
(if present) and discard.
2. Press and hold the locking/release button.
3. Push hanger onto the attachment until the
locking/release button snaps into the hole.
WARNING: Keep the blade area
clean. Always release the throttle trigger,
move the powerhead ON/OFF switch to the
OFF position, disconnect the spark plug (or
disconnect powerhead from power source),
and make sure the blade has completely
stopped turning before cleaning.
OPERATING POSITION
ALWAYS WEAR:
Hearing
Protection
Head Protection
SETTING THE EDGING DEPTH
Eye Protection
WARNING: Never attempt to adjust
the cut depth when the engine is running. Always release the throttle trigger, wait until the
blade stops turning, move the powerhead
ON/OFF switch to the OFF position, and disconnect spark plug (or disconnect from power source) before making adjustments.
Long Pants
Heavy Shoes
Depth Adjustment
Knob
When operating unit, stand as shown and
check for the following:
S Wear eye protection and heavy clothing.
S Keep right arm slightly bent with right hand
holding the trigger handle of powerhead.
S Keep left arm extended with left hand holding the handle.
S Keep unit below waist level.
S Adjust edger wheel for proper cut depth.
1. Loosen the depth adjustment knob.
2. Slide the wheel to the desired position.
S Raising the wheel will increase the cutting depth.
S Lowering the wheel will decrease the
cutting depth.
3. Tighten the depth adjustment knob securely.
WARNING: Never attempt to adjust
the edger wheel when the unit is in operation.
Always stop the powerhead, wait until the
blade stops turning, and disconnect the spark
plug (or disconnect powerhead from power
source) before making adjustments.
6
MAINTENANCE
BLADE MAINTENANCE
WARNING:
Always stop unit and disconnect spark plug wire (or disconnect powerhead from power source) before performing
maintenance.
WARNING: The blade will continue
to spin after the engine stops or after the
throttle trigger has been released. To avoid
serious injury, make sure the blade has
stopped coasting and disconnect the spark
plug (or disconnect powerhead from power
source) before performing work on the blade.
CHECK FOR DAMAGED OR
WORN PARTS
Contact an authorized service dealer for replacement of damaged or worn parts.
S Blade Shield -- Discontinue use of edger if
blade shield is damaged.
WARNING: Always replace a blade
that is bent, warped, cracked, broken, or
damaged in any other way. Never attempt to
straighten and reuse a damaged blade. Use
only specified replacement blade. Wear protective gloves when handling or performing
maintenance on the blade to help avoid injury.
S The blade is reversible. When the cutting
edge on one side becomes worn, turn the
blade over (see BLADE REPLACEMENT
in the SERVICE AND ADJUSTMENTS
section).
S Check blade for flatness periodically. Lay
the blade on a flat surface to inspect for flatness. Throw away a blade that is not flat.
CHECK FOR LOOSE
FASTENERS AND PARTS
S Blade nut
S Fasteners
INSPECT AND CLEAN UNIT AND
DECALS
S After each use, inspect complete unit for
loose or damaged parts. Clean the unit and
decals using a damp cloth with a mild detergent.
S Wipe off unit with a clean dry cloth.
SERVICE AND ADJUSTMENTS
BLADE REPLACEMENT
3. While holding the screwdriver in position,
remove blade nut by turning clockwise.
4. Remove both washers, and the blade from
the blade shaft.
Blade shield
WARNING: The blade will continue to
spin after the engine stops or after the throttle
trigger has been released. To avoid serious
injury, make sure the blade has stopped
coasting and disconnect the spark plug (or
disconnect powerhead from power source)
before performing work on the blade.
Blade
Washers
WARNING: Wear protective gloves
when handling or performing maintenance on
the blade to avoid injury. The blade is sharp and
can cut you even when it is not moving.
1. To remove the blade, align hole in the dust
cup with the hole in the side of the gearbox
by rotating the blade.
2. Insert a small screwdriver into aligned
holes. This will keep the shaft from turning
while loosening the blade nut.
5.
6.
7.
8.
9.
Screwdriver
7
Blade
Blade nut
Shaft
Install new blade onto blade shaft.
Reinstall both washers and blade nut
(counterclockwise).
Tighten blade nut firmly with a wrench
while holding screwdriver in position.
Remove the screwdriver.
Turn blade by hand. If the blade binds
against the shield, or appears to be uneven, the blade is not centered, and you
must reinstall.
STORAGE
WARNING:
S Clean the entire attachment.
S Inspect the blade shield area and clean any
dirt, grass, leaves, or debris that has collected. Inspect the blade and blade shield; replace a blade that is bent, warped, cracked,
broken or damaged in any other way.
S Lightly oil external metal surfaces.
S Apply a coating of oil to the entire surface of
the blade; wrap it in heavy paper or cloth.
S Check entire attachment for loose screws
or nuts. Replace any damaged, worn or
broken parts.
S At the beginning of the next season, use
only fresh fuel having the proper gasoline to
oil ratio.
Perform the following
steps after each use:
S Allow attachment and gearbox to cool before storing or transporting.
S Store attachment with blade shield in place.
Position attachment so that any sharp object cannot accidentally cause injury.
S Store the attachment in a dry, well ventilated area out of the reach of children.
SEASONAL STORAGE
Prepare attachment for storage at end of season or if it will not be used for 30 days or more.
If your edger attachment is to be stored for a
period of time:
LIMITED WARRANTY
Poulan PRO, a division of Husqvarna Consumer Outdoor Products N.A., Inc., warrants to the
original consumer purchaser that each new
Poulan PRO brand gasoline tool or attachment
is free from defects in material and workmanship and agrees to repair or replace under this
warranty any defective gasoline product or attachment as follows from the original date of
purchase.
2 YEARS - Parts and Labor, when used for
household purposes.
90 DAYS - Parts and Labor, when used for
commercial, professional, or income producing
purposes.
30 DAYS - Parts and Labor, if used for rental
purposes.
This warranty is not transferable and does not
cover damage or liability caused by improper
handling, improper maintenance or alteration, or
the use of accessories and/or attachments not
specifically recommended by Poulan PRO for
this tool. This warranty does not cover tune--up,
spark plugs, filters, starter ropes, starter springs,
cutting line, or rotating head parts that will wear
and require replacement with reasonable use
during the warranty period. This warranty does
not cover pre--delivery setup or normal adjustments explained in the instruction manual. This
warranty does not cover transportation costs.In
the event you have a claim under this warranty,
you must return the product to an authorized
service dealer.
Should you have any unanswered questions
concerning this warranty, please contact:
Poulan, a division of Husqvarna
Consumer Outdoor Products N.A., Inc.
7349 Statesville Road
Charlotte, NC 28269
1--800--554--6723
In Canada, contact:
Poulan PRO
850 Matheson Blvd. West
Mississauga, Ontario L5V 0B4
Giving the model number, serial number and
date of purchase of your product and the name
and address of the authorized dealer from
whom it was purchased.
THIS WARRANTY GIVES YOU SPECIFIC
LEGAL RIGHTS, AND YOU MAY HAVE OTHER RIGHTS WHICH VARY FROM STATE TO
STATE.
NO CLAIMS FOR CONSEQUENTIAL OR
OTHER DAMAGES WILL BE ALLOWED,
AND THERE ARE NO OTHER EXPRESS
WARRANTIES EXCEPT THOSE EXPRESSLY STIPULATED HEREIN.
SOME STATES DO NOT ALLOW LIMITATIONS ON HOW LONG AN IMPLIED WARRANTY LASTS OR THE EXCLUSION OR
LIMITATIONS OF INCIDENTAL OR CONSEQUENTIAL DAMAGES, SO THE ABOVE LIMITATIONS OR EXCLUSION MAY NOT APPLY
TO YOU.
This is a limited warranty within the meaning of
that term as defined in the Magnuson--Moss Act
of 1975.
The policy of Poulan PRO is to continuously
improve its products. Therefore, Poulan
PRO reserves the right to change, modify, or
discontinue models, designs, specifications,
and accessories of all products at any time
without notice or obligation to any purchaser.
8