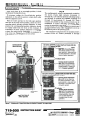
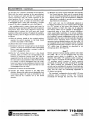
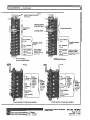
1
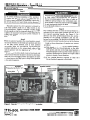
S8C Switch Operators
- Type CS-1A
INSTRUCTIONS
For Installation
ITABLE OF CONTENTS
I
Section
Page Number
Section
............................. 1
INSTALLATION . . . . . . . . . . . . . . . . . . . . . . . . . . . . .
.4
MANUAL OPERATION . . . . . . . . . . . . . . . . . . . . . . . . .
.8
INTRODUCTION
Page Number
ADJUSTMENTS
............................
INSPEGIlON SCHEDULE AND PROCEDURES
CHECKING SWITCH OPERATOR AND
CIRCUIT-SWITCHERPOSITIONS . . . . . . . .
.IO
. . . . . . . . . .18
. . . . . . . . . .21
I
I iTRODUCTjON
maximum. It is expressly designed for power operation
of S&C Circuit-Switchers-Mark V, as indicated in the
table below.
High-speed, high-torque poweroperation ofS&C
Circuit-Switchers-Mark V, by means of the S&C Switch
0perator”Type CS-lA, is essential in order to attain
thetwo-timeduty-cyclefault-closingratings
of
30,000 amperesrmsthree-phasesymmetrical,
76,500 amperespeak for Vertical-Break Style and
Integer Style models; and two-time duty-cycle faultclosing ratings of 40,000 amperesrmsthree-phase
symmetrical, 102,000 amperes peak for Center-Break
Style models.
The equipment covered by this publication must be
selectedfor a specific application and it mustbe
installed,operated,
and maintainedbyqualified
personswho
arethoroughlytrainedandwho
understand any hazards that may be involved. This
publication is written only for such qualified persons
and is not intended to be a substitute for adequate
training and experience in safety procedures for this
type of equipment.
The S&C Switch Operator-me CS-1A is a high-speed
operator having anoperatingtime
of 1.5 seconds
SWITCH OPERATORS-Type CS-1A
Application
High-Voltage
Device
Style and
Rating of
High-Voltage
Device
sac
Integer,
34 5 thru 69 kv
Mark V+
Circuit-Switcher
wlthout
Shunt-Trip
Devlce
S&C
Mark V+
Circult-Switcher
wlth
Shunt-Trip
Devlce
Vertlcal-Break,
34.5 thru 161 kv
Center-Break,
230 and 345 kv,
3 gaps
Minimum
Motor Locked-Rotor Maximum
and
at Rated
Control
Time,
Control Voltage,
Seconds@
Voltage
Inch-Lhs.
1.5 48
21 500
125 v dc
15
21 500
l5
6o hz
1.5
18 000
1.5
21 500
v dc
-
Ac~lerating TorqueCatalog
Operating
Number
Current,
Amperes
38845R4-A
30
38845R4-0
80
Schematic
Wiring
Diagram
Drawing
Number
CDRBl12R2
CDR-3123R2
38845R4-D
Integer,
34 5 thru 69 kv
Vertlcal-Break,
34,5 thru 161 k v
Center-Break,
230 and 345 kv,
3 gaps
CDR-3183 38846R5-AHP 80
v dc
125 v dc
30
38846R5-0.
CDR-3184A
1
0
Basedonminimumbatteryandexternalcontrolwire-sizeCatalog
Number 38858Rl-B,
for
applications
where
the Circuitrequirements specified in S&C Data Bulletin 719-60; operatmg time Switcher
is used in conjunction with an S&CAutomatic Control Device,
will be less iflarger-than-minimum batterysize and/or external control unless the switch operator
is ordered with the optional Shunt-Trip
Contactor
and
Time-Delay Relay accessory,
Catalog
Number Suffi
wire size is utilized
for use with
‘-HI‘.” Inthisinstance,thecatalognumber is 38846R5-BHP.
+ The Type cs-IAswitch operator is also
equivalentmodels of Mark 11, Mark 111, and Mark IVCircuit-Swtchers.
CDR-3183forCatalogNumber
38846R5-BHP. CDR-3195 for
Catalog Number38858R1-B.
*
Supersedes lnstructlon Sheet 719-500 dated 70-28-85
@1993
INSTRUCTION SHEET
S&C ELECTRIC COMPANY Chicago
CANADA
ELECTRIC
S&C
LTD.
September
Toronto
7 1gm50o
Page 1 of 21
7,1993
S&C Switch Operators
- Type CS-I A
I
1 INTRODUCTION - Continued
Power operation of S&C Circuit-Switchers-Mark V,
by means of the S&C Switch Operator--Type CS-lA,
also provides opening and closing without hesitation
under %-inch ice formation for Vertical-Break and
Integer Style models, 1%-inchice formation for CenterBreak Style models; close interphase simultaneity, long
life of fault-closing contacts under normal operating
duties; and avoidance of excessive switching transients
due toprolonged or unstable prestrikearcing.
Because of its high-speed operation, the S&C Switch
Operator-Type CS-1A is notsuitable for usewith
switches of other manufacture.
For6-gap S&C Circuit-Switchers, the S&C Switch
Operator-Type CS-2A is required.
and Type G,
For S&C Circuit-Switchers-TypeA
Vertical-Break Style, having reciprocating operating
mechanisms, the S&C Switch Operator-Type CS-10 is
required.
For S&C Alduti-Rupters Switches-Outdoor Distribution and S&C Alduti-Rupter Switches with Power
Fuses-Outdoor Distribution, S&C Switch OperatorsTypes AS-1A and AS10 are available.
For S&C Line-Rupters’”, the S&C Switch OperatorType LS-2 is available.
For switches of other manufacture, the S&C Switch
Operator-Type LS-1 is available. The LS-1 is a lowspeed operator with an operating time
of 4 to 7 seconds.
It is designed for power operation of outdoor highvoltage disconnects and interrupter switches
for which
this low operating speedis appropriate.
7 1gm50oINSTRUCTION
Page 2 of 21
September 7,1993
S&C Switch Operators--TypeCS-1A
includethe
following features as standard:
Built-in internal decoupling mechanism,operable by
integral external selector handle, with padlocking
provisions andautomaticmechanical
locking of
output shaft. Laminated safety-plate
window permits
%ible air-gap” verification of complete disengagement of output shaft.
Open-close pushbuttons, externally operable, with
padlockable cover.
Built-in nonremovable, foldaway manual operating
handle.
0 Mechanicalpositionindicatorsforbothswitch
operator and Circuit-Switcher “open” and “closed”
positions.
Non-reset electric operation counter.
0 Laminatedsafety-platewindow
for inspection of
built-in internal decoupling mechanism, mechanical
position indicators, and operationcounter(and
position-indicating
lamps,
if furnished as
accessories).
Foolproofrecoupling.Impossiblewithpositionindexing drums to couple the switch operator and
the Circuit-Switcher “unsynchronized.”
0 Fingertipprecisionadjustment
of output-shaft
rotation using self-lockingspring-biased cams.
0 Eight-pole auxiliary switch, coupled to motor, with
fingertip precision adjustment of individual contacts
using self-lockingspring-biased cams.
SHEET
S&C ELECTRIC COMPANY Chicago
S&C ELECTRIC CANADA LTD. 0 Toronto
ermostat
I INTRODUCTION - Continued
Antifrictionbearings
throughout;tapered roller
bearings for all high-torque gear-train shafts.
Two-pole pull-outfuseholdersformotor,spaceheater, and(if applicable) shunt-trip circuits.
Weatherproof, dustproof enclosure, equipped
with
120/240-volt ac space heater, factory-connected for
240-volt acoperation.Canreadilybefieldreconnected for 120-volt ac operation.
Tamper-resistant design-welded enclosure; baffled
louvers; gasketed, flanged door openings; cam-action
door latch;provisions for padlocking.
Foul-weather accessibility to interior of enclosure.
Access is by door rather than by removal of entire
enclosure.
Switch operator catalog numbers are suffied with
one or more letters.The first letter following the catalog
number designates the motor and control voltage:
SUfEX
Voltage
-A
-B
-D.
48 volts dc
125 volts dc
115 volts 60 hz
Not applicablet o Catalog Numbers 38846R5 or 38858R1.
Other s u f f i letters which may be added to the
switch
operator catalognumberindicate
the inclusion of
optional accessories as follows:
ACCESSORIES
Suffix Added to
Item
Switch Operator
Calaloa Number
Shunt-Trlp Contactor and Tlme-Delay Relay, minimize control-current inrush by energlzlng shunt-tnp device and
swltch operator motor In sequence@@
-HP
Deletion of Externallv Ooerable ODen-Close Pushbuttons
-J
-
I
I
1 Space Heater
I Key interlock
Swltch,
wlth
locks
Clrcult-Switcher
dfsconnects
and
open motor-control
circuit
-K
-L
Posltlon-Indicating Lamps (one red, one green), mounted inside the enclosure@
"
Extra Auxiliary Swltch (Indlvldually adjustable contacts),
4-PST (coupled to motor)
-Q
Duplex Receptacle and Convenience-Llght Lampholderwlth Swltch
-V
I Extra
Auxlllary
Switch
(Indlvidually
adjustable
contacts),
I
8-PST (coupled
Clrcult-Switcher)@
to
~~
~
____~
-W
-Y
Extra Auxillary Switch (indivldually adjustable contacts),
12-PST (coupled to Circuit-Sw!tcher)@
-Z
-
@ Notavailablewith
ber 38858R1-B.
@ Not available in applications utilizing an
Relav and ControlPack
0 The 8-pST extra
I
~~
Remote-Control Blocking Swltch, prevents remote operation
ofswitch operator when the protective coverfor the
externally mounted open-close pushbuttons IS open
@ Available as an optionalaccessory only with S&C Switch Operator
Catalog Number 38846R5-B included as standard eauimnent with
Catalog Number 38846R5-AhP. Permits use of minun;m&e
control
wire. Refer to S&C Data Bulletin719-60.
I
I
switch (suffix
S&C Circuit-Switcher
u-w)
be furnIShed
if the 12-PST version (suffm"77) IS specified, and vice versa.
S&C SwitchOperatorCatalogNum-
INSTRUCTION SHEET
S&C ELECTRIC COMPANY
Page Chicago
S&C ELECTRIC CANADA LTD. Toronto
7 1gm50o
3 of 21
September 7,1993
SBC Switch Operators
- Type CS-1A
I INSTALLATION
I
Step 1
Mount the switch operator as indicated on the erection
drawing. Then attach a flexible coupling to the output
shaft of the switch operator. See Figure 1. Thread the
attachment bolts through the flexible coupling plate
and through the coupling flange on the output shaft.
Tighten the bolts to draw the
flexible plate flush against
the flange; this w
l
i deform the threads in the flexible
plate, resultingin a binding, nonslip connection. Install
and tighten the self-locking nuts. D o not use lockwashers with the attachmentbolts.
Remove the clampbolts and set aside the detachable
half of the flexible coupling.
Make certain that the cutting tips of the piercing
set screws do not protrude through the body of the
flexible coupling on the switch operator output shaft
andthe flexiblecoupling
attachedtotheshaft
extending from the gearbox on the Circuit-Switcher
pole-unit base.
Install the vertical shaftbetween the flexible coupling
that is attached tot,heshaft extending from the gearbox
on the Circuit-Switcher pole-unit base and the flexible
coupling attached to theswitch operator outputshaft.
At the gearbox end of the vertical shaft, tighten the
flexible coupling clamp bolts equally so that theclamp
pulls down evenly. Then tighten the associated piercing
7 1~ ~ 5 0 4INSTRUCTION
3
Page 4 of 21
September 7,1993
set screws, piercing the shaft, andcontinue turning until
a firm resistance is felt.
At the switch operator output shaft,
replace the
detachable half of the flexible coupling, but do not
tighten the clamp bolts or the piercing set screws at
this time.
step 2
Mark the conduit-entrance location for the controlcircuit wiring on the conduit-entranceplate in the
bottom of the switch operator enclosure. See Figure 2.
Remove the conduit-entrance plate and cut out the
necessary opening. (If the Circuit-Switcher is equipped
with optional S&C Shunt-Trip Device, anentrance
cutout for an additional one-inch conduit should also
be made at this time.)
Replace the conduit-entrance plate and
make up the
entrance fittings. Apply sealing compound (provided
with each switch operator) when replacing the conduitentrance plate. Verlfy that the entrance fittings are
properly sealedto prevent water ingress.
step 3
If Circuit-Switcher is equipped with the optional shunttrip device, install the one-inch-diameterconduit
between adjacentshunt-trip solenoid housings and
SHEET
S&C ELECTRIC COMPANY 0 Chicago
S&C ELECTRIC CANADA LTD. Toronto
1 INSTALLATION - Continued
Piercing set screws
Attachment bolt
Flexible coupling
Circuit-Switcher
position indicators
Switch operator
Alignment arrow
L Self-locking nut
1
Latch knob
Manual operating
handle (in storage
/
Door handle
Figure 1. Exterior view of switch operator.
INSTRUCTION SHEET
lzl
S&C ELECTRIC COMPANY . Chicago
S&C ELECTRIC CANADA LTD. l Toronto
7 1 Q-500
Page 5 of 21
September 7,1gg3
S&C Switch Operators - Type CS-1 A
1 INSTALLATION - Continued
I
between one solenoid housing and the switch operator.
Refer to S&C Instruction Sheet 71 l-600.
f343P4
I
Remove the blocking from the motor contactors.
Connect the external control-circuit wiring (including space-heater source leads) to the terminal blocks
of the switch operator in accordance with the wiring
diagram furnished.
To avoid accidental cnergking of the operator after
the external connections have been completed,
remove the two-pole pull-out fuseholders for the
motor, space-heater, and (if applicable) shunt-trip
circuits. See Figure 2. Reinsert the fuseholders only
when indicated in the steps which follow.
Key interlock with switch
(Catalog Number Suffix ‘I-L”)
Operation counter
(optional on earlier models)
Pushbutton protective cover (closed)
Arrow plate .
-
Travel-limit discs -
_..
Position. -indexing drums
-
-
Travel-limit switch
Auxiliary switch, 8-PST
Extra auxil~aryawltch, O-PST
(Catalog Number Suffix “-WI’);
1PPST version (Cablog Number
Suffix “-Z”) is similar ‘i
- Extra auxiliary switch, 4-PST
(Catalog Number Suffix “47’)
I
Motor contactor, opening ’
.
Motor contactor, closing ’
Conduit-entrance plate ’
Motor-circuit two-pole
pull-out fuseholder
(control-source fuses
,$md two-pole controlsource disconnect
switch on earlier models)
Manual operating handle interlock switch
and mechanical blocking rods
FiguFe 2. Interior views of switch operator.
7
19.5()0 INSTRUCTION SHEET
Page 6 of 21
September 7,1993
S&C ELECTRIC COMPANY * Chm
S&C ELECTRIC CANADA LTD. l Toronto
I
1 INSTALLATION - Continued
Unauthorized changes should not be made in the
wiring of this switch operator. Should a controlcircuit revision appear desirable, it should be made
only on the authority of a revised wiring diagram
which has been approved by both the user and S&C
Electric Company.
Observe recommended minimum wire-size requirements for the control-circuit wiring, and the shunttrip device wiring where applicable, as shown in
S&C Data Bulletin 719-60 and on the switch
operator schematic wiring diagram furnished.
Note: Wiping must be complete and adequate control
voltage must be available at the switch operator before
checkout by an S&Cfac&ny specialist.
Position-indicating lamps
(Catalog Number Suffix “-M”)
Remote-control blocking switch
(Catalog Number Suffix “-Y”)
“Open-close” pushbuttons
Brake-release solenoid
/
Duolex receotacle and convenience-liaht
lampholder with switch (Catalog Number
Suffix “4”)
Time-delay and
auxtllary relays
62 and 62X (Catalog
Number Suffix “-HP”)
(shunt-trip redundant
/relay on earlier
models)
Shunt-trip circuit two-pole
pull-out fuseholder
Instruction manual
holder
Instructions, switch operator
travel-limit adjustment
Shunt-trip contactor
(Catalog Number
Suffix “-HP”)
(shunt-trip solenoid
switch on earlier
models)
*’
IA
Terminal block
Door gasket
/
Filter holder ’
Space heater J
Space-heater circuit two-pole pull-out
fuseholder (space heater fuses on
earlier models)
INSTRUCTION SHEET
m S&C ELECTRIC COMPANY l Chicago
S&C ELECTRIC CANADA LTD. l Toronto
7 1 Q-500
Page 7 of 21
September 7,1gg3
S&C Switch Operators - Type CS-1 A
MANUAL OPERATION
Before proceeding further, the user should become
familiar with the operation of the manual operating
handle and the selector handle, as described on the
switch operator nameplate on the right-hand side of
the enclosure and in Steps 5, 6, and 7 below. See
Figures 3 and 4.
Vertical shaft
Manual cInsing of an mZz& Ckuit-Switcher is
not recommended because of the possibility of
closing into a fault. Manual opening of an energized
Circuit-Switcher is permissible. Once the opening
operation has been initiated, however, it should be
completed with dispatch. Cranking should continue
until the Circuit-Switcher is fully open, as indicated
by resistance which will be felt as the CircuitSwitcher power train progresses to its stops. As the
Circuit-Switcher moves toward the open position,
the interrupters will close and the stored-energy
source within the brains will charge and latch. The
Circuit-Switcher disconnect blades should never be
in the closed position when the interrupters are
in the open position.
I
Selector handle (being turned
to decoupled position)
,
Figure 3. Manual operation.
Figure 4. Selector handle operation.
7 1 Q-500 INSTRUCTION SHEET
Page 8 of 21
September 7,1993
S&C ELECTRIC COMPANY * Chf
S&C ELECTRIC CANADA LTD. * Toronto
q
.
I MANUAL
OPERATION - Continued
Step 5
To operate manually: Pull the latch knob on the hub
of the manual operating handle and pivot the handle
forward slightly from its storage position. Release the
latch knob while continuing topivot the handleforward
to lock it into the cranking position. See Figures 1 and 3.
(As the handle is pivoted forward the motor brake is
mechanically released, both leads of the control source
are automatically disconnected,and both the
“opening”
and “closing” motorcontactorsaremechanically
blocked in the open position. However, the shunt-trip
device-when this option is provided-remains operative unless the switch operator is in the open position.)
If desired,duringmanualoperation,
the switch
operator may also be disconnected from the control
source by removing the motor-circuit two-pole pull-out
fuseholder, locatedon the right-handinside wall of the
enclosure. Likewise, theshunt-trip device may be
rendered inoperativeby removing the shunt-tripcircuit
two-pole pull-out fuseholder, located on the left-hand
inside wall of the enclosure.
To return the manual operating handleitsto storage
position, pull thelatch knob and pivot the handle
approximately 90 degrees. The handle wiU then be
disengaged from the switch operatorand may be
rotated freely in either direction to its storageposition.
Complete the handle storageby pivoting the operating
handlebackwardapproximately
90 degrees until it
latches in the storage position.
Note thatthemanualoperating
handle may be
disengaged from the switch operator mechanism at any
position of the handle. However, if the switch operator
and Circuit-Switcher are at any position between fully
open and fully closed when themanualoperating
handle is placed in the storageposition, and themotorcircuit fuseholder is inserted, the switch operator w
li
automatically move to the open position (because the
switch operator control circuit is designed to allow an
electrical closing only from the fully open position of
Circuit-Switcher).
The handle may be padlocked in its storageposition.
Step 6
To decouple:The integral external selector handle, for
operation of the built-in internal decoupling mechanism, is located on the right-hand side of the switch
operator enclosure. See Figure 3. Swing the selector
handle uprightand slowly rotate itclockwise 50 degrees
to thedecoupled position. See Figure 4. This decouples
the switchoperatormechanism
from the switch
operator output shaft. Then lower the selector handle
to engage the locking tab. When thus decoupled, the
switch operator may be operated either manually or
electrically withoutoperating the Circuit-Switcher.
When the selector handle is in the decoupled position,
the shunt-trip device (when this option is provided)
is rendered inoperative.* Moreover, in the decoupled
position, the switch operator’s output shaftis prevented
from moving by a mechanical locking device located
within the switch operator enclosure. During the
intermediate segment of the selectorhandle travel,
which includes the position at which actual disengagement(orengagement)
of theinternal decoupling
mechanism occurs, the motor-circuit source leads are
momentarily disconnected and both the “opening”and
“closing”motor contactorsare mechanically blocked in
the openposition.
Visual inspection, throughthe
observation window, will v e r a whether the internal
decoupling mechanism is in the coupled or decoupled
position. See Figure 5. Theselectorhandle
may be
padlocked in either position.
step 7
To couple: Manually operate the switch operator to
bring it to the same position (open or closed) as the
Circuit-Switcher. The switch operator position indicator, seen through the observation window, w
li show
when the approximateopen or closed position has been
attained. (Thepositionindicatorfor
the CircuitSwitcher, located on the output-shaft collar of the
switch operator, will be aligned later.) Tomove the
switch operator to the exact
position for coupling, turn
the manual operatinghandle slowly until the positionindexing drums are numerically aligned. Then swing
the selector handle uprightand rotateit counterclockwise to the
coupled position. Lower the handle to engage
the locking tab. The selectorhandle is nowin the
coupled position.
*
Only the shunt-trip device is renderedinoperative.Theswitch
user’s protective-relay circuit.
operator canstill be opened through the
Thus “elective? checkout of the system protective scheme IS possible
at any time.
INSTRUCTION SHEET
S&C ELECTRIC COMPANY
Page Chicago
September
Toronto
S&C ELECTRIC CANADA LTD.
7 19-500
9 of 21
7,1993
S&C Switch Operators - Type CS-1 A
I ADJUSTMENTS
I
step 8
remove the two-pole pull-out fuseholders for the
motor, space-heater, and (if applicable) shunt-trip
circuits and do not reinsert them until so directed.
Manually operate the switch operator to bring it to
the same position (fully open or fully closed) as the
Circuit-Switcher. Tighten the flexible coupling clamp
bolts equally so that the clamp pulls down evenly. Then
tighten the associated piercing set screws, piercing the
shaft, and continue turning until a firm resistance is
felt. See Figure 3.
Step 9
With the selector handle in the coupled position, crank
the Circuit-Switcher to the fully open position and then
to the fully closed position, and in each position
accurately align the mechanical Circuit-Switcher
position indicators on the output-shaft collar of the
switch operator with the alignment arrow below. See
Figure 1.
At this time, the drive-shaft crank of each pole-unit
of the Circuit-Switcher should be checked to determine
that it is in an overtoggle position and against its open
or closed stop at the fully open or fully closed position
of the switch operator.
Avoid forcing the power tram beyond the fully open
or fully closed Circuit-Switcher stop positions.
Forced cranking against these stops can build up
sufficient spring energy in the vertical and inter,$hase shafts to cause the manual operating handle
to spin backwards should the grasp on the handle
be accidentally released.
step 10
The cranking direction to close the Circuit-Switcher is
indicated by an arrow plate located near the hub of
the manual operating handle. See Figure 5. This
direction has been predetermined from the erection
drawing for the specific installation and has been
factory-set accordingly. The direction of rotation of the
switch-operator motor has also been set at the factory.
Verify that these directions of rotation are correct
as follows:
(a) With the selector handle in the coupled position,
manually crank the Circuit-Switcher to the fully
open position and then to the fully closed position.
Temporarily mark on the top of the switch operator
enclosure the direction in which the output shaft
rotates to close the Circuit-Switcher.
(b) If the cranking direction required to close the
Circuit-Switcher is opposite to that indicated by the
Position-indicating lamps
Figure 5. Views of switch operator througtl observation window.
7 1 Q1500
Page 10 of 21
September 7,1993
INSTRUCTION SHEET
S&C ELECTRlC COMPANY * Chiubgn
S&C ELECTRIC CANADA LTD. l Toronto
1ADJUSTMENTS - Continued
arrowplate,removethearrow-platemounting
screws and remount the arrow plate, exposing its
opposite side.
(c) With the manual operating handle in its storage
position and the selector handle in the decoupled
position, reinsertthemotor-circuitfuseholder.
Open the pushbuttonprotective cover. and operate
the switch operator by means of the externally
mounted "Open-Close" pushbuttons, if provided, or
in theirabsence, by momentarilyjumpering
terminals 1 and 8 to open, and 1 and 9 to c1ose.v
Note the direction in which the travel-limit discs
rotate when theswitch operator closes.The direction
should agree with the temporary direction mark
previously made on the top of the enclosure and
with the direction displayed in the cutawaysection
on the outer ring of the travel-limit discs. See Figure 6. ( A s a matter of information, the direction
of rotation of the travel-limit discs is always the
same as the direction of rotation of the output
shaft.)
(d) In the event that the direction of rotation of the
travel-limit discs noted in (c) above is opposite to
the temporary direction mark previously made in
(a) above, a reversal of the motor direction will be
necessary. Remove the m t o r d r c u i t fuseholder to
avoid accidentalorremote
energization of the
control circuit. Interchange the"Sl" and "S2"motor
leads connected to terminals
4 and 5 on the terminal
block in the switch operator enclosure.
It should be noted particularly that reversal of
the motor direction reverses only the direction of
rotation of the output shaft andtravel-limit discs.
The identity of the opening-stroke and closingstroke travel-limit discs (which will beadjusted
later) will remain unaffected.
(e> In the event that the direction of rotation of the
travel-limit discs noted in (c) above is opposite to
the direction displayed in the cutaway section on
the outerring of the closing-stroke travel-limit disc,
remove the positioning screws on the outer ring
of the closing-stroke travel-limit disc. See Figure 6.
Rotate the outer ring until the desired direction
is displayed in the cutaway section. Replace the
positioning screws.
(f) Reinsert the motor-circuit fuseholder and operate
the switch operator to theopen position.
(g) If the direction of output-shaft rotation to open
the Circuit-Switcher is opposite to that displayed
in the cutaway section on the outer ring of the
opening-stroke travel-limit disc, change the direction displayed as indicated in (e) above.
step 11
The travel-limit switch (coupled to the motor), which
governs theextent of output-shaftrotation in the
opening and closing directions, includes six contacts
that are operatedby cam-actuated rollers. Positioning
of the cams to properly
engage the rollers is facilitated
by the travel-limit discs (upper one is the openingstroke travel-limit disc; lower one is the closing-stroke
travel-limit discj.
Adjustment of the opening-stroke travel-limit disc
(and therefore the associated cams) is accomplished
as follows:
(a) Remove the motorcircuit fuseholder.
(b) Place the selector handle in the coupled position
and manually crank the Circuit-Switcher to the
open position.
(c) For the Circuit-Switcher style installed andits
number of interrupting gaps per pole-unit, determine from Table I the "Indicator-Plate Number" to
which the opening-stroke travel-limit disc is to be
rotated. Select the indicator-platenumber fromthe
"Opening-Stroke Adjustment-Clockwise to Open"
column if the disc and output shaft rotate in the
clockwise direction to open the Circuit-Switcher, or
from the "Opening-Stroke Adjustment-Counterclockwise to Open" column if the disc and output
shaft rotate in the counterclockwise direction to
open theCircuit-Switcher.
(d)Grasp the handwheel and turn it to the extent
possible in a direction opposite to thedirection the
output shaft rotates to open the Circuit-Switcher.
See Figure 6.
(e) With the handwheel held in the position indicated
above, raisethe opening-stroke travel-limit disc
approximately 3/16 of an inch and rotate the disc
until the arrowon its outer ring is in line with the
number onthe indicator plate
as specified in TableI.
Lower the disc, make sure it is engaged, and release
the handwheel.
For switch operatorswith optional remotecontrol blocking switch
(suffix u-Yn), opening the pushbutton protectivecover prevents remote
operation of the switch operator.
Terminal designations may differ in special wiring diagrams. In
such cases, refer to thespecific wiring diagram for the correctterminal
designations.
INSTRUCTION SHEET
S&C ELECTRIC COMPANY
Chicago
S&C ELECTRIC CANADA LTD.
0
Toronto
7 1gm50o
Page 11 of 21
September 7,1993
S&C Switch Operators - Type CS-1 A
(ADJUSTMENTS - Continued
I
TABLE I-INITIAL ADJUSTMENT OF TRAVEL-LIMIT DISCS
Indicator-Plate Number
Number of
Interrupting gaps
per Pole-Unit
Circuit-Switcher Style
Vertical-Break
_
and
Center-Break
Integer
I
Counterclockwise
to Open
Clockwise to Open
1
5
2
3
1
Closing-Stroke Adjustment
Opening-Stroke Adjustment
5
6
I
5
4
7
6
I
5
5
3
4
Counterclockwise
to Close
Clockwlse to Close
I
5
5
5
I
5
5
I
Switch operator
position indicator (opened)
r
Positioning srews
Opening-stroke travel-limit
disc (in raised position)
Cutaway section (on
outer ring)
Arrow (on cutaway
section)
Indicator plate (with numbers)
Adjustment of opening-stroke travel-limit disc.
Switch operator
position indicator (closed)
r
Indicator plate (with numbers)
Closing-stroke travel-limit
disc (in lowered position)
Arrow (on cutaway
section)
Cutaway section (on outer ring)
Figure 6. Adjustment of travel-limit discs.
7 1 Q-500
Page 12 of 21
September 7,1993
INSTRUCTION SHEET
S&C ELECTRIC COMPANY l Chtcago
S&C ELECT-WC CANADA LTD. - Toronto
!El
I
1ADJUSTMENTS - Continued
Step 12
Adjustment of the closing-stroke travel-limit disc (and
therefore the associatedcams)
is accomplished as
follows:
(a) Manually crank the Circuit-Switcher to the fully
closed position.
(b) Grasp the handwheel and turn it to the extent
possible in a direction opposite to thedirection the
output shaft rotates to close the Circuit-Switcher.
See Figure 6.
(c) With the handwheel held in the position indicated
above, lower the closing-stroke travel-limit disc
approximately 3/16 of an inch and rotate the disc
until the arrow on the outer ring is in line with
the number 5 on the indicator plate. Raise the disc,
make sure it is engaged, and release the handwheel.
Step 13
To preclude the possibility of a malfunction (with
resultant possible damage) due to improper adjustment, perform the following check
(a) Place the selector handle i n the decoupled position.
(b) Return the manual operating handle to its storage
position.
(c) Reinsert the motor-circuit fuseholder.
(d) Operate the switch operator electrically to open and
to close as described in Step lO(c). Verlfy that the
rotationdirection
of the travel-limitdiscs for
opening and closing corresponds with the direction
of rotation of theoutputshaftandthatthese
directions agree with the direction displayed in the
cutaway sectionon the outer ring of the travel-limit
discs.
Note that, when electrical operation is performed
the travelunder thedecoupled or “no load” condition,
limit discs do not stop at the indicator-platepositions
for which they were previously set in Steps 11 and 12.
This may be disregarded.
Step 14
Place the selectorhandle
in the coupled position.
Operate electrically to open the Circuit-Switcher and
determine the amount of overtravel in the opening
direction by releasing the motor brake and noting how
*
far the output shaft “unwinds.” (To release the motor
brake, unlatch the manual operating handle andpivot
it rapidly, with a snap motion, toward its cranking
position. Then return the manual operating handle to
its storage position.) There should always be a certain
amount of “unwind”or relaxation of the output shaft
(in both the open and closed positions) to indicate that
the Circuit-Switcher has been driven to a positive-toggle
position against itsopen (or closed) stops. If adjustment
is needed, remove the motor-circuit fuseholder. To
increase the amount of “unwind,” retard the openingstroke travel-limitdisc
(toincreasetravel)one
indicator-plate number at a time. See Figure 7. Keep
in mind that ULe direction of disc rotation is alwags
the same as that of the output s h f l . The output shaft
should never have suffkient “unwind”when the switch
operator is decoupled to cause rotation of the travellimit discs. If rotation of the travel-limit discs is evident,
advancetheopening-stroketravel-limitdisc(to
decrease travel)an amountnecessary only to eliminate
the “unwind” rotationof the travel-limit discs.
With themanualjperating
handle in itsstorage
position, reinsert the motor-circuitfuseholder, and
operate the switch operator electrically to close the
Circuit-Switcher. Repeat the procedure, as described
above and in Figure 7, anci adjust the closing-stroke
travel-limit disc one indicator-plate number at a time
to obtain the correct amount
of overtravel in the closing
direction.
Before checking the “unwind”after a closing stroke,
remove the motor-circuit fuseholderbefore releasing the motor brake. Excessive “unwind” at this
point could cause rotationof the travel-limit switch
sufficient to pick up a “bb” contact which, in turn,
would causetheswitchoperatortoopen
(if
energized).
Step 15
Operate the Circuit-Switcher several times electrically
with the switch operatorand observe the action.
Operationshould appear snlooth, with the CircuitSwitcherdrive-shaft crznks coming to rest fwmly
INSTRUCTION SHEET
S&C ELECTRIC COMPANY Chicago
S&C ELECTRIC CANADA LTD. Toronto
7 1gm50o
Page 13 of 21
September 7,1993
S&C Switch Operators - Type CS-1 A
ADJUSTMENTS - Continued
against their stops, in an over-toggle position, in both
opening and closing directions.
If necessary, realign the Circuit-Switcher position
indicators on the switch operator output-shaft collar
with the alignment arrow.
With the switch operator in the fully open position
and then in the fully closed position, check the corresponding switch operator position indicator. In each
position the corresponding position indicator should
be readily visible from the front of the enclosure. If
adjustment of either position indicator is necessary,
remove the motor-circuit fuseholder, loosen the two
set screws (see Figure 9), and rotate the indicator to
the desired position. Retighten the set screws.
Step 16
The auxiliary switch, which is permanently coupled to
the motor, includes eight contacts (terminals 11
through 26). (If the optional position-indicating lamps
are included, six contacts are available: terminals 13
through 18 and terminals 21 through 26.) These
contacts are provided so that external circuits can be
established to monitor switching operations. Each
contact is operated by a cam-actuated roller. The cams
are individually adjustable in 4.5-degree increments and
can be positioned so that roller engagement occurs at
the desired point in the operating cycle.
The “standard” configuration for the auxiliary switch
consists of four “al” contacts (terminals 11 through
Use when directfon of output shaft and travel-limit disc
rotation is clockwise to open.
travel-limit disc
,Opening-stroke travel-limit
disc (with Circuit-Switcher
and switch operator in fully
open position-raise and turn
counterclockwise to increase
travel of switch operator)
>
Indicator plate
Closing-stroke travel-limit
disc (with Circuit-Switcher
and switch operator in fully
closed position-lower and
turn clockwise to increase
travel of switch operator)
Use when dlrectlon of output shaft and travel-llmlt disc
rctatlvn is counterclockwise to open.
Opening-stroke travel-limit
disc (with Circuit-Switcher
and switch operator in fully
open position-raise and turn
clockwise to increase travel
of switch operator)
) Indicator plate
Closing-stroke travel-limit
disc (with Circuit-Switcher
and switch operator in fully
closed position-lower and
turn counterclockwise to
increase travel of switch
operator)
Handwheel
Open front view of
switch operator
Figure 7. Adjustment of travel-lrmrt aiscs lor aestrea --unwma-- or ourpur snarl.
7 1 gm500 INSTRUCTION SHEET
Page 14 of 21
September 7,1993
S&C ELECTRIC COMPAW l Chbgn
S&C ELECTRK CANAQA LTD. . Toronto
~~~~
_ _ ~
__
_
_
~
~
ADJUSTMENTS - Continued
18) and four "bl" contacts (terminals 19 through 26).
Thus, with the switch operator in the open position,
the "al" contacts are open and the "bl" contacts are
closed. Conversely, with the switch operator in the
closed position, the "al" contacts are closed and the
"bl" contacts are open. A contact is closed if its roller
is disengaged from a cam, and conversely, a contact
is open if its roller is engaged by a cam. See Figure 9.
Any auxiliary-switch contact being used must be
checked for proper operationa m the switch operator
travel-limitdiscshavebeenadjusted.
Check the
auxiliary-switch contacts for bothopen and closed
positions of the switch operator. To adjust the auxiliaryswitch contacts, refer to Figures 8 and 9 and proceed
as follows:
(a) With the selector handle in the coupled position,
operatethe switch operatortothe
fully closed
position (manually or electrically).
(b) Remove the motorcircuit fuseholder.
(c) Determine which "al" contacts are not
in the closed
position. A contact is closed if its roller is disengaged
from a cam, and conversely, a contact is open if
its roller is engaged by a cam.
(d) For the "al" contacts that are not i I the closed
position, raise (or lower) the corresponding cam
towarditsadjacentspringuntilthecam
is
separated from the teeth of the inner gear. Rotate
the cam untilit is in a position so that when lowered
(or raised) it will be disengaged from the roller.
Lower (or raise) the
cam making sure that the teeth
are in mesh with the inner gear and that thecam
is disengaged from the roller.
(e) Reinsert the motor-circuit fuseholder.
(0 Operate the switch operatortothe
fully open
position. Remove the motorcircuit fuseholder and,
if necessary, adjust the cams as described in (d)
above until all "bl"contactsare
in the closed
position.
(g) Reinsert the motor-circuit fuseholder and operate
the Circuit-Switcher. Both sets of contacts should
now be correctly positioned for both the open and
closed position of the Circuit-Switcher. Sufficient
adjustment is available to provide correct positioning of both sets of contacts.
Since eachcamcan
be individually adjusted in
4.5-degree increments, any"a1" contact can
be changed
to a "bl" contact, or vice versa. Also, because of the
many positions to which the cams can be adjusted,
the various rollers can be engaged or disengaged to
respectively open or close their contacts simultaneously, sequentially, randomly, or in various combinations. Adjustment of the auxiliary switch for other than
the "standard" contactconfiguration is left to theuser.
Remember that themotor-circuit fuseholdershould be
removed whenadjustingthesecontacts.
(Switch
operators having catalog numbers with the suffi"-&"
are equipped with an extraauxiliary switch, terminals
27 through 34, having four contacts-two "al"and two
"b1""which may be adjusted as described in (a)
through (g) above. SeeFigure 9.)
Step 17
Switch operators having catalog numbers with either
t h e s u f f i "-W" or "-z" are equipped with an extra
auxiliaryswitch
which is coupled tothe CircuitSwitcher. The s u f f i "-W" auxiliary switch consists of
eight contacts (terminals 35 through 50). The s u f f i
"-Z auxiliaryswitchconsists
of twelve contacts
(terminals 35 through 50 plus terminals 80 through
87). These contacts are provided so that external
circuits can be established to monitor Circuit-Switcher
operation. Each contactis operated by a cam-actuated
roller andthecamsare
individually adjustable in
4.5-degree increments.
The "standard" configuration for the suffix "-W" extra
auxiliaryswitchconsists
of four "a2" contacts
(terminals35through42)andfour
"b2" contacts
INSTRUCTION SHEET
S&C ELECTRIC COMPANY
S&C ELECTRIC
LTD.CANADA
Chicago
Toronto
7 1g150o
Page 15 of 21
September 7,1993
S&C Switch Operators - Type CS-1 A
I
(terminals 43 through 50). The “standard” configuration for the suffix “-Z” extra auxiliary switch consists
of six “a2” contacts (terminals 35 through 42 and
terminals 80 through 83) and six “b2” contacts
(terminals 43 through 50 and terminals 84 through
87). Thus, with the Circuit-Switcher in the fully closed
position, the “a2” contacts should be closed and the
“b2” contacts should be open. Conversely, with the
Circuit-Switcher in the fully open position, the “a2”
contacts should be open and the “b2” contacts should
be closed. See Figure 9.
Any suffix “-W or “-Z” auxiliary-switch contact being
used must be checked for proper operation after
satisfactory electrical operation of Circuit-Switcher has
been achieved. Check the auxiliary-switch contact
engagement for both the open and closed positions of
the Circuit-Switcher. Adjustment of the suffix “-W or
“-Z” extra auxiliary switch is identical to the adjustment
performed for the auxiliary switch and the suffi “-Q
extra auxiliary switch. Therefore, if adjustment of the
suffi “-W or “-Z” auxiliary switch is needed, refer to
Step 16 and Figures 8 and 9.
Travel-limit switch, auxiliary
switch and extra auxiliary switch
(Catalog Number Suffix “-Q”)
Extra auxiliary switch
Step 18
Reinsert the fuseholders for the motor, space-heater,
and (if applicable) shunt-trip circuits.
Roller
/
Inner gear
/
Cam (lowered
toward adjacent
/ spring)
Open front view
of switch operator
-Adjacent spring
Figure 8. Adjustment of cams on auxiliary switch.
Figure 9. “Standard” contact configurations.
7 1 g-500
Page 16 of 21
September 7,1993
1
INSTRUCTION SHEET
S&C ELECTRIC COMPANY - Chbg~
S&C ELECTRIC CANADA LTD. l Toronto
q
-
ADJUSTMENTS - Continued
Set screws (loosen to adjust
switch operator position
indicators)
Opening-stroke
travel-limit disc
Travel-limit
switch
Travel-limit switch
Closing-stroke
travel-limit disc
1
“al” contacts
“al” contacts I
Auxiliary switch,
B-PST
Auxiliary switch.
I
“bl” c:ontacts
open
“bl” contacts
I
Extra auxiliary
switch, 4-PST
(Catalog Number
Suffix “-Q”)
“al” c:ontacts
I clnsec
-.--- 3
“bl” contacts
t open
*\e
“a2”
contacts
closed
Extra
auxiliary
switch,
B-PST
(Catalog
Number
Suffix
“-lJy)
I
“a2” contacts
closed
“b2” contacts
open
Circuit-Switcher in fully closed position
q
Extra auxiliary
switch, 4-PST
(Catalog Number
Suffix “-Q”
Switch operator
in fully open position
Switch operator
in fully closed position
“b2”
contacts
open
“al” contacts
open
“bl” contacts
I closed
I
Extra
auxiliary
switch,
12-PST
(Catalog
Number
Suffix
“-Z”)
“82”
Extra
1 contacts 1 auxiliary
open
switch,
B-PST
(Catalog
Number
“b2”
Suffix
“-W’)
I
I
I
“a2” contacts
iz open
Circuit-Switcher in fully open position
INSTRUCTION SHEET
S&C ELECTRtC COMPANY l Chicago
S&C ELECTRIC CANADA LTD. l Toronto
Extra
auxiliary
switch,
12-PST
(Catalog
Number
Suffix
“-Z”)
7 1 g-500
Page 17 of 21
September 7,1993
SLC Switch Operators
- Type CS-1A
I INSPECTION SCHEDULE AND PROCEDURES
To assure continued proper performance
of CircuitSwitcher and Type CS-1A Switch Operator, they should
be inspected in accordance with S&C's recommended
schedule and procedures contained
in S&C Instruction
Sheet 711-590. (These procedures, incidentally, take
the place of the annual exercising which has, up until
theOctober
28, 1985issuance
of Instruction
Sheet 71 1-590,been recommended for Circuit-Switcher
and itsoperator.*)
Should the user wish to perform elective exercising
of the complete Circuit-Switcher installation-including theshunt-trip device, when this option is furnished-it may be accomplished without the need for
opening the high-voltage circuit, by equipping the
Circuit-Switcherwith
theoptionalstick-operated
bypass accessory(Cata1og Number Suffur "-B1"or"-B2").
Even if the bypass accessory has not been furnished]
the Type CS-1A Switch Operator may be conveniently
decoupled from the Circuit-Switcher, thereby permitting elective exercising of the operator at any
time
without requiringan outageor switching to an alternate
source; when the switch operator is in the decoupled
position, the shunt-trip device-when this option is
furnished-is rendered inoperative, thereby permitting
checkout of the system protective scheme.
As indicated in Instruction Sheet 71 1-590, the brake
in the Type CS-1A Switch Operator shouldbe inspected
every 2500 operations or 5 years, whichever occurs
more often.The inspection procedure is as follows. See
Figure 10.
1. Place the selector handle in the decoupled position.
2. Remove the two-pole pull-out fuseholders for the
motor, space-heater, and (if applicable) shunt-trip
circuits.
3. Disconnect the linkagerod
by removing the
X""20 X 1%'' hex-headscrew, lockwasher,flat
washer, and spacer-bushing from the end of the
brake lever, as shown in Detail A. Be careful not
to lose these parts. Then raise the brake lever and
measure thevertical freeplay, as shown in Detail B.
This dimension should be Yn" to 3h4".Should the
measurement be outsidethisrange,brake-wear
compensation is required; proceed to Step 4. If the
measurement is within thisrange, reattachthe
linkage rod and tighten the X"-20 X 1X" hex-head
screw securely; proceed to Step9.
4. Remove thefour 5/16"-18 X 1%"screws used to
attach themotor, withdrawthe motor, and carefully
rest itsshaft on the floor of the enclosure. Be careful
not to lose the square key or tubular spacer (if
furnished)] which may remain on the motor shaft.
Note: 115-volt ac and 230-volt ac motors utilize a
7 1~ ~ 5 INSTRUCTION
0 0
Page 18 of 21
September
S&C7,1993
1hn-20 socket-head set screw on the side of the
brake disc hub, as shown in Detail C. Loosen this
set screwapproximately one-half turn, using a
lh" Allen wrench, before removing the motor.
5. Using a 3 h 2 " Allen wrench, loosen the pad assembly
socket-head set screw on the sidt of the caliper
assembly approximately one-half turn. See Detail A.
6. Then, using a VI(;" Allen wrench, rotate the pad
assembly clockwise until the free play at the end
of the brake lever is Yn" to %",as shown in Detail B.
Now tighten the 3/32" pad assembly socket-head set
screw.
7. Insert thespacer-bushing throughthe angle bracket
and brakelever, and reattach thelinkage rod using
the W-20 X 1lh" hex-head screw, lockwasher, and
flat washer. Tighten the screw securely.
8. Insert the square keyin the keyway, as shown in
Detail A. Slip the tubular spacer(if furnished) over
the motor shaft and reinstall the motor. Position
the motor such that the two weep holes on the
side of the housing face downward. Replace the four
5/16"-18
X l1hnscrewsused to attach the
motor and
tightenthemsecurely.
On 115-voltacand
230-volt ac motors, further, retighten the %"-20
socket-head set screw on the side of the brake disc
hub.
9. Check the operation of the brakelinkage as follows:
Pull the latch knob on the hub of themanual
operatinghandleand
slowly pivot thehandle
forwardfromitsstoragepositiontowardits
cranking position until the brake disc can be rotated
by hand. Be careful not to get grease on the brake
disc. Now measure the distance that the end of
the brake lever travels from the point of initial brake
release to the bottom of its stroke (which occurs
when the handle locks into the cranking position).
This dimension should be %" to lh". See Detail D.
Should the measurementbe outside thisrange, refer
to thenearest s&C Sales Office.
10. Finally, to check the functioning of the brake,
decouple the operator and then
open and close the
operator electrically. After each operation, check
the position of the indicator on the appropriate
travel-limit disc: it should stop between indicatorplate numbers 2 and 8. See Figure 6. Should the
indicator on the travel-limit disc stop outside this
range, refer to the nearest S&C Sales Office.
*
Superseded-designswitchoperators,
Catalog Numbers 38846
through 38846R3, equlpped with opttonal shunt-trlp solenold switch
and redundant relay (Catalog Number Suffix "-HP")should contmue
to have these componentsexercised annually. See page 20.
SHEET
S&C ELECTRIC COMPANY
ELECTRIC CANADA LTD.
Chicago
Toronto
I
\INSPECTION SCHEDULE ANDPROCEDURES - Continued
Caution: Do not loosen
this %"-20 screw
1 \
disc
Brake lever--
DETAIL C
pacer-bushingLocationofmotorshaftseiscrew
(115- & 230-vac operator only)
Brake assembly
%" - %" verttcal free play
DETAIL B
Measuring brake lever
free play
Operating linkage
connected to brake lever
Brake lever at bottom of its stroke
(manual operating handle in
cranklng positlon)
%" - %" travel
DETAIL D
Measuring brake lever stroke
Figure 10. Brake inspection procedure.
INSTRUCTION SHEET
S&C ELECTRIC COMPANY
Page Chicago
S&C ELECTRIC CANADA LTD.
September
0 Toronto
7 19400
19 of 21
7,1993
S%C Switch Operators
I INSPECTION
SCHEDULE
AND
- Type CS-1A
I
PROCEDURES - Continued
Recommended Exercising Procedure for Superseded-Design Switch Operators, Catalog
Numbers 38846 through 38846R3,Equipped with Optional Shunt-Trip Solenoid Switchand
Redundant Relay (Catalog Number Suffix“-HP”)
In thesesuperseded-design switch operators, a
shunt-trip solenoid switch (94)and redundantrelay
(62) areutilized to minimize control-current inrush,
by energizing theshunt-trip device and switch
operator motor in sequence; the redundant relay
provides a backupfunction,ensuringCircuitSwitcheractuationindependent
of shunt-trip
operation. To verify their proper functioning, it is
recommended that the shunt-trip solenoid switch
andredundantrelayeach
beexercisedsepa-
rately(preferablythroughtheprotective-relay
circuit, to check out the external control wiring as
well) while theother component is temporarily
disabled.
The following annual exercising procedure is
recommended. (Note that the wire and terminal
designations referenced apply to the standard
wiring
diagrams
for
these
superseded
modelsCDR-3116R3-1 and CDR-3116R3-2-and may differ
on special wiring diagrams.)
To exercise the shunt-trip s o h o i d (94) switch:
1. Open the control-source disconnect switch; then
place the switch operator selector handle in the
decoupled position. (When the switch operator is
thus decoupled, the shunt-trip solenoids at the
Circuit-Switcher
pole-units
are
rendered
inoperative.)
2. Disable the opening contactor (OC) by removing
wires numbered 8C and 8D from the openingcontactor (OC) coil terminal C7. This wiU allow
the opening operation of the switch operator to
be totallycontrolled
by thecontacts of the
solenoid (94) switch.
3. Close the control-source disconnect switch and
energize the solenoid (94) switch (to move the
switchoperatortotheopenposition)
by a
simulated shunt-trip operation. Returnthe switch
operator to the closed position by means of the
pushbuttoncontrol.Repeatfourtimesfor
exercising purposes.
4. Open the control-source disconnect switch and
reconnect wires numbered 8C and 8D to the
opening-contactor (OC) coil terminal C7.
To exercise the redundant (62) relay:
1. Make surethatthe
control-sourcedisconnect
switch is opened and theswitch operator selector
handle is in the decoupled position.
2. Disable the solenoid (94)switch by removing wire
number 21 from terminal L1 on the redundant (62) relay.This will allow a n opening
operation of the switch operator to be initiated
by the contacts of the redundant(62) relay.
3. Close the control-source disconnect switch and
energize the redundant (62) relay (to move the
switchoperatortotheopenposition)
by a
simulatedshunt-tripoperation.
Energization
should be for a duration of more than ‘/4 second
to allow time for closing of the (62) relay contact.
Return the switch operator to theclosed position
by means of the pushbutton control. Repeat four
times for exercising purposes.
4. Open the control-source disconnect switch and
reconnect wire number 21 to the redundant (62)
relay terminal L1.
5. To return the switch operator to service, bring
the switch operator to the same position as the
Circuit-Switcher; place the selector handle in the
coupled position; and close the control-source
disconnect switch.
7 19-500
Page 20 of 21
September 7,1993
INSTRUCTION SHEET
S&C ELECTRIC COMPANY
S&C ELECTRIC
LTD.
CANADA
Chicago
Toronto
1 CHECKING
SWITCH
I
OPERATOR AND
CIRCUIT-SWITCHER
POSITIONS
Do notassume
thatthe switch operator position
necessarily indicates the open orclosed position of the
Circuit-Switcher. Upon completion of an opening or
closing operation (electrical or manual), check to be
sure that the
following conditions exist:
The switch operator position indicator, Figure 5,
signals “Open”or “Closed”to indicatethat theswitch
operator has moved through a complete operation.
Also note the position-indicating lamps, Figure 5, if
furnished.
The Circuit-Switcher position indicator, located on
the switch operatoroutputshaft,
Figure 1, is in
agreementwiththeswitchoperatorposition
indicator. Thatis, both indicators should show
“Open“
or “Closed.”
The Circuit-Switcher disconnect blade on each poleunit is fully open or fully closed.
Then tag andpadlock the switch operator in accordance with standard system operating procedures. In
all cases,makecertain
that the switch operator is
padlocked before “walking away.”
Correct operation of the Circuit-Switcher depends
on charging and latching the stored-energysource
within each brain as the disconnect bla&dsl.move to
the fully open position and the interruptersclose. The
interrupter target located on the side of each brain
housing appears yellow when the interrupter is open.
The target appears gray (normal)
when the interrupter
is closed.
Because the interrupters are closed as the CircuitSwitcher blades move to the fully open position, the
target appears yellow only briefly during the opening
operation. The target shouldnever appear yellow when
the Circuit-Switcher is in the fully open or fully closed
position.
To restore to normal operation
So that theswitch operator is ready for normalpower
operation of Circuit-Switcher by remote automatic or
supervisorycontrol,besurethatthe
following
conditions exist
The selector handle is in the coupled position.
The manual operating handle
is in its storage position.
The two-pole pull-out fuseholders for the motor,
space-heater, and (if applicable) shunt-trip circuits
are inserted.
The pushbutton protective cover is closed.
The switch operator is tagged and padlocked in
accordancewithstandardsystemoperating
procedures.
INSTRUCTIONSHEET
S&C ELECTRIC
21COMPANY
Page Chicago
S&C ELECTRIC CANADA LTD.
September
0 Toronto
7 1Sm5W
of 21
7,1993