1
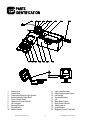
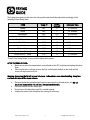
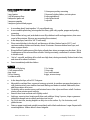
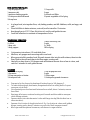
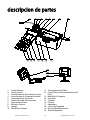
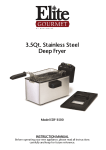
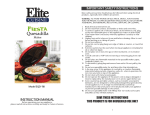
3.5Qt. STAINLESS STEEL
DEEP FRYER
FREIDORA 3.3L DE CAPACIDAD
Model: EDF-3500
INSTRUCTION MANUAL
Before operating your new appliance, please read all instructions carefully and keep for future reference.
www.maxi-matic.com
[email protected]
IMPORTANT
SAFEGUARDS
When using electrical appliances, basic safety precautions should always be followed, including the
following:
1. Read all instructions before operating.
2. Do not touch hot surfaces. Use handles or knobs if applicable.
3. This appliance produces heat. Do not use appliance on any surface that may be sensitive to
heat damage.
4. Remove all packaging plastics and other materials from unit before operating.
5. Wash all removable accessories before using for the first time.
6. To protect against electrical shock, do not immerse cord, plug or appliance itself in water or
other liquids.
7. Close supervision is necessary when appliance is used by or near children.
8. Unplug from outlet when not in use and before cleaning. Allow to cool before putting on or
taking off parts.
9. Do not operate any appliance with a damaged cord or plug or after the appliance
malfunctions or has been damaged in any manner. Return the appliance to the nearest
authorized service facility for examination, repair or adjustment.
10. The use of accessory attachments not recommended by the appliance manufacturer may
cause injuries.
11. Do not use outdoors.
12. Do not let cord hang over edge of table or counter or touch hot surfaces.
13. Do not place on or near a hot gas or electric burner, or in a heated oven.
14. Always attach plug to appliance first, then plug cord into wall outlet. To disconnect, turn
control(s) to OFF position, then remove plug from wall outlet.
15. Oversized foods or metal utensils must not be inserted in the appliance as they may cause a
fire or risk of electrical shock.
16. A fire may occur if the appliance is covered or touching flammable material including curtains,
draperies, walls and the like when in operation.
17. Do not clean with metal scouring pads. Pieces can break off the pad and touch electrical parts,
involving a risk of electrical shock.
18. Extreme caution should be exercised when using containers constructed of a material other
than metal or glass.
19. Do not store any materials other than manufacturer's recommended accessories in this unit
when not in use.
19. Do not place any of the following materials in the unit: Paper, cardboard, plastic and / or
similar non-food materials.
20. Some countertop and table surfaces, such as Corian®, wood and / or laminates, are not
designed to withstand prolonged heat generated by certain appliances. It is recommended by
countertop manufacturers and Maxi-Matic that a hot pad or trivet be placed under your Elite
deep fryer to prevent possible damage to the surface.
21. Always place the deep fryer on a stable surface and keep all flammable materials away from
the unit during operation.
22. Make sure that the deep fryer is never near or on a switched-on stove or cooking surface.
23. Before you use the deep fryer it must be filled with the required amount of oil or fat. **Never
use the deep fryer without oil or fat because this could damage the unit.
24. Never move the deep fryer during use. The oil becomes very hot. Wait until the unit and the
oil has completely cooled down before moving.
www.maxi-matic.com
1
[email protected]
25. This deep fryer is protected with a thermal safety device which switches the machine off
automatically if it over heats.
26. Never immerse the appliance in water.
27. Never leave the deep fryer unattended while in use.
28. Always ensure the safety of children if they are near the deep fryer.
29. If the deep fryer and/or cord are damaged, they must be repaired by a professional service
department. Do not try to repair the unit yourself or replace the damaged cord. This requires
special tools. Always contact our Customer Service Department for replacement parts.
30. Be sure not to damage the heating element. (Do not bend or dent.)
31. The electrical component is required with a safety heat switch, which ensures that the heating
element can only function when the element is correctly placed on the fryer.
32. In the case of overheating, the thermal protective device will switch off the fryer automatically.
This device is a small reset button (18) found either on the underside of the electrical
component, or in the cord storage compartment. It can be re-activated by pushing the button
in again with a pointed object (e.g. a pen). **Disconnect from power outlet before resetting!
SAVE THESE INSTRUCTIONS
THIS PRODUCT IS FOR
HOUSEHOLD USE ONLY!
www.maxi-matic.com
2
[email protected]
SHORT CORD
PURPOSE
NOTE: A short power cord is provided to reduce the risk of personal injury resulting from becoming
entangled in or tripping over a longer cord.
Longer power-supply cords or extension cords are available and may be used if care is exercised in
their use.
If an extension cord is used: (1) the marked electrical rating of the extension cord should be at least
as great as the electrical rating of the product; (2) the extension cord should be arranged so that it
will not drape over the countertop or tabletop where it can unintentionally be pulled on or tripped
over by children or pets.
POLARIZED
PLUG
If this appliance is equipped with a polarized plug (one blade is wider than the other), please follow
the below instructions:
To reduce the risk of electrical shock, this plug is intended to fit into a polarized outlet only one
way. If you are unable to fit the plug into the electrical outlet, try reversing the plug. If the plug
still does not fit, contact a qualified electrician. Never use the plug with an extension cord unless
the plug can be fully inserted into the extension cord. Do not alter the plug of the product or any
extension cord being used with this product. Do not attempt to defeat the safety purpose of the
polarized plug.
www.maxi-matic.com
3
[email protected]
PARTS
IDENTIFICATION
1.
2.
3.
4.
5.
6.
7.
8.
9.
10.
Power Cord
Control Box
Temperature Ready Light (Green)
Power Indicator Light (Red)
Timer Control Knob
Thermostat Control Knob
Oil Container
Heating Element
Fryer Basket
Basket Handle
www.maxi-matic.com
11.
12.
13.
14.
15.
16.
17.
18.
19.
20.
4
Filter Compartment
Filter Compartment Latch
Lid Handle
Viewing Window
Lid
Main Body Frame
Body Frame Handle
Safety Switch
Reset Button
Magnetic Power Cord Inlet
[email protected]
BEFORE
FIRST USE
BEFORE USING FOR THE FIRST TIME:
• Remove all printed documents and packaging materials from the machine.
• Pull out all removable parts and wash gently with hot water.
Do not immerse the Power Cord, Control Box Assembly or Heating Element of the deep fryer into
any liquids.
Dry all parts thoroughly before assembling.
• Do not operate the fryer without enough oil in the oil tank.
• The Deep Fryer should always be placed on a flat and stable surface where the power cord is
out of reach from children and away from accidental entanglement.
Tips:
• When you fry several different kinds of food, always fry the food that uses the lowest
temperature setting first.
• Do not mix different types of oil for frying.
• Frying already pre-cooked foods may take less time to fry than completely raw food.
• Replace the oil after each 10-15 uses; or earlier if the oil becomes brown and thick.
Safety Tips:
•
•
•
THIS DEEP FRYER IS ONLY SUITABLE FOR USE WITH OIL OR LIQUID FAT AND NOT
FOR USE WITH SOLID FAT. IF SOLID FAT IS USED, WATER CAN BECOME TRAPPED
INSIDE AND THE HOT FAT MAY SPEW OUT WITH CONSIDERABLE FORCE.
Never switch on the deep fryer without oil or liquid fat, as this could damage the
machine. Also, do not place any other liquids such as water or other substances
in the pan.
Place the deep fryer on a dry, stable surface. Since the deep fryer becomes hot
during use, make sure that it is not too close to other objects.
www.maxi-matic.com
5
[email protected]
HOW TO USE YOUR
DEEP FRYER
SETTING UP THE DEEP FRYER:
1. Make sure the Deep Fryer is UNPLUGGED when assembling.
2. Make sure the temperature control knob is set to the OFF or 0 position.
3. Assemble the control box (2) onto the main body frame (16). Make sure the control box is
secured properly to the slots on the back of the body frame. This will properly engage the
small safety switch (18) and ensure proper activation. Otherwise the fryer will not power on
properly.
4. Remove the frying basket (9) and allow it to hang and rest on the backside of the oil pan.
5. Use only good quality frying oil such as Peanut oil, Vegetable oil, pure Corn oil, Sunflower oil,
Canola oil, or Light Olive oil. (It is not recommended to mix oils).
6. Fill oil into the oil container approximately between the MIN marking and the MAX marking.
7. Do not fill over the MAX marking or lower than the MIN marking.
OPERATION:
1. Attach the magnetic power cord to the inlet on the back of the control box.
2. PLUG the power cord into an outlet.
3. Move the Thermostat knob to desired temperature setting according to the particular recipe
you are using. The RED and the GREEN indicator light will turn on.
4. While the oil is preheating, prepare the food that is going to be fried.
5. When the oil has reached the set temperature, the GREEN light will turn off.
6. NOTE: The GREEN ready light will cycle On and Off with the thermostat to maintain the set
temperature. The RED power light will remain illuminated throughout use.
7. When placing the food into the basket, make sure it is as dry as possible. Do not add water,
ice or wet food, it may cause HOT OIL SPLATTER.
8. When frying frozen food, clear off any ice particles and thaw food thoroughly.
9. Do not overfill the basket.
10. Lower basket of food into hot oil and cover fryer w/ lid.
11. Adjust the Timer Control Knob (5) to desired setting.
WARNING: DO NOT TOUCH THE CONTROL KNOB DURING THE FRYING PROCESS. HOT STEAM MAY
BE RELEASED AND MAY CAUSE INJURY.
12. When food has finished frying, the Timer will have a Bell Indicator. Remove the lid. Lift the
basket up slowly out of the hot oil and place the basket on the drain support located on the
back of the fry basket.
13. After the excess oil has drained, place the food on a paper towel lined baking sheet to absorb
excess oil.
14. If you are frying more than one batch, ensure the oil re-heats to the required temperature.
15. When frying is complete, turn control(s) to OFF position.
16. Disconnect the power cord. Allow the machine and the oil to cool completely before cleaning.
www.maxi-matic.com
6
[email protected]
FRYING
GUIDE
The frying times given in the chart are only a guide and should be adjusted accordingly to the
quantity of food being fried.
Shrimp
285°
Weight
(ounces)
8
Onion
Mushrooms
Fish Fillet
Fish Fillet in batter
Sliced Meat
Steak
285°
285°
300°
300°
340°
340°
5
10.5
8
14
14
14
3-4 minutes
6-8 minutes
5-6 minutes
6-8 minutes
7-10 minutes
7-10 minutes
Chicken Strips
French Fries (1st time)
French Fries (2nd time)
360°
375°
375°
18
18
8
7-10 minutes
6-10 minutes
3-5 minutes
FOOD
Temp. °F
Estimated Time
3-5 minutes
*French Fries being fried a 2nd time will be lighter and crispier.
AFTER THE FOOD IS FRIED:
• Make sure to turn the temperature control knob to the OFF position and unplug the deep
fryer.
• Once food is done cooking, remove the lid, and hang the basket on the hook and let
excess oil drip into the oil pot.
Warning: Removing the lid will release hot steam. Take extreme care when handling. Keep face
and bare skin clear of the steam release.
•
•
•
•
Remove the basket and place the food on paper towels to absorb excess oil. Do not
touch the basket while it is still hot. Always use the handle.
Place the basket into the deep fryer.
Do not move the deep fryer until it is cooled entirely.
Unplug the power cord and place into storage if necessary.
www.maxi-matic.com
7
[email protected]
CLEANING AND
MAINTENANCE
1.
Remove the lid and basket.
WARNING: Before cleaning the deep fryer, make sure that it is disconnected from the power
outlet, make sure the unit and the oil has completely cooled. Oil retains its temperature for a
long period after use. Do not attempt to carry or move the deep fryer while the oil is hot.
2.
3.
Wait for the fryer to cool, lift out the Control Box Assembly & Heating element.
Remove the oil pot and pour out the oil. It is recommended to filter the oil after each use if
you are to re-use the oil again.
After removing the oil pot, the fryer can be divided into separate components to clean.
The oil pot and the main body can be immersed into water to clean.
The Control Box & Heating Element should be wiped clean with absorbent paper towels. Then
use a damp cloth and a mild soap to clean.
WARNING: NEVER immerse the Control Box & Heating Element into water to clean.
Dry all parts thoroughly.
Note: Do not use abrasive scrubbing brushes or chemical cleaners to clean the unit.
4.
5.
6.
7.
How to replace the filters:
Your carbon filter should be changed every 6 months. The oil filter should be changed every 12
months.
1) Unclip and remove the filter cover.
2) Take out both white and black filter pieces.
3) Throw out old filters and replace with new filters. Make sure the White filter piece rests
on the metal surface BELOW the carbon filter (black piece).
NOTE: Filters can be gently rinsed in warm soapy water as well and reused again. But it will need
to be replaced after considerable amount of usage.
STORING YOUR DEEP FRYER:
Always allow the appliance to cool completely before storing. Store the appliance in a dry location.
Keep the power cord out of reach of children.
www.maxi-matic.com
8
[email protected]
DEEP FRYER
RECIPES
BATTER VARIETY:
The following are a few quick recipes with different types of batter to use with a variety of foods to
fry in the deep fryer for a delicious meal.
Beer Batter:
Mix together 1 ½ cups of flour and 1 ½ cups of any kind of beer in a large mixing bowl. Cover the
bowl after mixing and allow the batter to sit at room temperature for approximately 3 hours.
When ready to fry, dip desired food into the batter and follow the directions for frying battered
foods in this booklet.
Egg Batter:
Combine 2 egg yolks, ¾ cup of flour, 1-½ teaspoons of vegetable oil, ½ teaspoon of salt and 1 cup
of milk. Mix thoroughly. Add more milk if desired to adjust the density of the mixture. When
ready to fry, dip desired food into the batter and follow the directions for frying battered foods in
this booklet.
Egg Coating:
Combine 2 whole eggs with 1-½ teaspoons of vegetable and a pinch of salt and pepper to taste.
When ready to fry, dip desired food into the mixture and follow the directions for frying foods in
this booklet.
Extra Crispy Coating:
Beat together ½ cup milk and one whole egg in a small mixing bowl. In a separate bowl, mix
together ½ cup of flour and any of your favorite seasonings such as salt, pepper, chili powder,
garlic powder, etc. When ready to fry, dip desired food into the wet mixture first, then dip into the
dry flour mixture. Then follow the directions for frying foods in this booklet.
Bread Crumb Coating:
Beat together 1 ½ teaspoons of vegetable oil and 2 egg yolks in a small mixing bowl. IN a separate
bowl, mix together ½ cup of bread crumbs, 1/3 cup of flour plus any of your favorite seasonings
such as salt, pepper, chili powder, garlic powder, etc. When ready to fry, dip desired food into the
wet mixture first, then dip into the dry bread crumb mixture. Then follow the directions for frying
foods in this booklet.
TIPS FOR FRYING FOOD WITH BATTER COATING:
•
•
•
•
Make sure food is always sliced thinly and evenly. This helps the food to be fried evenly.
Shake off any excess flour or bread crumb coating to prevent any clumps from forming when
frying.
If you wish to use the basket when frying foods coated with batter, it is recommended to
lower the basket into the hot oil first and then gently and carefully place battered foods into
the oil directly. This will prevent the batter from catching and sticking to the wiring of the
basket.
Never fill the basket more than 2/3 full. In order to cook evenly, the food needs space for the
frying oil to fry each side.
www.maxi-matic.com
9
[email protected]
FRIED CHICKEN WITH CREAMY GRAVY
1/2 cup milk
1 egg, beaten
1 cup all-purpose flour
2 teaspoons garlic salt
1 teaspoon paprika
1 teaspoon ground black pepper
•
•
•
•
•
•
•
•
In a medium bowl, beat together 1/2 cup milk and egg.
In a re-sealable plastic bag, mix together the flour, garlic salt, paprika, pepper and poultry
seasoning.
Place chicken in bag, seal, and shake to coat. Dip chicken in milk and egg mixture, then once
more in flour mixture. (Reserve any remaining flour mixture.)
In the deep fryer, heat oil to 365°F until ready.
Place coated chicken in the hot oil, and brown on all sides. Reduce heat to 325°F, and
continue cooking chicken until tender, about 30 minutes. Remove chicken from fryer, and
drain on paper towels.
Discard all but 2 tablespoons of the frying oil and place into a saucepan over low heat. Stir in
2 tablespoons of the reserved flour mixture. Stirring constantly, cook about 2 minutes. Whisk
in chicken stock.
Stir in 1 cup milk, and bring all to a boil over high heat, stirring constantly. Reduce heat to low,
and simmer for about 5 minutes.
Serve immediately with the chicken.
BEIGNETS
Vegetable oil for frying
1 c. all-purpose flour
4 tsp. sugar
1/4 tsp. nutmeg
1 c. water or milk
•
•
•
•
•
•
•
1/4 teaspoon poultry seasoning
1 (4 pound) whole chicken, cut into pieces
3 cups vegetable oil
1 cup chicken broth
1 cup milk
1/3 c. butter
1/4 tsp. salt
1 tsp. vanilla extract
4 eggs, at room temp.
In the deep-fat fryer, oil to 350°F degrees.
Meanwhile, combine flour, sugar and nutmeg, set aside. In medium saucepan heat water or
milk, butter and salt over medium heat until boiling and butter is melted. Add vanilla, then
add flour mixture all at once.
Stir briskly with a wooden spoon until mixture leaves sides of pan and forms a ball. Continue
stirring a few minutes more until dry.
Remove from heat and beat until slightly cooled.
Add eggs, one at a time, beating well after each addition. Using 2 spoons, shape a generous
tablespoon dough into an oblong and drop into hot oil.
Fry 3 or 4 at a time, turning beignets as they rise to the surface. Fry 3 to 4 minutes, until
golden brown.
Drain on paper towels and sprinkle immediately with sifted confectioners' sugar. Repeat with
remaining batter. Makes about 2 dozen beignets
www.maxi-matic.com
10
[email protected]
SHRIMP EGG ROLLS
1 c. sifted flour
3 eggs
2 c. minced cooked shrimp
1 c. finely chopped celery
1/4 c. minced bamboo shoots
•
•
•
•
•
•
•
1/4 c. minced water chestnuts
1 tbsp. finely chopped onion
1 qt. corn oil
1/2 tsp. salt
Combine flour, 1-cup water and 2 eggs. Beat at low speed of electric mixer for 5 minutes. Set
aside for at least 15 minutes.
Mix shrimp, celery, bamboo shoots, water chestnuts, onion, 2 tablespoons corn oil and
seasonings thoroughly.
Heat heavy 6-inch skillet until drop of water will sizzle. Grease lightly with corn oil before
cooking each skin. Hold skillet off heat; pour 2 to 3 tablespoons batter into pan, moving and
tilting pan while pouring. Pour excess back into bowl of batter; return skillet to heat. Batter
will set very quickly.
Cook just until set and edge curls slightly. Turn out onto dry dishtowel until ready to roll.
Place about 2 tablespoons filling in center of each skin; brush edge with beaten egg. Fold
nearest edge over filling; fold over sides about 1 inch. Roll skin; seal with beaten egg. Pour
enough of remaining corn oil into deep fryer or skillet to fill 1/3 full.
Heat over medium heat to 375 degrees or until 1-inch square of bread turns brown in 10
seconds.
Add several egg rolls slowly; fry until lightly browned on all sides, turning as needed. Drain on
absorbent paper. Repeat with remaining rolls. Yield: 15 egg rolls.
FUNNEL CAKE
2 c. flour
1 tsp. baking powder
1/2 tsp. salt
2 eggs
1 1/2 c. milk
•
•
•
•
•
•
•
Combine all the above ingredients in order. Mix thoroughly.
Heat cooking oil in deep fryer until correct temperature.
Put batter in funnel (be sure to cover hole with one finger), then, holding the funnel over hot
oil (be very careful!), release some of the batter in circular motion, then criss-crossing motions
to form one funnel cake.
The funnel cake will rise quickly and expand - so be careful how much batter you use.
Cook to light golden brown on both sides.
Remove from oil and place on paper towels.
Sprinkle with powdered sugar and serve warm.
www.maxi-matic.com
11
[email protected]
GOLDEN FRIED ONION RINGS
6 med. mild white onions
1 1/8 c. sifted flour
1/2 tsp. salt
1 egg, slightly beaten
1 c. milk
•
•
•
•
Slice onion 1/4 inch thick and separate into rings.
Combine remaining ingredients in a bowl and stir just until dry ingredients are moistened.
Dip onion rings into flour mixture.
Fry several at a time in a deep fryer until golden brown. Drain on paper towel and sprinkle
with salt.
BUFFALO WINGS
24 wings (4 lbs.)
Salt & pepper (optional)
4 c. cooking oil
1/4 c. butter
2 to 5 tsp. hot sauce
1 tsp. white vinegar
•
•
•
•
•
Cut off tips and separate wings at joint; sprinkle with salt and pepper, to taste.
Heat oil in deep fat fryer or large heavy pot. When quite hot, add 12 wings and cook 10
minutes, stirring occasionally.
When wings are golden brown and crisp, remove and drain well. Add rest of wings; repeat
process.
Meanwhile, melt butter in saucepan; add hot sauce, to taste and vinegar. Pour sauce over
wings and mix well to cover.
Serve with Blue Cheese Dressing and celery sticks.
CORN DOGS
1/2 c Yellow corn meal
1/2 c Flour
1 tsp Honey
1/2 tsp Salt
1 ea Egg, lightly beaten
6-8 Hot Dogs / Frankfurters
•
•
•
•
•
•
6 ea Skewers or sticks
1 tbsp Sugar
1 tsp Baking powder
1/2 c Milk
1 tbsp Melted shortening
Combine the cornmeal, flour, sugar, mustard, baking powder and salt, mixing well.
Add the milk, egg and shortening, mixing until very smooth.
Pour the mixture into a tall glass. Put the frankfurters on sticks.
Dip them into the cornmeal batter to coat them evenly.
Deep fry in oil heated to 375 degrees until golden brown, about two minutes.
Drain on paper towels.
www.maxi-matic.com
12
[email protected]
BEER BATTER FISH FILLETS
1 cup all-purpose flour
1 teaspoon salt
1 teaspoon baking powder
1/2 teaspoon dried dill weed
3/4 cup beer
•
•
•
•
In a large bowl, mix together flour, salt, baking powder, and dill. Add beer, milk, and eggs; mix
well.
Place fish fillets in batter mixture, coat well, and let stand for 15 minutes.
Heat deep fryer to 375°F. Place fish in hot oil, and fry until golden brown.
Cook fish in batches to maintain oil temperature. Serve.
FRIED GREEN TOMATOES
3-4 lg. green tomatoes
2 c. flour
1 tbsp. salt
1 tbsp. pepper
•
•
•
•
•
•
•
•
•
1 tbsp. seasoning salt
2 eggs
2 c. milk
Oil for frying
Cut tomatoes into almost 1/2-inch thick slices.
Mix flour, salt, pepper and seasoning salt in one bowl.
Mix eggs and milk in another bowl. Dip each tomato slice into the milk mixture, then into the
flour, back to the milk and then to the flour again, coating well.
Heat oil in a deep fryer to 350 degrees and add battered tomato slices a few at a time, and
cook for 5 minutes or until golden brown.
CHURROS
Vegetable for frying
1 cup water
1/2 cup margarine or butter
1/4 teaspoon salt
•
•
1/2 cup milk
2 eggs
2 pounds cod fillets
2 quarts vegetable oil for frying
1 cup all-purpose flour
3 eggs
1/4 cup sugar
1/4 teaspoon ground cinnamon
Prepare to fry the churros by heating oil in deep fryer to 360 degrees F.
To make churro dough, heat water, margarine and salt to rolling boil in 3-quart
saucepan; stir in flour.
Stir vigorously over low heat until mixture forms a ball, about 1 minute; remove
from heat.
Beat eggs all at once; continue beating until smooth and then add to saucepan
while stirring mixture.
Spoon mixture into cake decorator’s tube with large star tip (like the kind use to
decorate cakes).
Squeeze 4-inch strips of dough into hot oil. Fry 3 or 4 strips at a time until golden
brown, turning once, about 2 minutes on each side. Drain on paper towels.
Mix Sugar and the optional cinnamon; roll churros in sugar mixture.
www.maxi-matic.com
13
[email protected]
SWEET & SOUR CHICKEN
MARINADE:
1/2 tsp. salt
1 1/2 tsp. soy sauce
1 tbsp. cornstarch
1 tbsp. cold water
BATTER:
1/2 c. chicken coating mix
1/2 c. ice water
1 egg yolk
SWEET AND SOUR SAUCE:
1/2 c. Kraft Sweet and Sour Sauce
1/4 c. chicken broth
1/4 c. water
1/2 tsp. cornstarch
1 green pepper, cut into 1 inch pieces
1 med. carrot, sliced inch long then lengthwise
1/2 c. sliced water chestnuts
1 can chunk pineapple
•
•
•
•
•
•
•
•
•
•
•
•
•
Combine marinade ingredients in a small bowl. Add chicken, mix well. Let stand 30 minutes.
Combine batter ingredients in a medium bowl until just mixed. Do not stir to blend.
Combine Sweet and Sour Sauce, chicken broth, water and cornstarch in a small bowl, set
aside.
Heat oil in deep fryer to 350 degrees
While oil is heating, coat each piece of chicken with batter. Reduce heat to medium.
Carefully lower coated chicken into hot oil with fryer basket.
Deep fry chicken 3 minutes or until browned. Remove from oil.
Turn heat up to high and heat oil to 400 degrees.
Carefully place chicken all at once in hot oil and deep-fry until crisp, about 30 seconds.
Remove chicken, draining well. Place on platter.
Using a fry pan, place 2 tablespoons oil. Heat to medium. Stir-fry green peppers, carrots and
water chestnuts 2 minutes.
Add Sweet and Sour Sauce mixture. Stir in pineapple. Stir-fry until sauce has thickened.
Remove from heat.
Stir in chicken and serve immediately. Makes 4 servings.
www.maxi-matic.com
14
[email protected]
LIMITED WARRANTY*
ONE (1) YEAR
1.
2.
3.
4.
5.
6.
7.
-
WARRANTY IS ONLY VALID WITH A DATED PROOF OF PURCHASE
Your small kitchen appliance is built with precision, inspected and tested before leaving our
factory.
It is warranted, to the original purchaser to be free from any manufacturing defects under
normal use and conditions for one (1) year, cord excluded. This Warranty applies only to the
original purchaser of this product.
If you need to exchange the unit, please return it in its original carton, with a sales receipt, to
the store where you purchased it. If you are past the stores allowed return policy period,
please see the enclosed Warranty.
If you use your appliance for household use and according to instructions, it should give you
years of satisfactory service.
During the one-year warranty period, a product with a defect will be either repaired or
replaced with a new or reconditioned comparable model (at our option) when the product is
returned to our Service Center. (See the “Returns” section below).
The repaired or replacement product will be in warranty for the remaining balance of the oneyear warranty period and an additional one-month period.
This limited warranty covers appliances purchased and used within the 50 contiguous states
plus the District of Columbia and does NOT cover:
Damages caused by unreasonable use, neglect, normal wear and tear, commercial use,
improper assembly or installation of product.
Damages caused in shipping.
Damages caused by replacement or resetting of house fuses or circuit breakers.
Defects other than manufacturing defects.
Breakage caused by misuse, abuse, accident, alteration, lack of proper care and maintenance,
or incorrect current or voltage.
Lost or missing parts of the product. Parts will need to be purchased separately.
Damages of parts that are not electrical; for example: cracked or broken plastic or glass.
Damage from service or repair by unauthorized personnel.
Extended warranties purchased via a separate company or reseller.
Consumer’s remorse is not an acceptable reason to return a product to our Service Center.
*One Year Limited Warranty valid only in the 50 contiguous states plus the District of Columbia,
excluding Puerto Rico and the Virgin Islands.
This warranty is effective only if the product is purchased and operated in the USA; product usage
which is in violation of the written instructions provided with the unit will void this warranty.
For international warranty, please contact the local distributor.
**Any instruction or policy included in this manual may be subject to change at any time.
MAXI-MATIC, USA
18401 E. Arenth Ave. City of Industry, CA 91748
Customer Service Dept: (800) 365-6133 Ext: 120/107/105 MON-FRI 8am-5pm PST
www.maxi-matic.com
15
[email protected]
RETURN INSTRUCTIONS
RETURNS:
A.
B.
Any return of defective merchandise to the manufacturer must be processed accordingly
by first contacting customer service (contact information shown below) to obtain an RA #
(Return Authorization Number). We will not accept any returns of merchandise without
an applicable RA #.
IMPORTANT RETURN INSTRUCTIONS. Your Warranty depends on your following these
instructions if you are returning the unit to Maxi-Matic USA:
1. Carefully pack the item in its original carton or other suitable box to avoid
damage in shipping.
2. Before packing your unit for return, be sure to enclose:
a) Your name, full address with zip code, daytime telephone number,
and RA#,
b) A dated sales receipt or PROOF OF PURCHASE,
c) The model number of the unit and the problem you are having
(Enclose in an envelope and tape directly to the unit before the box is
sealed), and
d) Any parts or accessories related to the problem.
3. Maxi-Matic USA recommends you ship the package U.P.S ground service for
tracking purposes. We cannot assume responsibility for lost or damaged
products returned to us during incoming shipment. For your protection, always
carefully package the product for shipment and insure it with the carrier. C.O.D
shipments cannot be accepted.
4. All return shipping charges must be prepaid by you.
5. Mark the outside of your package:
MAXI-MATIC USA
18401 E. ARENTH AVE.
CITY OF INDUSTRY, CA 91748
6. Once your return has been received by our warehouse, Maxi-Matic USA will
repair or replace the product if it is defective in material or workmanship,
subject to the conditions in paragraph B.
7. Maxi-Matic will pay the shipping charges to ship the repaired or replacement
product back to you.
www.maxi-matic.com
16
[email protected]
importantes medidas de
seguridad
\
Cuando use aparatos eléctricos, precauciones básicas de seguridad deberán seguirse, incluyendo
las siguientes.
1. Lea todas las instrucciones cuidadosamente, antes de usar el aparato
2. No toque las superficies calientes, use el mango o las agarraderas.
3. Remueva todo material de empaque, antes de usar el aparato
4. Lave todas las partes o accesorios removibles, antes de usar por vez primera.
5. Para protegerse, de una descarga eléctrica, no sumerja el cordón, enchufe eléctrico o aparato
en agua o ningún otro líquido.
6. Cercana supervisión es necesaria, cuando el aparato sea usado por o cerca de niños
7. Desconecte el aparato, cuando no esté en uso y antes de limpiarlo. Permita que se enfríe, para
remover las partes o accesorios.
8. Nunca use ningún aparato con el cordón dañado, enchufe, mal funcionamiento o dañado en
alguna otra forma.
9. El uso de accesorios no recomendados por el fabricante, pueden causar daños personales o al
aparato.
10. No lo use a la intemperie o en lugares húmedos.
11. No deje que el cordón cuelgue de la orilla de la mesa, mostrador o toque cualquier superficie
caliente.
12. No lo ponga sobre o cerca de superficies calientes como estufas y hornos
13. Siempre deberá conectar el cordón eléctrico al aparato y después al toma corriente eléctrica, si
aplica.
14. Siempre deberá de apagar el aparato antes de desconectar del toma corriente.
15. Nunca introduzca utensilios de metal en el aparato, podría causar fuego, descarga eléctrica o
daños personales
16. Fuego podría ocurrir, si el aparato es cubierto o toca material inflamable como cortinas
alfombras y paredes cuando esté en uso.
17. Extrema precaución deberá tener cuando use depósitos construidos de otro material que no
sean de metal o vidrio, si aplica.
18. No guarde ni ponga ningún material dentro del aparato, únicamente los accesorios
recomendados por el fabricante, cuando no esté en uso.
19. No ponga dentro o en la superficie exterior del aparato los siguientes materiales, papel,
cartón, plásticos o algún otro material inflamable.
20. Para reducir el riezgo de una descarga eléctrica, este Aparato tiene una ploga polarizada (un
lado de las navajas de la ploga es mas ancha que la otra) y esta diceñada para entrar en un
reseptáculo polarizado de una sola manera..
21. No utilize este aparato para otra cosa, sino para lo que fue diceñado.
22. Nunca coloque los siguientes materiales dentro de la unidad: Papel, cartón, plásticos o
materiales similares que no sean comestibles.
23. Algunos superficies de mesas y mostradores hechos o recubiertos de laminados de CORIAN,
MADERA FINA O FORMICA, no estan diceñados para soportar calores prolongados generados
por ciertos aparatos eléctricos de cocina. SE RECOMIENDA COLOCAR MANOPLAS DE COCINA O
MANTELES RESISTENTES AL CALOR BAJO SU APARATO.
GUARDE ESTAS INSTRUCCIONES
ESTE PRODUCTO ES PARA USO DOMĚSTICO UNICAMENTE.
www.maxi-matic.com
17
[email protected]
descripcion de partes
1.
2.
3.
4.
5.
6.
7.
8.
9.
10.
Cordon Eléctrico
Caja de Control
Luz Indicadora de Encendimiento (roja)
Luz Indicadora de Temperatura (verde)
Temporizador de 30 minutos
Control Ajustable del Termostato
Depósito Para Aceite
Elemento Térmico
Canasta
Manilla de la Canasta
www.maxi-matic.com
11. Compartimento del Filtro
12. Cerrojo Plástico del Compartimento del
Filtro
13. Manilla de la Tapadera
14. Ventanilla
15. Tapadera
16. Freidora
17. Agarradera
18. Control de Seguridad
19. Bóton de Restablecimiento
20. Enchufe Magnético
18
[email protected]
recommendacions
1.
Siempre ponga la freidora en una superficie plana y estable y mantenga todo material
inflammable alejado de la unidad mientras la este utilizando.
2. Asegurese de que la freidora no este cerca o en la estúfa
3. Antes de utilizar la freidora devera de llenarse con la cantidad necesaria de aceite. **Nunca
utilize la freidora sin aceite podria dañarse la unidad.
4. Nunca trate de mover la freidora durante su uso. El aceite se calienta mucho, espere a que la
unidad y el aceite se enfríe completamente antes de moverlo.
5. La freidora esta protegida con un interruptor térmico integrado el cual apaga la unidad si se
sobrecalienta.
6. Nunca sumerja la unidad en agua o en ningún otro líquido.
7. Nunca deje la freidora desatendida mientras este en uso.
8. Siempre asegurese de la seguridad de los niños cuando esten cerca de la unidad
9. Si la freidora o el cordón eléctrico estan dañados, deveran ser reparados inmediatamente en
un centro de servicio profesional, no lo trate de reparar o reemplazar el cordón eléctrico usted
mismo. Se requiere herramienta especial.
10. Asegurese de no dañar el elemento térmico. No lo doble o golpee.
11. La freidora tiene un interruptor térmico que funcionara si el elemento térmico esta
correctamente colocado en la freidora.
12. En caso que la freidora se sobre caliente, el interruptor térmico se activara y apagara la
freidora automáticamente. Este dispositivo es un boton de color rojo que se localiza bajo el
compartimento del cordón eléctrico. Puede ser reactivado con solamente presionarlo con un
objeto puntiagudo como con una pluma. **Disconecte del toma corriente antes de reactivarlo.
como preperar su freidora
ANTES DE UTILIZAR POR PRIMERA VEZ:
• Quite todo material de empaque incluyendo manuales
• Lave todas las partes suavemente con agua y jabón
No sumerja el cordón eléctrico o elemento térmico en agua o ningn otro líquido.
• Seque todas las partes perfectamente antes de ensamblarlas en la freidora
• No utilize la freidora sin suficiente aceite en el deposito
• La freidora siempre deve ponerla en una superficie plana y estable donde el cordón eléctrico
este fuera del alcance de los niños y que se enrreden en el mismo.
Ideas:
• Cuando fría diferentes tipos de alimentos siempre empiese con los alimentos que se frían a
mas baja temperatura.
• Nunca mezcle diferentes tipos de aceite para freir alimentos.
• Al freir alimentos pre-cocinados tomaran menos tiempo para freir que los que estan crudos.
• Reemplace el aceite despues de cada 10-15 usos; O más pronto si el aceite se torna café y
espeso.
www.maxi-matic.com
19
[email protected]
advertencias para mayor
seguridad
•
•
•
ESTA FREIDORA ESTA DICEÑADA PARA FREIR CON ACEITE LĺQUIDO UNICAMENTE. SI MANTECA
O GRASA SOLIDA ES UTILIZADA VAPOR DE AGUA QUEDARA ATRAPADA Y EL ACEITE CALIENTE
PODRIA SALTAR FUERA DE LA FREIDORA CON FUERZA CONSIDERABLE
Nunca encienda la freidora sin aceite, al acerlo podria dañar la unidad. No ponga agua u otras
substancias en el contenedor.
Ponga la freidora en una superficie estable y plana. La freidora se calentara durante su uso,
asegurese de que no este muy cerca de algùn objeto y pueda cauzar un incendio.
como utilizar la freidora
•
•
•
•
•
•
•
•
•
•
•
•
•
•
•
•
•
Asegurese de que la freidora este desconectada del toma corriente.
Coloque el elemento térmico en el contenedor de aceite. Asegurese de que el elemento
térmico este instalado correctamente y el interruptor (ROJO) de seguridad este activado. De
otra manera la freidora no encendera.
Quite la canasta freidora y cuelguela de la orilla del deposito de aceite.
Utilize unicamente aceite de buena calidad como aceite de cacahuate, aceite vegetal, aceite
de elote, aceite de girasol, aceite de canola o aceite de oliva (se recomienda no mezclar el
aceite de una clase con otro tipo)
LLene el contenedor con aceite entre las marcas de MIN. y MAX.
Nunca se sobrepase de la marca de MAX. O menos de MIN.
Asegurese de que el control de temperatura este en apagado(OFF).
Conecte la unidad al toma corriente.
Ajuste el control de temperatura a la temperatura deceada o de acuerdo a su recetario de
cocina. La luz indicadora ROJA y LA VERDE encenderán.
Mientras el aceite se calienta, prepare los alimentos que van a ser freídos.
Cuando el aceite aya alcanzado la temperatura seleccionada la luz verde se apagara.
NOTA: La luz verde de preparado tendra ciclos de apagado y encendido manteniendo asi la
temperatura seleccionada. La luz roja se mantendra iluminada durante todo el tiempo que
este en uso la freidora.
Cuando coloque los alimentos en la canasta freidora, asegurese de que esté completamente
seca. No agregue agua,hielo o alimentos mojados, podría cauzar que el aceite salpicara.
Cuando fria alimentos congelados, limpielo de cualquier particula de hielo y descogele por
completo.
No sobre llene la canasta freidora con alimentos.
Baje la canasta con alimentos dentro del aceite caliente
Tape la freidora.
Ajuste la perilla del temporizador al tiempo deseado.
www.maxi-matic.com
20
[email protected]
ADVERTENCIA: NO MUEVA EL TABLERO DE CONTROL DURANTE EL PROCESO DE FREIR. VAPOR
CALIENTE PODRĺA ESCAPAR Y CAUSARLE QUEMADURAS GRAVES.
• Cuando los alimentos se han terminado de freir, remuva la tapadera. Levante la canasta y
saque lentamente del contenedor de aceite y coloquelo en el soporte localizado detras de la
canasta freidora.
• Despues que el exeso de aceite se a drenado ponga los alimentos sobre toallas de papel para
quitar el exedente de aceite.
• Si va a continuar friendo asegurese de que el aceite se recaliente otra vez a la temperatura
seleccionada.
guia de como freir
Los tiempos dados en esta tabla son unicamente una guía y deveran ajustarse de acuerdo a la
cantidad de alimentos que van a ser freidos.
TABLA DE SUGERENCIAS APROXIMADAS
PESO EN
TIPO DE ALIMENTO
Temp. °F
(GRAMOS)
Camarones
285°
226
Cebollas
285°
141
Hongos
285°
297
Filete de pescado
300°
226
Fish Fillet in batter
300°
396
Pastelillos o bolas de pescado
300°
396
Carne en rebanadas
340°
396
Filete de rez
340°
396
Trozos de pollo
360°
510
Papas a la francesa (1st time)
375°
510
Papas a la francesa (2nd time)
375°
226
Estimated Time
3-5 minutos
3-4 minutos
6-8 minutos
5-6 minutos
6-8 minutos
6-8 minutos
7-10 minuos
7-10 minutos
7-10 minutos
6-10 minutos
3-5 minutos
*Papas a la francesa que son refreidos por 2da vez seran mas livianos y dorados.
DESPUES DE QUE LOS ALIMENTOS HAN SIDO FREIDOS:
1. Asegurese de poner el control de temperatura esté en apagado OFF y desconectado del toma
corriente.
2. Una vez que haya terminado de cocinar, quite la tapadera de la freidora, cuelgue la canasta
freidora para que el exeso de aceite caiga dentro del propio contenedor de aceite.
Advertencia: Al remover la tapadera de la freidora escapara vapor caliente, tenga mucha
precaucion al destaparla. Mantenga la cara y manos alejados del vapor que escapa.
3. Saque la canasta y ponga los alimentos en servilletas de papel para que absorva el exeso de
aceite. No toque la canasta cuando este caliente. Utilize la agarradera.
4. Despues que el exeso de aceite se a drenado, ponga los alimentos en tollas de papel para que
absorva completamente el exeso de aceite.
5. Coloque la canasta dentro de la freidora.
6. No mueva o la lleve de un lugar a otro la freidora hasta que este completamente fría.
7. Desconecte la freidora del toma corriente y guarde.
www.maxi-matic.com
21
[email protected]
como limpiar la freidora
1.
Quite la tapadera de la freidora.
ADVERTENCIA: Antes de limpiar la freidora asegurese que esté desconectada del toma
corriente, tambien asegurese de que la unidad y el aceite esten completamente fríos. El aceite
retiene su temperatura por largos periodos de tiempo despues del uso. No intente mover la
freidora mientras el aceite este caliente.
2.
3.
Espere a que la freidora enfrie, levante el elemento térmico.
Remueva el deposito del aceite vacie en un tazón se recomienda filtrar el aceite despues de
cada uso si planea reuzar el mismo aceite otra vez.
Despues de remover el depósito de aceite la freidora se podra dividir en varias partes para
limpiar.
El depocito del aceite y la base se pueden sumergir en el agua par alimpiar o lavar
El elemento térmico devera de ser limpiado con toallas de papel absorvente. Luego utilize un
trapo húmedo con un poco de jabón para limpiarlo.
PRECAUCIÓN: No sumerja el elemento térmico en agua para limpiar.
Seque todas las partes completamente.
Nota: Nunca utilize limpiadores abracivos, cepillos de alambre o químicos para limpiar la
unidad.
4.
5.
6.
7.
COMO REMPLAZAR LOS FILTROS:
Los filtros de carbón deveran de cambiar cada 6 meses, El filtro del aceite cada 12 meses.
1)
2)
3)
Quite la tapa del filtro.
Remueva los dos filtros el blanco y el negro.
Desagase de los filtros viejos y reemplace con nuevos. On.Asegurese de que el filtro
blanco descanse en la superficie de metal bajo el filtro de carbon( filtro negro).
Siempre permita que la freidora enfríe completamente antes de guardarla.
Guarde la freidora en un lugar seco y mantenga el cordón eléctrico fuera del alcance de los niños.
www.maxi-matic.com
22
[email protected]
el uso de un cordon electrico
corto
NOTA: Un cordón eléctrico corto se a ensamblado en el aparato, para reducir el riezgo de daños
personales como el enrredarse o tropezar con el cordón eléctrico, Si un cordón eléctrico es
requerido, extenciones eléctricas están disponibles para su compra en su ferreteria local y podrán
ser utilizadas si se toman las devidas precauciones. Si una extención eléctrica es utilizada:
(1) Las especificaciones eléctricas del cordón devera cuando menos ser de las mismas
especificaciones electricas o más que el aparato a utilizar:
(2)La extención eléctrica devera de colocarse de manera que no cuelge de la orilla de la meza
donde podrán accidentalmente ser jalados por niños o mascotas.
INSTRUCCIONES ESPECIALES:
• Para evitar una sobre carga eléctrica cuando use este producto, no utilize otro aparato de alta
potencia(watage) en el mismo circuito o en el mismo receptaculo eléctrico.
• Evite el uso de extenciones eléctricas porque la extención se podra sobrecalentar y causar
riezgo de incendio.
PRECAUCIÓN: Este aparato esta equipado con una ploga polarizada(un lado de la navaja de la
ploga es mas ancha que la otra) como una característica de seguridad para reducir el riezgo de una
descarga eléctrica. Esta ploga esta diceñada para entrar de una sola manera. Esta es una
caracteríística de seguridad. Si usted no puede introducir la ploga en el enchúfe eléctrico, Haga
girar la ploga 180˚ grados y trate de nuevo. Si el enchúfe no entra de ninguna manera, pongase en
contacto con un electricista aprovado. Nunca utilize una extención eléctrica sin que pueda
introducir completamente la ploga en el receptaculo eléctrico. No altere la ploga de ninguna
forma. No intente eliminar las caracteristícas de seguridad de la ploga eléctrica polarizada.
Un cordón eléctrico corto a sido ensamblado en su aparato para reducir el riezgo de daños
personales de enrredarce o tropezar con el cordón.
Extenciones eléctricas están disponibles y pueden ser usados si toma las devidas precauciones.
durante su uso.
Si una extención eléctrica mas larga va a ser utilizada favor de tomar muy en cuenta lo siguiente:
Las especificaciones eléctricas(voltage, watage y amperage) de la extención eléctrica devera de ser
igual o de más potencia que el aparato que se va a usar.
Este aparato es de uso domestico unicamente
www.maxi-matic.com
23
[email protected]
GARANTÍA LIMITADA * UN (1) AÑO
GARANTIA ES VALIDA CON UNA PRUEBA DE COMPRA FECHADA
1.
2.
3.
4.
5.
6.
7.
-
Su aparato de cocina está construido con precisión, inspeccionados y probados antes de salir de
nuestra fábrica.
Se garantiza, al comprador original, de estar libres de defectos de fabricación en condiciones de uso
normales y las condiciones para un (1) año, cordones excluidos. Esta garantía se aplica sólo al
comprador original de este producto.
Si necesita cambiar la unidad, devuélvala en su caja original, con el recibo de compra, a la tienda
donde lo compró. Si usted está más allá del plazo concedido para el retorno por la política de la tienda,
por favor consulte la garantía incluida.
Si utiliza el aparato para uso doméstico y de acuerdo con las instrucciones, debería ofrecerle años de
servicio satisfactorio.
Durante el período de garantía de un año, un producto con un defecto será reparado o reemplazado
por un modelo nuevo o reacondicionado (a nuestro criterio) cuando el producto sea devuelto a nuestro
Centro de Servicio. (Consulte la sección "Devoluciones" a continuación).
El producto reparado o reemplazado estará garantizado por el saldo restante del período de garantía
de un año y un plazo adicional de un mes.
Esta garantía limitada cubre los aparatos comprados y usados en los 50 estados contiguos y el Distrito
de Columbia, y no cubre:
Los daños causados por el uso excesivo, negligencia, uso y desgaste normal, uso comercial, montaje o
instalación incorrecta del producto.
Los daños causados durante el envío.
Los daños causados por la sustitución o reposición de fusibles o disyuntores.
Defectos que no sean defectos de fabricación.
Rotura causada por mal uso, abuso, accidente, alteración, falta de cuidado y mantenimiento, o
incorrecta de corriente o voltaje.
Pérdida o falta alguna pieza del producto. Las piezas se deben comprar por separado.
Daños de piezas que no sean eléctricos; por ejemplo: agrietado o roto de plástico o de vidrio.
Daños por servicio o reparación por personal no autorizado.
Las garantías extendidas compradas a través de una empresa independiente o revendedor.
Remordimiento del consumidor no es una razón aceptable para devolver un producto a nuestro Centro
de Servicio.
* Un año de garantía limitada válida solamente en los 50 estados contiguos y el Distrito de Columbia,
excluyendo Puerto Rico y las Islas Vírgenes.
Esta garantía es válida sólo si el producto es comprado y operado en los EE.UU., el uso del producto que se
encuentra en violación de las instrucciones escritas proporcionadas con la unidad anulará esta garantía.
Para la garantía internacional, por favor póngase en contacto con el distribuidor local.
** Cualquier instrucción o política incluida en este manual puede estar sujeta a cambios en cualquier
momento.
MAXI-MATIC, EE.UU.
18401 E. Ave Arenth. City of Industry, CA 91748
Departamento de Atención al Cliente: (626) 912-9877 Ext: 120/107 Lunes a viernes 8am-5pm PST
Sitio web: www.maxi-matic.com email: [email protected]
www.maxi-matic.com
24
[email protected]
INSTRUCCIONES DE DEVOLUCIÓN
DEVOLUCIONES:
A. Cualquier devolución de mercancía defectuosa al fabricante deben ser procesados apropiadamente
contactando primero al servicio al cliente (información de contacto se muestra a continuación) para
obtener un # RA (Número de autorización de devolución). No se aceptará ninguna devolución de
mercancía sin un # RA aplicable.
B. INSTRUCCIONES IMPORTANTES DE RETORNO. Su garantía depende que usted siga estas instrucciones si
va a devolver la unidad a Maxi-Matic EE.UU.:
1. Empaque cuidadosamente el producto en su caja original o en otra caja adecuada para evitar
daños durante el envío.
2. Antes del envío de la devolución unidad, asegúrese de adjuntar:
a) Su nombre, dirección completa con código postal, número de teléfono durante el
día, y #RA
b) Un recibo de compra fechado o COMPROBANTE DE COMPRA,
c) El número de modelo de la unidad y el problema que tiene (Encierre en un sobre y
pegue directamente a la unidad antes de sellar la caja) y
d) Todas las piezas o accesorios relacionados con el problema.
3. Maxi-Matic EE.UU. recomienda enviar el paquete de servicio terrestre de UPS para fines de
seguimiento. No podemos asumir la responsabilidad por productos perdidos o dañados
devueltos a nosotros durante el transporte entrante. Para su protección, siempre
cuidadosamente empaquetar el producto para su envío y asegurarlo con la compañía. Envíos
C.O.D no puede ser aceptado.
4. Todos los gastos de envío de devolución debe ser pagado por usted.
5. Marque el exterior del paquete:
MAXI-MATIC EE.UU.
18401 E. ARENTH AVE.
CITY OF INDUSTRY, CA 91748
6. Una vez que su devolución ha sido recibida por nuestro almacén, Maxi-Matic EE.UU. se
compromete a reparar o sustituir el producto si presenta defectos de materiales o mano de
obra, sujeto a las condiciones del apartado B.
7. Maxi-Matic pagará los gastos de envío para enviar el producto reparado o reemplazado de
nuevo a usted.
www.maxi-matic.com
25
[email protected]