1
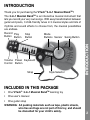
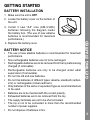
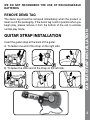
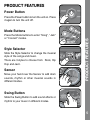
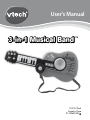
User’s Manual
3-in-1 Musical
musical Band
TM
© 2010 VTech
Printed in China
91-002483-000
Dear Parent,
At VTech®, we know how important the first day of school is for your
child. To help prepare preschoolers for this important event, VTech® has
developed the Preschool Learning™ series of interactive toys.
Preschool Learning™ features fun characters and inviting school themes
that use technology to capture a child’s attention and teach important
preschool skills like spelling, counting and the alphabet. These vital skills
are taught in a way that's both fun and highly engaging to maintain a
child's interest. Children will also be introduced to fun school subjects
such as art class, music class and even recess! With Preschool Learning™,
learning is fun from day one!
At VTech®, we know that a child has the ability to do great things.
That’s why all of our electronic learning products are uniquely designed
to develop a child’s mind and allow them to learn to the best of their
ability. We thank you for trusting VTech® with the important job of
helping your child learn and grow!
Sincerely,
Your friends at VTech®
To learn more about Preschool Learning™ series and other VTech® toys, visit www.vtechkids.com
INTRODUCTION
Thank you for purchasing the VTech® 3-in-1 Musical BandTM!
Volume Power Keyboard
Control Button
Strap
Style Selector
INTRODUCTION
The 3-in-1 Musical BandTM is an interactive musical instrument that
lets you record your very own songs. With easy transformation between
guitar and piano, 3 child-friendly tunes in 3 musical styles and lots of
rhythms and sound effects to choose from, the musical possibilities
are endless.
Record Play
Stop
Mode
Button Button Button
Buttons Sensor Swing Button
INCLUDED IN THIS PACKAGE
• One VTech® 3-in-1 Musical BandTM learning toy
• One user’s manual
• One guitar strap
WARNING: All packing materials such as tape, plastic sheets, wire ties and tags are not part of this toy, and should
be discarded for your child’s safety.
2
GETTING STARTED
BATTERY INSTALLATION
1. Make sure the unit is OFF.
3. Install 3 new “AA” size (AM-3/LR6)
batteries following the diagram inside
the battery box. (The use of new alkaline
batteries is recommended for maximum
performance.)
4. Replace the battery cover.
BATTERY NOTICE
• The use of new alkaline batteries is recommended for maximum
performance.
• Non-rechargeable batteries are not to be recharged.
• Rechargeable batteries are to be removed from the toy before being
charged (if removable).
• Rechargeable batteries are only to be charged under adult
supervision (if removable).
• Do not mix old and new batteries.
• Do not mix batteries of different types: alkaline, standard (carbonzinc) or rechargeable (nickel-cadmium).
• Only batteries of the same or equivalent type as recommended are
to be used.
• Batteries are to be inserted with the correct polarity.
• Exhausted batteries are to be removed from the toy.
• The supply terminals are not to be short-circuited.
• The toy is not to be connected to more than the recommended
number of power supplies.
• Do not dispose of batteries in fire.
GETTING STARTED
2. Locate the battery cover on the bottom of
the unit.
3
WE DO NOT RECOMMEND THE USE OF RECHARGEABLE
BATTERIES.
The demo tag should be removed immediately when the product is
taken out of the packaging. If the demo tag is still in position when you
begin play, please remove it from the bottom of the unit to activate
normal play mode.
GUITAR STRAP INSTALLATION
Insert the guitar strap at the back of the guitar
A. To fasten one end of the strap on the right side:
B. To fasten the other end of the strap on the left side:
GUITAR STRAP INSTALLATION
REMOVE DEMO TAG
4
PRODUCT FEATURES
Power Button
Press the Power button to turn the unit on. Press
it again to turn the unit off.
Press the Mode buttons to enter “Song”, “Jam”
or “Concert” modes.
Style Selector
Slide the Style Selector to change the musical
style of the songs and music.
There are 3 styles to choose from: Rock, Hip
Hop and Jazz.
Sensor
Move your hand over the Sensor to add drum
sounds, rhythm or other musical sounds in
different modes.
PRODUCT FEATURES
Mode Buttons
Swing Button
Slide the Swing Button to add sound effects or
rhythm to your music in different modes.
5
Keyboard
Press a key on the Keyboard to hear music
notes or sound effects in different modes. Turn
the Keyboard to change between Guitar and
Piano modes.
Slide the Volume Control to adjust the volume.
There are 3 volume levels to choose from.
Stop Button
Press the Stop Button to stop recording, stop
a song or music, or stop the playback of a
recorded track.
Play Button
Press the Play Button to play your recorded
song. When playing a song, the light next to
the Record button will stay lit.
PRODUCT FEATURES
Volume Control
Record Button
Press the Record Button to start recording.
If you run out of recording space, you will be
notified. During recording, the light next to the
Record button will flash.
6
Guitar/Piano Transformation
Turn
(The 3-in-1 Musical Band may not operate correctly if the batteries are
low. In this case, please replace the batteries.)
ACTIVITIES
ACTIVITIES
The 3-in-1 Musical BandTM can transform into a Guitar or Piano. To
transform the 3-in-1 Musical BandTM, press and hold the yellow VTech
button, then swing the keyboard into position as shown below. When
it is a piano, the Sensor works as a drum. When it is a guitar, use the
Sensor to strum.
GUITAR SHAPE
Song Mode
When you enter this mode, a song will play in the current musical style.
(Choose the musical style by sliding the Style Selector.)
To start a song, press any Keyboard key or move your hand over the
Sensor.
When a song is playing, add sound effects to the song by pressing the
keys on the Keyboard, sliding the Swing Button or moving your hand
over the Sensor.
7
Jam Mode
Press a key on the Keyboard to hear a music note.
Strum your hand over the Sensor to play a rhythm in the current musical
style. (Choose the musical style by sliding the Style Selector.)
Slide the Swing Button to add a sound effect in the current musical
style.
Concert Mode
When you enter this mode, a drum rhythm will play.
Press and hold a Keyboard key to add more sounds to the drum
rhythm.
Slide the Swing Button to add sound effects to the music.
The drum rhythm, bass guitar line, all Keyboard instruments and Swing
Button sound effects are in the current musical style. (Choose the
musical style by sliding the Style Selector.)
PIANO SHAPE
ACTIVITIES
Keep strumming the Sensor to add bass guitar to the drum rhythm.
Song Mode
When you enter this mode, a song will play in the current musical style.
(Choose the musical style by sliding the Style Selector.)
To start a song, press any piano key or move your hand over the
Sensor.
When a song is playing, add sound effects to the song by pressing
Keyboard keys or sliding the Swing Button.
Move your hand over the Sensor to add drum sounds to the song.
8
Jam Mode
Move your hand over the Sensor to add drum sounds to the song.
Keep sliding the Swing Button to hear a rhythm in the current musical
style. (Choose the musical style by sliding the Style Selector.)
Concert Mode
When you enter this mode, a drum and bass rhythm will play.
Press and hold a Keyboard key to add more instruments to the drum
and bass rhythm.
Slide the Swing Button to add a piano slide sound effect to the
music.
Move your hand over the Sensor to add drum sounds to the song.
The drum and bass rhythm and all Keyboard key sound effects are
in the current musical style. (Choose the musical style by sliding the
Style Selector.)
CARE & MAINTENANCE
1. Keep the unit clean by wiping it with a slightly damp cloth.
2. Keep the unit out of direct sunlight and away from any direct heat
source.
3. Remove the batteries when the unit is not in use for an extended
period of time.
4. Do not drop the unit on hard surfaces and do not expose the unit
to moisture or water.
CARE & MAINTENANCE / TROUBLESHOOTING
Press a key on the Keyboard to hear a piano note.
9
If for some reason the program/activity stops working, then please
follow these steps:
1. Turn the unit OFF.
2. Interrupt the power supply by removing the batteries.
3. Let the unit stand for a few minutes, then replace the batteries.
4. Turn the unit back ON. The unit will now be ready to play again.
5. If the unit still does not work, replace with an entire set of new
batteries.
If the problem persists, please call our Consumer Services Department
at 1-800-521-2010 in the U.S. or 1-877-352-8697 in Canada, and a
service representative will be happy to help you.
IMPORTANT NOTE:
Creating and developing Preschool Learning™ products is
accompanied by a responsibility that we at VTech® take very
seriously. We make every effort to ensure the accuracy of the
information which forms the value of our products. However, errors
sometimes can occur. It is important for you to know that we stand
behind our products and encourage you to call our Consumer
Services Department at 1-800-521-2010 in the U.S. or 1-877-352-8697
in Canada with any problems and/or suggestions that you might
have. A service representative will be happy to help you.
OTHER INFO
TROUBLESHOOTING
NOTE:
This equipment has been tested and found to comply with the limits for
a Class B digital device, pursuant to Part 15 of the FCC Rules. These
limits are designed to provide reasonable protection against harmful
interference in a residential installation. This equipment generates, uses
and can radiate radio frequency energy and, if not installed and used
in accordance with the instructions, may cause harmful interference to
radio communications. However, there is no guarantee that interference
will not occur in a particular installation.
10
If this equipment does cause harmful interference to radio or television
reception, which can be determined by turning the equipment off and
on, the user is encouraged to try to correct the interference by one or
more of the following measures:
• Reorient or relocate the receiving antenna.
• Increase the separation between the equipment and receiver.
• Connect the equipment into an outlet on a circuit different from that
to which the receiver is connected.
• Consult the dealer or an experienced radio/TV technician for help.
Caution: changes or modifications not expressly approved by the party
responsible for compliance could void the user’s authority to operate
the equipment.