1
Owner's Manual
®
&0 HORSEPOWER
22" EZ MULCH
SIDE DISCHARGE
ROTARY LAWN MOWER
Model No.
917.387240
,
,
0
'
Safety
Assembly
Operation
Maintenance
,
EspaSol
Repair Parts
CAUTION:
Read and follow all
Safety Rules and Instructions
before operating this equipment
Sears, Roebuck and Co., Hoffman Estates, IL 60179
Warranty
Safety Rules
Assembly
Operation
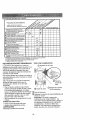
Maintenance Schedule
Maintenance
2
2
4
5
9
9
Product Specifications
Service and Adjustments
Storage
Troubleshooting
RepairParts
Parts Ordering
10
12
13
15
30
BackCover
LIMITED TWO YEAR WARRANTY ON CRAFTSMAN POWER MOWER
For two years from date of purchase, when this Craftsman Lawn Mower is maintained,
lubricated, and tuned up according to the operating and maintenance instructions in the
owner's manual, Sears will repair free of charge any defect in matedal or workmanship.
If this Craftsman Lawn Mower is used for commercial or rental purposes, this warranty
applies for only 90 days from the date of purchase.
This Warranty does not cover:
o Expendable items which become worn dudng normal use, such as rotary mower
blades, blade adapters, belts, air cleaners and spark plug.
o Repairs necessary because of operator abuse or negligence, including bent crankshafts and the failure to maintain the equipment according to the instructions contained in the owner's manual.
Warranty service is available by returning the Craftsman power mower to the nearest
Sears Service Center/Department
in the United States. This warranty applies only while
this product is in use in the United States.
This Warranty gives you Specific legal rights, and you may also have other rights which
vary from state to state.
SEARS, ROEBUCKAND
CO. D/817 WA, HOFFMAN ESTATES, ILLINOIS 60179
TRAINING:
° Read this operator's manual carefully.
Become familiar with the controls and
know how to operate your mower
propedy_ Learn how to quickly stop
mower=
o Do not allow children to use your
mower. Never allow adults to use
mower without proper instructions.
= Keep tile area of operation clear of all
persons, especially small children and
pets.
o Use mower only as the manufacturer
intended and as described in this
manual.
o Do not operate mower if it has been
dropped or damaged in any manner_
Always have damage repaired before
using your mower.
o Do not use accessory attachments that
are not recommended by the manufacturer. Use of such attachments may be
hazardous.
- The blade turns when the engine is
running
PREPARATION:
o Always thoroughly check the area to be
mowed and clear it of all stones, sticks,
wires, bones, and other foreign objects.
These objects will be thrown by the
blade and can cause severe injury.
o Always wear safety glasses or eye
shields when starting and while using
your mower°
° Dress properly. DO not operate mower
when barefoot or wearing open sandals.
Wear only solid shoes with good traction
when mowing.
2
Checkfueltankbeforestartingengine. o Nevercutgrassby pullingthe mower
Donotfill gastankindoors,whenthe
towardsyou..Mowacrossthe faceof
slopes,neverup anddownor you
engineis runningor whenthe engineis
hot. Allowthe engineto coolforseveral
mightloseyourfooting.Donot mow
excessivelysteepslopes.Usecaution
minutesbeforefillingthe gastank.
whenoperatingthe moweron uneven
Cleanoff anyspilledgasolinebefore
terrainor whenchangingdirectionsstartingthe engine.
Alwaysmakewheelheightadjustments
maintaingoodfooting
beforestartingyourmower. Never
• Neveroperateyourmowerwithout
properguards,plates,grasscatcheror
attemptto dothiswhilethe engineis
running.
othersafetydevicesin place
Mowonlyindaylightor goodartificial
MAINTENANCE
AND STORAGE:
light
o Check the blade and the engine
)PERATION"
mounting bolts often to be sure they are
Keepyoureyesandmindon your
tightened properly,
mowerandthe areabeingcut. Donot
• Check all bolts, nuts and screws at
let otherinterestsdistractyou.
frequent intervals for proper tightness to
Donotmowwet or slipperygrass,
be sure mower is in safe working
condition
Neverrunwhileoperatingyourmower.
Alwaysbesureof yourfooting- keepa
o Keep all safety devices in place and
firmholdonthe handlesandwalk.
working
o To reduce fire hazard, keep the engine
Donotput handsor feetnearor under
rotatingparts. Keepclearof the
free of grass, leaves or excessive
dischargeopeningat alltimes.
grease and oil.
• Check grass catcher often for deterioraAlwaysstoptheenginewheneveryou
leaveor are notusing yourmower,or
tion and wear and replace worn bags.
beforecrossingdriveways,walks,roads,
Use only replacement bags that are
recommended by and comply with
andanygravel-covered
areas.
Neverdirectdischargeofmaterial
specifications of the manufacturer of
towardbystandersnor allowanyone
your mower.
nearthe mowerwhileyouare operating • Always keep a sharp blade on your
it.
mower.
Beforecleaning,inspecting,or repairing • Allow engine to cool before storing in
any enclosure.
yourmower,stopthe engineandmake
absolutelysurethe bladeandall moving . Never store mower with fuel in the tank
inside a building where fumes may
partshavestopped_Thendisconnect
reach an open flame or an ignition
the sparkplugwireandkeepit away
source such as a hot water heater,
fromthe sparkplugto preventaccidental starting°
space heater, clothes dryer, etc.
Donotcontinueto runyourmowerif you CAUTION: Always disconnect spark plug
hita foreignobject. Followthe proce- wire and place wire where it cannot contact
dureoutlinedabove,thenrepairany
spark plug in order to prevent accidental
damagebeforerestartingandoperating starting when setting up, transporting,
adjusting or making repairs.
youmower
Donotchangethe governorsettingsor
WARNING: The engine exhaust from this
overspeedthe engine. Enginedamage product contains chemicals known to the
or personalinjurymay resulL
State of California to cause cancer, birth
Donotoperateyourmowerif itvibrates defects, or other reproductive harm.
abnormally,Excessivevibrationis an
indicationof damage;stopthe engine,
safelycheckfor the causeofvibration
andrepairas required.
Donot runtheengineindoors, Exhaust
fumesaredangerous.
3
Theseaccessorieswereavailablewhen
this lawnmowerwasproduced.Theyare
alsoavailableat mostSearsretailoutlets
andservicecenters. MostSearsstores
canalsoorderrepairpartsforyou,when
youprovidethe modelnumberofyour
lawnmower.Someof theseaccessories
maynotapplyto yourlawnmower:
LAWN MOWER PERFORMANCE
CUPPING
DEFLECTOR
MULCHER KITS
FOR REAR DISCHARGE LAWN MOWERS
FOR
FOR
REAR D_ECHARGE
GRASS
LAWN CATCHERS
MOWERS
SIDE
DISCRARGE
GRASS
LAWN CATCHERS
MOWERS
GAS CANS
LAWN MOWER MAINTENANCE
MUFFLERS
BELTS
AIR FILTERS
BLADE ADAPTERS
BLADES
Read these instructions and this manual in
its entirety before you attempt to assemble
or operate your new lawn mower: Your
new lawn mower has been assembled at
the factory with the exception of those
parts left unassembled for shipping
purposes_ All parts such as nuts, washers,
bolts, etc., necessary to complete the
assembly have been placed in the parts
bag. To ensure safe and proper operation
of your lawn mower, all parts and hardware you assemble must be tightened
securely. Use the correct tools as necessary to ensure proper tightness_
TO REMOVE
CARTON
LAWN
MOWER
FROM
• Remove loose parts included with
mower=
= Cut down two end corners of carton and
lay end panel down flat.
• Remove all packing materials except
padding between upper and lower
handle and padding holding operator
presence control bar to upper handle.
° Roll lawn mower out of carton and check
carton thoroughly
parts.
SPARK PLUGS
WHEELS
ENGINE OIL
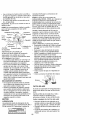
HOW TO SET UP YOUR
MOWER
TO UNFOLD
LAWN
HANDLE
IMPORTANT:
Unfold handle carefully so
as not to pinch or damage control cables.
° Raise handles until lower handle section
locks into place in mowing position.
= Remove protective padding, raise upper
handle section into place on lower
handle and tighten both handle knobs,
o Remove handle padding holding
operator presence control bar to upper
handle.
o Your lawn mower handle can be
adjusted for your mowing comfort_
Refer to "Adjust Handle" in the Service
and Adjustments section of this manual
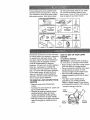
Operator Presence Control Bar
Upper'
Handle
_'_,_., i !
Lift U_
for additional loose
Lower
Handle
4
Mowing
Position
lOW YOUR LAWN MOWER
ADTHISOWNER'SMANUALANDSAFETYRULESBEFOREOPERATING
YOUR
NN MOWER. Compare the illustrations with your lawn mower to familiarize yourself
1 the location of various controls and adjustments
Save this manual for future
_rence.
.=sesymbols may appear on your lawn mower or in literature supplied with the
ducL Learn and understand their meaning.
CAUTION
ENGINE
OR WARNING
ON
ENGINE
OFF
FAST
SLOW
CHOKE
FUEL
OIL
DANGER, KEEP HANDS
AND FEET AWAY
Operator Presence
Control Bar
Engine Zone
Control
Upper Handle
Handle Knob
Starter Handle
Gasoline
Fill Cap
Engine OilCap
Air Filter
With Dipstick
Pdmer
Engine Speed
Control
Icher Door
Wheel Adjuster
(On Each Wheel)
!ETS CPSC SAFETY
REQUIREMENTS
]rs rotary walk-behind power lawn mowers conform to the safety standards of the
erican National Standards Institute and the U.S. Consumer Product Safety Commisq. The blade turns when the engine is running.
ERATOR PRESENCE CONTROL BAR - must be held down to the handle to start
engine. Release to stop the engine.
ILCHER DOOR - allows conversion to discharge or bagging operation.
IMER - pumps additional fuel from the carburetor to the cylinder for use when starting
Did engine.
_,RTER HANDLE - used for starting the engine.
GINE SPEED CONTROL LEVER - located on the side of the engine which allows
i to select either fast or slow engine speed.
5
HOW TO
USE YOUR
LAWN
MOWER
ENGINE SPEED
The engine speed was set at the factory
for optimum performance° Speed is not
adjustable.
ENGINE
ZONE
CONTROL
CAUTION: Federal regulations require an
engine control to be installed on this lawn
mower in order to minimize the risk of
blade contact injury. Do not under any
circumstances attempt to defeat the
function of the operator control The blade
turns when the engine is running.
o Your lawn mower is equipped with an
operator presence control bar which
requires the operator to be positioned
behind the lawn mower handle to start
and operate the lawn mower.
TO ADJUST cu'n'ING
HEIGHT
o Raise wheels for tow cut and lower
wheels for high cut.
° Adjust cutting height to suit your
requirements.
Medium position is best
for most lawns.
° To change cutting height, squeeze
adjuster lever toward wheel Move
wheel up or down to suit your requirements. Be sure all wheels are in the
same setting.
NOTE: Adjuster is properly positioned
when plate tab inserts into hole in lever.
Also, 9-position adjusters (if so equipped)
allow lever to be positioned between the
plate tabs.
Lower Wheels
Plate Tab
For High Cut
Raise Wheels For Low Cut
Lever
CAUTION: Do not operate your lawn
mower without mulcher door in locked
position, discharge deflector in place, or
approved grass catcher in place.
NOTE: Your lawn mower has been
shipped ready for mulching operation. To
convert to discharging operation, you must
install the discharge deflector attachment
included with your mower.
TO INSTALL DISCHARGING DEFLECTOR
o Unlock mulching door by lifting door
latch as shown.
o Lift door upward on it's hinge until the
deflector frame can be hooked over the
door mounting bracket as shown.
o Release the door to rest against
deflector frame.
= To return to mulching operation, reverse
the above steps and be sure door is in
locked position.
BEFORE
STARTING
ENGINE OIL
Your lawn mower is shipped without oil in
the engine.
= Be sure mower is level and area around
oil fill is clean.
o Remove engine oil cap w/dipstick and fill
to the full line on the dipstick.
. Use 20 ozs. of oil. For type and grade
of oil to use, see "ENGINE" in Customer
Responsibilities section of this manual
o Pour oil slowly. Do not over fill.
o Check oil level before each use. Add oil
if needed. Fill to full line on dipstick.
• To read proper level, tighten engine oil
cap each time.
• Reinstall engine oil cap and tighten.
o Change the oil after every 25 hours of
operation or each season. You may
need to change the oil more often under
dusty, dirty conditions.
_AS
necessary to repeat priming steps, In
Fillfueltank Usefresh,clean,regular warmer weather over priming may cause
unleadedgasolinewitha minimumof 87 flooding and engine will not start. If you do
flood engine wait a few minutes before
octane. (Useof leadedgasolinewill
increasecarbonandleadoxidedeposits attempting to start and DO NOT repeat
priming steps.
andreducevalvelife). Donot mixoil
withgasoline.Purchasefuelin quanti- MOWING TIPS
tiesthatcanbe usedwithin30daysto
. Under certain conditions, such as very
assurefuelfreshness.
tall grass, it may be necessary to raise
MPORTANT:WHENOPERATINGIN
the height of cut to reduce pushing effort
"EMPERATURES
BELOW32°F(0°C),use and to keep from overloading the engine
resh,cleanwintergradegasolineto help
and leaving clumps of grass clippings.
nsuregoodcoldweatherstarting.
- For extremely heavy cutting, reduce the
_/ARNING:Experienceindicatesthat
width of cut by overlapping previously
dcoholblendedfuels(calledgasoholor
cut path and mow slowly,
isingethanolor methanol)canattract
• For side discharge lawn mowers, cutting
noisturewhichleadsto separationand
in a counter-clockwise
direction, starting
ormationof acidsduringstorage,Acidic
at the outside of the area to be cut,
Jascandamagethefuelsystemof an
spreads grass clippings more evenly and
',nginewhilein storage.Toavoidengine
puts less load on the engine. To keep
)roblems,the fuelsystemshouldbe
clippings off of walkways, flower beds,
,_mptied before storage of 30 days or
onger, Drain the gas tank, start the
;ngine and let it run until the fuel lines and
"arburetor are empty. Use fresh fuel next
_eason. See Storage Instructions for
_dditional information
Never use engine
)r carburetor cleaner products in the fuel
ank or permanent damage may occur.
_,AUTION: Fill to bottom of gas tank filler
leck. Do not overfill. Wipe off any spilled
)il or fuel. Do not store, spill or use
etc., make the first cuts in a clockwise
direction.
o Pores in cloth grass catchers can
become filled with dirt and dust with use
and catchers will collect less grass., To
prevent this, regularly hose catcher off
with water and let dry before using,
o Keep top of engine around starter clear
and clean of grass clippings and chaff,
This will help engine air flow and extend
engine life.
}asoline near an open flame.Gasoline
MULCHING
Filler Cap
Engine Oil
Cap w/
Dipstick
"O START
ENGINE
To start a cold engine, push primer five
(5) times before trying to start. Use a
firm push. This step is not usually
necessary when starting an engine
which has already run for a few minutes.
Hold operator presence control bar down
to the handle and pull starter handle
quickly. DO NOT allow starter rope to
snap back.
To STOP engine, release operator
presence control bar.
tOTE: In cooler weather it may be
MOWING
TIPS
IMPORTANT:
For best performance,
keep mower housing free of built-up grass
and trash. Clean underside of mower
housing after each use. See "Cleaning" in
CUSTOMER RESPONSIBILITIES
section
of this manual.
o The special mulching blade will recut the
grass clippings many times and reduce
them in size so that as they fall onto the
lawn they will disperse into the grass
and not be noticed. Also, the mulched
grass will biodegrade quickly to provide
nutrients for the lawn. Always mulch
with your highest engine (blade) speed
as this wilt provide the best recutting
action of the blades.
o Avoid cutting your lawn when it is wet.
Wet grass tends to form clumps and
interferes with the mulching action. The
best time to mow your lawn is the early
afternoon. At this time the grass has
dried and the newly cut area will not be
exposed to the direct sun,
,, Forbestresults,adjust
the lawn mower
cutting height so that the lawn mower
cuts off only the top one-third of the
grass blades. If the lawn is overgrown it
will be necessary to raise the height of
cut to reduce pushing effort and to keep
from overloading the engine and leaving
clumps of mulched grass_ For extremely
heavy mulching, reduce your width of
cut, mow slowly and raise the rear of the
lawn mower one wheel adjuster setting
higher than the front.
o Certain types of grass and grass
conditions may require that an area be
mulched a second time to completely
hide the clipping& When doing a
second cut, mow across or perpendicular to the first cut path.
o Change your cutting pattern from week
to week. Mow north to south one week
then change to east to west the
next week. This will help prevent
matting and graining of the lawno
Max. 1/3
STOMER
RESPONSIBILITIES
MAINTENANCE
SCHEDULE
FiLL IN DATES
AS YOU COMPLETE
REGULAR SERVICE
_ERVICE
Check for Loose Fasteners
Clean/inspect Grass Catcher
(If Equipped)
6/
6/
Clean Lawn Mower
Clean Under Drive Cover
(Power-Propelled Mowers)
,'heck drive belt/pulleys
(Power-Propelled Mowers)
Check/Sharpen/Replace
6/
f_
j
6/
f,/
f/"
6,/
f_
Bfade
6/
Lubrication Char[
Clean Battery/Recharge
Eiectdc Star[ Mowers t
Check Engine Oil Level
DATES
6/
6/
6/
6/4
6/
Change Engine Oil
Clean Air Filter
Inspect Muffler
6/1,2
6/
6/
Clean or Replace Spark Plug
6/
Replace Air Filter Paper Cartridge
6/2
I - Change more often when operating under a heavy load or in high ambient
temporalures
g. Service mora otlen when operating tn ditty or dusty conditions
3. Replace blades moreollan when mowing in ._,a
ndy soil
4 ,, Charge
NERAL
48 hot_rs aI end of sBr_on
RECOMMENDATIONS
LUBRICATION
warranty on this lawn mower does not
er items that have been subjected to
,rater abuse or negligence. To receive
value from the warranty, operator must
ntain mower as instructed in this
luaL
ne adjustments will need to be made
iodically to properly maintain your unit.
adjustments in the Service and Adjust°
qts section of this manual should be
.cked at least once each season.
)nce a year, replace the spark plug,
lean or replace air filter element and
heck blade for wear. A new spark plug
nd clean/new air filter element assures
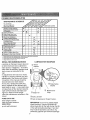
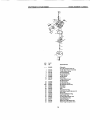
DIAGRAM
(_) Wheel
Adjuster
(_) Brake Spring
Bracket
(_) Mulcher Door
roper air-fuel mixture and helps your
ngine run better and last longer.
:ollow the maintenance schedule in this
_anual
(_) Spray Lubricant
FORE EACH USE
(_) Refer to Maintenance "Engine" Section.
(_) Engine Oil
,heck engine oil level
,heck for loose fasteners.
BRICATION
Hinge
IMPORTANT Do not oil or grease plastic
wheel bearings. Viscous lubricants will
attract dust and dirt that will shorten the life
._punit well lubricated.
of the self lubricating bearings, if you feel
they must be lubricated, use only a dry,
powdered graphite type lubricant sparingly_
9
PRODUCT SPEC FaCAT ONS
MODEL NUMBER
SERIAL
917.387240
NUMBER
DATE OF PURCHASE
HORSEPOWER:
6.0
DISPLACEMENT:
11.5 CU. IN.
GASOLINE
1,5 QUARTS
CAPACITY/TYPE:
UNI EADED REGI]I AR
SAE 30 (ABOVE 32°F)
OIL TYPE (API-SF/SG/SH):
SAE 5W-30 (BELOW 32°F)
20 OZS.
OIL CAPACITY:
_PARK PLUG(GAP:
CHAMPION
.030")
VALVECLEARANCE:
J19LM
INTAKE:
004 - 008
EXHAUST:
.004 - .008
SOLID STATE IGNITION
AIR GAP:
,0125 IN,
3LADE BOLT TORQUE:
35-40 FT. LBS.
The model and serial numbers will be found on a decal attached to the rear of the
lawn mower housing,Record both serial number and date of purchase in space
provided above.
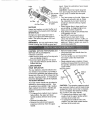
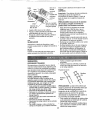
LAWN
MOWER
TO REMOVE BLADE
Always observe safety rules when
performing any maintenance,
TIRES
o Keep tires free of gasoline, oil, or insect
control chemicals which can harm
rubber_
o Avoid stumps, stones, deep ruts, sharp
objects and other hazards that may
cause tire damage,
BLADE
CARE
For best results, mower blade must be
kept sharp, Replace bent or damaged
blades°
Crankshaft
Blade Adapter _eyway
Blade
Key-----._
B ,t B,ade
NOTE: Remove the blade adapter and
check the key inside hub of blade adapter.
The key must be in good condition to work
property_ Replace adapter' if damaged_
TO REPLACE BLADE
;__ /)_
• "-222
arrkshaft
Lockwasher
= Disconnect spark plug wire from spark
plug and place wire where it cannot
come in contact with spark plug.
o Turn lawn mower on its side° Make sure
air filter and carburetor are up.
o Use a wood block between blade and
mower housing to prevent blade from
turning when removing blade bolt,
o Protect your hands with gloves and/or
wrap blade with heavy cloth.
o Remove blade bolt by turning counterclockwise. Use a 9/16" box or open-end
wrench,
o Remove blade and attaching hardware
(bolt, lock washer and hardened
washer),
o Position the blade adapter on the engine
crankshaft
Be sure key in adapter and
crankshaft keyway are aligned,
Trailing Edge Blade Adapter
10
Positionbladeon the bladeadapter
aligningthe two (2)holesin the blade
with the raised lugs on the adapter.
Be sure the trailing edge of blade
(opposite sharp edge) is up toward the
engine,
Install the blade bolt with the lock
washer and hardened washer into blade
adapter and crankshaft,
Use block of wood between blade and
lawn mower housing and tighten the
blade bolt, turning clockwise.
The recommended tightening torque is
35-40 fL Ibs.
#IPORTANT: Blade bolt is grade 8 heat
eated,
NOTE: Although multi-viscosity oils
(5W30, 10W30 etc.) improve starting in
cold weather, these multi-viscosity oils will
result in increased oil consumption when
used above 32°F Check your engine oil
level more frequently to avoid possible
engine damage from running low on oil.
Change the oil after every 25 hours of
operation or at least once a year if the
lawn mower is not used for 25 hours in one
year.
Check the crankcase oil level before
starting the engine and after each five (5)
hours of continuous use. Tighten oil plug
securely each time you check the oil level
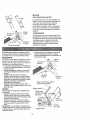
TO CHANGE ENGINE OIL
IOTE: We do not recommend sharpening
bade - but if you do, be sure the blade is
alanced
NOTE: Before tipping lawn mower to drain
oil, drain fuel tank by running engine until
fuel tank is empty
O SHARPEN
o Remove engine oil cap; lay aside on _.
clean surface.
o Tip lawn mower on its side as shown
and drain oil into a suitable container.
Rock lawn mower back and forth to
remove any oil trapped inside of engine.
o Wipe off any spilled oil on lawn mower
and on side of engine,
• Fill engine with oil. Fill only to the
"FULL" line on the dipstick. DO NOT
OVER FILL,
- Replace engine oil cap,
BLADE
:are should be taken to keep the blade
alanced. An unbalanced blade will cause
ventual damage to lawn mower or
ngine.
The blade can be sharpened with a file
or on a grinding wheel Do not attempt
to sharpen while on the mower
To check blade balance, drive a nail into
a beam or wall, Leave about one inch of
the straight nail exposed. Place center
hole of blade over the head of the nail.
If blade is balanced, it should remain in
a horizontal position. If either end of the
blade moves downward, sharpen the
heavy end until the blade is balanced,
IRASS CATCHER
The grass catcher may be hosed with
water, but must be dry when used.
Check your grass catcher often for
damage or deterioration
Through
normal use it will wear. If catcher needs
replacing, replace only with a manufacturer approved replacement catcher.
Give the lawn mower model number
when ordering.
!NGINE
UBRICATION
Ise only high quality detergent oil rated
4th API service classification SF, SG, or
;H Select the oil's SAE viscosity grade
ccording to your expected operating
_mperature.
Container
AIR FILTER
Your engine will not run properly and may
be damaged by using a dirty air filter.
Replace the air filter every year, more
often if you mow in very dusty, dirty
conditions,
Do not wash air filter,
TO CHANGE AIR FILTER
o Remove the air filter by turning counterclockwise to the stop and pull away from
collar.
• Remove filter from inside of cover.
o Clean the inside of the cover and the
collar to remove any dirt accumulation.
• Insert new filter into cover
o Put air filter cover and filter into collar
aligning the tab with the slot.
• Push in on cover and turn clockwise to
tighten,
11
Collar
trash. Clean the underside
after each use
Clip
Clockwise
ToRemove
Slot
Air Filter
Tab
Air Filter Cover
Turn Clockwise
To ]]ghten
MUFFLER
Inspect and replace corroded muffler as it
could create a fire hazard and/or damage.
SPARK PLUG
Change your spark plug each year to
make your engine start easier and run
better. Set spark plug gap at .030 inch_
CLEANING
IMPORTANT:
For best performance, keep
mower housing free of built-up grass and
CAUTION:
BEFORE PERFORMING ANY
SERVICE OR ADJUSTMENTS:
. Release control bar_
• Make sure the blade and all moving parts
have completely stopped.
. Disconnect spark plug wire from spark
plug and place where it cannot come in
contact with plug,
LAWN
MOWER
REAR
DEFLECTOR
CAUTION:
Disconnect spark plug wire
from spark plug and place wire where it
cannot come in contact with the spark
plug.
* Turn lawn mower on its side. Make sure
air filter and carburetor are up. Clean
the underside of your lawn mower by
scraping to remove build-up of grass
and trash.
. Clean engine often to keep trash from
accumulating. A clogged engine runs
hotter and shortens engine Iife_
° Keep finished surfaces and wheels free
of all gasoline, oil, etc.
o We DO NOT recommend using a
garden hose to clean lawn mower
unless the electrical system, muffler, air
filter and carburetor are covered to keep
water out. Water in engine can result in
shortening engine life.
. Remove hairpin cotters.
° Disconnect the lower handle from the
handle brackets
. Turn the handle over and reassemble
the hairpin cotters that have been
removed.
• Route cable(s) below crossbar of lower
handle and reassemble the controls and
the operator presence control bar to the
upper handle.
Shipping Position
The rear deflector, attached between the
rear wheels of your mower, is provided to
minimize the possibility that objects will be
thrown out of the rear of the mower into the
operator mowing position. If the deflector
becomes damaged, it should be reptaced_
TO ADJUST HANDLE
Your lawn mower handle can be raised or
lowered for your mowing comfort.
Four
(4) positions are available: high, medium
high, medium low and Iow_ Handles are
shipped mounted in the medium low
position.
• To change from medium low to medium
high position, the upper and lower
handle sections will have to be turned
over.
- Remove the cable clips.
• Remove the controls and operator
presence control bar from the upper
handle_
of your mower
High
Medium
Medium
Low
CAUTION:
The operator presence control
bar must pivot freely to permit blade/brake
engagement when control bar is released.
Do not overtighten the fasteners holding
the controls to the upper handle,
• To change from medium low to high
position only the upper handle section
will have to be turned over.
,, To change from medium low to low
position, only the lower handle section
will have to be turned over.
12
IGINE
,RBURETOR
High
Jr carburetor has a non-adjustable fixed
in jet for mixture control. If your engine
_s not operate properly due to sus;ted carburetor problems, take your
in mower to an authorized Sears
vice center for repair and adjustment.
IGINE SPEED
e engine speed has been factory seL
not attempt to increase engine speed
it may result in personal injury. If you
ieve the engine is running too fast or
, slow, take your lawn mower to an
',horized Sears service center for repair
sq
Remove
/
ling Pin
-I adjustmenL
Hair Pin Cotter
mediately prepare your lawn mower for
,rage at the end of the season or if the
it will not be used for 30 days or more.
Lower
Squeeze To
Remove
tWN MOWER
/
len lawn mower is to be stored for a
riod of time, clean it thoroughly, remove
dirt, grease, leaves, etc. Store in a
an, dry area
._lean entire lawn mower (See "CLEANNG" in the Customer Responsibilities
section of this manual).
_ubricate as shown in the Customer
Hair pin
Cotter
_esponsibilities
section of this manual
3e sure that all nuts, bolts, screws, and
3ins are securely fastened. Inspect
"noving parts for damage, breakage and
Near. Replace if necessary.
louch up all rusted or chipped paint
_urfaces; sand lightly before painting.
[NDLE
Upper
Mounting Pin
Operatora Presence
Bar
Handle
Fold Forward
For Storage
u can fold your lawn mower handle for
_rage.
Squeeze the bottom ends of the lower
landle toward each other until the lower
3andle clears the handle bracket, then
_qove handle forward.
_oosen upper handle mounting bolts
_nough to allow upper handle to be
folded back,
portant:
When folding the handle for
_rage or transportation, be sure to fold
., handle as shown or you may damage
., control cables_
Lower
Handle
Fold Backward
Mowing Position
Lower Handle
ENGINE
FUEL SYSTEM
IMPORTANT: It is important to prevent
gum deposits from forming in parts such
as carburetor, fuel filter, fuel hose, or tank
during storage. Also, experience indicates
that alcohol blended fuels (called gasohol
13
or usingethanolor methanolcanattract
moisturewhichleadsto separationand
formationof acidsduringstorage,Acidic
gascandamagethefuelsystemof an
enginewhilein storage,
. Drainthefueltank.
- Startthe engineandlet it rununtilthe
fuellinesandcarburetorareempty,
° Neveruseengineor carburetorcleaner
productsinthe fueltankor permanent
damagemayoccur,
° Usefreshfuelnextseason.
NOTE: Fuelstabilizeris anacceptable
alternativeinminimizingtheformationof
fuelgumdepositsduringstorage,Add
stabilizerto gasolineinfuel tankor storage
container_Alwaysfollowthe mixratio
foundon stabilizercontainer.Runengine
at least10 minutesafteraddingstabilizer
to allowthe stabilizerto reachthe carburetor. Do notdrainthe gastank and
carburetorif usingfuel stabilizer.
ENGINEOIL
Drainoil (withenginewarm)andreplace
withcleanengineoil. (See"ENGINE"in
the CustomerResponsibilities
sectionof
this manual),
TROUBLESHOOTING
PROBLEM
Does not start
CYLINDER
o Removesparkplug_
o Pouroneounce(29ml)of oil through
sparkplugholeintocylinder,
o Pullstarterhandleslowlya fewtimesto
distributeoil
- Replacewithnewsparkplug
OTHER
o Do notstoregasolinefromoneseason
to another.
- Replaceyourgasolinecanif yourcan
startsto rust Rustand/ordirt in your
gasolinewillcauseproblems,
o If possible,storeyourunitindoorsand
coverit_togiveprotectionfromdustand
dirt,
• Coveryourunitwitha suitableprotective
coverthatdoesnot retainmoisture.Do
notuseiplastic Plasticcannotbreathe
whichallowscondensationtoformand
will causeyourunitto rust.
IMPORTANT: Never cover mower while
engine a_d exhaust areas are still warm_
CAUTION:
Never store the lawn mower
with gasoline in the tank inside a building
where furoes may reach an open flame or
spark, Allow the engine to cool before
storing in any enclosure.
CHART
CORRECTION
CAUSE
. ClearVreplace air' filter_
• Fill fuel tank.
° Drain tank and refill with
fresh clean fuel,
- Drain fuel tank and
carburetor and refill tank
o Dirty air filter_
o Out of fuel,
= Stale fuel
, Water in fuel
with fresh gasoline,
° Connect wire to plug,
• Spark plug wire is
disconnected.
- Bad spark plug.
• Loose blade or broken blade
adapter_
. Control bar in released
position.
. Control bar defective.
14
• Replace spark plug_
,l]ghten
blade bolt or
replace blade adapter:
. Depress control barto
handle.
• Replace control bar:
tROUBLESHOOTiNG
>ROBLEM
.oss of power
CHART
CAUSE
CORRECTION
° Rearof lawn mower housing
or crying blade dragging
in heavy grass.
o Cutting too much grass.
° Dirty air filter.
,, Buildup of grass, leaves,
and trash under mower.
,, Too much oil in engine.
° Walking speed too fast.
=oor cut- uneven
o Wom, bent or loose blade.
o Wheel heights uneven.
° Buildup of grass, leaves
and trash under mower.
Excessive
tibration
o Wom, bent or loose blade.
° Bent engine crankshafL
_tarter rope hard
o pull
= Engine flywheel brake is on
when control bar is released.
• Bent engine cranksha&
o Blade adapter broken.
° Blade dragging in grass.
• Set to "Higher Cut"
position.
° Set to "Higher Cut"
position.
• Clean/replace air filter.
• Clean underside of mower
housing.
o Check oil level.
° Cut at slower walking
speed.
o Replace blade. Tighten
blade boll
• Set all wheels at same
height
° Clean underside of
mower housing.
• Replace blade. Tighten
blade bolt.
° Contact an authorized
° Depress control barto
upper handle before
pulling starter rope.
o Contact an authorized
service center,
o Replace blade adapter.
° Move lawn mower to cut
grass or to hard surface
to start engine,
._rass catcher
lot filling (if so
.=quipped)
"lardto push
= Cutting height too low.
° Lift on blade worn off.
° Catcher not venting air.
° Raise cutting height.
• Replace blade.
° Clean grass catcher.
° Grass is too high or wheel
height is too low.
° Rear of lawn mower
. Raise cutting heighL
housing or blade dragging
in grass,
° Grass catcher too full,
housing one (1) setting
higher.
o Empty grass catcher.
° Adjust handle height to
suiL
° Handle height position not
right for you.
15
° Raise rear of lawn mower
Garant_a
Reglas de Seguddad
Mantaje
Operaci6n
Mantenimiento
Programa de Mantenimiento
16
16
18
19
23
23
Especificaciones del Producto
Servicio y Adjustes
Almaoenamiento
Identificaci6n de problemas
Partes de repuesto
arden de Partes
24
26
27
28
Vea el manual
ingl6s del duefio
Contratapa
GARANTIA LIMITADA DE DOS AI_OS PARA LA SEGADORAA MOTOR CRAFTSMAN
Par dos (2) arias, a partir de la fecha de osmpra,coando esta Segadora Craftsman se mantenga,lubfique
y afineseg_n los instruccionespara la operaci6ny el rnantanimierltoen el manual dal duefio, Sears
reparar&gratis todo defectoen el material y la mano de obra_
Si la Segadora Craftsmanse usa para fines osmercialeso de arriendo, esta garantfa s61ose aplica par
noventa (90) dJasa partirde la fecha de compra,
Esta Garantfa no cobre:
° Articatos que se desgastanduranteel usa normal tales coma las cuchillassegadoras mtatorias,los
adaptadoresde la cuchilla,las correas,los fillms de aire y las bujlas_
o Reparacionosnecesariasdebido at abuso o a la negligenciadel operador, incluy_ndosea los
cigLiefalos dobladosy a la falta de mantenimientodal equipo seg_3nlas insb'uoc:ionesque se incluyen
en el manual del due5o_
EL SERVIClO DE GARANT[A ESTADISPONIBLEat devotverla segadpra a motor Craftsmanal centro/
departmentode servicio Sears mas cercano en los estadosunidos. Esta garantia se aplisa solamente
mientrasel producto este en usa en los EstadosUnidos.
Esta Garantfa le otorga derechos legalesespecificos,y puede que tambi_n tenga otros derechos que
varian de estado a estado.
Sears, Roebuckand Co., D/817WA, Hoftman Estates,IL 60179 USA
Los estandraresde seguridadexigen la presencia
del operatoren los osntratespara reducira un
minimael desgode lesionarse.Su unidad viene
equipadacon dichos controles.Par ningun motivo
trate del eliminarla funci6n de los controlesque
exigenla presencia dal operador.
ENTRENAIVIIENTO:
° Lea este manualdel operador
cuidadosamenta_Familiarfcesacon los
contmles y apmnda a operar su segadora en
forma adecuada. Apranda a pararsu segadora
r_pidamente_
• No permita
quelosnifios
usensu segadora,
Nunsa pe_'nita
quelosadultos
operanla
segadorasinosntar
conlasinstruccionos
adecuadas,
• Mantenga el fireade operaci6ndespejada
de gente, especialmentede nifios pequefios
y de animalos dom_stioss.
° Use la segadorasolamente para los fines
propuestospar el fabdcantey seg_n las
explicacionosdescritas en oste manual.
° No opera la segadora si se ha saido o dafado en
cualquierafarina. Siempre repare los dafios
antes de usarla.
• No use acoesoriosque no hayan sido
recornendadospar el fabfisante_[] usa de dichos
accesodos puede ser patigroso.
° La cuchilla gira cuando el motor est&
funcionando,,
PREPARACI6N:
° Siempre revise cuidadosamente el firea que se
va a segar y dosp_jelade todas las piedras,
palos, alambres, huesos y otros objetos
extrafos. Estosobjetos serdn lanzados con la
cuchiltay pueden producirlesiones graves_
° Siempre use anteojos de seguridado protectores
de ojos cuando arranqoe y durante el tiempo
que use la segadora.
16
istase en forma adecuada No opere la
egadorasin zapatos o con sandalias
_ientrasque el motor est_ funcionando
iegue siempre durante el dia o con buena
iz artificial
ERAClON:
lantenga sus ojos y su mente en ia
egadora yen el &rea que se est& cortando+
+opermita que otros interesesIo distraigan+
Io corte c6sped mojado o resbaloso+Nunca
_rra mientras est_ operando su segadora+
iempre asegt_resede mantener el equilibdo
mantenga el mango agarrado firmemente y
amine
Io ponga las manos o los pies cerca odebajo
e las parles rotatorias. Mant_ngase
]ejado de ta abertura de descarga en todo
iomento+
iempre pare el motor cuando se vaya
cuande no est_ usando su segadora, o
ntes de atravesar las entradas para autos,
_ssenderes, caminos y _reas cubiertas de
pio.
lunca dirija la descarga del material hacia
_sespeetadores ni permita a nadie cerca de
t segadora mientras la est_ operando+
,ntes de limpiar, inspeccionar o de reparar I
segadora, pare el motor y est_
ompletamente seguro de que la cuchilla y
ue todas las partes que se mueven se
ayan detenido Luege, desconecte el
lambre de la bujia y mant_ngalo alejado de
sta para evitar el arranque por accidente+
Io continue haciendo funcionar su segadora
i le pega a un objeto extraSo. Siga el
rocedimiento descrito anteriormente, luego
epare cualquier dafio antes de volver a
rrancar y de operar su segadora
Io cambie los ajustes del regulador o
agaque el motor ande a una velocidad
xcesiva+Se pueden producir daSos en el
"_etory I esiones personales,
lo opere su segadora si vibra fuera de le
,ermaL La vibraci6n excesiva es una
_dicaci6n de dafio; pare el motor, revise en
_rma segura la causa de la vibraci6n y haga
reparaciones segL_nsea necesado
o haga funcionar el motor en
ecintoscerrados, Los gases de escape son
,eligrosos.
_uncacorte el c_sped tirando la segadora
_aciausted+Siegue a travSs de la cara de
_s pendientes, nunca hacia ardba o hacia
_bajopues puede perder el equilibrio No
,iegue pendientes demasiado empinadas
Tenga cuidado cuando opere la eegadora en
terreno dispareje o cuando cambie de
direcci6n - mantenga un buen equilibrio.
. Nunca opere la segadora sin las
protecciones adecuadas, las planchas, el
recogedor de c6sped y etros dispositivos de
seguridad en su lugar.
MANTENIMIENTO Y ALMACENAMIEN-TO:
• Revise la cuchilla y los pemos de montaje
del motor a menudo, para asegurarse que
est_.napretados en la forma adecuada.
,, Revise todos los pernos, tuercas y tomillos a
intervalosfrecuentes, para verificar si est_n
apretados en forma adecuada, y
asegurarseque la segadora se encuentra en
condiciones de funcionamiento seguro.
• Mantenga todos los dispositivos de seguddad
en su lugar y listos para funcionar+
• Para reducir el peligro de incendio,
mantenga el motor sin c6sped, hojas y grasa
o aceite en exceso
• Revise el recogedor de c_sped a menudo
para verificar si hay deterioro y desgaste y
cambie las bolsas desgastadas. Use
solamente tas bolsas de repuesto
recomendadas por el fabricante de su
segadora o que cumplen con las
especificaciones de _ste,
• Siempre mantenga una cuchilla afilada en su
segadora
• Siempre perrnita que el motor se enfrie
antes de guardarla en cualquier recinto
cerrado.
• Nunca guarde la segadora con combustible
en el estanque dentro de un edificio endonde
los gases pueden alcanzar una llama
expuesta o una fuente de igniciSn, tal como el
calentador de agua, la estufa de
calefacci6n, la secadora de ropa, etc.
PRECAUCION: Siempre dsscenecte el
alambre de la bujia y p6ngalodonde no pueda
entrar en contacto con la bujia, para evitar el
arranque por accidente, durante la preparaci6n,
el transporte, el ajuste o cuando se hacen
reparaciones
PRECAUCION; Es coneeido por el Estado de
California que los gases de escape del motor de
este productor contienen quimicos los cuales a
ciertos niveles, pueden ocasionar, c_ncer,
defectos de nacimiento, y otros daSos al sistema
reproductivo.
17
Estos accesorlos estaban disponibles cuando
se produjo la segadora Tambi_n est_n
disponibles en la mayorla de las tiendas de
Sear y an los centro de servicio. La mayofia de
las tiendas Sears tambi_n puedan mandar a
RENDIMIENTO
pedir partes de repuesto para usted, si les
proporciona' el n_imer'odel modelo de su
segadora. ,_lgunos de aetos accesorios tal vez
no se apliquen a su segadora.
DE LASEGADORA
MANTENIMIENTO
DE LASEGADORA
Lea estas instrucciones y este manual
completamente antes de tratar de montar u
operar su segadora nueva. Su segadora nueva
ha sido montada en la f_brica con ta excepciSn
de aquellas partes que se dejafon sin montar
por razones de envio. Todas las partes como
las tuercas, tas arandelas, los pemos, etc., que
son necesarias para completar el montaje han
sido cotocadas en la belsa de parses Para
asegurarse que su segadora funcione en forma
segura y adecuada, todas las partes y los
art_culos de ferreteria que se monten tienen
que ser apretados seguramente. Use las
herramientas correctas, como sea necesario,
para asegurar que se aprieten adecuadamente.
PARA REMOVER LA SEGADORA
DE LA CAJA DE CARTON
° Remueva las partes sueltas que se incluyen
con la segadora.
° Corte las dos esquinas de los extremos de la
caja de cartSn y tienda el panel del extremo
plano_
° Remueva todo el material de empaque,
excepto la cuSa entre el mango superior y _1
inferior, y la cuSa que sujeta la barra de los
control que exige la presencia del operador
junto con el mango superior.
• Haga rodar la segadora hacia afuera de la
caja de cartSn y revisela cuidadosamente
para verificar si todavla quedan partes
sueltas adicionales.
COMO PREPARAR
PARA DESDOBLAR
SU SEGADORA
EL MANGO
Importantel Despliegue el mango con mucho
cuidado pare no pellizcar o dafar los cables de
control
• Levante los mangos hasta que la secciSe del
mango in!erior se asegure en su lugar, en ta
posici6n para segar.
. Rernueva la cuSa protectora, levante la
secciSn del mango superior hasta su lugar en
el mango inferior, y apriete ambas manillas
del mango.
° Remueva la cuSa rJel mango que sujeta la
barra de los control que exige la presencia del
operador junto con el mango superior.
• El mango de ta segadora puede ajustarse
seg_n le acomode para segar: Refi_rase a
"AJUSTE DEL MANGO" en la SecciSn de
Servicio y Ajustes de este manual
Mango
Superior
Barra de control que exige
la presencia de opsrador
Levante
Levanta
hacia arriba
Mango
inferior
18
PosiciSn
para segar
FAMILIARICESE
CON SU SEGADORA
LEA ESTE MANUAL DEL DUEI_IOY LAS REGLAS DE SEGURIDAD ANTES DE OPERAR SU
SEGADORA, Compare tas ilustraciones con su segadora para familiadzarse con la ubicaci6n de
los diversos controtes y ajuste& Guarde este manual para referencia en el futuro.
Estos simbolos pueden apareser sobre su segadora o en la literatura proporoionada con el
productoo Aprenda y comprenda sua significadoso
ATTENCION O
ADVERTENCIA
MOTOR
ENCENDIDO
MOTOR
APAGADO
RAPIDO
LENTO
ESTRANGU
LACI(_N
COMBUBT_BLE
ACEITE
PELIGRO GUARDE LA5
MANO$ Y LOS PIES LEJOS
Barra de control que exige
la presencia del operador
Control de zona
de1motor
Mango superior
Cord6n
arrancador
Manilla del mango
Tapa del deposito
de gasolina
Tapa dal deposito de
aceite del motor con
varilla indicadora de
Filtro del aire
Cebador
Control de la
velocidad del motor
Pueda dela
acolchade_
Ajustador de la rueda
(en cadameda)
CUfvIPLE CON LOS REQUISITOS
DE SEGURIDAD
DE LA CPSC
Las segadoras a motor, que se conducen desde la parte de atr_.s, rotatorias, Sears, cumplen con
los est_.ndares de seguridad del American National Standards Institute y de la U.S. Consumer
Product Safety Commission. La cuchilla gira cuando el motor est& funcionando,
BARRA DE CONTROL QUE EXIGE LA
PRESENClA DEL OPERADOR -tiene que
sujetarse abajo, junto con el mango, para hacer
arrancar el recto1: Su_ltela para parar el motor,
PUERTA DE LA ACOLCHADORA - permite la
conversi6n para la operaci6n de descarga o
ensacado
CEBADOR - bombea combustible adicional
desde el carburador al cilindro para uso cuando
se necesita hacer arrancar un motor frio
CORDON ARRANCADOR - se usa para hacer
arrancar el motor.
PALANCA DE CONTROL DE LA VELOClDAD
DEL MOTOR - situada en la parte lateral del
motor y le permite seleccionar las velocidades
de! motor ya sea r&pida o lenta.
19
COMO
USAR
CONTROL
MOTOR
SU SEGADORA
DE LA VELOCIDAD
PRECAUCION:
No opere su segadora sin
la puerta de la acolchadora asegurada en
su posiciSn, sin el desviador de descarga
en su lugar o sin el recogedor de c_sped,
aprobados, en su lugar:
AVISO: Su segadora ha sido enviada lista para
la operaciSn de acolchado Para convertida
para la operaci6n de descarga tiene que instalar
el accesorio del desviador de descarga que
viene incluido con su segador&
PARA INSTALAR EL DESVIADOR DE
DESCARGA
DEL
La velocidaddel motorse controlapot medio de
una patanca ubicada en el lado del motor:La
posici6nde r_.pidose usa para arrancar el
motor,para el corte normaly un mejor
ensacamiento del c_sped La posiciSnlento es
para corseliviano, recortey para economizar
combustible,
Palanca de
controldela
_-
velocidad del _motor
Cebador
CONTROL
DE ZONA DEL MOTOR
PRECAUCION:
Las regulaciones
federales exigen que se instale un control
para el motor en esta segadora para
reducir a un rninimo el riesgo de
lesionarse debido al contacto con la
cuchill& Por ning0n motivo trate de
eliminar la funci6n del control del
operador. La cuchilla gira cuando el motor
est,. funcionando.
• Su segadora viene equipada con una barra
de controlque exige la presencia del
operador, 1oque requiere que el operador
est_ detr&s del mango de la segadora para
hacerla arrancar y operarla.
PARA AJUSTAR LA ALTURA DE CORTE
o Levante las ruedas para el corte bajo y baje
las ruedas para el corte alto.
• Ajuste la altura de corte para que se
acornodea sus requisitos La posici6ndel
medio es la mejor para la rnayoria de los
c_spedes.
• Para cambiar la altura de code, empuje la
palanca del ajustador hacia la rued& Mueva
la rueda hacia ardba o hacia abajo de modo
que se acomode a sus requisitos.Aseg0rese
que todas las ruedas queden igualmente
ajustadas.
ATENCION: El ajustador esta correctamente
coloeado cuando las orejas de la placa est_n
insertadas en el agujero del mango. Tambi_n,
los ajustes de 9 posiciones(si equipado)
permiten que el mango pueda ser movido entre
las orejas de la placa,
Orejas de la
Para un corte alto,
baje las ruedas
Mango
Para un corte bajo, levante las ruedas
• Abra el seguro de la puerta de ta acoichadora
levant_ndolo seg0n se muestra.
• Levante ta puerta hacia arriba en su bisagra
hasta que el bastidor del desviador pueda set
enganchado sobre el puntal de montaje de la
puerta, seg0n se muestra
° Suelte la puerta para que descanse en contra
del bastidor del desviador.
• Para volver a la operaci6n de acolchado, siga
los pasos antedores en el orden inverso y
aseg0rese que la puerta est_ en la posici6n
asegurada.
--___..._
\ _.._.L....-----_
Puerta de la
acolchadora
Desviador
ANTES DE HACER ARRANCAR
MOTOR
EL
ACEITE
Su segadora fue enviada sin aceite en el motor'.
° Aseg0rese que la segadora est6 nivelada y
que el Area alrededor del dep6sito de aceite
est_ limpia
• Remueva la tapa del dep6sito de aceite del
motor con la varilla indicadora de nivel y
rellene hasta la linea de Ileno en _sta.
• Use 20 oz. de aceite Para el tipo y la catidad
vea "MOTOR" en la secciSn de las
Responsabilidades del Cliente en este
manual.
• Vacie el aceite lentamente. No Io Ilene
demasiado.
, Revise el nivel del aceite antes de cada uso.
Agregue aceite si es necesario. Llene hasta
la Iinea de Ileno en la varilla indicadora de
niveL
° Para leer' el nivel adecuado, apdete la tapa
del dep6sito de aceite del motor cada vez.
° Vuelva a instalar la tapa del dep6sito del
aceite y apri_tela.
° Cambie el aceite despu_s de 25 horas de
operaci6n o pot Io menos una vez al aSo si la
segadora se utiliza menos 25 horas al aSo.
Puede necesitar cambiar el aceite m#.sa
menudo cuando las condiciones son
p6lvorosas o sucia&
2O
GASOLINA
= Uane el estanquede combustible.Use gasolina
regular,s_nplomo, nueva y limpia con el mfnimo
de 87 octanos. (El use de gasolinacon plomo
aumenta_ los depSsitosde 6yJdode plomo y
carbono y se reducir_ta duraci6nde la v&lvula).
No mezcle el ace_tecon la gasolin& Para
asegurar que la gesolina uQizadasea fresca
compre estanques loscuales puedan ser
utilizadosdurante los primeros 30 dfas,,
IMPORTANTE:CUANDO SE OPERE EN
TEMPERATURAS POR DEBAJO DE 32° F (0° C)
USE GASOLINA DE CALIDAD DE INVIERNO,
LIMPIAY NUEVAPARAAYUDAR AASEGURAR
UN BUEN ARRANQUE EN CLIMA FRIO
ADVERTENCIA:La expedanciaha indicado que
los combustiblesmezclados con alcohol (conocidos
como gasohol, o el uso de etanol o metanol)
puedan atmer la humedad, la que conduce a la
separaci6ny formaci6nde _cidos durante el
almacenamianto_La gasolina acidica puede dafiar
el sistema del combustiblede an motor durante el
almaosnamiento.Para evitar los problemascon el
motor,se debe vadar el sisternade combustible
antes de guardado por un pedodo de 30 aliaso
n_s. Vacie el estanquede combustible, haga
arrancar el motor y h_galo funcionar hasta que las
line.asdel combustibley el carburador queden
vacio& La prSximatemporada use combustible
nuevo,Vea tas InstnJccionespara el
Almacanamiento para rn_s informaci6n,Nunca use
productosde limpieza para el motor o para el
carburador en el estanque del combustiblepues se
puedan producirdaSos permanentes,
PRECAUCION: Uene hasta la pade
infedordel cuello de rellanodel estanque de
gasolina_No Io llene demasiado. Umpie e!aceite o
el combustible derramado. No almacene,derrameo
use gasolinacerca de una llama expuesta.
Tapa del deposito
de aceite con
..
_- Tapa del
vadlla indicadoraX_
_''/
de nivel
(_.-._-_
rellenador
de gasolina
= Para parar el motor,suelte la barm de control
que exige la presenciadel opemdor.
AVISO: En climas m_s fdos puede que sea
necesariorepetJrlos pasos del cebado. En climas
m_s calurosos el cebar demasiado puede producir
el ahogoy el motor no va a arrancar, Si se ahega el
motor espere unos cuantos minutosantes de tratar
de haosrloarrancary no repita los pasos del
cebado.
CONSEJOS PARA SEGAR
• Bajo ciertascondidones, tal como c#.spedmW
alto, puede ser necesedo el elevar la altura del
code para reducirel esfuerzonecesado para
empujarla segadoray para evitar sobrecargarel
motor,dejando montones de recortesde c_sped.
• Para un corte muy pesado, reduzca el ancho del
corte pasendo parciatmentepor encima del lugar
antedormanteosrtado y siegue lentamente.
• Si las segadoras de descaEja lateralcortan en
una direcoiSncontrariaalas manillas del retoj, si
se em-pieza en la parle de afuera del 4rea que
se va a cortar, se repartir&qlos recortesdel
c_sped en forma n_s pareja y el motor se
cargar_ menos. Para evitar que los recortes
caigan en los senderos,an las t]ores,elc,, haga
los primems cortesan la direcciSnde las
manillasdel reloj.
• Los poros en los recogedores de c_sped de tela
pueden nenarsecon mugre y potvocon el use y
los recegedores recaudar&nmanes c&sped_
Para evitar 6sto, mc[e el recogedorcon la
manguera de agua, regulan'nante,y d_jelo
secarse antes de usado.
• Mantenga la parte superiordel motor, alrededor
del arrancador,despejaday sin recortesde
c_.spedy paja. Esto ayudar&el flujodel aire det
motor y extendeR-&
la duraciSn6ste
CONSEJOS
ACOLCHAR
PARA SEGAR Y
Important: Pare obtener el mejor rendimiento
mantenga la caja de la segadora sin
acumulaciSn de cesped y basura. Vea
"limpieza" en la secoiSn de responsabilidades
del cliente de este manual.
° La cuchilla acolchadora especial va a volver
a cortar los recortes de c6sped muchas
veces, y los reduce en tama5o, de modo que
si se caen en el c#sped se van a dispesar
entre _ste y no se van a notar. Tambi_n, el
PARA HACER ARRANCAR EL MOTOR
c_sped acolchado se va a deshacer
• Parahacer arrancar un motorfn'o,empujeel
r#,pidamente entregando substancias
cebadorcinco(5) vecesantesde tratado,Use un
nutdtivas para el c_sped. Siempre acolche
empujetirmemanteEste pasonormalmanteno
con la velocidad del motor (cuchilla) m&s alta,
es necesalio cuando se hace arranosr un motor
pues as[ se obtendr_, la mejor acciSn de
recorte de las cuchiltas
queya ha estado funcionandopor acos coantos
minutos,
, Evite cortar el c_sped caando est_ mojado.
• Sujete la barra de control que exige la presencia
El c_sped mojado tiende a formar montones
e inteffiere con la acoi6n de acotchado. La
del operador abajo en el mango y tire el mango
del anancador r_pidamante No perrnitaque el
mejor hora para segar el c_sped es temprano
cordSndel arrancador se devuelva
en la tarde A esa hera _ste se ha secado y
abruptamante,
el &rea recien cortada no quedar& expuesta
al sol directo.
21
I
o
Para obtener los mejores resultados, ajuste
la altura del corte de la segadora de modo
que _sta corte solamente el tercio superior de
las hojas de c_sped. En el caso de que el
c_sped haya crecido demasiado, puede set
necesado el etevar la altura del corte para
reducir el esfuerzo necesario para empujar la
segadora y para evitar sobrecargar el motor,
dejando montones de recortes de c6sped.
Para un acolchamiento muy pesado, reduzca
el ancho del corte pasando por encima del
lugar antedormente cortado y siegue
lentamente.
o Ciertos tipos de c_sped y sus condiciones
pueden exigir que un &rea tenga que ser
acolchada pot segunda vez para esconder
completamente los recortes. Cuando se haga
el segundo corte, siegue atravesado o en
forma perpendicular a la pasada del primer
corte..
o Cambie su patr6n de corte de semana a
semana. Siegue de norte a sur una semana y
luego cambie de este a oeste la pr6xima
semana. Esto evitar& que el c6sped se
enrede y cambie de direcci6n
Max. 1/3
22
RESPONSABILIDADES DEL CLIENTE
PROGRAMA
DE MANTENIMIENTO
Revisar sl hay suletadores
S
sueltos
Ltmpiar/inspecctonar
el recogedor de
c_sped [si viene equtpado)
E ! Limplar la segadora
mlst6n
podeTde
propulsor)
Umpiar (segadoras
debaJo de lacon
cubierta
la trans
D
sadas
poder
propulsor)
Revisar (segadoras
las correascon
y las
po_eas
impuF
Revisar o/afiladcambiar la cucht_la
M
6/
6/
_/'
_,/
6/
J
G
a
=___;_
_
_
Tabladelubricaci6n
Umplar la ba_effa/recargar
(segadoras con arrahque el_c_rico)
Revisar el nlvel deI acelte
Camblar el aceile del motor
_
1_
_
_"/4
_fI,2
J=
Umpiat el filtro de aire
Inspeccionar el stlenctador
O
3
Umpiar otcambtar la bujia
Cambiar el cartucho de papal del filtro
de a#e
6/
_ 2
1 - Cambiar m,_s a menudo cuando se opera bajo cafga pesada o en ambier_tas con alias lemperaturas
2 - Dar _;ervlcio m_s a menudo cuatldo se opera en ¢ondlc_ones suci_s o polvorosas
3 - C arr=ble tas cuc hll[as m_s a menudo cuando s{egue en terreno are_oso
4 • Cargar per 48 horas a_lln de la lamporada
RECOMENDACIONES
GENERALES
TABLA
La garantia de esta segadora no cubre los
artfculos que han estado sujetos al abuso o a la
negligencia de1operador, Para recibir todo el
valor de la garantfa, el operador tiene qua
mantener la segadora segt)n las instrucciones
descritas en este manual
DE LUBRICAClON
C) Ajustador de ta rueda
Hay algunos ajustes que se tienen que hacer en
forma periSdica para peder mantener su unidad
adecuadamente.
Todos los ajustes en la secciSn de Servicio y
Ajustes de este manual tienen queser
revisados per Io menos un vez par cada
temporada_
,, Una vez al aRo, cambie ta bujia, limpie o
cambie el elemento del filtro de aire y revise
si la cuchilla est'. desgastada. Una bujia
nueva y un elemento del filtro de aire limpio/ C)
nuevo aseguran la mezcla de aire-combus- (_)
tible adecuada y ayudan a que su motor
funcione major y que dure m_,s
o Siga el programa de mantenimiento en este
manual.
ANTES DE CADA USO
o Revise el nivel del aceite del motor
• Revise si hay sujetadores sueltos
LUBRICAClON
Mantenga la unidad bien lubdcada
23
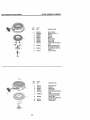
(_) Puntal de
resorte de!
freno
(_) Aceite de motor
(_ Bisagra de la puerta
de la acotchadora
Rocie el lubricente
Refierase a la secci6n de responsabilidedes del
cliente en "motor"
Importante: No aceite o engrase los
rodamientos de la rueda de plastico Los
lubricantes viscosos atraeran polvo y mugre, Io
que acortara la duraci6n de los rodamientos
autolubricantes. Si cree que tienen que
lubricarse, use solamente un lubricante tipo
grafito, de potvo seco, enforma moderada.
ESIPECJFICACIONES
DEL PRODUCTO
NUMERO DE MODELO
917.387240
NOMERO DE SERIE
FECHA DE COMPRA
CABALLOS DE FUERZA:
6.0
DESPLAZAMiENTO:
11 5 CU IN
CAPACIDAD Y TIPO
DE GASOLINA:
1_5Cuartos
REGULAR SIN PLOMO
TIPO DE ACEITE:
SAE 30 (sobre 32°F)
API-SF/SG/SH)
SAE 5W-30 (debajo 32°F)
CAPACtDAD DE ACEITE:
20 oz. de capacidad
BUJ[A (ABERTURA: .030")
CHAMPION J19LM
TOLERANCIA DE VALVULA:
ADMISION:
DESCARGA:
SENCENDIDO DE ESTADO
SOLIDO ABERTURA DE AIRE:
.0125 IN.
TORSI6N DEL PERNO
DE LA CUCHILLA:
35-40 FT. LBS.
.004 - _008
.004 - _008
El num6ro del nodelo y el de serie se encuentran en la calcomania adjunta ala parte trasera de
la caja de la segadora_ Debe registrar tanto el nurn6ro de serie come la fecha de compra y
mantengalos en un lugar seguro pare refencia en el futuro.
SEGADORA
• Remueva el pemo de la cuchilla gir_ndolo en
el sentido contrario en que giran las manillas
del reloj.
• Remueva la cuchilla y los articulos de
ferreterfa adjuntadores (el perno, la arandela
de seguddad y la arandela endurecida).
AVlSO: Remueva el adaptador de la cuchilla y
revise el cubo iclterior de la ranura del
adaptador de la cuchilla. La ranura tiene que
estar en buenas condiciones para que funcione
en forma adecuada. Cambie el adaptador si
est_ dafiado.
Siempre observe las reglas de seguddad
cuando haga et mantenimiento,
LLANTAS
° Mantenga las Ilantas sin gasolina, aceite o
substancias quimicas para control de
insectos que pueden daSar la goma.
,, Evite los tocones, las piedras, las grietas
profundas, los objetos afilados y otros
peligros que pueden daSar a las Uantas.
CUIDADO DE LA CUCHILLA
Para obtener los mejores resultados, la cuchilla
de la segadora tienen que mantenerse afiladas.
Cambie la cuchilla doblada o daSada.
PARA REMOVER LA CUCHILLA
o Desconecte el alambre de la bujia y p6ngalo
en donde no pueda entrar en contacto con
6sta.
°Haga descansar la segadora en su lado.
Asegerese que el filtro de aire y que el
carburador queden mirando hacia ari"iba,
° Use un bloque de madera entre la cuchilla y
la caja de la segadora pare evitar que la
cuchilla gire cuando se le quite el pemo.
o Proteja sus manos con guantes y/o envuelva
la cuchilla con una tela gruesa.
PARA CAMBIAR LA CUCHILLA
,, Ponga el adaptador de la cuchilla en el
cigue_al del motor_ Aseg_Jreseque la ranura
del adaptador y que el chavetero del ciguefial
est6n alineados,
° Ponga la cuchilla en el adaptador de 6sta
alineando los dos (2) agujeros en la cuchilla
con las salientes elevadas en el adaptador_
° Aseg_rese de que el borde de salida de la
cuchilla (opuesto al borde afilado) est6 hacia
arriba hacia el motor.'
,, Instate el pemo de la cuchilla con la arandela
de seguridad y la arandela endurecida en el
adaptador de la cuchille y el cigueSal.
24
• Use un bloque de madera entre la cuchilla y
[a caja de la segadora y apriete el peme de la
cuchilla gir&ndolo en el sentido en que giran
las manillas del reloj
, La torsion para apretar recomendada es de
35 - 40 pies libras
Importante:
El pemo de la cuchilla es clase 8
tratado a calor
AVISO: No recomendamos el afilar la cuchilla pero si Io hace, asegQrese de que quede
balanceada.
Adaptador de la cuchilla
Ranura_
Perno
de la Cuchilla
cuchilla
Chavetero
uenal
endurecida
Arandela
Borde de salida la cuchilla
de seguridad
PARA AFILAR LA CUCHILLA
Se tiene que tener cuidado de mantenerla
balanceada. Una cuchilla que no est_
balanceada va a producir eventualmente dale
en la segadora o en el motor.
• La cuchilla puede afilarse con una lima o en
una rueda rectificadora No trate de afilarla
mientras se encuentra en la segadora
• Para revisar el balance de la cuchilla, clave
un clave en una viga o en la pared Deje
alrededor de una pulgada de un clave recto
expuesto Ponga el agujero central de la
cuchilla sobre la cabeza del clave. Si ta
cuchilla est_ balanceada debe permanecer
en la posici6n horizontal Si cualquiera de los
extremes de la cuchilla se mueve hacia
abajo, afile el extreme pesado hasta que 0sta
quede balanceada
RECOGEDOR DE CO:SPED
• El recogedor de c0sped puede ser rociado
con el agua de la manguera pero tiene que
estar seco cuando se vaya a usar
• Revise su recogedor de cOsped a menudo
para verificar si est& daRado o detedorado.
Se va a desgastar con el use normal. Si se
necesita cambiar el recogedor, c&mbielo
solamente per uno que sea aprobado per el
fabricante DOel n_mero del modelo de la
segadora cuando Io ordene.
viscosidad SAE segun su temperatura de
operaciOn esperada
AVISO: A pesar de que los aceites de
multiviscosidad (5W30, 10W30, etc) mejoran el
arranque en clima frio, estos aceites de
multiviscosidad van a aumentar el consume de
aceite cuando se usan en temperaturas sobre
32° F. Revise el nivel del aceite del motor m&s a
menudo, para evitar un posible dafio en el
motor, debido a que no tiene suficiente aceite
Cambie el aceite despu0s de 25 horas de
operaciOn o per Io menos una vez al ado si la
segadora se utiliza menos 25 horas el are
Revise el nivel del aceite del c_rter antes de
arrancar el motor y despu0s de cada cinco (5)
horas de use continuado. Apriete el tap6n del
aceite en forma segura cada vez que revise el
nivel del aceite
PARA CAMBIAR EL ACEITE DEL MOTOR
• Desconecte el alambre de la bujia y pOngalo
de mode que no pueda entrar en contacto
con 0sta.
• Remueva la tapa del dep6sito de! aceite;
d0jela a un lade en una superficie limpia
• Incline la segadora y h&gala descansar en su
lade y drene el aceite en un envase
adecuado. Mueva la segadora de atr&s para
adelante para remover rode el aceite que se
haya quedade atrapado dentro del motor.
• Limpie todo el aceite derramado en la
segadora yen el lade del motor.
• Llene el motor con aceite. Ll0nelo solamente
hasta la Ifnea de Ileno (FULL) en la varilla
indicadora de niveL NO LO LLENE
DEMASIADO
• Vuelva a porter la tapa en el depOsito del
aceite.
° Vuelva a conectar el alambre de la bujfa a
FILTRO DE AIRE
Su motor no funcionar& en forma adecuada y
puede sufrir daOos si se usa un _tro de aire
sucio.
Cambie el filtro de aire cada aOo, y m_s a
menudo si siega en cendiciones muy
polvorosas o sucias. No lave el filtro de aire.
MOTOR
PARA CAMBIAR
LUBRICAClON
Use solamente aceite de detergente de alta
calidad clasificado con la clasificaciOn SF, SG, o
SH de servicio APL Seleccione la calidad de
• Remueva el filtro de aire gir_ndolo en el
sentido contrario en que giran las manillas
de1 reloj, hasta el tope, y retfrelo del collar.
• Remueva el filtro de la parte interior de la
cubierta.
• Limpie la parte interior de la cubierta y el
collar para remover toda acumulaciOn de
mugreo
25
EL FILTRO DE AIRE
Collar
_#""_
Filtro /_
de aire I-'_,_--..'_,,._
._ \ _,_,.,._.>,._,..._
Gire en el
sentido
contrado
mejor Ajuste la abertura de la bujia en 0,03
pulgada.
LINIPIEZA
reloj para
Importante: Para obtener el meier rendimento,
mantenga la caja de la segadora sin
acurnulaci6n de c6sped y basura. Limpie la
parte de abajo de su segadora despues de
cada use
Abrazadera" / "=_'_
//)
Oreia /
.,._Gire
en el sentido
ureja"
._
-- (re las manillas del
Cubierta del J
reloj para apretar
filtro de aire
PRECAUCI6N:
Desconecte
el alambre
de la bujfa y p6ngalo en donde no
pueda entrar en contacto con 6sta.
° Haga descansar la segadora en su lado.
Aseg0rese que el filtro de aire y que el
carburador queden mirando hacia arriba.
Limpie la parte inferiorde su segadora
rasp&ndola para remover la acumulaci6n de
c6sped y basura.
o Limpie el motor a menudo para evitar que se
acumule la basura. Un motor tapado funciona
m_.scaiiente y se acorta su duraci6n.
° Mantenga las superficies pulidas y las ruedas
sin gasolina, aceite, etc.
• No recomendamos el uso de una manguera
de jard[n para limpiar la segadora a rnenos
que el sistema el6ctrico, el silenciador, el
filtro de aire y el carburader est6n tapados
para evitar que les entre el agua. El agua en
el motor puede acortar la duraciSn de 6ste
o Inser_e el _tro nuevo en la cubierta.
• Ponga la cubierta del _tro de aire dentro del
collar afineando la oreja con la ranura.
• Empuje la cubierts hacia adentro y girela en
el sentido de las manJllas del reloj para
apretaria.
6sta.
SlLENCIADOR
Inspeccione y cambie el silenciador si est,.
corroido pues producir un peligro de incendio y/
o da_o.
BUJIA
Cambie su bujia cada a£=opara hacer que su
motor arranque rn&s fAciirnente y funcione
SEGADORA
DESVIADOR
• Vuelva a montar ta guia del cord6n
arrancador.
- Vuelva a montar los controles y ta barra de
control que exige la presencia del operador
en et mango superior_
TRASERO
Se pmporcionaun desviador trasero, adjunto
entre las ruedas traseras de su segadora, para
reducira un minimo la posibilidadque objetos
sean lanzados hacia afuera de la parte trasera
de la segadora, en la posici6n en donde se
encuentra el operado_ Si se daSa el desviador
debe cambiarse
Posici6n de envio
Mediana
PARA AJUSTAR EL MANGO
Se puede levantar o bajar el mango de su
segadora seg_n le quede c6modo. Hay cuatm
(4) posieionesdisponibles:alta, mediana alta,
mediana baja, baja. Los mangos se envian
montados en la posici6nmediana baja.
• Para cambiarde la posici6nmediana baja a
mediana alta, la seeci6n superior y la inferior
del mango tendrdn que darse vueltao
• Remueva las abrazaderas del cable.
• Remueva los controlesy la barra de control
que exige la presenciadel operador del
mango supedor.
= Remueva la guia del cord6n arrancador del
mango infedor_
• Remueva las clavijas de horquilla.
° Desconecte el mango inferiorde los puntales
del mango.
° De vuelta el mango y vuelva a montar las
clavijas de horquilla que se habian removido.
Mediana
baja
PRECAUCION:
La barra de control que
exige la presencia del operador tiene que
pivotear libremente para permitir el
enganche de la cuchilla/freno cuando se
suelta la barra de control No apriete
demasiado los sujetadores que sujetan a
los controles al mango superior.
o Para cambiar de la posici6n de mediana baja
a alta solamente se tendr& que dar vuelta la
secci6n del mango superior°
• Para cambiar de la posici6n mediana baja a
baja, solamente se tendr_, que dar vuelta la
secci6n det mango inferior.
26
MOTOR
VELOCIDAD
Alta
%aja
Apriets para
remover
Mango
inferior
a de
montaje
Clavija de horquilla
Inmediatamente prepare su segadora para el
almacenamiento al final de cada temporada o si
la unidad no se va a usar por 30 dias o m_s,
SEGADORA
Cuando se va a guardar la segadora por cierto
periodo de tiempo, limpiela cuidadosamente,
remueva toda la mugre, la grasa, las hojas, etc,
Gu&rdela en un &rea limpia y seca.
• Limpie toda la segadora (Vea "LIMPIEZA" en
la secci6n de Responsabilidades del Cliente
de este manual),
,, Lubriquela seg_n se muestra en la secciOn
de Responsabilidades del Cliente de este
manual,,
,, AsegSrese de qua todas las tuercas y
clavijas y todos los pemos y tomillos est_n
apretados en foma segura Inspeccione las
partes que ss mueven para verificar si est_.n
dafadas, quebradas o desgastadas
C_.mbielas si es nscesado.
- Retoque todas las superficies que est_n
oxidadas o con la pintura picada; use una lija
antes de pintar.
MANGO
Pueds doblar el mango de su segadora para
almacenarla,
'. Apriete los extremos inferiores del mango
inferior entre s[ hasta qus el mango inferior
quads separado del puntal del mango, luego
mu_valo hacia adelante.
o Suelte los psmos de montaje del mango
superior Io suficiente como para permitir que
el mango superior se pueda doblar hacia
atr&s.,
Importante: Cuando doble el mango para el
almacenarniento o el transporte, aseguress qua
Io doble segun se muestra o puede danar los
cables de control
DEL MOTOR
La velocidad del motor ha sido ajustada sn ta
f_brica, No trate de aumentar la velocidad del
motor puss ee pueden producir lesiones
personales. Si cree qua el motor est,.
funcionando demasiado r&pido o demasiado
lento, Ileve su segadora a un centro!departamento de sewicio autorizado para repararla o
ajustaria
CARBURADOR
Su carburador tiene un chorro principal fijo no
ajustable para controlar la mezcla. Si su motor
no est,. funcionando en forma adecuada debido
a problemas qua se sospecha vienen del
carburador, Ileve su segadora a un centro/
departamento de servicio autorizado para
repararla y/o ajustarla.
. Cuando prepare sus mangos a partir de la
posiciSnde almacenamiento, el mango
inferior autom_.ticamente se asegurar& en la
posici6n para segar_
Mango
Apriete para
remover
Clavija de
horquilla
Clavija de
montaje
Barra de control que exige la
presencia del operador
Mango
Doblar hacia
adelante para
almacena
Doblar
hacia atras
Posici6n
para segar
Mango inferior
27
MOTOR
SiSTEIVlA DE COMBUSTIBLE
Importante: Es importanteevitar que se
formen depositosde goma en partes
fundamentales del sistemade combustibletales
como el carburador,el filtro del combustible,la
manguera del combustibleo en el estanque
durante el almacenamiento. La expedencia
tambien indica quel los combustiblesmazclados
con alcohol (conocidocomo gasoholo que
tienen etanol o rnetanol) pueden atraer
humedad, 1oque conduce a la separaci6n y a la
formac6n de _.cidosdurante el almacenamiento.
La gasolina&cidica puede daSar el sistema de
combustiblede un motor durante el periodo de
almacenamiento.
o Drene el astanque de combustible
• Haga arrancar el motor y d_jetofuncionar
hasta que las lineas del combustibley el
carburadorest_n vacios_
o Nunca use los productospara limpieza del
carburador odel motor en el estanque de
combustible pues se pueden producir daSos
pem_anentas.
° Use combustible nuavo la prSxima
temporada_
AVISO: El estabilizador de combustible es una
alternativa aceptable para reducir a un mfnimo
la formaciSn de depSsitos de goma en el
combustible durante el periodo de
almacenamiento. Agregue estabilizador a la
gasolina en el estanque de combustible o en el
envase para at almacenamiento. Siempre siga
la proporciSnde mezcla que se encuentra en e!
envase del estabilizador. Haga funcionar el
motor por lo menos 10 minutos despu_s de
agregar el estabilizador, para permitir que este
Ilegue al carburador. No drene la gasolina del
estanque de gasolina y el carburador si se est_
usando estabilizador de cornbustible
IDENTIFICACION
ACEITE DEL MOTOR
Drene el aceite (con el motor caliente) y
c_mbielo con aceite de motor limpio_ (Vea
"MOTOR" en la secci6n de Rasponsabifidades
del Cliente de este manual.)
ClLINDRO
° Remueva la buj{a.
o Vacfe una onza (29 ml) de aceite a trav_s del
agujero de la bujla en el cflindro_
= Tire la manilla de arranque tentamente unas
cuantas veces para distdbuir el aceite_
° Vuelva a montar la nueva buj[a.
OTROS
° No guarde la gasolina de una temporada a la
otra.
° Cambie et envase de la gasolina si se
empieza a oxidar_La oxidaci6n y/o la mugre
en su gasolina producir_.n problemas.
° Si es posible,guarde su unidad en un recinto
cerrado y c_ibrala para protegerla contra el
poIvo y la mugre
• Cubra su unidad con un forro protector
adecuado que no reteega la humedad. No
use pl_stico.El pl_.stico no puede respirar, Io
que permite la formaciSn de condensaciSn, Io
que producir& la oxidaciSn de su unidad_
Importante: Nunca cubra la segadora mientras
el motor y tas areas de escape todvia estan
calientes
PRECAUClON:
Nunca almacene la
segadora con gasolina en el estanque
dentro de un edificio en donde los gases
pueden alcanzar una llama expuesta o
una chispa. Permita que se enfrfe el motor
antes de almacenarla en alger] recinto
cerrado_
DE PROBLEMAS
PROBLEMA
CAUSA
CORRECCION
No arranca
• Filtrode aire sucio_
• Sin combustible.
• Limpie/cambieel filtro de aire.
° Lleneel estanque de corrlbustible.
• Drene el estanque y vuetva a
Ilenarlo con combustible limpioy
nuevo.
• Drene el estanque de combustible y
el carburador y vuelva a Ilenar el
estanque con gasolina nueva_
. Conecte el alambre a la bujia.
oCombustible rancio.
• Agua en el combustible
° Alambre de la bujia
desconectado.
o Bujia mala.
° Cuchilla suelta o adaptador
de la cuchillaquebrado.
•, Barra de control en la posiciSn
suelta.
28
° Cambie la bujia.
• Apriete el perno de la cuchilla o
cambie el adaptador de la cuchilla
= Presione ta barra de control hacia el
mango
° Cambie la barra de control
PROBLEMA
Falta de fuerza
CORRECCI6N
CAUSA
o Barra de controldefectuosa,
• Ajuste ala posici6n de "Corte
m&s alto."
• Parte trasera de le cajacuchilla
de la segadora arrastr&ndose
en el c_sped pesado.
,, Est,, cortando mucho c_sped
° Filtro de aire sucio.
° Ajuste ata posici6nde "Corte
m_s alto]'
oAcumulaci6n de c_sped, hojas
y basura debajo de la segadora.
• Demasiado aceite en el motor_
• Revise el nivel del aceite_
• Limpie/cambieel filtro de aire.
° Limpie la parle inferior de la caja
de la segadora.
o Corte a una velocidad de
recorrido m&s lenta.
Mal corte -disparejo
° CuchiUa desgastada, dobtada
o suelta..
• Altura de las ruedas dispareja.
=AcumulaciSn de c_sped, hojas
o basura debajo de la segadora.
Cambia la cuchilla. Apriete el
pemo de la cuchilla.
Ajuste todas las ruedas ala
misma altura.
Limpie la parte inferior de la caja
de la segadora.
VibraciSn excesiva
o Cuchilla desgastada, doblada o
suelta.
• Ciguefial del motor doblado,
Cambie la cuchina. Apriete el
pemo de la cuchillao
P6ngase en contacto con su
centro de servieio autorizado
m_,s cercano.
Cord6n arrancador
diffcil de tirar
° El freno del volante del motor
est_ aplicado cuando se suelta
la barra de control.
oCiguefial del motor doblado..
oAdaptador de la cuchilla
quebmde.
o La cuchilla se arrastra en el
c_sped.
Presione la barra de control
hacia el mango superior antes de
tirar el cord6n arrancador,
P6ngase en contacto con su
centro de servicio autorizado
m_s cercano.
° Cambie el adaptador de la
cuchilla.
° Mueva la segadora a un lugar en
donde el c_sped ha sido cortado
o a una superficie firme pare
hacer arrancar el motor°
. Altura de corte demasiado
baja_
• Levantamiento de la cuchilla
desgastado,
• Recogedor sin ventilaci6n de
aire.
• Eleve la altura de corte.
° Cambie la cuchiltas.
° Limpie el recogedor de c6sped..
Recogedor de c_sped
no se Ilena (si viene
equipade)
Diffcil de empujar
o El c_sped est& demasiado alto
o la altura de la rueda demasiado baja..
,, Parte trasera de la caja/cuchilta
delasegadora
arrastr_ndose
en el c_sped.
° Recogedor de c_sped demasiado Ilenor
° Posici6n de la altura del mango
no adecuada pare usted.
29
Eleve la altura de corte.
Eleve la parte trasera de la caja
de la segadera (1) un lugar m&s
alto.
Vacfe el recogedor de c_sped.
Ajuste la altura del mango de
modo que le acomode.
ROTARY
LAWN MOWER MODEL NO. 917.387240
42
35
66
44
\
ROTARY
KEY
NO.
PART
NO.
1
2
3
4
6
7
8
9
10
12
13
14
15
16
86902
145646)(479
157081X479
132001
63601
131959
850733X004
750097
156577
66426
51793
136376
88348
STD512505
17
t8
19
20
21
22
23
24
25
26
28
29
30
32
33
34
35
36
37
38
39
750157
14054O
87584X004
151667x479
151665x479
751592
700168X479
700166X479
750085X007
146630
700331XO04
701037
152124
154132
147286
151889
750913X004
61651
142748
62335
151138
LAWN MOWER MODEL NO. 917.387240
DESCRIPTION
Control Bar
Upper Handle
Lower Handle
Rope Guide
Loclmut 1/4-20
Handle Bolt
Up-Stop Bracket
Hex Thread Rolling Screw #10-24 x 3/4
Engine Zone Control Cable
Wire Tie
Hairpin Cotter
Handle Knob
Flat Washer 3/8
Hex Head Self Tapping Screw 1/4-20 x 1/
2
Supper[ Rod
Rear Deflector
Deflector Bracket
Handle Bracket Assembly (Left)
Handle Bracket Assembly (Right)
Leclmut 3/8-16
Support Bracket (Left)
Support Bracket (Right)
Wheal Adjuster Bracket
Spacer
Selector Spdng
Selector Knob
Torsion Spring
Housing Bracket Assembly
Hinge Rod
Discharge Guard
Axle Arm Assembly (Rear)
Spnng Washer (Rear)
Shoulder Bolt 3/6-16
Belleville Washer
Wheel & Tire Assembly (Rear)
KEY
NO.
PART
NO.
40
41
42
43
44
a5
47
48
49
51
55
57
58
59
60
61
145935X004
150348
57143
83923
150182
74760612
149741
85463
STD54-1425
150406
48420
851514
152202
851074
850263
851084
64
......
65
66
67
68
69
70
71
--
52904
151440
153350x479
153282x479
74180410
751399
752118
161870
DESCRIPTION
Axle Arm Assembly
Wheel & Tire Assembly (Front)
Wave Washer
Lecknut 3/8-16
Hubcap
Hex Head Bolt 3/8-16 x 3/4
Screw 5/16-18 x 3/4
Danger Decal
Locknut 1/4-20
Hex Head Thread Roiling Screw 3/8-16 x 1
Lawn Mower Housing (lesL Ref. #20, 47, 48, 53, 54)
Blade Adapter
22" Blade
Washer
Helical Hardened Leckwasher 3/8
Hex Head Machine Scre_ 3/6-24 x 1/4 Grd. 8
Engine- ( See Breakdown)
Craftsman
Model 143.986004
Decal
Hubcap
Bracket Supper[ Handle (Right)
Bracket Support Handle (Left)
Screw
Bracket
Clipping Deflector
Owner's Manual (English/Spenish)
Available accessories not included with lawn mower:.
7!1 33072
71 33201
71 33623
7_ 33500
71 33000
71 33316
Grass Catcher
MulcherKit
Gas Can (2.5gal.)
FuelStabilizer
SAE 30W Oil (20 oz,)
Mower Cover
CRAFTSMAN
4-CYCLE
ENGINE
MODEL
NUMBER
143.986004
_==_370K
@
g00
130
126
416
46
3O5
32
CRAFTSMAN
KEY
NO
PART
NO
1
2
6
7
36774
26727
33734
36557
12
12A
36775
36558
12B
14
15
16
17
!8
36694
28277
30589
34839A
31335
651018
19
20
30
40
36261
32600
36776
40004
40
40005
41
36070
41
36071
42
42
43
45
40006
40007
20381
36777
46
48
50
52
69
70
32610A
27241
36778
29914
35261
36995
72
75
80
81
82
36083
27897
30574A
30590A
30591
83
86
89
90
92
93
100
101
103
30588A
650488
611004
611112
650815
650816
34443B
610118
651007
110
119
120
125
37047
36787
36825
36779
!25
36780
126
36781
126
36782
130
135
6021A
35395
4-CYCLE
ENGINE
MODEL NUMBER 143.986004
KEY
NO
PART
NO
Cylinder (Incl 2 & 20)
Dowel Pin
Breather Element
Breather Ass'y (Incl 6 &
12A)
Breather Tube
Breather Cover & Tube
(Incl12B)
Breather Tube Elbow
Washer
Governor Rod (Inc! 14)
Governor Lever
Governor Lever Clamp
Screw, Torx T-15, 8-32 x
19/64"
Extension Spring
Oil Seal
Crankshaft
Piston, Pin & Ring Set
(Std)
Piston, Pin & Ring Set
(,010" OS)
Piston & Pin Ass'y (Std)
(Incl 43)
Piston & Pin Ass'y.
(.610" OS) (Incl 43)
Ring Set (Std.)
Ring Set (010" OS)
Piston Pin Retaining Ring
Connecting Rod Ass'y
(Incl 46)
Connecting Rod Bolt
Valve Lifter
150
151
151A
169
172
174
178
35991
31673
40017
36783
36784
30200
29752
182
184
6201
26756
!85
186
189
191
36785
32653
650839
36559
195
207
216
223
224
238
239
241
245
250
260
261
262
275
277
285
287
610973
34336
33086
650451
36786
650932
34338
35797
35066
35065
36980
30260
650831
36790
6509B6
35000A
650926
Camshaft (MCR)
Oil Pump Ass'y
• Mounting Flange Gasket
Mounting Flange (Incl 72
thru 83)
Oif Drain Plug
Oil Seal
Governor Shaft
Washer
Governor Gear Ass'y
(Incl 81)
Governor Spool
Screw, 1/4-20 x 1-1/4"
Flywheel Key
Flywheel
BelleviUe Washer
Flywheel Nut
Solid State Ignition
Spark Plug Cover
Screw, Torx T-16. 16-24 x
15/16"
Ground Wire
• Cylinder Head Gasket
Cylinder Head
Exhaust Valve (Std) (Incl
161)
Exhaust Valve
(1/32" OS) (IncL 151)
Intake Valve (Std) (Incl
151)
Intake Valve (1/32" OS)
(Inck 151)
Screw, 5!16-18 x 1-1/2"
Resistor Spark Plug
(RJ19LM)
290
292
298
300
29774
26460
28763
36916
301
305
306
307
309
310
313
370A
370C
370K
380
390
400
36246
35647
36996
35499
650562
36648
34060
36261
36861
36695
640026
590694
36792A
DESCRIPTION
DESCRIPTION
Valve Spring
Valve Spring Cap
Intake Valve Seal
• Valve Cover Gasket
Valve Cover
Screw, 10-24 x 9/16"
Nut & Lock Washer, 1/428
Screw, 1/4-28 x 7/8"
• Carburetor To Intake
Pipe Gasket
Intake Pipe
Governor Link
Screw, 1/4-20 x 3/8"
S.E. Brake Bracket (Incl
195)
416
36085
417
650760
900
-- --
900
-- --
....
33
Terminal
Throttle Link
R P M Adjusting Lever
Screw, 1/4-20 x 1"
• Intake Pipe Gasket
Screw, 10-32 x 49/64"
• Air Cleaner Gasket
Air Cleaner Collar
Air Cleaner Filter
Air Cleaner Cover
Blower Housing
Screw, 10-24 x 9/16"
Screw, 1/4-20 x 1/2"
Muffler
Screw, 1/4-20 x 2-5/16"
Starter Cup
Screw, 8-32 x 21/64 =
Fuel Line
Fuel Line Clamp
Screw, 10-32 x 35/64"
Fuel Tank (Incl 292 &
301)
Fuel Cap
Oil Fill Tube
• =O"-Ring
"O"-Ring
Screw, 10-32 x 1/2"
Dipstick
Spacer
Lubrication Decal
Primer Decal
Starter Decal
Carburetor (Incl 184)
Rewind Starter
Gasket Set
(Incl Items Marked • in
Notes)
Spark Arrestor Kit
(IncL 417)(Optional)
Screw, 8-32 x 3/8"
(Optional)
Replacement Engine
NONE
Replacement S/B
750796,
order Irom 71-999
RPM High 2900 to 3200
NOTE: This engine could have been built with 590737
starter,
NOTE: All component dimensions given in US inches
1 inch = 25 4 mm
CRAFTSMAN
4-CYCLE
ENGINE
MODEL NUMBER
40
KEY
NO.
PART
Na
----
640026
1
2
4
5
6
7
16
17
631615
631767
631184
631183
631036
650506
631775
650417
18
20
20A
25
27
28
29
3O
31
35
36
37
4O
44
47
48
630766
64O027
64OO53
631867
631024
632019
631028
631021
631022
36045A
632735
632547
640028
27110
630748
631027
DESCRIPTION
Carburetor
IncL 184 of Engine PartsUst
Throttle Shaft & Lever Assembly
Throttle Return Spring
Dust Seal Washer
Dust Seal (Throttle)
Throttle Shutter
Shutter Screw
Fuel Fitting
Throttle Crack Screw/
Idle Speed Screw
Tension Spring
Idle RestdctorScrew
Idle RestdctorScrew Cap
Roat Bowl
Roat Shaft
Float
FloatBowl "O" Ring
Inlet Needle, Seat, & Clip (Incl 31)
Spring Clil_
Primer Bulb/RetainerRing
Main Noz21eTube
"O"Ring,Main NozzJeTube
High Speed Bowl Nut
Bowl Nut Washer
Welch Plug, Idle MixtureWell
Welch Plug,Atmospheric Vent
34
143.986004
,DRAFTSMAN 4-CYCLE
ENGINE
MODEL NUMBER 143.986004
KEY
NO
PART
NO
---1
2
3
4
5
6
7
8
590694
590599A
590600
590696
590601
590697
590698
590699
590700
11
590695
12
590535
13
590701
KEY
NO_
PART
NO,
---3
6
7
8
590737
590740
590616
590617
590618A
11
590667A
12
590535
13
14
590701
590741
DESCRIPTION
Recoil Starter
Spring Pin (Inel 4)
Washer
Retainer
Washer
Brake Spring
Starter Dog
Dog Spring
Pulley & Rewind Spring
Ass'y
Starter Housing Ass'y,
(40 degree grommet)
Starter Rope ( 98=X 9/
64" dia,)
Starter Handle
O--2
_
tl--7
35
DESCRIPTION
Rewind Starter
Retainer
Starter Dog
Dog Spring
Pulley & Rewind Spring
Ass'y
Starter Housing Ass'y
(40 degree grommet)
Starter Rope
(Length 98" x 9/64" dia,)
Starter Handle
Locking Tab
Forthe repairor replacementpartsyouneed
delivereddirectlyto yourhome
Call7 am - 7 pro,7 daysa week
1-800-366-PART
(1-800-366-7278)
Para ordenar piezas con entrega a
domicilio - 1-800-659-7084
For inuhouse major brand repair sewice
Call 24 hours a day, 7 days a week
1=800=4-REPAIR
(1-800-473-7274)
Para pedir servicio de reparaci6n
domicilio
- 1-800-676-5611
a
For the location of a Sears Parts and
Repair Center in your area
Call 24 hours a day, 7 days a week
1-800-488=1222
For inforrnatiorl on purchasing a Sears
Maintenance Agreement or to inquire
about an existing Agreement
Call 9 am - 5 pro, Monday-Saturday
1=800=827-6655
When requesting service or ordering
parts, always provide the following
information:
• Product Type
• Model Number
o Part Number
o Part Description
America S Repatr Specialists
161870
REV.4
02.17.98
VB
Printed in U.S.A.