1
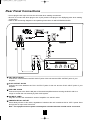
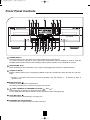
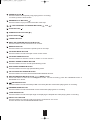
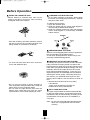
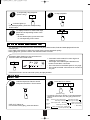
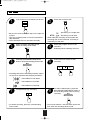
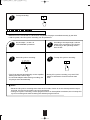
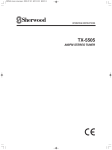
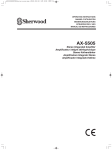
DD-6200(G)2007.3.2910:23AM페이지 1
DD-6200(G)2007.3.2910:23AM페이지 1
DD-6200(G)2007.3.2910:23AM페이지 2
Introduction
READ THIS BEFORE OPERATING YOUR UNIT
This symbol is intended to alert the user to the presence
of uninsulated "dangerous voltage" within the product's
enclosure that may be of sufficient magnitude to constitute a risk of electric shock to persons.
CAUTION
: TO REDUCE THE RISK OF ELECTRIC SHOCK, DO NOT REMOVE
COVER (OR BACK). NO USER-SERVICEABLE PARTS INSIDE. REFER
SERVICING TO QUALIFIED SERVICE PERSONNEL.
This symbol is intended to alert the user to the presence
of important operating and maintenance (servicing)
instructions in the literature accompanying the appliance.
WARNING : TO REDUCE THE RISK OF FIRE OR ELECTRIC SHOCK,
DO NOT EXPOSE THIS APPLIANCE TO RAIN OR MOISTURE.
FOR YOUR SAFETY
EUROPE
AUSTRALIA
220 V
240 V
Units shipped to Australia are designed for operation on 240 V AC only.
To ensure safe operation, the three-pin plug supplied must be inserted only into a standard threepin power point which is effectively earthed through the normal household wiring. Extension cords
used with the equipment must be three-core and be correctly wired to provide connection to earth.
Improper extension cords are a major cause of fatalities. The fact that the equipment operates satisfactorily does not imply that the power point is earthed and that the installation is
completely safe. For your safety, if in any doubt about the effective earthing of the power
point, consult a qualified electrician.
PAN-EUROPEAN UNIFIED VOLTAGE
All units are suitable for use on supplies 220-240 V AC.
CAUTION
• Leave a space around the unit for sufficient ventilation.
• Avoid installation in extremely hot or cold locations, or in an area that is exposed to direct sunlight or heating equipment.
• Keep the unit free from moisture, water, and dust.
• Do not let foreign objects in the unit.
• The ventilation should not be impeded by covering the ventilation openings with items, such as newspapers, table-cloths,
curtains, etc.
• No naked flame sources, such as lighted candles, should be placed on the unit.
• Please be care the environmental aspects of battery disposal.
• The unit shall not be exposed to dripping or splashing for use.
• No objects filled with liquids, such as vases, shall be placed on the unit.
• Do not let insecticides, benzene, and thinner come in contact with the set.
• Never disassemble or modify the unit in any way.
■Notes on the AC power cord and the wall outlet.
• The unit is not disconnected from the AC power source(mains) as long as it is connected to the wall outlet, even if the unit has
been turned off.
• When disconnecting the power cord from the wall outlet, always pull the plug, not the power cord.
• Disconnect the plug from the wall outlet when not using the unit for long periods of time.
• The wall outlet shall be installed near the unit and shall be easily accessible.
Note on recycling
This product’s packaging materials are recyclable and can be reused. Please dispose of any materials
in accordance with the local recycling regulations.
When discarding the unit, comply with local rules or regulations.
Batteries should never be thrown away or incinerated but disposed of in accordance with the local regulations concerning chemical waste.
This product and the accessories packed together constitute the applicable product according to the
WEEE directive except batteries.
2
DD-6200(G)2007.3.2910:23AM페이지 3
CONTENTS
Introduction
Introduction
�READ THIS BEFORE OPERATING YOUR UNIT
.....................................2
Rear Panel Connections . . . . . . . . . . . . . . . . . . . . . . . . . . . . . . . . . . . . . . . . . . . . . . . . . . .4
Front Panel Controls . . . . . . . . . . . . . . . . . . . . . . . . . . . . . . . . . . . . . . . . . . . . . . . . . . . . . 5
Before Operation . . . . . . . . . . . . . . . . . . . . . . . . . . . . . . . . . . . . . . . . . . . . . . . . . . . . . . . . 8
Operations
�PLAYING BACK TAPES . . . . . . . . . . . . . . . . . . . . . . . . . . . . . . . . . . . . . . . . . . . . . . . . . . . . . . . . 9
�AMS(Automatic Music Search) PLAY . . . . . . . . . . . . . . . . . . . . . . . . . . . . . . . . . . . . . . . . . . . . . . 10
�RELAY PLAY . . . . . . . . . . . . . . . . . . . . . . . . . . . . . . . . . . . . . . . . . . . . . . . . . . . . . . . . . . . . . . . . 10
�RECORDING . . . . . . . . . . . . . . . . . . . . . . . . . . . . . . . . . . . . . . . . . . . . . . . . . . . . . . . . . . . . . . . . 11
�CD SYNCHRO RECORDING . . . . . . . . . . . . . . . . . . . . . . . . . . . . . . . . . . . . . . . . . . . . . . . . . . . . 12
�DUBBING FROM DECK B TO DECK A . . . . . . . . . . . . . . . . . . . . . . . . . . . . . . . . . . . . . . . . . . . . 13
�COUNTER DISPLAY . . . . . . . . . . . . . . . . . . . . . . . . . . . . . . . . . . . . . . . . . . . . . . . . . . . . . . . . . . 13
�MEMORIZING THE SPECIFIC POINT . . . . . . . . . . . . . . . . . . . . . . . . . . . . . . . . . . . . . . . . . . . . . 14
Troubleshooting Guide . . . . . . . . . . . . . . . . . . . . . . . . . . . . . . . . . . . . . . . . . . . . . . . . . . . . . . . 15
Specifications . . . . . . . . . . . . . . . . . . . . . . . . . . . . . . . . . . . . . . . . . . . . . . . . . . . . . . . . . . . . . . . . 16
3
DD-6200(G)2007.3.2910:23AM페이지 4
Rear Panel Connections
�Do not plug the AC input cord into the AC outlet when making connections.
�Be sure to connect the white plugs to the L(Left) and the red plugs to the R(Right) jacks when making
connections.
�Refer to the connecting diagram in the operating instructions of AMPLIFIER/RECEIVER.
① REC INPUT JACKS
Connect the cords between the REC INPUT jacks of this unit and the REC OUTPUT jacks of your
amplifier.
② PLAY OUTPUT JACKS
Connect the cords between the PLAY OUTPUT jacks of this unit and the PLAY INPUT jacks of your
amplifier.
③ DIGI LINK JACKS
Connect this jack to the DIGI LINK jack of Sherwood amplifier/receiver bearing the DIGI LINK III or
II logo to control this unit remotely by DIGI LINK system.
④ AC INPUT CORD
Plug this cord into the switched AC outlet of amplifier or a wall AC outlet.
⑤ UNSWITCHED AC OUTLET
Power always flows to this outlet, regardless of whether this unit is switched ON or OFF if power flows
through the AC input cord of this unit.
Note : The equipment whose power consumption exceeds 100 watts should not be connected.
4
DD-6200(G)2007.3.2910:23AM페이지 5
Front Panel Controls
① POWER SWITCH
Press this switch to turn the power on and press again to turn the power off.
For system operation, plug the AC input cord into the switched AC outlet on amplifier or receiver, keep the
POWER switch ON and control power ON/OFF with the power operation on the amplifier or receiver.
② HEADPHONE JACK
Stereo headphones with a standard 1/4 inch plug can be plugged into this jack for private listening.
③ CASSETTE DOOR
Press the EJECT button of the corresponding DECK to open the cassette door when the deck is in the stop
mode.
※ Number 3 ~8 buttons will function for Deck B operation only and Number 9 ~ 16 buttons for Deck A
operation only.
④ EJECT BUTTON(
)
Press this button to open the cassette door.
To close the cassette door, push the door gently until it clicks.
⑤, ⑦ FAST FORWARD and REWIND BUTTONS(
and
)
Press the button to advance or rewind the tape rapidly.
For the AMS (Automatic Music Search) function, press the button during playback.
⑥ STOP BUTTON(
)
Press this button to stop playing or recording, etc..
⑧ FORWARD PLAY BUTTON( )
Press this button to playback the front side of the tape.
5
DD-6200(G)2007.3.2910:23AM페이지 6
⑨ PAUSE BUTTON( )
Press this button to temporarily stop playing back or recording.
To restart, press the PLAY button.
⑩ REVERSE PLAY BUTTON(
)
Press this button to play back the back side of the tape.
⑪, ⑬ FAST FORWARD and REWIND BUTTONS(
⑫ STOP BUTTON(
)
)
⑭ FORWARD PLAY BUTTON(
⑮ EJECT BUTTON(
and
)
)
� CASSETTE DOOR
� DECK A/B COUNTER SELECTOR BUTTON
Press this button to select the deck to be counted.
� MEMORY BUTTON
Press this button to memorize the specific point on the tape.
� COUNTER MODE BUTTON
Press this button to select the tape or time counter mode.
� COUNTER RESET BUTTON
Press this button to reset the counter to “0000” or “00 min. 00 sec.”.
� NORMAL SPEED DUBBING BUTTON
Press this button to set to normal speed dubbing mode.
� HIGH SPEED DUBBING BUTTON
Press this button to set to high speed dubbing mode.
� CD SYNCHRO RECORDING BUTTON
Press this button to use the CD SYNCHRO RECORDING function.
� RECORD/RECORD MUTE BUTTON(
) (DECK A only)
Press this button to enter the recording pause mode. To start recording, press the FORWARD PLAY or
REVERSE PLAY button.
�
NR B/OFF BUTTON
Press this button to select the Dolby B NR or the Dolby NR OFF mode while playing back or recording.
� REVERSE MODE BUTTON
Press this button to select the desired reverse mode while playing back or recording.
� TAPE SIZE BUTTON
Press this button to select the tape length for displaying the elapsed time while playing back or recording.
� RELAY PLAY BUTTON
Press this button to continue to play from Deck A to Deck B or vice versa.
Use this function with the REVERSE MODE button.
6
DD-6200(G)2007.3.2910:23AM페이지 7
� FLUORESCENT DISPLAY
�
�
�
�
�
�
��
�
�
�
�
�
�
� NORMAL SPEED DUBBING INDICATOR
� DECK A TAPE DETECTION INDICATOR
� RECORDING INDICATOR
� DOLBY B NR INDICATOR
� REVERSE MODE INDICATOR
� LEVEL METER DISPLAY
� DECK A TAPE DIRECTION DISPLAY
� DECK B TAPE DETECTION INDICATOR
� MEMORY INDICATOR
� RELAY PLAY INDICATOR
� DECK B TAPE DIRECTION DISPLAY
� COUNTER DISPLAY
� CD SYNCHRO RECORDING INDICATOR
� HI SPEED DUBBING INDICATOR
※DIGI LINK SYSTEM REMOTE CONTROL
This unit can be remotely controlled with Sherwood DIGI LINK III amplifier or receiver.
�For available functions, refer to the compatible unit’s operating instructions.
�To listen to tapes by DIGI LINK system, first make DIGI LINK connection between this unit and Sherwood
compatible amplifier or receiver.
7
DD-6200(G)2007.3.2910:23AM페이지 8
Before Operation
� NOTES ON CASSETTE TAPE
�Before loading a cassette tape, take up the
slack in the tape to prevent it from becoming
entangled around the capstan.
� CLEANING THE HEAD SECTION
�For the best condition of the deck, always keep
the head (recording/playback/erase), capstan
and pinch roller clean.
To clean them as follows;
1. Open the cassette door.
2. Clean the heads with the cotton swab dipped in
commercially available head cleaner.
3. Clean the capstan and pinch roller with another
cotton swab dipped in commercially available
rubber cleaner.
�After the recording has been finished, remove
the tab to prevent the recorded contents from
being erased or recorded on accidently.
� DEMAGNETIZING THE HEAD
When the recording/playback head is magnetized,
the sound quality will be deteriorated.
In this case, demagnetize the head using a commercially available demagnetizer.
� PRINCIPLE OF DOLBY B NR SYSTEM
The Dolby NR system functions so that it automatically increases recording levels of medium and
high frequencies when the recording signal level is
lower than the specified level(encoding), and automatically reduces the output level to the normal
level during playback(decoding). In this way, the
tape hissing noise is remarkably reduced without
affecting the sound quality. The Dolby B NR system used in your Cassette Deck improves S/N
ratio by about 5 dB at 1 kHz and about 10 dB at 10
kHz.
※ Manufactured under license from Dolby
Laboratories.
“Dolby” and the double-D symbol are
trademarks of Dolby Laboratories.
�To rerecord after tabs have been removed,
cover with adhesive tape.
�Do not store the tapes in direct sunlight or
near equipment that generates heat. Keep the
tapes away from any magnetic fields.
�Do not touch the tape surface and store the
tapes in their cases after use. Dust can cause
contamination of the heads resulting in noise.
� AUTO TAPE SELECTOR
The type of tape loaded is detected automatically
by the auto tape selector and recording bias and
equalization are set automatically according to the
characteristic of that tape such as NORMAL or
CrO2 tape.
Note : Do not use the metal tapes because these
tapes are not played back and recorded
correctly.
8
DD-6200(G)2007.3.2910:23AM페이지 9
Operations
z
PLAYING BACK TAPES
Note : Do not use the metal tapes because these are not played back and recorded correctly.
1
Press the POWER swith to turn the power on.
�Do not turn the power off while operating the unit. In this case, the tape door may not be opened.
2
Load the tape with the bottom side
up and to close the cassette door,
push the door gently until it clicks.
3
In case of the tape recorded with
Dolby B NR, select the Dolby B NR
mode.
�
�Each time this button is pressed, Dolby B NR or
Dolby NR OFF mode is selected as follows;
�
�Only in the stop mode, the door can be opened.
�According to the type of the tape loaded, the corresponding type is shown by the auto tape selector as follows (Deck A only) ;
“NOR” : Normal tape.
“CR” : Chrome(CrO2) tape.
Dolby B NR
” lights up.
Dolby NR OFF : “
” goes off.
�
:“
�For details, refer to “AUTO TAPE SELECTOR”
on page 7.
4
Select the desired reverse mode.
5
�Each time this button is pressed, the reverse
mode is selected as follows ;
Start playback.
Front side
Back side
(Deck A only)
: Playback of a single side
Deck A tape detection
indicator
Tape counter
: Playback of both sides
(Front side � Back side)
: Repeat playback of both sides
( � Front side � Back side )
L
dB
R
�On the Deck B, the front side can be played
back regardless of the reverse mode.
20
10
6
3
0
Dolby B NR Reverse mode Level meter
indicator
9
3
6
Playback mode
DD-6200(G)2007.3.2910:23AM페이지 10
6
To temporarily stop playback.
(Deck A only)
7
To stop playback.
�“
” indicator lights up.
�To restart playback, press the corresponding
PLAY button.
8
To rapidly advance or rewind the tape,
press the corresponding button in the
stop mode.
�At the desired point, press the STOP
or corresponding PLAY button.
AMS(Automatic Music Search) PLAY
�The automatic music search function automatically skips other musics, finds and starts playback from the
desired music.
�Up to 20th music before or after the current music can be searched quickly.
�During playback, press the button the desired number of times.
Example) When listening to the second music
before or after the current music.
※ Automatic music search function might not
operates as expected if :
�The length of the blank space between two
musics is less than 4 seconds.
�The noise level of the blank space is very high.
�The overall recorded volume level of a music is
very low.
�The second music can be searched quickly and played back.
RELAY PLAY
1
Load the tapes into Deck A and B
and press the RELAY PLAY button.
2
Press the PLAY button.
(Deck A only)
�According to the PLAY button on the selected deck
and the reverse mode, the relay play performs as
follows :
: Deck A (Front or Back side)
Deck B (Front side)
or
Deck B (Front side) � Deck A (Front side) �
Deck B (Front side)
: Deck A (Front side � Back side)
Deck B (Front side) � or � Deck A (Front side
� Back side)
: � Deck A (Front side � Back side)
Deck B (Front side) �
�“RELAY P” lights up.
�To cancel the relay play, press this button.
10
DD-6200(G)2007.3.2910:23AM페이지 11
RECORDING
1
Load a tape to be recorded into deck A.
2
: Recording of a single side.
�Be sure the erase-protection taps on the tape are
in place.
�The type of tape(normal or chrome) is automatically detected.
�The metal tapes are not recorded correctely.
3
When recording with Dolby B NR,
select the Dolby B NR mode.
5
Press the RECORD/RECORD MUTE
button to enter the recording pause mode
Select the reverse mode.
,
: Recording of both side.
�When selecting recording of both sides and
recording first on the back side, recording is
made only on that side.
4
Select the program source to be
recorded.
Example) When selecting the tuner.
6
Press the PLAY button to start
recording.
�According as there are the erase-protection taps or
not, the PLAY indicators are flickering as follows ;
: Recordable on both sides.
: Recordable on front side.
: Recordable on back side.
7
To temporarily stop recording.
8
�To restart recording, press the corresponding
PLAY button.
To make a blank space, press the
RECORD/RECORD MUTE button in
the recording pause mode or during
recording.
�The unit will make a 4 second blank space and
then enter the recording pause mode.
11
DD-6200(G)2007.3.2910:23AM페이지 12
9
To stop recording.
CD SYNCHRO RECORDING
�When this unit is connected to a Sherwood compatible CD player controlled remotely by the DIGI
LINK III system, the CD synchro recording can be performed.
1
Do the steps 1, 2 and 3 in
“RECORDING” procedure.
3
Start CD synchro recording.
2
4
�The CD is selected automatically on the amplifier
bearing the DIGI LINK III logo.
�If 8 seconds elapses after starting recording, the
CD player starts automatically.
According to the tape length, edit the
tracks to be recorded on the CD player referring to the operating instructions of that.
To stop CD synchro recording.
�During CD synchro recording, only the STOP
button of the Deck A function buttons does
work.
� Notes
�Because CD synchro recording starts from the front side, if there is not the erase-protection tap on
that side, CD synchro recording can not be performed.
�During CD synchro recording, if other program source on the amplifier is selected, the unit stops CD
synchro recording and starts recording the selected program source.
12
DD-6200(G)2007.3.2910:23AM페이지 13
DUBBING FROM DECK B TO DECK A
1
Open the cassette door by pressing
the EJECT button and load a blank
tape into Deck A and prerecorded
tape into Deck B respectively.
2
�NORMAL : Normal speed
dubbing.
�HIGH : 1.5 times as fast
as normal speed
dubbing.
�Because dubbing starts from the front side, if
there is not the erase - protection tap on that
side, dubbing can not be performed.
3
Start dubbing.
�For better sound quality, select the normal
speed dubbing mode.
�During dubbing, the tape is recorded in accordance with the recording condition of the tape to
be played regardless of the Dolby NR mode.
To stop dubbing.
�During dubbing, only the STOP button of the deck function buttons does work.
COUNTER DISPLAY
Selecting a tape length
Selecting a counter mode
�There are two kinds of counter mode : tape
counter, time counter for displaying the elapsed
playing or recording time.
�Select the desired counter mode.
�Select the corresponding tape length according to
the loaded tape in the time counter mode.
Example) When selecting the 60 minutes as tape
length.
�
�Each time this button is pressed, the tape
length changes as follows ;
�Each time this button is pressed, the counter
mode changes as follows ;
�During playing or recording, the elapsed playing
or recording time is displayed.
�The time counter is not actually a clock, so the
displayed time is not exactly equal to the actual
elapsed time.
: Tape counter mode
: Time counter mode
13
DD-6200(G)2007.3.2910:23AM페이지 14
Selecting the desired deck counter mode
Resetting the counter
�In each counter mode, you can reset the counter
to “0000” or “00 min. 00 sec.”.
Example) In the tape counter mode.
�Select the Deck A or the Deck B counter mode
as desired.
�“
” of the selected deck is flickering for 3
seconds and the corresponding deck counter
mode is displayed.
�When the unit is in the stop mode displaying a
deck counter mode, playing or recording, etc. on
the other deck changes the deck counter mode
to the other.
MEMORIZING THE SPECIFIC POINT
�This function is helpful to listen to the specific passage.
�At the desired point, press the MEMORY button to memorize.
�“ MEMO” lights up and the specific point is memorized.
�If the FAST FORWARD or the REWIND button is pressed in the stop mode, winding the tape
stops at the memorized point.
�To cancel, press this button or open the corresponding cassette door.
14
DD-6200(G)2007.3.2910:23AM페이지 15
Troubleshooting Guide
If your unit should not perform as expected, consult the table below to see if the problem can be corrected
before seeking help from your dealer or our service organization.
PROBLEM
POSSIBLE CAUSE
REMEDY
No power
�The AC input cord is disconnected.
�The POWER switch is not pressed
completely.
�Connect the cord securely.
�Press the POWER switch to ON.
No sound
�Unrecorded tape is loaded.
�Incorrect connections.
�Incorrect operation of the amplifier.
�Load the recorded tape.
�Make connections correctly.
�Operate the amplifier correctly.
Distorted or abnormal
sound
�Dirty head.
�Incorrect selection of the Dolby NR
system.
�The tape is stretched or wrinkled.
�Clean the head.
�Select the Dolby B NR or the
Dolby NR OFF mode.
�Replace the tape.
Vibrating sound
�Dirty capstans or pinch rollers.
�Clean the capstans or pinch
rollers.
�Wind the tape by advancing or
rewinding rapidly.
�The tape is irregularly wound.
Too noisy
�Magnetized head.
�Poor connections.
�Demagnetize the head.
�Check the connections and connect all cords securely.
Not recording
�The tabs have been removed.
�Dirty head.
�Cover with the adhesive tape.
�Clean the head.
15
DD-6200(G)2007.3.2910:23AM페이지 16
Specifications
�TYPE . . . . . . . . . . . . . . . . . . . . . . . . . . . Stereo full logic double cassette deck with Dolby B NR system.
�Track system . . . . . . . . . . . . . . . . . . . . . . . . . . . . . . . . . . . . . . . . . . . . . . . . . . . . . . . 4-track, 2-channel stereo
�Recording system . . . . . . . . . . . . . . . . . . . . . . . . . . . . . . . . . . . . . AC bias system (bias frequency : 105 kHz)
�Erasing system . . . . . . . . . . . . . . . . . . . . . . . . . . . . . . . . . . . . . . . . . . . . . . . . . . . . . . . . . . . . . . . . . AC system
�Tape speed . . . . . . . . . . . . . . . . . . . . . . . . . . . . . . . . . . . . . . . . . . . . . . . . . . . . . . . . . 4.76 cm/sec. (1-7/8 ips)
�Heads
Deck A . . . . . . . . . . . . . . . . . . . . . . . . . . . . . . . . . 1 erasing head and 1 recording / playback head (rotating)
Deck B . . . . . . . . . . . . . . . . . . . . . . . . . . . . . . . . . . . . . . . . . . . . . . . . . . . . . . . . . . . . . . . . . . 1 playback head
�Wow and flutter, unweighted CCIR/ARM . . . . . . . . . . . . . . . . . . . . . . . . . . . . . . . . . . . . . . . . . . . . . . . . . 0.3 %
�Frequency response, - 20 dB recording / playback, Dolby NR OFF
Normal . . . . . . . . . . . . . . . . . . . . . . . . . . . . . . . . . . . . . . . . . . . . . . . . . . . . . . . . . . . 40 Hz ~ 12 kHz, ± 3 dB
Chrome . . . . . . . . . . . . . . . . . . . . . . . . . . . . . . . . . . . . . . . . . . . . . . . . . . . . . . . . . . . 40 Hz ~ 13 kHz, ± 3 dB
�Signal to noise ratio, weighted CCIR/ARM
Dolby NR OFF, normal/chrome . . . . . . . . . . . . . . . . . . . . . . . . . . . . . . . . . . . . . . . . . . . . . . . . . . . 43 / 45 dB
Dolby B NR, normal/chrome . . . . . . . . . . . . . . . . . . . . . . . . . . . . . . . . . . . . . . . . . . . . . . . . . . . . . 53 / 55 dB
�Line input sensitivity/impedance . . . . . . . . . . . . . . . . . . . . . . . . . . . . . . . . . . . . . . . . . . . . . . . 400 mV / 63 kΪ
�Line output level/impedance . . . . . . . . . . . . . . . . . . . . . . . . . . . . . . . . . . . . . . . . . . . . . . . . . . 500 mV / 1.5 kΪ
�Total harmonic distortion, 333 Hz, 0 dB recording
Normal . . . . . . . . . . . . . . . . . . . . . . . . . . . . . . . . . . . . . . . . . . . . . . . . . . . . . . . . . . . . . . . . . . . . . . . . . . . . 2 %
�Channel separation . . . . . . . . . . . . . . . . . . . . . . . . . . . . . . . . . . . . . . . . . . . . . . . . . . . . . . . . . . . . . . . . . 40 dB
�GENERAL
�Power supply . . . . . . . . . . . . . . . . . . . . . . . . . . . . . . . . . . . . . . . . . . . . . . . . . . . . . . . . . . . . . . 230 V ~ 50 Hz
�Power consumption . . . . . . . . . . . . . . . . . . . . . . . . . . . . . . . . . . . . . . . . . . . . . . . . . . . . . . . . . . . . . . . . . 14 W
�Unswitched AC outlet . . . . . . . . . . . . . . . . . . . . . . . . . . . . . . . . . . . . . . . . . . . . . . . . . . . . . . Total 100 W max.
�Dimensions (W x H x D) . . . . . . . . . . . . . . . . . . . . . . . . . 440 x 141 x 250 mm (17-3/8x5-1/2x9-13/16 inches)
�Weight(Net) . . . . . . . . . . . . . . . . . . . . . . . . . . . . . . . . . . . . . . . . . . . . . . . . . . . . . . . . . . . . . . . 4.0 Kg (8.8 lbs)
Note : Design and specifications are subject to change without notice for improvements.
16