1
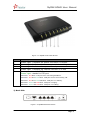
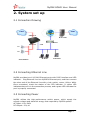
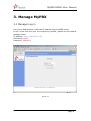
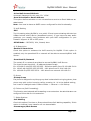
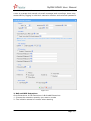
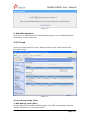
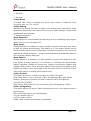
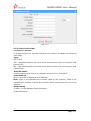
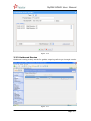
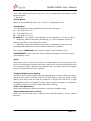
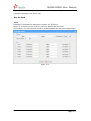
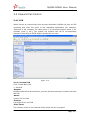
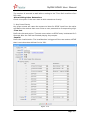
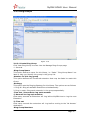
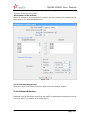
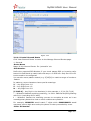
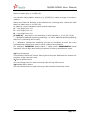
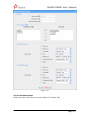
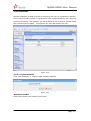
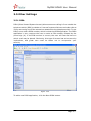
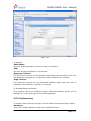
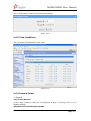
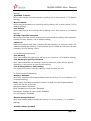
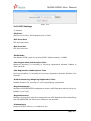
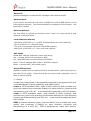
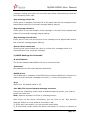
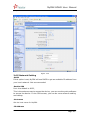
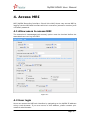
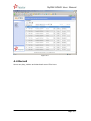
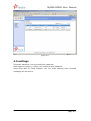
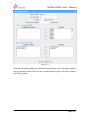
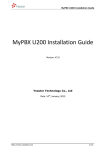
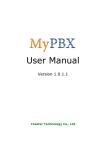
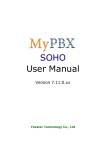
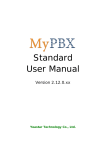
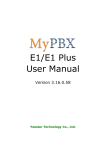
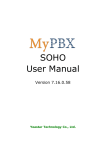
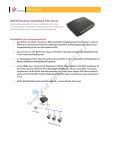
SOHO User Manual Version 1.0.1.1 Yeastar Technology Co., Ltd MyPBX-SOHO User Manual Table of Contents 1. Introduction ............................................................................................ 4 1.1 Features ............................................................................................ 4 1.2 Hardware Specification ........................................................................ 4 1.2.1 Exterior Appearance ...................................................................... 4 1.3 Package Contents ............................................................................... 6 2. System set up ......................................................................................... 7 2.1 Connection Drawing ............................................................................ 7 2.2 Connecting Ethernet Line ..................................................................... 7 2.3 Connecting Power ............................................................................... 7 3. Manage MyPBX........................................................................................ 9 3.1 Manager Log in ................................................................................... 9 3.2 Status Monitor .................................................................................. 10 3.2.1 Line Status ................................................................................. 10 3.3 Basic ............................................................................................... 11 3.3.1 Extension ................................................................................... 11 3.3.1.1 Analog Extension (FXS)) ....................................................... 11 3.3.1.2 VOIP Extension ..................................................................... 13 3.3.2 Trunk ........................................................................................ 16 3.3.2.1 Analog Trunk (FXO) ............................................................... 16 3.3.2.2 VOIP Trunk ........................................................................... 18 3.3.2.3 Service Provider .................................................................... 19 3.3.3 Outbound Routes ........................................................................ 20 3.3.3.1 Create Outbound Route .......................................................... 21 3.3.3.2 Delete Outbuond Route .......................................................... 22 3.3.4 Auto Provision ............................................................................ 22 3.3.4.1 Create New Phone ................................................................. 22 3.4 Inbound Call Control ......................................................................... 24 3.4.1 IVR ........................................................................................... 24 3.4.1.1 Create IVR............................................................................ 24 3.4.1.2 Delete IVR ............................................................................ 26 3.4.2 IVR Prompts ............................................................................... 26 3.4.3 Ring Groups ............................................................................... 27 3.4.3.1 Create Ring Group ................................................................. 27 3.4.3.2 Delete Ring Group ................................................................. 28 3.4.4 Inbound Routes .......................................................................... 28 3.4.4.1 Create Inbound Route ............................................................ 29 3.4.4.2 Delete Routes ....................................................................... 31 3.4.5 Blacklist ..................................................................................... 32 3.4.5.1 Create Blacklist ..................................................................... 32 3.5 Other Settings .................................................................................. 33 www.yeastar.com Page 2 MyPBX-SOHO User Manual 3.5.1 DISA ......................................................................................... 33 3.5.2 Conferencing .............................................................................. 34 3.5.3 Time Conditions .......................................................................... 35 3.5.4 Feature Codes ............................................................................ 35 3.5.5 Paging and Intercom ................................................................... 38 3.6 System Settings ............................................................................... 40 3.6.1 Options ...................................................................................... 40 3.6.2 Music on Hold Prompts................................................................. 41 3.6.3 SIP Settings ............................................................................... 42 3.6.4 Voicemail Settings....................................................................... 44 3.6.5 Network Setting .......................................................................... 46 3.6.6 DHCP Server .............................................................................. 47 3.6.7 Autobackup setting...................................................................... 48 3.6.8 Password Settings ....................................................................... 49 3.6.9 Date and Time ............................................................................ 50 3.6.10 Backup and Restore ................................................................... 51 3.6.11 Reset and Reboot ...................................................................... 52 3.6.12 Firmware Update ....................................................................... 53 3.7 Reports ........................................................................................... 54 3.7.1 Call Logs .................................................................................... 54 3.7.2 System Info ............................................................................... 55 4. Access MRI ........................................................................................... 57 5. Use MyPBX ........................................................................................... 62 5.1 Make outbound call ........................................................................... 62 5.1.1 Make call via PSTN trunk .............................................................. 63 5.1.2 Make call via VoIP trunk ............................................................... 63 5.2 Incoming call.................................................................................... 66 5.2.1 Sample Routing to an IVR ............................................................ 66 APPENDIX A FAQ ....................................................................................... 68 APPENDIX B How to configure autobackup.................................................... 69 APPENDIX C How to configure NAT setting ................................................... 71 APPENDIX D How to Use Auto Provision ....................................................... 74 www.yeastar.com Page 3 MyPBX-SOHO User Manual 1. Introduction MyPBX — IPPBX for Small Office and Home Office 1.1 Features ● Auto-provision ● IVR(Automated Attendant) ● Blind Transfer ● Call Detail Records (CDR) Search ● Call Forwarding ● Call Parking ● Call Pickup ● Call Recording ● Inbound/Outbound Call Routes ● Paging and Intercom Groups ● Direct Inward Subscriber Access (DISA) ● ● ● ● ● ● ● ● ● ● ● Call Transfer Call Waiting Caller ID Do Not Disturb(DND) Music On Hold Ring Group Caller ID Routing Three-way Conference Calling MRI(MyPBX Recording Interface) Voicemail Blacklist 1.2 Hardware Specification 1.2.1 Exterior Appearance 1) Front Side www.yeastar.com Page 4 MyPBX-SOHO User Manual ① ② ③ ④ ⑤ Figure 1-1 MyPBX Front Panel Picture No. ① ② ③ ④ ⑤ Identifying Green Light:Indicates the power connection is normal. Green Light:Indicates the server system is in working order Green Light:Indicates the system is ready. Green Light:Indicates the internet interface is in use Red Light:stands for FXO port Green Light:stands for FXS port LED Dual - Red blink:FXO port isn’t connecting PSTN line. LED Dual - Red and Green blink:FXO port receive an incoming call. LED Dual - Red and Green fast blink:FXO port is in talking. LED Dual - Green and Red blink:FXS port is ringing. LED Dual - Green and Red blink:FXS port is in talking. 2) Back Side Figure 1-2 MyPBX Back Side Picture www.yeastar.com Page 5 MyPBX-SOHO User Manual 1.3 Package Contents ▲ 1 unit of MyPBX-SOHO server ▲ 1 power supply ▲ 1 Internet line ▲ Few telephone cables [RJ-11] Note: If any of the above items is damaged or missing, contact your reseller. www.yeastar.com Page 6 MyPBX-SOHO User Manual 2. System set up 2.1 Connection Drawing PSTN PSTN FXO Ports IP Provider FXS Ports LAN Router 601 602 Normal Phone IP Phone Soft Phone 2.2 Connecting Ethernet Line MyPBX provides two 10/100M Ethernet ports with RJ45 interface and LED indicator. Plug Ethernet line into MyPBX’s Ethernet port, and then connect the other end of the Ethernet line with a hub, switch, router, LAN or WAN. Once connected, check the status of the LED indicator. A yellow LED indicates the port is in the connection process, and a green LED indicates the port is properly connected. 2.3 Connecting Power MyPBX utilizes the high-performance switch power, which supply the enough voltage and electrical energy that required by MyPBX system. AC Input: 100~240V DC Output: 12V,1A www.yeastar.com Page 7 MyPBX-SOHO User Manual Please follow the steps below to connect the MyPBX unit to a power outlet: 1. Connect the small end of the power cable to the power input port on the MyPBX back panel, and plug the other end of the cable into a 100VAC power outlet. 2. Check the Power LED on the front panel. A solid green LED indicates that power is being supplied correctly. www.yeastar.com Page 8 MyPBX-SOHO User Manual 3. Manage MyPBX 3.1 Manager Log in From your web browser, input the IP address of the MyPBX server. If this is the first time you are configuring MyPBX, please use the default settings below: IP Address: http://192.168.5.150 Username: admin Password: password Figure 3-1 www.yeastar.com Page 9 MyPBX-SOHO User Manual 3.2 Status Monitor 3.2.1 Line Status Figure 3-2 MyPBX Status Description: Extensions: 1) : extension is unregistered 2) : extension is idle 3) : extension is ringing 4) : extension is busy in a call Trunks: SIP Trunk: 1) Unregistered — trunk registration failed. 2) Registered — succeed registration, trunk is ready to use. 3) Request Send — Registering. www.yeastar.com Page 10 MyPBX-SOHO User Manual 4)Waiting — Waiting for Authentication. FXO Trunk: FXO: please refer to the LED identifying of front panel. 3.3 Basic 3.3.1 Extension Extension has two types: normal desk extension (FXS) and VOIP extension. Figure 3-3 3.3.1.1 Analog Extension (FXS)) Edit Analog Extension On the administration page of FXS extensions, click ‘Edit’ on the extension that you want to edit, and modify the following information on prompt window 1) General ·Extension The numbered extension, i.e. 1234, that will be associated with this particular User / Phone. ·Name A character-based name for this user, i.e. ‘Bob Jones’ www.yeastar.com Page 11 MyPBX-SOHO User Manual ·Caller ID The Caller ID (CID) string will be used when this user calls another internal user. 2) Voice Mail ·Voice Mail Access PIN Code Voicemail Password for this user, Ex: ‘1234’. ·Send Voice Mail to Email Address This option defines whether or not voicemails are sent to the Email address as an attachment. Note: You need to have an SMTP server configured for this functionality. 3) Flash ·rxflash Sets the amount of time, in milliseconds, that must have passed since the last hook-flash event received by MyPBX before it will recognize a second event. If a second event occurs in less time than defined for Flash, then MyPBX will ignore the event. The default value of Flash is 1000 ms, and it can be configured in 1ms increments. 4) Group ·Pickup Group If a phone is assigned to a pickup group that is shared with a ringing phone, that phone may pick up the incoming call by calling *4 .*4 is default setting, but it can be changed under Feature Codes -> General -> Call Pickup. 5) Follow me The mode of call forwarding when there’s incoming call on this extension. Admin can set up the call forwarding type for this extension. 6)Other Options .Call Waiting Check this option if the User or Phone should have Call-Waiting capability. If this option is checked, busy transfer will not be available for this extension. .Hasmanager/Web Access Check this option to allow user to access the MyPBX Web Interface, which allows a user to manage their saved Voicemail messages and recordings. Users may access MRI by login to MyPBX web interface with their extension number and voicemail password. www.yeastar.com Page 12 MyPBX-SOHO User Manual Figure 3-4 3.3.1.2 VOIP Extension A VOIP extension is an SIP Account that allows an IP Phone or an IP Soft- Phone client to register on MyPBX. 1. Add VOIP Extension Go to Extensions VOIP Extensions Create New Extension 1) General ·Extension The numbered extension, i.e. 1234, that will be associated with this particular User / Phone. ·Password The password for the user's sip account , Ex: ‘12t3f6’ ·Name A character-based name for this user, i.e. ‘Bob Jones’ ·Caller ID The Caller ID will be used when this user calls another internal extension. www.yeastar.com Page 13 MyPBX-SOHO User Manual 2) Voice Mail ·Voice Mail Access PIN Code Voicemail Password for this user, Ex: ‘1234’. ·Send Voice Mail to Email Address This option defines whether or not voicemails are sent to an Email Address as attachment. Note: You need to have an SMTP server configured for this functionality. 3) VoIP Setting ·NAT Try this setting when MyPBX is on a public IP and communicating with devices hidden behind a NAT device (broadband router). If you have one-way audio problems, you usually have problems with your NAT configuration or your firewall's support of SIP or RTP ports. ·DTMF Mode – RFC2833, Info, Inband, Auto. 4) IP Restriction ·Enable IP Restriction Check this option to enhance the VoIP security for MyPBX. If this option is enabled, only the permitted IP or network will be able to access MyPBX’s VoIP Server. ·Permitted IP/Network The certain IP or network permitted to access MyPBX’s VoIP Server. The input format should be : IP address/network mask Ex: 192.168.5.100/255.255.255.255 – Will allow traffic from IP 192.168.5.100 Ex: 120.42.46.120/255.255.255.255 – Will allow from IP 20.42.46.120 Ex: 192.168.5.0/255.255.255.0 – Will allow from network 192.168.5.0 5) Group ·Pickup Group If a phone is assigned to a pickup group that is shared with a ringing phone, that phone may pick up the incoming call by pressing *4. *4 is the default setting, but it can be changed under Feature Codes -> General -> Call Pickup. 6) Follow me (Call Forwarding) This function sets inbound call forwarding on an extension. An administrator can configure Follow Me for this extension. 7)Other Options .Call Waiting Check this option if the User or Phone should have Call-Waiting capability. If this option is checked, busy transfer will not be available. .Hasmanager/Web Access www.yeastar.com Page 14 MyPBX-SOHO User Manual Check this option to allow a user to access the MRI web interface, which allows a user to manage their saved voicemail messages and recordings. Users may access MRI by logging in with their extension number and voicemail password. Figure 3-5 2. Bulk add SIP Extensions Go to Extensions SIP Extensions Bulk add Extensions 1)Choose the extension quantity you want to create 2)The initiative extension number when starting www.yeastar.com Page 15 MyPBX-SOHO User Manual Figure 3-6 3. Edit VOIP Extension Click ‘Edit’ on VOIP Extension administration page or click ‘Modify Selected Extensions’ to edit extension. 3.3.2 Trunk There are three types of trunks: Analog trunks (FXO), VOIP and Service Provider trunks. Figure 3-7 3.3.2.1 Analog Trunk (FXO) 1. Edit Analog Trunk (FXO) On the analog Trunk administration page, click ‘Edit’ on selected trunk and modify information on prompt window: www.yeastar.com Page 16 MyPBX-SOHO User Manual 1)General 1)General ·Trunk Name A unique label used to identify this trunk when listed in outbound rules, incoming rules, etc. Ex: 'Port 5' ·Audio Setting Normally you should not have to adjust your analog ports beyond the initial calibration. Should you still need to fine tune your audio settings, please make adjustments as necessary. 2)Advanced Options ·Busy Detection Busy Detection is used to detect far end hang-up or for detecting a busy signal. Select “Yes” to turn this feature on. ·Busy Count If Busy Detection is enabled, it is also possible to specify how many busy tones to wait for before disconnecting. The default is 4, but better results can be achieved if set to 6 or even 8. Remember, the higher the number, the more time required to release a channel. A higher setting lowers the probability that you will encounter random hang-ups ·Busy Pattern If Busy Detection is enabled, it is also possible to specify the cadence of your busy signal. In many countries, it is 500msec on, 500msec off. Without Busy Pattern specified, MyPBX will accept any regular sound-silence pattern that repeats <Busy Count> times as a busy signal. If you specify Busy Pattern, then MyPBX will further check the length of the tone and silence, which will further reduce the chance of a false positive disconnect. ·Caller ID Start This option allows you to define the start of a Caller ID signal: Ring: Start when a ring is received (Caller ID Signaling: Bell_USA, DTMF). Polarity: Start when a polarity reversal is started (Caller ID Signaling: V23_UK,V23_JP,DTMF). Before Ring: Start before a ring is received (Caller ID Signaling: DTMF). ·Caller ID Signaling This option defines the type of Caller ID signaling to use. It can be set to one of the following: Bell: bell202 as used in the United States v23_UK: Used in the UK v23_JP: Used in Japan DTMF: Used in Denmark, Sweden, and Holland www.yeastar.com Page 17 MyPBX-SOHO User Manual Figure 3-8 3.3.2.2 VOIP Trunk 1. Add SIP Trunk Input correct SIP information (provided by VOIP provider). Inaccurate information will prevent the trunk from registering. ·Provider Name A unique label to help you identify this trunk when listed in outbound rules, incoming rules etc. Ex: 'yeastar'. ·Hostname/IP Service provider’s hostname or IP address.5060 is the standard port number used by SIP protocol. Don’t change this part if it is not required. .Domain VoIP provider’s server domain name. ·Username Username of SIP account. Used for SIP trunk registration. .Authorization name Used for SIP authentication. Leave this blank if not required. ·Password Password of SIP account. .Online number Define the online number that expected by Skype for SIP and some others SIP Service providers. Leave this field blank if it is no required. ·Enable Outbound Proxy Server www.yeastar.com Page 18 MyPBX-SOHO User Manual Figure 3-9 3.3.2.3 Service Provider 1. Add Service Provider To Create the Service provider definition you need to complete the following VoIP fields. ·Type SIP or IAX SIP – Identifies whether the trunk sends and receives calls by using the VoIP protocol SIP. IAX - Identifies whether the trunk sends and receives calls by using the VoIP protocol IAX. ·Provider Name A unique label would help to you identify this trunk. Ex: 'Provider2'. ·Hostname/IP Service provider’s hostname or IP address. Note: 5060 is the standard port number used by SIP protocol, 4569 is the standard port number used by IAX protocol. Don’t change this part if it is not required. .DOD Setting 1) DOD – Direct Outward Dialing Number. 2) Bind Extension. www.yeastar.com Page 19 MyPBX-SOHO User Manual Figure 3-10 3.3.3 Outbound Routes Outbound routing mainly works for guides outgoing calls to go through trunks. Figure 3-11 www.yeastar.com Page 20 MyPBX-SOHO User Manual 3.3.3.1 Create Outbound Route Click ‘New Outbound Route’ and fill in the corresponding information in the popup window. 1)General ·Route Name Name of this Outbound Route. Ex: 'Local' or 'LongDistance' etc. ·Dial Pattern In dial patterns, some characters have special meanings: X ... Any Digit from 0-9 Z ... Any Digit from 1-9 N ... Any Digit from 2-9 [12345-9] ... Any Digit in the brackets (in this example, 1,2,3,4,5,6,7,8,9) . ... Wildcard, Matches Anything Remaining; i.e. 9011. Matches anything starting with 9011 (excluding 9011 itself) ! ... Wildcard, causes the matching process to complete as soon as it can unambiguously determine that no other matches are possible. For example, NXXXXXX would match normal 7 digit dialings, while 1NXXNXXXXX would represent a three digit area code plus phone number, proceeded by a one. ·Strip Allows the user to specify the number of digits that will be stripped from the front of the dialing string before the call is placed via one of the selected trunks For example, to dial 9 before a long distance call, one digit should be stripped from the front before the call is placed. ·Prepend digits before dialing Allow the user to specify digits that are prepended to a number before the call is placed over a trunk. If a trunk requires 10 digit dialing, but users prefer 7 digit dialing, this field could be used to prepend a 3 digit area code to all 7 digit strings before they are routed to a trunk. User may also prepend a 'w' character for analog trunks to provide a LED delay before dialing ·Calls From Extensions Define the Extensions that are allowed to use the selected trunks. ·Make Outbound Calls on Trunk Define the Trunks that calls, matching the specified pattern, will be placed through. www.yeastar.com Page 21 MyPBX-SOHO User Manual Figure 3-12 3.3.3.2 Delete Outbuond Route Click ‘Delete’ on selected trunk to remove the trunk. 3.3.4 Auto Provision 3.3.4.1 Create New Phone Click ‘Create New Phone’ and fill in the corresponding information in the popup window. 1)General ·MAC IP Phone’s MAC address. ·Name Name of this Phone. ·Call Waiting www.yeastar.com Page 22 MyPBX-SOHO User Manual This call feature allows your phone to accept other incoming calls to an extension already in an active call. ·Key As Send ·Line Extension: Selected the extension number for IP Phone. Label: It is shown on the LCD for users to identify the account. Line Active: You can choose on/off to enable/disable the account respectively. Figure 3-13 www.yeastar.com Page 23 MyPBX-SOHO User Manual 3.4 Inbound Call Control 3.4.1 IVR When there’s an inbound call aims at Auto Attendant, MyPBX will play an IVR recording and route the caller to the requested destination (for example, ‘Welcome to XX company, for sales press 1, for technical support press 2, for operator press 0, etc’). The system will transfer the call to corresponding extension according to DTMF digits inputted by the user. Figure 3-14 3.4.1.1 Create IVR Click ‘Create New IVR’. 1)General ·Number MyPBX treats IVR as an extension; you can dial this extension number to access the IVR. ·Name A name for the IVR ·Prompt A Prompt file for the IVR ·Play Times The number times of the selected IVR prompt file will be played. www.yeastar.com Page 24 MyPBX-SOHO User Manual ·WaitExten The number of seconds to wait before routing to the ‘Time Out’ condition of an IVR node. ·Allow Dialing Other Extensions Check this option if the user want to dial extensions directly. 2)Key Press Events Key press events will cause the system to listen for DTMF input from the caller and define the actions that occur when a user presses the corresponding digit. ·Time Out Define the timeout action. Timeout occurs when no DTMF entry is detected for 3 Seconds after the IVR has finished playing its prompts. ·Invalid Define the invalid action. The invalid action is triggered if the user enters a DTMF that is not otherwise defined for the IVR. Figure 3-15 www.yeastar.com Page 25 MyPBX-SOHO User Manual 3.4.1.2 Delete IVR Select the item that you would like to remove and press the ‘Delete’ button. 3.4.2 IVR Prompts The administrator can use this screen to record IVR prompts by doing the following: 1)Click ‘Record New IVR Prompt’ 2) Input the desired file name on the popup window and choose an extension to call for recording (such as 500). 3) Click ‘Record’. The selected extension will ring and you can pick up the phone to start recording. Figure 3-16 The administrator can also upload IVR prompts by doing the following: 1))Click ‘Upload an IVR Prompt’. 2) Click ‘Browse’ to choose the desired IVR prompt. 3) Click ‘Upload’ to upload the selected prompt. Figure 3-17 www.yeastar.com Page 26 MyPBX-SOHO User Manual 3.4.3 Ring Groups Figure 3-18 3.4.3.1 Create Ring Group Click ‘New Ring Group’ to enter into the Manage Ring Groups page 1)General ·Ring Group Name This option defines a name for this Group, i.e. ‘Sales’. ‘Ring Group Name’ is a label to help you identify this group in the group list. ·Number for this ring group This option defines the numbered extension that may be dialed to reach this Group. ·Strategy This option sets the Ringing Strategy for this Group. The options are as follows: 1. Ring All: Ring all available Extensions simultaneously. 2. Ring in order: Ring each extension in the group sequentially. ·Time Out / Seconds to ring each member 1) Seconds to ring each member How many seconds an Extension will ring before MyPBX tries to ring the next Extension. 2) Time out How many seconds the extension will ring before routing to the ‘No Answer’ destination. ·Ring Group Members www.yeastar.com Page 27 MyPBX-SOHO User Manual This selection shows all users in the group. Selecting a user here makes them a member of the current group. ·Destination If No Answer When all people on this group fail to answer the call, system will handle the call according to the selected destination. Figure 3-19 3.4.3.2 Delete Ring Group Select the item you’d like to remove and press the ‘Delete’ button. 3.4.4 Inbound Routes Inbound routing processes incoming call traffic to destination extensions during business hours, or outside of working hours www.yeastar.com Page 28 MyPBX-SOHO User Manual Figure 3-20 3.4.4.1 Create Inbound Route Click ‘New Inbound Route’ to enter to the Manage Inbound Routes page. 1)General ·Route Name Name of this inbound Route. Ex: 'pstncallin' etc. ·DID Number Define the expected DID Number if your trunk passes DID on incoming calls. Leave this field blank to match calls with any or no DID info. Only Service or E1 trunks need to be configured. You can also use a pattern match (e.g. 2[345]X) to match a range of numbers. ·Pattern In patterns, some characters have special meanings: X ... Any Digit from 0-9 Z ... Any Digit from 1-9 N ... Any Digit from 2-9 [12345-9]... Any Digit in the brackets (in this example, 1,2,3,4,5,6,7,8,9) . ... Wildcard: Matches anything remaining; i.e. 9011. Matches anything starting with 9011 (excluding 9011 itself) ! ... Wildcard: Causes the matching process to complete as soon as it can unambiguously determine that no other matches are possible. For example, NXXXXXX would match 7 digits while 1NXXNXXXXX would represent a three digit area code plus phone number proceeded by a one. ·Caller ID Number www.yeastar.com Page 29 MyPBX-SOHO User Manual Define the Caller ID Number to be matched on incoming calls. Leave this field blank to match any or no DID info. You can also use a pattern match (e.g. 2[345]X) to match a range of numbers. ·Pattern Define the Caller ID Number to be matched on incoming calls. Leave this field blank to match any or no CID info. In patterns, some characters have special meanings: X ... Any Digit from 0-9 Z ... Any Digit from 1-9 N ... Any Digit from 2-9 [12345-9]... Any Digit in the brackets (in this example, 1,2,3,4,5,6,7,8,9) . ... Wildcard: Matches anything remaining; i.e. 9011. Matches anything starting with 9011 (excluding 9011 itself) ! ... Wildcard: Causes the matching process to complete as soon as it can unambiguously determine that no other matches are possible. For example, NXXXXXX would match 7 digits while 1NXXNXXXXX would represent a three digit area code plus phone number proceeded by a one. 2)Trunk Sequence This selection shows all Trunks. Moving a trunk to the ‘Selected’ box makes it a member of the inbound route. 3)During Office Hours You can choose how to route incoming calls during office hours. 4)Outside Office Hours You can choose how to route incoming calls outside of business hours. www.yeastar.com Page 30 MyPBX-SOHO User Manual Figure 3-21 3.4.4.2 Delete Routes Select the item you’d like to remove and click ‘Delete’ key. www.yeastar.com Page 31 MyPBX-SOHO User Manual 3.4.5 Blacklist Number Blacklist is used to block an incoming call you do not want to answer. If the incoming call number is registered in the number blacklist, the caller will hear the following: “The number you have dialed is not in service. Please check the number and try again”. The system will then disconnect the call. Figure 3-22 3.4.5.1 Create Blacklist Click ‘New Blacklist’ to create a new number blacklist. Figure 3-23 ·Blacklist number Enter the number you would like to block. www.yeastar.com Page 32 MyPBX-SOHO User Manual 3.5 Other Settings 3.5.1 DISA DISA (Direct Inward System Access) allows someone calling in from outside the telephone switch (PBX) to obtain an ‘internal’ system dial tone and make calls as if they were using one of the extensions attached to the telephone switch. To use DISA, a user calls a DISA number, which invokes the DISA application. The DISA application in turn requires the user to enter a PIN number, followed by the pound sign (#). If the PIN number is correct, the user will hear dial tone on which a call may be placed. Obviously, this type of access has serious security implications, and great care must be taken not to compromise your security. Figure 3-24 To add a new DISA application, click the New DISA button. www.yeastar.com Page 33 MyPBX-SOHO User Manual Figure 3-25 1) General ·DISA Name Give this DISA application a name to help you identify it. ·PIN The user will be prompted for this number. ·Response Timeout The maximum amount of time DISA will wait before disconnecting if the user has dialed an incomplete or invalid PIN number. Default is 10 seconds ·Digit Timeout The maximum amount of time permitted between digits when the user is inputting in an extension. Default is 5 seconds. 2) Allowed Outbound Routes This selection shows all outbound routes. Selected outbound routes will be available for users who log into this DISA application. 3.5.2 Conferencing To create a new conference bridge, click the ‘New Conference Bridge’ button ·Extension This is the number dialed to reach this Conference Room. www.yeastar.com Page 34 MyPBX-SOHO User Manual ·Pin Code Set an optional pin code for accessing the bridge. Figure 3-26 3.5.3 Time Conditions You can setup the business hours here. Figure 3-27 3.5.4 Feature Codes 1. General ·One Touch Record A user may initiate or stop call recording by dialing *1 during a call. (*1 is default setting) ·Extension for Checking Voice Mail www.yeastar.com Page 35 MyPBX-SOHO User Manual Users can check their voice mail by dialing *2 on their phone (*2 is default setting). ·Attended Transfer Users may transfer an incoming call by dialing *3 on their phone (*3 is default setting). ·Blind Transfer Users may blind transfer an incoming call by dialing *03 on their phone (*03 is default setting). ·Call Pickup Users may pick up an incoming call by dialing *4 on their phone (*4 is default setting) ·Pickup a specific extension Users may pick up a specific extension’s incoming call by dialing *04+extension number on their phone (*04 is default setting) ·Intercom Define the feature code that is used to dial an extension in intercom mode. For instance setting this value to *5 would allow you to initiate an intercom call with extension 501 by dialing *5501. 2. Call Parking Preferences ·Call Parking User may enable call parking by calling *6 on his phone (*6 is default setting) ·Call Parking in specify extension User may enable the call parking in specify extension, then call the specify extension in any phone to continue the calling. ·The waiting time for Call parking The maximum time for the call parking, using “second” as unit. 3. Call Forward Preferences ·Reset to defaults User may reset the call forward default value by calling *70 on his phone (*70 is default setting) Note: When the Reset to defaults feature is used, the call forward default values will be set as follows: Always forward: Disabled Busy forward to voice mail: Enabled No answer forward to voice mail: Enabled Do not disturb: Disabled ·Enable always forward User may enable always forward by calling *71 on his phone (*71 is default setting) ·Disable always forward www.yeastar.com Page 36 MyPBX-SOHO User Manual User may disable always forward by calling *071 on his phone (*071 is default setting) ·Enable busy forward User may enable busy forward by calling *72 on his phone (*72 is default setting) ·Disable busy forward User may disable busy forward by calling *072 on his phone (*072 is default setting) ·Enable no answer forward User may enable no answer forward by calling *73 on his phone (*73 is default setting) ·Disable no answer forward User may disable no answer forward by calling *073 on his phone (*072 is default setting) ·Forward to number User may forward the call to number by calling *74 on his phone (*74 is default setting) Note: User may activate call forward to number by dialing *74 + phone number. e.g.: by dialing *74501, it will forward the call to extension 501. ·Forward to Voicemail User may forward the call to voice mail by calling *074 on his phone (*074 is default setting) ·Enable do not disturb User may enable do not disturb by calling *75 on his phone (*75 is default setting) ·Disable do not disturb User may disable do not disturb by calling *075 on his phone (*075 is default setting) www.yeastar.com Page 37 MyPBX-SOHO User Manual Figure 3-28 3.5.5 Paging and Intercom Paging and Intercom is a feature reserved for SIP phones that support these features. It can be used to make an announcement over the speakerphone to a phone or group of phones. Targeted phones will not ring, but answer immediately into speakerphone mode. This section is for configuring group paging and group intercom. System-wide intercom access is configured through the Feature Codes page. This feature should work with Yealink's T28,T26,T22,T20,T10T,T9CM and possibly other manufacturer's SIP phones(not ATAs). Any phone that is always set to auto-answer should also work. www.yeastar.com Page 38 MyPBX-SOHO User Manual Figure 3-29 To create a new paging group, click the ‘New Paging Group’ button. ·Number for this Paging group This option defines the numbered extension that may be dialed to reach this paging Group. ·Duplex Paging is typically one way for announcements only. Checking this will make the paging duplex, allowing all phones in the paging group to be able to talk and be heard by all. This makes it like an “instant conference”. www.yeastar.com Page 39 MyPBX-SOHO User Manual Figure 3-30 3.6 System Settings 3.6.1 Options 1) General ·Ring Timeout Number of seconds to ring a device before handling the call as per the extension’s Follow Me settings. Default value is 30s. .MAX call duration The absolute maximum amount of time permitted for a call. A setting of 0 disables the timeout. Default value is 6000s. ·Music on hold Used to set hold music for the system. ·Tone Region Please choose your country or you nearest neighboring country for default Tones (Ex: dial tone, busy tone, ring tone etc.) Note: please reboot the system to take it effect. ·HTTP bindport/Web Access Port Port to bind to for HTTP sessions (default is 80) 2) Extension Preferences ·User Extensions www.yeastar.com Page 40 MyPBX-SOHO User Manual The default value is 500 to 616 ·Paging Group Extensions The default value is 620 to 629 ·Ring Group Extensions The default value is 630 to 639 ·Conference Extensions The default value is 640 to 659 ·IVR Extensions The default value is 660 to 689 Figure 3-31 3.6.2 Music on Hold Prompts The administrator can upload on hold music as follows: 1) Click ‘Upload Music On hold File 2) Click ‘Browse’ to choose the desired audio file. 3) Click ‘Upload’ to upload the selected file. Note: The sound file format should be as follows: GSM 6.10, 8.000kHz, Mono, 1kb/sec www.yeastar.com Page 41 MyPBX-SOHO User Manual Figure 3-32 3.6.3 SIP Settings 1) General ·UDP Port UDP Port to bind to, SIP standard port is 5060. ·RTP Port Start RTP Port start with ·RTP Port End RTP Port end with ·DTMF Mode Set default DTMF mode for sending DTMF. Default setting: rfc2833 ·Max Registration/Subscription Time Maximum duration (in seconds) of incoming registration allowed. Default is 3600 seconds. ·Min Registration/Subscription Time Minimum duration (in seconds) of incoming registration allowed. Default is 60 seconds. ·Default Incoming/Outgoing Registration Time Default duration (in seconds) of incoming/outgoing registration ·Registerattempts Number of SIP REGISTER messages to send to a SIP Registrar before giving up. Default 0 (no limit). ·Registertimeout Number of seconds to wait for a response from a SIP Registrar before classifying the SIP REGISTER has timed out. Default is 20 seconds. ·Videosupport Support for SIP video or no. Default is yes. www.yeastar.com Page 42 MyPBX-SOHO User Manual 2) NAT ·Extern IP Address displayed in outbound SIP messages when behind a NAT. ·External Host If you specify an external host name, MyPBX will perform DNS queries on the host name periodically. Not recommended for production environments! Use External IP instead. ·External Refresh Set how often to refresh the external host if used. You may specify a local network in the field below ·Local Network Address '192.168.0.0/255.255.0.0' : All RFC 1918 addresses are local networks; '10.0.0.0/255.0.0.0' : Also RFC1918; '172.16.0.0/12':Another RFC1918 with CIDR notation; '169.254.0.0/255.255.0.0' : Zero conf local network. ·NAT Mode Global NAT settings (Affects all peers and users); Yes = Always ignore info and assume NAT; No = Use NAT mode only according to RFC3581; Never = Never attempt NAT mode or RFC3581 support; Route = Assume NAT, don't send report ·Allow RTP Reinvite MyPBX by default tries to redirect the RTP media stream (audio) directly from the caller to the callee. Some devices do not support this (especially if one of them is behind a NAT). 3)Codecs A codec is a compression or decompression algorithm run against voice as it is moved between analog (speaking) and digital (VoIP). u-law: A PSTN standard codec, used in North America, that provides very good voice quality and consumes 64kbit/s for each direction (receiving and transmitting) of a VoIP call. u-law should be supported by all VoIP phones. a-law: A PSTN standard codec, used outside of North America, that provides very good voice quality and consumes 64kbit/s for each direction (receiving and transmitting) of a VoIP call. a-law should be supported by all VoIP phones. GSM: A wireless standard codec, used worldwide, that provides okay voice quality and consumes 13.3kbit/s for each direction (receiving and transmitting) of a VoIP call. GSM is supported by many VoIP phones. www.yeastar.com Page 43 MyPBX-SOHO User Manual G.726: A PSTN codec, used worldwide, that provides good voice quality and consumes 32kbit/s for each direction (receiving and transmitting) of a VoIP call. G.726 is supported by some VoIP phones. ADPCM, G.729, H261, H263, H263p, H264. Figure 3-33 3.6.4 Voicemail Settings 1) General Voicemail Settings ·Maximum messages per folder This select box sets the maximum number of messages that a user may have in any of their folders. ·Max message time This select box sets the maximum duration of a voicemail message in minutes. Message recording will not occur for times greater than this amount. ·Min message time This select box sets the minimum duration of a voicemail message in seconds. Messages below this threshold will not be saved. ·Ask caller to press 5 www.yeastar.com Page 44 MyPBX-SOHO User Manual If this option is set, the caller will be asked to press 5 before he can leave a message. Setting this option will minimize auto-dialer telemarketing machines from accessing voice mail. ·Say message Caller-ID If this option is enabled, the Caller ID of the party that left the message will be played back before the voicemail message begins playing. ·Say message duration If this option is set, the duration of the message in minutes will be played back before the voicemail message begins playing. .Say message arrival time If this option is set, the arrival time of the message will be played back before the voicemail message begins playing. .Allow callers to Review Checking this option allows the caller to review their message before it is submitted as a new voicemail message. 2) SMTP Settings for Voicemail ·E-mail Address The E-mail Address that MyPBX will use to send voicemail. ·Password the password for the email address used above ·SMTP Server The IP address or hostname of an SMTP server that the MyPBX will connect to in order to send voicemail messages via email, i.e. mail.yourcompany.com. ·Port SMTP Port: the default value is 25. ·Use SSL/TLS to send secure message to server If the server of sending email needs to authenticate the sender, you need to select the check box. Note: Must be selected for Gmail or exchange server. After filling out the above information, you can click on the ‘Test Account Settings’ button to check whether the setup is OK. 1) If the test is successful, you can use the email safely. 2) If test failed, please check the above information is correct or network is www.yeastar.com Page 45 MyPBX-SOHO User Manual proper. Figure 3-34 3.6.5 Network Setting ·DHCP If this option is set, MyPBX will use DHCP to get an available IP address from your local network. Not recommended. ·Enable SSH Port: the default is 8022, This is the advance way to access the device, you can use the putty software to access the device. In the SSH access, you can do more advance setting and debug. ·Hostname Set the host name for MyPBX. ·IP Address www.yeastar.com Page 46 MyPBX-SOHO User Manual Set the IP Address for MyPBX. ·Subnet Mask Set the subnet mask for MyPBX. ·Gateway Set the gateway for MyPBX. ·Primary DNS Set the primary DNS for MyPBX. ·Secondary DNS Set the secondary DNS for MyPBX. Figure 3-35 3.6.6 DHCP Server Dynamic Host Configuration Protocol (DHCP) is a network protocol that enables a server to automatically assign an IP address to a computer from a defined range of numbers (i.e., a scope) configured for a given network. www.yeastar.com Page 47 MyPBX-SOHO User Manual Figure 3-36 3.6.7 Autobackup setting Autobackup extends the allocated disk space for backing up critical files. When properly configured, MyPBX will move all qualified files to a Windows PC every 30 minutes. For the voicemail files and recoding files, they must be created before Autobackup has been configured. For the CDR files, the call log file size must be more than 8MB. www.yeastar.com Page 48 MyPBX-SOHO User Manual Figure 3-37 3.6.8 Password Settings The default password is ‘password’. To change the password, enter the new password and click update. The system will then prompt you re-login using your new password. www.yeastar.com Page 49 MyPBX-SOHO User Manual Figure 3-38 3.6.9 Date and Time Set the date and time for MyPBX. www.yeastar.com Page 50 MyPBX-SOHO User Manual Figure 3-39 3.6.10 Backup and Restore Backup / Restore MyPBX’s Configuration. www.yeastar.com Page 51 MyPBX-SOHO User Manual Figure 3-40 3.6.11 Reset and Reboot ·Reboot Appliance Warning: Rebooting the appliance will terminate all active calls. ·Reset to Factory Defaults Warning: By resetting your System to factory defaults, you will lose all your configurations! Do not power down the MyPBX during factory default reset operations. Failure to heed this warning may result in critical damage to the unit. The unit is successfully reset when the “run” lamp begins to flash. www.yeastar.com Page 52 MyPBX-SOHO User Manual Figure 3-41 3.6.12 Firmware Update Upgrading of the firmware is possible through the Administrator web interface using a TFTP Server or an HTTP URL. Enter your TFTP Server IP address and firmware file location, then click start to update the firmware. www.yeastar.com Page 53 MyPBX-SOHO User Manual Figure 3-42 3.7 Reports 3.7.1 Call Logs The call Log captures all call details, including call time, caller number, callee number, call type, call duration, etc. An administrator can search and filter call data by call time, call type and call duration and can also export CDR data to a CSV file. www.yeastar.com Page 54 MyPBX-SOHO User Manual Figure 3-43 3.7.2 System Info General: Information about hardware version, firmware version and system uptime. Network: Information about hostname, MAC address, IP address, subnet mask, gateway, Primary DNS and Secondary DNS. Disk Usage: Disk usage information. Memory Usage: Memory usage information. www.yeastar.com Page 55 MyPBX-SOHO User Manual Figure 3-44 www.yeastar.com Page 56 MyPBX-SOHO User Manual 4. Access MRI MRI (MyPBX Recording Interface: Check Voice Mail).Users may access MRI by logging into the MRI web interface with their username (extension number) and voicemail password. 4.1 Allow users to access MRI The extension’s hasmanager(web access) option must be checked before the associated user can log into MRI. Figure 4-1 4.2 User login Users can access the MRI web interface by navigating to the MyPBX IP address using a web browser. If you are unsure of this address, please contact your network administrator. www.yeastar.com Page 57 MyPBX-SOHO User Manual Figure 4-2 4.3 Voicemail Users can check, delete, move and download voicemail files here. www.yeastar.com Page 58 MyPBX-SOHO User Manual Figure 4-3 4.4 Record Users can play, delete and download record files here. www.yeastar.com Page 59 MyPBX-SOHO User Manual Figure 4-4 4.5 settings Voicemail password: new voicemail box password. Enter again to confirm: confirm new voicemail box password. Send Voice Mail To Email Address: Set the email address that voicemail messages will be sent to. www.yeastar.com Page 60 MyPBX-SOHO User Manual Figure 4-5 4.6 Follow me Set the mode of call forwarding when there’s incoming call on this extension. Figure 4-6 www.yeastar.com Page 61 MyPBX-SOHO User Manual 5. Use MyPBX PSTN PSTN FXO Lines IP Provider FXS Lines LAN Router 601 602 Normal Phone IP Phone Soft Phone 5.1 Make outbound call To make an outbound call, we need to add trunk/service provider first. There are two types of service provider: ·Analog Ports: FXO ports of MyPBX, connect to local PSTN ·SIP Trunk: Connect to remote SIP VOIP service provider server What are FXO and FXS? FXS (Foreign exchange Station) is an interface which drives an analog telephone or FAX machine. FXS interfaces deliver power, provide ringing, and use FXO signaling. FXS interfaces are what allow you to hook telephones and other analog devices to your PBX FXO (Foreign exchange Office) is an interface that connects to a phone line to supply your PBX with access to a public telephone network. FXO interfaces use FXS signaling. FXO interfaces allow you to connect your PBX to real analog phone lines. www.yeastar.com Page 62 MyPBX-SOHO User Manual 5.1.1 Make call via PSTN trunk Let’s route all inside extensions through an analog trunk by dialing 9. In Outbound Routes, add a new outbound route as below. Figure 5-1 As we can see from the outbound route of ‘pstnout’, all phone numbers starting with 9 will have their first digit stripped off (digit 9) and will be sent to the PSTN (port 1-2). After we have configured the above, we can dial 9 + local number to dial out via a PSTN line. Note: Setting number prefix to wild card X and setting Strip to 0 digits from the front will allow all calls to go through this outbound route. 5.1.2 Make call via VoIP trunk Let’s configure all inside extensions to dial ‘0’ through the VoIP service provider. www.yeastar.com Page 63 MyPBX-SOHO User Manual 1. Add VoIP service provider Before we do add this, please make sure you have a VoIP service provider account. Trunks SIP Trunk Add SIP Trunk Enter your account information on this page, and click Save. Figure 5-2 2. Add Outbound Routes As we can see from the Outbound Route of ‘voipout’, all phone numbers starting with 0 will have their first digit stripped off (digit 0) and will be sent to the SIP service provider. www.yeastar.com Page 64 MyPBX-SOHO User Manual Figure 5-3 Now that we have added two outbound dialing rules, any call starting with 9 will be routed to the PSTN, and any number starting with 0 will be routed to the SIP provider. www.yeastar.com Page 65 MyPBX-SOHO User Manual 5.2 Incoming call 5.2.1 Sample Routing to an IVR Let’s configure an incoming call to route to the IVR. In the IVR itself, let’s configure digit 0 to route the call to extension 500, and digit 1 to route the call to extension 501. 1. Add IVR To add a new IVR, go to IVR Create New IVR Figure 5-4 www.yeastar.com Page 66 MyPBX-SOHO User Manual 2. Add Inbound Routes As we can see from the Inbound Route of ‘allin’, all incoming calls will be sent to the IVR. Figure 5-5 www.yeastar.com Page 67 MyPBX-SOHO User Manual APPENDIX A FAQ Q1. How to Register SIP device? A1: 1) Register SIP soft phone Download the x-lite softphone from counterpath website www.counterpath.com After install the x-lite, right click the panel and select the SIP Account setting and then configure it. Display Name: 500 User Name: 500 Password: 500 Authorization Name: 500 Domain: 192.168.5.150 2) Register IP Phone (for example, Yealink’s T28 IP Phone) a) Connect the T28’s WAN port to the switch. And it can get the IP from your route. b) Press the ‘OK’ key on T28 to get the IP of T28. c) Put the IP on web browser then you can enter the T28 configure page through this IP. d) Put the SIP extensions info on the T28 IP phones. Display Name: 501 User Name: 501 Register Name: 501 Password: 501 SIP Server: 192.168.5.150 Use the same method register another T28 to other extension. Q2. How do I reset MyPBX back to the factory default settings? A2: To perform a reset, please follow steps below: Step 1: Hold down the ‘Reset’ button on the back of the unit for 5 seconds and watch the LEDs on the front of the MyPBX. When the status LED turns red, let go of the reset button. Step 2: When the RUN status LED starts blinking, MyPBX will be set back to factory defaults. Step 3: To access the configuration page, navigate to 192.168.5.150 using a web browser. Make sure that you are on the 192.168.5.0 subnet before doing this. Step 4: Login to the device with the username ‘admin’ and the password ‘password’, in order to begin reconfiguring the device. www.yeastar.com Page 68 MyPBX-SOHO User Manual APPENDIX B How to configure autobackup Before Autobackup can be properly configured, an SMB share folder accessible from MyPBX must be set up on a Windows based machine. Once that has been set up, please follow the steps below. Step 1 Add a new folder, rename it, and set this new folder’s share Properties according to Figure B-1 Figure B-1 Set up share Properties Step 2 Enter the new folder and create a new text file, then rename this file to status.txt. This step is very important, DO NOT forget to create the status.txt file. Step 3 Configure Autobackup settings on MyPBX to Figure B-2 www.yeastar.com Page 69 MyPBX-SOHO User Manual Figure B-2 Autobackup Setting SMB share host/IP: Change this to the IP address of the computer where backup files will be stored. SMB share name: Change this to the name of the shared folder where backups will be stored. SMB share username: The user name used to log into the network share. Leave this blank if it is not required SMB share password: The password used to log into the network share. Leave this blank if it is not required If configuring Autobackup for the first time, the system will prompt you to restart MyPBX once your settings have been saved. After rebooting, open your Windows share folder to see if the MyPBX backup files and folders has been created. If the contents of the backup folder look similar to Figure B-3, then you have successfully configured Autobackup on the MyPBX unit. Figure B-3 Autobackup setting succeed www.yeastar.com Page 70 MyPBX-SOHO User Manual APPENDIX C How to configure NAT setting When MyPBX is behind a NAT(firewall),you need to configure NAT setting on MyPBX if you want to use a remote extension. Please follow section 1 or 2 below depending on your network configuration. 1. If MyPBX is connected to a local network, you must set up port forwarding on your router. Specifically, you must map port 5060 (default SIP port) and port 10001-10200 (default RTP port range) as UDP ports. Next, go to the MyPBX web interface and configure the SIP settings according to Figure C-1: External IP: your router’s public IP address External Host: your router’s domain External refresh: 20 seconds Local Network Address:192.168.5.0/255.255.255.0 (change this according to your network configuration) NAT mode: Yes Allow RTP Reinvite: No Figure C-1 Assuming that your router’s host address is yeastar.3322.org, your local network is from 192.168.5.1-192.168.5.254, and the subnet Mask is 255.255.255.0, the MyPBX network settings should configured like Figure C-2 www.yeastar.com Page 71 MyPBX-SOHO User Manual Figure C-2 MyPBX Network setting 2. MyPBX has a public IP, it means you configure MyPBX Network setting as Figure C-3: Figure C-3 Next, you should configure the NAT settings according to Figure C-4 www.yeastar.com Page 72 MyPBX-SOHO User Manual Figure C-4 External IP: The public IP address of MyPBX External Host: Leave this blank if no domain has been configured External refresh: Leave this blank Local Network Address: Leave this blank NAT mode: Yes Allow RTP Reinvite: No www.yeastar.com Page 73 MyPBX-SOHO User Manual APPENDIX D How to Use Auto Provision Step 1. Disable DHCP Server on your local network. E.g. Disable DHCP Server on Linksys Router. Figure D-1 Step 2. Enable DHCP Server on MyPBX. Login MyPBX web interface, System Settings DHCP Server Enable DHCP Server. www.yeastar.com Page 74 MyPBX-SOHO User Manual Figure D-2 Step 3. Configure phones on MyPBX auto-provision page. 1. Login MyPBX web interface, Basic Auto Provision Create New Phone. Figure D-3 www.yeastar.com Page 75 MyPBX-SOHO User Manual 2. Fill in the phone detail message on the pop-up windows. Input IP Phone’s MAC address, configure Name, Call waiting, Line, Extension, Label, Line active for the phone. Figure D-4 Step 4. Turn on the power and connect the network cable to IP Phone. Remark: The factory default setting of DHCP for IP Phone is enable, so you can skip this step to step 5. If the DHCP is disable, please follow below step to enable it. (e.g.: Yealink’s IP Phone). 1. Login IP phone’s web page. 2. Enable DHCP. Figure D-5 Step 5. Finish. <Finish> www.yeastar.com Page 76