1
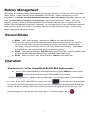
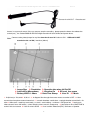
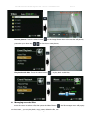
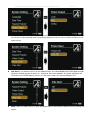
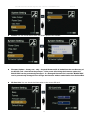
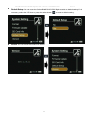
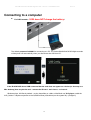
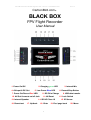
CarbonBird FPV BLACK BOX Flight Recorder - SD Card – GroundStation PVR Rev1.0.1 CarbonBird.com® BLACK BOX FPV Flight Recorder User Manual 1. Power On/Off 2. Charging green LED 4. AV Input & DC Out 5. Low Power Blue LED 7. Power On/Record Red LED 8. DC 5V In Charge 10. AV Out & remote on/off Jack 11. full Reset 13. Internal Speaker 16. Down/next 17. Up/back 14. SD HC Class 10 18. Enter 1 3. Internal Mic 6. Record/Stop Button 9. USB data transfer 12. Lock Switch 15. IR Sensor 19. Esc /page back 20. Menu CarbonBird FPV BLACK BOX Flight Recorder - SD Card – GroundStation PVR Rev1.0.1 IR Remote Control – CR2032 1. Record/Stop 2. Up 3. Enter 4. Down 5. LCD/TV Switch 6. Exit 7. Menu 8. LCD Off Wired Remote Control Accessories Normal use requires user care – undue force can break cables, plugs and buttons ; moisture will short electronics – sea salt will corrode connections - Keep the CarbonBird® BLACK BOX dry, dirt and dust free. Most damage is caused by not understanding/not remembering how to use a product and assuming incorrectly or applying excessive force to solve learning problems – study the device and the manual carefully and you will be a happy FPV pilot with your memories safely and correctly recorded – if unsure about something STOP – ask questions – be cautious – We recommend USING the remote to change settings via the infra red link – we recommend USING THE RED BUTTON INSTANT POWER/RECORD button instead of the spring/slider buttons. 2 CarbonBird FPV BLACK BOX Flight Recorder - SD Card – GroundStation PVR Rev1.0.1 Battery Management NEVER leave at LiFe battery flat (empty/discharged) for more than a few hours - 6 hours at the worst case before starting charge – battery chemistry will be PERMANENTLY EFFECTED – Battery management is YOUR responsibility – and always store both batteries between 60%->100% fully charged immediately after use. Get home – put the battery on charge as your first priority. After 3 hours charge the 2 nd battery – this is very important. A battery cannot be charged (repaired) days or weeks later after being flat – its capacity WILL BE SEVERLY REDUCEDbecause the chemistry is damaged – So once again get your mind conditioned to restore the battery chemistry before YOU damage it by neglect – keep the LiFe cells charged in storage – 3-4 bars on the screen voltage gauge – is best for storage. Record Modes Video - video / audio recorded, data saved as .AVI files in the Record Files folder for FPV the main goal is to record the video channel and either the onboard sound if you install an onboard mic (this tends to be annoying engine/prop audio) or the ambient sound and pilots commentary at the ground station which is much more valuable and interesting - CarbonBird® BLACK BOX has a built in Microphone and we recommend to do this. Photo - still pictures saved as .JPG files under the Photo Files – not very useful as the pictures are not really any different from a paused video frame in SD Audio - audio only record, data will be saved as a .WAV files under Audio Files Operation How to turn on / off the CarbonBird® BLACK BOX flight recorder: Turn on /off the CarbonBird® BLACK BOX flight recorder by sliding GENTLY the Power On/Off switch to ON for 2 SECS (or beep is heard if BEEP is set to active) - the RED LED light turns on – release the spring loaded slider - then the startup splash-screen will appear for 2 secs; To turn it OFF slide GENTLY the switch for 2 SECS until the shut-down picture appears on the monitor PS: if the video signal and/or the SD card are unavailable the CarbonBird® BLACK BOX flight recorder will alarm by vibration and/or the red warning on screen until signal and SDCard are ready; If the Lock symbol appears – slide the top LOCK switch right. or ; use the One button Cable 3 CarbonBird FPV BLACK BOX Flight Recorder - SD Card – GroundStation PVR Rev1.0.1 Connect it to AV OUT - Press the red button in to power & record, if the you want to stop the recording , please press the button the release the switch (out) , the CarbonBird® BLACK BOX flight recorder will save all files and power down; Note: Camera overlay data (except for top line date time & user Id if select to ON - OSD stuff is NOT recorded to the .avi file) Interface ( below) 1. Image Size 2. Resolution 3. Overwite data when full On/Off 4. Internal/Ext Microphone; 5. Vibration On 6. SD card free space 7. Battery LEVEL 1-4bars 8. Date/Time Stamp 9. User ID 10. Mode 1. D1(full res) or 720; 640 2. H,M or L 3. A diagonal line through the arrows means overwrite is OFF 4. A box around the microphone means internal mic 5. smooth brackets =audio alert – squiggle bracket around bell = vib alert 6. White card =card logo card ready ; no card = card missing – numbers = free space left 7.batt icon 04bars where 4 bars =full battery – when charging 4 bars move in a sequence 8. hard write to file of DATETIME is active if this is onscreen 9. User ID write is active 10. Icon is either VideoCam(FPV) / Still cam or Speaker 4 CarbonBird FPV BLACK BOX Flight Recorder - SD Card – GroundStation PVR Rev1.0.1 Recording FPV Preparing to record – Installing battery and charging First insert one of the LiFe batteries – line up the 4 gold bars with the 4 gold pins – Angle the battery downward on the 4 pin-connector side by 15° - at the SDCard side - there are 2 lugs on the battery to lock in/under - on the gold pin side – then rotate the battery to level – DONT try to slide the battery - its a rotate-insert type. Hold it down and insert the cover and press the cover lightly to lock it. Remove the battery when not in use !!! Use the Wall charger 110-240v to charge the internal LiFe battery for 3-6 hours before you begin recording ; then swap the spare LiFe Cell and charge that as well for 3-6 hours – the wall unit has a red LED to indicate its is receiving 110/240v – RED LED does NOT change colour or go out when done/full – when connected to the CarbonBird® BLACK BOX a GREEN LED will illuminate on the PVR - use the LCD monitor to confirm its charging – 4 bars move on LCD battery icon TFT displaylower left - use your watch to time 3 hr check the charge state by removing the power jack. Then swap the 2 nd battery and charge it for 3-6 hours. The Green LED will not change colour or go out - To check the state of charge disconnect the charge plug and power the unit up to check for 4 bars - Never leave batteries flat for more than a few hours ! The CarbonBird® BLACK BOX flight recorder comes pre-programmed to record video at the recommended FPV settings D1 H – check the Icons on the bottom of the screen (when powered up) to confirm your settings (above) If you want to change the settings or check them do the following : Turn ON the unit – use the IR remote - press M for menu – then select System settings Insert a high speed SD card (Class 10) to save / record data.; 2Gb to 32Gb - *Gb card gives 2 hours recording – max 60mins per flight - 2 x 60min section files for example set LCD as the display device To record FPV withOUT IR remote or instant start lead slide Record/Stop switch to “Rec” , the red power led flashes - a red dot REC icon top- left of screen will flash once per sec ; the recording time will show on the right-upper corner One button POWER & recording - Press down the red button on the cabled remote - turns on the CarbonBird® BLACK BOX flight recorder & starts recording - release the remote button to stop recording CarbonBird® BLACK BOX flight recorder will power off after saving recorded data automatically ,(Remote Cable is plugged into the AV Out port ) 5 CarbonBird FPV BLACK BOX Flight Recorder - SD Card – GroundStation PVR Rev1.0.1 Managing and Play Back of FPV files Learning to use the navigation buttons = main menu = increase or decrease or next / previous = exit or page back = select or enter for Playback – we recommend the IR remote Playing back recorded FPV files Select playback/video - Press to play back video ; a short-press of the up down keys a LONG-PRESS-HOLD then adjusts the audio volume ; for 3seconds changes the playback speed ; 2x ; 4x ; 8x or 20x ; (hold 3 secs) to reverse or to set high speed reverse 2x etc.. 6 CarbonBird FPV BLACK BOX Flight Recorder - SD Card – GroundStation PVR Browse photos: Press the select button press the up or down key on the image Viewer item to browse the still photos, to view last or next picture; Play back audio files: Press the select button Rev1.0.1 to play back audio files; Managing recorded files: move the cursor to select a file, then press the Menu Button on the screen, , you can play back, copy, paste, delete the file, etc. 7 , the file manager menu will popup CarbonBird FPV BLACK BOX Flight Recorder - SD Card – GroundStation PVR Recorder Settings Press the key to set recorder settings , as follows Work Mode (MODE) :There are three modes Photo/Video/Audio – Use Video Motion Detection: set off 8 Rev1.0.1 CarbonBird FPV BLACK BOX Flight Recorder - SD Card – GroundStation PVR Rev1.0.1 Select OFF for FPV – or if you really want to - to enable/disable Motion detection - When motion detect record is set to ON , via the slider Record/Stop switch set to “Rec” , a motion can trigger event will trigger an automatic recording!!! Motion Sensitivity Level: there are three grades for the sensitivity motion: high, medium, low Resolution: 720*480 or 720*576, or VGA:680*480 ;720 is recommended Video Quality: MPEG rate, High i= 8-9 Mbps, Medium = 3.5 Mbps, the Low = 2.5 Mbps ; We recommend HIGH – in High mode 1 hour requires 3-4Gb card space. 9 CarbonBird FPV BLACK BOX Flight Recorder - SD Card – GroundStation PVR Rev1.0.1 Timestamp and format: The (user set) timestamp will appear on right top of the video if set to On ; We recommend OFF File Length :Set the record files time length: we recommend 60 min FPS Set: This option is for setting how many frames per second - video – we recommend 30 frames per second for FPV 10 CarbonBird FPV BLACK BOX Flight Recorder - SD Card – GroundStation PVR Rev1.0.1 Audio Record Volume : You can adjust the volume level value for the audio input in 1 to 10 – a low number is low gain – a higher number records the sound at a higher level - louder Microphone Select: You can select the built in mic or external FPV microphone as your audio source; since our FPV ships don't transmit the sound of 3-8engines - we recommend BuiltInMic – that way the voice over at the ground station is recorded – ambient sounds and any comments you make. Overwrite: If your selection is ON ,the CarbonBird® BLACK BOX flight recorder will stop recording once the SD card becomes full, if your selection is Off, the CarbonBird® BLACK BOX flight recorder will continue to record by writing over the oldest files once the SD card becomes full; 11 CarbonBird FPV BLACK BOX Flight Recorder - SD Card – GroundStation PVR Rev1.0.1 System Settings Language : select the OSD language Date and Time: Use the nav buttons to move the cursor to the date line and correct the YEAR,DAY or MONTH, Next move to the time line and adjust to the correct time for your time zone. Press the Enter button to save setting 12 CarbonBird FPV BLACK BOX Flight Recorder - SD Card – GroundStation PVR Rev1.0.1 Password Protection: you can set or cancel the password protection for USB or format SD card or files to prevent been deleted without your authorization. The default password is 000000 for all passwords. USB Password: You can set/enable/disable the USB password for accessing the CarbonBird® BLACK BOX flight recorder by USB. Delete Password: You can enable/disable the delete-password for deleting the files in the SD card. 13 CarbonBird FPV BLACK BOX Flight Recorder - SD Card – GroundStation PVR Rev1.0.1 Format Password: You can set enable/disable the format- password for formatting(wiping) a SD card. Video Output: You can select the video output signal format your external display devices, such as TV, monitor or LCD* (default). 14 CarbonBird FPV BLACK BOX Flight Recorder - SD Card – GroundStation PVR Rev1.0.1 Power Save: In order to save more power, you can set the CarbonBird® BLACK BOX flight recorder to turn off the LCD automatically after 3 seconds by setting the LCD off. The LCD will be turned on if you press any key. Vibe Alert: if you select the On to run the vibration alarm, the CarbonBird® BLACK BOX flight recorder will give a vibration prompt for power on , video loss, SD card invalidation, low power, and power off. This uses a lot of EXTRA battery power to run the motor inside! Not recommended for FPV. Beep: When you select the On to open the beep sound on, there will be a beep sound for pressing the button. 15 CarbonBird FPV BLACK BOX Flight Recorder - SD Card – GroundStation PVR Rev1.0.1 Format: You can format the SD card, the default password is 000000. Firmware Update – factory use - only – A special firmware file is loaded into the root directory of the SD HC card – then follow the prompts – if the power fails during the firmware update the BLACK BOX can be permanently damaged – If a damaged firmware file is used the BLACK BOX can be permanently damaged. Dont change the firmware without authorisation from CarbonBird. SD Card Info: You can check the information on the current SD card. 16 CarbonBird FPV BLACK BOX Flight Recorder - SD Card – GroundStation PVR Default Setup: You can reset the CarbonBird® BLACK BOX flight recorder to default setting if it is necessary; select the YES then to press the select button Rev1.0.1 Version: You can check the current FW version. 17 to reset to default setting; CarbonBird FPV BLACK BOX Flight Recorder - SD Card – GroundStation PVR Rev1.0.1 Connecting with wireless FPV video receiver Connect the CarbonBird® BLACK BOX flight recorder to the wireless video / audio receiver using the cable supplied with your BLACK BOX (RCA male → 4pole 3.5mmheadphone jack) at the same time the CarbonBird® BLACK BOX flight recorder can output DC5V (max 400mA) to power the external CCD camera via the AV-In & DC Out cable, The yellow RCA connector = video, the white RCA connector = audio; Connecting with an External Battery You cannot connect a 7.4v LiPo direct – you must use a 5v uBEC - DC 5V RED +ve ; ground to the earth (copper shielded wire on the outside of the red wire) Use extreme caution – test the voltage with a DMMeter first! Reversed polarity wiring will damage the device. Connecting to a TV Set the TV out format to PAL /NTSC by pressing the button on the remote ; The AV Out Cable’s yellow RCA = video, the white = audio; you can turn up the volume down button the volume up button (on the remote) 18 ,or CarbonBird FPV BLACK BOX Flight Recorder - SD Card – GroundStation PVR Rev1.0.1 Connecting to a computer For DATA transfer – USB does NOT charge the battery ! The default password is 00000 for connecting to a PC. The CarbonBird® BLACK BOX flight recorder will be power off automatically when you disconnect the USB from PC. If the BLACK BOX shows USB connected but the card does not appear as a device (or show up on a Mac desktop) then recycle the card – remove the SD card – wait 2 secs – re-insert it. Windows plays .AVI files by default – to play these files on a Mac or MacBook use VLC player or add the XviD_Codec 1.0 alpha.component to the Quicktime library/Quicktime (not the system lib) – (Google it) 19 CarbonBird FPV BLACK BOX Flight Recorder - SD Card – GroundStation PVR Rev1.0.1 Specs Video format: MPEG 4 XVid codec ; file format wrapper .AVI (Audio is MS AD-PCM 16bit 22Mhz in mono) Photo format: JPG High Resolution LCD: 2.5", TFT true color LCD Audio and video output: RCA 3-in-1 AV output Storage type required – NOT included : SD Card Class 10 SDHC (FAT 32 ,supports 2Gb, 4Gb, 8Gb, 16Gb and 32G) Video size / speed – auto detect : PAL 720x576(D1)/25FPS ; NTSC 720x480(D1)/30FPS Power supply out for external camera : Voltage: 5V; max. current = 400 mA out Video format: NTSC/PAL auto detect Multi record mode: Manual/Auto/Motion detection USB2.0 Recording time: 1 hours/movie (battery life) or at a rate of 3-4Gb per hour – 8Gb card = 2hrs Power consumption: 480mA/h (with LCD on), 3.7V 1000 mAH chargeable Li-ion battery, Charging time – 6 hrs - Approved 5.0V DC 1.5A Wall charger. External power via uBEC – not included - must be DC 5v filtered Size: 90 mm x 59 mm x23 mm; Weight: 98g (including LiFe battery) WARNING : FIRE Risk management awareness - Select a NON Flammable surface and area in your domestic or work environment such as a hard floor or a kitchen surface to charge lithium batteries – Batteries get warm during charging but should NEVER get hot under normal conditions – Attended chargingis recommended – this means you keep an eye on the battery temperature during charge – An unattended charger is potentially hazardous IF the battery is overcharged or overheated by error or accident and may burn itself – therefore keep the risk low by selecting a monitored and non-flammable location for the charging station. Never charge batteries near combustable items. Do not dispose of Lithium batteries in the trash. Product is return warranted for normal use – excludes shipping – Returns or defect reports MUST be sent using this product website's messaging system. Login and by sending a message related to your order number. Carbonbird.com 33 Doubleview Drive , Elanora , Qld 4221 AUSTRALIA CarbonBird.com is a registered trading name of Impressions Imprint P/L 20