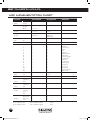
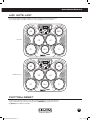
1
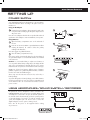
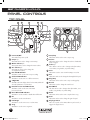
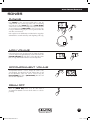
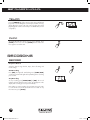
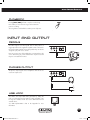
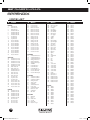
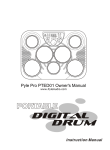
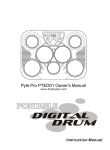
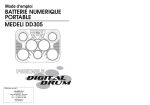
SDD7
Top panel
SDD7
Multi-Pad Electronic Drum Kit
owner’s manual
www.simmonsdrums.net
9605 SDD7 Multipad Manual.indd 1
3/21/12 11:19 AM
SDD7 Owner’s manual
9605 SDD7 Multipad Manual.indd 2
3/21/12 11:19 AM
www.simmonsdrums.net
Congratulations!
Thank you for purchasing the Simmons® SDD7 Multi-Pad Electronic Drum Kit.
To get the most enjoyment from your new tabletop digital drum, we recommend that you review
this manual at least once, then refer back to it often to learn more about specific functions.
This Owner’s Manual can be downloaded from the Simmons website at simmonsdrums.net.
So that we may better serve you, please register your warranty today at simmonsdrums.net.
Taking Care of your´
Multi-Pad electronic Drum Kit
Location
Keep the unit away from direct sunlight, high temperature sources, and excessive humidity to
prevent deformation, discoloration, or more serious damage.
Power Supply
• Turn the power switch OFF when the SDD7 is not in use.
• The AC adapter should be unplugged if the SDD7 is not to be used for an extended period
of time.
• Avoid plugging the AC adapter into an outlet that is also powering high-consumption
appliances such as electric heaters or televisions. Also avoid using multi-plug adapters,
since these can reduce sound quality, cause operation errors and result in possible damage.
• Turn OFF the SDD7’s power switch and all related devices prior to connecting or
disconnecting cables to avoid damaging the unit.
Handling and Transport
• Never apply excessive force to controls, connectors, and other parts.
• Unplug cables by gripping the plug firmly. Do not pull on the cables.
• Disconnect all cables before moving the unit.
• Physical shocks caused by dropping, bumping, or placing heavy objects on the unit can
result in scratches and more serious damage.
Cleaning
• Clean the unit with a dry, soft cloth.
• A slightly damp cloth may be used to remove stubborn grime and dirt.
• Never use cleaners such as alcohol or paint thinner.
• To avoid discoloration, do not place vinyl objects on top of the unit.
Radio Interference
• The SDD7 contains digital circuitry and may cause interference if placed too close
to radio or television receivers. If this occurs, move the SDD7 further away from the
affected equipment.
Service and Modification
• There are no user-serviceable parts in the SDD7.
• Do not attempt to open the drum unit or make any changes in the circuits or parts of the unit.
This would void the warranty.
1
9605 SDD7 Multipad Manual.indd 1
3/21/12 11:19 AM
SDD7 owner’s manual
Table of Contents
Taking Care of Your SDD7______________________________________________ 1
Setting Up__________________________________________________________ 3
Power Supply__________________________________________________ 3
Using Headphones/Sound System/Recorder__________________________ 3
Panel Controls_______________________________________________________ 4
Top Panel_____________________________________________________ 4
Rear Panel_____________________________________________________ 5
Demo _____________________________________________________________ 6
Operation__________________________________________________________ 6
Selecting a Drum Kit_____________________________________________ 6
Hand Percussion________________________________________________ 6
Editing Kits and Pads__________________________________________________ 7
Setting Pad Voice________________________________________________ 7
Setting Pad Volume______________________________________________ 7
Setting Pad Pan_________________________________________________ 7
Setting Pad Gain________________________________________________ 8
Saving Kits_____________________________________________________ 8
Reverb________________________________________________________ 8
Songs_____________________________________________________________ 9
Playing_______________________________________________________ 9
Main Volume___________________________________________________ 9
Accompaniment Volume__________________________________________ 9
Drum Off______________________________________________________ 9
Tempo_______________________________________________________ 10
Click ________________________________________________________ 10
Recording__________________________________________________________ 10
Record_______________________________________________________ 10
Playback_____________________________________________________ 11
Input and Output____________________________________________________ 11
Pedals_______________________________________________________ 11
Phones Output_________________________________________________ 11
USB Jack_____________________________________________________ 11
Appendix__________________________________________________________ 12
Voice List_____________________________________________________ 12
Kit List_______________________________________________________ 13
Song List_____________________________________________________ 13
MIDI Implementation Chart_______________________________________ 14
MIDI Note Map_______________________________________________ 15
Factory Reset__________________________________________________ 15
Specifications_______________________________________________________ 16
Warranty__________________________________________________________ 17
2
9605 SDD7 Multipad Manual.indd 2
3/21/12 11:19 AM
www.simmonsdrums.net
setting up
12V
power supply
AC Power
Socket
Your digital multi-pad will run on either batteries or a power adapter.
Follow the instructions below according to the power source you
intend to use.
Using an AC-Adapter
1
1 Connect the power adapter to the DC IN jack located on the
rear panel of the unit and plug the AC power adapter into an
AC power outlet.
12V
AC Power
Socket
Note: Do not use adapters other than the one specified. The technical
specification of the adapter is a DC 12V 2200mA, center positive.
Using Batteries
2 Open the battery compartment cover on the underside of
2
the unit.
3 Insert six “C” size R 14, SUM-2 or equivalent batteries. When
inserting the batteries, be careful to follow the polarity
markings in the illustration.
Note: We suggest using alkaline batteries.
4 Close the battery compartment securely.
Note: Power will be automatically drawn from the AC adapter if
an optional AC adapter is connected while batteries are installed
in the instrument.
12V
3
12V
AC Power
Socket
AC Power
Socket
Caution: It is recommended that you replace worn batteries as
soon as possible. When battery voltage drops, the display will dim
and / or the sound will become distorted, when this occurs, replace
the batteries with a complete set of six new batteries of the same type.
NEVER mix old and new batteries, different types of batteries
(alkaline, magnesium, etc.), batteries by different makers, or batteries
from the same maker but of different types.
4
12V
AC Power
Socket
Misuse may cause the instrument to become hot, result in fire, or
battery leakage.
To prevent damage due to battery leakage, remove all the batteries
from the instrument when it is not to be used for an extended period
of time. Batteries left in an unused instrument will also lose their
power over time.
using headphones/sound system/recorder
An optional set of stereo headphones can be connected to the
PHONES/OUTPUT jack located on the rear panel. When a pair
of headphones is connected to the jack, the internal speakers of
the unit will switch off automatically, perfect for private practice
or late night playing. If you want to use with an external sound
system, the headphone jack can also be used to connect the
digital multi-pad to a stereo system or mixing console.
Note: Turn off the power on all equipment before making
any connections.
L
R
3
9605 SDD7 Multipad Manual.indd 3
3/21/12 11:19 AM
SDD7 owner’s manual
PANEL CONTROLS
Top panel
5
6
7
8
9
1
15
18
14
19
16
3
Top panel
17
4
2
SDD7
10 11 12 20
1 Power On/Off
2 3 4 5 6 7 8 9 10 11 12 13 21
22
This switch turns power on/off.
Tempo +/–
These buttons are used to change current tempo.
Master Volume +/–
These pads can be used to change the master volume.
Acc. Volume +/–
These buttons can be used to change the
accompaniment volumes.
Rec and LED Indicator
This button can be used to start or stop recording.
Click and LED Indicator
This button is used to turn on or off the metronome.
3-Digit LED
This LED is the main display device for the SDD7, which will
show the parameters of current menu.
Hand Percussion and LED Indicator
This button can be used to turn on the hand
percussion function.
Drum Off and LED Indicator
This button is used to enable or disable drum off function.
Kit
This button is used to enter kit menu.
Pad Assign
This button is used to enter voice or volume menu.
Song
This button is used to enter song menu.
23
13 Start/Stop
14 15 16 17 18 19 20 This button can be used to start or stop a song.
Volume
This button can be used to change the volume of individual
pads or triggers.
Select +/–
These buttons can be used to change values (kit number,
voice number, song number, etc.) when editing.
Save
This button is used to save current kit setting to a user kit.
Pan
This button can be used to change the listening field of a pad.
Play/Stop
This button can be used to start or stop recording replay.
Reverb
This button is used to change the reverb level.
Data Wheel
This dial can be used to change values (kit number, voice
number, song number, etc.) when editing.
21 Demo
This button can be used to start or stop the demo song.
22 Gain
This button can be used to change the gain of a pad.
23 Playing Surfaces
There are 7 pads on the SDD7. When a pad is struck, it
triggers the assigned voice.
4
9605 SDD7 Multipad Manual.indd 4
3/21/12 11:19 AM
www.simmonsdrums.net
Rear panel
23
24
25
23 Phones Jack
25 USB Jack
This jack is used to connect with headphones.
24 Pedal Input Jacks
Kick and hi-hat pedal input jacks.
26
Provides MIDI connectivity between the SDD7 and
a computer.
26 DC Input
Connect to the DC 12V power supply.
5
9605 SDD7 Multipad Manual.indd 5
3/21/12 11:19 AM
SDD7 owner’s manual
Demo
Press [DEMO] to start or stop the demo song. The 3-digit LED
will display “dE”. You can also press [START/STOP] to stop the
demo song.
Operation
Selecting a Drum kit
The SDD7 defaults to KIT mode, when powered on, drum kit 001.
To select a different drum kit, press the [KIT] button and use the
[SELECT] [+] / [–] or [DATA WHEEL] to choose any drum kit
(1-30) on the 3 segment LED screen.
Note: When the SDD7 is in KIT mode, ad red dot appears in the
screen above [KIT].
hand percussion
Press [HAND PERC] to enter the hand percussion mode with the
hand mode indicator lit. The song number is 5 and the kit number
is 21.
Note: [HAND PERC] mode does not work with song playback.
6
9605 SDD7 Multipad Manual.indd 6
3/21/12 11:20 AM
www.simmonsdrums.net
Editing kits and pads
setTing the pad voice
Press the [PAD ASSIGN] button to change the sound of an
individual pad or trigger. When in pad assign mode, a red dot will
appear in the LED menu above [PAD].
In pad assign mode, striking a pad once will identify the 3 voice
number on the LED menu. Hitting the pad again will advance that
pad to the next sound (1-215). You can also use the [SELECT]
[+] / [–] or [DATA WHEEL].
Please see the Appendix for a complete list of sounds.
setTing the pad volume
Press [VOLUME] to enter pad assign menu. If pad assign menu is
selected,the corresponding menu indicator will be lit.
The LED menu will display the volume of the currently selected
pad or trigger. To select a different pad, strike the pad once. Use
the [SELECT] [+] / [–] or [DATA WHEEL] to set the volume
between 0-9.
SetTing the pad pan
Press [PAN] to enter pad assign menu. If pad assign menu is
selected, the corresponding menu indicator will be lit.
In this menu, the LED menu will show the pan of current pad,
which can be selected by pressing the [PAD ASSIGN] button on
the top panel or by hitting a pad. The [SELECT] [+] / [–] or
[DATA WHEEL] can be used to select the pan (0-9, loop) for the
current pad.
7
9605 SDD7 Multipad Manual.indd 7
3/21/12 11:20 AM
SDD7 owner’s manual
SetTing the pad gain
Press [GAIN] to enter pad assign menu. If pad assign menu is
selected, the corresponding menu indicator will be lit.
In this menu, the LED menu will show the gain of current pad,
which can be selected by pressing the [PAD ASSIGN] button
on the top panel or by hitting a pad. The [SELECT] [+] / [–] or
[DATA WHEEL] can be used to select the gain (0-9, loop) for the
current pad.
Saving Kits
Press [SAVE] to enter the kit save menu. The [SELECT] [+] / [–] or
[DATA WHEEL] can be used to select a user kit (21-30, loop)
current kit setting. During kit selecting the user kit number will
keep flashing.
Press [SAVE] again, the current kit setting will be saved to the
selected kit. The machine will return to the kit menu and select this
user kit as the current one, if all the data has been saved successfully.
If there is an error during save, “Err” will appear on the LED.
Note: The unsaved kit setting will be lost after kit changing.
reverb
Press [REVERB] to adjust the reverb level for all drum kits. In this
menu, the digit on far left of LED will display letter ‘r’. The two
digits on the right will display current reverb level. The [SELECT]
[+] / [–] or [DATA WHEEL] can be used to adjust the reverb
level (0-3, no loop). This value will auto-save after adjustment.
8
9605 SDD7 Multipad Manual.indd 8
3/21/12 11:20 AM
www.simmonsdrums.net
Songs
PlayinG
Press [SONG] to enter song menu. Default value is 001, the
3-digit LED will show current song number with corresponding
menu indicator lit. The [SELECT] [+] / [–] or [DATA WHEEL]
can be used to select the current song (1-100, loop). First 80 styles
are loop-playing. Press [START/STOP] to start or stop the song.
If song is switched during play, the new song will start after the
end of the current measure.
Each song has its own default tempo and drum kit, the song player
will initialize the current kit and tempo at the beginning of the song.
Main Volume
In the main volume menu, the digit on far left of LED will display
‘L’. The two digits on the right will display current main volume. The
[MASTER VOLUME] [+] / [–] can be used to adjust the volume
(0-9, no loop). And this value will auto-save after adjustment.
Accompaniment Volume
Accompaniment Volume is used to change the volume of the
Song playback. The LED menu will start with the letter A, and
the accompaniment volume 0-9 can be selected using the
[ACC.VOLUME] [+] / [–] or [DATA WHEEL]. This value will
autosave after adjustment.
drum off
When the [DRUM OFF] button is lit, the drum track of
accompaniment SONGS is turned off. This feature is useful for
practicing.
9
9605 SDD7 Multipad Manual.indd 9
3/21/12 11:20 AM
SDD7 owner’s manual
tempo
Press the [TEMPO] [+] / [–] to enter the tempo menu. The [+] and
[–] can be used to change the current tempo (30-280, no loop),
which affects the speed of the click, and song play. Press both
[+] and [–] will reset the current tempo to its default value (current
song tempo).
Click
The Click LED indicator will run once a song is playing. Press
[CLICK] once for voice count. Press [CLICK] twice for click sound.
Press again to turn off the click.
Recording
record
Prepare to Record
Select the desired song, drum kit, tempo, drum off setting, and
reverb settings.
Start Recording
Press [REC], the light will start flashing. Press [START/STOP]
or strike the pad and the light will stop flashing as the recording
process starts.
Stop Recording
To stop recording, press [START/STOP] or [REC]. The record
indicator will turn off. If the memory is full, “FL” will appear on the
display and recording process stops automatically.
Note: When you start recording, the vocal metronome also starts
to count. But the sound of the vocal will not be recorded. To stop
the metronome, press [CLICK].
10
9605 SDD7 Multipad Manual.indd 10
3/21/12 11:20 AM
www.simmonsdrums.net
playback
Pressing [PLAY/STOP] will start or stop the recorded song.
Note: When you record a new song, it will overwrite the
previous recording.
The song data recorded will be lost when you turn off power.
input and output
pedals
The SDD7 supports one hi-hat pedal and one kick pedal as a
trigger input device. The supplied foot pedals can be connected to
the unit to simulate a hi-hat or bass drum pedal. They can also be
assigned to play other voices as well.
Note: Do not press any of the pedals when connecting them to the
unit or while turning on power. Pedal function may be reversed if
they are connected in this manner.
phones output
The phones output supports stereo headphones and can also be
used as an output source.
L
R
usb jack
The SDD7 will output MIDI data generated by hitting the
pads or pedal trigger via the USB port. Click and MIDI codes
in songs are excluded. It will also receive MIDI data from an
external device.
See MIDI Implementation chart in the Appendix for more
information.
11
9605 SDD7 Multipad Manual.indd 11
3/21/12 11:20 AM
SDD7 owner’s manual
APPENDIX
VOICE LIST
# Name
#Name
#Name
#Name
Kick Kit
53
54
55
56
57
58
59
60
61
62
63
64
65
66
67
68
69
70
71
72
104 Open Hi Conga
105 Low Conga
106 Hi Bongo
107 Low Bongo
108 High Timbale
109 Low Timbale
110 High Agogo
111 Low Agogo
112 Cabasa
113Shaker
114 Claves
115 Mute Triangle
116 Open Triangle
117 Short Guiro
118 Long Guiro
119 Mute Cuica
120 Open Cuica
121 Mute Surdo
122 Open Surdo
123Maracas
124 Highq
125Slap
126 Scratch Push
127Scral
128One
129Two
130Three
131 Four
132 Cartoon001
133 Cartoon002
134 Cartoon003
135 Cartoon004
136 Cartoon005
137 Cartoon006
138Laugh
139Metronome1
140Metronome2
141Tambourine001
142Tambourine002
143Tambourine003
144Tambourine004
145Tambourine005
159Sfx014
160Sfx015
161Sfx016
162Sfx017
163Sfx018
164Sfx019
165Sfx020
166Sfx021
167Sfx022
168Sfx023
169Sfx024
170Sfx025
171Sfx026
172Sfx027
173Sfx028
174Sfx029
175Sfx030
176Sfx031
177Sfx032
178Sfx033
179Sfx034
180Sfx035
181Sfx036
182Sfx037
183Sfx038
184Sfx039
185Sfx040
186Sfx041
187Sfx042
188Sfx043
189Sfx044
190Sfx045
191Sfx046
192Sfx047
193Sfx048
194Sfx049
195Sfx050
196Sfx051
197Sfx052
198Sfx053
199Sfx054
200Sfx055
201Sfx056
202Sfx057
203Sfx058
204Sfx059
205Sfx060
206Sfx061
207Sfx062
208Sfx063
209Sfx064
210Sfx065
211Sfx066
212Sfx067
213Sfx068
214Sfx069
215Sfx070
1
2
3
4
5
6
7
8
9
10
11
12
13
14
15
16
17
18
19
20
21
Rock Kick 001
Rock Kick 002
Rock Kick 003
Standard Kick 001
Standard Kick 002
Standard Kick 003
Standard Kick 004
Pop Kick 001
Pop Kick 002
Pop Kick 003
Acoustic Kick 001
Acoustic Kick 002
Acoustic Kick 003
Acoustic Kick 004
Acoustic Kick 005
Acoustic Kick 006
Acoustic Kick 007
Acoustic Kick 008
Acoustic Kick 009
Acoustic Kick 010
Acoustic Kick 011
Snare Kit
22
23
24
25
26
27
28
29
30
31
32
33
34
35
36
37
38
39
40
41
42
Standard Snare 001
Standard Snare 002
Standard Snare 003
Standard Snare 004
Standard Snare 005
Standard Snare 006
Brush Snare 001
Brush Snare 002
Standard Stick 001
Standard Stick 002
Rock Snare 001
Rock Snare 002
Rock Snare 003
Pop Snare 001
Pop Snare 002
Pop Snare 003
Acoustic Snare 001
Acoustic Snare 002
Acoustic Snare 003
Acoustic Snare 004
Acoustic Snare 005
Tom Kit
43
44
45
46
47
48
49
50
51
52
Standard Tom 001
Standard Tom 002
Standard Tom 003
Standard Tom 004
Standard Tom 005
Standard Tom 006
Room Tom 001
Room Tom 002
Room Tom 003
Room Tom 004
Room Tom 005
Room Tom 006
Electronic Tom 001
Electronic Tom 002
Electronic Tom 003
Electronic Tom 004
Electronic Tom 005
Electronic Tom 006
Analog Tom 001
Analog Tom 002
Analog Tom 003
Analog Tom 004
Analog Tom 005
Analog Tom 006
Acoustic Tom 001
Acoustic Tom 002
Acoustic Tom 003
Acoustic Tom 004
Acoustic Tom 005
Acoustic Tom 006
Hi-hat Kit
73
Standard Hi-hat Close
74
Standard Hi-hat Pad
75
Standard Hi-hat Open
76
Analog Hi-hat Close
77
Analog Hi-hat Pad
78
Analog Hi-hat Open
79Shakable
80
Rock Hi-hat Close
81
Rock Hi-hat Pad
82
Rock Hi-hat Open
83
Acoustic Hi-hat Close
84
Acoustic Hi-hat Pad
85
Acoustic Hi-hat Open
Crash Kit
86
Standard Crash001
87
Standard Crash002
88
Standard Crash003
89
Analog Ride001
90
China Crash
91Splash001
92
Standard Ride 001
93
Rock Crash
94
Standard Ride 002
95
Electronic Crash
96Splash002
97
Ride Bell
Panel Kit
98Vibraslap
99
Hand
100Tambourine
101Stcowb
102Mutecowb
103 Mute Hi Conga
Sfx Kit
146Sfx001
147Sfx002
148Sfx003
149Sfx004
150Sfx005
151Sfx006
152Sfx007
153Sfx008
154Sfx009
155Sfx010
156Sfx011
157Sfx012
158Sfx013
12
9605 SDD7 Multipad Manual.indd 12
3/21/12 11:20 AM
www.simmonsdrums.net
KIT LIST
# Name
#Name
#Name
#Name
01
Pop 1
02
Pop 2
03
Standard 1
04
Room
05
Rock 1
06Electronic
07
Analog
08
Jazz 1
09
10
11
12
13
14
15
16
17
Funk
18
Clave
19
Drum Bass
20
Hip Hop
21
Conga 1
22
Conga 2
23Timbales
24Latin
25
26
27
28
29
30
Brush
Standard 2
Rock 2
Boss
Rock 3
Standard 3
Rock 4
Jazz 2
Funk
User 1 (Pop1)
User 2 (Pop 2)
User 3 (Standard 1)
User 4 (Room)
User 5 (Rock 1)
SONG LIST
#KitName
Beat #Kit Name
Intro
01
Rap
01
Intro
4/4
37
38
39
03
02
05
21
21
21
01
03
04
05
03
01
02
05
05
07
03
01
07
04
02
01
21
21
05
03
01
03
01
8 Beat 2
8 Beat 3
8 Beat 4
8 Beat 5
8 Beat Ballad 1
8 Beat Ballad 2
8 Beat Ballad 3
Soft Rock
Rock 1
Rock 2
Rock 3
Rock 4
Rock 5
Hard Rock 1
Hard Rock 2
16 Beat 1
16 Beat 2
16 Beat 3
16 Beat 4
16 Beat 5
16 Beat 6
16 Beat 7
16 Beat Ballad 1
16 Beat Ballad 2
16 Beat Ballad 3
16 Beat Ballad 4
16 Beat Ballad 5
16 Beat Funk 1
16 Beat Funk2
4/4
4/4
4/4
4/4
4/4
4/4
4/4
4/4
4/4
4/4
4/4
4/4
4/4
4/4
4/4
4/4
4/4
4/4
4/4
4/4
4/4
4/4
4/4
4/4
4/4
4/4
4/4
4/4
4/4
Bounce
07
07
01
06
04
07
Dance1
Dance2
Dance3
Dance4
Dance5
Dance6
4/4
4/4
4/4
4/4
4/4
4/4
8 Beat
02
03
04
05
06
07
08
09
10
11
12
13
14
15
16
17
18
19
20
21
22
23
24
25
26
27
28
29
30
Dance
31
32
33
34
35
36
40
41
42
03
01
03
Rap 1
Rap 2
Rap 3
4/4
4/4
4/4
Bounce 1
Bounce 2
Bounce 3
4/4
4/4
4/4
Shuffle 1
Shuffle 2
Shuffle 3
Shuffle 4
Shuffle 5
Shuffle 6
Shuffle 7
4/4
4/4
4/4
4/4
4/4
4/4
4/4
03
04
01
04
Slow Rock 1
Slow Rock 2
Slow Rock 3
Slow Rock 4
4/4
4/4
4/4
4/4
03
23
12
12
03
01
03
03
12
12
12
12
01
Reggae 1
Reggae 2
Bossa Nova 1
Bossa Nova 2
Samba
Salsa
Latin Rock
Cha-Cha
Mambo
Rhumba 1
Rhumba 2
Rhumba 3
Tango
4/4
4/4
4/4
4/4
4/4
4/4
4/4
4/4
4/4
4/4
4/4
4/4
4/4
09
09
08
Swing 1
Swing 2
Swing 3
4/4
4/4
4/4
04
03
01
Shuffle
43
44
45
46
47
48
49
03
02
03
01
05
04
03
Slow Rock
50
51
52
53
Latin
54
55
56
57
58
59
60
61
62
63
64
65
66
Swing
67
68
69
Beat #KitName
Others
70
71
72
73
74
75
76
77
78
79
80
8 Beat
81
82
83
84
85
86
87
88
89
12
02
03
02
01
01
03
01
03
12
09
Waltz
3/4 Ballad
Swing Blues
Blues
March 1
March 2
R&B
Hip-Hop
Funk
Country
Big Band
4/4
4/4
4/4
4/4
4/4
4/4
4/4
4/4
4/4
4/4
4/4
03
05
03
05
05
01
03
07
03
8 Beat 1
8 Beat 2
Ballad
Hard Rock 1
Hard Rock 2
Hard Rock 3
Pop Dance 1
Pop Dance 2
R&B
4/4
4/4
4/4
4/4
4/4
4/4
4/4
4/4
4/4
01
03
16 Beat
Fusion
4/4
4/4
02
03
Funk 1
Funk 2
4/4
4/4
04
03
03
01
Shuffle 1
Shuffle 2
16 Beat Shuffle
16 Beat Triplet
4/4
4/4
4/4
4/4
03
12
08
Reggae
Bossa Nova
Big Band
4/4
4/4
4/4
16 Beat
90
91
Funk
92
93
Shuffle
94
95
96
97
Others
98
99
100
Beat
13
9605 SDD7 Multipad Manual.indd 13
3/21/12 11:20 AM
midi implementation chart
SDD7 owner’s manual
MIDI IMPLEMENTATION CHART
Function
Transmitted
Recognized
Basic
Channel
Default
Changed
10Ch
X
1-16Ch
X
Mode
Default
Messages
Altered
X
X
*********
1
X
X
Note Number:
True Voice
27-88
*********
0” 127
0” 127
Velocity: Note On
Note Off
O 9nH, V=1-127
X (9nH, V=0)
O 9nH, V=127
X (9nH, V=0;
8nH, V=0-127)
X
X
X
X
X
O
0
1
5
7
10
11
20
64
65
66
67
80
81
91
93
120
121
123
X
X
X
X
X
X
X
X
X
X
X
X
X
X
X
X
X
X
O
O
O
O
O
O
O
O
O
O
O
O
O
O
O
O
O
O
:True
X
X
O
0” 127
After
Touch
Key’s
Ch’s
Pitch Blend
Control
Program
Change
System Exclusive
*********
O
:Song Position
:Song Select
:Tune
X
X
X
X
X
X
:Song Position
:Song Select
:Tune
X
X
X
X
X
X
System
Real Time
:Clock
:Commands
:Start
:Stop
X
X
X
X
Aux
:LOCAL ON/OFF
:All Notes Off
:Active Sense
Reset
X
X
X
X
X
O
O
O
System
Common
System
Common
Messages
Mode 1: OMNI ON, POLY
Mode 3: OMNI OFF, POLY
Mode 2: OMNI ON, MONO
Mode 4: OMNI OFF, MONO
Remarks
Bank Select
Modulation
Portamento Time
Volume
Pan
Expression
Rhythm Allocation
Sustain Pedal
Portamento On/Off
Sostenuto Pedal
Soft Pedal
Reverb Program
Chorus Program
Reverb Level
Chorus Level
All Sound Off
Reset All Controllers
All Notes Off
O: YES
X: NO
14
9605 SDD7 Multipad Manual.indd 14
3/21/12 11:20 AM
www.simmonsdrums.net
MIDI NOTE MAP
The following diagrams identify the MIDI note number assigned to each pad. This is useful
when using the SDD7 as a MIDI controller for a soft synth application on a computer.
G2
Drum Kit
D#2
Top C2panelA1
D1
F#1
F1
SDD7
A2
Hand Percussion
B2
Top C2panelA1
E1
F#1
F1
SDD7
FACTORY RESET
The Factory Reset function will restore the SDD7 to factory defaults for sounds, drum kits, and
songs. To initiate the Factory Reset, press both and hold [TEMPO] [+] / [–] buttons, then turn
the [Power] button Off, then back On.
15
9605 SDD7 Multipad Manual.indd 15
3/21/12 11:20 AM
SDD7 owner’s manual
SPECIFICATIONS
Pads
Sounds
Drum Sets
Songs
Overall Controls
Metronome
Connections
Dimension
Weight
Power Supply
Accessories
7 drum pads with touch response and includes two pedals for bass drum and hi-hat
215 drum/percussion voices, 128 GM sounds (total 8 MB data)
25 Preset sets, 5 User sets
100 Songs
Chord, Demo, Dial, Tempo/Tap, Light, Rhythm Volume, Main Volume
Voice, Click or Light
12V adapter, head phones, USB (MIDI IN/OUT), bass drum and hi-hat controller
500mm (w) x 370mm (d) x 157mm (h)
3.3Kg
12V adapter / 6 C-type batteries
Drum sticks, two controller pedals
16
9605 SDD7 Multipad Manual.indd 16
3/21/12 11:20 AM
www.simmonsdrums.net
FCC Statements
1. Caution: Changes or modifications to this unit not expressly approved by the party responsible for compliance could void
the user’s authority to operate the equipment.
2. Note: This equipment has been tested and found to comply with the limits for a Class B digital device, pursuant to
Part 15 of the FCC Rules. These limits are designed to provide reasonable protection against harmful interference in a
residential installation. This equipment generates, uses, and can radiate radio frequency energy and, if not installed and
used in accordance with the instructions, may cause harmful interference to radio communications. However, there is no
guarantee that interference will not occur in a particular installation. If this equipment does cause harmful interference to
radio or television reception, which can be determined by turning the equipment off and on, the user is encouraged to
try to correct the interference by one or more of the following measures:
•Reorient or relocate the receiving antenna.
•Increase the separation between the equipment and receiver.
•Connect the equipment into an outlet on a different circuit.
•Consult an experienced radio/TV technician for help.
One (1) Year Limited Warranty
Subject to the limitations set forth below, Simmons® hereby represents and warrants that the components of this product shall
be free from defects in workmanship and materials, including implied warranties of merchantability or fitness for a particular
purpose, subject to normal use and service, for one (1) year to the original owner from the date of purchase.
Retailer and manufacturer shall not be liable for damages based upon inconvenience, loss of use of product, loss of time,
interrupted operation or commercial loss or any other incidental or consequential damages including but not limited to lost
profits, downtime, goodwill, damage to or replacement of equipment and property, and any costs of recovering, reprogramming, or reproducing any program or data stored in equipment that is used with Simmons® products. This guarantee gives
you specific legal rights. You may have other legal rights which vary from state to state. Some states do not allow limitations
on how long an implied warranty lasts, so the above limitation may not apply to you.
Simmons
P.O. Box 5111
Thousand Oaks, CA 91359-5111
All trademarks and registered trademarks mentioned herein are recognized as the property of their respective holders.
Made in China
1202-9605
17
9605 SDD7 Multipad Manual.indd 17
3/21/12 11:20 AM
9605 SDD7 Multipad Manual.indd 18
3/21/12 11:20 AM