1
Top-Freezer
Refrigerators
Safety Information
Connecting
Electricity ...........
Extension Cords ................
'.4
3
Safety Precautions
2
Operating
Automatic
..............
In#ructiom"
Icemaker
.............
5
Care and Cleaning ..............
Shelves .........................
6
4
Storage Drawers ...............
Temperature
Controls
...........
Imcallation
Write the model and serial
numbers here:
Model #
4, 5
4
In#ructions
Preparing to Install
the ReflJgerator
................
Reversing the Door Swing ...
Water Line Installation
.......
7
11-14
8-10
Serial #
Tronbleshooting
You can find them on a label on
Before You Call
the upper left side of the fresh food
For Service
compartment.
Normal
Tips
.................
Operating
Sounds
15, 16
......
15
Combiner Support
Consumer Support
............
Product Re_strafion
........
Warranty .....................
www.A meriea naApp lia nees. cam
Printed/b the United States
i;_ Printedon Recyc/edPaper
Models
20
17, 18
19
16, 17, 18
197Dg984PO04 49-60522-1
08-08 JR
IMPORTANT SAFETYINFORMATION.
READ ALL INSTRUCTIONS BEFOREUSING.
WARNING'!
Use this appliance only for its intended purpose as described in this Owner's Manual
SAFETYPRECAUTIONS
When using electrical appliances, basic safety precautions should be followed, including the following:
{{_i
This refligerator must be properly installed
and located in accordance with the Installation
Instructions before it is used.
_Do not allow children to climb, stand or hang
on the shelves in the refligerator. They could
damage the refligerator
and seriously i_jure
themseNes.
_Do not touch the cold surfaces in the fleezer
compamnent
when hands are damp or wet.
Skin may stick to these exuemely cold
stlrfaces.
{{_iDonot store or use gasoline or other flammable
vapors and liquids in the vicinity of this or any
other appliance.
_Keep fingers out of the "pinch point" areas;
clearances between the doors and between
the doors and cabinet are necessarily small.
Be careflfl closing doors when children are
in the area.
_Unplug
making
the refligerator
repairs.
before cleaning
and
NOTE: Westrong/}/recommend
that an}/servicingbe
performedby a qualifiedindividual
{{_iTurning the control to the 0 position does
not remove power to the light circuit.
{{_iDonot refleeze flozen foods which have
thawed completely.
In refligerators with automatic icemakers,
avoid contact with the moving parts of the
ejector mechanism, or with the heatng
element that releases the cubes. Do not place
fingers or hands on the automatc icemaking
mechanism while the refligerator is plugged in.
A DANGER! RISK OF CHILD ENTRAPMENT
PROPER
DISPOSAL
OFTHEREFRIGERATOR
Child enuapment
and suff\mation
are not
problems
of the past. Junked
or abandoned
refligerators
are still dangerous...even
if they
will sit for "just a few days." If you aIe gettng
rid of your old refligerato_;
please follow the
insuuctions
below to help prevent
accidents.
Before You ThrowAway Your Old
Refrigerator or Freezer:
_,Take off the doors.
Leave the shelves in place so that
may not easily climb inside.
2
children
Refrigerants
All refligeration
products contain refligerants,
which under federal law must be removed prior
to product disposal. If you are gettng rid of an
old refligeraton
product, check with the
company handling the disposal about what
to do.
IMPORTANT SAFETYINFORMATION.
READ ALL INSTRUCTIONS BEFOREUSING.
www.AmericanaAppliances.com
WARNING!
HOWTOCONNECT
ELECTRICITY
Do not, under any circumstances, cut or remove the third (ground) prong from the power cord.
For personal safety, this appliance must be properly grounded.
The power cord of this appliance is equipped
with a 3-prong (grounding)
plug which mates
with a standard 3-prong (grounding) wall outlet
to minimize the possibility of elecuic shock
hazard flom this appliance.
Have the wall outlet and circuit checked by a
qualified electrician to make sure the outlet is
properly grounded.
Where a standard 2-prong wall oudet is
encountered,
it is your personal responsibility
and obligation to have it replaced with a
properly grounded 3-prong wall outlet.
The refiigerator
its own individual
voltage
rating
that
should ahvays be plugged
into
electrical
outlet which has a
matches
the rating
This provides the best performance
and also
prevents overloading house wiring circuits which
could cause a fire hazard flom overheated wires.
Never unplug your refligerator
by pulling on the
power cord. Ahvays grip plug firmly and pull
straight out flom the outlet.
Repair or replace
that have become
Do not use a cord
damage along its
immediately all power cords
flayed or otherwise damaged.
that shows cracks or abrasion
length or at either end.
X_qmn moving the refligerator
away flom the
wall, be careflfl not to roll over or damage the
power cord.
plate.
USEOFEXTENSION
CORDS
Because of potential safety hazards under certain conditions, we strongly recommend against
the use of an extension cord.
Howevex; if you must use an extension cord, it is absolutely necessax T that it be a UI,-listed (in the
United States) or a CSAqisted (in Canada), 3-wire grounding type appliance extension cord having a
grounding type plug and outlet and that the elecuical rating of the cord be 15 amperes (minimum)
and 120 volts.
READAND FOLLOWTHISSAFETYINFORMATIONCAREFULLY.
SAVE THESEINSTRUCTIONS
3
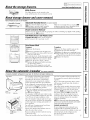
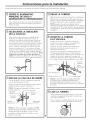
About the temperaturecontrol dial
Turning the dial to 0 stops cooling in both compartments--fresh food and freezer. It does not shut off power to the refrigerator.
Temperature Control Dial (onsomemodels)
The temperature
control
dial has nine
settings
plus 0. I is the warmest.
9 is the
coldest. At first, set tile dial at 5.
Insert a coin into the slot in the middle
of tile dial an(t you can turn the dial to
the setting that is best suited to your needs.
After using
if necessary,
Allow 24 hours
get cold.
the refl'igeratot,
adjust
the dial
for tile
refi'igerator
to
About the fresh food compartmentshelves.
Shelf supports at various levels allow you to custom-space your shelves. Not all features are on all models.
Half-Width Shelves
One end of file shelf rests on a molded sidewall support; a bracket on the other end
hooks into a track on the rear cahinet wall.
Toremove,lift the shelf up at fi'ont, then off
the support and out of the track.
Toreplace,
select desired shelf height. With shelf
fiont Yaisedslightly,hook tile bracket's top lug into
tile track,then lower tile shelf onto tile support.
NOTE:Theshelfto therightof thetrackis
designedto hookinto thewht-handslot,theshelf
to theleft is designedtohookinto theleft-handdot.
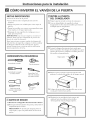
Full- Width Shelves
To removethe full-width shelves
Some models have a steel wire sliding shelf, a
stationary tempered glass shelf, a spillproof
shelf or two steel wire stationary shekes.
These shekes cm_be moved m mmther place
in the fresh food comparunent.
The flfll_widfl_sliding shelf has stop-locks.
¼71en placed correctly on the shelf supports,
the shelf will stop before coming completely
out of the refiigerator and will not flit when
you place food on it or remove food from it.
_
Liftrear JX
Toremovea full-widthshelfwhenthefresh
foodcompartment
doorcannotbe openedfully
Spillproof Shelves (on some models)
Spillproof shelves have special edges
to help prevent spills flom dripping
to lower shelves. To remove or replace
the shelves, see the ahove instructions.
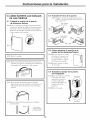
About the freezer compartment shelves.
Step Shelf
Toremove the stepshelf"
f--if]I Jft left side of shelf slightly.
[2-]Move shelf to the left to flee its Hght
ends flom holes in the cahinet wall.
f-_I_ower light side of shelf, move shelf to
the light and rake it out.
Toreplace the step shelf"
V-if]_Withshelf tilted as shown, fit left ends
of shelf into holes in cahinet wall.
About the storage drawers.
Not all features are on all models.
Fruit and Vegetable Drawers
Excess water that may accumulate in the
bottom of the drawers should be emptied
and the drawers wiped dry.
[2--]I_iffleft side of shelf slightly, swing shelf
up, fit fight ends of shelf into holes in
cahinet wall, and lower shelf into place.
About the storage drawers,
www.AmericanaAppliances.com
Utility Drawer
ii
iiii_5/i)
The
most
utility
useflll
drawer
location
can
be moved
for your
to the
famib,'s
needs.
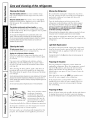
About storage drawer and cover removal.
Not aft features are on aft models.
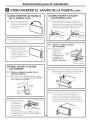
Adjustable Humidity Drawer (onsomemodels)
Slide the control all the way to the
Slide the control all the way to the LOW
HIGHsetting to provide high humidity
setting to provide lower humidity levels
recommended
for most vegetables,
recommended
for most fruits.
Drawer and Cover Removal
Drawers can be removed easily by grasping the sides and lifting up slightly while pulling
drawers past the stop location.
Y
HIGH
iIII iii:
LOW
! iii
Full-Width Drawer with Plastic Cover
Toremove the cover,lift it off its supports,
pull it forward, tilt it and take it out.
Twin Drawer Shelf
Toremove:
Toreplace:
[7] Remove the drawers.
[2-] Reach in, push the flont of glass cover
up, and at the same time, pull it forward
_tsflu as it will come.
Tilt it and take it out. Avoid cleaning the cold
glass cover with hot water because flit extreme
{emperatm'e difference may cause it to break.
r_] Remove the drawer flmne. (Always
'"' remove the ,glasscover before you rake
out the drawer flame.)
Lift the fi'ame off the supports at each side
and back, pull it fbrward, tilt it and take it out.
About the automatic icemaker
A newly-installed
[j] Replace the dmwe_s.
so e odels).
refrigerator may take 12-24 hours to begin making ice.
PowerSwitch
Icemakel
The icemaker will produce approximate b
3 to 3 1/2 lbs. of ice in a 24-hour period,
depending on the fl'eezer compartment
temperature,
room
temperature,
number
of door openings and oilier use conditions.
If the refl'igerator is operated befbre the water
connection is made to the icemaket; move the
feeler arm to the STOP (up) position.
_(_qlenthe refligerator has been connected
to the water suppl); move the feeler am1 to
the ON (down) position.
The icemaker will fill with water when it cools
to 15°E A newly-installed refi'igerator mW rake
12 m 24 bouts to begin making ice cubes.
Once the icemaker starts to make ice, it mW
take up m 48 hours to fill the bin, depending
on the temperature seuings and tmmber of
door openings.
You will hear a buzzing sound each time
the icemaker fills with WamL
\
FeelerArmin
i the STOP
FeelerArm in (up)position
the ON (down)
poatJon
r-_ Lower the frame until it rests on the
supports at each side and back.
[2--]Replace the glass covei; pushing its rear
edge firmly into the rear flame channel
and gently lowering the flont into place.
............
Throw away the filet few batches of ice m
allow the wamr line m cleaL
Be sure nothing inmrferes with the sweep
of the feeler arm.
When the bin fills m the level of the feeler
arm, file icemaker Mll stop producing ice.
It is no,mal for several cubes m be joined
mgetbeL
If ice is not used flequently, old ice cubes
will become cloudy, tasm stale, shrink or
fllse mgetbeL
On power switch models, the g_een power
light will blink if ice cubes get stuck in the
icemakeL To correct rids, set the power
switch
m 0 (Off) and
remove
the
cubes.
Set
file power switch to I (on)to restart the
icemakeL Atker the icemaker h_ksbeen
turned on again, there will be a del W of
about 45 minums before the icemaker
resumes operation.
NOTE:In homeswith/ower-than-average
water
pressure,youmayheartheicemakercyc/emu/tip/e
timeswhenmakingonebatchof ice.
Icemakeraccessorykit:
If your refrigerator did not ah'eady come
equipI)ed with an mltomatic icemaker, an
icemaker accessoW kit is available at extra cost.
Check the back of the refligerator for
the specific icemaker kit needed
for your model.
5
Care and cleaning of the refrigerator.
Cleaning the Outside
Moving the Refrigerator
The door handles and trim (on some models).
Clean
with a cloth dampened with soapy water. Dry with a
Be careflfl when moving tile refligerator
away flom
tile wall. All types of floor coverings
can be damaged,
particularly
cushioned
coverings
and those with
embossed
surfaces.
soft
cloth.
Keep the outside clean.Wipe with a clean cloth lightly
dampened with kitchen appliance wax or mild liquid
dish detergent. Dry and polish with a clean,
soft cloth.
The stainless steel panels and door handles (on some
models) can be cleaned with a commercially
available
stainless steel cleaneL Do not use appliance
wax or polish
on tile stainless steel.
Donot wipe the refrigeratorwith a soileddishcloth or wet
towel Thesemay.leavea residuethat canerode thepaint.
Donot usescouringpads,powderedcleaners,bleachor cleaners
containingbleachbecausetheseproductscanscratchand
weakenthepaint finish.
Turn file leveling legs at each flont corner of die
refligeramr counmrclockwise until tile rollers support
tile refligemtoL Pull tile refligeramr smfight out and
reunn it to position by pushing it suaight in. Moving
the refrigeratorin a side directionmaltresultin damage
to thefloorcoveringor refrigerator.
When pushing the refrigerator back, make sure you don't roll over
the power cord or icemaker supply,line (on some models).
After rolling tile refligerator back into place, mrn tile
legs clockwise unOl tile legs again bear tile weight of tile
refiigeratoL
Light Bulb Replacement
Cleaning the Inside
To helpprevent odors,leave an open box of baking soda
in tile fiesh food and freezer compartments.
Unplugthe refrigeratorbefore cleaning.
If this is not practical, wring excess moisture out of
sponge or cloth when cleaning around switches, lights
or controls.
Use warm water and baking soda solution--about
a
tablespoon (15 ml) of baking soda m a quart (1 liter)
of water. This both cleans and neumdizes odors. Rinse
and wipe dry:
After cleaning tile door gaskets, apply a thin layer of
petroleum .jelly to tile door gaskets at tile hinge side.
This helps keep the gaskets from socking and bending
out of shape.
Avoid cleaningcoldglassshelves(on somemodels)with hot water
becausetheextremetemperaturedifferencemay.causethemto
break.Handleglass shelvescarefully.Bumpingtemperedglass can
causeit to shatter.
Donot washany.plasticrefrigeratorparts in thedishwasher.
Condenser
normal
operating
condenserhome
cleaning
in
environments.
Howevex; in
environments
that illay be
cleaned periodically
soils,
particularly
dusty
or greasy,
tile condenser should be
for efficient refrigerator operation.
To clean tile condensex;
mrn tile temperature
dial to 0. Sweep away or vacuum up dust.
control
Fox best results, use a brush specially designed for tiffs
purpose. It is available at most appliance parts stores.
6
Turning the control to the Oposifion does not remove power to
the light circuit.
Preparing for Vacation
Fox long vacations or absences, remove food and
unplug tile refligerator. Move tile temperature
control
dial to tile 0 position, and clean tile interior with a
baking soda solution of one tablespoon (15 ml) of
baking soda to one quart (1 liter) of wateL Leave tile
doors open.
Move the feeler arm to the STOP (up) position and
shut off"tile water supply to tile refligeratoL
If tile temperature
can drop below fleezing, have a
qualified servicer drain the water supply system (on
some models) to prevent serious property damage
due to flooding.
Preparing to Move
_...
There is no need for routine
-<%_--V
gloaning thesondenser
To replace a burned-out
bulb, unplug tile refligerator
flom its elecuical
oudet, unscrew tile bulb when cool
and replace it with an appliance
bulb of tile same or
lower wattage.
Secure all loose items such as grille, shelves and drawers
by roping them securely in place to prevent damage.
Be surethe refrigeratorstays in an uprightposition &flog moving.
Installation
Instructions
Models 16, 17, 18
ff you have questions, call 1.800.432.2737
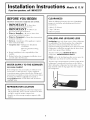
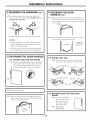
BEFORE YOU BEGIN
CLEARANCES
Read
Allow file following clearances for ease of installa6on,
proper air circulation and plumbing and electrical
these
instructions
completely
• IMPORTANT
instructions
and carefully.
- S},ve
these
for local inspector's
coIlIlectioIIs.
use.
• Sides 3/4" (19 mm)
• IMPORTANT - Obse,
ve
• Top 1" (25 mm)
governing
•
codes and ordinances.
Note to Installer - Be sure to leave these
instructions with the Gonsumer.
• Note
to Consumer
- Keep these insuuctions
for future reference.
• Skill level - Installation of tiffs appliance
basic mechanical skills.
• Completion
time - Refrigerator
15 minutes
requires
Installation
Reversing the Door Swing
1 hour
• Proper installation
installer.
is the responsibility
• Product failure due to improper
covered under the Warranty.
of the
installation
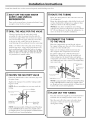
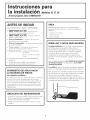
ROLLERS AND LEVELING LEGS
Levelinglegs near each flont corner of the refligerator
are adjustable. They firmly position the refligerator
and prevent it flom moving when the doors are
opened. Leveling legs should be set so the front of the
refrigerator is raised]ust enough that the doors close
easily when opened about half,,ray.
Turn the leveling legs clockwise to raise the
refrigerato_, counterclockwiseto lower it.
is not
WATER SUPPLY TO THE ICEMAKER
(on some models)
If the refligerator
has an icemaker, it will have to be
connected to a cold water line. A water supply kit
(containing copper tubing, shutoff vane, fittings and
instructions) is available at extra cost flom your dealm;
by visiting our Website at ge.com (in Canada at
www.geappliances.ca)
or from Parts and Accessories,
1.800.661.1616.
REFRIGERATOR
• Back 1" (25 ram)
LOCATION
• Do not install the refligerator where file temperature
will go below 60°F (16°C) because it will not run often
enough to maintain proper mmperamres.
• Install it on a floor suong enough to support it fully
loaded.
Rollers next to the leveling legs allow you to move the
refligerator away flom the wall for cleaning.
Turn the legs counterclockwise
until the weight of the
refligerator
is uansferred
flom them to tim rollers.
Afker rolling the refligerator
back into place, mrn the
legs clockwise
until the legs again bear the weight of
the refligeratoL
Installation
Instructions
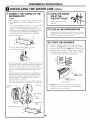
INSTALLING THE WATER LINE IONSOMEMODELS)
BEFORE YOU BEGIN
WHAT YOU WILL NEED (CONT.)
Recommended
copper water supply kits are _PX8X2,
_X8X3
or _PX8X4, depending
on the amount
of
tubing you need. Approved
plastic water supply lines
are GE SmartConnect
_'' Refligerator
Tubing
(_08X10006,
_08X10015
and _08X10025).
GE SmartConnect
_" Refrigerator
Tubing
available
in the following
lengths:
When
connecting
your
Osmosis
_rater
System,
is with a GE RVKit.
For
systems,
follow
the
refligerator
to a GE Reverse
tile only approved
installation
other
reverse
osmosis
water
manufacturer's
6' (1.8 m)
-X&_X08X10006
15' (4.6 m)
-_i_08X10015
25' (7.6 m)
-_i_08X10025
Be sure that
as described
tim kit you select
above.
Kits are
allows at least
8' (2.4 m)
recommendations.
NOTE: The only GE approved
plastic tubing is that
supplied
in GE SmartConnect
Refrigerator
Tubing
kits. Do not use any other plastic water supply line
because
the line is under pressure
at all times. Certain
types of plastic will crack or rupture
with age and
cause water damage to your home.
This water line installation
is not warranted
by tim
refligerator
or icemaker
manufacturer.
Follow these
instructions
carefiflly to minimize
the risk of expensive
water damage.
TM
Water hammer (water banging in the pipes) in house
plumbing can cause damage to refrigerator parts and
lead to water leakage or flooding. Call a qualified
plumber to correct water hammer before installing
the water supply line to the refrigeratoL
• AGE water supply Mt (containing tubing, stmtoff
vane and fittings listed below) is available at exua
cost flom your dealer or from Parts and Accessories,
1.800.661.1616.
To prevent burns and product damage, do not hook
tap tim water line to tim hot water line.
• A cold water supply. The water pressure
between 20 and 120 p.s.i. (1.4-8.1 bar).
If you use your refligerator
before connecting
the
water line, make sure tim feeler arm is in tim STOP
(up) position.
• Power
• 1/2"
_f'_.,_
_
,_
wrench.
• Straight and Phillips
blade screwdriver.
Do not install tim icemaker utbing in areas where
temperatures
fall below fleezing.
• Two 1/4" outer diameter
compression
nuts and
2 ferrules (sleeves)--to
connect
the copper tubing to the stmtoff
_,,__
vah'e and tim refligerator
water val_."_"_"-__'"Q
OR
When using any elecuical device (such as a power
drill) during installation, be sure the device is double
insulated or grounded in a rammer to prevent the
hazard of electric shock, or is battery powered.
All installations must be in accordance
plumbing code requirements.
drill.
or adjustable
must be
• If you are using a GE SmartConnect'"
Refligerator
Tubing kit, the necessm y fittings are preassembled
to tim tubing.
• If your existing copper water line has a flared fitting
at the end, you will need an adapter
(available at
plumbing
supply stores) to connect
the water line to
the refligerator
OR you can cut off the flared fitting
with a tube cutter and then use a compression
fitting. Do not cut formed
end flom GE
SmartConnect"*
Refligerator
robing.
with local
WHAT YOU WILL NEED
• Copper or GE SmartConnect
Refrigerator
Tubing
kit, 1/4" outer diameter
to connect
the refligerator
to tim water supply. If using coppe_, be sure both
ends of tim tubing are cut square.
TM
To determine how much tubing you need: measure
the distance flom tim water valve on tim back of tim
refligerator
to tim water supply pipe. Then add 8'
(2.4 m). Be sure there is sufficient extra robing
(about 8' [2.4 m] coiled into 3 turns of about 10"
[25 cm] diameter) to allow the refligerator
to move
out flom the wall after installation.
•
8
Shutoff valve to connect to tim cold water line.
The shutoff valve should have a water inlet with a
minimum inside diameter of 5/32" at the point of
connection to the COLD WATER LINE. Saddle-type
shutoff valves are included in many water supply kits.
Before purchasing, make sure a saddle-type vane
complies with your local plumbing codes.
Installation
Install
the shutoff
vaNe on the nearest
frequently
used
Instructions
drinking
Route the tubing between
the refligerator.
NOTE: Be sure there is sufficient extra robing
(about 8 feet [244 cm] coiled into 3 turns of about
10" [25 cm] diameter) to allow the refligerator to
move out flom the wall after installation.
Ghoose a location for the vaNe that is easily
accessible. It is best to connect into the side of a
vertical water pipe. When it is necessary to connect
into a horizontal water pipe, make the connection
to the top or side, rather than at the bottom, to
avoid drawing off any sediment flom the water pipe.
1-51
CONNECT THE TUBING
TO THE VALVE
Place the compression
nut and ferrule
(sleeve)
for copper robing onto the end of the tubing and
connect
it to the shutoff valve.
Drill a 1/4" hole in the water pipe (even if using a
self-piercing valve), using a sharp bit. Remove any
burrs resulting fiom drilling the hole in the pipe.
Take care not to allow water to drain into the drill.
Failure to drill a 1/4" hole may result in reduced
ice production or smaller cubes.
Make sure the robing is fully inserted
into the
valve. Tighten
the compression
nut securely.
For plastic robing flom a GE SmartGonnect"*
Refligerator
Tubing kit, insert the molded
end
of the tubing into the shutoff valve and tighten
compression
nut until it is hand tight, then tighten
one additional
turn with a wrench.
Overtightening
may cause leaks.
_ression
Nut
Saddle-Type
ShutoffValve
SmartConnecU
Tubing
VALVE
PackingNut--
Fasten the shutoff vaNe to the cold water pipe with
the pipe clamp.
Outlet Valve.
or you may crush the
tubing.
PipeClamp-_N4k_
--
Ferrule (sleeve)
NOTE: Gommonwealth
of Massachusetts Plumbing
Godes 248GMR shall be adhered to. Saddle vanes
are illegal and use is not permitted in Massachusetts.
Gonsult with your licensed plumber.
Tighten the clamp screws until the sealing washer
begins to swell.
NOTE: Do not overtighten
the cold water line and
Route the tubing through a hole drilled in the wall
or floor (behind the refligerator
or adjacent base
cabinet) as close to the wall as possible.
long
I_ DRILL THE HOLE FOR THE VALVE
I_ FASTEN THE SHUTOFF
line.
I_ ROUTE THE TUBING
m SHUT OFF THE MAIN WATER
SUPPLY AND UNPLUG
REFRIGERATOR
Turn on the nearest faucet (counterclockwise)
enough to clear the line ofwatm.
water
Washer
e
_lnlet
End
I_ FLUSH OUT THE TUBING
Turn the main water supply on (counterclockwise)
and flush out the tubing until the water is clea_.
ClampScrsw#
Saddle-Type_/'
ShutoffValve
Shut the water off at the water valve after about
J
one quart (1 liter) of water has been flushed
VerticalCold
Water Pipe
through
NOTE: Gommonwealttl of Massachusetts Plumbing
Godes 248GMR shall be adhered to. Saddle vanes
are illegal and use is not permitted in Massachusetts.
Gonsult with your licensed plumbe_.
9
the tubing.
|
Installation
B
Instructions
INSTALLING THE WATER LINE
I_ CONNECT THE TUBING
REFRIGERATOR
TO THE
I-8-1TURN THE WATER
ON AT THE
SHUTOFF VALVE
NOTES:
• Before
making
the
the rcfligecator
outlet.
• We recommend
has
sand
connection
power
installing
or particles
refligemtor's
water
refligemtor.
If using
kit, you
will need
connect
the
Remove
the
to the
cord
is not
a water
that
could
vane.
Install
be sure
into
i| your
the
the
water
screen
supply
line
near
Refl'igemtor
robe
robe
PLUG IN THE REFRIGERATOR
the
Tubing
(_X08X10002)
cut plastic
Tighten
any connections
that leak.
wall
of the
it in the water
GE SmartConnecg"
Do not
access
filter
clog
an additional
filter.
reiiig_l.mm
plugged
to
to install
Arrange
the coil of tubing
so that it does not
against
the back of the refligerator
or against
Push the refrigerator
back to the wall.
filter:
covet:
I_
Remoxe
xalxe
the
plastic
flexible
(refiigecator
cap
fiom
the
the
nut
and
tcrmle
On
GE
water
connection).
compression
of the
tubing
Tubing
kit,
Insert
the
as flu
as shown.
the
end
nuts
are
of the
as possible.
robing
¼]file
(sleeve)
onto
SmartConnecf
already
into
holding
the
the
the
to the
water
valve
tubing,
START THE ICEMAKER
end
_ Refl'ig_cator
assembled
xibrate
the wall.
On power switch models, set the icemaker
power
switch to the / (Of/) position.
On feeler arm models,
move the feeler arm to the ON (down) position.
The
icemaker
will not begin to operate
until it reaches
its operating
temperature
of 15°F (-9°C) or below.
It will then begin operation
automatically.
©
Place
(CONT.)
Powerswitch model
tubing.
connection
tighten
the
fitting.
For
plastic
tubing
fl'om
a GE
Tubing
kit, insert
the
slmtoff
valve
tighten
tight,
then
and
tighten
Ovcrtightening
Fasten
a vertical
the
one
may
tubing
into
You
end
additkmal
_ Refl'igecator
of the
corn pression
cause
position.
SmartConnecf
molded
tubing
nut
turn
with
into
until
the
it is hand
a wrench.
in
leaks.
the
may
clamp
need
the ON (down)position
provided
to pry
to
()pen
hold
the
it in
Feelerarm model
clamp.
NOTE: In lower water pressure
conditions,
the
water valve may ttlrn on up to 3 times to deliver
enough
water to the icemakeL
TubingClamp
1/4" Copper
Tubing
1/4" Compression
Nut
(sleeve)
Refrigerator
Connection
SmartConnect
T_
Tubing
10
Installation Instructions
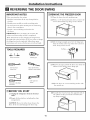
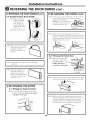
REVERSING THE DOOR SWING
IMPORTANT
NOTES
[] REMOVE THE FREEZER DOOR
When reversing the door swing:
• Read the instructions
starting.
2.1 Tape
all the way through
before
• Handle parts carefldly to avoid scratching
paint.
the door
shut with masking
tape.
2.2 With a 5/16" hex-head
socket drivm, remove
screws that hold the top hinge to the cabinet.
the
• Set screws down by their related parts to avoid using
them in the wrong places.
• Provide a non-scratching
the doors.
work surface for
IMPORTANT: Once you begin, do not move the
cabinet until door-swing reversal is completed.
These insu_ucfions are for changing the hinges flom
the right side to the left side--if you ever want to change
the hinges back to the right side, follow these same
insu-ucfions and reverse all references to left and right.
2.3 Lift the hinge straight
tap to flee the hinge
flom the socket in the top of the (loot and
aside, along with its screws.
TOOLS REQUIRED
T°pHinge_
Phillipsscrewdriver
pin
set it
I
Maskingtape
2.4 Remove the rope and tilt the (loot away flom the
cabinet. Lift it off the center hinge pin.
T20or T25Torxdriver
(neededfor somemodels)
5/16" hex-head
socket driver
5/16" open-end
wrench
Puttyknife or thin-blade
screwdriver
2.5 Set the (loot on a non-scratching
the outside up.
surface with
Ill BEFORE YOU START
1.1 Unplug
outlet.
the refrigerator
1.2 Empty all door
compartment.
shelves,
from
2.6 Transfer
tim 2 screws flom tim opposite
side of
the cabinet to the screw holes vacated by the
top hinge removal.
its electrical
including
the dairy
CAUTION: Do not let either (loot drop to the
floor. To do so could damage the (loot stop.
11
Installation
Instructions
REVERSING THE DOOR SWING
[] REMOVE
3.1 Tape
REMOVE THE FRESH FOOD DOOR (CONT.)
THE FRESH FOOD DOOR
the door
shut with masking
(CONT.)
tape.
3.5 Transfer tlle two screws flom tlle opposite side of tile
cabinet to tile screw holes vacated by tile center
hinge removal.
3.6 Transfer
opposite
tile washer
side.
(if your model
has one) to tile
3.2 Using a 5/16"
hex-head
socket screwdriver
and
a 5/16" open-end
wrench,
remove the two
screws holding
the center hinge to the cabinet.
I,ift the center hinge to fiee its pin flom the
socket in the top of the door, and set hinge and
screws aside. Be careful not to lose the center
hinge spacer
3.7 _ke one of tlle screws removed in step 2 and start
it in d_e outemaost screw hole on the opposite side.
Do not chive it all tile way downi-leave
enough space
under tile screw head for ddckness of tile bracket.
and washer.
IJ
141REVERSING
3.3 Remove
cabinet.
hinge
door
dm
rope
and
Lift file door
bracket.
bottom,
(If the
put
flit die door
flom
plastic
it back
on
away
flom
file
file pin
in the
bottom
washer
socks
to the
THE HARDWARE
4.1 Moxe the bottom hinge bracket
the right side to the left side.
and plastic washer fiom
Plastic
file hinge.)
_J_
Switchthe hingepin to the
oppositesideof the bracket.
!..
®-.1I-.¢---.
I
11_./_2_
Hinge
Bracket
3.4 Set tile door outside-up
on a non-scratching
surface.
12
__1 Washer
_1_
Installation
Instructions
I_ REVERSING THE HARDWARE (CONT.)
[] REVERSING THE DOOR
HANDLES ICONT.I
4.2 Interchange
hinge and screws at top right with
screws at top left of cabinet. Do not tighten screws
on hinge side at this time.
5.1.4
on the opposite
the top hinge.
I'1t
1'1'
Remove plug button fl'om the top hinge hole on
the left side of the door and insert it into the hole
side that was vacated
by removal
of
Plugu_
Installingthe hingeon the left. Installingthe hinge on the right.
5.1.5
NOTES:
Pull the plug button
flom the flont
and transfer it to the opposite
side.
• Some hinges have four holes. Which holes you
use for installing the hinge depends on which
side you install the hinge.
q
THE DOOR HANDLES
5.2 Transfer
5.1 Transfer fresh food door handle
5.2.1
5.1.1 Remove the handle plug using a rope-tipped
putty knife under the edge, and remove the
screw underneath.
Remove the two screws
holding
the handle
handleon the
oppositeside.
PlugButton
• The outer edge of the hinge should be parallel
to the edge of the case for correct installation.
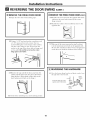
REVERSING
of the door
I
Toreattachthe
door stop
Move the metal or plastic door stop and
screws flom the right side to the left side.
_!Door
Stop
__
to the top of the doo_.
Left
RightSide __._.;_
DoorStop
Plug'_
I
5.1.2
Remove
the handle.
I
5.3 Reinstalling
Handle
5.1.3
RightSide
Remove the screws flom the right edge of the
door top and insert them into the handle screw
holes on the opposite
side.
5.3.1
Attach
the Fresh Food Door
the handle
to
the right side of the
door with screws at
the top and under
the handle plug.
5.3.2
Reinstall
handle
13
the
plug.
Installation
Instructions
REVERSING THE DOOR SWING
I-_ REVERSING THE DOOR HANDLES (CONT,)
5.4 Transfer Freezer
5.4.1
Remove
Door Handle
I-_ RE-HANGING
6.1.2
the screw
screws holding
the
handle
to the 1)ottom
of the door.
Remove
THE DOORS (CONT.)
Insert the pin on the center
hinge into the socket
the top of the door. Place the spacer, then the
in
_e_Hlnge Pin
washer, on the hinge pin.
NOTE:
The center
hinge must
be turned
o_er as shown when
mounted
on the left side.
holding
the handle
to the top of the
door and the two
5.4.2
(CONT.)
and Spacer
the handle.
6.1.3
Tilt the door
toward
the cabinet.
As the door
is
1)rought
into position,
slide the hinge under
the head
of the screw which earlier had been partly driven into
the outermost
hole. Insert the remaining
screw, then
tighten
1)oth screws securely.
5.4.3
Remove
the screw tiom
the
right top edge of the door
and insert it into the
handle
screw hole on the
left side.
I
5.4.4
Transfer
the door
section 5.2.
stop
5.4.5
Attach
to the
right
the
edge
handle
as shown
in preceding
6.2
Re-hang the freezer
6.2.1
Lower
I
of the door
Re-hang the fresh food door
6.1.1
I,ower
the
fresh
food
hinge
is in place
on
6.2.2
Tilt the door toward the cabinet,
lifting the top hinge
so the pin fits into the socket on the top of the door.
6.2.3.
Make sure the door is slightly above the top of the
cabinet
and the gap between
the doors is even across
the tiont. Tighten
the top hinge screws. Do not
overtighten
these screws-tighten
them until they are
just snug, then turn them another
one-half
turn.
THE DOORS
6.1
bottom
door
door
and Spacer
stop screws.
I-_ RE-HANGING
freezer
pin. Be sure the
Center Hin
onto
the andcenter
g__L
washer
spacer hinge
are in place
on the pin
...............
with screws at top and
l)ottom,
using bottom
holes
_cated
1)y remowd
of the
door
the
pin.
the
door
onto
Be sure
the
the
washer
pin.
Plastic
Washer
Hinge __
Bracket
L_
L
14
Normal operating sounds.
AmerioanaApplianoesoom
Newer refrigerators sound different from older refrigerators.
and use newer technology.
Modern refrigerators
have more features
Do you hear what I hear? These sounds are normal.
• The.ewhighefr,cie.cy
conlpressor
nlay
itln
f.s_e,..d longe,_ha.
HUMMM...
--
_lllfll
fllAl_
WHIR!
Ill
wnuuon...
your old refrigerator
and you may hear a high-pitched hum or pulsadng
sound while it is operadng.
a large amount
of food is added to the refligerator
fleezer compartments.
The fans are helping
to
maintain
the correct temperatures.
• You may hear a whooshing sound when the doors close.
This is due m pressure
equalizing
within the refligemmL
6
CLICKS, POPS,
CRACKS and CHIRPS
• You may hear cracking or popping sounds when file
refligerator is fi_st plugged in. This happens as the
refligemtor cools m the correct mmpemmre.
•
The compressor may cause a dicking or chiIping sound
when attempting m restart (rids could rake
up m 5 mint]ms).
•
Expan0on and cormaction of cooling coils during and
_ffter deflost can cause a crocking or popping sound.
•
On models wkh an icemake_; _ffter an icemaking cycle, you
m W hear the ice cubes dropping into file ice bucket.
• You may hear the fans spinning at
high speeds.
This happens when the refligerator
is first plugged in, when the doors
are opened flequenfly or when
or
WATERSOUNDS
•
The flow of refligemnt dnough file fleezer cooling coils
m W make a gurgling noise like b41ing wateL
•
Wamr dropping on the deflost heater can cause a sizzling,
popping or buzzing sound during the deflost cycle.
•
Awater dfippi_g n4se may (_2ctlrduring file defrost cycle as
ice melts flom file evaporator mad flowsinto file &vfinpan.
•
Closing file door m W cause a gurgling sound due m
pressure equalization.
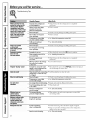
Before you call for service...
Troubleshooting Tips
Save time and money!l Review the charts on the following
pages first and you may not need to call for service.
Possible Causes
Refrigerator
doesnot
operate
Refrigerator
in defrost
Temperature
control
What ToDo
cycle.
• _(Mfitabout 30 minutes for defrost cyde to end.
in 0 position.
• Move file mmpemmre conUol dial m a mmpemmre
setting.
Refrigerator is unplugged.
• Push the plug complemly into the outlet.
The fuse is blown/circuit
breaker is tripped.
• Replace filse or reset the breakeL
Vibrationorrattling(slight
vibration
is normal)
Roller screws or leveling legs
need adjusting.
• See Rollers andLevelingLegs.
Freshfoodorfreezer
compartment
too warm
Temperature control dial
not set cold enough.
• See About thetemperaturecontroldial.
Warm weather or frequent
door openings.
• Set file temperature conUol dial one step comet.
SeeAbout thetemperaturecontroldial
Door left open.
• Check to see if packalge is holding door open.
Package blocking air duct in
freezer compartment.
• Check m see if packalge is Necking air duct in fleezer
dial
co[ilpartlllent.
15
Before you call for service...
Troubleshooting Tips
PossibleCauses
What ToDo
Motor operates for long
periods or cycles on and
Normal when refrigerator
is first plugged in.
* Wait 24 horns for file refligemtor
cool down.
offfrequently. (Modern
refrigerators with more
storage space and a larger
space and a larger freezer
require more operating
time. They start and stop
often to maintain even
temperatures.)
Often occurs when large
amounts of food are
placed in refrigerator.
* This is hernial.
Door left open.
Hot weather or frequent
door openings.
• Check to see if package
* This is nomml.
Temperature
control dial
set at the coldest setling.
* See About the temperature control dial.
Grille and condenser
need cleaning.
• See Care and cleaning.
Frost orice crystals
Door left open.
• Check to see if package
on frozen food
(frost within package
is normal)
Too frequent or too long
door openings.
Automatic icemaker
Icemaker
does not work
Water supply turned
not connected.
(onsome models)
to complete b,
door open.
is holding
is hoMing door open.
• Move the feeler ann to the ON (down) position.
is not on.
off or
* See Installing the water line.
Freezer compartment
too warm.
• Wait 24 hems
cool down.
Piled up cubes in the storage
bin cause the icemaker
to shut off.
• Level cubes by hand.
Frequent"buzzing" sound
Icemaker is on but the water
supply to the refrigerator has
not been connected.
* Move the feeler am1 m the STOP (up) position.
on will damage file water valve.
Cubestoosmall
Water shutoff valve connecting
refrigerator to water line may
be clogged.
* (hll the plumber
SIowice
Door left open.
* Check to see if package
Temperature control dial
not set cold enough.
* See About the temperature control dial.
Ice cubes have
Ice storage bin needs cleaning.
* EInpb, and w;ksh bin. Discard oM cubes.
odor/taste
Food transmitting
to ice cubes.
* XVmp foods well.
cube freezing
odor/taste
for the refligemtor
to completely
Keeping it
to clear file valve.
is hoMing door open.
Interior of refrigerator
needs cleaning.
• See Care and cleaning.
Moisture forms on
cabinet surface
between the doors
Not unusual during
periods of high humidity,
* \Vipe surface dxT and reset temperature
one setting coldeL
Moisture collects inside
(in humid weather, air
carriesmoisture into
refrigerator when doors
are opened)
Too frequent or too
long door openings.
Refrigeratorhas odor
Foods transmitting
* Foods with strong oclo_s shouM be tightly wrapped.
odor to refrigerator.
* Keep an open box of t)aking soda in the refligemtor;
replace evely three months.
Interior
• See Care and cleaning.
/6
needs cleaning.
control
dial
GE Service
GE, a name
you Service
Benefits
Protection
recognized
Protection
Plus
TM
worldwide
ff)r quality
Plus'_--comprehensive
and dependability
together
with Assurant
protection
on your appliances.*
Solutions,
offers
Include:
* Prompt, reliable
service from GE Authorized
Servicers
, Convenient
hours designed
to suit your busy schedule
, Quality replacement
parts
, The dependability
of GE, a name recognized
and trusted
, Ask about our interest-free
payment plans
worldwide
With Service Protection
Plus you can expect:
• An extended
service plan that limits unexpected
repair bills
• Service coverage
for most m_jor brands
• Unlimited
service calls for the length
of your contract,
or credit toward a replacement
product
• Service coverage
for covered operating
parts and labor on appliances
and home elecuonics
that fail during
normal
single family household
use
• Your satisfaction
is our goal. We suive to provide you with excellent
service in a professional
and timely manner.
Place
*Most
SPP
your confidence
brands
covered
is a trademark
up
in GE and call us in the U.S. toll-free
to 15 years
of General
Electric
old in the
continental
at
1.800.626.2224
for more
information.
U.S.
Company.
...............
Please place in envelope and mail to:
General Electric Company
Warranty Reg_tration
P.O. Box 34980
Louisville,
Department
KY 402324980
77
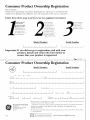
Consumer
Product
Ownership
Registration
Dear Customer:
Thank you for purchasing our product. Re_stration for Americana '* is provided by GE.
Thank you for placing your confidence in us. We are proud to have you as a customer!
Follow
these
three
omplete
steps
and
to protect
your new appliance
mail
After mailing
the
istration
bel(m,
;tore this doculnellt
Consumer
_roduct
Ownership
Registration
today.
Have
the
mind
of knowing
peace
can contact
the unlikely
)'O fir
t will help
a sate' place, h
COlltains ildi)rmation
of
we
}ou will need
)ou in
event of a
}ou require
Our service
sate't} modification.
the
Model
you
}'o/Ir Ile_,\
operate
appliance
service.
immber
properly.
in
C,E
(800.432.2737).
Number
Serial
Number
If you did not get a registration
card with your
product,
detach
and return the form below to
ensure
that your product
is registered.
...................
Consumer
Product
Ownership
Model
Mr. J
First]
Name
Ms.::i!
Mrs.::i!
_,,_
(;ut here
Registration
Number
Serial
,,,,,,,,,,I
I
Number
I
I
I
I
I
I
I
Miss ]
I
I
I
I
I
I
I
I
I
]
[
I
I
I
I
I
I
I
I
I
I
ap_.#l
I
I
I
,
I
I
I
I
Street
Address
()_vller's
should
USA is: 800
(;ARES
Important:
investment:
I,ast
Name
I
]
I
I
I
I
I
I
I
I
I
I
I
I
I
I
I
I
I
I
I
I
I
I
I-I .
.
E-maUA(_(_ress*
Zip
I)at_ Plaid
"'_"1,
Month
I
Da,I,
I
,_arl.
* Please
provide
commtmications
GE Consumer & Industrial
Appliances
General Electric ¢ompanu
Louisville, KY 40225
ge.com
/8
Check
here
FAILURE
TO
X,tS_RRANTY
I
your
N.mberlI.
P,o.e
e-mail
fi'om
if )ou
address
to receive,
GE Appliances
do
not
COMPLETE
want
AND
I-I .
via e-mail,
discotmts,
.
special
ofl_'rs
aIM other
impormm
selected
partners.
(C, EA).
to receive
RETURN
colmmmicatiolas
THIS
CARD
fi'om
DOES
NOT
GEA's
carefull}
DIMINISH
YOUR
RIGHTS.
For intormation
about
or call 800.626.2224.
GEA's
privac}
and
data
usage
polic};
go to ge.com
and
www.A mericanaAppliances,
click
on
corn
"Privacy
Policy"
Refrigerator Warranty.
All warranty services for Americana
are provided by GE Factory
Service Centers, or an authorized Customer Care® technician.
To schedule service, call 800.432.2737. Please have serial number
and model number available when cafling for service.
Staple your receipt here.
Proof of the original purchase
date is needed to obtain service
under the warranty.
TM
We Will Replace:
Fromthe date of the
original purchase
Anypartof die refligemtor
which fails due m a defect in materials or workmanship.
During [his limited one-year warranty, we will also provide, free of charge, all labor
and related service to replace the defective part.
Service trips to your home
product.
Improper
instaUation,
to teach you how to use the
delivery
or maintenance.
Replacement
breakers.
of house
fuses or resetting
Replacement
of light bulbs.
Failure of the product if it is abused, misused, or used for
other than the intended purpose or used commercially.
Damage to the product
or acts of God.
Loss of food due to spoilage.
Incidental
or consequential
defects with this appliance.
Damage
caused after delivery.
Product not accessible
of circuit
caused by accident,
damage
fire, floods
caused by possible
to provide required
service.
Products which are not defective, broken, or which are
working as described in the Owner's Manual.
EXCLUSION OFIMPLIED WARRANTIES--Your sole and exclusive remedy is product repair as provided in this
Limited Warranty. Any implied warranties, including the implied warranties of merchantability or fitness for a
particular purpose, are limited to one year or the shortest period allowed by law.
This warranty is extended to the original purchaser and any succeeding owner for products purchased for home
use within the USA. If the product is located in an area where service by a GE Authorized Servicer is not available,
you may be responsible for a trip charge or you may be required to bring the product to an Authorized GE Service
location for service. In Alaska, the warranty excludes the cost of shipping or service calls to your home.
Some states do not allow the exclusion or limitation of incidental or consequential damages. This warranty gives
you specific legal rights, and you may also have other rights which vary from state to state. To know what your
legal rights are, consult your local or state consumer affairs office or your state's Attorney General
Warrantor: General Electric Company. Louisville, KY 40225
19
ConsumerSupport.
ScheduleService
Expert GE repair service is only one step away from your dooL Schedule service at your convenience
800.432.2737 during nomlal business hours.
by calling
In Canada, call 1.800.561.3344
ExtendedWarranties
Purchase a GE extended warranty and learn about special discounts that are available while your warranty
in eff)ct. You can purchase it by calling 800.626.2224
during nomml business hems. GE Consumer
Home
will still be there after your warmnly expires. In Canada, call 1.888.261.2133
is still
Services
PartsandAccessories
IndMduMs quMified m seiMce dleir own appliances can have parts or accessories sent direcdy m their homes
(VISA, MasmrCard and Discover cards are accepted). Order by phone at 800.626.2002 during normal business
hotlI'S.
Instructionscontainedin thismanualcoverprocedurestobeperformedbyanyuser.Otherservicing generallyshould be
referredto qualifiedservice personnel Cautionmustbe exercised,since improperservicing maycauseunsafeoperation.
Customers in Canada should consult the yellow pages for the nearest Mabe service center; or call 1.888.261.3055.
ContactUs
vvvvvv.AmericanaAppliances,com
If you are not satisfied Mill die se_Mce you receive flom GE, send a letter
numbeL
_A/lite to:
(;eneral Manage_; Customer Relations
GE Appliances,
Appliance
Park
Louisville, KY 40225
In Canada:
XA/riteto:
Directo_; Consumer
Relations,
Suim 310, 1 Factory Lane
Moncton,
N.B. E1C 9M3
m GE. Please
Mabe Canada
include
your phone
Inc.
,.*,"_' Printedi)) the United States
_
Printedon RecycledPaper
Congelador superior
Refrigeradores
Informaci6n
de seguridad
Cables de extensi6n
.................
C6mo conectar la elect_icidad
........
3
3
Precauciones
2
de segmddad
Instrucciones
Con
trol
...........
de operaci6n
.........................
4
Cuidado y limpieza
...............
6
Estan tes .........................
4
Gavetas de ahn acen ami en to ......
4, .5
M_quina de hielos autom_tica
......
.5
Instrucciones
Cdmo invertir
para la instalaci6n
el vaivdn de
Escriba aqui el modelo y el n#mem
de serie:
la puerta
lnstalacidn
Modelo #
del agua ......................
Preparaci6n
para in stalar
el refrigerador
. ..................
Serie #
Encuentre estos m)meros en ][a
edquem en el hdo izquierdo de la
parte superior de] comparfimiento
de][ reffigerador.
....................
de la tuberfa
11-14
8-10
7
Consejos para la soluci6n
de problemas
An tes de soli ci tar un servi ci o ....
Son idos n orm ales de operaci 6n
Soporte
al consumidor
Garan tfa .......................
Soporte
www.A medca naApp
_÷_'
al consumidor
15, 16
.... 1.5
19
. ..........
20
Modelos 16, 17, 18
lia nces. corn
/rnpreso en /os Estados Unidos
/m_o _ _/ _i_/_do
19705984P004
49-60522-1
08-08 JR
/MPORTANTE/NFORMACiONBESEGUR/DAD.
tEA TODAS/.ASINSTRUCC/ONES
ANTESBESU USO.
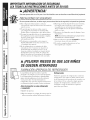
a, iAB VER'
!
Use este aparato s61ocon el fin para el cual fue disefiado como se describe en este Manual del pmpietario.
PRECAUCIONES
DESEGURIDAD
AI usar aparatos el#ctricos, se deben seguir precauciones bbsicas de seguridad, incluyendo las siguientes:
Este refiigerador debe insmlarse y ubicarse
correcmmen/c
segtln las Instrucciones de insmlaci6n
antes de su tlSO.
No permim que los nifios se suban, se paren
o se cuelguen de los estantes en el refiigerador.
Podffan dafiar el refiigerador y sufiir g_aves dafios.
No toque las superficies fi_as en el comparfimienm
del congelador con las manos hfimedas o m(_adas.
[a piel se puede pegar a esters superficies
extremadamen/c
flf_s.
No almacene o use gasolina u o/ros vapores y
lfquidos inflamables en las _ireas cercanas a estc
o a cualquier owo aparato.
Mantenga los dedos alejados de las fireas estrechas;
los espacios en/re las puerms y entre las puert_s
y los gabinetes son necesariamen/c
pequefios.
Tcnga cuidado al cerrar las puerms cuando h_a
nifios en el _irea.
Desconecte el refiigerador
reparaciones.
anms de limpiar y hacer
NOTA:Recomendamos
enfbticamentequacuatquierservicio
seareatizadopor un bdividuo catificado.
Fijar el conuo] en la posici6n 0 (apagado)no elimina
la corriente hacia el circuim de luces.
No _mlva a congelar alimen/os
descongelado
pot completo.
que se hart
En los refiigeradores
con m_iquinas de hielo
aumm>iticas, evite el conmcto con las partes en
movimiento del mecanismo eyecmr, o con el
elemenm calef:,mmr localizado en la parte inferior
del dispositivo para hacer hielo. No coloque los
dedos o las manos en el mecanismo de la m_quina
de hielos mientras el refiigerador
est_ conecmdo.
iP
SE
/GRO!
A
BE
LOS
f
ELIMINACION
APROPIADA
DELREFRIGERADOR
Los problemas
de que los nifios se queden
atrapados
y se sofbquen no son cosas del pasado.
Los refiigeradores
desechados
o abandonados
siguen siendo peligrosos, afin si s61o est;in pot
"unos pocos dfas". Si est:i desechando
su
refligerador
viejo, pot favor siga las instrucciones
a condnuaci6n
para wudmle a evimr accidenms.
Antes de desechar su viejo refrigerador
e cenge/ador:
}; Qukele las puerms.
Deje los esmntes en su lugm; de manera que los
nifios no puedan subh_e fiicilmente al interior
2
Refrigerantes
Todos los aparatos de refligeraci6n
condenen
refiigerantes,
los cuales se deben redrar antes
de la eliminaci6n del producto de acuerdo con
la ley federal. Siva a desechar algfin aparato
andguo de refiigeraci6n,
consulte con la
compafifa a cargo de desechar el aparato
para saber qu5 hacer.
www.PmericanaPppliances.com
A iAD
I
COMOCONECTAR
LAELECTRICIDAD
Bajo ninguna circunstancia, no corte ni retire la tercera pata (conexi6n a fierra) del cable de electricidad.
Por seguridad personal, este aparato debe estar correctamente conectado a fierra.
E1 cable el_ctrico de este aparato est_i provisto de
till enchufe de ues patios (conexidn
a delTa) que
encomia ell till tomacoriiente
est_hldar de 3 oiificios
(conexidn
a derra) para minimizar
la posibilidad
de peligro de till choque el_ct,ico de esm aparato.
Haga que el tomacorrienm de la pared y el circuito
sean revisados por till elecuicism caUficado para
asegurar que el tomacorrienm fiene la conexidn a
fierra apropiada.
Cuando haya till tomacorrienm
est:indar de dos
paras, es su responsabilidad
y obligacidn
personal
reemplazarlo
con un tomacorIienm
adecuado
de
tres oIificios correcmmenm
conecmdo
a deiia.
E1 refligerador deberg siempre esmr conecmdo ell
su propio tomacoriiente el_ctiico individual que
tonga till nivel de volt_je que se _jusm a la placa de
potencia.
Esto oflece el mejor desempefio
y tambi&l evim
sobreca_gar
los circuitos elSctricos de la casa que
podrfan causar un incendio a partir de los cables
reca/enmdos.
Nunca desconecm
su refligemdor
ha/ando
cable el_ct_ico. Nempre
tome el enchufe
fimlemente
y hfi/elo directamenm
del
[OlIlacoIrien[e.
del
Repare o reemplace
de inmediato
todos los cables
elScuicos que se hayan desgasmdo o daf/ado. No
use tlll cable que tonga griems o dafios de abrasidn
en su longiuld o en cualquier
extremo.
A1 redrar el refligerador
de no enrollar o dafiar
de la pared, tenga
el cable el_ct_ico.
cuidado
USODECABLES
DEEXTENSION
Debido a peligms potenciales de seguridad bajo ciertas condiciones, nos oponemos al uso de cables de
extensi6n.
Sin embargo,
si debe usar un cable de extensidn,
es absolutamente
necesario que sea un fipo de cable
de exmnsidn pare apamtos con conexidn a fierra de tres cables, que est_ en la ]ism de UI, (en los Esmdos
Unidos) o en la lism CSA (en Cana&i), que tonga un enchufe de fipo conexidn a fieria y saUda y que
el giado el_ct_ico del cable sea de 15 amperios
(mfnimo)
y 120 voltios.
LEAYSIGACUIDADOSAMENTE
ESTAINFORMACION
DESEGURIDAD.
CONSERVE
ESTAS/NSTRUCC/ONES
3
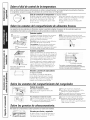
Sabre el dial de control de la temperatura.
Girar el dial a 8 interrumpe el enfriamiento en ambos comparfimientos: el compartimiento
el congelador, aunque no apaga el suministro de corriente hacia el refrigerador.
de alimentos frescos y
Dial de control de la temperatura (onalgunosmodelos)
E1 dial de control de la/cmpec,
mwa fiene nueve
nivcles mils 0. Ies el nivcl mils calientc v 9 es el
nivcl mils flfo, lnicialmenm,
fije el dial en 5.
Inser/c una moneda
en la nmuca en el centro
del dial y podc, i gicar el dial hacia el nivcl que
mejor se adapm a sus necesidades.
Despu_s de usar el rcfiigemdor,
de set necesario,
Permi/a 24 hams
se enflfc.
Lqusm el dial
pare que el refiigcmdor
Sabre los estantes del compartimiento de alimentos frescos.
Los soportes do los estantes en diferentes nive/es le permiten adaptor el espacio de los estantes segOn sus
necesidades. No todas los caractedsticas est_n presentes en todos los modelos.
Estantos medias
[]
/Jn extremo del estante descansa sabre un soporte
moldeado en el costado; el sopoi_e en el otto
extremo se engancha en un riel en la parte
posterior de la pared del gabinete.
Levantehacia
NOTA: E/estante hacia /a derecha de/rio/estfi
disefiado para engancharse en /a ranura de/a derecha;
el estante hacia /a /zquierda estfi diseMdo para
engancharse en /a ranura izquierda.
Para retirar, lexm_te el estante en la parte delanteca,
luego saque del soporte y fi_eca del riel.
Para reemplazar,seleccione la altma deseada pare
el estante. Con el estante delantero lexvmtado
FT-]
ncune nacla arriba
ligemmente,
enganche la oreja superior del soporte
en el riel, luego b;!je el esmnte hasm el soporte.
Estantes comp/otos
kevante]a oarteDoaerior
Algunos modelos tienen un estante desli/smW en
alambre de acero, un estante de vidrio mmperado
estacionmio,
un estanm a prueba de salpicaducas
o dos estantes estacionarios
en alambre de acero.
Estos estanms se pueden mo\vr hacia otto lugar
en el comparfimiento
de alimentos flescos.
E1 estanm desliamm
de tamaflo completo tiene
flenos. Cuando se coloca correctamenm
en los
lafrente
Para retirar los estantes de
tama_o completo
soportes del estante, el estante flena antes de
salirse completamenm
del refligemdor
y no se
inclinar_ cuando coh)que o fettle alimentos
del mismo.
Para retirar un estante de tamafio completo
cuando la puerta del compartimiento de alimentos
frescos no se pueda abrir completamente
Estantes a prueba de salpicaduras
(on algunos
modelos)
Los es/antcs
a prueba
de salpicaduras
tienen barrios
especiales
para evimr que
las salpicaduras
se fieguen
a los esmnms
infcriores.
Para retirar o reemplazar
los
estan/cs,
yea las instrucciones
arribas
Sabre los estantes de/compartimiento de/conge/ador.
Estante de escaion
Para retirar el estante de escal6n:
_] Levante el lado izquierdo
del escaldn
ligemmente,
[-_ Muexa el estante hacia la izquierda
paca liberar los extremos
derechos
orificios
en la pared
de los
del gal)inete.
-3-] el aje
el costado
estante
hacia derecho
la derecha del y estante,
s_iquelo. mue_a
Para reemplazar el estante
de escal6n:
-_Con
el estante inclinado coma aparece, ajuste
los extremos del lado izquierdo del estan}e en
los ofificios de la pared del gabinete.
Sabre los gavetas de almacenamiento.
No todos los caracteristicas
est_n presentes on todos los modelos.
Gavetas para frutas y vegetales
Se debe retirar
el exceso
de agua que se
pueda
acumular
al fbndo de las gavetas
y se deben
secar las gavetas.
-] ligecamente,
,exante el costado
estante
muexa izquierdo
el estante del
hacia
arriba,
@/ste los extremos del lado derecho del
estante en los orificios de la pared del gabinete
) b_!je el estante a su lugar
Sobre /as gavetas de a/macenamiento.
_:___-_-_
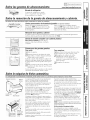
Gaveta de refrigerios
!
!
La ga, eta de refligerios
se puede
mo,
er a la posicidn
fitil segfin
las necesidades
de sum_is
fimfilia.
www.PmericanaPppliances.com
Sobre la remocion de la gaveta de a/macenamiento y cubierta.
No todas /as caractedsficas
Humidity
Gontro
HIGH
estbn presentes on todos los modelos.
!
Gaveta preservadora de humedad ajustable (onalgunosmodelos)
Deslice el control
completamente
basra
la posicidn
HIGH (alto) para oflecer
la alto
humedad
recomendada
para la mayorfa
de los vegetales,
LOW
Lleve el control
per complete
basra la
posicidn
LOW (bajo) pata ofiecer
los niveles
bajos de humedad
recomendados
para la
mayorfa
de las flu/as.
Remocion de la gaveta y cubierta
Se pueden
refirar
las gavetas f:,k:ilmente
tomando
mientras
hala las gavems m_s alb_ de la ubicacidn
los costados
del #one.
} le_an/ando
ligeramen/e
Gaveta de tama6o comp/eto con cubierta pl#stica
Para retirar la cubierta, lmante
soportes,
} s_quela.
hale
hacia
delan/e,
de los
inclfnela
Estante para /as gavetas geme/as
Para retirar:
Para reemplazar:
;] B_ie el marco basra que descanse sobre
los soportes
en cada costado
y atr_s.
Z] Retire ]as gavctas.
[_
mpuie el flente de la cubierta de vidrio
hacia arriba, y al mismo tiempo, hale hacia
delantc tanto come se pueda.
Inclfnela y sfiquela. Evim limpiar la cubierta de
vidrio flfa con agua calienm ya que la diferencia
de mmpecatucas
extremas
podrfa causar que se
quiebre.
i
'j]
-]
eemplace
empujando
firmemente
la cubierta
de Gdrio,
su horde l)osterior
en el canal del marco
posterior
y suaxemente
hacia su lugar.
'j] Reemplace
1)aje el flente
las gaxetas.
etire el marco de la gmeta. (Siempre
retire
la cubierta de vidrio m_tes de sacar el marco
& ]a gavcta.)
Lcxm_tc el marco de los soportcs en cada costado
y atF, is, hale hacia delanm, incline y saque.
Sobre/a ma ulna de hie/osautomatica.
Un refrigerador
!ntermptordecoviente
recientemente
M_,_uina
c
instalado puede tomar entre 12 y 24 heros para empezar a hacer hielo.
La mtiquina de hielos producirfi aproximadamente
entre 3 y 3,5 libras de hielo en un periodo de
24 hems, dependiendo
de la temt)eratm;l del
compartimiento
del congeladoc la temt)eratma del
cuarto, el ndmeio de veces que se ab,e la puerta
v otras condiciones de llSO.
Si el refl igemdor se opera antes de hacer la conexidn
del agua hacia la mtiquina de hielo, mum:_ el b,azo
de llenado hacia la posici6n STOP
(hacia arriba).
Cuando se hava conectado el refl igeiador al
suministro deagua, mue_;l el b,azo de llenado hacia
la posici6n ON (hacia ab@0.
La mtiquina de hielos se llenar:i de agua cuando se
entire basra 15°E Un refligerador reci&_ instalado se
puede tomar entre ] 2 y 24 betas para empe/_lr a
hare1 cubes de hielo.
[J1)a vez que la mtiquina de hielos empie/;_ a hacer
hielo, pnede tomar hasta 48 horas para llenar el
compartimiento,
dependiendo
de los niveles de
temperamra y del ndmero de veces que se abra la
puerta.
Escuchar:i un mmlbi(to cada vez que la mtiquina de
hielos se llene de agua.
Brazede]lenado
haciala posici6n
ON(haciaabajo)
Ilenado hacia
]a posici6n
STOP(hacia
arriba)
Deseche los p,imeros cubes de hielo pma permitir
que la lfnea del agua se limpie.
Asegdrese de que nada interfiera
del braze indicador
con el movimiento
Cuando el contenedor se llene al nivel del braze
indica&m la m_iquina de hielos dejar, i de producir hielos.
Es normal
que varies cubes de hielo sejtmten.
Si el hielo no se usa con flecuencia, los cubes de hielo
viejo se \o]\rel}in mrbios, con saber ranciov se
encogerSn.
En los modelos de interrupter de energ_a, la luz verde
se \olverfi intermitente si los cubes de hielo se atascan
en la mtiqnina de hielos. Para corregir esto, ponga el
intemlptor de corriente en la posicidn de 0 (apagado)
y retire los cubes. Reglese el inteHuptor de corriente
a la posici6n de / (encendido) para reiniciar la
mfiquina de hielos. Despu& de haber encendido de
numo la mtiquina de hielos, hab,;i una demo,a de
45 minutes antes de que la mtiquina de hielos reinicie
las operaciones.
NOTA: Enhogaresconpresibnde aguainferiora/ promedio,es
posib/eque escuchee/ cic/ode/a mgquinadehMos variasveces
al hacerun /otedehie/o.
Kitde acceseriosde la maquina de hielos
Si su refl igerador rLoviene ya equipado con tma
mtiquina de hielos automtitica, existe un kit accesorio
para la mtiquina de hielos que estfi disponible per un
costo adicional.
Revise en la parte posterior del refiigeradoi
del kit para la mfiquina de hielos especNca
necesita para su modelo.
en busca
que
5
Cuidadoy limpieza de/refrigerador.
Limpieza exterior
Mover el refrigerador
Las maniias de la puerta y aoeesorio (en algunos modelos).
[,impie con un patio humedecMo
con aguajabonosa.
Seflue
con un patio seco.
Tenga cuidado a] mover el refiigerador ]ejos de ]a pared.
Todos los tipos de cubierms de piso se pueden datim;
particulam_en/e
]_s cubierms ac@nadas y aquellas con
superficies con disetios en relieve.
Mantenga el exterior limpio.I,finpie]o con un patio ligeramen/e
humedecido
con cera de cocina para electrodom&ticos
o
demrgente lfquido suave pata plains. Seque y b,dlle con un
patio limpio y seco.
Lospaneles y las maniias de las puertas de acero inoxidable (en
algunos modelos) pueden ser ]impiados con un ]impiador
para acero inoxMable para uses comerciales. No utilice cera
para elecuodom&ticos
sobre el acero inoxidable.
No timpie et refrigerador con un patio sucio para ptatos o con una
toatta mojada. Estospueden dejar residuesVpueden emsionar ta
pintura. No use a/mohadi/tasde restregar,/impiadores en potvo,
b/anqueadoreso Iimpiadoresque contenganbtanqueadoresya que
estos productos pueden raspar y debflitar el acabado de pintura.
Hale el refligerador
en ]fl_ea recto y regr&elo a su posicidn
empuj_h_dolo de ]a misma fb_na. Moverelrefrigeradorenuna
direeei6n lateral puede resultar on dafiosa la superfieie del piso
o al refrigerador.
Cuandoempuje de nuevo et refrigerador, asegE/resede no pisar et
came etbctrico o/a ffneade suministroa/a mfiquinade hie/os
(en atgunosmodetos).
Despuds de rodar el refligerador
a su posicidn, gire
]as paros de] refiigerador
en el sentido de ]as maneci]]as
de] re]oj hasm que ]as paras sostengan nuevamente
el peso
de] refiigerador.
Reposicion de la bombilla
Limpieza interior
Para ayudara evitarolores, deje una c_ua abierm de
bicarbonate
en los compartimien/os
de alimen/os fiescos
yen el congelador.
Oesconeete el refrigeradorantes de limpiarlo.Si esto no es
pr_ctico, escurra ]a humedad excesiva con una esponja o patio
al ]impiar ahededor de los inte,Tuptores, ]uces o conUoles.
Use una solucidn de agua tibia y bicarbonato--una
cucharada
(15 m]) de bicarbonate
para un cuarto (1 li/ro) de agua. Esto
lira piay n e,maliza los olores. Enj uague y seque.
Despuds de ]impiar los empaques
de ]a puerta, aplique
tma capa delgada de vaselina en los empaques
de ]a puerta
en el cosmdo de ]a bisagra. Esto a}alda a evitar que los
empaques
se peguen y se doblen basra perder su forma.
Evite limpiar los estantes de vidrio frfos (en atgunosmodetos)con
agua catiente va que la diferencia de/as temperaturas extremas
puede causar que se quiebren.Manipute los estantesde vidrio con
cuidado. 6otpear et vidrio temptadopuede causar que se quiebre.
No lave ningunaparte ptfistica c/elrefrigeradoren ta tavadorade plato&
Condensador
No hay necesidad
Limpiezade los
serpentines
operacidn
de una limpieza de rutina del condensador
en ambien/es de operaci6n de
hogares normales. Sin
embargo, en ambien/es que
puedan ser par/icularmen/e
po]_orientos o grasosos, el
condensador
debe ]impiarse
periddicamenm
para una
de] refiigerador
del condensador
eficiente
Para ]impiar el condensado,; gire el dial de control de ]a
temperatura a 0. Barra o aspire el po]vo.
Para mejores resulmdos use un cepillo especia]mente
disetiado para este fin. Es/5 disponible en la mayorfa de
tiendas de partes de elec/rodom&ticos.
6
Para reemplazar
una bombilla quemada,
desconecte
el
refiigerador
de] tomacorriente
eldctrico, desenrosque
la
1)ombilla cuando estd frfa y reempb_cela
con una 1)ombilla
para refiigeradores
de similar o inferior w)lt_ue.
girar et control a ta posicibn 0 no desconecta ta corriente de/
circuito de ta tuz.
Come prepararse para /as vacaciones
Para una largas vacaciones o ausencias, retire los a[imentos
y desconecm
el refiJgerador
Gire el dial de conuol de
]a temperature
hacia la posicidn O (apagago}, y limpie el
interior con una solucidn de una cuchamda
de
bicarbonate
(15 ml) y un cuarto
Deje las puertas abierms.
(1 ]itro) de agua.
Mueva el braze de llenado a ]a posicidn STOP (hacia
arriba) y cierre el suministro
de] agua hacia el refiJgemdor
Si la temperature
puede caer per deb_jo del punto de
congelamiento,
haga que una persona calificada drene el
sistema de] suministro
de agua (en a/gunos modelos)
pare
evimr series datios a ]a propiedad
causados per
inundaciones.
Come prepararse para trasladarse
Asegure redes los artfculos suekos come la reiilla, los
esmnms y c_jones peg:_ndolos con cinm en su lugar pare
evimr datios. AsegOrese de qua el refrigerador permanezca an
una posici6n vertical durante el traslado.
I str
I |
[]
|
[]
[]
f
|
Modelos 16,17,18
Si tienepreguntas,Ilame a1800.432.2737
ANTES DE INICIAR
AREA
Lea est_
Permita el siguientc espacio pan_ una tiicil instalaci6n,
apropiada circulacidn del aire y conexiones de plomerfa
el_ctricas.
instrucciones
completa
y cuidadosamente.
• IMPORTANTE
instrucciones
-G,_;d_ _,t_,
para uso del inspector
• IMPORTANTE
cddigos y 6rdenes
• Nota
"Costados 3/4" (19 ram)
- o,,,_,__o_o,
lo,
"Arriba 1" (25 ram)
• Aw,is 1" (25 ram)
de ley.
al instalador
instrucciones
local.
- A_g-C,_
d_ dei_ _t_
con el consumidor.
• Nora al consumidor
para retbrencia
RODiLLOS Y PATAS NIVELADORAS
- Conserve estasinstrucciones
flm_ra.
las patas nivoladorascerca de cada esquina delantera
del refiigerador
son _justables. l_sms colocan
firmemente
el refiigerador
y evitan que se mueva
cuando las puertas se abran. Las paros niveladoras
se deben colocar de manera que el f]ente del
refiigerador
se levante lo suficiente para que las
puerms se cierren f_icilmente cuando se abran hasm
la mitad.
• Nivel de destreza - La instalacidn de este aparato
requiere de destrezas mecfinicas bfsicas.
• Tiempo
de ejecucidn
- Instalacidn
] 5 minutos
Imertir
I hora
* La instalacidn
instalador.
apropiada
* La fidla del I)roducto
inadecuada
y
del refligerador
el xaix&_ de la puerta
es la responsabilidad
debido
no est_i cubierta
Gire las paros niveladoras an e/sentido do las manocillas
del roloj para levantar el refiigeradoi; y on el sentido
contrariopara bajarlo.
a una instalacidn
por
la garantfa.
SLJMINISTRO
DE AGUA
LA MAQUiNA
DE HIELOS
{en algunos
del
LOS rodillos al lado de las patas niveladoras
le permiten
mover el refrigerador
lejos de la pared para limpiarlo.
HACIA
Gire las paros en el senddo
contrario
de las manecillas
del reloj hasm que el peso del refiigerador
se traslade
de 5sins hacia los rodillos. DespuSs de rodar el
rei:?igerador
de nuevo hacia su lugar, gire las paros en
el sentido de las manecillas
del reloj hasm que las paros
sostengan
nuevamente
el peso del refiigerador.
modelos)
Si el refiigerador
tiene tma m_(tuina de hielos, se ten(tr_ que
conectar a tma tul)erfa de agtm potable tifa. Un kit de
sunfinistro de agua (contiene tuberfa de col)re, x_ihula de
cierre, accesorios e instrucciones)
est_i disponiMe con un
costo adicional a trax_s de su proxeedor, xisitando nuestra
p_igina _¢\el) ge.com o 1)ien a trax_s de Partes y Accesorios,
] .800.661.1 61 6.
UBICACI()N
DEL REFRIGERADOR
• No instale el refl'igerador donde la/cmperamm
bL@ de 60°F
(16°C) ya que no corrcc, i con suficienm ti'ecuencia pare
mantener las mmpec, ttuc, ts apropiadas.
• Instfilela en un piso flmrm pant que lo soporte con carga
com pleta.
7
Instrucciones para la instalaci6n
COMO INSTALAR LA TUBERJA DEL AGUA
(EN ALGUNOS
MODELOS)
ANTES DE INiCIAR
QUI
i,os kits de cobre recomendados
pare el suministro
de
agua son WXSX2, WX8X3 o WX8X4, dependiendo
de la
canfidad de mberfa necesafia. His mberfas pl_hficas
aprobadas
pare eEsuministro
de agua son Eas mberfas pare
eErefligerador
SmartConnect
_" de (;E (¼,CK08X10006,
_APX08X10015 y _A,_X08X10025).
Los kits de tuberfa para el refrigerador
SmartConnect "_de
GE estfin disponibles en las siguientes longitudes:
6' (1,8 m)
-_\ XO8X10006
1:5' (4,6 m)
- _\ XO8XlO015
25' (7,6 m)
- WX08X10095
Asegfirese de que el kit que haya seleccionado
permita al
menos 8 pies (9,4 m) como se describe arriba.
NOTA: La finica tuberia de phistico aprobada de GE
es la que viene provista con los kits de tuberla para el
refrigerador
SmartConnect'"
de GE. No use ninguna otra
tuberia phistica para el suministro del agua ya que la tuberia
esta bajo presidn todo el tiempo. Ciertos tipos de pl&stico se
fracturarAn o se romperAn con el tiempo y causarAn dafios en
su casa debido al agua.
• Un kit de suministro de agua de GE (contiene tuberfa,
vfilvula de cierre y accesorios enumerados
abajo) estfi
disponible a un costo adicional en su tienda o pot medio de
Partes y Accesorios, ] .800.661.1616.
• Un suministro de agua fria. ka presidn del agmt debe estar
entre 20 y ]2(1 p.s.i. (],4-8,] bar).
_
_
• Taladro d&ctrico.
AE conecmr su refligerador
a un Sistema de Agua de
6smosis Im_ersa de GE, Ea dnica insmEacidn aprobada es
con un kit de Osmosis Inversa de GE. Para (mos sistemas
de agua de 6smosis inve_sa, siga Eas instmcciones
fhbficanm.
del
Esm insm/acidn de Ea mberfa dee agna no estfi garanfizada
pot eEfhbficante
dee refligerador
o de Eamfiquina de
hieEos. Nga esms instrucciones
cuidadosamenm
pare
minimizar el riesgo de un dafio costoso debido N agua.
EE marfiEEeo dee agua (agua goEpeando conua Ea mberfa)
en Ea mberfa de Ea casa puede causar dafios a Eas parms dee
refligerador
y conducir a un gomo o inundacidn
pot el
agua. Elaine a un pEomero calificado pare corregir eE
mardEEeo dee agua anms de insm/ar Ea mberfa dee agua
a/refligerador
• tlave
piano
• Dos tuercas
de compresidn
de 1/4"
de diaimetro
exterior
y 2 f_rulas
(mangas)
- para conectar
la tuberfa
de cobre a la vfilvula de cierre y 1
a wilvula del agua del refligerador.
Si usa eE refHgerador
anms de conecmr Ea mberfa,
asegfirese de que eE brazo de EEenado est_ en Ea posicidn
STOP (hacia arriba).
de Ea mgquina de hieEos en Eugares
caiga pot deb_jo dee nivel de
0 BIEN
• Si estfi usando un kit de tuberfa para el refligerador
SmartConnec/'_
de GE, los accesorios necesarios ya vienen
preinstalados
en la tuberfa.
• Si su tuberfa existente de cobre para el agmt dene un
accesorio con vuelo en el extremo, necesitarfi un adaptador
(disponible en las tiendas de suministros de plomerfa) para
conectar la lfnea del agua al refrigerador
O B1EN, podrfi
cortar el accesorio con vuelo con un cortador de tubos y
luego usar un accesorio de compresidn. No corte el
extremo tormado de la tuberfa para el refrigerador
SmartConnecf :'_de GE.
AE usar cualquier aparao
eE6cuico (como un m/adro
eE&tfico) dumnm Ea insta/acidn, asegfirese de que eE
aparato est6 msEado o conecmdo
de maneta que evim eE
peEigro de una descarga el_ctfica, o se opere pot baterfas.
Todas Eas insm/aciones
se deben reNizar
requisitos dee cddigo ]ocN de pEomerfa.
de 1/2" o ajustable.
• Destornill[ador
y de estrella.
Pare evimr quemaduras
y dafios con eE producto,
no
conecte Ea mberfa dee agua a Ea mberfa dee agua cNienm.
No insta/e Ea mberfa
donde Ea temperatura
congeEamiento.
NECESITA (CONT.)
segfin los
QUE NECESITA
e Kit de tuberia de cobre para el refrigerador
o
SmartConnect
T_'de GE, 1/4" de didmeuo
externo para
conecmr eE refligerador
al suminisuo
de agua. Si usa
cobre, asegfirese de que mnbos extremos de Eamberfa
se
coIten
• Vfilvula de cierre para conectar a la lfnea del agua fl'fa, i,a
vfihlfla de cierre deberfi tenet una entrada de agua con un
di_hnetro interno mfnimo de •5/, 3 _"
9 ene!puntode
conexi6n a la TUBER1A DEL AGUA FR1A. Ias vfilvulas de
apagado tipo silla vienen incluidas en muchos kits de
suministro de agua. Antes de comprar, asegfirese de que
una vfilvula tipo silla cumple con los c6digos de plomerfa en
su localidad.
tlIlif()I_IlelneIlte.
Para detemfinar
Ea canfidad de tuberfa que necesim: mida
Ea dismncia desde Ea v_/vula del agua en Ea parte posterior
deE refiigerador
hasm el mbo de suministro
de agua.
Luego agregue 8 pies (2,4 m). Asegfirese de que haya
suficienm mberfa adiciona/(unos
8 pies [2,4 m] enroEEado
en tres vueEms de unas 10 pulgadas [25 cm] de difimeuo)
pare pemfifir que eE refiigemdor
se pueda mover de Ea
pared despu& de Ea insm/acidn.
8
Instrucciones para la instalaci6n
Instale
%
la v_lvula
de cierre
en
la mberfa
del
agua
de
consmno
m_s
contra
tiempo
utilizada.
_-] DIRIJA LA TUBERiA
CIERRE EL SUIVlINISTRO
PRiNCiPAL DE AGUA Y
DESENCHUFE EL REFRIGERADOR
Abra el grifo m_is cercano
en
agujas del reloj pot suficien/e
tuberfa
del agua.
flecuentemente
Dirija la tuberfa entre la lfl_ea del agua fifa y el refiigemdor
Dirija la tuberfa a travds de un orificio perfbrado en la
pared o en el piso (detr5s del refligerador
o del gabinete
de la base adyacente) lo m_is cerca posible a la pared.
del sentido
de las
para limpiar
la
NOTA: Asegtlrese de que h_a suficiente mberfa
adicional (unos 8 pies [2,4 m] enrollada en Ires vuelms de
ahededor de 10" [25 cm] de di4metro) para permitir que
el refligerador
se pueda mover de la pared despu& de la
insmlacidn.
SELECCIONE LA UBICACION
DE LA VALVULA
CONECTE LA TUBERiA
A LA VALVULA
Seleccione
una ubicaci6n
para la wilvula que sea
fScilmente accesible. Es mejor conectarla
en el
cosmdo de tma tuberfa vertical de agua. Cuado sea
necesario conectarla
en una tuberfa horizontal
de
agua, haga la conexi6n
en la parte superior o al lado,
en vez de hacerlo en la parte de abajo, para evitar
retirar cualquier
sedimento
de la tuberfa del agua.
Coloque la tuerca de compresidn
y f>rula para
la tuberfa de cobre (manga) en el extremo de la
tuberfa y condctela a la xSlvula de cierre.
Asegtlrese de que la tuberfa estd complemente
insertada
en la wilvula. Apriete la merca de
compresidn
firmemente.
Perfore un orificio de 1/4" en la mberfa del agua
(incluso si est4 usando una wilvula auto perforadora),
usando una broca afilada. Retire cualquier
sobrante
que resulte de perforar
el orificio en la tuberfa. Tenga
cuidado de no permitlr
que se filtre agua haeia el
taladro. No perfbrar un orificio de 1/4" puede resulmr
en menor producci6n
de hielo o cubos m_is pequefios.
Para tuberfa de pl4stico de un kit de tuberfa para
el refrigerador
SmartConnect
_"de GE, inserte el
extremo moldeado
de la tuberfa en la v41vula de cierre
y apriete la tuerca de compresidn
hasm que estd
firmemente
apretada a mano, luego apriete otto giro
con una llave. Apretar demasiado
puede causar fl/gas.
Tuercade
compresi6n
V_lvula
tipo silla
Tuberia
Tuercade
Wlvula de salida
[] iNSTALE LA VALVULA
DE CIERRE
Apriete los tornillos de la abrazadera hasm que la
arandela sellante empiece a hincharse.
podrfa romperse.
Abrazadera
del tubo
Tornillode la
abrazadera
V_lvulade
_____"_"
cierre tipo silla
demasiado
la mberfa ya que
Arandela
!
F@ula(manga)
NOTA: Se deber4n seguir los Cddigos 248CMR
de Plomerfa para el Estado de Massachusetts.
I,as vSlvulas tipo silla son ilegales y su uso no est4
permitido
en Massachusetts.
Consulte con un plomero
licenciado.
Una la wilvula de cierre a la mberfa de agua flfa
con la abrazadera para el mbo.
NOTA: No apriete
--
r-----
F-_LAVE LA TUBERiA
Extremode
entrada
Abra el suministro principal de agua en contra del
sentido de las agujas del rel<d } laxe la tuberfa hasm
que el agua estd limpia.
Cierre el agua en la v_ilvula despuds de que un cuarto
(1 litro) de agua se ha}a eliminado pot la tuberfa.
Tuber[avertical
de aguafria
NOTA: Se deberdn
seguir los Cddigos 248CMR
de Plomerfa
para el Estado de Massachusetts.
Las
vSlvulas tipo silla son ilegales y su uso no esr5
permifido
en Massachusetts.
Consulte
con un
plomero
licenciado.
9
Instrucciones para la instalaci6n
COMO INSTALAR LA TUBERJA DEL AGUA (cowr.I
m CONECTE LA TUBERJA AL
REFRIGERADOR
ABRA LA LLAVE DEL AGUA
EN LA VALVULA DE ClEF{RE
Apriete cualquier conexi6n que pueda presentar fl/gas.
NOTAS:
Antes de hacer la conexi6n al reffigerador,
asegfirese
de que el cable de corriente (]el reffigerador
no estd
conectado en el tomacorriente
de la pared.
Recomendamos
instalar un filtro de agua si su
suministro de agua tiene arena o partfculas que
podrfan obstruir la malla de la vfil_lfla de agua del
refligerado_: Inst_lelo en la tuberfa del agua cerca
al refligerador.
Si usa un kit de tuberfa para el
refligerador
SmartConnecU'
de GE, necesitar_ un tubo
adicional (_\0¢08X10002) para conectar el filtro. No
corte la tuberfa plfistica para
instalar el filtro.
Retire la cubierta
_-I CONECTE
Organice el cable de la tuberfa de manera que no vibre
contra la parte trasera del refiigerador o contra la pared.
Emp,ge el refiigerador hacia la pared.
del acceso.
Retire la tapa flexible de pl_stico
de la %lvula del agua (conexi6n
del refligerador).
©
[_ INiCIE LA IViAQUINA
Coloque la merca de compresi6n y
la fOrula (manga) en el extremo de
la tuberfa como se muestra. En el
DE HIELO
En los modelos de interruptor de energfa, fije el
interruptor de la m_quina de hielos en la posici6n de
! (encendido).
En los modelos de bmzo de llenado mueva
el brazo de llenado a la posici6n ON (hacia ak!jo).
La mfiquina de hielos no empezarfi a operar hasta que
alcance su temperatura de operaci6n de 15°F (-9°C) o
menor. Luego, empezar_ a operar autom_ticamente.
kit de tuberfa para el refiigerador
SmartConnect ''_ de GE, las tuercas
ya vienen armadas con la mberfa.
Inserte el extremo de la tuberfa en la conexidn de la
%lvula del agua lo m_s que se pueda. Mientras sostiene
la tuberfa, apriete el accesorio.
ntrr'
Para tuberfa de pl_stico de un kit de tuberfa para el
refiigerador SmartConnect 1''de GE, inserte el extremo
moMeado de la mberfa en la %l_lfla de cierre y apriete
la tuerca de compresi6n basta que est_ firmemente
apretada a mano, luego apriete otra vuelta con una lla,>.
Apretar demasiado puede causar fugas.
ModelodelInterruptor
deenergia
J
,,_?
.5'
-+_;'_'_- Brazo
de
.......
Ilenado
hacia
laposici6n
de
STOP(hacia
Ilenado
haciala arriba)
posici6n
OR
(haciaabajo)
Una la mberfa a la abrazadera provista para sostenerla
en una posici6n vertical. Quiz_s necesite apalancar
la abrazadera.
Abrazadera
dela
Tuberia
de1/4"
tuberia
Modelodel Brazode Ilenado
Tuercade
compresi6n
de 1/4"
NOT.&." En condiciones de menor presidn del agua,
la v_ilvula de agua puede encenderse hasta 3 veces
para suministrar suficiente agua a la m_iquina de
hielos.
F_rula
Tubode
SmartConnect
_
EL REFRIGERADOR
Conexi6ndel
erador
Reemplace la cubierta de acceso. __
10
Instrucciones para la instalacion
COMO INVERTIR EL VAIVEN DE LA PUERTA
[] RETIRE LA PUERTA
DEL CONGELADOR
NOTAS IMPORTANTES
A1 inverdr
el v'aiv&_ de la puerto:
* Lea las instrucciones
empezar.
complemmente
* Maneje las partes con cuidado
pinmra.
antes de
2.2 Con un destornillador de casquillo de cabeza
hexagonal de 5/16," retire los tornillos que sosfienen
la bisagra superior del gabinete.
para evimr raspar la
* Ponga los tornillos con su parte correspondiente
evimr usarlas en el lugar equivocado.
* Disponga de una superficie
raspe para las puertas.
2.1 Pegue la puerto cerrada con cinm de enmascarar
para
de trab_jo que no se
IMPORTANTE: Una vez que empiece, no mueva el
gabinete hasm que hwa complemdo el proceso de
inverflr el vaiv&_ de la puerto.
Esms instrucciones son para cambiar las bisagras del
lado derecho al izquierdo, si alguna vez desea cambiar
las bisagras al lado derecho nuevamente, siga las
mismas instrucciones e invierta toda las referencias
hacia la izquierda y derecha.
HERRAMIENTAS
REQUERIDAS
Destornillador
deestrella
Bisagra
superior
Cintade enmascarar
Destornilladorde casquillo
con cabezade 5/16"
2.4 Retire la cinm y levante la puerto hacia flmra del
gabinete.
Lev_intela del pasador de la bisagra central.
DestornilladorTorxce
T20 6 T25,(necesitado
paraalgunosmodela)
Llaveabierta
de 5/16"
Cuchilloparamasilla
(espdtula)o destornillador
delgado
[_ANTES
2.3 Levante la bisagm directamenm hacia arriba para
liberar el pasador de la bisagra del casquillo en la parte
superior de la puerto y coldquela a un lado, j unto con
los tornillos correspondientes.
2.5 Coloque la puerto sobre una superficie
con la parte exterior hacia arriba.
2.6 Traslade los dos tornilk_s del lado opuesto del
gabinete hacia los ofificios de los tornillos
desocupados al refirar la bisagra superior
DE INICIAR
1.1 Desconecte el refrigerador
del tomacorriente
que no raye
el6ctrico.
1.2 Desocupe todos los esmnms de la puerto, incluyendo el
comparfimiento de bicmos.
PRECAUCION: No permim que ninguna puerto se
caiga a/piso, ya que esto podrfa daflar el f_eno de la
puerto.
11
Instrucciones para la instalacion
COMO INVERTIR EL VAIVEN DE LA PUERTA (CONT.I
[_ RETIRE LA PUERTA DE
ALIMENTOS FRESCOS
3.1 Pegue
la puerta
cerrada
_]RETIRE LA PUERTA DE
ALIIV]ENTOS FRESCOS (CONT.)
con cinta de enmascarar.
3.7 Tome uno
coldquelo
en el lado
suficienm
grosor del
3.2 Usando un destornillador de casquillo de cabeza hexagonal
de 5/16" y una llm_ abierm de 5/16," retire los dos tornillos
que sostienen la bisagra cen/ral al gabinem. Levanm la
bisagra central para liberar el pasador del casquillo en la
parte superior de la puerto y coloque la bisagra y los
tornillos a un lado. Tenga euidado de no perder el
espadador y la arandda de la bisagra central.
de los tornillos refimdos
en el orificio pare tornillo
opuesto. No atornille pot
espacio b_io la cabeza del
soporm.
en el paso 2 y
mils exmfior
completo,
de]e
tornillo pare el
[_ COMO INVERTIR LOS
ELEMENTOS DE SOPORTES
4.1 Mueva el soporte de la
bisagra inferior v la
mai{dela pK_stica del lado
,
_
II
---'41
I
I
hacia arriba
3.5 Traslade los dos tornillos del lado opuesto
a los ofificios de los tornillos desocupados
bisag_a central.
3.6 Traslade la arandela
.... -_
4.2 Intercambie
la bisagra y los tornillos en la prore
superior derecha con los tornillos en la parte superior
izquierda del gabinete. No apriete los tornillos en el
lado de la bisagra en este momento.
"SF
3.4 Coloque la puerto con el exterior
superficie que no raye.
Pl&tica
¢!1-¢""!11
----.. --...----_
tr_/
Soportede _€.
Cambieel pasadorde la bisagra labisagra1/.
al lado opuestodel soporte.
3.3 Retire la cinm e incline la puerto hacia flmra del
gabinem. Levanm la puerto del pasador en el soporm
de la bisagra inferior
(Si la arandela pldsfica se pega a/
rondo de la puerto, coldquela de nuevo en la bisagra.)
Arandela
Instalaci6nde la bisagra
a la izquierda,
NOTAS:
en una
,
Instalaci6nde la bisagra
a la derecha.
" Algunas bisagras fienen cuauo orificios. Los
orificios a udlizar pare la insta/acidn de la bisagm
dependen
del lado que insta/e la bisagm.
del gabinem
a/refimr la
" E1 borde
a/borde
(si su modelo la incluye)
hacia el cosmdo opuesto.
12
exmrno de la bisagra deberd esmr para/elo
de la c_ja pare una insta/acidn
correcm.
Instrucciones para la instalacion
[-5-1COMO INVERTIR LAS MANIJAS
DE LAS PUERTAS
5.2 Traslade
5.2.1
5.1 Traslade la manija de la puerta
de alimentos
frescos
el freno
de la puerta
Desplace
el tope de la puerto de metal
pl_isdco y los tornillos
del lado derecho
lado izquierdo.
Freno met_lico
5.1.1 Redre el tapdn de Ia manija pot deb_jo deI borde
usando un cuchillo de masilla con la punta forrada
con cinm, y retire el tornillo que est_i por deb_io.
Retire los dos tornillos que sostienen la manija con
la parm superior de la puerto.
Partesuperior
Frenopl_stico
de la puerta
/
Tap6n _
5.3 Come
puerta
m
m
5.1.3
reinstalar
5.3.1Pegue
la manija en el lado
derecho
de la puerto con
los mrnillos
que est_in en
la parte superior
y deb_jo
del tapdn de la manija.
Retire los tornillos del borde derecho de la parte
superior de la puerto e ins@telos en los ofificios de
los tornillos de la manija en el lado opuesto.
5.3.2Vuelva
a insmlar
de la manija.
5.4.2 Redre
_
de la puerta
Retire el tornillo que sostiene
la manija con la parte
superior de la puerto y
los dos tornillos que
sostienen la manija con
la parte infelJor de
la puerm.
Retire el botdn de la bisagra superior del lado
izquierdo de la puerto e ins&telo en el orifido eta el
lado opuesto que se desocup6 al retirm la bisagra
superior.
de la
frescos
el mpdn
Traslade la manija
del congelador
5.1.4
la manija
de los alimentos
Parte superior
la manija.
TaK
Parteinferior
5.1.5 Retire el mpdn del flente de la puerto _ trasl;ktelo
a] lado opuesto.
Par8 volver 8
instalar la manija
en el lado opuesto.
13
o
al
Instrucciones para la instalaci6n
COMO INVERTIR EL VAIVEN DE LA PUERTA (CONT.I
[]COMO
INVERTIR LAS MANIJAS
DE LA PUEFITA (CONT.)
[-67COMO VOLVER A COLGAR
LAS PUEFITAS (CONT.)
5.4.3
6.1.3
Retire el tornillo del borde
superior derecho de la puerto
e ins&telo en el ofificio del
tornillo de la manija
lado izquierdo.
en el
Incline la puerto hacia el gabinete. A medi&t que la
puerto wmlve a su posicidn, deslice la bisagm deb_o de la
cabeza del mrnillo que anmfiormenm se [labfa insertado
parcialmenm en el ofificio m_isexmrno. Inserm el tornillo
restante, hmgo apriete ambos tornillos firmemente.
Vuelva a colgar la puerta
del congelador
5.4.5
Una la manija a/borde
derecho de la puerto con
tornillos en la parm superior
e infefi(n; usando los
ofificios que quedan a/
refimr los tornillos del fleno
de la puerto.
___ I'
congelador
al
pasador de la
_
bisagra central.
Cercidrese de que
la arandela y el e
spaciador est6n en
;iasSagOr2rcae
elPal__
_,c_
__
_
su lugar en el pasador.
,
,
I_
[-_
""
''_
pl_sticay espaciador
NICOMO VOLVER A COLGAR
LAS PUEFITAS
6.1
Vuelva a colgar la puerta
alimentos
frescos
6.1.1
g_je la puerto de los alimentos flescos al pasador
de la bisagra infefi(n: Asegfirese de que la arandela
est6 en su lugar en el pasador.
6.1.2
6.2.2
Incline la puerto hacia el gabinete, levanmndo la
bisagra superior de manera que el pasador se _juste
en el c_Lsquillo en la parte superior de la puerta.
&2.3
Cercidrese de que la puerto est_ ligermnente
pot
encima de la parte superior del gabinete y el
espacio entre las puert_ks est_ tmifbm_e pot el
flente. Apriete los t(nnillos de la bisagra superior
No apriete deIn_Lsiado estos tornilk}s, apfi&elos
h_Lsmque est&] L_jusmdos, luego d_ otto medio giro.
de los
Inserte el pasador en
la bisagra cenmd en
el casquillo de la
prore superior de
la puerta. Coloque
el espaciad(n;
luego la mandela
en el pasador de la bisagra. NOTA: La bisagra
central debe girmse como se muestra al instalmse
en el lado izquierdo.
14
Sonidosnorma/esde operaci6n.
.amoricanaAppliances.co
Los refrigeradores
m#s nuevos producen sonidos diferentes a los modelos m#s antiguos. Los refrigeradores
modernos fienen m#s funciones y usan tecnologfa m#s reciente.
gUsted escucha/o que yo escucho?Estos sonidos son normales.
[] E1
.._,_ocomp_e_o_
_te
HMMMM..
alta eficiencia
puede
f_ulcio..,-.l_,-_pido
_, -- WHOOSH...
dinat m_s que el de su
refYigerador
anterior
y puede escuchar
un zumbido
de tono alto o un sonido pulsante
mientras
opera.
[] Puede escuchar
un sonido de soplido cuando las
puert:ks se cierran. Esto se debe a que la presi6n se
est:i estal)ilizando
dentro del refligerador
CHASQUIDOS,
ESTALLIDOS,
CRUJID
movi&ldose
a gran velocidad.
Esto pasa
cuando el refligerador
se conecm
por
_
tt_
primera
vez, cuando
las puertas se abren
f}ecuentemente
o cuando se guarda
gran cantidad
de alimentos
en el refligerador
o en los
compardmientos
del congelador.
Los vendladores
estlin
ayudando
a mantener
las tempemturas
correctas.
SSRIIISS11£AGUA
O,
GORJEOS
[] Puede escuchar sonidos como de cr/{jido o estallidos
cuando el refligerador
se conecm pot p_imera vez. Esto
pasa a medida que el refligerador
se enflfa hasm la
temperatura
coxrecta.
[] E1 compresor
puede causar un chasquido
o un g(njeo
cuando inmnm volver a armncar
(esto puede tomar
hasm 5 minutos).
[] Expansi6n
y conuacci6n
de las bobinas duranm o
despu4s del ciclo de descongelacidn
puede causar
sonidos como de cr@do o esm/lidos.
[] E1 fluido del refligerante
a tra%s de las bobinas puede
producir un sonido de borbomo
como de agua
hixMendo.
[] E1 agua que cae en el cNenmdor
de descongelacidn
puede causar un chisporromo,
esm/lido o zumbido
duranm el ciclo de descongelacidn.
[] Un ruido de agua cayendo se puede escuchar durante el
ciclo de descongelacidn
a medida que el hielo se derrim
del evapomdor
y fluye hacia la bandeja de drem_je.
[] E1 cierre de las puerms puede producir un sonido de
gorgomo debido a la esmbilizacidn
de la presidn.
[] Ell modelos con mfiquina de hielos, despu& de
complemr
un ciclo de hacer hielo, se pueden escuchar
los cubos de hielo cuando caen a la bandeja de hielos.
Antesde//amar a so/icitar semicio...
Consejos para la solucidn de problemas
iAhorre fiempo y dinero! Revise las tablas en las siguientes p@inas
primero y quiz#s no necesite Ilamar a soficitar el servicio.
Elrefrigeradorno opera
Vibraciono traqueteo(una
_ora
as normal)
Hie/oo crista/es de hie/o en
losa/imentos conge/ados (El
hie/odentrode unpaquete
es normal)
Los cubos son
muy peque_os
Posib/es causas
Qua hacer
E1 refrigerador
estfi en
d ddo de deseongelado.
El dial de control de la temperamra
estfi en posicidn 0 (apagado).
El refrigerador
estfi desconectado.
E1 fusible estfi quemado
/ d
interruptor
automfitieo
se salt6.
* Espere unos 30 minutos basra que el ciclo
de descongelado
termine.
* Mueva el dial de control de la temperamra
a un nivel de temperamra.
* Empuje el enchufe completamente
ell el tomacorrienm.
* Reemplace
el fusible o fije el interruptor
Los rodillos o patas
niveladoras
necesitan
a_iuste.
La puerta se deia abierta.
Abrir la puerta con mucha
frecuencia o por mucho tiempo.
* Consulte
La valvula de cierre del agua que
conecta el refrigerador
a la linea
del agua puede estar obstruida.
la seccidn Rodillos y patas n/voladoras.
* Revise si un paquete est_i reteniendo
* Hame
al plomero
para que limpie
la puerto abierm.
la vg/vula.
/5
Antesde//amar a so/icitar servicio...
E! motor
opera con
frecuenciapar largos
periodoso ciclos de
farinaintermitente (Los
refrigeradomsmodernos
con mas espaciode
almacenamientoy un
conge/ador maswande
requierendemas tiempo
de operation. Arranca'ny
parancon frecuencia
para mantener
temperaturasuniformes.
)
El compa#imiento de
alimentosfrescoso el
congelador no estanmug
frios
-La maquinadehielos
automaticano funciona
(ena/gunosmode/as)
Posib/es causas
Qu# hater
Normal cuando el refrigerador
se conecta iniciaimente.
* Espere 24 horas
par completoo
* esto es noIIn_d.
Con frecuencia ocurre cuando
grandes cantidades de aiimentos
se aimacenan en el refrigerador.
basra que el refligerador
se enflfe
La puerta se deja abierta.
E1 clima caiiente o abrir
la puerta frecuentemente.
* Revise si un paquete
* Esto es noiIIl}tL
El dial de control de la temperatura
estfin en en el nivel mils frio.
* Consulte la secci6n Sabreel dial de control de la temporatura.
La rejiUa y el condensador
necesitan limpieza.
* Consulte la secci6n Cuidado y limpieza.
El control de la temperatura no est_
en un nivel suficientemente ffio.
* Consulte la secci6n Sabre el dial de control de la temporatura.
E1 clima caliente o abrir
la puerta frecuentemente.
* Fi)e el conuol
de la temperamra
atm
nivel mils flfo.
Consulte
la secci6n Sabre el dial do control do la tomporatura.
La puerta
®Revise
se deja abierta.
est_i reteniendo
si un paquete
est_i reteniendo
la puerta
abierta.
la puerta
abierta.
Un paquete estfi obstruyendo
el conducto del aire en el
compartimiento
del congelador.
* Revise si hay tm paquete
bloqueando
el conducto
del ahe en el comparfimiento
del congelador
La mfiquina de hielos no
estfi encendido.
* Mueva el t)razo de llenado
E1 suministro
del agua estfi
apagado o no estfi conectado.
* Consulte
E1 comparfimiento
del
congelador no es muy frio.
* Espere 24 horas para que el refligerador
completamenm.
* Nivele los cubos con la mann.
Hay cubos amontonados
en
el recipiente
de almacenamiento
que causan que la mfiquina de
hielos se
la seccidn
a la posicidn
ON (hacia ab_jo).
C6moinstalar la tuboria @l agua.
se enflfe
Zumbido
frecuente
La mfiquina de hielos estfi en
la posicidn de encendido,
pero
el suministro de agua hacia el
refriKerador
no estfi conectado.
* Mueva el brazo de llenado a la posicidn ,STOP (hacia
arfiba). Mantener
el brazo en la posicidn ON (hacia
ab@)) dafiarfi la wi/vula del agua.
Congelamiento
lentode
los cubos de hielo
La puerta
• Revise si un paquete est5 reteniendo la puerto abierm.
• Consulm la seccidn Sabreel dial do control do la tomporatura.
Lostubas de hielo tienen
E1 recipiente
de aimacenamiento
de hielos necesita limpieza.
* Desocupe
Hay aiimentos
olor / sabora
* Envuelva
bien los a/imentos.
* Consulm
la seccidn
olaf/sabot
=
__
Se farina humedad en
ia superficie de/gabinete
entre las uertas
_
Humedad se farina ai
interior (en clima h#medo,
el aim #eva/a humedad
al refrigerador cuando
las _uertas se abren)
_
El refrigerador tiene olor
16
se deia abierta.
El dial de control de la temperatura no
eslfi en un nivel suficientemente ffio.
que trasmiten
los cubos de hielo.
El interior del refrigerador
necesita limpieza.
No es raro durante
periodos de alta humedad.
el recipiente
y lfivelo. Deseche
los cubos vieios.
de Cuidado ylimpioza.
* Sequela
superficie, luego file el control
mmpemmm
a un nivel m_is flfo.
de la
Abrir la puerta con mucha
frecuencia o par mucho tiempo.
Hay aiimentos que trasmiten
olor / sabor aLlrefrigerador.
* ix)s alimentos con olores fllertes (leben envolve_e
El interior
* Consulm
necesita
limpieza.
fim_emente.
* Mantenga
Lma c_ia abierm de bicarbonato
en el refligerad(m
reemplficela
cada tres meses.
la seccidn
de Cuidado ylimpioza.
Notas.
www.PmericanaPppliances,corn
L
_w
_=m =
me,=
m=,=
e=e_
eee= ",_,= =
17
Notas.
_J
_k
Garantiade/refrigerador.
Grape aquf su recibo.
Se requiere facilitar prueba de
la fecha de compra original para
obtener un servicio bajo
la garantia.
Todos los servicios de la garantfa para Americana
son
proporcionados por GE centros de fbbrica o nuestros
prestadores Customer Care ® autorizados. Para concertar
una cita de servicio, Ilame al 1.800.432.2737.Cuando Ilame
para soficitar servicio, por favor tonga a mano el nd_mero
de serie y el nd_merode modelo.
TM
GE reemplazara:
Una#o
A partir de la fecha
de compra original
Cualquierparte del _eflige_ado_ que f_Hle debido a un defecto en mate_iales o en la f_d)ricaciGn.
Du_ante esta garantia fimitada de un a#o, GE tambi&l proporcionar_i,
sin costo, mano de ob_a y
servicio relacionad(_para
reemplazar las partes defe.ctuosas.
Viajes de servicio a su hogar para ensefiarle c6mo usar
d producto.
Instalaci6n o entrega inapropiada,
impropio.
o mantenimiento
Fallas del producto si hay abuso, real uso, o uso para
otros prop6sitos que los propuestos, o uso para fines
comerciales.
P6rdida de alimentos por averias.
++++
Reemplazo
interruptores
Reemplazo
de fusibles de su hogar
de drcuito.
o reajuste
de
de las bombillas.
Dafio al producto
causado por acddente,
inmldadones,
o actos de Dios.
fuego,
Dafio incidental o consecuencial
defectos con d aparato.
por posibles
Producto
no accesible
para
causado
facilitar
d servido
requerido.
Causar dafios despu_s de la entrega.
Productos que no est4n defectuosos, rotos, o que
no funcionen segun lo prescrito en el Manual del
Propietario.
EXCLUSION BE GARANTJAS IMPL/C/TAS--Su #nico y exclusivo derecho es la reparaciGn de/pmducto, tal y
como se indica en esta Garantia limitada. Cua/quier garantia implicit& inc/uyendo /as garantias implicitas de
comerciabilidad o adecuaciGn para un fin determinado, estan /imitadas a un a#o o el periodo de tiempo mas
breve permitido por la ley.
Esta garantia se extiende al comprador original y cualquier comprador posterior de pmductos comprados para uso
residencial dentro de Estados Unidos. Si el producto estb situado en un brea que no dispone de servicio por parte
de un proveedor de servicio autorizado de GE,podria tenor que hacerse cargo de los costes de envio o bien podria
soficitbrsele que fleve el producto a una centro de servicio de GE autorizado para realizar la reparacidn. En Alaska,
la garantia excluye el costo de envio o/as visitas de servicio a su casa.
Algunos estados no permiten la exclusidn o las limitaciones de dafios incidentales o consecuenciales. Esta garantia
da derechos legales especificos, y usted podria tenor otros derechos que variarbn de estado a estado. Para saber cubles
son sus derechos legales, consulte a la oficina de asuntos del consumidor local o la oficina del Attomey General en
su Iocalidad.
Garante: General Electric Company. Louisville,
KY 40225
/9
Soporteai consumidor..
Soliciteunareparaci6n
E1 servk:io de expertos GE esui a tan sdlo un paso de su puerta.
llamando
al 800.432.2737
durante
horas normales de oficina.
Programe
el servk;io a su conveniencia
garantfasampliadas
Compre una garantfa ampliada y obtenga demlles sobre descuentos
especiales disponibles
mientras su
garantfa est_i m)n acfiva. Puede comprarla
lhmando
al 800.626.2224
durante horas nonnales
de oficina.
GE Consumer
Home Services esmr_ afin ahf cuando su garantfa termine.
Piezasj/ accesorios
Aquellos individuos
con la ca[ificacidn necesaria para repaint sus propios elecuodom&dcos
pueden
pedir que se les manden
las piezt_s o accesorios direcmmenm
a sus hogares (aceptamos
lt_s m_jems
\qSA, MasterCard
y Discover). Haga su pedido llamando
a[ 800.626.2002
dumnm horas noiIlla[es de
oficina.
tas instrucciones descritason este manualcubmn lospmcedimientosa seguir per cualquier usuario. Cualquier
otra reparaciOndeberia,per reglageneral,referime a pomona/calificado autorizado.Oebeejerceme pmcaucion
ya que/as reparacionesincorrectas puedencausarcondiciones de funcionamiento
inseguras.
P6ngaseen contactoconnosotros
Si no est;i sadsfbcho
ml4fbno.
Escrfbanos
a:
con el servicio que recibe
www.PmericanaPppliances,corn
de (;E, envfe una carm a (;E. Pot fi_vo_; incluya
su nfimero
de
General Manage_; Customer Relations
GE Appliances,
Appliance
Park
Louisville, KY 40225
_
/rnpreso on papel recic/ado