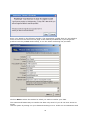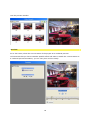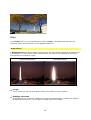
1
proDAD
Vitascene
© proDAD, 2007
Autor : Uwe Wenz
1
Table of contents
Welcome
Copyright / legal information
Further Infos
Philosophy
Workshops & Training for Vitascene
Installation, Help, Registration, Technology and Systemrequirments
Help
Registration
Technical Support - Support
Technology and Systemrequirements
Program start and Plug ins
Vitascene stand-alone
Adobe Premiere Elements
Adobe Premiere Pro
Avid Liquid
Avid Xpress
Canopus Edius
Sony Vegas
Ulead Media Studio
Pinnacle Studio
Workshops for familiarization
Text with Ray filter and Key frames
Apply Sparkle filter to an image
Apply Shape Wipe transition effect
User interface/introduction
Start page
Navigation
Filter-Presets
Preview
Export
Settings
Control elements
Preview area / Timeline / Keyframes
Menu description
Shortcuts...
Apply templates
Filter-Presets
Own templates
Filter group / Sparkle
Filter
Color Adjustment
Source / Video A
Transition group / Glow Wipes
Mask-Presets
Customize effect
Customize mask
2
4
4
5
6
7
8
8
9
11
12
12
13
13
17
20
21
22
25
29
31
34
35
46
53
61
61
63
63
65
67
73
82
82
84
85
85
85
87
88
88
89
89
91
91
93
95
Texture
Filter
Source / Video A
Source / Video B
See also
Export
Settings
Edit
Operators
Geometry
Pixel-Aspect
Attributes
Color Adjustment
Blur
Filter
Effect Parameter
97
98
99
102
105
105
105
106
108
108
110
112
114
116
123
153
3
Welcome to Vitascene Version 1.0 !
Effects and transitions with the aid of deliberate blurring, expertly selected color matches
and understated lighting create sophisticated visual moods on film, enabling glamour, flair,
charm and drama to be perfectly accentuated - which is why it is barely possible to imagine
a professional production without these kinds of effects:
Vitascene makes a perfect quality stylistic device available to everyone - it’s amazingly easy
to use and, thanks to the latest GPU technology, lightning fast!
We hope you enjoy Vitascene and always produce results that are full of effects!
Copyright / legal Information
Copyright proDAD GmbH. All rights reserved.
Licensing Conditions
Please read these licensing conditions carefully before installing the software.
Licensing agreement
When setup starts, a licensing agreement is shown, which you should read carefully.
By installing the software, you stale that you accept the copyright conditions, the licensing
agreement and the licensing procedure.
License Guarantee
proDAD GmbH grants the user the right to use this product for its proper and permitted
purpose. The present product may only be installed on one computer. proDAD hereby
guarantees to provide a license key free of charge. If the software needs to be installed on
more than one computer, you are required to purchase multiple license keys. It is forbidden
to copy the software or the instructions, in whole or in part, unless expressly permitted in
writing by proDAD GmbH.
The program temporarily runs in the full version mode for 30 days when installation is
complete. This time must be used to apply for an unlimited license key. This will usually be
sent electronically free of charge within 8 working days. Packaging and postage must be
paid if a hard copy on a floppy disk is required. By installing the product you accept the
registration procedure.
Trademarks
All products and trademarks mentioned in association with this product are trademarks that
belong to the respective owners. All trademarks are used without any guarantee that they
may be used freely, and they may be registered trademarks.
Limitation of Liability
The extent of liability for any one claim is limited to a replacement of the product. This
applies to proDAD GmbH, all licensees and retailers. Claims shall only be recognized if the
software is returned in an orderly manner, together with the returned goods number that
has to be previously arranged with proDAD GmbH. The goods must also be accompanied by
proof of purchase. This guarantee becomes void if a malfunction of this product is due to
improper use, mistreatment, an accident or improper handling. proDAD GmbH, its sales
partners and licensees, shall not be held liable for damages or subsequent damages arising
from the impossible usage of this product. Liability is limited in all cases to the purchase
price of the product.
4
Documentation
The greatest of care has been taken in compiling and translating the handbook. However,
the possibility of errors cannot be fully excluded. proDAD GmbH shall assume no
responsibility or liability whatsoever for the consequences of any incorrect statements or
information which the documentation or translation may contain. Subject to technical and
optical modifications. Information regarding any inaccuracies is always welcome.
Copyright
The software and the individual components of this product are the property of proDAD
GmbH. By installing this product, the licensee agrees to refrain from unauthorized use and
duplication.
proDAD GmbH does not accept any responsibility for the usage of this program and the
publication of its contents and data that has been created with this program.
proDAD GmbH * Gauertstr. 2 * 78194 Immendingen * Deutschland * HRB 1077
Further Info’s
FURTHER INFORMATION ABOUT VITASCENE
Workshops and FAQs : www.prodad.com
Training and Learning-products :
The company 30th century/Uwe Wenz is proDAD Vitascene’s official training partner.
Interested parties can obtain detailed information on advanced seminars at www.30thcentury.de .
A training-DVD containing tutorials on how to apply and modify the numerous effect options
of Vitascene software will soon be released in English.
In addition, detailed workshop packages on Vitascene software are currently being devised.
5
Philosophy
Vitascene is a modern software based on an innovative architecture. The advantage it has
in comparison to similar products is that it free from old development concepts. At the same
time, this fortunate circumstance also offers the opportunity to incorporate new concepts,
which may at first glance appear to be unusual, but which are, or will be, advantageous.
•
•
•
A greatly abbreviated insight into the various features of the application, User interfaces
can be viewed simultaneously wherever possible: Almost all elements are visible in an
overview in relation to one another.
Complete interactivity: all parameters entered can be viewed immediately without
annoying confirmations.
Real-time preview: the preview is interactive and can be adjusted to the performance of
your computer, which simplifies things when experimenting, entries do not need to be
confirmed unnecessarily.
• User navigation based on the modern Windows systems for quicker comprehension.
• Shortcut menus (right mouse button) are provided wherever possible for quicker
•
performance.
Identical or similar functions can be used in different areas of the application to act
according to one's own preferences.
• Help via the mouse in short form for quick tips while working.
• Menu navigation in tree form or as structure. Options are shown in the respective option
window for schematic and orderly user navigation and the greatest possible extendibility.
• Dynamic GUI system for summarizing user habits and making functions available in just a
•
few single steps.
Limitless layout area for infinite freedom when editing roller titles, extra-dimensional
graphics etc.
Innovative layout features for interactive alignment, scaling etc.
•
• Object-oriented layout features for unlimited structure and diversity.
• Object-oriented effect engine for maximum scalability of results by combining individual
•
effect settings.
User-oriented preview functions for impressive, result-like previews (instead of wire
frame models), interactively and qualitatively adjustable.
• Diverse export functions for extensive user possibilities.
• Future-oriented rendering methods designed for use on standardized systems. These
make additional hardware useable in the future and can be continually optimized in line
with increasing hardware performance.
Modern plug-in structure for NLE host applications.
•
• Modern plug-in structure as host application for other manufacturers and plug-ins.
• Internal object-oriented program structure, ultra-scalable and future-safe.
By purchasing this product, you have not only made a good decision for the present, but you
can also be assured that you will continue to have an application available in future that is
always compatible with your environment and which attains performance and perfection by
continually improving itself.
An advantage that should not be underestimated, during and particularly following
the acquisition of an innovative software!
6
Workshops & Training for Vitascene
Instructions for beginners and advanced users of Vitascene :
A training-DVD containing tutorials on how to apply and modify the numerous effect options
of Vitascene software will soon be released in English. In addition, detailed workshop
packages on Vitascene software are currently being devised.
The company 30th century/Uwe Wenz is proDAD Vitascene’s official training partner.
Interested parties can obtain detailed information on advanced seminars at www.30thcentury.de (powered by proDAD).
Digital Video Trainings-Center
7
Installation, Help, Registration, Technology and System
requirements
Either start the .exe file of your download or the setup file of your CD.
The remaining steps are shown and explained in the displays of the respective setups.
Please make sure that during installation your plug-in is installed as well:
Should unexpected errors arise during installation, our support team can be contacted per
email directly from the setup process in order to analyze the error. Please only use this
option if an error occurs.
Vitascene can be started directly once the setup process is completed. You will then reach
the registration part of the program.
Help
Vitascene, Stylish transition effects and filters! 100% GPU processing power! 100%
interactive!
For discerning professionals who are looking for the best quality in the shortest time!
Of course, being multifunctional also means that it is much more demanding both in terms
of the quality and for the user. Although the operation of Vitascene has been designed very
intuitively, a certain period of familiarization is always required for high-performance
multimedia programs. We therefore recommend that you initially read this manual to get a
feeling for the program. You should definitely work through the tutorials. The worked
examples that are described there are specially tailored to help you learn how to use the
program and understand the systematic behind it. Only after completing the tutorials will
8
you have obtained a feeling for the hidden possibilities, many of which can only be achieved
by combining several program features. Once you have grasped the basic principles of the
tutorials, you should be in a position to create complex and demanding results after just a
few days. Further assistance is always available in the program help, which gives you an
overview of the comprehensive parameters and options that are available.
Help
Questions will always arise while working with programs. In Vitascene, you can get the
answers quickly and easily. The key is the integral program help, which is always available,
easily found and quickly leads you to a result. Simply open the menu Help.
Here, you also find an index for quick reference in a modern electronic form.
The manual supplied with the program (with the exception of OEM versions and demo
versions) as well as downloads or CD versions of this product) is actually only intended to be
an introduction to the program. The primary source of information and assistance, together
with a full overview of the software, can be found in the program's online help.
This manual shows you how to use the software and provides you with diverse systematic
information. For in-depth detailed information, you should refer to the aforementioned
online help.
Further Info’s :
If you require further information about the program, visit the Website www.prodad.com .
Here you will find :
• Workshops
• Supplementary instructions
• Tutorials
• Information about new plug-ins (that have been created after this manual had been
compiled)
• Other information about proDAD
Instructions for beginners and advanced users of Vitascene :
In Kürze erscheint eine LernDVD mit Lektionen über die Anwendung und Veränderung der
zahlreichen Effektmöglichkeiten zur Software Vitascene.
The company 30th century/Uwe Wenz is proDAD Vitascene’s official training partner.
Interested parties can obtain detailed information on advanced seminars at www.30thcentury.de (powered by proDAD).
Registration
Registration / Key request
Please note: the Register function is not available in demo versions.
When the program is started for the first time, you will be given a PID code that allows you
to obtain your license key free of charge. You should do this within 30 days. Ideally, send
your PID code to proDAD straight away. Click Registration.
9
Enter your details in the following window. The registration number that you are asked to
enter is found on the second cover page of the manual provided OR, if you bought the
product from the proDAD-Online-Shop, it is in the email confirming the purchase.
Click on Next to select the method in which you wish to transfer your data.
The easiest and fastest way to transfer the data is by email. If you do not have access to
email:
Use the option of printing out your data and sending it to us. Under no circumstances send
10
us manually or handwritten letters or faxes.
What to do when you receive your key:
Usually, you will receive an e-mail with a link where you can retrieve your key. Download
this file and save it on a convenient location on your computer. Then simply double-click and
execute this .exe file. The key will then be activated in Vitascene, and you can now continue
using Vitascene without any time restrictions.
If you need to make any changes to your system, you may have to apply for your license
key again. Please use one of the methods described above and send your new PID code to
proDAD.
The PID code does not contain any information about your system. The license key is just a
technological device designed to protect the software against illegal use. This device reduces
costs incurred by illegal copying, which will be reflected in future upgrade prices.
Beneficiaries of this protection device are legal users who have paid to use the software, as
well as retailers and the manufacturer.
Technical Support - Support
proDAD Support
We at proDAD are happy to answer any questions you may have about our program.
Simply contact us
· by email at [email protected]
· by telephone: +49 (0)7462 9459 0
· by fax: +49 (0)7462 9459 79
· by post: proDAD GmbH, Gauertstr. 2, 78194 Immendingen, Germany
Please provide us with the following information:
· Version number and date of the program (menu Help)
· Your operating system
· Name and version number of your video editing program (if applicable)
· Any program updates you have already installed (if applicable).
Ideally you will send us your request by menu Help, in case of problems send an
email....
Then the installation and user protocol is also sent to us automatically as a zip file.
You do not need to do anything else. By the way, the transferred data does not include any
personal information.
Note:
In Vitascene’s Help Menu you will find the option Service Update, which will take you to the
www.prodad.com service page to download Service Updates (Service Packs) of the
software. When installed, the latest version of Vitascene offers enhancements and will solve
possible problems.
11
Technology and System requirements
At the moment, you are provided with basic information on the technology by proDAD
Vitascene. One aspect that is particularly important for correct use is compliance with the
requirements in terms of your PC.
What is a GPU (graphics processing unit)?
Modern graphics cards have an extremely high level of computing power, which is vastly
superior to that of the CPUs used in PCs. With Vitascene this power is used to create effects!
Digital processing is carried out by the graphics card, speeding up the whole procedure
enormously.
Brand new technology – 50 times faster than it used to be – with an accelerated
GPU!
The advantages of GPU processing:
• up to 50 times faster than using a CPU
• perfect quality using 16 bit and 32 bit IEEE
• more precise processing for improved quality and sharper details
Is your computer suitable for GPU processing?
Click here to check your PC: GPU-Test
System requirements:
•
DirectX 9 graphics card with Shader 2.0
•
Graphics card with a minimum of 128MB
Possible limitations in terms of performance:
•
An out of date graphics hardware driver
•
An out of date version of DirectX
Tip:
Always keep your PC system up to date in terms of driver software for graphics cards and
your version of DirectX. We also recommend taking the GPU-Test to determine the capacity
of your graphics card.
Program start and Plugins :
For information purposes and for the sake of completeness, the following plug-in
descriptions include all potentially available plug-ins. Your licence may not include the use of
a particular plug-in, in which case you will not be able to use that plug-in.
Even if the description refers to use of the standalone version, this does not mean that the
plug-in is covered by your licence.
12
Vitascene stand-alone (independent version)
Starting the independent version of the program:
Click on the Vitascene icon on your desktop by double-clicking
or via the Windows start menu / Programs / proDAD / Vitascene 1.0 .
Adobe Premiere Elements / Plugin as video effect
Start Adobe Premiere, place a video clip in the timeline and, in the Medium field, go to the
Video Effects menu. Once it is open you will see the proDAD folder. This folder contains
the Vitascene filter.
13
Now hold down your left mouse button and drag the Vitascene filter onto the clip in the
Timeline. Vitascene will start automatically, now choose a suitable video effect from the
Filter Templates (e.g. Sparkle / 127). A playback of the current video clip with the selected
video effect will appear in the Vitascene preview window, and, of course, you can modify the
selected effect in Vitascene to suit you
Once the project has been edited and completed in Vitascene, simply press the F12 key or
click on the symbol
to return to Premiere Elements.
This will automatically save the Vitascene project.
Tip:
If you want to open the Vitascene filter again, highlight the video clip (with the Vitascene
effect) in the Timeline and go to the Properties dialogue box (displayed on the right, next
to the Adobe Premiere preview window). Click on the (Setup...) button
Vitascene Filter icon, this will re-start Vitascene.
alongside the
Adobe Premiere Elements / Plugin as video transition
Start Adobe Premiere, place two video clips in the Timeline, superimpose them (i.e. arrange
the two clips in the Timeline so that they overlap). Now go to the Video cross fade menu in
the Medium field. Once it is open, you will see the proDAD folder. This folder contains the
Vitascene Transition.
14
Now hold down your left mouse button and drag the Vitascene Transition between the clips
in the Timeline.
Vitascene will not start automatically. Highlight the transition in the Timeline by clicking with
your mouse and go to the Properties dialogue box (displayed on the right, next to the
15
Adobe Premiere preview window).
Click on the User defined... Button, this will open Vitascene. Choose a suitable transition
from the Transition Templates (e.g. Radial+Mask #14). A playback with the selected
transition will appear in the Vitascene preview window and, of course, you can modify the
selected transition in Vitascene to suit you.
Once the project has been edited and completed in Vitascene, simply press the F12 key or
click on the symbol
to return to Premiere Elements.
This will automatically save the Vitascene project.
16
Adobe Premiere Pro / Plugin as video effect
Start Adobe Premiere, place a video clip in the timeline and go to the Effects folder. Once
the Video effects folder is open you will see the proDAD folder. This folder contains the
Vitascene filter.
Now hold down your left mouse button and drag the Vitascene filter onto the clip in the
Timeline. Vitascene will start automatically, now choose a suitable video effect from the
Filter Templates (e.g. Sparkle / 127). A playback of the current video clip with the selected
video effect will appear in the Vitascene preview window, and, of course, you can modify the
selected effect in Vitascene to suit you.
Once the project has been edited and completed in Vitascene, simply press the F12 key or
click on the symbol
to return to Adobe Premiere Pro.
This will automatically save the Vitascene project.
Tip:
If you want to open the Vitascene filter again, highlight the video clip (with the Vitascene
effect) in the Timeline and go to the Effect settings dialogue box (displayed on the left,
17
next to the Adobe Premiere preview window). Click on the (Setup...) button
the Vitascene Filter icon, this will re-start Vitascene.
alongside
Adobe Premiere Pro / Plugin as video transition
Start Adobe Premiere, place two video clips in the Timeline, superimpose them (i.e. arrange
the two clips in the Timeline so that they overlap). Go to the Effects folder. Once the Video
cross fade folder is open you will see the proDAD folder. This folder contains the
Vitascene Transition.
Now hold down your left mouse button and drag the Vitascene Transition between the clips
in the Timeline.
18
Vitascene will not start automatically. Highlight the transition in the Timeline by clicking with
your mouse and go to the Effect settings dialogue box (displayed on the left, next to the
Adobe Premiere preview window).
Click on the User defined... Button, this will open Vitascene. Choose a suitable transition
from the Transition Templates (e.g. Radial+Mask #14). A playback with the selected
transition will appear in the Vitascene preview window and, of course, you can modify the
selected transition in Vitascene to suit you.
Once the project has been edited and completed in Vitascene, simply press the F12 key or
click on the symbol
to return to Adobe Premiere Pro.
This will automatically save the Vitascene project.
19
Avid Liquid / Plugin as video effect
Start Avid Liquid, place a video clip in the Timeline and go to the Effects library. Once the
proDAD folder is open you will see the Vitascene Filter. Hold down your left mouse button
and drag it onto the clip in the Avid Liquid Timeline.
The Vitascene filter is represented in the clip by a "Star symbol" or by a purple line above
the clip. Now double click on the "Star symbol" (displayed in green in the clip in the
Timeline), Vitascene will start. Now you can further edit the clip or add an effect.
Once the project has been edited and completed in Vitascene, simply press the F12 key or
to return to Avid Liquid.
click on the symbol
This will automatically save the Vitascene project.
Avid Liquid / Plugin as video transition
Start Avid Liquid and place two video clips in the Timeline, superimpose them (i.e. arrange
the two clips in the Timeline so that they overlap).
Now go to the Effects library. Once the proDAD folder is open you will see the Vitascene
Transition. Hold down your left mouse button and drag this Transition between the clips in
the Avid Liquid Timeline.
Now double click on the Vitascene Transition in the Timeline (displayed in grey between
then clips), Vitascene will start.
Choose a suitable transition from the Transition Templates (e.g. Radial+Mask #14). A
playback with the selected transition will appear in the Vitascene preview window in real
20
time and, of course, you can modify the selected transition in Vitascene to suit you.
Once the project has been edited and completed in Vitascene, simply press the F12 key or
click on the symbol
to return to Avid Liquid.
This will automatically save the Vitascene project.
Avid Xpress / Plugin as video effect
Start Avid Xpress. After successful installation of the Vitascene - Avid Xpress plug-in,
Vitascene will be available via the Avid Xpress Effects dialogue box (Effects Editor).
Now drag and drop the Vitascene Filter into the Timeline and click on the Edit Effect
option. This will start Vitascene. A playback of the current video clip with the chosen video
effect will appear in the Vitascene preview window and, of course, you can modify the
selected effect in Vitascene to suit you.
Once the project has been edited and completed in Vitascene, simply press the F12 key or
click on the symbol
to return to Avid Xpress.
This will automatically save the Vitascene project.
Avid Xpress / Plugin as video transition
Start Avid Xpress. After successful installation of the Vitascene - Avid Xpress plug-in,
Vitascene will be available via the Avid Xpress Effects dialogue box (Effects Editor).
Now drag and drop the Vitascene Filter into the Timeline and click on the Edit Effect
option. This will start Vitascene. A playback with the selected transition will appear in the
Vitascene preview window in real time and, of course, you can modify the selected transition
in Vitascene to suit you.
Once the project has been edited and completed in Vitascene, simply press the F12 key or
click on the symbol
to return to Avid Xpress.
This will automatically save the Vitascene project.
21
Canopus Edius / Plugin as video effect
A video effect (Filter) is applied to a clip using drag and drop in Edius. The Video Filter
folder contains a proDAD directory, which includes the Vitascene Filter that is ready for
use.
Drag and drop the Vitascene Filter onto a clip in the Timeline. The Vitascene software will
not start. Once a clip has been selected in the Timeline, Edius displays (as a property) the
effect for this clip by name. Double click on the name to open the Vitascene-Control
dialogue box.
22
This displays the following options:
1. Reduce quality to increase speed
This attempts to maintain a real-time preview, even for elaborate effects, by employing
faster processing.
2. Expanded color palette
This makes full use of the YUV color space, achieving a maximum level of up to 1.0 volt,
which is the quality standard for broadcasting.
Click on the Edit button to start the Vitascene software.
Once the project has been edited and completed in Vitascene, simply press the F12 key or
click on the symbol
to return to Canopus Edius.
This will automatically save the Vitascene project.
23
Canopus Edius / Plugin as video transition
Start Canopus Edius, place two video clips in the Timeline. In the Transition folder you will
see a proDAD directory which contains the Vitascene Transition that is ready for use.
Now use drag and drop to place the Vitascene Transition between the two clips in the
Timeline. The Vitascene software will not start.
Once a transition has been selected in the Timeline, Edius displays (as a property) the effect
for this clip by name. Double click on the name to open the Vitascene-Control dialogue
box.
This displays the following options:
1. Reduce quality to increase speed
This attempts to maintain a real-time preview, even for elaborate effects, by employing
faster processing.
24
2. Expanded color palette
This makes full use of the YUV color space, achieving a maximum level of up to 1.0 volt,
which is the quality standard for broadcasting.
Click on the Edit button to start the Vitascene software.
Once the project has been edited and completed in Vitascene, simply press the F12 key or
click on the symbol
to return to Canopus Edius.
This will automatically save the Vitascene project.
Using the Canopus-Inspector you can obtain more information on the Vitascene transition
(including for example its start position, its end position as well as the duration of the
transition in the Timeline).
Sony Vegas / Plugin as video effect
Start Sony Vegas and place a video clip, for example, in the Timeline and select it to
identify the video image for previewing in Vitascene.
Next go to the VideoFX folder, where you will find the proDAD Vitascene Filter.
25
Now hold down your left mouse button and drag the Default icon onto the clip in the
Timeline. This will start the Video TrackFX dialogue box.
Now click on the Edit button.
Note:
Preview images in Vitascene can only be correctly displayed, if the event (e.g. the clip in the
Vegas Timeline) has been selected beforehand. Vitascene waits for a maximum of 3 seconds
for a reaction from Vegas. Once this waiting time has passed, because no clip has been
selected for example, Vitascene uses the default video images for the preview.
Vitascene will start, now choose a suitable video effect from the Filter Templates (e.g.
Sparkle / 127). A playback of the current video clip with the selected video effect will appear
in the Vitascene preview window, and, of course, you can modify the selected effect in
Vitascene to suit you.
Once the project has been edited and completed in Vitascene, simply press the F12 key or
click on the symbol
to return to Sony Vegas.
This will automatically save the Vitascene project. The Vitascene effect appears as follows in
Sony Vegas:
26
Note:
If you want to open the Vitascene Filter again, click on the video clip (with the Vitascene
effect) in the Timeline on the Event FX button (green button).
You can open Vitascene again using the Video TrackFX dialogue box.
27
Sony Vegas / Plugin as video transition
Start Sony Vegas and place two video clips in the Timeline, superimpose them (i.e. arrange
the two clips in the Timeline so that they overlap).
Now go to the Transition folder, where you will find the proDAD Vitascene Transition.
Now hold down your left mouse button and drag the Default Transition between the clips in
the Timeline.
This starts the Video Event FX dialogue box.
28
Now click on the Edit button.
Note:
Preview images in Vitascene can only be correctly displayed, if the event, a transition in the
Vegas Timeline, has been selected beforehand. Vitascene waits for a maximum of 3 seconds
for a reaction from Vegas. Once this waiting time has passed, because no transition has
been selected for example, Vitascene uses the default video images for the preview.
Vitascene will start, now choose a suitable transition from the Transition Templates (e.g.
Radial+Mask #14). A playback with the selected transition will appear in the Vitascene
preview window and, of course, you can modify the transition in Vitascene to suit you
Once the project has been edited and completed in Vitascene, simply press the F12 key or
click on the symbol
to return to Sony Vegas.
This will automatically save the Vitascene project.
Ulead Media Studio / Plugin as video transition
Start Media Studio and place two video clips in the Timeline, superimpose them (i.e. arrange
the two clips in the Timeline so that they overlap).
Now go to the Production archive, which contains the Transition effects / proDAD
folder with the Vitascene Transition.
29
Hold down your left mouse button and drag this transition between the two clips in the
Media Studio Timeline.
Now double-click on the Vitascene Transition in the Timeline, this opens the Vitascene
dialogue box.
30
Click on the Options... button. This opens Vitascene.
Choose a suitable transition from the Transition Templates (e.g. Radial+Mask #14). A
playback with the selected transition will appear in the Vitascene preview window and, of
course, you can modify the transition in Vitascene to suit you.
Once the project has been edited and completed in Vitascene, simply press the F12 key or
click on the symbol
to return to Ulead Media Studio.
This will automatically save the Vitascene project.
Pinnacle Studio
Note:
If a Vitascene version is running in other editing programs as a full version (or as a
standalone version) a separate, chargeable activation needs to be made through Pinnacle.
Pinnacle Studio / Plugin as video effect
Start Pinnacle Studio, place a video clip in the Timeline and go to the Effects library. In the
list of video effects click on the proDAD category and on the right (under Effects) doubleclick
on Vitascene Filter.
A faded lock symbol in front of the plugin name indicates that the plugin has not yet been
activated (purchased) and calculations are indicated in test mode by a logo.
Activation will take place online by clicking on:
The plug-in was assigned to the clip in the timeline.
31
Vitascene is started by clicking on the Edit Vitascene Filter button.
Vitascene will start.
When all settings in Vitascene have been applied, you can return to Pinnacle Studio by using
the F12 Key on your keyboard. The Vitascene project is inserted into the Studio Timeline.
Pinnacle Studio / Plugin as video transition
Start Pinnacle Studio and place two video clips in the Timeline. Now go to the Transition
library, which contains the proDAD folder with the Vitascene Transition.
A faded lock symbol in front of the plugin name indicates that the plugin has not yet been
activated (purchased) and calculations are indicated in test mode by a logo.
Activation will take place online by clicking on:
32
After activation :
Hold down your left mouse button and drag this transition between the two clips in the
Pinnacle Studio Timeline.
Vitascene will not start automatically. Highlight the transition in the Timeline by double
clicking with your mouse and go to the Vitascene transition dialogue box.
33
Click on the Edit Button, this will open Vitascene. Choose a suitable transition from the
Transition Templates (e.g. Radial+Mask #14). A playback with the selected transition will
appear in the Vitascene preview window and, of course, you can modify the selected
transition in Vitascene to suit you.
Once the project has been edited and completed in Vitascene, simply press the F12 key or
click on the symbol
Vitascene project.
to return to Pinnacle Studio. This will automatically save the
Workshops for familiarization
Here you can find some applications in a step-by-step guide.
Working through these examples takes approx. 30 minutes. Afterwards, you will know how
to carry out projects with Vitascene and realize your own ideas. If you work through the
examples you will save time later when exploring the logic and application.
The following workshops are available:
1. Text supported by Ray filter and Key frames (Title in proDAD Heroglyph with alpha
channel created and 1. video editing software in the Timeline as well as 2. imported directly
into Vitascene)
2. Apply Sparkle Filter to an image with the use of Key frames
3. Apply the Shape Wipe transition effect with an integrated sparkle effect (Use
Vitascene as a plug-in to video editing software)
Have fun getting to know the program!
A training DVD with a large number of video workshops on Vitascene software is now
available.
The company 30th century/Uwe Wenz is proDAD’s official training partner. Interested parties
can obtain detailed information on advanced seminars at www.30th-century.de .
34
Text with Ray filter and Key frames
The colorful title that is packed with effects (with text) has already been created with
proDAD Heroglyph using Alpha Keys (saved as a *.tif file).
Use the following settings for single frame export in Heroglyph.
1. Use as a plug-in:
The title you have created can subsequently be imported, for example into the video editing
software Timeline (e.g. Adobe Premiere Pro), go to the Adobe Premiere Effects folder. Once
the Video effects folder is open, you will see the proDAD folder, which contains the
Vitascene Filter.
35
Now hold down your left mouse button and drag the Vitascene filter onto the clip in the
Timeline. Vitascene will start automatically, now choose a suitable video effect from the
Filter Templates (for example Ray #390). A playback of the current video clip with the
selected video effect will appear in the Vitascene preview window.
Once the project has been edited and completed in Vitascene, simply press the F12 key or
click on the symbol
to return to Adobe Premiere Pro.
This will automatically save the Vitascene project.
2. Stand-alone use:
Or import the title direct into Vitascene, in order to apply the Ray filter or to modify the title
with drifting light reflections by using Key frames.
First start Vitascene, then go to the Filter-Presets and select the Ray filter (e.g. effect
#390) by double clicking in the Vitascene preview window. The effect is applied to the title
(created in proDAD Heroglyph) and light reflections are visible at the preview stage.
36
After saving the effect, the desired background (image or clip) will no longer be visible in the
preview window. To import our previously created image, go to the Navigation Menu in the
Source field and click on the Video A option.
This opens the Video A dialogue box. In the Source field click on the Type of fill option,
this opens a drop-down menu; select the Image / animation option. Then click on the
Folder button - to the right next to the Image drop-down menu - to select our image file,
for example, and import the file with the help of the Image option. The format 720x576
Pixel RGB + Alpha is displayed within the details of the graphics used.
The image file appears immediately in the Vitascene preview window (with the Ray filter
already integrated).
37
The Video A dialogue box also contains setting options for imported images (or clips) for
pixel-aspect, attributes and geometry.
For this workshop, use the original image without additional settings.
Now go to the Navigation menu in the Parameter field and click on the Filter option.
This opens the Filter dialogue box with various settings for the active Ray filter.
38
39
Here you can modify the settings for the Ray filter, but first go to the preview window and
check whether the Keyframes option is activated (key points during the course of an
animation, which have various properties at pre-determined times).
Without activation of the Keyframes option no changes in the effect, in relation to the
progress of an animation, will be shown. In this case, the settings will apply to all points in
time during an animation.
40
Now alter the setting for the Length option, selecting a value of 24%, for example, and set
the reduce flicker controller to 35%.
Now select the Bright Edge setting from the Scan Mode drop-down menu.
In addition, set the Threshold controller to 20% and, in the Method drop-down menu,
select the Motion Beam setting.
Set the Exposure controller to 4.50 and the Zoom controller to 1%.
41
The preview window will now display the effect of the Ray filter on the image used as
follows. Clear light reflections are visible within the Vitascene text, which run from the
centre of the image to the edge of the text.
Now alter the Ray effect with the help of the controller :
Composite = 0%
Scene-Intensity = 100%
And set the Glow-Intensity = 55%.
42
Leave the Highlight Color option as white and Highlight -Intensity at 25%.
Now select the Tint-Color Red (in relation to the rays of light), set the Tint-Intensity to
200% and Exposure Tint to 1.15.
The preview window will now display the effect of the Ray filter on the image used as
follows. Clear light reflections as well as Red discoloration is visible within the Vitascene
text.
Finally alter the position of the source of the rays of light in a horizontal and vertical
direction, use Key frames to do this (at the beginning and end of the animation).
First place the slider (position in the time axis beneath the preview) at the beginning of the
animation.
Then move the Horizontal controller to -57% and the Vertical controller to 46%.
43
The preview appears as follows.
Now place the slider (position in the time axis beneath the preview) at the end of the
animation.
Then move the Horizontal controller to 57% and the Vertical controller to 46%.
The preview appears as follows.
44
Now start an animation in the preview window with the help of the Play button. You will
notice that the light reflections move during the course of the animation. This movement is
created by placing a beginning Key frame and an end Key frame. Of course, you can position
further Key frames during the course of the animation. To do this, you need to place the
slider in the required position and then alter the effect properties using the controller.
Repeat this for each Key frame within the animation.
Note:
Naturally, you can shift Key frames within the Timeline, to do this place your mouse on a
Key frame, hold down the left mouse button and drag it to a new position in the Timeline.
You can also delete Key frames during the course of an animation, to do this place the slider
on the corresponding Key frame and press the Delete key on your keyboard.
To round off, click on the Color Adjustment option in the Navigation menu.
This opens the Color adjustment dialogue box, which provides access to the following display
settings for the image or video material used.
45
Apply Sparkle filter to an image (including by using Key frames)
This tutorial provides information on the application and adjustment of a Sparkle filter in
relation to a selected image (or clip) in Vitascene. The use of Key frames is also discussed
here. To do this, for example, Sparkle rays are presented as an animation in the background
image (set in motion).
First start Vitascene, then go to the Filter Templates and select the Sparkle filter (e.g.
Effect #131) by double clicking in the Vitascene preview window.
Should you be running Vitascene in a stand-alone format, after saving the effect, the
desired background will no longer be visible in the preview window (but rather an example
image). To import our image, go to the Navigation Menu in the Source field and click on
the Video A option.
This opens the Video A dialogue box. In the Source field click on the Type of fill option,
this opens a drop-down menu; select the Image / animation option.
46
Then click on the Folder button - to the right next to the Image drop-down menu - to
select our image file, for example, and import the file with the help of the Image option.
The image file appears immediately in the Vitascene preview window (with the Sparkle filter
already integrated).
The Video A dialogue box also contains setting options for imported images (or clips) for
pixel-aspect, attributes and geometry.
For this workshop, use the original image without additional settings.
Now go to the Navigation menu and click on the Filter-Presets option.
This opens the Filter-Presets dialogue box with various templates and settings for the
active Sparkle filter.
Now go to the Navigation menu in the Parameter field and click on the Filter option.
47
This opens the Filter dialogue box with various settings for the active Sparkle filter
(without filter templates, since a template is already applied in the preview window).
Here you can modify the settings for the Sparkle filter, but first go to the preview window
and check whether the Keyframes option is activated (key points during the course of an
animation, which have various properties at pre-determined times).
Without activation of the Keyframes option no changes in the effect, in relation to the
progress of an animation, will be shown. In this case, the settings will apply to all points in
time during an animation.
48
Now stop the preview by clicking on stop. Leave the beginning Key frame with its current
settings (see preview or current controller position). Next, move the slider to a new position
during the course of an animation. No new Key frames will be placed, unless you enter the
first setting in the Sparkle dialogue box, in relation to the current position in the Timeline.
Now alter the following settings using the controller:
Glow-Intensity = 70%
Spot-Intensity = 0%
Orientation = 60%
and reduce flicker = 54%
This will create the following preview for the 2nd Key frame. Start the preview to look at the
effect with the help of the Play button.
49
Now stop the preview by clicking on stop. Now move the slider to a new position during the
course of an animation. No new Key frames will be placed, unless you enter the first setting
in the Sparkle dialogue box, in relation to the current position in the Timeline.
Now alter the following settings using the controller:
Length = 25
Erosion-Threshold = 91%
Glow-Intensity = 70%
Spot-Intensity = 0%
Orientation = 80%
and reduce flicker = 30%
This will create the following preview for the 3. Key frame. Start the preview to look at the
effect with the help of the Play button.
50
Now stop the preview by clicking on stop. Now move the slider to the end position during
the course of an animation.
Now alter the following settings using the controller:
Length = 20
Highlight-Threshold = 20%
Erosion-Threshold = 13%
Glow-Intensity = 30%
Spot-Intensity = 0%
Orientation = 90%
and reduce flicker = 20%
This will create the following preview for the End-Key frame. Start the preview to look at the
effect with the help of the Play button.
51
Now stop the preview by clicking on stop.
Now you can process the animation as a video clip in preview, with the help of Export.
Note:
Naturally, you can shift Key frames within the Timeline, to do this place your mouse on a
Key frame, hold down the left mouse button and drag it to a new position in the Timeline.
You can also delete Key frames during the course of an animation, to do this place the slider
on the corresponding Key frame and press the Delete key on your keyboard.
This completes application of the Sparkle filter in connection with the use of Key frames in
the Timeline.
52
Apply Shape Wipe transition effect (with integrated Sparkle effect)
This tutorial focuses on use of a transition effect from the Shape Wipe Gallery. Vitascene is
used as a plug-in to video editing software (e.g. Avid Liquid).
Double click on the Vitascene Transition in the Timeline (appearing in grey between the
clips), Vitascene will start, the video material from the video editing software will appear in
the preview window.
Choose a suitable transition from the Filter Templates (e.g. Sparkle Circle Wipe #46). A
playback with the selected transition will appear in the Vitascene preview window in real
time. Video A is faded into video B. Of course, you can modify the transition in Vitascene to
suit you.
Now go to the Timeline beneath the preview window, stop playback and place the slider in
the position of your choice.
Leave the Beginning Key frame with its original settings, as the fade out is no longer
visible in the preview window and the process should start from zero (centered).
53
Now go to the lower section of the Templates dialogue box, where there are 3 folders
(Impression, Location and Filter).
Select the following settings in the Impression folder, in relation to the Key frame
positioned during the course of an animation:
A/B Sharpness = 150%
Opacity = 30%
There will be no settings in the Location folder, as the position of the circle remains
centred.
In the Filter folder select the following settings for the Sparkle effect.
54
Length = 10
Highlight-Threshold = 60%
Erosion-Threshold = 30%
and Orientation = 30%
This will create the following preview for the 2nd Key frame. Start the preview to look at the
effect with the help of the Play button.
55
Parallel to the circle (template) additionally placed rays (Sparkle) are visible.
No new Key frames will be set, unless you enter the first setting in one of the Impression,
Location or Filter folders, in relation to the current position in the Timeline.
Select the following settings in the Impression folder, in relation to the Key frame
positioned during the course of an animation:
A/B Sharpness = 160%
Opacity = 40%
56
There will be no settings in the Location folder, as the position of the circle remains
centered.
In the Filter folder select the following settings for the Sparkle effect.
Length = 10
Highlight-Threshold = 80%
Erosion-Threshold = 30%
Glow-Intensity = 100%
Orientation = 60%
and reduce flicker = 70%
This will create the following preview for the 3. Key frame. Start the preview to look at the
effect with the help of the Play button.
Parallel to the enlarged circle (increased by the time passed since the 2nd Key frame) a
greater number and more powerful rays (Sparkle) are visible.
The End-Key frame is not modified any further as it is no longer visible (at this point in
time the circle has gone beyond the visible area of the preview window).
This completes creation of the Shape Wipe transition effect (as the basis for Sparkle Circle
Wipe #46). Simply return to Avid Liquid using the F12 key or by clicking on the symbol.
This will automatically save the Vitascene project.
57
The Navigation menu contains more additional effect options.
1. Template-Presets
Of course, it is also possible to change the templates (here a circle) within the project by
using the Template-Presets dialogue box.
2. Customize effect
This is where you can alter the settings for Crossing, Wrap, Emphasis, Geometry and
Iris Control.
58
3. Customize mask
This is where you can alter the settings for Source, Blur, Pixel-Aspect, Attributes and
Geometry.
4. Texture
This is where you can alter the settings for Source and Geometry.
59
5. Filter
These settings have already been entered (application of the Sparkle effect).
60
User interface/introduction
In this chapter you can read important information about the structure of the Vitascene user
interface.
In addition, this is where you can obtain all the information on applying numerous effects
and options for modifying and combining them.
Start page
The options that are useful at the start of the program are presented in an overview.
1. Start
2. Most recently opened projects
To create a new project, click on the new project option in the Edit projects area.
Using the Open option, you can open (saved) projects that have already been created.
61
The proDAD Vitascene navigation bar can be changed; you can work in either a Structure
screen or a Segmentation screen, adjusting the software interface to your way of working.
The change can be made in the lower section of the navigation menu.
The Vitascene navigation bar (screen / structure), is switchable in the lower section of
the navigation menu to Structure / Segmentation.
The Vitascene navigation bar (screen / Segmentation), is switchable in the lower
section of the navigation menu to Structure / Segmentation.
62
Navigation
In the Navigation menu click on the Overview option
the dialogue box Start page / Navigation overview is displayed as follows:
Filter-Presets
The Filter Templates dialogue box contains 2 groups in the Root folder, sorted by Filter
group and Transition group.
The Filter group contains further Folders, which in turn contain numerous effect templates
that are ready for use.
63
The Transition group contains further Folders, which in turn contain numerous effect
templates that are ready for use.
To select a Filter template, go to a Template folder (e.g. Filter group / Sparkle), where effect
templates are displayed. By double clicking on the effect of your choice, you will transfer it
64
into the preview window.
Preview
For a short time, show the current status of the project as a rendered preview.
Let's assume that you have created a Sparkle effect and want to watch the current status as
a rendered preview animation, you can carry this out here easily.
65
Create as
Animation as preview = Rendering an animation file with immediate playing options
Control
Display of the current status in the real time preview
Playback
Display of the currently created timeline area in the animated real time preview
Click on Create as
this opens the Animation as preview dialogue box.
66
preview settings for :
Period, Rate, Quality, Scale, Frame type, Rendering, Codec, Driver, Key frames and file
directory
Export
Here you can choose your desired type of export:
Animation = Animation file (e.g. AVI, MPG, WAV, etc.)
Single frames = Export into an index of one picture or a continuous picture sequence
Export - Animation - AVI
The following parameter enables the individual display of animation (see below for settings)
67
Time period
This is where you can adjust the temporal data for the active timeline object using the
keyboard.
Rate
This is where the frames per second are modified. Pre-selections for PAL and NTSC are
available for easy access.
Quality
This is where the quality level is chosen:
low: produces the fastest, but qualitatively poorest results when working, i.e. for
• previews, ideal for low-performance computers or when using complicated animations in
objects
• medium: produces somewhat softer results than low
• good: best possible display of glyphs, but only crude display of graphics/animations
premium: best possible preview quality, soft glyphs and sharp textures. A interference
•
reducing device is additionally used in case of small contours.
This setting requires the most rendering time, especially if animations are used.
Scale
This parameter is used to quickly halve the set format values. It is also ideal for calculating
an animation rendering of the highest quality, but to reducing it by decreasing the rendering
time.
Frame type
Here you can set the half or full frame parameters.
If you want to export a result, but either the editing software's project settings or the video
hardware requires a change of the half frame sequence, this can be adjusted simply.
"Full frames" is especially required for Web animations or results that are to be used
elsewhere other than in the video application.
If a comb effect is evident in the rendered result, this probably means that the incorrect half
68
frame type is selected. If the result is slightly jerky, it may be necessary to change the
settings from Full frame to Half frame.
In some parameters of other cutting products these half frame settings have a different
name:
• Upper first = even
• Lower first = odd
Optimizing for video
This filter should always be selected if the end result is designed for video output.
Advantage: less picture interference, optimized color spectrum.
When the filter is switched off there is a speed advantage in calculating of about 20%, but
with this it brings a lower quality during video usage.
Rendering
This is where you can establish the format in which an animation will be used (AVI) and how
the Alpha channel should be controlled.
• RGB+Alpha computation (in a graphic): 24 Bit RGB color data as well as 8Bit alpha
channel data is stored in a file. The data can nevertheless be called up separately and is
not yet offset.
• RGB offset with alpha: 24 Bit RGB color data as well as 8Bit alpha channel data is stored
in a file (already offset).
Export RGB-Stream as
This is where the animation output format (AVI) is determined.
File
This is where the path, together with the output folder, in which the individual image
sequence is issued, are determined.
Codec
the codecs available are already checked on selection. Why? Some codecs do not register
correctly in the system. If the export process is then started, a system error appears that
looks as though Vitascene could not export with this codec. The real reason, however, is
usually an insufficient system integration of the codec - or of course a different alignment to
other media (e.g. special media players, etc.). If error checking brings up results these will
be shown in the codec's info window (codec does not support format, etc.)
Important: as some codecs transmit a default error code in this checking the real cause for
error can not always be determined correctly. Even an incorrect data path can cause an
export process to fail. Therefore, please always check the export path's validity (especially if
removable media, RAM discs, etc. are used).
Important Note:
Raw format : ideal for uncompressed animation files (AV) for usage in studios without
possible plug-ins. Supports RGB-A (inclusive of alpha channel!)
69
The Button
By clicking this button the animation rendering will start.
The codecs registered in the system that allow data to be written are always offered for
•
export.
without applying the scaling option the format of animations is always equal to the format
•
in export/format
AVI animations cannot contain an alpha channel and are therefore not to be used, if in
• the final usage the Keying per alpha channel is possible. The possibility of single frame
sequence export via TIFF or TGA 32 can be applied here.
Export - Single frames
This is where the settings are set for rendered single frames sequences that are to be
exported.
The following options are available:
70
Time period
This is where you can adjust the temporal data for the active timeline object using the
keyboard.
Rate
This is where the frames per second are modified. Pre-selections for PAL and NTSC are
available for easy access.
Quality
This is where the quality level is chosen:
low: produces the fastest, but qualitatively poorest results when working, i.e. for
• previews, ideal for low-performance computers or when using complicated animations in
objects
• medium: produces somewhat softer results than low
• good: best possible display of glyphs, but only crude display of graphics/animations
premium: best possible preview quality, soft glyphs and sharp textures. A interference
•
reducing device is additionally used in case of small contours.
This setting requires the most rendering time, especially if animations are used.
Scale
This parameter is used to quickly halve the set format values.
It is also ideal for calculating an animation rendering of the highest quality, but to reducing
it by decreasing the rendering time.
Frame type
Here you can set the half or full frame parameters.
If you want to export a result, but either the editing software's project settings or the video
71
hardware requires a change of the half frame sequence, this can be adjusted simply.
"Full frames" is especially required for Web animations or results that are to be used
elsewhere other than in the video application.
If a comb effect is evident in the rendered result, this probably means that the incorrect half
frame type is selected. If the result is slightly jerky, it may be necessary to change the
settings from Full frame to Half frame.
In some parameters of other cutting products these half frame settings have a different
name:
• Upper first = even
• Lower first = odd
Optimizing for video
This filter should always be selected if the final result is to be used for video output.
Advantages: less picture interference, optimized color spectrum.
Although deactivating this filter will increase the rendering speed by approx. 20%, this will
diminish the quality when using the result for video productions.
Rendering
This is where the format that is used for the single frame sequence (TIF, JPG, PNG, TGA,
PPM, SGI) is defined and also how the alpha channels are to be controlled.
Calculation RGB+alpha (in one graphic) : 24 bit RGB color data as well as 8Bit alpha
• channel data is saved in a file. However, the data can be opened separately and is not yet
rendered.
RGB + alpha (as two images): 24-bit RGB color data and 8-bit alpha channel data are
•
stored in two files.
RGB rendered with alpha: rendered 24-bit RGB color data and 8-bit alpha channel data
•
are stored in a single file.
• only RGB (ignore alpha): 24-bit RGB color data is stored.
• only alpha (ignore RGB): 8-bit alpha channel data is saved.
Export RGB as
this is where the single frame display format is defined. The following are available: tiff, jpg,
tga, png, ppm and sgi.
Folder
this is where the path and the target folder are defined in which the single frame sequence
is distributed.
By clicking on this button
the export process starts.
72
Settings
General settings for the Search path for images/animations, Alternative video sources and
Specialisation customisation
Display:
Video format, Background / borders, Duration and Language - User interface
Here you will find settings for project templates :
Undo and Save
Search path for images/animations
The global search paths are defined here. When loading a project the corresponding
components, such as graphics or animations are searched for. In principle, these
components are not embedded in a project file. This has the advantage that the project file
can be kept much more compact.
However, the disadvantage that comes up is that an uploaded graphic must always be
stored in the location that is pointed at. This can create problems if you want to transfer the
project to another PC, for example. However, this parameter eliminates the problem:
73
If a project is opened on another PC that has a different drive environment, the components
only have to be located in one of the search paths selected here in order to be found.
You can create a search path by clicking New.
Please note: No sub-folders will be searched.
Alternative video sources
This setting dialogue box is used to determine video source A and/or video source B.
You can import the following formats into Vitascene, to do this click on the customize
option:
74
Note:
In plug-in operation, it is not possible to choose the source, as the Vitascene filter is
applied directly to a clip (host video) from the video editing software, for example. The same
applies to the use of Vitascene as a transition.
Specialization customization
This setting dialogue box is used to compile the setting options for an effect.
To select an effect, click on the New button, it appears in the dialogue box
75
Click on the New button again, this opens a list of effects.
Now select the Video Filter / Color Adjust effect.
This will be transferred into the Edit page dialogue box and displayed as follows:
76
Under Category you will see the following options:
Select the Video A option, for example, this will be set as a Category.
In the lower section, you can see Available elements and Current elements for an effect.
By double clicking on an element (e.g. Inverse) in the Available elements window, you can
transfer this element to the Current elements window. You are then offered the Inverse
option, to check, simply click on the Test button. This opens the Test dialogue box with an
integrated Invert option, which can now be used.
77
In this way, you can include and display any effect functions in the list of templates as
Specializations.
Video format
Here you can define the video format that you wish to transfer via the plug-in interface or
the export functions later.
Set the width and height settings, the overscan limit, the frame rate, as well as the pixel x/y-relationship.
Either use the preset basic settings for HDV, HDTV, 16:9, Cineon, PAL, NTSC, etc. or use
any desired format in order to operate your target medium with Vitascene.
78
available formats :
Video overscan, width and height
This setting represents the entire, i.e. the maximum useable area (the resolution).
The export of data and the preview of animations are carried out with this value.
Text overscan, the title save area
If used, this value is generally smaller than the video overscan.
If, for example, 700 * 556 pixels are selected as opposed to 720 width and 576 height in the
video overscan,
a reserve area is created that should not be touched.
Within this area no layout measures should be carried out, as objects that reach into this
area may be cut off or disappear completely in critically set TV appliances.
Tip:
Vitascene can also be used for graphic animation, such as for the final application in Internet
banners. For this the width and the height of the final banner should be input under video
overscan in order to prevent rendering of unnecessary areas in the preview and save the
cutting procedure to reach the final size.
Smaller formats are always shown from the zero coordinate, top left.
79
Background / borders
This is where the user interface design can be freely adjusted according to personal taste
and used monitor type.
First of all, the user can select between 3 pre-defined patterns and one free setting:
• Automatic: neutral editing area with slightly darkened borders and outer areas.
freely configurable: this is where the individual color adjustments can be carried out
•
according to personal taste.
• black: dark editing area with lighter borders and outer areas.
• white: light editing area with darker borders and outer areas.
This is what the different elements mean:
• visible background: corresponds to the video overscan minus the text overscan.
• invisible area: this is the area which borders on the visible background
Duration
This setting dialogue box is used to determine the length of the applied effect.
Note:
The length of an effect cannot be altered during plug-in operation (i.e. operating Vitascene
from video editing software).
80
Language - User interface
Here you can define the user interface's language.
The selected language is used while the program is running. It is not necessary to restart
the software.
Undo
This is where you set the number of the dynamically saved undo steps.
Theoretically the number of the steps is unlimited, but every saved undo step in between
takes up memory. Therefore, this value should not be set unnecessarily high.
Save
Here you can define the quantity as well as the interval of automatic file saves while using
Vitascene.
81
Manual
By clicking on the Manual option the Vitascene service manual will begin.
Control elements
Preview area / Timeline / Keyframes
The Suspend effect button appears above the preview window, by clicking and holding
down the left mouse button, the effect is blanked from the preview window.
After clicking on the button
automatically displayed.
beneath the preview window, the video preview is
82
The Timeline is the Vitascene chronological control centre: For more information and access
points, please pay attention to the information appearing alongside the cursor while working.
Player details:
rewind
Play
forward
Stop
Current position and animation length
Timeline details (Timeline):
The Timeline with the current position (slider, vertical bar) as well as the entire project
length, defined by the blue line.
Key frames in the Timeline:
Key frames are pre-determined points during the course of an animation, which contain
various properties of a selected effect. If desired, you can place a number of Key frames in a
project. Prior to this, the Keyframes option beneath the Timeline must be activated.
Then move the slider within the Timeline to a position of your choice, go to the effects
window and use various controllers to alter the effect properties in relation to this Key frame
(or position during the course of an animation). Next, move the slider again within the
Timeline to another selected position and enter the effect settings again, in relation to the
current position. In this way, you can place any number of Key frames within a project and
create your own animation.
83
Menu description
The menus in their opened status and their tasks :
File
New
new project : Create empty project
Open... : opens a Vitascene project
Recently opened projects : List of the last edited projects
Close : Exit project and return to status at start of program
Save : Save project under same name
Save as... : Save project under another name
Import
Append project ... : Temporally attach another project to the current project
Graphic... : Load a graphic file as complete graphic object
Export
Animation : Create and save an animation file
Single frames : Save a sequence of single frames
Exit : End of program
Edit
Undo : Undo
Restore : Redo
Key frames : Activates the Key frame function
Effects
Playback: Play the current effect
Period of time (Duration): Determines the length of an effect
View
% values : Increase / reduce layout display (-> +/- key!)
low : lower quality, quickest presentation
middle : better quality, quicker presentation
good : high quality, higher rendering demand, slower presentation
premium : highest quality and rendering demand, slower presentation
Options : Display/ Video format and Background / borders
Extras
Start page : Back to Overview (Start page / Navigation overview))
Back: Change Vitascene screen (back)
Next: Change Vitascene screen (next)
Preview: Create an edited preview
Recently opened projects : List of the last edited projects
Settings: Open the Vitascene setting dialogue box
Help
About Vitascene : Info about program version, licensing data
Manual : Online manual
Import license file : Manually load a license file *.mtkey
Register
Incase of problems, send us an email... : should only be used if a problem arises. In case of
need of support.
Open Vitascene homepage : www.prodad.com with FAQs, tips, info etc.
Service update : download/install current version of program
84
Add-on products
Other products
Shortcuts
Here you will find several working aids. Although they may not be obvious at first glance,
they are very helpful when working with Vitascene, provided that you enjoy using the
keyboard:
Open... : Strg-0
Save : Strg-S
Quit : Strg-Q
Undo : Strg-Z
Manual : F1
Apply templates
This is where you will find a full range of all design options.
This memory contains templates sorted by Filter group and Transition group.
Filter-Presets
The Filter Templates dialogue box contains 2 groups in the Root folder, sorted by Filter
group and Transition group.
The Filter group contains further Folders, which in turn contain numerous effect templates
that are ready for use.
85
The Transition group contains further Folders, which in turn contain numerous effect
templates that are ready for use.
86
To select a Filter template, go to a Template folder (e.g. Filter group / Sparkle), where effect
templates are displayed. By double clicking on the effect of your choice, you will transfer it
into the preview window.
Own templates
You can also create and save your own templates:
By clicking on
two menus are available:
1. Menu Templates :
• Create group: creates a group for your own templates
• rename: renames a template group
• delete: deletes a template group
2. Menu Display :
87
•
•
•
•
•
List: display as a list
Table: Display the templates in a table
small Icons: smallest form of symbolic display (single mouse click = animation)
symbols: middle form of symbolic display (single mouse click = animation)
Big Icons: largest form of symbolic display (single mouse click = animation)
Filter group / Sparkle
In this chapter, the application of an effect from the Filter Group, based on the example of
a Sparkle effect, is explained in more detail. Sparkle effects can be found in the Sparkle
filter templates.
Double click on Effect #131 to transfer it to the Vitascene preview window.
Filter
Click on the Filter option in Navigation menu / parameter.
The Filter dialogue box appears, and contains numerous controllers with which you can
modify the Sparkle effect, for example.
88
With the help of the controllers displayed, you can alter the sparkle effect properties.
More details of Sparkle filter setting options as well as graphic displays can be seen by
clicking here.
Any change to a property is immediately displayed in the preview window in real time.
Tip:
Of course, you can select other effects using the Filter drop-down menu, the dialogue boxes
nevertheless differ from each other, since every effect comes with different setting options.
Use of the controller is still the same, for checking purposes every change is displayed
immediately in the preview window.
Color Adjustment
Another option in the Navigation menu / Parameter is color adjustment.
After clicking on the color adjustment option, the color adjustment dialogue box
appears. With the help of the controllers displayed, you can alter the display properties of
the image or video material used.
Source / Video A
In the Video A dialogue box, you can determine which image or video material you want to
use. Until then, the image material is automatically selected in the preview window.
Click on Video A option in the Navigation menu / Source, the Video A dialogue box
appears.
89
1. Select source:
In the Source window selected your desired image or video material, to do this click on the
Image / animation option in the Type of fill drop-down menu and then use the Folder
button to navigate to the folder that contains your required image or video file.
You can also select the Video A or B option and then import your desired image or video
material. To do this click on the Config button.
2. Pixel aspect:
In the Pixel aspect menu, the image or video material used can be reduced, enlarged and
left unchanged. The ratio aspect can also be modified.
3. Attributes:
The Attributes field contains Flip options in a horizontal, vertical and diagonal
direction, and, of course, you can select the unchanged option, which means that no Flip
effect will be applied to the image or video material used.
In addition, you can apply an Invert effect, which reverses the color values of the image,
video clip or template used.
90
4. Geometry:
Geometry settings have an effect on the size of an image and its position in a horizontal or
vertical direction as well as the rotation of an image, video clip or template.
Any change in a property is immediately displayed in the preview window in real time.
Transition group / Glow Wipes
In this chapter, the application of an effect from the Transition Group, based on the
example of a Glow Wipe effect is explained in more detail.
Double click on Glow Centre Sweep #04 to transfer it to the Vitascene preview window.
Mask-Presets (Templates)
Click on the Mask-Presets option in the Navigation menu / Alpha-Wipe.
The Mask-Presets dialogue box appears, this contains numerous templates (e.g. circular
templates), which can be transferred into the preview window by double clicking on them.
91
In addition, the following settings are available for the selected effect.
1. Impression :
2. Location :
92
3. Wrap :
Any change in a property is immediately displayed in the preview window in real time.
Customize effect
Click on the Customize effect option in the Navigation menu / Alpha Wipe.
The Customize effect dialogue box appears. This contains numerous options (Crossing,
Wrap, Emphasis, Geometry and Iris Control), with which you can modify the selected
template.
1. Crossing
93
2. Wrap :
3. Emphasis :
4. Geometry :
94
5. Iris Control :
Any change in a property is immediately displayed in the preview window in real time.
Customize mask
Click on the Customize mask (template) option in the Navigation menu / Parameter.
The Customize mask dialogue box appears: this is where you can import templates (e.g. a
circular template) into the preview window. Using the Folder button, you can access a folder
which contains pre-installed templates that are ready for use.
1. Select source:
In the Source field, select your desired template form, to do this click on the
Image/Animation option in the Type of fill drop-down menu and then use the Folder
button to navigate to the folder that contains the required template.
95
2. Select Blur filter:
In the Blur field (fuzziness) you can again add an effect using the drop-down menu.
3. Pixel aspect:
In the Pixel aspect menu, the image or video material used can be reduced, enlarged and
left unchanged. The ratio aspect can also be modified.
4. Attributes :
The Attributes field contains Flip options in a horizontal, vertical and diagonal
direction, and, of course, you can select the unchanged option, which means that no Flip
effect will be applied to the image or video material used.
In addition, you can apply an Invert effect, which reverses the colour values of the image,
video clip or template used.
5. Geometry :
Geometry settings have an effect on the size of an image and its position in a horizontal or
vertical direction as well as the rotation of an image, video clip or template.
96
Any change in a property is immediately displayed in the preview window in real time.
Texture
Click on the Texture option in the Navigation menu / Parameter.
The Texture dialogue box appears.
1. Select source – color as texture:
This is where, in the Source field (single-color), you can assign a color to the template in
the preview window, for example. Click on the Color option, this opens the Color dialogue
box, where you can select your desired color.
The selected color (e.g. red) is then displayed in the template in the preview window. Of
course, a graphic or animation can be selected as a texture.
2. Select source - graphic / animation, Video A or Video B as texture:
Or select your desired image or video material in the Source field, to do this click on the
Image / Animation option in the type of fill drop-down menu and then use the Folder
97
button to navigate to the folder that contains the required image or video file.
3. Geometry :
Any change in a property is immediately displayed in the preview window in real time.
Filter
Click on the Filter option in the Navigation menu / Parameter.
The Filter dialogue box appears; it contains a choice of numerous filters, select the Glim
effect, for example.
98
Any change in a property is immediately displayed in the preview window in real time.
Tip:
Of course, you can select other effects from the Filter drop-down menu, the dialogue boxes
nevertheless differ from each other, since every effect comes with different setting options.
Use of the controller is still the same, for checking purposes every change is displayed
immediately in the preview window.
Source / Video A
Click on the Video A option in the Navigation menu / Source.
In the Video A dialogue box, you can determine which image or video material you want to
use. Until then, the image material is automatically selected in the preview window.
1. Select source:
In the Source field, select your desired image or video material (as Video A), to do this click
on the Image /Animation or Video A option in the type of fill drop-down menu, for
example, and then use the Folder button to navigate to the folder that contains the required
image or video file.
99
2. Select filter:
In the Filter field assign a filter to the selected image or video material. To do this open the
drop-down menu.
3. Color Adjustment:
With the help of the controller displayed, you can modify the image properties of the image
or video material used.
4. Select Blur effect:
In the Blur field (fuzziness) you can again add an effect using the drop-down menu.
100
5. Pixel aspect :
In the Pixel aspect menu, the image or video material used can be reduced, enlarged and
left unchanged. The ratio aspect can also be modified.
6. Attributes :
The Attributes field contains Flip options in a horizontal, vertical and diagonal
direction, and, of course, you can select the unchanged option, which means that no Flip
effect will be applied to the image or video material used.
In addition, you can apply an Invert effect, which reverses the color values of the image,
video clip or template used.
7. Geometry :
Geometry settings have an effect on the size of an image and its position in a horizontal or
vertical direction as well as the rotation of an image, video clip or template.
101
Any change in a property is immediately displayed in the preview window in real time.
Source / Video B
Click on the Video B option in the Navigation menu / Source.
In the Video B dialogue box, you can determine which image or video material you want to
use. Until then, the image material is automatically selected in the preview window.
1. Select source:
In the Source field, select your desired image or video material (as Video B), to do this click
on the Image /Animation or Video B option in the type of fill drop-down menu, for
example, and then use the Folder button to navigate to the folder that contains the required
image or video file.
102
2. Select filter:
In the Filter field assign a filter to the selected image or video material. To do this open the
drop-down menu.
3. Color Adjustment:
With the help of the controller displayed, you can modify the image properties of the image
or video material used.
103
4. Select Blur effect:
In the Blur field (fuzziness) you can again add an effect using the drop-down menu.
5. Pixel aspect :
In the Pixel aspect menu, the image or video material used can be reduced, enlarged and
left unchanged. The ratio aspect can also be modified.
6. Attributes :
The Attributes field contains Flip options in a horizontal, vertical and diagonal
direction, and, of course, you can select the unchanged option, which means that no Flip
effect will be applied to the image or video material used.
In addition, you can apply an Invert effect, which reverses the color values of the image,
video clip or template used.
7. Geometry :
Geometry settings have an effect on the size of an image and its position in a horizontal or
vertical direction as well as the rotation of an image, video clip or template.
104
Any change in a property is immediately displayed in the preview window in real time.
See also
Whatever you do when inputting or designing, this is where continuative actions are
available, which can be useful at the current time.
Vitascene simply tries to move interesting actions for each position into your focus and helps
further in this situation.
Export
Here you can choose your desired type of export:
Animation = Animation file (e.g. AVI, MPG, WAV, etc.)
Single frames = Export into an index of one picture or a continuous picture sequence
Settings
General settings for the Search path for images/animations, Alternative video sources and
Specialization customization
105
Display:
Video format, Background / borders, Duration and Language - User interface
Here you will find settings for project templates :
Undo and Save
Edit
By clicking on Edit in the Start page / Navigation Overview dialogue box (Work groups),
you will open the Edit dialogue box.
The Edit dialogue box offers you 2 options..
106
1. Customize effect:
This is where you can access the Filter-Presets dialogue box via the Customize effect
option.
The Root folder contains numerous effect templates (filters as well as transitions).
Application of the Filter-Presets is described later in the tutorial.
2. New project :
Click on the New project option to re-open the Filter-Presets dialogue box, which
contains numerous effect templates (filters as well as transitions), which you can use and
modify.
107
Operators
Operators comprise various settings (parameters) and effect options.
They are differentiated by:
Geometry
Geometry settings have an effect on the size of an image and its position in a horizontal or
vertical direction as well as the rotation of an image, video clip or template.
Rotation
The Rotation turns an image, video clip or template (mask) around.
without Rotation :
with Rotation :
Scale
The Scale option reduces or enlarges an image, video clip or template (mask).
without scaling :
with scaling (enlargement) :
108
with scaling (reduction) :
Position horizontal
The Horizontal position option moves the position of an image, video clip or template in a
horizontal direction.
without horizontal displacement :
with horizontal displacement :
109
Position vertical
The Vertical position option moves the position of an image, video clip or template in a
vertical direction.
without vertical displacement :
with vertical displacement :
Avoid edges, through may enlarge
By activating this option, the following changes are made to an image, video clip or template
(mask).
without Activation
"Avoid edges, through may enlarge" :
with Activation
"Avoid edges, through may enlarge" :
Pixel-Aspect
In the Pixel-Aspect field, an image, video clip or template can be left unchanged, reduced or
enlarged. For example, a 4x3 image, video clip or template can be changed to 16x9.
Adjust by
This provides 3 options for making changes:
110
1. Adjust by unchanged, an image, video clip or template retains its original size
unchanged :
2. Adjust by enlarge, an image, video clip or template is enlarged
enlarge :
3. Adjust by reduce, an image, video clip or template is reduced
reduce :
111
Aspect Ratio
This is where the Aspect Ratio of an image, video clip or template is altered.
Aspect Ratio 1.0000 :
Aspect Ratio 2.0000 :
Attributes
The Attributes field contains Flip options in a horizontal, vertical and diagonal
direction, and, of course, you can select the unchanged option, which means that no flip
effect will be applied to the image, video clip or template used.
Flip
1. Flip unchanged; an image, video clip or template stays as it is
Flip unchanged :
112
2. Flip horizontal, an image, video clip or template is flipped horizontally
Flip horizontal :
3. Flip vertical, an image, video clip or template is flipped vertically
Flip vertical :
4. Flip diagonal, an image, video clip or template is flipped diagonally
Flip diagonal :
113
Invert
In addition, an Invert effect can be applied to reverse the colour values of an image, video
clip or template.
Invert :
Color Adjustment
In the Colur Adjustment field you can alter the color properties of an image, video clip or
template.
Brightness
The Brightness option alters the brightness of an image, video clip or template.
Normal Brightness :
Adjusted brightness :
Contrast
The Contrast option alters an image, video clip or template as follows.
114
Normal Contrast :
Adjusted Contrast :
Saturation
The Saturation option alters an image, video clip or template as follows.
Normal Color :
Adjusted Color :
Hue
The Hue option alters the color balance of an image, video clip or template as follows.
Neutral Hue :
Adjusted Hue :
115
Gamma
The Gamma option (non-linear brightness adjustment) alters an image, video clip or
template as follows.
Neutral Gamma :
Adjusted Gamma :
Blur
In the Blur field, you are offered various Blur effect options (fuzziness). The differences
between the individual Blur effects are presented in more graphic detail here. Blur means
the same as fuzziness or soft-focus.
Gauss Blur (3x3, 7x7, 9x9 und 11x11)
The blur is strengthened as follows :
Gauss Blur 3x3
Gauss Blur 7x7
Gauss Blur 9x9
Gauss Blur 11x11
116
Gauss Blur
With the help of the Intensity option, the Blur effect (fuzziness) can be manually
strengthened.
Horizontal Gauss Blur
With the help of the Intensity option, the Blur effect can be strengthened in a horizontal
direction.
Vertical Gauss Blur
With the help of the Intensity option, the Blur effect can be strengthened in a vertical
direction.
117
Center Blur
With the help of the Intensity option, the Blur effect can be strengthened from the centre
of the image.
With the Zoom option, you can zoom into or out of the image. The Horizontal and Vertical
options move the position of the Center Blur effect in a horizontal or vertical direction.
Zoom Blur
With the help of the Intensity option, the Blur effect can be zoomed from the centre of the
image.
With the Zoom option, you can zoom into or out of the image. The Horizontal and Vertical
controller moves the position of the Zoom Blur effect in a horizontal or vertical direction.
118
Disc Blur
With the help of the Intensity option, the Blur effect can be manually strengthened.
Direction Blur
With the help of the Intensity option, the Blur effect can be manually strengthened (e.g. in
a horizontal direction).
With the Orientation option, you can change the Direction Blur effect to a different
direction.
119
Annulus Blur
With the help of the Intensity option, the Blur effect can be strengthened (controller
spacing = 20%).
When the Spacing controller is moved (e.g. to approximately 70%), the Annulus Blur effect
appears as follows.
Cross Blur
With the help of the Intensity option, the Blur effect can be strengthened.
With the Orientation option, you can change the Cross Blur effect to a different direction.
120
Blur + Expand white
With the help of the Intensity option, the Blur effect (the white value) can be strengthened.
Blur + Expand black
With the help of the Intensity option, the Blur effect (the black value) can be strengthened.
Frequence Blur
With the help of the Intensity option, the Blur effect can be strengthened and the image
contours altered (Frequency controller = 100%).
121
When the Frequency controller is moved (e.g. to approximately 50%), the Frequency Blur
effect appears as follows.
Cycle Frequence Blur
With the help of the Intensity option, the Blur effect can be strengthened and the color of
the image contours altered.
When the Frequency controller is moved (e.g. to approximately 100%) the Cycle Frequency
Blur effect appears as follows.
122
Filter
In the Filter field, you are offered various types of Filter. The differences between the
individual filters are presented in more graphic detail here.
Bright Bloom
A Bright Bloom effect allows partial overexposure and the related expansion of bright areas
in the image or video material used. A Bloom effect can often be recognized by the bright
areas being surrounded by a glow.
without Bright Bloom
with Bright Bloom
•
Length
This is where you can increase bright areas in an image or video material.
•
Highlight Threshold
This allows you to control the brightness at which the effect begins, enabling the effect to
be applied selectively e.g. only to light or bright sections of images
123
•
Scene-Intensity
This is where you can control the brightness intensity of the original image.
•
Glow-Intensity
The glow property of bright areas that have already been enlarged (e.g. lights) in an
image can be strengthened.
•
Highlight-Intensity
This setting option creates additional brightening of the bright sections of an image.
Bright Direction Bloom
The Bright Direction Bloom effect simulates reflections in an image by scattered light,
which are highly visible in bright rays of light or light sources, like the sun, for example.
without Bright Bloom Direction
with Bright Bloom Direction
•
Length
This is where you can determine the length of rays of light.
•
Highlight Threshold
This allows you to determine the brightness threshold at which the effect begins.
•
Scene-Intensity
The intensity of the original image is used for optional dim-out as well as to strengthen
the effect.
•
Glow-Intensity
This allows the rays of light created to be highlighted with a glow.
124
•
Highlight-Intensity
This allows the rays of light created to be brightened up (the color white is added) or highlighted.
•
Orientation
This allows the direction of the rays of light in the image to be changed.
•
reduce flicker
This allows you to reduce fluctuations in the brightness of rays of light in a sequence.
Bright Cross Bloom
The Bright Cross Bloom effect simulates reflections in an image by scattered light, which
are highly visible in bright rays of light or light sources, like the sun, for example.
This differs from the Bright Direction Bloom effect in the Cross (crossways) dispersal of
the rays of light.
without Bright Cross Bloom
with Bright Cross Bloom
•
Length
This is where you can determine the length of rays of light.
•
Highlight Threshold
This allows you to determine the brightness threshold at which the effect begins.
•
Scene-Intensity
The intensity of the original image is used for optional dim-out as well as to strengthen
the effect.
•
Glow-Intensity
This allows the rays of light created to be highlighted with a glow.
125
•
Highlight-Intensity
This allows the rays of light created to be brightened up (the color white is added) or highlighted.
•
Orientation
This allows the direction of the rays of light in the image to be changed.
•
reduce flicker
This allows you to reduce fluctuations in the brightness of rays of light in a sequence.
Saturation Bloom
Der Effekt Saturation Bloom verstärkt farbige Flächen im Bildmaterial. Dadurch können
Farben leuchtender dargestellt werden, sogar bis hin zum Glühen verstärkt werden.
without Saturation Bloom
with Saturation Bloom
•
Length
You can use this option to increase the colored sections of images or video material
•
Threshold
This enables you to determine the color threshold at which the effect begins.
•
Gamma
This setting option controls the effect on bright and dark areas.
•
Scene-Intensity
The intensity of the original image is used for optional dim-out as well as to strengthen
the effect.
126
•
Opacity
Enables you to determine the display strength of the effect.
•
Saturation
Enables you to determine the strength of the colors in the image.
•
Hue
Use this option to alter the shade of the color in the image.
Saturation Direction Bloom
The Saturation Direction Bloom effect strengthens colored sections in the image material.
This effect also simulates reflections in the image using scattered light.
without Saturation Direction Bloom
with Saturation Direction Bloom
•
Length
Use this option to increase the colored sections as well as to determine the length of
reflections in the image or video material.
•
Threshold
This enables you to determine the color threshold at which the effect begins.
•
Scene-Intensity
The intensity of the original image is used for optional dim-out as well as to strengthen
the effect.
•
Opacity
Enables you to determine the display strength of the effect.
127
•
Saturation
Enables you to determine the strength of the colors in the image.
•
Hue
Use this option to alter the shade of the color in the image.
•
Orientation
This allows the direction of the rays of light in the image to be changed.
•
reduce flicker
This allows you to reduce fluctuations in the brightness of rays of light in a sequence.
Defocus
The Defocus effect simulates an optical blur, with no visible points of light, allowing this
effect to be created much more rapidly.
without Defocus
•
with Defocus
Focus
This enables you to control the focus of the original - as far as a complete blur.
To display or highlight points of light, use the Defocus + Bokeh effect.
128
Defocus + Bokeh
The Defocus + Bokeh effect doesn’t just simulate an optical blur but also creates Bokehs
(points of light) emerging from bright sections of images (areas).
Unlike the Defocus effect, this is a more high quality effect determined by the camera lens.
without Defocus + Bokeh
with Defocus + Bokeh
•
Focus
This enables you to control the focus of the original - as far as a complete blur.
•
Gamma and Brightness
These parameters affect the emergence and the brightness of points of light (Bokeh).
Unlike the Defocus effect, without visible points of light.
129
Hollywood Night
By applying this effect, a daylight shot is turned into a night time shot.
At night, the human eye can not distinguish between colors, and contrasts are less easily
perceived, this is what this effect does, taking account of Scotopic vision.
without Hollywood Night
with Hollywood Night
•
Brightness
After applying the Hollywood Night effect, you can use this option to alter the
brightness of the image. Brightness is controlled within the effect and you cannot return
to the original image.
•
Contrast
With this parameter, you can adjust the contrast of the image. Contrast is controlled
within the effect and you cannot return to the original image.
130
Color Blur
With the help of the Color Blur effect and the Length parameter, the color and Sharpness
of the image or video material can be altered.
without Color Blur
(Lenght = 0)
with Color Blur
(Lenght = 10)
•
Threshold
Use this option to determine at what level the effect begins.
•
Sharpness
With this parameter, you can determine the gentleness of the color transition.
Sparkle
The Sparkle effect simulates light effects in the image and is best applied to bright areas of
an image.
131
•
Length
This option enables you to determine the size of the sparkle (light effects).
•
Highlight Threshold
With this parameter, you can determine the brightness at which the effect begins.
•
Erosion Threshold
This option is used to set the number of sparkles created. The reduce flicker option also
has an effect on the creation of new sparkles.
•
Glow-Intensity
This option controls the strength of the glow effect on the sparkle.
•
Highlight Intensity
This option is used to define the brightness (brightening) of the sparkle.
•
Spot-Intensity
This option affects the strength of the spot dispersion.
132
•
Spot-Size
Use this option to determine the size of the spot.
•
Orientation
This option determines the direction or rotation of the sparkle, when the Spot method is
chosen, direction has no effect.
•
reduce flicker
This enables you to reduce fluctuations in the brightness of sparkles in a sequence.
Glim
The Glim effect simulates glowing areas in an image, which are clearly visible in the
following illustration.
•
Highlight Threshold
With this parameter, you can determine the brightness at which the effect begins.
•
Erosion Threshold
This is where the number of glowing areas created is set. The reduce flicker option also
has an effect on the creation of new glowing areas.
•
Glow-Intensity
This option controls the strength of the glow effect for glowing areas.
•
Highlight Intensity
This is where the brightness (brightening) of glowing areas is defined.
•
Spot-Size
This is where you can determine the size of glowing areas.
•
reduce flicker
This enables you to reduce fluctuations in the brightness of glowing areas in a sequence.
133
Starburst
The following illustration shows the application of the Starburst effect, light effects are
clearly visible.
•
Length
Use this option to determine the length of rays of light.
•
reduce flicker
This enables you to reduce murmur and therefore the emergence of streaks (rays).
•
Pattern A
By means of a document, you can tell that by using the Pattern A option, the
appearance of text areas can be varied.
134
•
Pattern B
By means of a document, you can tell that by using the Pattern B option, the
appearance of text areas can be varied However, this presentation is less refined.
•
Checker A
By means of a sample, you can tell that by using the Checker A option, identification of
the size of areas can be varied. Identification is modulated using this sample.
•
Checker B
By means of a sample, you can tell that by using the Checker B option, identification of
the size of areas can be varied. Identification is modulated using this sample. However,
this presentation is less refined.
•
Radial A
By means of a sample, you can tell that by using the Radial A option, identification of
the size of areas can be varied. Identification is modulated using this sample.
•
Radial B
By means of a sample, you can tell that by using the Radial B option, identification of the
size of areas can be varied. Identification is modulated using this sample. However, this
presentation is less refined.
Other additional settings are available in the Scan Mode field :
•
Luminosity
This option alters the appearance of the Starburst effect, depending on the brightness.
•
Luminosity edge
An edge is determined in terms of brightness, to which the effect then relates.
•
Alpha
This is where the alpha channel is used; should there not be one, the effect is applied to
the whole image.
135
Edge
• Alpha
This is where the alpha channel is used, should there not be one the effect is applied to
the whole image. An edge is determined, to which the effect then relates.
•
negative Luminosity
This method alters the appearance of the Starburst effect, depending on the brightness.
However, only the dark areas of the image are used.
•
Bright Edge
An edge is determined in terms of brightness (tracing of bright edges only), to which the
effect then relates.
•
Saturation
This is where areas with a high concentration of color are altered in preference.
•
Maximum
This is where areas with a maximum level of colour are used; 100 % white has the same
effect as 100 % red, green, blue, magenta, yellow or cyan.
Further options for creating effects :
•
Threshold
This option determines when an effect begins, depending on the method used.
•
Method
You have the following options for the number of rays or effect appearance:
12 Streaks
6+ Streaks
6 Streaks
4 Streaks
2 Streaks
Spot
You can decide on the appearance.
•
Orientation
This option determines the direction or rotation of the rays, when the Spot method is
chosen, direction has no effect.
136
•
Scene-Intensity
This is where you can control the brightness intensity of the original image.
•
Opacity
This option strengthens the opacity (covering power) of the effect.
•
Saturation
This is where you can strengthen or reduce the colour of the ray effect.
•
Hue
With the help of this option you can alter the shade of the ray effect.
•
Highlight Color
This is where you can decide on a colour to brighten up the ray effect.
•
Highlight Intensity
This option enables you to set the strength of the selected brightening colour.
•
Tint Color
This is where you can choose a colour with which to tint the rays.
•
Tint-Intensity
This option enables you to set the strength of the selected tint colour.
•
Exposure Tint
This is where you determine the way in which the tint works.
137
Rays
Rays create penetrating light reflections in the image, which are clearly visible in the
following illustration.
•
Length
This is where you can determine the length of the light rays. The (visible) length of rays
is also affected by the Method and Progress.
•
reduce flicker
This enables you to reduce murmur and therefore the emergence of streaks (rays).
•
Pattern A
By means of a document, you can tell that by using the Pattern A option, the
appearance of text areas can be varied.
•
Pattern B
By means of a document, you can tell that by using the Pattern B option, the
appearance of text areas can be varied However, this presentation is less refined.
•
Checker A
By means of a sample, you can tell that by using the Checker A option, identification of
the size of areas can be varied. Identification is modulated using this sample.
138
•
Checker B
By means of a sample, you can tell that by using the Checker B option, identification of
the size of areas can be varied. Identification is modulated using this sample. However,
this presentation is less refined.
•
Radial A
By means of a sample, you can tell that by using the Radial A option, identification of
the size of areas can be varied. Identification is modulated using this sample.
•
Radial B
By means of a sample, you can tell that by using the Radial B option, identification of the
size of areas can be varied. Identification is modulated using this sample. However, this
presentation is less refined.
Other additional settings are available in the Scan Mode field :
•
Luminosity
This option alters the appearance of the Rays effect, depending on the brightness.
•
Luminosity edge
An edge is determined in terms of brightness, to which the effect then relates.
•
Alpha
This is where the alpha channel is used; should there not be one, the effect is applied to
the whole image.
•
Alpha Edge
This is where the alpha channel is used, should there not be one the effect is applied to
the whole image. An edge is determined, to which the effect then relates.
•
negative Luminosity
This method alters the appearance of the Starburst effect, depending on the brightness.
However, only the dark areas of the image are used.
139
•
Bright Edge
An edge is determined in terms of brightness (tracing of bright edges only), to which the
effect then relates.
•
Saturation
This is where areas with a high concentration of color are altered in preference.
•
Maximum
This is where areas with a maximum level of color are used; 100 % white has the same
effect as 100 % red, green, blue, magenta, yellow or cyan.
Further options for creating effects :
•
Threshold
This option determines when an effect begins, depending on the method used.
More effect settings are available in the Method field :
•
Edge Light
The progress of brightness has its origin in the source edge and not the vanishing point.
Brightness changes according to its distance from the source edge.
•
Flat Light
The progress of brightness has its origin in the source edge and not the vanishing point.
Brightness changes according to its distance from the vanishing point.
140
•
Soft Light
The progress of brightness is based on the source edge in both directions, to the
vanishing point and in the opposite direction.
•
Motion Beam
This effect option functions as follows.
•
Flat Beam
This effect option functions as follows.
141
•
Spot Beam
This effect option functions as follows.
•
Back Beam
This effect option functions as follows.
142
•
3D Spot
The rays are positioned around the object, as on the surface of a sphere. This effect is
only visible in an animation.
Further options for creating effects :
•
Exposure
Depending on the method, the brightness level of the rays is controlled from the source
to the maximum length.
•
Zoom
This is where you can move the rays towards the vanishing point.
143
•
Composite
This is a type of combination of background and ray effect.
Depending on its identity, the composite is created in a positive or negative slider
direction using the luminance or alpha value. To ensure that both options are always
available, the slider can be moved in a negative direction for the second option.
Composite 0%
Composite 100%
•
Scene-Intensity
This is where you can control the brightness intensity of the original image.
•
Glow-Intensity
This allows the rays of light created to be highlighted with a glow.
•
Highlight Color
This is where you can decide on a color to brighten up the ray effect.
•
Highlight Intensity
This option enables you to set the strength of the selected brightening color.
•
Tint Color
This is where you can choose a color with which to tint the rays.
144
•
Tint-Intensity
This option enables you to set the strength of the selected tint color.
•
Exposure Tint
This is where you determine the way in which the tint works.
•
Horizontal
Using this option you can move the vanishing point in a horizontal direction.
•
Vertical
Using this option you can move the vanishing point in a vertical direction.
Dust
The Dust effect creates a misty or hazy effect; bright areas appear blurred and illuminate
dark areas in the image.
without Dust
with Dust
145
•
Method
This is where you can set the type of editing.
•
Length
Using this option you can determine the degree of blur in the image.
•
Haziness
Using this option you can determine the intensity of the Dust effect (build up of haze or
mist).
•
Gamma
This setting option controls the effect on bright and dark areas within the image.
•
Glow-Intensity
The image is brightened, by adding a glow to the bright areas.
•
Highlight-Intensity
With this setting option, bright sections of images can be lightened or darkened.
Motion Dust
The Motion Dust effect creates a hazy or misty effect, bright areas become blurred and
illuminate dark areas within the image. In addition, the effect of a rapid camera pan (or
reflection) appears within the image.
without Motion Dust
•
with Motion Dust
Length
This is where you can determine the strength of the blur as well as the spread of the
reflection in the image.
146
•
Haziness
Using this option you can determine the intensity of the Dust effect (build up of haze or
mist).
•
Gamma
This setting option controls the effect on bright and dark areas within the image.
•
Glow-Intensity
The image is brightened, by adding a glow to the bright areas.
•
Highlight-Intensity
With this setting option, bright sections of images can be lightened or darkened.
•
Orientation
This allows the reflection direction (or swivel effect) to be changed within the image.
Zoom Dust
The Zoom Dust effect creates a hazy or misty effect, in addition, it simulates penetrating
reflections within the image (e.g. Zoom in the centre of the image).
without Zoom Dust
with Zoom Dust
•
Length
This is where you can determine the strength of the blur as well as the strength of the
reflection in the image.
•
Haziness
Using this option you can determine the intensity of the Dust effect (build up of haze or
mist).
147
•
Gamma
This setting option controls the effect on bright and dark areas within the image.
•
Glow-Intensity
The image is brightened, by adding a glow to the bright areas.
•
Highlight-Intensity
With this setting option, bright sections of images can be lightened or darkened.
•
Horizontal
This option allows you to change the horizontal position of the vanishing point (the lowest
position of the reflection); the value (0%) corresponds to the centre in a horizontal
direction.
•
Vertical
This option allows you to change the vertical position of the vanishing point (the lowest
position of the reflection); the value (0%) corresponds to the centre in a vertical
direction.
Cross Dust
The Cross Dust effect creates a hazy or misty effect, in addition, it simulates a cross
reflection in the image (crossways).
without Cross Dust
•
with Cross Dust
Length
This is where you can determine the strength of the blur as well as the strength of the
cross-reflection in the image.
148
•
Haziness
Using this option you can determine the intensity of the Dust effect (build up of haze or
mist).
•
Gamma
This setting option controls the effect on bright and dark areas within the image.
•
Glow-Intensity
The image is brightened, by adding a glow to the bright areas.
•
Highlight-Intensity
With this setting option, bright sections of images can be lightened or darkened.
•
Orientation
This allows the reflection direction to be changed within the image.
Color Composite
The Color Composite effect allows various color changes to be made within the image
material.
The original image without a Color Composite effect.
The example illustrations with a Color Composite effect applied have been created using
the following settings:
Opacity=70%,
Red=20%
Green=20%
Blue=80%
Fill as Plane
Various methods are available in the Composite field:
149
•
Screen
With this option, the color is multiplied by the inverted brightness of the image.
•
Overlay
This method overlays the image with color, however bright and dark areas of colour are
protected.
•
Dodge
In this case, the color in the image is displayed as brighter.
•
Burn
The color in the image is strengthened but displayed as darker.
150
•
Hard light
Using the brightness of the image, the colors are applied using the Screen or Dodge
method.
•
Soft light
Using the brightness of the image, the colors are applied using the Screen or Dodge
method, but the contrast is reduced.
•
Grain extract
This option removes the color from the image.
151
•
Grain merge
This option strengthens the color in the image.
•
Difference
This method subtracts the color in the image.
In the Fill as field, there is also the option
•
Fill as: Gradient
This option enables the colors of sky and earth to be separated, for example.
152
The example illustration has been created using the following setting:
Opacity=70%, Composite=Overlay
Fill as Gradient: upper color
Red=80%, Green=50%, Blue=0%
Fill as Gradient: lower color
Red=33%, Green=15%, Blue=60%
Effect Parameter
Within Effect Parameter, you are offered various setting options for the effects used. The
various differences in settings for the individual parameters are presented in more graphic
detail here.
A/B Sharpness
With the help of the A/B Sharpness parameter, the edge contours of the template can be
set to soft / medium or hard.
A/B Sharpness
(hard)
A/B Sharpness
(soft)
153
A/B Tint
The A/B Tint parameter alters the colour scheme of the template as follows.
A/B Tint
(30%)
A/B Tint
(200%)
Fade Point
The Fade Point parameter alters the cross fade behavior of the template as follows.
Fade Point
(0%)
Fade Point
(500%)
X / Y-axis for Wrap
The X-axis for Wrap parameter alters the position of the template to the right or left and
causes distortion of the image or video material.
154
Displacement in the direction of the X-axis
(-100%)
Displacement in the direction of the X-axis
(+100%)
The Y-axis for Wrap parameter alters the position of the template upwards or downwards
and causes distortion of the image or video material.
Displacement in the direction of the Y-axis
(-100%)
Displacement in the direction of the Y-axis
(+100%)
155
Hor. / Vert. displacement for Wrap
The Horizontal displacement for Wrap parameter distorts the template and the image
material as follows.
horizontal displacement
(-100%)
horizontal displacement
(+100%)
The Vertical displacement for Wrap parameter distorts the template and the image
material as follows.
Vertical displacement
(-100%)
Vertical displacement
(+100%)
156
Opacity
The Opacity parameter alters the Intensity of the template.
with Opacity
(70%)
with Opacity
(100%)
blend luminance
With the blend luminance parameter, the brightness of the template is greatly overdrawn.
with blend luminance
(with Opacity 100%)
with blend luminance
(with Opacity 100%)
157
Loops
With the Loops parameter, you can alter the number of available waves (e.g. from 1 to 3
waves) in the preview window.
Waveform
The Waveform parameter alters the waves as follows (first select opacity of 100%).
with 3 waves (Loops) and Waveform (200%)
with 3 waves (Loops) and Waveform (100%)
158
with 5 waves (Loops) and Waveform (75%)
Rotation
The Rotation parameter turns the template around and affects only transition templates.
159
Iris
This is where you can alter the appearance of the template in terms of its Position.
Iris (20%)
Iris (60%)
swap direction
With the swap direction parameter, you can reverse the effect process (e.g. visible with
Effect #47).
The effect progresses with activated parameters, e.g. as Zoom In (in a direction from
complete image to zero, centered) or with deactivated parameters e.g. as Zoom Out (in a
direction from zero to complete image, centred). The background image is replaced each
time.
160