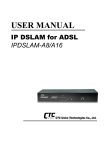
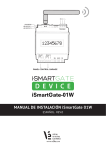
1
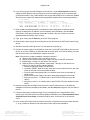
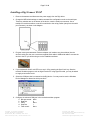
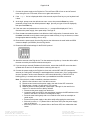
 Setting up
Digi Connect Wi-SP or Digi ConnectPort TS W Devices
On a Secured Wireless Network
for use with Veriteq viewLinc
Contents
Before You Start the Installation ...............................................................................................2
Introduction................................................................................................................................................ 2
Veriteq vNet and Digi Device Drivers CD ................................................................................................. 2
Network Settings ....................................................................................................................................... 2
Wi-Fi Settings ............................................................................................................................................ 3
Terminal Emulation Program .................................................................................................................... 3
Telnet Client .............................................................................................................................................. 4
Installing a Third-Party Terminal Emulation Program or Telnet Client...................................................... 4
Digi Device Discovery Program ................................................................................................................ 4
Installing a Digi ConnectPort TS W ...........................................................................................5
Installing a Digi Connect Wi-SP.................................................................................................7
Wireless LAN Configuration Commands................................................................................10
Introduction.............................................................................................................................................. 10
Entering the Commands ......................................................................................................................... 10
Sample Commands for Static IP Address and WEP Encryption ............................................................ 11
Sample Commands for Reserved IP Address and WPA2-PSK ............................................................. 11
Command Syntax.................................................................................................................................... 12
Veriteq, a Vaisala company
13775 Commerce Parkway
Richmond, BC, Canada, V6V 2V4
www.veriteq.com | www.vaisala.com
Tel 604 273 6850
1 800 683 8374 (North America)
Fax 604 273 2874
[email protected]
Page 2 of 12
Before You Start the Installation
Introduction
This document provides information to help you install a Digi Connect Wi-SP or Digi ConnectPort TS W
device on a secured wireless network. These instructions replace steps 1 and 2 in the Veriteq Quick Start
Guide for viewLinc with vNet or Digi Devices. Refer to the Quick Start for steps 3 and beyond.
Veriteq vNet and Digi Device Drivers CD
The Veriteq vNet and Digi Device Drivers V1.0.4 (or newer) CD is required for the installation. If the
Software Installation menu does not display automatically when you insert the CD into the PC, start the
setup.exe program in the root folder of the CD.
If you don’t have the CD, its contents can be downloaded by clicking on the “Driver Download [zip]” link at
http://www.veriteq.com/products/vnet-poe/index.htm.
Extract the files from the .zip file. Start the setup.exe program in the root folder of the extracted files to
display the Software Installation menu.
Network Settings
Obtain an IP address for the wireless port of the Digi device from your IT administrator. It should either be
a reserved IP address supplied by DHCP, or a static IP address.
If you will be using a reserved IP address with a Digi ConnectPort TS W device, you may need to perform
steps 1 through 10 in the Installing a Digi ConnectPort TS W section before you have all the information
you need to provide to the IT administrator. (If there is only one MAC address printed on the bottom of the
ConnectPort TS W device, it is for the wired port, not the wireless port.)
If you are installing a Digi ConnectPort TS W device, but there is no DHCP server on the subnet that the
PC is connected to, then you will also need to get a temporary static IP address that is on the same
subnet as the PC running the installation software.
The settings you need to get include:
1. MAC address:
_____________________
2. Type:
__ static IP
3. IP address:
_____._____._____._____
4. Subnet mask:
_____._____._____._____
(only if static IP)
5. Gateway address: _____._____._____._____
(only if static IP)
Veriteq, a Vaisala company
13775 Commerce Parkway
Richmond, BC, Canada, V6V 2V4
www.veriteq.com | www.vaisala.com
(on bottom of Digi device)
__ IP reserved by DHCP
Tel 604 273 6850
1 800 683 8374 (North America)
Fax 604 273 2874
[email protected]
Page 3 of 12
Wi-Fi Settings
Obtain the various Wi-Fi configuration settings for your wireless network from your IT administrator or
refer to the documentation for your wireless access point.
For more information on the various settings, read the “WiFi LAN Settings”, “WiFi security settings”, and
“WiFi 802.1x authentication settings” sections in the Configure Digi devices chapter of the Digi Connect
Family User’s Guide document. Also refer to the description of the set wlan command in chapter 2 of the
Digi Connect Command Reference document. These documents are on the Veriteq vNet and Digi Device
Drivers V1.0.4 (or newer) CD (Software Installation menu | Documentation Index | Digi Documentation
Index), or the latest versions can be downloaded from the Digi web site at
www.digi.com/support/supporttype.jsp?tp=3.
Typical settings include:
1. Network identifier (SSID): _______________________________
2. Type of authentication used to establish a connection with the access point:
__ WEP (shared key) __ WPA-PSK (Personal) __ WPA2-AUTH (Enterprise)
3. Type of encryption used on data transferred over the wireless link:
__ WEP __ TKIP __ AES
4. Key size (if WEP encryption is enabled): __ 64-bit
__ 128-bit
5. Key (if WEP or WPA-PSK): _________________________________________________
6. Operation mode in which the device will work: __ BSS
__ IBSS
7. Any other settings: _______________________________________________________
Terminal Emulation Program
If you will be installing a Digi Connect Wi-SP device, ensure that your computer has a terminal emulation
program installed:
1. Look in your Start menu, in Accessories | Communications, to see if HyperTerminal is
available.
2. If HyperTerminal is not installed, and you are running Windows Server 2003, you might be able to
install it with these instructions:
a. Open the Windows Control Panel.
b. Double-click on Add or Remove Programs.
c. Click Add/Remove Windows Components (on the left).
d. Double-click Accessories and Utilities, then double-click Communications.
e. Select the checkbox for HyperTerminal.
f. Follow the instructions to complete the Windows Components Wizard.
3. If neither HyperTerminal nor any other terminal emulation program is installed (most likely
because you are running Windows Vista, Windows Server 2008, or Windows 7), you will need to
install a third-party program. Refer to the Installing a Third-Party Terminal Emulation Program or
Telnet Client section.
Veriteq, a Vaisala company
13775 Commerce Parkway
Richmond, BC, Canada, V6V 2V4
www.veriteq.com | www.vaisala.com
Tel 604 273 6850
1 800 683 8374 (North America)
Fax 604 273 2874
[email protected]
Page 4 of 12
Telnet Client
If you will be installing a Digi ConnectPort TS W device, ensure that your computer has a Telnet client
program installed:
1. Open a Command Prompt window.
2. Type telnet then press the Enter key.
3. If a message similar to “Welcome to Microsoft Telnet Client” is displayed, the program is installed.
Type q then press the Enter key to exit it.
4. If an error message is displayed that this “is not recognized as an internal or external command”,
and you are running Windows Vista, Windows Server 2008, or Windows 7, you need to enable
the Telnet program (it is disabled by default):
a. Open the Windows Control Panel.
b. Go to Programs or Programs and Features.
c.
Click on Turn Windows features on or off. If you are prompted for an administrator
password or confirmation, type the password or provide confirmation.
d. In the Windows Features dialog box, select the Telnet Client checkbox.
e. Click OK. The installation might take several minutes.
5. If no Telnet client is installed, you will need to install a third-party Telnet client. Refer to the
Installing a Third-Party Terminal Emulation Program or Telnet Client section.
Installing a Third-Party Terminal Emulation Program or Telnet Client
You only need to install a third-party terminal emulation program or Telnet client if the instructions above
indicated this was necessary.
There are many freeware, shareware, and commercial programs available. For your convenience we
have listed links to some of them. These four programs are free to download, and all can be used either
for serial port (terminal emulation) or TCP/IP (Telnet) communication. We have not used them, and make
no guarantees whatsoever about them:
• RealTerm: http://realterm.sourceforge.net/
• TeraTerm: http://ttssh2.sourceforge.jp/
• PuTTY:
http://www.chiark.greenend.org.uk/~sgtatham/putty/download.html
• HyperTerminal: http://www.hilgraeve.com/hyperterminal.html
(30-day trial)
Digi Device Discovery Program
If the Digi Device Discovery program hasn’t been installed on your computer yet, install it from the Veriteq
vNet and Digi Device Drivers V1.0.4 (or newer) CD:
1. Insert the Veriteq vNet and Digi Device Drivers CD into the PC. If the Software Installation menu
does not display automatically, start the setup.exe program in the root folder of the CD.
2. Click on Device Discovery Install on the Software Installation menu and follow the instructions.
Veriteq, a Vaisala company
13775 Commerce Parkway
Richmond, BC, Canada, V6V 2V4
www.veriteq.com | www.vaisala.com
Tel 604 273 6850
1 800 683 8374 (North America)
Fax 604 273 2874
[email protected]
Page 5 of 12
Installing a Digi ConnectPort TS W
1. Disconnect the power supply from the Digi device.
2. Connect the device's Ethernet connector to your network switch using a customer-supplied
straight-thru CAT5 cable. The network port should be on the same subnet as the PC you are
using to run the installation software (which might be different from the subnet where it will be
deployed).
3. Connect the power supply to the Digi device, then wait until the Ethernet LINK LED (on the
Ethernet connector) is a solid green.
4. Start the Digi Device Discovery program. It will display a list of all Digi devices found on this
subnet.
5. Scroll down the device list until you find the MAC address of the Ethernet port of the device you
are configuring. (The MAC address is printed on the bottom of the Digi device.) If the device does
not appear in the list, wait a few seconds, then click Refresh view.
Note: If the device you need to configure is not shown, you may need to change some settings in
your firewall software:
• Allow the dgdiscvr.exe program to receive incoming network connections. It is typically found
in the folder C:\Program Files\Digi\Digi Device Discovery
• Unblock UDP port 2362 and multi-cast address 224.0.5.128, as these are used by device
discovery.
6. If the device does not have a valid IP address (indicated with a red exclamation mark beside the
IP address and the message “Not properly configured” under Details), you need to assign a
temporary static IP address to the Ethernet (wired) port of the device:
a. Select the device, then click Configure network settings.
b. Select Manually configure network settings.
c.
Enter the IP Address, Subnet Mask, and Default Gateway values of the temporary
static IP address.
d. Click Save, then click OK to restart the device. Wait for the device to finish restarting and
to be rediscovered. If after 30 seconds a message is displayed indicating an error while
saving the settings, click OK, then click Refresh view. Confirm that the new settings
were successfully applied despite the error message. If the new settings were not saved,
try to configure the network settings again.
7. If you are using the Microsoft command line Telnet client, select the device in the list displayed by
the Digi Device Discovery program, then click Telnet to command line (under Device Tasks). If
you are using a third-party Telnet client, you will need to follow the instructions provided with that
program, and manually specify the IP address of the Ethernet port of the Digi device to initiate the
connection. If the Telnet client is unable to connect to the device, restore the device to factory
defaults by following the instructions in step 15d, then go back to step 4.
8. At the login: prompt, enter the default user name root then press the Enter key. At the
password: prompt, enter the default password dbps (the text you type will not be displayed),
then press the Enter key.
9. If the user name and password were correct, the #> prompt will be displayed. If it isn’t, repeat
step 8.
Veriteq, a Vaisala company
13775 Commerce Parkway
Richmond, BC, Canada, V6V 2V4
www.veriteq.com | www.vaisala.com
Tel 604 273 6850
1 800 683 8374 (North America)
Fax 604 273 2874
[email protected]
Page 6 of 12
10. If you will be using a reserved IP address for this device, use the show network command to
display the MAC address of the wireless port (on the line starting with “wln0” as shown below),
give that information to the IT administrator, then ensure that the DHCP server has been updated
with the device’s reserved IP address and wireless MAC address before continuing with step 11.
#> show network
Network interfaces (values are those active in the network stack):
Name
MAC Address
IP Address
Submask
Gateway
----- ----------------- --------------- --------------- --------------eth0
00:40:9D:43:7F:E4 192.168.10.75
255.255.255.0
192.168.10.1
wln0
00:40:9D:43:6F:8D 192.168.20.108
255.255.255.0
192.168.20.1
11. Enter the set commands described in the Wireless LAN Configuration Commands section.
(Specify the deployment IP address, not the temporary static IP address.) Use the show
commands to verify that the settings were made correctly. If any are incorrect, re-enter the
appropriate set command(s), then re-verify.
12. Type quit then press the Enter key to exit the Telnet program.
13. Disconnect the power supply from the Digi device, then disconnect the CAT5 cable from the Digi
device.
14. Attach the antenna to the Digi device. Turn the antenna so it points up.
15. Connect the power supply to the Digi device, then wait until the WiFi LINK LED (on the top of the
device) is on solid, indicating it is associated with an access point. If the LED is blinking, it means
that the device hasn’t yet established a wireless connection.
Note: If the device is unable to establish a wireless connection:
a) Wait for a few minutes to see if it is able to connect.
b) Disconnect and reconnect the power supply, then wait for the WiFi connection.
c) Repeat steps 1 through 15, then wait for it to connect.
d) Reset the device to factory defaults, repeat steps 1 through 15, then wait for it to
connect. To reset the device to factory defaults:
• Disconnect the power supply from the device.
• Locate the “RESET” label on the top of the device, then locate the hole for the reset
button on the side of the device below the label.
• Press the reset button gently with a non-conductive tool such as a toothpick or
plastic stylus.
• Reconnect the power supply to the device while still pressing the reset button.
• Wait until you see a 1-1-1 pattern blink on the STATUS LED (on the top of the
device).
• Wait until you see a 1-5-1 pattern blink on the STATUS LED, then release the reset
button.
16. Insert the Veriteq vNet and Digi Device Drivers CD into the viewLinc server. If the Software
Installation menu does not display automatically, start the setup.exe program in the root folder of
the CD.
17. Follow the instructions in steps 4 through 14 in the Installing Drivers Using RealPort Setup
section in the vNet PoE Device User Guide (Software Installation menu | Documentation Index |
vNet PoE Device User Guide) to install the RealPort driver for this device on the viewLinc
server.
18. In the Veriteq Quick Start Guide for viewLinc with vNet or Digi Devices document, start with step
3, “vLog or Spectrum Software” and continue from there with product installation.
Veriteq, a Vaisala company
13775 Commerce Parkway
Richmond, BC, Canada, V6V 2V4
www.veriteq.com | www.vaisala.com
Tel 604 273 6850
1 800 683 8374 (North America)
Fax 604 273 2874
[email protected]
Page 7 of 12
Installing a Digi Connect Wi-SP
1. Remove the antenna and disconnect the power supply from the Digi device.
2. Change the MEI switch settings to enable command line configuration mode on the serial port.
These tiny switches are on the bottom of the device, near the serial port connector. Use a
toothpick or small screwdriver to set all four switches to the on/up position (away from the serial
port connector), as shown in the diagram.
3. Plug the Veriteq-provided DB-9 crossover adapter (null modem, see picture below) into the
device’s serial port, then use a customer-supplied serial cable or USB-serial cable to connect the
device to the PC you will be using to run the installation software.
4. If your keyboard’s Scroll Lock LED is on, turn it off by pressing the Scroll Lock key. Start the
terminal emulation program, such as HyperTerminal. If using HyperTerminal, you may be asked
to supply a connection name.
5. Select the COM port that is connected to the Digi device. You may need to use the Windows
Device Manager to determine which port this is.
6. Configure the selected COM port in the terminal emulation program:
a. Bits per second: 9600
b. Data bits:
8
c. Parity:
None
d. Stop bits:
1
e. Flow control:
None
Veriteq, a Vaisala company
13775 Commerce Parkway
Richmond, BC, Canada, V6V 2V4
www.veriteq.com | www.vaisala.com
Tel 604 273 6850
1 800 683 8374 (North America)
Fax 604 273 2874
[email protected]
Page 8 of 12
7. Connect the power supply to the Digi device. The red Power LED will turn on and off several
times during the next 15 seconds, then turn on again and remain on.
8. If the login: line isn’t displayed within a few seconds, tap the Enter key on your keyboard until
it does.
9. At the login: prompt, enter the default user name root then press the Enter key. At the
password: prompt, enter the default password dbps (the text you type will not be displayed),
then press the Enter key.
10. If the user name and password were correct, the #> prompt will be displayed. If it isn’t,
disconnect the power supply, then repeat steps 7 through 10.
11. Enter the set commands described in the Wireless LAN Configuration Commands section. Use
the show commands to verify that the settings were made correctly. If any are incorrect, re-enter
the appropriate set command(s), then re-verify.
12. Disconnect the power supply from the Digi device, then disconnect the serial cable and DB-9
crossover adapter (null modem) from the Digi device.
13. Restore the MEI switch settings for the EIA-232 protocol.
14. Attach the antenna to the Digi device. Turn the antenna so it points up. Locate the device within
the area covered by the desired wireless access point.
15. If you are using a reserved IP address for this device, ensure that the DHCP server has been
updated with the device’s IP address before continuing with step 16.
16. Connect the power supply to the Digi device, then wait until the WiFi LNK LED (nearest the
antenna) is a solid green, indicating it is associated with an access point. (If you configured the
device to operate in ad hoc mode instead, the LED should blink slowly.) If the WiFi LED is
blinking quickly, it means that the device hasn’t yet established a wireless connection.
Note: If the device is unable to establish a wireless connection:
a) Wait for a few minutes to see if it is able to connect.
b) Disconnect and reconnect the power supply, then wait for the WiFi connection.
c) Repeat steps 1 through 16, then wait for it to connect.
d) Reset the device to factory defaults, repeat steps 1 through 16, then wait for it to
connect. To reset the device to factory defaults:
• Disconnect the power supply from the device.
• Locate the small round hole for the reset button just above the MEI switches on the
bottom of the device, as shown in the diagram in step 2.
• Press the reset button gently with a non-conductive tool such as a toothpick or
plastic stylus.
• Reconnect the power supply to the device while still pressing the reset button.
• Wait until you see a 1-1-1 pattern blink on the Power LED (near the power supply
jack on the device).
• Wait until you see a 1-5-1 pattern blink on the Power LED, then release the reset
button.
Veriteq, a Vaisala company
13775 Commerce Parkway
Richmond, BC, Canada, V6V 2V4
www.veriteq.com | www.vaisala.com
Tel 604 273 6850
1 800 683 8374 (North America)
Fax 604 273 2874
[email protected]
Page 9 of 12
17. Connect the Veriteq data logger to the Digi device using the supplied Veriteq serial cable.
18. Insert the Veriteq vNet and Digi Device Drivers CD into the viewLinc server. If the Software
Installation menu does not display automatically, start the setup.exe program in the root folder of
the CD.
19. Follow the instructions in steps 4 through 14 of the Installing Drivers Using RealPort Setup
section in the vNet PoE Device User Guide (Software Installation menu | Documentation Index |
vNet PoE Device User Guide) to install the RealPort driver for this device on the viewLinc
server.
20. In the Veriteq Quick Start Guide for viewLinc with vNet or Digi Devices document, start with step
3, “vLog or Spectrum Software” and continue from there with product installation.
Veriteq, a Vaisala company
13775 Commerce Parkway
Richmond, BC, Canada, V6V 2V4
www.veriteq.com | www.vaisala.com
Tel 604 273 6850
1 800 683 8374 (North America)
Fax 604 273 2874
[email protected]
Page 10 of 12
Wireless LAN Configuration Commands
Introduction
The same commands are used for Telnet or terminal emulation communication modes.
Network configurations vary widely, so it is impossible to provide the exact set of commands you need to
enter for your particular installation. The syntax of the commands, and some sample configurations, are
provided.
For more information on the various settings, read the “WiFi LAN Settings”, “WiFi security settings”, and
“WiFi 802.1x authentication settings” sections in the Configure Digi devices chapter of the Digi Connect
Family User’s Guide document. Also refer to the description of the set wlan command in chapter 2 of the
Digi Connect Command Reference document.
Entering the Commands
Carefully enter the desired commands in the Telnet or terminal emulation window, following each by
pressing the Enter key.
You may wish to create a text file containing all the commands and settings, then copy and paste them
into the Telnet or terminal emulation window. This can eliminate typing errors and save time, especially if
more than one device is being configured. Just remember to change the IP address in the text file for
each device if using static IP addresses.
After resetting the device you may need to press the Enter key again to cause the login: prompt to be
displayed (but first wait for the device to become ready again).
Veriteq, a Vaisala company
13775 Commerce Parkway
Richmond, BC, Canada, V6V 2V4
www.veriteq.com | www.vaisala.com
Tel 604 273 6850
1 800 683 8374 (North America)
Fax 604 273 2874
[email protected]
Page 11 of 12
Sample Commands for Static IP Address and WEP Encryption
set network if=wln0 ip=192.168.100.230 gateway=192.168.100.1
submask=255.255.255.0 dhcp=off static=on autoip=off
set wlan protmode=bss
set wlan channel=0
set wlan ssid=OurTestWLAN
set wlan authentication=sharedkey
set wlan encryption=wep
set wlan wepmode=128bit
set wlan wepindex=1
set wlan wepkey1=ab12cd34ef567ab12cd34ef567
show network
show wlan
Sample Commands for Reserved IP Address and WPA2-PSK
set network if=wln0 dhcp=on static=off autoip=off
set wlan protmode=bss
set wlan channel=0
set wlan ssid=OurTestWLAN
set wlan authentication=wpa_psk
set wlan encryption=ccmp
set wlan psk=QWERTYUIOPasdfgjklmn987654321
show network
show wlan
Veriteq, a Vaisala company
13775 Commerce Parkway
Richmond, BC, Canada, V6V 2V4
www.veriteq.com | www.vaisala.com
Tel 604 273 6850
1 800 683 8374 (North America)
Fax 604 273 2874
[email protected]
Page 12 of 12
Command Syntax
The command syntax follows these conventions:
• Text in italics needs to be replaced by information specific to your network.
• Square brackets [ ] surround optional items.
• Items separated by commas allow more than one option at a time.
• Braces { } surround entries that require you to choose only one of several options, which are
separated by the vertical bar |.
• For example, choose any combination of options for “set wlan encryption”, but choose either “64bit” or
“128bit” when setting “set wlan wepmode”.
• Do not include any braces or square brackets when entering commands.
set network [if=interface] [ip=ip_address] [submask=subnet_mask]
[gateway=gateway_addr] [static={on|off}] [dhcp={on|off}] [autoip={on|off}]
set wlan protmode={bss|ibss_create|ibss_join|any}
set wlan channel={0|1-14}
set wlan ssid=string
set wlan authentication=[open],[sharedkey],[wep_auth],[wpa_psk],[wpa_auth],
[leap],[any]
set wlan encryption=[open],[wep],[tkip],[ccmp],[any]
set wlan outer_eap=[peap],[tls],[ttls],[any]
set wlan inner_eap=[gtc],[md5],[mschapv2],[otp],[chap],[mschap],
[ttls_mschapv2],[pap],[any]
set wlan options=[diversity],[short_preamble],[verify_cert]
set wlan username=string
set wlan password=string
set wlan psk=string
set wlan wepmode={64bit|128bit}
set wlan wepindex={1|2|3|4}
set wlan wepkeyN=hex_string
(N=wepindex)
set wlan country=string
set wlan maxtxrate={1|2|5.5|11}
(Mbps)
set wlan txpower={6|8|10|12|14|16}
(dBm)
boot action={reset|factory}
show network
show wlan
(to confirm the network settings)
(to confirm the wlan settings)
Copyright © 2010 Veriteq Instruments, Inc. All rights reserved.
Document Number: 880-0324-00
Release Date: August 2010
Veriteq, a Vaisala company
13775 Commerce Parkway
Richmond, BC, Canada, V6V 2V4
www.veriteq.com | www.vaisala.com
Tel 604 273 6850
1 800 683 8374 (North America)
Fax 604 273 2874
[email protected]