1
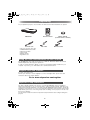
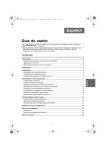
Page 1 Tuesday, October 23, 2007 5:32 PM English User’s Guide Warning z Please read the safety instructions booklet before setting up the projector. • This manual covers only basic operations, including how to set up the projector, and basic projector operations. For more detailed information, see the Reference Guide on the CD-ROM that comes with the projector. Contents Unpacking ....................................................................................................................................... 2 Using the User Documentation on the CD-ROM .......................................................................... 2 Register with ASK Proxima........................................................................................................... 2 Important Lamp Information.......................................................................................................... 2 General Guide ................................................................................................................................. 3 Remote Controller General Guide ................................................................................................ 5 Preparing the Remote Controller .................................................................................................. 5 Replacing the Remote Controller Battery ..................................................................................... 6 Getting Ready ................................................................................................................................. 7 Setting Up the Projector................................................................................................................ 7 Screen Size and Distance ............................................................................................................ 7 Adjusting the Projector Elevation Angle........................................................................................ 8 Rear Projection (From the Back of the Screen)............................................................................ 8 Connecting a Computer to the Projector ...................................................................................... 9 Connecting to a Standard Video Device....................................................................................... 9 Turning On the Projector ............................................................................................................ 10 Turning Off the Projector ............................................................................................................ 12 Projector Basics ........................................................................................................................... 13 Selecting the Input Source.......................................................................................................... 13 Adjusting the Projected Image.................................................................................................... 13 Keystone Correction (KEYSTONE) ............................................................................................ 14 Using the Setup Menu.................................................................................................................. 15 Troubleshooting ........................................................................................................................... 16 Indicators .................................................................................................................................... 16 Projector Troubleshooting........................................................................................................... 20 Service and Support..................................................................................................................... 22 1 English ASK M9_UG_E.book ASK M9_UG_E.book Page 2 Tuesday, October 23, 2007 5:32 PM Unpacking Unpacking As you unpack the projector, check to make sure that all of the items listed below are present. PROJECTOR AC Power Cord • • • • • • Remote Controller Video Cable Battery (CR2025) (Loaded in remote controller.) Mini D-Sub Cable Soft Cases (projector and cords) CD-ROM with Reference Guide Printed User's Guide Safety booklet Warranty booklet Registration card Using the User Documentation on the CD-ROM The CD-ROM that comes with the projector has a PDF file “Reference Guide” that contains detailed explanations about projector operations. In order to read the Reference Guide, you need to have Adobe® Reader® installed on your computer. If you don't, go to www.adobe.com to download and install it. Register with ASK Proxima It's quick, easy, and secure. Activate your warranty to ensure eligibility for service and support. Get special offers and notifications about free product updates. Go to www.askproxima.com/register Important Lamp Information The lamp originally installed in this projector is model SP-LAMP-035, which is intended for tabletop (non-inverted) use. Do not use this lamp in ceiling mounted (inverted) applications. For ceiling mount (inverted) application, use lamp model SP-LAMP-036 instead, which is specifically designed for that purpose. Use of the wrong lamp will significantly reduce lamp life and void the lamp warranty (and if use of the wrong lamp results in damage to the projector, it will also void the projector warranty). See the safety instructions booklet for important safety information about ceiling mounting this projector. 2 Page 3 Tuesday, October 23, 2007 5:32 PM English ASK M9_UG_E.book General Guide General Guide [Front/Top/Left Side] Intake vents Key and Indicator Panel Elevation adjustment foot release button Lens cover Remote control signal receiver Projection lens Exhaust vents [Key and Indicator Panel] TEMP indicator [FOCUS] key LAMP indicator [Enter] key* POWER/STANDBY indicator [MENU] key [ [ESC] key ] (Power) key [INPUT] key Cursor keys [AUTO] key [ZOOM] key * The projector’s enter key does not have anything printed on it. When you see [ENTER] in this manual, it means you should press the projector’s enter key or the [ENTER] key of the remote controller. Warning z Never look into the lens while the projector is turned on. z Never allow the intake and exhaust vents to become blocked, and make sure there is at least 30 cm (11.8 inches) clearance around the projector. Blocked vents can cause heat to build up, creating the risk of fire and malfunction. z Never touch the areas around the exhaust vents. These areas can become very hot, and create the risk of burn injury. 3 ASK M9_UG_E.book Page 4 Tuesday, October 23, 2007 5:32 PM General Guide [Bottom] Elevation adjustment foot Lamp cover Elevation adjustment foot release button Left, right adjustment feet (2) [Back, Terminals] RGB input terminal Anti-theft lock hole Intake vents Remote control signal receiver Power connector VIDEO input terminal Warning z In the unlikely event of a lamp rupture, particles may be ejected from the projector. Keep out of the area under and around the projector when it is turned on. See the safety instructions booklet for more details. z The anti-theft lock hole is provided for connection of an anti-theft chain. 4 Page 5 Tuesday, October 23, 2007 5:32 PM General Guide Remote Controller General Guide [INPUT] key Remote control signal emitter [AUTO] key CLASS 1 LED PRODUCT [ ] (Power) key [BLANK] key [ZOOM +] [ZOOM –] keys [FOCUS [FOCUS [FREEZE] key ] ] keys [COLOR MODE] key [D-ZOOM +] [D-ZOOM –] keys [MENU] key [KEYSTONE +] [KEYSTONE –] keys Cursor keys [POINTER] key [BRIGHT] key ([ [ECO] key ([ ] key) [ENTER] key ([STYLE] key) ] key) [ASPECT] key ([ [ESC] key ] key) [FUNC] key Preparing the Remote Controller The remote control unit comes loaded with a test battery. Before using it for the first time, remove the battery insulation sheet from the back of the remote controller. z To avoid running down the battery, store the remote control unit so its buttons are not pressed inadvertently. 5 English ASK M9_UG_E.book ASK M9_UG_E.book Page 6 Tuesday, October 23, 2007 5:32 PM General Guide Replacing the Remote Controller Battery Before you can use the remote controller for the first time, you need to load the battery that comes with it. 1. Caution RISK OF EXPLOSION IF BATTERY IS REPLACED BY AN INCORRECT TYPE. DISPOSE OF USED BATTERIES ACCORDING TO THE INSTRUCTIONS. Caution Misuse of a battery can cause it to leak and stain the area around it, or to explode, creating the risk of fire and personal injury. Make sure that you always observe the following precautions. z Take care that the battery is oriented correctly when you load it. z Use only battery type that is specified for use with the remote controller. Hook your fingernail on the groove of the battery holder on the back of the remote controller. While holding down the release on the side (), pull out the holder (). 2. Place the battery (CR2025) onto the battery holder. z Make sure that the plus (+) side of the battery is facing upwards (so you can see it). Take care that you do not install the battery upside down. 1 2 3. Replace the battery holder back into the remote controller. 6 Page 7 Tuesday, October 23, 2007 5:32 PM English ASK M9_UG_E.book Getting Ready Getting Ready Setting Up the Projector Locate the projector on a desk, table, or stand that is firm and level. Make sure to allow sufficient space around the sides and back of the projector for proper ventilation. z The following illustrations show how the projector should be oriented for optimum projection relative to the screen. Viewed from Above Viewed from the Side Screen Screen The center of the projector’s lens should be aligned with the horizontal center of the screen. Make sure the projector is at a right angle to the screen. z You can place the projector on a surface that is angled up to 30 degrees upwards or downwards during use. Never locate the projector on a surface that is angled more than 30 degrees, or angled at all to the left or right. Such conditions can cause the lamp to explode or can shorten lamp life, and also creates the risk of malfunction. z The projector’s auto keystone correction range is 0 to +30 degrees. If the surface you are projecting onto is angled downwards from horizontal, use manual keystone correction (page 14) to correct the image. Screen Size and Distance Diagonal Screen Size Inches cm Minimum Distance (m) 40 60 80 100 150 200 102 152 203 254 381 508 1.1 1.7 2.3 2.8 4.3 5.7 Approximate Projection Distance Maximum Minimum Maximum Distance (m) Distance (feet) Distance (feet) 2.2 3.4 4.5 5.6 8.5 11.3 3.61 5.58 7.55 9.19 14.11 18.70 7.22 11.15 14.76 18.37 27.89 37.07 z Note that the distances provided above are for reference only. Interactive screen size and distance calculator www.askproxima.com/calculator 7 ASK M9_UG_E.book Page 8 Tuesday, October 23, 2007 5:32 PM Getting Ready Adjusting the Projector Elevation Angle You can change the elevation angle of the projector in a range of 0 to 12 degrees. You can also make fine adjustments to the left and right side elevation angle when necessary. To change the projector elevation angle 1. Lift up the front of the projector and press the release button. z This causes the elevation adjustment foot to drop from the bottom of the projector. z Be sure to press the release button before trying to lower the elevation adjustment foot. Pulling on the foot without pressing the release lever can damage the foot. 2. 3. 4. While holding down the release button, raise and lower the front of the projector until the elevation adjustment foot is approximately the length you need. Release the release button to lock the elevation adjustment foot in its current position. Use the left and right adjustment feet to further fine adjust the elevation angle. z The left and right adjustment feet are for fine adjustment only. Do not try to rotate them too far. Doing so can cause an adjustment foot to detach. Tightening an adjustment foot too strongly can cause it to become stuck. Rotate to adjust horizontal alignment. z To retract the elevation adjustment foot, hold down the release button and slide the elevation adjustment foot back into the projector. Never try to forcibly change the elevation adjustment foot position without pressing the release button. Rear Projection (From the Back of the Screen) In the case of rear projection, left/right orientation is opposite that of front projection, so you need to configure the setup menu accordingly. For more detailed operation information, see the Reference Guide on the CD-ROM that comes with the projector. 8 Page 9 Tuesday, October 23, 2007 5:32 PM Getting Ready Connecting a Computer to the Projector You can use the projector to project an image of video output from a computer. z Always turn off the projector and the computer before connecting them. Projector RGB input terminal Computer To monitor terminal (analog RGB output terminal) Bundled mini D-Sub cable Connecting to a Standard Video Device You can use the projector to project an image from a video deck, TV, video camera, or other video device. z Always turn off the projector and the video device before connecting them. Projector VIDEO input terminal Video device To VIDEO output terminal Bundled video cable z You can use the bundled video cable to connect to a pin jack (RCA) type VIDEO output terminal. When connecting a video camera or other video device with a special video output terminal, use the special cable that comes with the video device. For details, see the documentation that comes with the video device. z The RGB input terminal can be connected to the component video terminal of video equipment using an optionally available adapter. For more information, see “Connecting to a Component Video Output Device” in the Reference Guide on the CD-ROM that comes with the projector. 9 English ASK M9_UG_E.book ASK M9_UG_E.book Page 10 Tuesday, October 23, 2007 5:32 PM Getting Ready Turning On the Projector Before performing any of the operations in this section, make sure you first set up the projector and connect to an output device. AC Power Cord Precautions z Use the AC power cord that comes with the projector. z Make sure that you use a power source with the same voltage as that specified for the projector. z Do not share the outlet supplying power to the projector with other devices. If you are using an extension cord, make sure that the ampere rating of the extension cord is compatible with the power consumption value of this projector. z Never use the power cord while it is still bundled together. z Never place objects on top of the power cord and do not step on it. z Never pull on the power cord. When unplugging it, grasp the plug. z Use a conveniently located power outlet that you can reach easily when you need to unplug the projector. To turn on the projector 1. Use the bundled AC power cord to plug the projector into a power outlet. Power supply connector z Plugging into a power outlet causes the three indicators on the top of the projector to light amber. After a short while, two of the indicators will go out and only the POWER/STANDBY indicator will remain lit amber, which indicates the standby state. z Note that the projector will not turn on if you press the [ ] (power) key while all three indicators are lit amber. Wait until the projector is in the standby state before trying to turn it on. Bundled AC power cord The shape of the plug depends on your geographical area. z This product is also designed for IT power distribution system with phase-to-phase voltage 230V. 2. 3. 4. Turn on the computer or video device that is connected to the projector. If the projector’s lens cover is closed, open it. z Do not try to force the lens cover open past horizontal. Doing so creates the risk of malfunction. Press the [ ] (power) key. z This causes the POWER/STANDBY indicator to flash green, which indicates that the projector is warming up. z After warm up is complete, POWER/STANDBY indicator stops flashing and remains lit green, and the projector starts projecting an image from the device connected to it. z A “Language” window will be projected the first time you turn on the projector. Use the procedure under “Specifying the Display Message Language” on the page 11 to configure the language settings. 10 Page 11 Tuesday, October 23, 2007 5:32 PM Getting Ready z If the Eco Mode is turned on, the LAMP indicator will light green when warm up starts. z If the projector is hot when you plug the AC power cord into a power outlet, it will go into a cool down state. The cool down state is indicated by the POWER/STANDBY indicator flashing orange. Note that the projector will not turn on until cool down is complete, even if you press the [ ] (power) key. The projector will turn on and enter the standby state after cool down is complete. Specifying the Display Message Language A “Language” window will be projected the first time you turn on the projector. Use the menu on this screen to specify the display language you want to use. 1. 2. Use the cursor [ ] and [ ] keys to highlight the language you want to use. Press the [ENTER] key. Direct Power On You can configure the projector so it powers up automatically as soon as you plug it into a power source. With this “Direct Power On” feature, you do not even need to press the [ ] (power) key. To enable Direct Power On, display the Setup Menu, and then change the “Direct Power On” setting to “On”. z When you have Direct Power On enabled, do not leave the projector plugged into an electrical outlet while it is turned off. If you do, there is the chance that it (and the lamp) might turn on automatically when power is restored after being cut off by a power outage, tripping of a breaker, etc. z Direct Power On causes the projector to turn on automatically as soon as it is plugged into a power outlet. This greatly reduces the amount of time it takes until you are ready to start projecting. Note, however, that the actual startup sequence (Standby State Power On Warm Up Projection Starts) that the projector performs is the same, regardless of whether Direct Power On is enabled or disabled. The only difference is what triggers the sequence (plugging in or pressing the [ ] (power) key). For details about the startup sequence that the projector performs when you plug it into a power source, see “To turn on the projector” on page 10. z For details about configuring the Direct Power On setting, see “Direct Power On” under “Option Settings 1 Main Menu” in the Reference Guide on the CD-ROM that comes with the projector. 11 English ASK M9_UG_E.book ASK M9_UG_E.book Page 12 Tuesday, October 23, 2007 5:32 PM Getting Ready Turning Off the Projector z When you turn off the projector, the lamp goes out and the projector goes into a cool down state. Note that you will not be able to turn the projector back on again while it is cooling down. z The projector may remain quite hot for a while after you turn it off. Take care when moving the projector or otherwise handling it after use. z Make sure that the projector is cooled down sufficiently before storing it. To turn off the projector 1. 2. Press the [ ] (power) key. z This causes the confirmation message “Do you want to turn off the projector?” to appear in the center of the projection screen. z If you do not turn off the projector the confirmation message will disappear automatically after about 10 seconds. The confirmation message will also disappear if you press [ESC] key. To turn off the projector, press the [ confirmation message. ] (power) key again in response to the z This causes the projector lamp to go out and stops projection. z Also the POWER/STANDBY indicator starts to flash amber, which indicates that the projector is cooling down. z The projector will not turn back on again while it is cooling down. z After cool down is finished, the POWER/STANDBY indicator on the top of the projector will light amber, which indicates the standby state. You can now turn the projector back on, if you want. 3. After checking to make sure that the POWER/STANDBY indicator has stopped flashing amber and remains lit, unplug the AC power cord from the power outlet. z This causes the POWER/STANDBY indicator to go out. 4. 5. After ensuring that the projector and the connected computer or video device are turned off, disconnect the connecting cables from the projector and the connected device. Close the lens cover. Auto Power Off Auto Power Off automatically turns off the projector whenever there is no input signal, and no operation is performed on the projector for about 30 minutes. When Auto Power Off is triggered, the projector first enters a cool down state, the same as it does when you press the [ ] (power) key to turn it off. z While Direct Power On (page 11) is enabled, the projector will turn off automatically if no key operation is performed and no signal input is received within about 10 minutes after it is turned on. 12 Page 13 Tuesday, October 23, 2007 5:32 PM Projector Basics Projector Basics z For detailed information about projection operations, see the Reference Guide on the CD-ROM that comes with the projector. Selecting the Input Source When you turn on the projector, it first checks the RGB terminal for an input signal and then the VIDEO terminal. When it detects an input signal, it automatically selects it and starts projecting the signal. Whenever you want to manually trigger an input source search operation, press the [INPUT] key. z When the projector detects an input source (RGB, component, or VIDEO) after an auto or manual select operation, the name of the newly selected source will appear in the projected image for a few seconds. z The message “No signal input.” will appear if no input signal can be selected. Adjusting the Projected Image To adjust the size of the projected image Hold down the [ZOOM +] key to increase the size of the image or the [ZOOM –] key to decrease it. When the image is the size you want, release the key. Projector key operation Press the [ZOOM] key and then hold down the [ ] key to increase the size of the image, press the [ZOOM] key and then hold down the [ ] key to decrease it. When the image is the size you want, release the key. To adjust image focus Hold down the [FOCUS the key. ] or [FOCUS ] key. When the focus is the way you want, release Projector key operation Press the [FOCUS] key and then hold down the [ ] or [ ] key to focus. When focus is the way you want, release the key. 13 English ASK M9_UG_E.book ASK M9_UG_E.book Page 14 Tuesday, October 23, 2007 5:32 PM Projector Basics Auto Adjustment of an RGB Image When the input source is RGB (computer), the projector automatically adjusts vertical and horizontal positioning, frequency, and phase whenever it detects an RGB signal (following input source selection, power up, etc.). You can also execute an automatic adjustment operation by pressing the [AUTO] key. z You can turn off auto adjustment when you want to disable auto adjustment and maintain manual settings. z The projected image may become distorted while an auto adjustment operation is in progress. z If an image is unclear following the auto adjustment operation, you can use the menu to adjust items manually. Keystone Correction (KEYSTONE) When the projector is at an angle to the screen it is projecting on, the projected image may have different length top and bottom edges. This phenomenon is called, “keystoning”. This projector comes with functions for automatic as well as manual keystone correction, which provides a regularly shaped projected image. z Keystone correction can cause the corrected image to be smaller than the original (uncorrected) image, or it can cause distortion of the image. If the projected image becomes difficult to view, try moving the screen and/or projector so they are oriented close to the configuration shown under “Setting Up the Projector” on page 7. z The center of the projector’s lens should be aligned with the horizontal center of the screen (page 7). Automatic Keystone Correction When “On” is selected for the “Option Settings 1 Auto Keystone Correction” setting of the Setup Menu, the projector will detect the vertical orientation of the object in the image and adjust its shape automatically so it appears as a rectangle. The message “Auto Keystone Corrected.” appears in the lower left corner of the projected image when the projector performs auto keystone correction. z The projector’s auto keystone correction range is 0 to +30 degrees. If the surface you are projecting onto is angled downwards from horizontal, use manual keystone correction to correct the image. z Auto keystone correction is performed by detecting the elevation angle of the projector. This means that the surface you are projecting onto needs to be standing straight up. If the surface you are projecting onto is not straight, use manual keystone correction to correct the image. To use manual keystone correction 1. Press the [KEYSTONE +] or [KEYSTONE –] key. 2. Use the [KEYSTONE +] and [KEYSTONE –] keys to correct for keystoning. 3. To close the setup screen, press the [ESC] key. z This causes the keystone correction screen to appear on the projected image. z Correction can be performed for keystoning within ±30°. 14 Page 15 Tuesday, October 23, 2007 5:32 PM English ASK M9_UG_E.book Using the Setup Menu Pressing the [MENU] key while an image is being projected displays the setup menu on the projected image. The setup menu can be used to configure a variety of different projector settings. Use the cursor keys to select and configure settings, and the [ENTER] key to register them. Using the Setup Menu The menu items that can be set (or displayed) depend on the current input source. In the following table, the “Input Source” columns indicate whether each item appears ( ) or not ( ) for each input source (R = RGB, C = Component, V = Video, – = No input signal). A triangle ( ) indicates that the item can be set (or displayed), subject to certain conditions. Main menu Sub-menu Image Adjustment Brightness Contrast Sharpness Saturation Tint Color Mode Color Balance Vertical Position Horizontal Position Frequency Phase Video Mode Restore Menu Defaults Screen Settings Keystone Correction Aspect Ratio Projection Mode Startup Screen No Signal Screen Blank Screen Restore Menu Defaults Input Settings RGB Input Video Signal Signal Name Indicator Restore Menu Defaults Input Source R C V – Main menu Sub-menu Option Settings 1 Menu Position Auto Keystone Correction Auto Adjust Eco Mode Auto Power Off Direct Power On Language Restore Menu Defaults Option Settings 2 Zoom Memory Pointer Restore Menu Defaults Operational Info Lamp Time Reset Lamp Time Input Signal Signal Name Index Resolution Horizontal Frequency Vertical Frequency Scan System Restore All Defaults Input Source R C V – z For detailed information about settings and how they are configured, see the Reference Guide on the CD-ROM that comes with the projector. 15 ASK M9_UG_E.book Page 16 Tuesday, October 23, 2007 5:32 PM Troubleshooting Troubleshooting Indicators The status of the indicators lets you know the current operational status of the projector. This section provides details about indicators. z “POWER” in the following table stands for the “POWER/STANDBY” indicator. TEMP indicator LAMP indicator POWER/STANDBY indicator Normal Operation Indicators When this indicator: Is this: It means this: POWER : Amber steady TEMP : Amber steady LAMP : Amber steady POWER : Amber steady Standby state: The AC power cord is plugged in and the projector is in standby. POWER : Green flashing Projector is warming up after being turned on. POWER : Green steady Projector is on and standing by for use. POWER : Amber flashing Projector is cooling down after being turned off. If the projector is hot when you plug the AC power cord into a power outlet, it also goes into a cool down state. LAMP : Green steady The projector’s Eco Mode is turned on. You have just plugged the AC power cord into a power outlet. Wait until the projector enters the standby state (see below) before trying to turn on power. Error Indicators and Warning Messages When an error occurs, wait until cool down is complete and the fan stops before unplugging the AC power cord. If you unplug the AC power cord while the fan is still operating, an error may occur when you plug the AC power cord back in. Indicator/Error Message POWER : Green steady TEMP :– LAMP :– Message : Internal temperature is too high. Check projector air vents for blockage. Description and Required Action The projector’s internal temperature is very high. Press the [ESC] key to clear the warning message and perform the following steps. Check for any blocking of the projector’s intake vents and exhaust vents, and make sure that there is sufficient space around the projector. If there is dust accumulated around the intake vents and/or exhaust vents, turn off the projector and remove it. 16 Page 17 Tuesday, October 23, 2007 5:32 PM Troubleshooting Indicator/Error Message POWER : Amber flashing Amber steady TEMP : Red flashing (1-second interval) Turns off LAMP :– Message : Internal temperature is too high. The projector will turn off. POWER : Amber flashing Red steady TEMP : Red flashing (0.5second interval) LAMP :– Message : – POWER : Green steady TEMP :– LAMP :– Message : The projector has a history of turning off due to high temperature. Check air vents for blockage. POWER : Amber flashing Red steady TEMP : Red steady LAMP : Red steady Message : There is a problem with the fan. The projector will turn off. POWER : Amber flashing Red steady TEMP : Red steady LAMP :– Message : A system problem has occurred. The projector will turn off. POWER : Green steady TEMP :– LAMP :– Message : A system problem has occurred. Some functions may not operate correctly. Description and Required Action Power has turned off automatically due to internal overheating. Perform the following steps. Check for any blocking of the projector’s intake vents and exhaust vents, and make sure that there is sufficient space around the projector. If there is dust accumulated around the intake vents and/or exhaust vents, remove it. If there is no problem with the projector’s vents, confirm that the POWER/STANDBY indicator is lit amber (without flashing), and then turn power back on again. If the error occurs again when you turn power back on, contact ASK Proxima service at www.askproxima.com/service Power has turned off automatically due to internal overheating. This causes a dialog box containing the text in the next item below to appear the next time you turn on the projector. Follow the steps that are provided. The last time you were using the projector, power turned off automatically due to internal overheating. Press the [ESC] key to clear the warning message and perform the following steps. Check for any blocking of the projector’s intake vents and exhaust vents, and make sure that there is sufficient space around the projector. If there is dust accumulated around the intake vents and/or exhaust vents, turn off the projector and remove it. Disconnect the power cord from the projector and wait for all of the projector’s indicators to go out. Next, reconnect the power cord and turn the projector back on. If the error occurs again when you turn power back on, contact ASK Proxima service at www.askproxima.com/service Power has turned off automatically due to a fan problem. Confirm that the POWER/STANDBY indicator is lit red (without flashing) and that the fan has stopped. After checking the POWER/STANDBY indicator, disconnect the power cord from the projector and wait for all of the projector’s indicators to go out. Next, reconnect the power cord and turn projector power back on. If the error occurs again when you turn power back on, contact ASK Proxima service at www.askproxima.com/service Power has turned off automatically due to a system problem. After confirming that the POWER/STANDBY indicator is lit red (without flashing), disconnect the power cord from the projector and wait for all of the projector’s indicators to go out. Next, reconnect the power cord and turn the projector back on. If the error occurs again when you turn power back on, contact ASK Proxima service at www.askproxima.com/service A system problem has occurred, which may cause problems with some functions. Turn off the projector, disconnect the power cord from the projector and wait for all of the projector’s indicators to go out. Next, reconnect the power cord and turn the projector back on. If the error occurs again when you turn power back on, contact ASK Proxima service at www.askproxima.com/service Press the [ESC] key to clear the warning message. 17 English ASK M9_UG_E.book ASK M9_UG_E.book Page 18 Tuesday, October 23, 2007 5:32 PM Troubleshooting Indicator/Error Message POWER : Green steady TEMP :– LAMP :– Message : Zoom and focus cannot be performed for some reason. Try turning the projector off and then back on again. If this message reappears, request servicing. POWER : Amber flashing Red steady TEMP : Red steady LAMP :– Message : – POWER : Amber flashing Red steady TEMP : Red flashing (0.5-second interval) LAMP : Red flashing (0.5-second interval) Message : – POWER : Amber flashing Red steady TEMP : Red flashing (2-second interval) LAMP :– Message : – POWER : Amber flashing Red steady TEMP : Amber flashing (1-second interval) LAMP :– Message : – Description and Required Action Zoom and focus cannot be performed due to some trouble in the optical drive circuit. Turn off the projector and then turn it back on again. If the error occurs again when you turn power back on, contact ASK Proxima service at www.askproxima.com/service Press the [ESC] key to clear the warning message. The projector was turned off automatically due to some problem that was probably caused by external digital noise or some other reason. Confirm that the POWER/STANDBY indicator is lit red (without flashing) and that the fan has stopped. After checking the POWER/STANDBY indicator, disconnect the power cord from the projector and wait for all of the projector’s indicators to go out. Next, reconnect the power cord and turn projector power back on. If the error occurs again when you turn power back on, contact ASK Proxima service at www.askproxima.com/service The projector was turned off automatically because the lamp turned off or did not turn on. After confirming that the POWER/STANDBY indicator is lit red (without flashing), unplug the power cord. Wait for a short while and then plug it back in and turn on the projector again. If the error occurs again when you turn power back on, wait until the projector cools down and then replace the lamp (lamp replacement instructions are in the section "Replacing the Lamp" in the Reference Guide on the CD-ROM that comes with the projector). If the lamp does not light after you replace it, contact ASK Proxima service at www.askproxima.com/service Power has turned off automatically due to a projector memory error. Confirm that the POWER/STANDBY indicator is lit red (without flashing) and that the fan has stopped. After checking the POWER/STANDBY indicator, disconnect the power cord from the projector and wait for all of the projector’s indicators to go out. Next, reconnect the power cord and turn projector power back on. If the error occurs again when you turn power back on, contact ASK Proxima service at www.askproxima.com/service Power has turned off automatically because the lamp cover is open. Perform the following steps. After confirming that the POWER/STANDBY indicator is lit red (without flashing), disconnect the power cord from the projector. Check to make sure that the lamp cover is closed. Plug the power cord back in and turn the projector back on again. If the error occurs again when you turn power back on, contact ASK Proxima service at www.askproxima.com/service 18 Page 19 Tuesday, October 23, 2007 5:32 PM Troubleshooting Indicator/Error Message POWER : Green steady TEMP :– LAMP : Red flashing (1-second interval) Message : It is time to replace the lamp. Use the procedure in the User’s Guide to replace the lamp as soon as possible. POWER : Amber flashing Red steady TEMP :– LAMP : Red steady Message : The lamp has exceeded its service life! The projector will not turn on until you replace the lamp. Description and Required Action It is time to replace the lamp. Replace the lamp following the steps under “Replacing the Lamp” in the Reference Guide on the CD-ROM that comes with the projector. Press the [ESC] key to clear the warning message. The allowable life for the lamp has been exceeded, and the projector will not turn on. Replace the lamp following the steps under “Replacing the Lamp” in the Reference Guide on the CD-ROM that comes with the projector. 19 English ASK M9_UG_E.book ASK M9_UG_E.book Page 20 Tuesday, October 23, 2007 5:32 PM Troubleshooting Projector Troubleshooting Check the following items whenever you experience any problem with the projector. Problem The projector does not turn on when I press the [ ] (power) key. Cause and Recommended Action See If the POWER/STANDBY indicator is not lit, the AC power cord may not be connected correctly. ➔ Make sure the AC power cord is connected correctly to the projector and the power outlet (see “Turning On the Projector”). page 10 If the TEMP or LAMP indicator remains flashing or lit, it means some type of error has occurred. ➔ See “Error Indicators and Warning Messages” under “Indicators”. page 16 The connected computer or video device may not be turned on, or it may not be outputting a video signal. ➔ Make sure the connected computer or video device is turned on, and perform the required operation on it to output a video signal. — The correct input source is not selected on the projector. ➔ On the projector, select the input source that corresponds to the device whose image you are trying to project (see “Selecting the Input Source”). page 13 The projector does not correctly project the image from the connected device. Images may not project correctly when you have the component output terminal of a video device connected to the RGB terminal of the projector. ➔ Try using the projector’s VIDEO input terminal (see “Connecting to a Standard Video Device”). page 9 When RGB/ Component is selected as the input source, the color of the projected image or the image itself is abnormal. The wrong option (“Component” or “RGB”) may be selected for the “Input Settings RGB Input” setting on the setup menu. The image will not be projected correctly if “Component” is selected while the projector’s RGB input terminal is connected to the RGB output terminal of a computer, or if “RGB” is selected while the projector’s RGB input terminal is connected to the component video output terminal of a video device. ➔ Use the setup menu to change the “Input Settings RGB Input” setting to “Auto” to correct the problem. Reference Guide (CD-ROM) The remote controller does not work. The remote controller battery may be dead. ➔ Replace the battery (see “Replacing the Remote Controller Battery”). page 6 The projector does not project any image from the connected device. The TEMP or LAMP indicator is flashing or lit. The remote controller may be too far from the projector. ➔ Make sure the remote controller is within the allowable range when you operate it. Reference Guide (CD-ROM) ➔ See “Error Indicators and Warning Messages” under “Indicators”. page 16 20 Page 21 Tuesday, October 23, 2007 5:32 PM Troubleshooting Problem Cause and Recommended Action See The message “It is time to replace the lamp.” is being projected. It is time to replace the lamp. ➔ Replace the lamp (see “Replacing the Lamp”). Reference Guide (CD-ROM) The message “The lamp has exceeded its service life!.” is being projected. The allowable life for the lamp has been exceeded, and the projector will not turn on. ➔ Replace the lamp (see “Replacing the Lamp”). Reference Guide (CD-ROM) Try performing the following steps, which can return the projector to normal operation. 1. Press the [ ] (power) key to turn off the projector. 2. After the projector’s cool down is finished and the fan is completely stopped, unplug the AC power cord. 3. Plug the power cord back in and turn the projector back on again. * If the power off confirmation message does not appear when you press the [ ] (power) key, unplug the AC power cord and wait for at least 10 minutes. Then plug the power cord back in and turn the projector back on again. 21 English ASK M9_UG_E.book ASK M9_UG_E.book Page 22 Tuesday, October 23, 2007 5:32 PM Service and Support Questions? We're here to help! Visit us at: www.askproxima.com/service Service and Support We're here to support you with your new purchase. We can help you with... z Determining screen sizes z Documentation in other languages z Connecting your sources (TV, DVD, Cable/Satellite, Game, etc.) z Selecting optional accessories z Product warranty protection plans USA, Canada, Latin America Customer Support Telephone +1 (503) 685-8888 TOLL FREE: 800-799-9911 Mon-Fri, 7 am - 5 pm Pacific [email protected] Asia Pacific Customer Support Telephone Singapore: +65 63539449 China: 800.828.2268 Australia: 1300-725-295 Australia Direct Sales: 1800-885-841 Mon-Fri, 9 am - 6 pm SGT [email protected] Europe, Middle East, Africa Customer Support Telephone +31 (0)36 539 2820 Mon-Fri, 08:30 - 18:00 CET [email protected] - Lamp contains mercury. Manage in accordance Warning z Hg with local disposal laws. See www.lamprecycle.org Declaration of Conformity Manufacturer: InFocus Corporation, 27500 SW Parkway Ave. Wilsonville, Oregon 97070-8238 USA European Office: Louis Armstrongweg 110, 1311 RL Almere, The Netherlands We declare under our sole responsibility that this projector conforms to the following directives and norms: EMC Directive 2004/108/EC, EMC: EN 55022, EN 55024, EN 61000-3-2, EN 610003-3, Low Voltage Directive 73/23/EEC, Amended by 93/68/EEC, Safety: IEC 60950-1:1st Edition. Trademarks Apple, Macintosh, and PowerBook are trademarks or registered trademarks of Apple Computer, Inc. IBM is a trademark or registered trademark of International Business Machines, Inc. Microsoft, PowerPoint, and Windows are trademarks or registered trademarks of Microsoft Corporation. Adobe and Acrobat are trademarks or registered trademarks of Adobe Systems Incorporated. InFocus, In Focus, and INFOCUS (stylized), LP, LiteShow, ScreenPlay, LitePort, ASK and Proxima are either registered trademarks or trademarks of InFocus Corporation in the United States and other countries. FCC Warning This equipment has been tested and found to comply with the limits for a Class A digital device, pursuant to part 15 of the FCC Rules. These limits are designed to pro-vide reasonable protection against harmful interference when the equipment is oper-ated in a commercial environment. This equipment generates, uses, and can radiate radio frequency energy and, if not installed and used in accordance with the instruc-tion manual, may cause harmful interference to radio communications. Operation of this equipment in a residential area is likely to cause harmful interference in which case the user will be required to correct the interference at his own expense. Changes or modifications to this equipment that are not expressly approved by InFocus Corp. may void the user's authority to operate the equipment. EN 55022 Warning This is a Class A product. In a domestic environment it may cause radio interference, in which case the user may be required to take adequate measures. The typical use is in a conference room, meeting room or auditorium. 22 Page 23 Tuesday, October 23, 2007 5:32 PM Service and Support Canada This Class A digital apparatus complies with Canadian ICES-003. Cet appareil numérique de la classe A est conforme à la norme NMB-003 du Canada. Agency Approvals Product Models: W150 UL, CUL, NOM, IRAM, GOST, C-tick Other specific Country Approvals may apply. Please see product certification label. InFocus reserves the right to alter product offerings and specifications at any time without notice. 23 English ASK M9_UG_E.book ASK M9_UG_E.book Page 24 Tuesday, October 23, 2007 5:32 PM