1
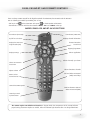
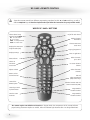
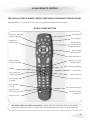
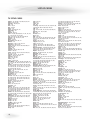
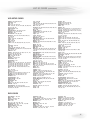
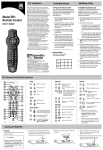
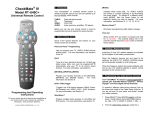
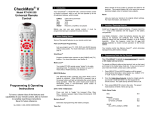
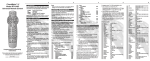
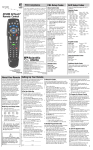
USER'S GUIDE
Remote controls
programming
IN THIS GUIDE
E2050-ER1 AND RT-U43CO REMOTE CONTROLS
MODELS E2050-ER1 AND RT-U43CO BUTTONS. . . . . . . . . . . . . . . . . . . . . . . . . . . . . . . . . . 1
PROGRAMMING THE E2050-ER1 REMOTE CONTROL. . . . . . . . . . . . . . . . . . . . . . . . . . . . . 2
PROGRAMMING THE RT-U43CO REMOTE CONTROL . . . . . . . . . . . . . . . . . . . . . . . . . . . . . 3
RC-U49C+ REMOTE CONTROL
MODEL RC-U49C+ BUTTONS . . . . . . . . . . . . . . . . . . . . . . . . . . . . . . . . . . . . . . . . . . . . . . . . 6
PROGRAMMING THE RC-U49C+ REMOTE CONTROL . . . . . . . . . . . . . . . . . . . . . . . . . . . . . . 7
AT8400 REMOTE CONTROL
MODEL AT8400 BUTTONS . . . . . . . . . . . . . . . . . . . . . . . . . . . . . . . . . . . . . . . . . . . . . . . . . . 13
PROGRAMMING THE AT8400 REMOTE CONTROL. . . . . . . . . . . . . . . . . . . . . . . . . . . . . . . 14
LIST OF CODES
TV SETUP CODES . . . . . . . . . . . . . . . . . . . . . . . . . . . . . . . . . . . . . . . . . . . . . . . . . . . . . . . . . 16
VCR SETUP CODES . . . . . . . . . . . . . . . . . . . . . . . . . . . . . . . . . . . . . . . . . . . . . . . . . . . . . . . 17
VCR SETUP CODES . . . . . . . . . . . . . . . . . . . . . . . . . . . . . . . . . . . . . . . . . . . . . . . . . . . . . . . 17
E2050-ER1 AND RT-U43CO REMOTE CONTROLS
There are three remote controls for the digital terminals: the E2050-ER1, the RT-U43CO and the RC-U49C+.
You can identify your model by examining the "5" key.
• This key is oval
on the E2050-ER1 and square
on the RT-U43CO and RC-U49C+.
• The RC-U49C+ is the one with the three buttons "MODE", "ALL" and "AUDIO" at the top.
MODELS E2050-ER1 AND RT-U43CO BUTTONS
LED indicator (RT-U43CO)
LED indicator (E2050-ER1)
On/off for each device
Displays channel information
Displays the Interactive
Program Guide (IPG)
Chooses interactive
screen item
Page Up/Page Down
Displays settings
Exits an application
Selects channels, up or down
Selects an interactive
screen item
Adjusts volume
Selects favourites channels
Returns to last
channel viewed
VCR and Video-on-Demand
(VOD) control keys
Controls the BYPASS option
Switches between VCR and
Video-on-Demand (VOD)
Controls your VCR’s
TV/VCR function
The remote requires two alkaline AA batteries. A diagram inside the compartment of the remote indicates
proper battery placement. Replace as needed, when the indicator light becomes dim or no longer illuminates.
1
E2050-ER1 AND RT-U43CO REMOTE CONTROLS
(CONTINUED)
PROGRAMMING THE E2050-ER1 REMOTE CONTROL
This step is not essential, but allows you to use the digital terminal remote control with your TV and VCR.
How to Program the TV Mode Key
1.
2.
3.
4.
Turn on the TV set.
Point the remote control away from the digital terminal, the TV and the VCR.
On your remote control, press and hold TV and SELECT at the same time until the LED on the remote blinks twice.
Using the remote control keypad, enter your TV’s 3-digit setup code (the codes are listed in the appendix on page
68); the LED should blink once each time you enter a digit. When the three digits have been entered correctly, the LED
blinks twice. If it doesn’t blink twice, try another code.
5. Once you have found the correct code, point the remote control at the TV set and press POWER.
6. If the TV turns off, write the code you used here: TV ________________
7. If your TV or VCR brand is not listed in the appendix or if none of the codes works, refer to "How to Search for
Codes", below.
How to Program the VCR Mode Key
1. Turn on the VCR and move the VCR/VOD slide switch to the VCR position.
2. Repeat the steps described under "How to Program the TV Mode Key", substituting the VCR key for the TV key.
3. Write the code you used here: VCR ________________
Located in the bottom right corner of the remote, the VCR/VOD key is used to activate the dedicated
Video-on-Demand and VCR keys.
• Slide it to the VOD position when using Video-on-Demand, and to the VCR position when using the VCR.
How to Search for Codes
1. Point the remote control away from your TV or VCR, depending on which one you are programming.
2. To search for TV codes, press and hold TV and SELECT at the same time until the LED on the remote blinks twice.
or
To search for VCR codes, press and hold VCR and SELECT at the same time until the LED on the remote blinks twice.
3. Slowly enter the code 9 9 1; the LED should blink once each time you enter a digit. When the three digits have been
entered correctly, the LED blinks twice.
4. Point the remote control at the TV or VCR, and press TV or VCR.
If the device turns off, go to step 5.
If the device remains on, start again from the beginning of step 4.
5. Press SELECT to confirm a valid code; the LED blinks twice.
6. Point the remote toward the device you programmed, and power on and off to confirm operation.
7. You now need to identify the code you just found.
2
E2050-ER1 AND RT-U43CO REMOTE CONTROLS
(CONTINUED)
How to Identify Programmed Codes
1. Point the remote control away from the digital terminal , TV and VCR.
2. To identify the TV code, press and hold TV and SELECT at the same time until the LED on the remote blinks twice.
or
2. To identify the VCR code, press and hold VCR and SELECT at the same time until the LED on the remote blinks twice.
3. Slowly enter the code 9 9 0; the LED should blink once each time you enter a digit. When the three digits have been
entered correctly, the LED blinks twice.
4. Press 1 on the keypad, then count the LED blinks. The number of blinks indicates the first digit in the code. If the LED
doesn’t blink, the digit is 0.
5. Press 2 on the keypad, then count the LED blinks. The number of blinks indicates the second digit in the code.
6. Press 3 on the keypad, then count the LED blinks. The number of blinks indicates the third digit in the code.
How to Program the Volume Control
This step is not essential, but it lets you better control the volume on your devices.
You must have already completed TV setup as outlined in the How to Search for Codes section of this guide.
1. Point the digital terminal remote control away from the digital terminal, TV and VCR.
2. Press and hold the CBL and SELECT keys at the same time until the LED on the remote blinks twice.
3. Slowly enter the code 9 9 3; the LED should blink once each time you enter a digit. When the three digits have been
entered correctly, the LED blinks twice.
4. Press TV to control your television volume from the digital terminal remote control, or CBL to control your digital
terminal volume from the digital terminal remote control. The LED blinks twice to confirm a valid selection.
5. Point the remote toward the digital terminal and adjust the volume to confirm operation.
Before using the volume control feature for the first time, set the volume to three-quarters using the TV
remote control. Use the digital terminal remote for all subsequent volume changes.
PROGRAMMING THE RT-U43CO REMOTE CONTROL
How to Program the TV Mode Key
1. Turn on the TV set, then press and hold the TV and SELECT keys at the same time until the LED stays lit.
2. Press and hold the CH+ key (Point and Press™ method) until the TV set turns off. As soon as it turns off, release the
CH+ key.
or
2. Refer to the list of TV codes on page 68 and enter the code for your TV brand. If there are several, try them one at a
time until the TV turns off.
3. Press the MUTE key. If the TV turns on, press the TV key to lock in the code. The LED will blink and go out. If the TV
does not turn on, repeat steps above until you can turn the TV on and off.
4. Write the code and your TV’s brand here: __________________
If, when using the Point and Press™ method, you find a code that turns your TV off but not back on,
you may have gone past the correct matching code. Try pressing CH- one step at a time until you find a code
that turns your TV back on.
5. If you found the code using the Point and Press™ programming method refer to the section 3-Digit Code Number
Readback.
3
E2050-ER1 AND RT-U43CO REMOTE CONTROLS
(CONTINUED)
How to Program the VCR Mode Key
1. Turn on the VCR or DVD player, then press and hold the VCR and SELECT keys until the LED stays lit.
2. Repeat the steps described under How to Program the TV Mode Key, substituting the VCR key for the TV key.
3. Write the code and your TV brand here: _____________________________
Write the code and your DVD brand here: _____________________________
4. If you found the code using the Point and Press™ programming method, refer to the section 3-Digit Code Number
Readback, below.
Located in the bottom right corner of the remote, the VCR/VOD key is used to activate the dedicated
Video-on-Demand and VCR keys. The colour of the remote control’s LED tells you which function has
been activated.
• Press the VCR/VOD key. If the LED is red, the remote is in Video-on-Demand mode;
if the LED is green, it is in VCR mode.
How to Program a TV/VCR Combination Unit
1. Follow the steps described under How to Program the TV Mode Key and How to Program the VCR Mode Key.
2. In the space provided, write the code for the TV _________________ and VCR __________________
3. If you found the code using the Point and Press™ programming method, refer to the section 3-Digit Code
Number Readback, below.
You cannot use the Point and Press™ method to program the VCR functions of the TV/VCR.
3-Digit Code Number Readback
1. For the TV code, press and hold the TV and SELECT keys at the same time until the LED stays lit.
2. Press the INFO key. The LED will "blink back" the code numbers, with a 1-second interval between each digit of the
code. Example: For code "035", the indicator light will blink 10 times, then 3 times, then 5 times. Once you have
found the code, write it down here for future reference _______________
3. For the VCR code, follow steps 1 and 2 using the VCR and SELECT keys. Once you have found the code, write it down
here for future reference _______________________
4. For the terminal code, follow steps 1 and 2 using the VCR and SELECT keys. Once you have found the code, write it
down here for future reference _______________________
4
E2050-ER1 AND RT-U43CO REMOTE CONTROLS
(CONTINUED)
How to Program the Volume Control
1. Press and hold the CBL and SELECT keys at the same time until the LED stays lit.
2. Press the VOL+ key, and then the CBL key. The LED will blink twice and go out.
3. To control the volume through the TV again, repeat step 1 and, at step 2, press the VOL+ and TV keys.
How to Program the SmartKeys™
You can program the CBL and TV keys so that whenever either is pressed, several tasks take place in sequence.
To turn on the terminal, turn on the TV, and tune to channel 3 with the press of one button
1. Press and hold the CBL and SETTINGS keys at the same time until the LED stays lit.
2. In this order, press CBL, TV, 0, 3. The LED light will blink and stay lit.
3. Press CH+ to lock in this setting; the indicator light will blink and go out.
4. To return the CBL button to its normal default setting, repeat step 1, then press CH-.
To turn on the TV and tune to channel 3 with the press of one button
1. Press and hold the TV and SETTINGS keys at the same time until the LED stays lit.
2. In this order, press TV, 0, 3. The LED light will blink and stay lit.
3. Press CH+ to lock in this setting; the LED will blink and go out.
4. To return the TV button to its normal default setting, repeat step 1, then press CH-.
Important: When using SmartKeys™ to transmit a series of button presses, be sure to keep your remote
aimed at the devices to ensure all functions are received in their entirety.
How to Reset the Remote Control
1. Press and hold the CBL and SELECT keys at the same time until the LED stays lit.
2. Press the SETTINGS key twice; the LED will blink and go out.
5
RC-U49C+ REMOTE CONTROL
These three remote controls have different programming procedures for their TV and VCR mode keys, as well as
different VOD/VCR keys. It’s therefore important that you follow the instructions for your particular model.
MODEL RC-U49C+ BUTTONS
Selects device being
operated. Press MODE, then…
CBL - for Cable mode
TV - for TV mode
VIDEO - for VCR/DVD mode
AUDIO - for Audio mode
Displays the Interactive
Program Guide (IPG)
On/off for each device
Displays channel
information
Chooses interactive
screen item
Page Up/Page Down
Displays settings
Exits an application
Mutes volume
Selects an
interactive
screen item
Adjusts volume
Returns to last
channel viewed
Controls the
BYPASS option
Selects channels,
up or down
On-screen decision
buttons
Selects favourites
channels
VCR and
Video-on-Demand
(VOD) control keys
Switches between VCR and
Video-on-Demand (VOD)
Controls your VCR’s
TV/VCR function
Programmable
favourite channel
Stretch & Zoom
Functions
Programmable
favourite channel
The remote requires two alkaline AA batteries. A diagram inside the compartment of the remote indicates
proper battery placement. Replace as needed, when the indicator light becomes dim or no longer illuminates.
6
RC-U49C+ REMOTE CONTROL
(CONTINUED)
PROGRAMMING THE RC-U49C+ REMOTE CONTROL
Point and Press® Programming
This method allows you to program the remote control without using codes. Instead, the remote control automatically
finds the correct command that you select in a variety of codes until you find the code that operates your device. You
then lock in the correct code as described below.
When using this method, there are several important points to remember:
• The order in which you program your electronic devices is not important.
• There may be several codes that turn your electronic devices on/off (or perform other functions). Once you lock-in a
code, be sure to check the available functions for that device (i.e. TV - Vol+/-, Mute, TV Input (TV/VCR button),
VIDEO - Play, Stop, Rew..., AUDIO - Volume/Mute) to see if they are operating.
• While the remote is searching for the correct setup code(s) for your electronic devices, it is possible that other
(previously programmed) devices may turn on/off (or perform other functions). If this occurs, continue pressing the CH+
or CH- buttons until you find the correct code for the device you are programming.
• It may take several minutes for the remote to find the correct code that turns your device on/off (or performs another
selected function). During this time, the POWER/MODE buttons will illuminate in fast-rotation (i.e. CBL > TV > VIDEO >
AUDIO > CBL..).
Programming your electronic devices using CH+ or CH- buttons (Point and Press® method)
1. Turn on all the electronic devices (TV, VCR, DVD, AUDIO) you want to program the remote to operate.
2. On your remote control, press and hold SELECT, then MUTE together until the POWER/MODE buttons illuminate
in slow rotation (i.e. CBL > TV > VIDEO > AUDIO > CBL..).
3. Press and hold the CH+ button until one device turns off. While you are pressing the CH+ button, the POWER/MODE
buttons will illuminate in fast-rotation. As soon as one device turns off, release the CH+ button.
4. Press MUTE button.
a. If the device that turned off... turns back on, press SELECT to lock in this code.
The POWER/MODE buttons will blink 3-times and go out.
or
b. If the device that turned off... does not turn back on, press CH- one step at a time until that device turns back on.
Each time you press the CH- button, the POWER/MODE buttons will illuminate once in reverse fast-rotation
(i.e. AUDIO > VIDEO > TV > CBL).
5. Once you have found a code that turns the device on/off, press SELECT to lock in this code. The POWER/MODE
buttons will blink 3-times and go out.
6. Repeat steps 2 to 5 above for each of the remaining electronic devices you wish to program the remote to operate.
7
RC-U49C+ REMOTE CONTROL
(CONTINUED)
Code Number Readback
To identify the 3-digit setup codes stored under the Point and Press® programming method, follow these steps:
1. For the TV code, press and hold the TV and SELECT keys at the same time until the TV button illuminates.
2. Press the INFO key. The TV button will "blink back" the code numbers, with a 1-second interval between each digit of
the code. Example: For code "035", the indicator light will blink 10 times, then 3 times, then 5 times. Once you have
found the code, write it down here for future reference _______________________
3. For the VCR code, follow steps 1 and 2 using the VCR and SELECT keys. Once you have found the code,
write it down here for future reference _______________________
4. For the DVD code, follow steps 1 and 2 using the VCR and SELECT keys. Once you have found the code,
write it down here for future reference _______________________
5. For the AUDIO code, follow steps 1 and 2 using the AUDIO and SELECT keys. Once you have found the code,
write it down here for future reference _______________________
Located in the bottom right corner of the remote, the VCR/VOD key is used to activate the dedicated
Video-on-Demand and VCR keys.
• Slide it to the VOD position when using Video-on-Demand, and to the VCR position when using the VCR.
CODE-ENTRY PROGRAMMING
How to Program the TV Mode Key
1. Turn on your TV. On your remote control, press and hold SELECT, then MUTE together until the POWER/MODE buttons
illuminate in slow rotation (i.e. CBL > TV > VIDEO > AUDIO > CBL..).
2. Refer to the list of TV Setup Codes on page 68. Using the remote control keypad, enter your 3-digit setup code.
You may have to enter several different codes until your TV turns off.
3. As soon as you have entered a 3-digit code that turns your TV off, press MUTE. If the TV turns back on, press SELECT
to lock in the code. The POWER/MODE buttons will blink 3 times and go out. If the TV does not turn back on, enter
a different 3-digit setup code until your TV turns back on. Then press SELECT to lock in the code. The POWER/MODE
buttons will blink 3 times and go out.
4. If the TV turns on, write the code you used here: TV ________________
Note : If your TV or VCR/DVD brand is not listed in the appendix or if none of the codes works, refer to "Point
and Press® Programming" section.
How to Program the VCR/DVD Mode Key
1. To program your VCR or DVD, repeat steps 1 to 4 above, substituting the TV indications for your VCR.
2. Write the code you used here: VCR ________________ DVD ________________
How to Program a TV/VCR Combination Unit
1. First, turn on your TV/VCR combination device and install a VHS tape.
2. Next, program your remote to operate the TV functions. Using the Code Entry Programming method described above,
find a TV Setup Code that operates the TV functions (Power, Vol. +/-, Mute) of your TV/VCR unit.
3. Using the Code Entry Programming method described above, enter, lock and test each 3-digit VCR Setup Code for
your brand until a code is found that operates the transport functions of your TV/VCR unit.
8
RC-U49C+ REMOTE CONTROL
(CONTINUED)
ALL button
Once you have programmed each of your devices, press ALL button to turn all of them on/off with a single button press.
You can also program the ALL button to tune your TV to its correct output channel (usually 3).
Programming the ALL Button
1. Press MODE, then CBL to select the remote’s cable mode.
2. Press SETTINGS, then ALL together until the TV button illuminates.
3. Press [0] , then [3] .
•
•
Your TV output channel may also be 2 or 4.
Depending on your TV brand, the channel may have to be entered as 3, 03 ou 003.
4. Press CH+ to store the TV channel. The TV button will blink 3-times and go out.
Using the ALL button
When pressing the ALL button, be sure to keep the remote control aimed at your electronic devices until your electronic
devices turn on or off.
Resetting the ALL button
1. Press MODE, then CBL to select the remote’s cable mode.
2. Press SETTINGS, then ALL together until the TV button illuminates.
3. Press CH+. The TV button will blink 3-times and go out.
M1, M2 buttons
Your remote has 2 Channel Memory Buttons – M1 and M2. Each of these buttons can store up to 5 cable channels.
Each cable channel can be up to 5-digits. Some or all of your remote’s Channel Memory Buttons may come pre-tuned to
channels or functions selected by your cable operator. If they have not been pre-tuned by your cable operator, they can
be programmed as follows:
Programming M1 and M2 buttons
To program the M1 button to cable channels 1, 12, 123, 231 and 17, follow these steps:
1. Press M1, then CBL together until the CBL button illuminates.
2. Enter each channel as follows:
a. Enter 1st channel # - 001.
b. Press CH+ to advance to next channel # setting.
c. Enter 2nd channel # - 012.
d. Press CH+ to advance to next channel # setting.
e. Enter 3rd channel # - 123.
f. Press CH+ to advance to next channel # setting.
g. Enter 4th channel # - 231.
h. Press CH+ to advance to next channel # setting.
i. Enter 5th channel # - 017.
3. Press M1 to store the above channels. The CBL button will blink 3-times and go out. To store fewer than 5 channels,
you can press the M1 button any time after entering a complete channel number.
4. Repeat the above steps to program the M2 button. Follow the example in step 1, but press M2, then CBL together
until the CBL button illuminates.
9
RC-U49C+ REMOTE CONTROL
(CONTINUED)
Using M1, M2 buttons
Using the programmed channels (previous page) as an example…
1. Press M1 Cable set-top terminal tunes to channel 001.
2. Press M1 again – Cable set-top terminal tunes to channel 012.
3. Press M1 again – Cable set-top terminal tunes to channel 123.
4. Press M1 again – Cable set-top terminal tunes to channel 231.
5. Press M1 again – Cable set-top terminal tunes to channel 017.
6. Press M1 again – Cable set-top terminal tunes to channel 1…. repeat.
Whenever a Channel Memory button is pressed, the function of the transport buttons will automatically switch back to Cable.
When pressing the M1 button, be sure to keep the remote control aimed at your Cable set-top terminal to ensure the full
channel numbers are received in their entirety.
Resetting M1, M2 buttons
To reset M1 and M2, follow these steps:
1. Press M1, then CBL together until the CBL button illuminates.
2. Press M1. The CBL button will blink 3-times and go out.
Resetting # button
The # button comes pre-set to operate the Zoom function of your digital set-top terminal. In the unlikely event this
button stops performing this function, it may need to be reset. To reset the # button to its factory default setting,
follow these steps:
1. Press #, then CBL together until the CBL button illuminates.
2. Press #. The CBL button will blink and go out.
How to Program the Volume Control
When you first program your remote, volume/mute are controlled through your TV (except AUDIO which defaults to the
AUDIO device). The volume control options in each mode of the remote are:
CBL
TV
VIDEO
AUDIO
TV (default), Cable or Audio.
TV (default), Cable or Audio.
TV (default), Cable or Audio.
AUDIO device (default), Cable or TV.
To control volume/mute through your Cable set-top terminal in the remote’s cable mode…
1. Press CBL, then SELECT together until the CBL button illuminates.
2. Press VOL+, then CBL for Cable volume. The CBL button will blink 3-times and go out.
To return volume control to your TV, repeat step 1, then press VOL+, then TV in step 2.
10
RC-U49C+ REMOTE CONTROL
(CONTINUED)
How to Program the SmartKeys™
Your remote has two SmartKeys™ - CABLE and TV that operate in its cable mode.
Each SmartKey™ can be programmed to transmit multiple functions.
Programming and using the CBL SmartKey™
The CBL button normally turns on/off your cable set-top terminal.
To program the CBL button to transmit multiple pre-programmed functions, follow the steps below:
1. Press MODE, then CBL to select the cable mode of your remote.
2. Press CBL, then SETTINGS together until the CBL button illuminates.
3. Press the option number below for the desired functions:
Option
Pre-Programmed to turn on…
[1]
Cable & TV - tune TV to Ch 3
[2]
Cable & TV - tune TV to Ch 2
[3]
Cable & TV - tune TV to Ch 4
[4]
Cable, TV & VIDEO - tune TV to Ch 3
[5]
Cable, TV & VIDEO - tune TV to Ch 2
[6]
Cable, TV & VIDEO - tune TV to Ch 4
[7]
Cable, TV, VIDEO & AUDIO - tune TV to Ch 3
[8]
Cable, TV, VIDEO & AUDIO - tune TV to Ch 2
[9]
Cable, TV, VIDEO & AUDIO - tune TV to Ch 4
[0]
Cable only (default)
4. The CBL button will blink 3-times and go out, storing the selected option.
Programming and using the TV SmartKey™
The TV button normally turns on/off your TV.
To program the TV button to transmit multiple pre-programmed functions, follow the steps below:
1. Press MODE, then CBL to select the cable mode of your remote.
2. Press TV, then SETTINGS together until the TV button illuminates.
3. Press the option number below for the desired functions:
Option
Pre-Programmed to turn on…
[1]
TV - tune TV to Ch 3
[2]
TV - tune TV to Ch 2
[3]
TV - tune TV to Ch 4
[0]
TV only (default)
4. The TV button will blink 3-times and go out, storing the selected option.
Important: When using SmartKeys™ to transmit a series of button presses, be sure to keep your remote
aimed at the devices to ensure all functions are received in their entirety.
11
RC-U49C+ REMOTE CONTROL
(CONTINUED)
Mode Lock™
Your CheckMate® IV remote can be set-up in two different operating modes - "locked" and "unlocked". From the factory,
it is set in its "locked" mode, which means it will operate all the functions of your cable set-top terminal, plus a limited
number of functions of your TV, VCR, DVD devices. In its locked mode, your remote is unable to change channels on your
TV device.
By comparison, in its "unlocked" mode, it can still operate all the functions of your cable set-top terminal, but more of the
functions of your TV, VCR and DVD devices.
The following steps will allow you to set your remote to its "unlocked" mode, or reset it to its "locked" mode.
To "unlock" your remote for multi-device operation…
1. Press CBL, then MUTE together until the CBL button illuminates.
2. Press [9, 9, 9]. The CBL button will blink 3-times and go out.
To "lock" your remote in its cable operating mode for single-device operation...
1. Press CBL, then MUTE together until the CBL button illuminates.
2. Press [0, 0, 0]. The CBL button will blink 3-times and go out.
TV/VCR Input
In the remote's Cable and TV modes, this button operates the TV Input function on your TV. In the remote's VIDEO mode,
this button changes the TV/VCR function on your VCR.
You can program this button so that in the remote's cable mode, TV/VCR will operate the TV/VCR function on your VCR,
eliminating the need to change modes on the remote.
To program the TV/VCR button to operate your VCR...
1. First activate CBL mode.
2. Press TV/VCR, then SELECT together until the CBL button illuminates.
3. Press VIDEO. The CBL button will blink 3-times and go out.
To return this button to operate the TV Input function on your TV, repeat step 1, then press TV in step 2.
12
AT8400 REMOTE CONTROL
THE AT8400 ALLTOUCH® REMOTE CONTROL FUNCTIONS AS FOUR REMOTE CONTROLS IN ONE!
Once programmed, it can control your TV, VCR, PVR, and any equipment connected to the AUX outputs.
MODEL AT8400 BUTTONS
Displays the Interactive
Program Guide (IPG)
Power ON/OFF
The 4 mode keys
Performs the
selected action
Provides settings
information and
program descriptions
Moves through
onscreen choices
Exits to full-screen TV
Replays the last 8
seconds of a program
Displays a list of your
recorded programs
Returns to live programming
Rewinds
Fast-forwards
Plays a program or
resumes a paused one
Stops recording
a program
Records a program
Pauses a program
Turns PIP feature
on or off
The 5 dedicated PIP keys
Swaps PIP screen
with main screen
Selects PIP channels
up and down
Moves PIP screen
The remote requires two alkaline AA batteries. A diagram inside the compartment of the remote indicates
proper battery placement. Replace as needed, when the indicator light becomes dim or no longer illuminates.
13
AT8400 REMOTE CONTROL
(CONTINUED)
The steps described below are the same for each mode button. Repeat them for each device
controlled by the remote, make sure you press the correct mode key for each device.
PROGRAMMING THE AT8400 REMOTE CONTROL
How to Program the TV Mode Key
1. Turn on the TV set, then press and hold the SELECT and TV keys until the TV mode key blinks twice.
2. Using the remote control keypad, enter the setup code for your brand of device (the codes are listed in the
appendix at the end of this guide); if the TV mode key blinks twice, you have entered the right code. If it does not
blink twice, start again using a different code.
3. Once you have found the correct code, point the remote control towards the device and press POWER,
or CH+.
4. If the device works properly, write the code you used here: TV ________________
5. Repeat these steps for other devices and write down the code for each.
VCR ________________ AUX (CD and DVD) ________________ CBL (PVR) ________________
If none of the codes works, refer to How to Search for Codes, below.
How to Search for Codes
1. Turn the TV on, then press and hold the SELECT key and the appropriate mode key (AUX, VCR, TV or CBL)
until it blinks twice.
2. Enter carefully the code 9 9 1. After each digit the mode key will blink once.
At the end of the operation it should blink twice.
3. Point the remote towards the device and press
.
The remote automatically tests each code in its library, starting with the most common ones.
The mode key blinks once each time the remote transmits a new code.
Each of the code libraries contains fewer than 100 codes.
The mode key blinks twice when it reaches the last code in the library.
4. As soon as the device powers down, press SELECT then the POWER key.
If the device turns on, you have found the right code. Press SELECT to lock it.
5. You now need to find out which code you used.
14
AT8400 REMOTE CONTROL
(CONTINUED)
How to Identify Programmed Codes
1. Press and hold the SELECT key and the appropriate mode key (AUX, VCR, TV or CBL) until the mode key blinks twice.
2. Enter carefully the code 9 9 0. After each digit the mode key will blink once.
At the end of the operation it should blink twice.
3. Press 1, then count the number of times the mode key blinks.
That number indicates the first digit in the code. If the mode key does not blink, the digit is 0.
4. Press 2, then count the number of blinks. That number indicates the second digit in the code.
5. Do the same for 3 and 4, and the numbers of blinks. They indicate the third and fourth digits in the code.
How to Program the Volume Control
This step is not essential, but it gives you better control of the volume on your devices.
1. Press the SETTINGS key twice to display the General Settings screen, and make sure that the Audio: Volume
Control setting is set to Variable.
2. Turn on the device, then press and hold the SELECT and CBL keys until the CBL mode key blinks twice.
3. Enter carefully the code 9 9 3. After each digit the CBL mode key will blink once.
At the end of the operation it should blink twice.
4. On the PVR remote, press the MODE key for the appropriate device volume you want to control.
5. Point the remote towards the device, and adjust the volume to confirm that the VOLUME and MUTE keys
function as expected.
15
LIST OF CODES
TV SETUP CODES
Admiral – 107, 030, 061, 193, 056, 026, 054, 211
Advent – 072, 094, 425
Adventura – 060, 185, 047
Aiko – 106
Aiwa – 135, 214
Akai – 044, 053
Alaron – 193
Amark – 007, 086, 023, 215
Ambassador – 191
Ampro – 112
Amstrad – 006, 157
Anam - 194, 069, 088, 089, 093, 111, 120, 125, 134,
217, 218, 219, 220, 221, 222, 223
AOC – 033, 044, 070, 199, 053, 030, 038, 427
Audiovox – 106, 194, 465, 111, 220
Baysonic – 194
Belcor – 033, 073
Bell & Howell – 030, 168, 211
Bradford – 194
Brocksonic – 250, 477, 054, 165, 167
Brockwood – 192, 033, 073
Candle – 066, 044, 070, 027, 052, 060, 068, 091
Carnivale – 044
Carver – 068
Celebrity – 014
Centurion – 040, 051, 095, 107, 108
Cineral – 106, 465
Citizen – 060, 044, 070, 074, 106, 027, 052, 059,
068, 091, 211, 233
Concerto – 070, 051, 192, 073, 095
Contec – 194, 020, 199, 147
Coronado – 007, 023
Craig – 194, 134, 223
Crosley – 068
Crown – 194, 007, 023
Curtis Mathes – 180, 030, 044, 061, 065, 068, 070,
074, 107, 159, 168, 465, 040, 016, 054, 108, 211, 213
CXC – 194
Daewoo – 106, 465, 027, 039, 051, 068, 073, 090,
091, 092, 094, 095, 101,102, 108, 114, 118, 121,123,
130, 158, 159, 189, 191, 194, 196, 197, 198, 200,
202, 204, 205, 206, 207, 209
Daytron – 192, 051, 040, 073, 095, 107, 108
Denon – 159
Dumont – 031, 073, 192
Electro Home – 051, 073, 095, 192
Electroband – 014
Elektra – 002, 353
Emerson – 250, 168, 191, 192, 193, 194, 296, 477,
007, 008, 012, 054, 108, 016, 023, 053, 064, 103,
139, 158, 159, 164, 165, 166, 167, 169, 392, 400,
401, 402, 408, 415
Envision – 044, 051, 073, 095, 192
Fisher – 168, 028, 355, 356
Fujitsu – 193
Funai – 047, 185, 193, 194
Futuretech – 194
Gateway – 426
GE – 035, 061, 065, 107, 149, 192, 296, 465, 005,
019, 027, 033, 037, 046, 051, 055, 015, 018, 042,
044, 049, 054, 068, 073, 090, 095, 101, 102, 103,
389, 390, 396, 403, 406, 407
Gibralta – 007, 025, 027, 040, 051, 059, 058, 192,
023, 048, 053, 068, 073, 090, 095, 107, 108, 233, 360
Gilbrater – 031, 044
Goldstar(LG) – 044, 070, 192, 124, 007, 027, 040,
059, 058, 023, 053, 068, 073, 090, 107, 108, 233,
360, 361
Gradiente – 067, 070
Grundig – 059, 233
Grunpy – 193, 194
Hall Mark – 192, 051, 073, 095
Harley Davidson – 193
Havard – 194
Hitachi – 070, 159, 007, 027, 049, 051, 085, 023,
068, 095, 096, 097, 098, 099, 100
Infinity – 068
16
Inkel – 075, 364
Inteq – 031
Janeil – 060
JBL – 068
JC Penney – 005, 027, 037, 051, 041, 035, 044, 168,
192, 039, 053, 068, 073, 092, 095, 102, 355
JCB – 014
JVC – 067, 077, 080, 132, 104, 105, 106, 396, 397,
410
Kawasho – 051, 192, 073, 095
KEC – 194
Kenwood – 044
Kloss – 060
KMC – 007, 023
KTV – 044, 194, 007, 029, 059, 023, 053, 233, 366
LG – 070, 023, 053, 068, 073, 090, 107, 108, 233,
360, 361
Kurazai – 030, 211, 213
Lodgenet – 030, 211, 213
Logik – 030, 211, 213
Luxman – 070, 027, 051, 192, 068, 073, 095
LXI – 061, 068, 168, 170, 192, 006, 056, 105, 024,
026, 157
Magnavox (Philips) – 044, 068,193, 001, 005, 007,
026, 027, 052, 048, 081, 192, 023, 068, 071, 073,
089, 090, 091, 093, 134, 385, 387, 397, 404
Majestic – 030, 211, 213
Marantz – 044, 068, 076, 053, 107, 108, 109
Matsushita – 264
Megatron – 159, 192, 086, 215
MEI – 199
Memorex – 030, 070, 164, 168, 192, 264, 090, 211,
213, 355, 388, 405
MGA/Mitsubishi – 033, 044, 164,192, 107, 027, 040,
051, 076, 084, 053, 068, 073, 090, 095, 107, 109,
110, 216, 384, 394, 395, 398, 399, 417
Midland – 031, 061, 065, 149, 053
Minutz – 035, 033
Mitsubishi – 033, 107, 164, 192
Montgomery Ward – 007, 037, 040, 056, 081, 022,
023, 026, 053, 071, 072, 108, 211, 213
Motorola – 107, 069
MTC – 044, 070, 074
Multitech – 194
NAD – 180, 170, 192
NEC – 044, 070, 027, 040, 101, 028, 068, 090, 108,
200
Nikko – 044, 106, 192
NTC – 106
Onwa – 194
Optonica – 179, 107
Optimus – 180, 168, 264
Orion – 250, 193, 477, 013, 032, 045, 047, 078, 019,
159, 160, 161, 162, 163, 382
Panasonic – 065, 264, 019, 021, 024, 063, 042, 043,
044, 045, 046, 429
Penney – 035, 044, 061, 065, 070, 074, 149, 170,
192, 033
Philco – 044, 068, 159, 477, 001, 007, 027, 052, 081,
023, 053, 071, 072, 091
Philips – 068
Philips (Magnavox) – 001, 027, 081, 023, 068, 071,
073, 089, 090, 091, 093, 134, 385, 387, 397, 404, 072
Pilot – 044, 059, 097, 192, 073, 094, 233
Pioneer – 180, 103, 111, 144, 383
Portland – 106, 007, 027, 023, 068
Prism – 065
Proscan – 061, 055, 073, 082, 112, 070
Proton – 192, 126, 128, 090, 371, 372
Pulsar – 031, 192, 073
Quarter – 060
Quartz – 060
Quasar – 179, 065, 264, 019, 049, 176, 044
Radio Shack – 179, 044, 061, 070, 168, 192, 194, 073
Radix – 051
Randex – 051
RCA – 061, 104, 149, 065, 107, 022, 027, 046, 072,
073, 082, 062, 049, 056, 074, 119, 120, 254, 042,
052, 053, 054, 055, 069, 070, 416
Realistic – 179, 044, 070, 192, 194, 012, 060, 062,
014, 049, 051, 267, 548, 022, 166, 168
Ricoh – 048, 267, 548
Runco – 053, 031, 044
Salora – 089
Sampo – 044, 040, 090, 108
Samsung – 044, 070, 074, 192, 007, 020, 040, 119,
129, 015, 016, 017, 023, 031, 090, 107, 108, 134,
147, 151, 153, 386, 411
Sanky – 062,053
Sansei – 465
Sansui – 477, 081, 014, 055, 423, 424
Sanyo – 168, 002, 028, 071, 133, 060, 061, 118, 254,
353, 355, 356, 376, 377
Scotch – 192
Scott – 250, 192, 193, 194, 040, 057, 059, 135, 198,
225, 226, 090, 108, 168
Sears – 061, 070, 168, 170, 185, 192, 193, 002, 007,
027, 028, 041, 043, 060, 014, 049, 051, 056, 118,
119, 023, 031, 038, 039, 068, 353, 355, 356
Semivox – 194
Semp – 170, 059
Sharp – 179, 107, 007, 009, 056, 064, 096, 062, 016,
022, 023, 024, 025, 026, 027, 028, 029, 393, 395, 409
Shintom – 086
Shogun - 254
Signature – 030
Signature 2000 – 007, 040, 056, 030, 193, 023, 026,
108, 211, 213
Singer – 086
Sony – 014, 038, 050, 062, 047, 046, 049, 020, 021
Soundesign – 192, 193, 194, 052, 091
Squareview – 185, 006, 157
Sunpak – 267
Supre-Macy – 380
SSS – 194
Starlite – 194
STS – 056
SupregMacy – 060
Supreme – 014
Symphonic – 185, 006, 014, 047, 157
Sylvania – 044, 068, 001, 005, 006, 026, 027, 040,
052, 081, 014, 049, 057, 095, 068, 071, 072, 090,
091, 093, 107, 108, 157, 158, 419
Tandy – 107
Tatung – 069, 019, 044
Technics – 065, 264
Technol Ace – 193
Techwood – 065, 070, 027, 068
Teknika – 030, 070, 074, 106, 164, 193, 194, 001,
007, 027, 052, 023, 068, 072, 091, 168, 213
Telefunken – 070
Telerent – 007, 030, 023, 213
Tera – 127, 381
Tevion – 065, 414
TMK – 070, 191, 192, 027, 068, 090
Toshiba – 074, 168, 170, 041, 043, 030, 031, 038,
039
Tosonic – 199
Totevision – 059, 053, 233
Universal – 027, 035, 068, 102
Vector Research – 044
Victor – 067
Vidikron – 068
Vidtech – 192, 027, 068
ViewSonic – 428
Viking – 060
Wards – 030, 179, 035, 044, 070, 192, 193, 027, 068,
090
White Westinghouse – 193, 211, 408
XR-1000 – 030, 213
Yamaha – 044, 033, 027, 068
York – 040, 070, 090, 108
Zenith – 030, 031, 106, 025, 034, 036, 047, 048, 049,
050, 051, 391, 405, 406, 434
LIST OF CODES
(CONTINUED)
VCR SETUP CODES
Admiral – 062, 004l, 066, 075
Adventura – 014
Aiko – 292
Aiwa – 014, 051, 106, 132
Akai – 055, 075, 120, 011, 021, 098, 103, 269, 275,
336, 351, 352, 354
American High – 049
Asha – 254
Audio Dynamics – 007, 052, 243, 291
Audiovox – 051, 106, 194, 465
Beaumark – 254
Bell & Howell – 118, 060, 357
Broksonic – 016, 135, 198, 225, 030, 048, 333,
337, 358, 359
Calix – 051
Canon – 049, 034, 105, 086, 362
Carver – 095
CCE – 086, 292
Cineral – 292
Citizen – 051, 292, 006, 059, 254, 033, 172, 247,
331
Colortyme – 052, 291
Colt – 086
Craig – 051, 061, 086, 254, 172, 363
Curtis Mathes – 049, 055, 074, 176, 006, 034, 052,
086, 112, 247, 291
Cybernex – 254
Daewoo – 059, 292, 010, 012, 058, 112, 114, 116,
033, 343, 344, 345, 346, 347
Daytron – 002, 058, 345, 365
DBX – 007, 052, 243, 291
Denon – 056
Dynatech – 014,106, 132
Electrohome – 051
Electrophonic – 051
Emerex – 046
Emerson – 014, 016, 051, 057, 075, 135, 198, 222,
225, 226, 292, 003, 022, 040, 091, 101, 106, 107,
109, 059, 033, 086, 132, 326, 327, 331, 332, 333,
334, 335, 336, 337, 338, 339, 340, 341, 342
Fisher – 061, 068, 118, 050, 060, 035, 081, 357,
363
Fuji – 047, 049
Funai – 014, 106, 132
Garrard – 014
GE – 062, 049, 074, 254,034, 041, 086, 172, 174
Go Video – 019, 043, 063, 348, 349, 350
GoldStar (LG) – 051, 052, 006, 247, 331
Gradiente – 014
Harley Davidson – 014
Harman/Kardon – 052, 291
Harwood – 086
Headquarter – 060
HI-Q – 061
Hitachi – 014, 055, 056, 119, 005, 078, 132
HITACHI – 106, 113
Instant Replay – 017, 034, 049, 086
JC Penney – 017, 034, 049, 052, 056, 060, 254,
078, 086, 172, 238, 291
JCL – 049, 086
Jensen – 055
JVC – 081, 055, 006, 007, 026, 038, 060, 102, 120,
128, 243, 247, 250, 253
KEC – 051, 292
Kenwood – 081, 052, 055, 006, 007, 060, 106, 120,
132, 238, 243, 247
KLH – 086
Kodak – 049, 051
LG (GoldStar) – 051, 052, 006, 247, 331
Lloyd’s – 014, 222, 132
Lloyd – 106
Logik – 086, 367
LXI – 051, 106, 132, 331
Magnasonic – 292
Magnavox (Philips) – 014, 049, 053, 095, 034,
106, 163, 086, 132, 183
Magnin – 254
Marantz – 049, 095, 006, 052, 060, 086, 172, 183,
238, 247, 291
Marta – 051, 331
Matsui – 094, 368
Matsushita – 049, 176
MEI – 049
Memorex – 060, 062, 014, 049, 051, 053, 061, 118,
176, 254, 034, 104, 106, 110, 132, 238, 331, 363,
369, 370
MGA (Mitsubishi) – 081, 062, 057, 075, 254, 031,
042, 255, 258
MGN Technology – 254
Minolta – 056, 119
Mitsubishi (MGA) – 081, 062, 057, 075, 254, 031,
042, 255, 258
Montgomery Ward – 009, 014, 034, 037, 062, 074,
066, 170, 173, 373
Motorola – 062, 049
MTC – 014, 254, 106, 132, 172
Multitech – 014, 086, 254, 106, 132, 172, 367
NEC – 081, 052, 055, 118, 007, 060, 070, 071, 120,
238, 243, 291, 374, 375
Nikko – 051
Noblex – 254
Olympus – 049
Optimus – 062, 051, 052, 055, 118, 176
Orion – 016, 198, 013, 022, 065, 066, 067, 322,
326, 327, 328, 329, 330
Panasonic – 049, 176, 034, 099, 112, 117, 430
Penney – 049, 051, 052, 056, 068, 254
Pentax – 056, 119, 078
Philco – 049, 034, 106, 086, 132, 183
Philips (Magnavox) – 049, 095, 017, 034, 106,
086, 132, 183
Pilot – 051
Pioneer – 081, 176, 045, 078, 120, 263
Portland – 058, 345
Profitronic – 254
Proscan – 086, 041, 074, 170, 174
Protec – 086
Pulsar – 053
Quarter – 060
Quartz – 060, 090, 238, 378
Quasar – 049, 176, 034, 112
Radio Shack – 014, 051
Radix – 051
Randex – 051
RCA – 062, 049, 056, 074, 119, 120, 254, 015, 017,
037, 041, 106, 078, 132, 141, 170, 172, 173, 174
Realistic – 060, 062, 014, 049, 051, 061, 118, 034,
106, 066, 132, 238, 363
Runco – 053
Samsung – 059, 254, 021, 039, 098, 108, 111, 269,
271, 275, 276, 278
Sanky – 062, 053
Sansui – 081, 014, 055, 093, 120, 367, 379
Sanyo – 060, 061, 118, 254, 114, 238, 346, 357,
363
Scott – 057, 059, 135, 198, 255, 226, 003, 031,
033, 332, 367
Sears – 060, 014, 049, 051, 056, 061, 068, 118,
119, 035, 078, 238, 331, 363
Semp – 059
Sharp – 062, 004, 066, 075
Shintom – 086, 367
Shogun – 254
Signature 2000 – 009, 014, 037, 062, 074, 066,
170, 173, 373
Singer – 086
Sony – 047, 014, 046, 048, 049, 032, 056, 058, 060
Soundesign – 106, 132
STS – 056
Sylvania – 014, 049, 057, 095, 015, 017, 018, 034,
042, 049, 054, 065, 073, 106, 086, 132, 141, 183,
184, 322, 324, 420
Symphonic – 014, 106, 132
Tandy – 014, 060, 106, 132, 238
Tashiko – 051, 331
Tatung – 055, 007, 243
Teac – 014, 055, 007, 106, 132, 243
Technics – 049, 176, 086
Teknika – 014, 049, 051, 030, 106, 132, 331, 359
Thomas – 014, 132
Thomson – 014, 106
TMK – 222, 254, 091, 338
Toshiba – 057, 059, 226, 050,096, 033, 035, 078,
081
Totevision – 051, 254, 172, 331
Unitech – 254, 172
Vector – 059
Vector Research – 052, 031, 291
Video Concepts – 059, 075, 052, 132, 291
Videosonic – 254
Wards – 062, 014, 049, 056, 061, 074, 086, 095,
226, 254, 006, 106, 066, 132, 172, 247, 331
White Westinghouse – 292
XR-1000 – 014, 049, 086, 367
Yamaha – 052, 007, 060, 106, 132, 243, 291
Zenith – 014, 047, 053, 008, 038, 058, 120, 122,
128, 132, 435
Kenwood – 228
KLH – 134, 248, 252
LG (Goldstar) – 080, 129, 133, 135, 179, 260
Magnavox – 082, 124, 138, 143, 146
Marantz – 270
Mintek – 432
Mitsubishi – 083, 181, 185
NAD – 246
Onkyo – 085, 244
Panasonic – 084, 115, 118, 121, 124, 431
Pioneer – 085, 125, 187, 188
Proceed – 236
Samsung – 125, 192, 224, 225
Sharp – 122, 034, 076, 077, 079
Sony – 087, 040, 059, 061, 436
Sylvania – 421
Thomson – 123, 156, 237
Toshiba – 088, 082, 085, 087, 113
Yamaha – 089, 121, 124, 210
Zenith – 089, 129, 133, 135
DVD CODES
Apex Digital – 193, 227
B144 – 146
Denon – 076, 201, 203
DVD-Video – 199
ECA – 156
GE – 077, 150, 152, 156, 175
Goldstar (LG) – 129, 133, 135, 179, 260
Gradiente – 212, 234
Harmon Kardon – 256, 259
Hitachi – 117, 149
JVC – 079, 177, 179
17