1
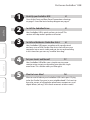
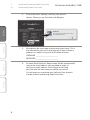
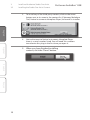
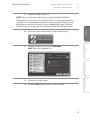
AudioBox™ USB Français Deutsch Español English Quick Start Guide ® www.presonus.com 0.1 Important Safety Instructions The exclamation point within an equilateral triangle is intended to alert the user to the presence of important operating and maintenance (servicing) instructions in this manual. The lightning flash with arrowhead symbol within an equilateral triangle is intended to alert the user to the presence of uninsulated “dangerous” voltage within the product’s enclosure that may be of sufficient magnitude to constitute a risk of electric shock to humans. CAUTION: TO REDUCE THE RISK OF ELECTRIC SHOCK, DO NOT REMOVE THE COVER. NO USER-SERVICEABLE PARTS INSIDE. REFER SERVICING TO QUALIFIED PERSONNEL. CAUTION: To reduce the risk of electric shock, do not expose this appliance to rain and moisture. The apparatus shall not be exposed to dripping or splashing liquids and no object filled with liquids, such as vases, shall be placed on the apparatus. CAUTION: These service instructions are for use by qualified service personnel only. To reduce the risk of electric shock, do not perform any servicing other than that contained in the operation instructions. Repairs must be performed by qualified service personnel. 1. Read these instructions. 2. Keep these instructions. 3. Heed all warnings. 4. Follow all instructions. 5. Do not use this apparatus near water. 6. Clean only with dry a cloth. 7. Do not block any ventilation openings. Install in accordance with the manufacturer’s instructions. 8. Do not install near any heat sources, such as radiators, heat registers, stoves, or other apparatus (including amplifiers) that produce heat. 9. Do not defeat the safety purpose of the polarized or grounding-type plug. A polarized plug has two blades, with one wider than the other. A grounding-type plug has two blades and a third grounding prong. The wide blade and the third prong are provided for your safety. If the provided plug does not fit into your outlet, consult an electrician for replacement of the obsolete outlet. 10. Protect the power cord from being walked on or pinched, particularly at plugs, convenience receptacles, and the point where they exit from the apparatus. 11. Use only attachments/accessories specified by PreSonus. 12. Use only with the cart, stand, tripod, bracket, or table specified by the manufacturer or sold with this apparatus. When a cart is used, use caution when moving the cart/apparatus combination to avoid injury from tip-over. 13. Unplug this apparatus during lightning storms or when unused for long periods of time. 14. Servicing is required when the apparatus has been damaged in any way, such as if a power-supply cord or plug is damaged; or liquid has been spilled, or objects have fallen, into the apparatus; or if the apparatus has been exposed to rain or moisture, does not operate normally, or has been dropped. All PreSonus products in the USA should be serviced at the PreSonus factory in Baton Rouge, Louisiana. If your product requires a repair, contact [email protected] to arrange for a return-authorization number. Customers outside the USA should contact their local distributor. Your distributor’s contact information is available at www.presonus.com. 15. The apparatus shall be connected to a Mains power outlet with a protective grounding/earthing connection. 16. Where the Mains plug or an appliance coupler is used as the disconnect device, the disconnect device shall remain readily operable. CE This product complies with the European Union Council Directives and Standards relating to electromagnetic compatibility EMC Directive (2006/95/EC) and the Low Voltage Directive (2004/108/EC). English Español REACh This product is compliant with the European Union Directive EC1907/206 for the Registration, Evaluation, Authorization, and Restriction of chemicals (REACh) and contains none or less than 0.1% of the chemicals listed as hazardous chemicals in the REACh regulation. Deutsch RoHS This product is compliant with the EU Directive 2011/65/EU for the Restriction of the use of Certain Hazardous Substances in Electrical and Electronic Equipment. No lead (Pb), cadmium (Cd), mercury (Hg), hexavalent chromium (Cr+6), PBB or PBDE is intentionally added to this device. Any traces of impurities of these substances contained in the parts are below the RoHS specified threshold levels. WEEE This symbol on the product or its packaging indicates that this product must not be disposed of with other waste. Instead, it is your responsibility to dispose of your waste equipment by handing it over to a designated collection point for the recycling of waste electrical and electronic equipment. The separate collection and recycling of your waste equipment at the time of disposal will help conserve natural resources and ensure that it is recycled in a manner that protects human health and the environment. For more information about where you can drop off your waste equipment for recycling, please contact your local city recycling office or the dealer from whom you purchased the product. Français EU Directives on the Protection of the Environment and Other Euro Stuff PreSonus AudioBox™ USB English Hook Up your AudioBox USB 2 Install the AudioBox Driver 3 Install and Authorize Studio One Artist 4 Set your Levels and Record! 11 5 Want to Learn More? Español 1 2 Consult the Front and Rear Panel Connections drawings on page 2-3 and the basic hookup diagram on page 4. 5 Your AudioBox USB is quick and easy to install. This section will help make it quicker and easier! 6 Your AudioBox USB comes complete with a professional and easy-to-use DAW, Studio One Artist, that will turn your computer into a music studio and get you up and recording in less time than you can say “number one song.” Deutsch Your AudioBox USB offers you a simple way to create monitor mixes to get you recording your next hit single even faster. This section walks you through it. 16 Français Want to read all about your AudioBox USB’s tech specs? Dying to be the Studio One guru in your neighborhood? Can’t wait to learn the secrets of microphone placement, compressors, and digital effects (oh my!)? Visit these resources to learn more!! Quick Start Guide English Introduction A Quick Note About This Quick Start Guide: This Quick Start Guide is written to help you get acquainted with your AudioBox USB. Complete information is in the Owner’s Manual located on your AudioBox Driver disc. We suggest that you use the Owner’s Manual to familiarize yourself with the features, applications, and correct connection procedures for your AudioBox before trying to connect it to your computer. This will help you avoid problems during installation and setup. Throughout the Owner’s Manual you will find Power User tips. These tips provide tricks to help you become a seasoned pro with your AudioBox. In addition to the Power User tips, you will find an assortment of audio tutorials at the back of the User Manual. These tutorials cover everything from microphone placement to equalizer and compression suggestions and are included to help you get the most from your AudioBox USB and Studio One Artist software. 1 Français We encourage you to contact us with questions or comments regarding this product. You can reach us by email at support@ presonus.com or call us at 1-225-216-7887 between 9 a.m. and 5 p.m. Central Time (GMT 05:00). PreSonus Audio Electronics is committed to constant product improvement, and we value your suggestions highly. We believe the best way to achieve our goal of constant product improvement is by listening to the real experts: our valued customers. We appreciate the support you have shown us through the purchase of this product and are confident that you will enjoy your AudioBox USB! Deutsch Español Thank you for purchasing the PreSonus AudioBox™ USB. PreSonus Audio Electronics has designed the AudioBox utilizing high-grade components to ensure optimum performance that will last a lifetime. Loaded with 2 Class A microphone preamplifiers; a built-in 2x2 USB recording and playback engine; zero-latency analog monitoring; MIDI I/O; and more, AudioBox USB breaks new boundaries for music performance and production. All you need is a computer with a USB connection, a few microphones and cables, speakers, and your instruments, and you are ready to record in the studio or in front of a live audience! 1 1.1 Hook Up your AudioBox USB Front Panel Connections 1.0 Hook Up your AudioBox USB 1.1 Front Panel Connections English Español Deutsch Microphone / Instrument Preamps. Each channel of the AudioBox USB has a microphone preamp and an instrument preamp. The combo connector lets you use either ¼” phone or XLR connectors in the same jack. Use the ¼” jacks to connect guitars or other unamplified instruments. Use the XLR jacks to connect your favorite microphone. 48V Button. This button activates phantom power for both microphone preamps. Français Input Trim Controls. These knobs adjust the input gain level for their respective inputs. 2 PreSonus AudioBox™ USB Phones Level. This knob controls the output level for the headphone output on the back of the unit. Clip Indicators. Both channels feature a clip LED next to the trim control. The red clip indicator LED will illuminate when the channel’s input signal reaches 0 dBFS. Power LED. This LED indicates bus power. It will illuminate red when the AudioBox USB is properly powered. Main Level. This knob controls the output level for the main outputs on the back of the unit. Mixer Control. This knob crossfades between the analog input signal of preamps and the playback signal from your computer. If the knob is at 12 o’clock the input and playback systems will be equally balanced. Quick Start Guide 1 1.2 Rear Panel Connections ¼” Stereo Headphone Output. This is where you connect your headphones. The output level is controlled by the Phones volume knob on the front of the unit. Deutsch Main Outputs. This is where you connect your studio monitors or monitoring system. The output level of the main outputs is controlled by the Main volume knob on the front of the unit. Français USB Connection. This is where you connect the USB cable from your AudioBox USB to your computer. The AudioBox is completely buspowered from this connection. MIDI In and Out Ports. The MIDI inputs and outputs allow connection and/ or communication with external MIDI equipment for sequencing and other MIDI functions. Español English 2.2 Hook Up your AudioBox USB Rear Panel Connections 3 1 1.3 PreSonus AudioBox™ USB Hook Up your AudioBox USB Basic Hookup Diagram 1.3 Basic Hookup Diagram AUDIOBOX USB 48V Power Clip -10 0 1 60 +30 11 Clip English 1 Mic•Instrument 2 -10 0 60 +30 INPUTS -80 PLAYBACK 10 Español headphones guitar Deutsch Designed by PreSonus in vocal mic IN OUT L the USA. Manufactured in PRC. R USB MIDI PHONES Français computer midi monitors Consult your Owner’s Manual (on disc) for more information on your AudioBox USB’s connections and controls. 4 Quick Start Guide 2.0 Install the AudioBox Driver Installing the Driver (Windows Only) 2 2.1 Install the AudioBox Driver Your AudioBox USB is a rugged USB 1.1 audio interface with zero-latency analog monitoring control and professional audio tools. Installing the Driver (Windows® Only) For step-by-step instructions on installing the AudioBox USB driver and control panel on your Windows system, please see Section 3 in your AudioBox Owner’s Manual. a it) -A t / XP E lec Before you start the installation, quit all applications, and connect your AudioBox USB to an available USB port on your computer. Windows Vista Users: If you see any Windows Security alerts, click “Install this driver software anyway.” After you have followed the onscreen instructions, you will be alerted that the installer has successfully finished and it will prompt you to reboot your computer. Deutsch OSX (Win / Vist 7 64-b s & al 32 dow s vers Win dow Uni nu sA udio Español After inserting the Installation CD into your disc drive, run the AudioBox installer. It will take you through each step of the installation process. Français 2.1 English Mac® Users: The AudioBox USB is a class-compliant Core Audio device. No installation is necessary on Mac computers. Simply connect your AudioBox USB to your Mac to begin using it. Click “Finish” (PC) to automatically restart your computer. 5 3 Install and Authorize Studio One Artist 3.0 PreSonus AudioBox™ USB Install and Authorize Studio One Artist For complete information on using, installing and authorizing Studio One see Section 4 in your AudioBox USB Owner’s Manual or Studio One User Manual (located in the Studio One Help menu). English Your AudioBox USB comes with Studio One Artist recording and production software. Studio One Artist provides you with all of the tools necessary to capture and mix a great performance. As a valued PreSonus customer, you are also eligible for a discount upgrade to Studio One Producer or Studio One Professional. For more details on the Studio One upgrade program for PreSonus customers, please visit http://studioone.presonus.com/. If you use another DAW and do not wish to install Studio One Artist, please skip to Section 4. Español 1. Insert your Studio One Artist installation DVD into your computer’s DVD drive. 2. Windows: The Studio One Installer will launch automatically, follow the onscreen instructions. nu sA udi o Deutsch Français 6 E lec -A t Mac: Drag the Studio One application icon over the “Applications” folder. Make sure to run Studio One from the Applications folder on your hard drive. Quick Start Guide 3 3.1 Authorizing Studio One Artist Make sure that your computer is connected to the I nternet. (For instructions on authorizing Studio One without an Internet connection, please consult Section 4.1 of the AudioBox USB manual. 2. Launch the Studio One Artist program by double-clicking on its icon on your desktop or in your applications folder. The Activate Studio One menu will appear. 3. Click the Create a New Account link. Deutsch Español English 1. Français 3.1 Install and Authorize Studio One Artist Authorizing Studio One Artist 7 3 3.1 Install and Authorize Studio One Artist Authorizing Studio One Artist PreSonus AudioBox™ USB Fill out the form, making sure that your email is correct. When you are finished, click Register. 5. Write down the username and password you chose. This is the information you will use to register all your PreSonus products as well as to log into the PreSonus forum. English 4. Español USERNAME _______________________ PASSWORD _______________________ 6. Deutsch An email from PreSonus Registration will be automatically sent to the email address you provided in order to verify your email address. Don’t forget to Activate your account the next time you check your email! It is not necessary to activate your PreSonus User Account in order to finish authorizing Studio One Artist. Français 8 Quick Start Guide 3 3.2 Enter the username and password you just created and the product key from your Studio One Artist installation disc. Click on the Activate button to finish the activation process. Studio One Artist comes with many audio loops and instruments that are organized into Soundsets, as well as demo songs and third-party plug-in instruments. The first time you launch Studio One, you will be asked to install the content automatically; however, any part of the content package can be installed at any time by opening the Studio One 2.0 menu and selecting “Studio One Installation...” in Studio One Artist. 1. By default, each package will be selected for installation. Make sure your Studio One DVD is inserted in your computer and select to what location on your computer you’d like the content to save. 2. Click Install Packets. Deutsch Installing the Studio One Artist Content Français 3.2 Español English 7. Install and Authorize Studio One Artist Installing the Studio One Artist Content 9 3 3.2 Install and Authorize Studio One Artist Installing the Studio One Artist Content PreSonus AudioBox™ USB To install any of the third-party content, click on the arrow button next to its name in the content list (Celemony Melodyne Trial, Native Instruments Komplete Player) to launch its installer. 4. Notice that next to Native Instruments Komplete Player there is a serial number listed. You will need this numbers to authorize this plug-in the first time you open it. English 3. Español 5. When you have finished installing content, click the “Done” button. Deutsch Français 10 Quick Start Guide 4 Set your Levels and Record! Before you begin, there are a few general rules of thumb that we recommend you follow: •• A lways turn both the Main and Phones knobs on the front panel down before making connections. English •• Before plugging or unplugging a microphone or engaging phantom power, make sure the trim level has been turned all the way down for that channel. Español •• Do not allow your inputs to clip. Watch the clip LEDs; when these LEDs turn red, they are indicating that the analog-to-digital converters are being overdriven. Overdriving the converters will cause digital distortion, which sounds terrible and cannot be undone. •• Your studio equipment should be powered on in the following order: A. S ound sources (guitars, microphones, etc.) connected to the AudioBox inputs B. AudioBox USB and computer Deutsch C. Power amplifiers or powered monitors When it’s time to power down, your system should be turned off in the reverse order. Now that you know what not to do, let’s get some audio going! Français 4.0 Set your Levels and Record! 11 4 4.1 Set your Levels and Record! Creating a Monitor Mix 4.1 PreSonus AudioBox™ USB Creating a Monitor Mix Turn all the knobs on your AudioBox all the way counter-clockwise. 2. Connect your AudioBox USB to your computer and make sure that the power LED is illuminated. 3. Grab a microphone and a mic cable and plug them into the AudioBox’s Channel 1 mic input. 4. Connect the Main Outputs of your AudioBox to your power amplifier or powered monitors using balanced cables. 5. If you’re using passive speakers, connect them to your power amplifier using speaker cable. 6. If your microphone requires phantom power, press the 48V button on the front panel. 7. Turn on your amplifier or powered monitors. 8. Connect a pair of headphones to your AudioBox USB. English 1. Español Deutsch Français 12 Quick Start Guide 9. Set your Levels and Record! Creating a Monitor Mix 4 4.1 Launch Studio One Artist. NOTE: The rest of this section describes using your AudioBox USB with Studio One Artist. However, most of these steps can be generally applied to any DAW. Consult the documentation that came with your DAW for specific application instructions. Section 3 of your AudioBox USB Owner’s Manual includes setup instructions for some of the most popular DAW applications. English 10. From the Start page, select “Create a new Song.” Deutsch Español 11. T o begin a new Song, select “AudioBox USB” from the Templates list. Français 12. Give your Song a name. 13. Click the OK button when you are finished. 13 4 4.1 Set your Levels and Record! Creating a Monitor Mix PreSonus AudioBox™ USB 14. Turn the AudioBox Phones volume control to the 12 o‘clock position. English 15. Click on the MIX button to open the Console in Studio One Español 16. Speak into the microphone while watching the meter on Channel 1 in Studio One and slowly turning the AudioBox Input 1 Trim knob clockwise. Deutsch Français 14 Quick Start Guide Set your Levels and Record! Creating a Monitor Mix 4 4.1 English 17. Turn the Mixer knob on the front panel of your AudioBox to the 12 o’clock position. This will allow you to hear both your inputs and the playback from the computer. You are now ready to record. Español 18. Click the “Record“ button in Studio One Artist and begin recording your first masterpiece! Français Deutsch 19. To playback your recording, click on the “Return to Zero” button in the transport in Studio One Artist and then click on the “Play” button. 15 5 Want to Learn More? PreSonus AudioBox™ USB 5.0 Want to Learn More? AudioBox USB Information Complete information about your AudioBox USB can be found in the Owner’s Manual. Your Owner’s Manual is located on the AudioBox installation disk. The AudioBox USB Owner’s Manual contains complete operating instructions for your interface. English Other useful information in the AudioBox USB User Manual: Español •• Third-party DAW setup instructions •• Microphone-placement technique tutorial •• Dynamics-processing tutorial •• Equalizers tutorial •• Reverb and delay tutorial •• Troubleshooting guide Studio One Artist Information Deutsch The Studio One Artist Advanced Quick Start Guide can be found in your AudioBox USB User Manual. Complete information about Studio One can be found in the Studio One User Guide. The Studio One User Guide is installed on your computer with Studio One Artist and can be accessed from the Help menu in Studio One. Many tutorial videos about Studio One can be found at studioone.presonus.com. Tech Support and Online Resources Visit www.presonus.com and select Knowledge Base from the Support tab for answers to many commonly asked questions. Français If all else fails… In the USA: Call PreSonus Technical Support at 1-225-216-7887, Monday through Friday between 9 a.m. and 5 p.m. Central Time (GMT 05:00). Outside the USA: Contact your PreSonus distributor. Anywhere in the world: Contact PreSonus Technical Support through our Web portal: http://support.presonus.com/home 16 Quick Start Guide Added bonus: PreSonus’ previously Top Secret recipe for… Jambalaya Ingredients: English 5 lbs link andouille sausage 3 lbs boneless chicken 2 lbs ground beef 3 lbs onions (yellow or purple) 2 stalks of celery 1 lb bell peppers (green or red) 1 batch green onions 3 lbs rice Tony Chachere’s Cajun Seasoning 1 bottle chicken stock concentrate (or 3 cubes chicken bullion) 1 can Rotel tomotoes with chilies, diced (regular hot) Tabasco sauce Español •• •• •• •• •• •• •• •• •• •• •• •• 1. 2. In a 16 qt. pot or larger, slice link sausage and pan-fry until brown. Add ground beef and brown. 3. 4. 5. 6. 7. 8. 9. Cook until onions are translucent. Add chicken and cook until it turns white. Add diced green onions, 1 tsp. salt, ½ gallon water and bring to a boil. Add rice and bring to a boil. Cook on high for 8 m inutes, covered, stirring every 2 minutes Cook covered on low for 10 minutes, stirring only once. Turn off and let sit for 30 minutes. Serve and enjoy! •• Do not remove from pot Add diced onions, celery, and bell peppers, 1 can Rotel Original diced tomatoes w/chilies, 3 oz concentrate chicken stock, ½ teaspoon of Cajun seasoning, 1 teaspoon of Tabasco hot sauce (or more…maybe lots more). Français Serves 20 Deutsch Cooking Instructions: © 2012 PreSonus Audio Electronics, Inc. All Rights Reserved. AudioBox, DigiMax, FireStudio, Nimbit, PreSonus, QMix, StudioLive, and XMAX are trademarks or registered trademarks of PreSonus Audio Electronics, Inc. Capture, Impact, Mixverb Presence, RedLightDist, SampleOne, Studio One, and Tricomp are trademarks or registered trademarks of PreSonus Software Ltd. Mac, Mac OS, and Macintosh are registered trademarks of Apple, Inc., in the U.S. and other countries. Windows is a registered trademark of Microsoft, Inc., in the U.S. and other countries. Other product names mentioned herein may be trademarks of their respective companies. All specifications subject to change without notice... except the recipe, which is a classic. 17 AudioBox™ USB Quick Start Guide EMC Statement: English Español NOTE: This equipment has been tested and found to comply with the limits for a Class B digital device, pursuant to part 15 of the FCC Rules. These limits are designed to provide reasonable protection against harmful interference in a residential installation. This equipment generates, uses, and can radiate radio frequency energy and, if not installed and used in accordance with the instructions, may cause harmful interference to radio communications. However, there is no guarantee that interference will not occur in a particular installation. If this equipment does cause harmful interference to radio or television reception, which can be determined by turning the equipment off and on, the user is encouraged to try to correct the interference by one or more of the following measures: • Reorient or relocate the receiving antenna. • Increase the separation between the equipment and the receiver. • Connect the equipment into an outlet on a circuit different from that to which the receiver is connected. • Consult the dealer or an experienced radio/TV technician for help. Deutsch CAUTION: Changes or modifications to this device not expressly approved by PreSonus Audio Electronics could void the user’s authority to operate the equipment under FCC rules. This apparatus does not exceed the Class A/Class B (whichever is applicable) limits for radio noise emissions from digital apparatus as set out in the radio interference regulations of the Canadian Department of Communications. Français ATTENTION — Le présent appareil numérique n’émet pas de bruits radioélectriques dépassant les limites applicables aux appareils numériques de classe A/de classe B (selon le cas) prescrites dans le règlement sur le brouillage radioélectrique édicté par le ministère des communications du Canada. 7257 Florida Boulevard • Baton Rouge, ® Louisiana 70806 USA • 1-225-216-7887 www.presonus.com Part# 825-AB0003-C