1
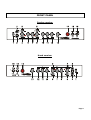
USER'S MANUAL
Hand made, 50 watts,
Tube Guitar Amplifier
Models:
AD 5300 - head
AD 5301 - combo
Congratulations on purchasing a tube guitar amplifier head and joining
Laboga Family. Thank you for your trust. The Alligator belongs to the world’s top
tube constructions. It is designed with 35-years of experience in creating and
servicing top quality equipment. Wide correction possibilities of the amplifier will
enable each individual to find their own sound and will ensure long hours of creative
entertainment. We hope the amplifier will satisfy all of your needs.
Enjoy playing!
IMPORTANT!
Before using the amplifier for the first time, read the instructions concerning safety
measures carefully – they are on page 6 and 7. Keep these instructions for the
future.
Page 2
TABLE OF CONTENTS:
AMPLIFIER SPECIFICATION........................................................................................4
AMPLIFIER FEATURES.............................................................................................5
WHAT IS IN THE SET...............................................................................................5
SAFETY PRECAUTIONS.............................................................................................6
TECHNICAL HINTS, PROPER USAGE.............................................................................7
FRONT PANEL.......................................................................................................8
REAR PANEL.......................................................................................................11
CHANGING TUBES IN THE AMPLIFIER.........................................................................12
HOW TO USE THE AMPLIFIER IN ORDER TO PROLONG TUBE'S LIFE-SPAN.............................13
TECHNICAL DATA.................................................................................................14
TROUBLESHOOTING..............................................................................................15
CONNECTIONS.....................................................................................................17
Page 3
AMPLIFIER SPECIFICATION
Caiman 5300 is a full tube head amplifier, hand crafted by qualified craftsman. This amp
weighs not even 15 kilos and still has 50 Watts of power. The design of the amp, solves the
permanent problem of every musician - the handling. It is not only light weigh tube amp, but also
it’s all integrated in a very compact housing.
With its soft and compressed sound, it is the ideal amp for all ranges from Blues to Metal,
offering the comfort a musician is used to and expects from an amp. In preamplifier the classic
sound meets the modern. The EL84M tubes, used in power stage, are very dynamic, warm and,
which is more important, very reliable.
The Caiman has two switchable channels: clean and overdrive. Clean channel additionally
allows to reach a little crunch (especially with turning Master Volume off). With overdrive channel
though, you get tones from crunch to high gain. This channel also has two independent gain knobs,
switchable using footswitch. For instance: you can then set the Gain 1 at lower values and the Gain
2 at higher. So, when you want to play a solo, only thing you need to do, is to switch Gain 2 using
footswitch, like you usually do, when you change the channels. This will rapidly increase the amount
of gain.
Preamplifier was designed to increase functionality of equalizer section. The regulation depth
of each band allows to set many different tone types, which makes the Caiman extremely versatile
amp.
Switching between channels is possible using front panel switch or footswitch, which is
included in the set. Both channels have bright switches.
The Caiman has 4, 8 and 16 ohm outputs, so it’s possible to connect every type of cabinet,
but we have designed a special cabinet for it – 212 Caiman, which is compact and light weight.
The combo version 5301 uses legendary Celestion G12T-75 internal speaker.
Page 4
AMPLIFIER FEATURES
- power: 50W,
- tubes used: 4 × EL84, 2 × 12AX7,
- speaker (combo only): Celestion G12T-75,
- two channels: clean and distorted,
- volume control: clean channel, gain and volume controls – distorted channel,
- two separately gain knobs controlled with a footswitch: Gain1 and Gain2,
- the same tone control for both channels,
- footswitch: changes channels and switches between Gain 1 and Gain 2,
- channel switching on relays,
- separate Bright switches for both channels,
- series effects loop,
- speaker outputs: 4 Ω, 8 Ω, 16 Ω.
WHAT IS IN THE SET
- Footswitch Channel / Gain,
- Cable connecting footswitch and amplifier (“stereo”),
- Power supply cable,
- Owner’s manual,
- Warranty.
Page 5
SAFETY PRECAUTIONS
ATTENTION: To reduce the risk of electrical shock, do not
remove the back cover of the amplifier. Inside parts can be
repaired only by qualified service personnel.
WARNING: To prevent the risk of electrical shock do not
expose this appliance to moisture, rain or any liquid.
This symbol is intended to alert the
user to the presence of dangerous
voltage and constitutes a risk of
electrical shock.
This symbol alerts the user to the
presence of important operating
and maintenance instructions.
Be cautious while transporting the cabinet.
ATTENTION !!!
•
Amplifier produces high volume levels. Staying in places of high volume levels could cause
permanent hearing loss.
•
To avoid electrical shock never open the amplifier’s cover. In case of failure, refer servicing to
qualified personnel.
•
Always use the highest quality signal cables (we recommend Laboga cable “Way of sound”)
and volume signal cables. Using improper speaker cables could cause damage to the amplifier.
•
Do not use the amplifier in humid and dusty places.
•
Do not operate the amplifier through the unearthed socket.
•
Leave the amplifier and bias settings to qualified personnel.
•
Tubes could get heated intensively, do not touch it or it could cause burning.
•
Do not leave the apparatus in the vicinity of children.
•
Unplug the amplifier before tube change, unplug the cord and wait for the tubes to cool down.
•
Before changing the fuse, switch the amplifier off and unplug the cord. Also, make sure you
use the fuse of the proper rate.
!! Keep this instruction for the future use !!
Page 6
TECHNICAL HINTS, PROPER USAGE
•
avoid using the amplifier in humid and dusty places
•
do not put it in an unstable place
•
do not install the apparatus near any heat sources
•
do not use the amplifier before connecting it to the correct cabinet
•
after switching on, wait about 30-60 seconds until tubes get heated
•
switch the amplifier off before any cable change
•
in order to ensure proper air circulation, do not block any of the ventilation openings
•
never put any liquid containers near the amplifier
•
in case of any objects or liquid access inside the amplifier, urgently switch the apparatus off
and unplug the power supply cord
•
protect the amplifier from any strikes
•
before transporting, wait about 10 minutes for the tubes to cool down
•
always use a dry or slightly wet cloth to wipe all dust. Never use solvents to clean
•
use additional devices and accessories according to producer’s recommendations
•
during storms or when left unused for a long period of time, power supply cord should be
unplugged from the outlet
Crossed-out wheeled bin symbol implies that in EU countries, after use, product must be
discarded separately in a special, adjusted place. It concerns both the apparatus itself as
well as other accessories bearing this symbol. Do not discard such products together with
unsorted communal wastes.
In EU countries there are special systems of collecting used electrical products. Transporting used,
electrical products in certain, adjusted places, prevents their being harmful to the environment and
people’s health.
„LABOGA” Adam Laboga
ul. Partyzantów 35/2
51-675 Wrocław, Polska
www.LabogaAmps.com
We reserve the right to introduce any technical changes and the changes to this amplifier’s image. This
instruction is actual once it has been printed.
ALL RIGHTS RESERVED © 2010 LABOGA
Page 7
FRONT PANEL
Combo version:
Head version:
Page 8
1. Channel selection
Switch to change channels of the
amplifier. It works only when Jack is
unplugged from the Footswitch socket.
In position “up” the clean channel is
on, whereas, in position “down” the
distorted channel is on.
2. Footswitch
Socket
to
connect
a
footswitch, with
controlled
Channel
switching
and
Gain selecting.
TRS Jack socket
(T – tip:1, R – ring: 2, S – sleeve: 3),
where tip changes channels, ring changes masters, sleeve is ground. It
uses “stereo” cable, which can be also
replaced by “mono” cable, however
then, the Gain switch will not be active
and,
in
the
amplifier,
only
potentiometer Gain 2 will be active.
3. Input
Input jack socket to connect to the
guitar.
4. Clean Volume
Volume of the clean channel.
HINT: At a low setting of this
potentiometer, you get a clean sound.
When
you
boost
the
clean
potentiometer, you get sound that is
more saturated until some crunch is
achieved. When you turn the Master
down and boost the Clean, you obtain
more crunch. So you can get crunch on
both channels, which, at the same
time, differ in character and dynamics.
5. Bright
High frequency boost for the clean
channel.
6. Gain 1
Gain control for the distorted channel.
HINT: With a little value you can
obtain crunch effect or overdrive. By
adding gain, distortion is added until
reading high gain. For guitars with
Humbucker pick-ups and high output
signal, it is possible, that turning the
knob to the right, does not cause more
distortion. It only gives more noise of
the amplifier. It is designed that way,
because each guitar has a different
output signal level, and the value of
gain was set up that way, that in the
case of guitars with less signal, it is
also possible to get more distortion.
7. Gain 2
Second gain control for the distorted
channel which is only available when
the footswitch is used.
This is a duplicate of Gain 1. They
both can be set independently and
selected with the use of a footswitch.
HINT: This potentiometer can be used
to boost distortion, e.g. while soloing.
To achieve such effect, set Gain 2 knob
in such a way that after switching from
Gain 1, the more distortion is heard.
8. Drive Volume
Distorted channel volume. Proportions
between clean and distorted channel
can be set by this potentiometer.
9. Bright
High frequency boost for distorted
channel. Apart from high frequency
boost,
the
switch
also
changes
distortion character. It is possible that
using certain controls of equalizer or
gain, high frequency boost will be less
noticeable.
Page 9
10. Bass
Adjusts the low-frequency tone for
both channels.
11. Middle
Adjusts the middle-frequency tone for
both channels.
12. Treble
Adjusts the high-frequency tone for
both channels.
HINT: Set all the potentiometers in a
12.00 o’clock position, then adjust
them individually to get the best
sound.
Remember,
that
the
frequencies of each controller are
related to each other, the change of
one influences the others.
13. Master Volume
Master volume control.
HINT: Besides controlling the volume,
it influences saturation of the clean
channel. Therefore, when turned down
to a lower level, a crunch sound can be
obtained on the clean channel.
14. Lamp indicator
When glowing, the amplifier in on.
HINT: There is a 12V bulb under the
cover, which can be unscrewed without
taking the chassis out. If the light
needs to be replaced, turn the amplifier
off, unscrew the metal nut, gently push
the bulb in and turn left at the same
time until the bulb comes free from the
holder.
15. Stand By
In position “up” the amplifier is ready
to work. Changing it to positions “ON”
sends anode voltage to the tubes – in
these positions the amplifier plays.
HINT: You should keep the switch in
the “up” position if there are long
breaks between playing. You should
also wait about 1 min. between
switching the Standby to the “up”
position and turning the amplifier off.
16. Power
This switch turns the amplifier on and
off. The amplifier is off when the switch
is in position “up” – then the lamp - 24
is not illuminated.
The amplifier is on when the switch is
in position “ON” – the switch is
illuminated in red. In this position the
amplifier does not play, but tubes are
hot, and you can change channels.
HINT: Before turning the amplifier on,
always make sure that the Standby
switch is in position “up” – it will
extend the life span of the tubes. The
amplifier should be turned on in the
following way: first, turn on the Power
switch and wait about 1 minute. Next,
you can turn the Standby on.
Turning off the amplifier works the
other way around. First, turn the
Standby on, then wait about 1 minute,
afterward you can turn the Power off.
Page 10
REAR PANEL
Combo:
Head:
1. Main fuse integrated with power
supply socket
Ma
Sp
are
fus
e
in f
u
se
Slo Blo fuse T1.25A
is in the case,
integrated
with
power
supply
socket. There is
one
spare
fuse
inside.
HINT: Take out the power cord during
a storm or when unused for a longer
period of time.
HINT: While changing the fuse , make
sure
the blades of the fuse are
properly installed.
ATTENTION!
Before
you
change the fuse, always unplug
the amplifier from the power
outlet and wait for at least one
minute.
ATTENTION! Always change
the fuse for one of the same
value.
2. Effects loop socket – “Return”
Inserting a plug into this socket brakes
internal connection in the amplifier,
which bypasses the effects loop.
HINT: This input can also be used as
line input, therefore the amplifier
serves as a power amp.
Page 11
3. Effects loop socket - “Send”
Output signal socket taken from the
preamplifier. Nominal signal output
level is 0dBV.
ATTENTION! Do not connect
the cabinets with different
impedance at the same time.
ATTENTION! Before turning
the amplifier on, make sure the
cabinet is connected to the
appropriate
power
output
socket.
HINT: This output always has signal,
even if the loop is not used.
Consequently, the outlet can be used
to connect a guitar tuner permanently
– it does not influence the sound.
4. Power output socket for a 4 ohm
impedance cabinet.
5. Power output socket for an 8 ohm
impedance cabinet.
6. Power output socket for a 16 ohm
impedance cabinet.
5301 – connecting to an external
cabinet
Thick speaker cable connects amplifier’s
output with internal speaker. Its special
length allows to connect the internal
speaker to the external cabinet and use
them both at the same time
– see page 17.
CHANGING TUBES IN THE AMPLIFIER
Positions of tubes in the amplifier:
V1
V2
V3 ÷ V6
MODEL
FUNCTION
12AX7
12AX7
EL84
first preamp tube
second preamp tube
power tubes
Page 12
Hints concerning tubes
Leave tube change and bias setting for qualified personnel. Tubes could get heated
intensively. If you touch them, you can get burnt. That is why, before you change tubes, turn
amplifier off, take the plug out and wait for them to cool down.
Before you change tubes, pay attention if their “feet” are straight because the feet have to be
positioned in a certain way.
The first symptom that tubes should be replaced is worsening the tone of the amplifier. The
sound gets flat and the dynamics are worse. There are certain signs that imply tubes should be
changed: red outer metal cover, which is normally gray, flashes inside the tube, or other unusual
signs.
Use only new tubes. Power tubes should all be changed at the same time for a quartet of
EL84 tubes. It is a pentode, which is characterized by having a longer life span and is more
mechanically reliable than EL34 for example. A quartet of power tubes, like any other tubes, can be
purchased in a Laboga service.
It is recommended to use V1 and V2 with low noise and/or “low microphonics”. Because the
amplifier has high sensitivity, hums may appear when all the knobs are set “to the right” position
and the amplifier is on the distorted channel.
HOW TO USE THE AMPLIFIER IN ORDER TO PROLONG TUBES’ LIFE-SPAN
1). The amplifier should always be switched on in the following way: first turn Power on and wait
for 1 minute. Then, you can turn the Standby. Switching the amplifier off is the other way
around – first turn Standby off, then wait 1 minute, then you can turn power off.
2). Always use a matched quartet of power tubes, from Laboga or renowned producers.
3). Before transporting the amplifier, wait for the amplifier, especially for the tubes, to cool down.
4). When you don’t use the amplifier, it is advisable to keep Standby to position “0”
5). An excessive amount of dust on the tubes may decrease heat distribution of the tubes, which
could shorten tube's life-span. Use an original Laboga cover or hard case to prevent damage
and dust.
Page 13
TECHNICAL DATA
INPUTS:
•
•
•
Guitar input sensitivity:
Maximum signal level:
Input impedance:
-10 dBV
+4 dBV
1 MΩ
OUTPUTS:
•
•
Power output impedance:
- 4 Ω output impedance
- 8 Ω output impedance
- 16Ω output impedance
Output power: 50 W
EFFECTS LOOP:
•
•
•
•
Effects
Effects
Effects
Effects
Loop
Loop
Loop
Loop
Send output level:
Send output impedance:
Return output level:
Return output impedance:
0 dBV
100 Ω
0 dBV
470 kΩ
TUBES:
•
•
Preamp section:
Power section:
two 12AX7
four EL84M
POWER SUPLY:
• 230V AC / 50Hz – mains fuse: SloBlo T1,25A/250V
• 110V AC / 60Hz – mains fuse: SloBlo T2,5A/250V
Maximum power consumption: 190 VA
CASE:
Caiman AD5300
• Dimensions (width x depth x height): 495 x 270 x 220
• Weigth:
14,7 kg
Caiman AD5301
• Dimensions (width x depth x height): 495 x 270 x 450
• Weigth:
21,2 kg
Page 14
TROUBLESHOOTING
SYMPTOM
RECOMMENDED INTERVENTION
The amplifier doesn’t play,
LED diodes aren’t lit, control
light isn’t lit.
Check if the main fuse isn’t blown or if the power supply cord isn’t
broken (use another). If it still doesn’t help, contact Laboga service
personnel or any Laboga retailer.
There is smoke coming out of
the amplifier.
Immediately unplug the amplifier from the mains outlet and
contact authorized Laboga service personnel or any Laboga retailer.
Don’t repair it yourself.
The amplifier doesn’t play, but
LED diodes are lit.
Check if guitar cable is connected and if guitar cabinet works
properly. Then, check if guitar’s volume potentiometer, Master or
other potentiometers having influence on amplifier’s volume, aren’t
mute.
If the above mentioned hints fail, unplug the amplifier from main
outlet, wait at least 1 minute and check if anode fuse isn’t blown. If
the fuse is blown, change it for a new one, turn the amplifier on
again and observe the tubes for any unusual signs. If, after you
the change it, it blows again, contact authorized Laboga service or
any Laboga retailer.
If the fuse wasn’t blown, put guitar cable to the Return socket at
the back of the amplifier and check if you can hear the guitar:
5). If you do, check if any of preamp tubes aren’t broken by
swapping them. If there is still no result, contact authorized
Laboga service or any Laboga retailer.
6). If you can’t hear the guitar, contact authorized Laboga
service or any Laboga retailer.
Clean channel works, but the
distorted channel is mute.
Check if Lead Gain or Lead Volume isn’t mute. If not, unplug the
amplifier from the mains electric supply, wait for the tubes to cool
down, unscrew rear grate and change V2. If there are no results,
contact authorized Laboga service or any Laboga retailer.
The amplifier makes hum
even after turning Master
down.
Check if the outer metal cover in any of the power tubes is glowing
red (it is usually gray). If yes, immediately turn the amplifier off
and contact authorized Laboga service or any Laboga retailer.
Page 15
While playing there are weird
sounds – crackle, or the
sounds vanish completely
Check if the power cable is inserted properly and if it isn’t falling out
of the socket. Additionally, check the quality of the speaker’s cable
– if it isn’t damaged and if the cable has the proper diameter.
The amplifier gives
uncontrollable weird, loud
sounds even if guitar is
unplugged.
Observe if it happens on both channels (this information can be
crucial while consulting the service department). Unplug the guitar
and switch to the distorted channel – watch if sounds cease when
you mute Lead Gain:
Footswitch won’t change
channels
•
If yes, unplug the amplifier from the main power supply, wait
for the tubes to cool down, unscrew the rear grate and change
V1 for any other tube. If the problem disappears, keep such
tube configuration.
•
If sounds don’t fade, turn the Lead Volume down and check if
sounds disappear. If yes, unplug the amplifier from the mains
electric power, wait for the tubes to cool down, unscrew the rear
grate and change V2 for V3 or V4. If it doesn’t, turn the Master
down. It could happen that sounds won’t stop even after turning
the Master down - then contact authorized Laboga service and
tell about your observations
Unplug the cable from the Footswitch and try to change channels;
•
If channels can be changed, then plug in another footswitch
cable to the amplifier. It should be a “stereo” cable. You can
also plug in a “mono” cable, but the Master in the footswitch will
not be active and only Master 2 will work.
If that doesn’t help, contact authorized Laboga service or any
Laboga retailer.
Page 16
CONNECTIONS
Page 17
Page 18
Page 19
ALL RIGHTS RESERVED © 2010 LABOGA
Page 20