1
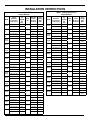
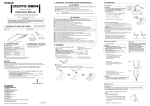
“TO BE REMOVED FOR USE BY THE OCCUPANT.”
Jason International, Inc.
49-1013-100
Date 02/11
8328 MacArthur Drive
North Little Rock, AR 72118
www.jasoninternational.com
Owner’s Manual
Integrity Whirlpool Baths
®
INSTALLATION, OPERATION, AND MAINTENANCE
If the carton shows sign of damage, inspect
the product before accepting and describe the
problem on the Bill of Lading.
INSPECTION
Inspect the unit prior to installation. In the event of a
problem, DO NOT install the unit. All components are
factory assembled to the bath and the unit is water tested
and inspected prior to leaving Jason International, Inc.
If the carton shows sign of damage, inspect the product before
accepting and describe the problem on the Bill of Lading.
Note: Transportation and insurance from Jason’s factory are
the buyer’s responsibility.
Damage sustained in transit is the responsibility of
the carrier. If damage is discovered, the carrier must
be immediately notified in writing with a request for a
representative to inspect the unit. Failure of the carrier to
respond should be reported to the seller and carrier. Always
file a freight claim promptly.
The installer is responsible for insuring that the unit is free
from defects or shipping damage. In the event of a problem,
DO NOT install the unit. Jason International is not responsible
for damage that might have been avoided by inspection or
testing prior to installation.
Damage to the unit during installation will not be covered
by warranty and is the responsibility of the installer.
ALL WARRANTY CLAIMS ON ACRYLIC SURFACE
DAMAGE MUST BE MADE PRIOR TO INSTALLATION.
Inspect plumbing and bath surface for missing or damaged
components. Alert your dealer of any discrepancies.
To protect the unit from damage keep the bath in the carton
until ready for installation.
EQUIPMENT ACCESS
In accordance with Building Codes, service access to all
therapy bath equipment, controls and electrical connections
must be provided during installation (see Table 1 –
Specifications for minimum access size). Insufficient access
will hinder repair and maintenance. Warranty service will not
cover costs of providing equipment access.
Jason offers an optional removable lateral skirt for all
rectangular baths. The skirts are available in matching acrylic
colors and provide convenient access to bath equipment as
well as an excellent finished appearance.
CAUTION: DO NOT LIFT OR HANDLE THE BATH BY ITS PLUMBING.
OWNER’S RECORD
Place serial number card with
product configuration in this box
Dealer:
Date Purchased:
Date Installed:
Installer:
Jason International, Inc. • 501.771.4477 Page 1 of 9
Customer Service : 800.255.5766
INSTALLATION INSTRUCTIONS
TABLE 1 - SPECIFICATIONS (cont.)
Integrity Whirlpool
TABLE 1 - SPECIFICATIONS
Integrity Whirlpool
60 x 60 x 20.5
Operating
Capacity
Gal
Liter
53
152 x 152 x 52
201
B3060
TL
60 x 30 x 20.5
29
152 x 76 x 52
109
B3260
TL
60 x 32 x 20.5
32
152 x 81 x 52
121
B3260
SL/SR
60 x 32 x 20.5
32
152 x 81 x 52
121
60 x 36 x 20.5
37
Model
A6060
B3660
B3660
SL/SR
B3666
B3672
B3672
SL/SR
B4260
B4260
SL/SR
B4272
B4272
SL/SR
C6060
D3260
J4260
J4266
J4272
L4872
Overall
Dimension
L x W x H (in.)
L x W x H (cm.)
152 x 91 x 52
140
60 x 36 x 20.5
37
152 x 91 x 52
140
66 x 36 x 20.5
39
168 x 91 x 52
147
72 x 36 x 20.5
45
183 x 91 x 52
170
72 x 36 x 20.5
45
183 x 91 x 52
170
60 x 42 x 20.5
44
152 x 107 x 52
166
60 x 42 x 20.5
44
152 x 107 x 52
166
72 x 42 x 20.5
49
183 x 107 x 52
185
72 x 42 x 20.5
49
183 x 107 x 52
185
60 x 60 x 20.5
54
152 x 152 x 52
204
60 x 32 x 20.5
36
152 x 81 x 52
136
60 x 42 x 20.5
43
152 x 107 x 52
162
66 x 42 x 20.5
46
168 x 107 x 52
174
72 x 42 x 20.5
49
183 x 107 x 52
185
72 x 48 x 20.5
56
183 x 122 x 52
Pump
HP
1
1
1
1
1
1
1
1
1
1
1
1
1
1
1
1
1
1
1
Min. Size
Access
W x H (in.)
W x H (cm)
Floor
Loading
lbs/ft2
kg/M2
36 x 17
42.4
91 x 43
207
36 x 17
48.6
91 x 43
237
36 x 17
48.0
91 x 43
234
--
50.5
--
246
36 x 17
46.6
91 x 43
227
--
48.8
--
238
36 x 17
44.2
91 x 43
215
36 x 17
44.6
91 x 43
217
--
45.9
--
224
36 x 17
44.7
91 x 43
218
36 x 17
45.9
91 x 43
224
36 x 17
40.5
91 x 43
197
--
41.5
--
202
36 x 17
42.0
91 x 43
205
36 x 17
52.1
91 x 43
254
36 x 17
36.3
91 x 43
177
36 x 17
41.9
91 x 43
204
36 x 17
33.2
91 x 43
162
36 x 17
38.7
91 x 43
188
Jason International, Inc. • 501.771.4477 60 x 30 x 20.5
Operating
Capacity
Gal
Liter
38
152 x 76 x 52
144
K3060
TL
60 x 30 x 20.5
38
152 x 76 x 52
144
K3060
SL/SR
60 x 30 x 20.5
38
152 x 76 x 52
144
60 x 32 x 20.5
39
152 x 81 x 52
148
Model
K3060
K3260
Overall
Dimension
L x W x H (in.)
L x W x H (cm.)
K3260
TL
60 x 32 x 20.5
39
152 x 81 x 52
148
K3260
SL/SR
60 x 32 x 20.5
39
152 x 81 x 52
148
66 x 36 x 20.5
48
168 x 91 x 52
181
K3666
TL
66 x 36 x 20.5
48
168 x 91 x 52
181
K3666
SL/SR
66 x 36 x 20.5
48
K3666
N3660
N4260
N4272
V4266
V4272
W4266
168 x 91 x 52
181
60 x 36 x 20.5
44
152 x 91 x 52
166
60 x 42 x 20.5
49
152 x 107 x 52
185
72 x 42 x 20.5
52
183 x 107 x 52
196
66 x 42 x 20.5
43
168 x 107 x 52
162
72 x 42 x 20.5
46
183 x 107 x 52
174
66 x 42 x 20.5
40
168 x 107 x 52
151
Page 2 of 9
Pump
HP
1
1
1
1
1
1
1
1
1
1
1
1
1
1
1
Min. Size
Access
W x H (in.)
W x H (cm)
Floor
Loading
lbs/ft2
kg/M2
36 x 17
56.8
91 x 43
277
36 x 17
57.0
91 x 43
278
--
58.8
--
287
36 x 17
54.1
91 x 43
264
36 x 17
54.3
91 x 43
265
--
56.0
--
273
36 x 17
49.8
91 x 43
243
36 x 17
50.0
91 x 43
244
--
51.4
--
251
36 x 17
57.1
91 x 43
278
36 x 17
48.1
91 x 43
234
36 x 17
46.3
91 x 43
226
36 x 17
43.9
91 x 43
214
36 x 17
42.3
91 x 43
206
36 x 17
42.1
91 x 43
205
Customer Service : 800.255.5766
Installation Instructions (cont.)
INSTALLATION
See the USER MAINTENANCE INSTRUCTIONS section
of this owner’s manual, prior to installation, for humidity and
mold prevention suggestions.
1. Finish Frame: A finish frame under the shell rim should
also always be constructed to support the bath deck and
insure proper drainage toward the bath well. This frame is
not intended to support the full bath weight (see Figures
1 & 2).
Jason offers a removable lateral skirt for most baths.
The skirts are available in matching acrylic colors and
provide convenient access to bath equipment as well as an
excellent finished appearance. However, if Jason’s lateral
skirt is not used, an access panel MUST be provided to
enable final electrical connections and service. Please
refer to the minimum recommended access panel size
in Table 1 - Specifications.
If a Jason lateral skirt is to be used, the bath deck must
be leveled at 20.5” (52cm) from the support floor or the
skirt will not fit properly.
CAUTION: Make sure the support frame is drilled
and/or notched as needed to assure that the ON/
Off air actuator switch and air tube are not bound
or pinched.
Allow ample clearance for the pump. Whirlpools with
optional front pump mounts may require a minimum of
1” clearance beyond the front and pump side lip of the
bath to allow clearance of the pump.
CAUTION: Ambient temperature under the bath
where the pump and electronics are installed must
not exceed 122°F (50°C).
2. 100% Silicone with mildew resistant properties should be
applied between the water resistant backer board and
the deck of the bath. NOTE: If you use a tile flange kit,
modify the framing to support the bath lip as shown in
Figure 1.
3. Install the drain and overflow assembly to the bath shell
according to the instructions provided with the drain and
position the bath in the area of intended installation.
Figure 1
4. Finish plumbing rough-in of drain and overflow assembly.
At this time, considerations should be made for the
position and mounting of the faucet set, as well as all
related plumbing.
5. Remove the packing board before installing the bath.
The bath is equipped with separate bath equipment
support bases which are joined for shipment with packing
boards. Detach the packing board from the bath and from
underneath the equipment.
WARNING: Any modification to the equipment is
not recommended and will void the Manufacturer’s
warranty.
6. Install the bath level for proper drainage. Jason baths
are designed to be supported at the base of the bath. If
the floor is smooth and level, the baths’ Level Form™
Base will provide proper drainage and support (See
Figure 3).
7. Mortar is required when the subfloor is not smooth and
level; when additional sound insulation is desired; or when
the bath is installed in a drop-in application. In alcove
installations, a bed of mortar may also be recommended
to aid in leveling the bath. Note: Do not use a sand bed
to install or level the bath.
8. Secure the bottom of all equipment mounts so that it
is level with the bottom of the bath. Position the bath
in the area of intended installation and cut the equipment
support strap(s) to allow the equipment to rest firmly
on the floor. We recommend securing the equipment
mounts to the floor with removable fasteners for ease
of servicing.
9. Protect the acrylic bath surface from damage during
installation with a suitable material, i.e., cardboard
and/or plastic film. The acrylic surface of this bath has
been provided with a protective film which helps protect the
bath during shipment and installation. Additional protection
may also be required to protect the acrylic surface during
installation. If the bath is tiled in, remove the necessary
portion of the film when installing the tile.
Figure 2
F IG . 2
O P T IO N A L
T IL E F L A N G E
K IT
D R Y W A LL
O P T IO N A L
IN T E G R A T E D
T IL E LIP
D R Y W A LL
T ILE
S IL IC O N E B E A D
T ILE
1 " X 2"
SUPPORT
Jason International, Inc. • 501.771.4477 Page 3 of 9
Customer Service : 800.255.5766
Installation Instructions (cont.)
Figure 3
ELECTRICAL
Electrical Power Supply: These instructions are written
assuming 60Hz, 120v power supply. Special notations
are also included for export versions of the pump, control
equipment, and power supply.
WARNING: Verification of electrical requirements MUST
be made before installation. Refer to the equipment labels
for voltage and frequency requirements.
NOTE: Verify that the electrical service matches either the
120v or 240v system requirements for this bath.
NOTE: The bath is designed for indoor use only. The electrical equipment must not be exposed to direct or indirect water
or moisture contact. The electrical equipment must also be
protected from dust and other airborne debris before, during,
and after installation.
1. Electrical Service: A licensed electrician must provide
the “dedicated” electrical service protected by a GFCI.
The location of the GFCI must be at least five (5) feet (152
cm) away from the inside surface of the bath, accessible
for regular testing. Use copper conductors only.
DANGER — RISK OF ELECTRIC SHOCK: Connect
only to a circuit protected by a Ground Fault Circuit Interrupter (GFCI). In the unlikely occurrence of a current
imbalance in the power conductors, the GFCI will interrupt
the power to the bath.
WARNING: The electrical service to the GFCI must not be
interrupted by any control device. Likewise, the electrical
Jason International, Inc. • 501.771.4477 service from the GFCI to the bath control should be direct
and not interrupted by a switch. Never use a switch in
conjunction with a control device. This will VOID THE
MANUFACTURER’S WARRANTY.
2. GROUNDING IS REQUIRED
The unit should be installed by a qualified service
representative and properly grounded.
3. INSTALL SERVICE CONNECTION AT LEAST 6” (15cm)
ABOVE SUB FLOOR.
ALL LOCAL AND STATE ELECTRICAL AND PLUMBING CODES MUST BE OBSERVED. Where there are no
local codes the National Electric Code (NEC) and Uniform Plumbing Code (UPC) shall be observed. It is the
responsibility of the installer/owner to determine specific
code compliance prior to installation of the product.
NOTE: In the Commonwealth of Massachusetts, installation is to be done by a Massachusetts licensed
plumber.
4. Integrity Whirlpool Control Box (120v,60Hz): This
Whirlpool bath is provided with an Air On/Off switch.
The pump is pre-wired to a control box which has a 36”
cord. Connect the pump to a GFCI (Ground Fault Circuit
Interupter) with 120v (volt), 20A (amp), 60HZ (hertz) electrical service with a service ground receptacle dedicated
for use by this bath.
5. Export Integrity Whirlpool Control Box (240v,60Hz):
This Whirlpool bath is provided with an Air On/Off switch.
The pump is pre-wired to a control box which has a 36”
Page 4 of 9
Customer Service : 800.255.5766
Installation Instructions (cont.)
cord. Connect the pump to a GFCI (Ground Fault Circuit
Interupter) with 240v (volt), 15A (amp), 60HZ (hertz) electrical service with a service ground receptacle dedicated
for use by this bath.
6.Export Integrity Whirlpool Control Box (120v,50Hz):
This Whirlpool bath is provided with an Air On/Off switch.
The pump is pre-wired to a control box which has a 36”
cord. Connect the pump to a GFCI (Ground Fault Circuit
Interupter) with 120v (volt), 20A (amp), 50HZ (hertz) electrical service with a service ground receptacle dedicated
for use by this bath.
7. Export Integrity Whirlpool Control Box (240v,50Hz):
This Whirlpool bath is provided with an Air On/Off switch.
The pump is pre-wired to a control box which has a 36”
cord. Connect the pump to a GFCI (Ground Fault Circuit
Interupter) with 240v (volt), 15A (amp), 50HZ (hertz) electrical service with a service ground receptacle dedicated
for use by this bath.
DANGER: Do not alter the factory installed wiring.
All building materials and wiring should be routed away
from the pump or other heat-producing components of
the unit.
CLEANING
1. Remove all loose debris. Construction plaster or excess
grout can be removed with the use of a wood (edge)
trowel.
2. Paint or tar stains may need to be removed with a
cleaner such as paint thinner, turpentine, or isopropyl
alcohol (rubbing alcohol). Never allow the cleaner to
soak against the acrylic surface for long periods of time.
Always rinse the surface immediately following the
use of cleaners.
3. Follow the manufacturer’s instructions for safe use of
cleaning products. If the surface becomes scratched or
dulled, it may be restored by using a quality plastic polish,
like Novus Plastic Polish No. 2 (available from the Jason
Dealer). It is always preferable to protect the acrylic
surface during installation to minimize cleanup and
prevent surface damage.
WATER TESTING
Before finishing the installation, it is recommended that the
bath be water tested and the plumbing tested for leaks.
1. Before water testing the bath, make sure any pump
unions are hand tight. Do not over tighten or use a pipe
wrench. This will damage the unions and cause leaking.
If the unit leaks with the unions hand tight, then loosen
the unions(s) and check the O-ring seal to ensure it is
properly seated.
2. Fill and operate the bath. Close the drain and fill the
bath with water to at least 10 inches [25 cm] below the
bath deck. The inlet temperature should not exceed 104°F
(40°C) as this could damage the acrylic surface. Refer
to the FILLING AND DRAINING section of this owner’s
manual for more information.
NEVER RUN THE WHIRLPOOL PUMP WITHOUT
ENOUGH WATER IN THE BATH TO COVER THE
JETS.
3. Before starting the pump, direct the jet nozzles downward
to prevent the possibility of water splashing from the bath.
Refer to the OPERATING INSTRUCTIONS, FEATURES,
AND CONTROLS section of this Owner’s Manual.
4. Inspect the plumbing for leaks.
5. Turn the equipment Off and then drain the water. The
bath unit and its plumbing are designed to drain after each
use whether used as a whirlpool bath, air bath, soaking
bath, or when taking a shower.
Jason International, Inc. • 501.771.4477 Page 5 of 9
Customer Service : 800.255.5766
OPERATING INSTRUCTIONS, FEATURES, AND CONTROLS
INTRODUCTION
AIR ON/OFF BUTTON
This manual contains all of the information needed for the
proper operation of this Integrity® Whirlpool bath. The Whirlpool
bath has been designed to provide years of relaxing troublefree service, provided the unit is maintained and operated in
accordance with these instructions.
The Air On/Off button provides a safe
and convenient method for controlling
the Whirlpool bath. The Air On/Off
button is factory mounted onto the bath
prior to shipment. See Figure 3 for the
location of the Air On/Off button (air
actuator) on the Whirlpool bath. Fill the
bath to at least two (2) inches above
the highest jet and press the Air On/
Off button to start the whirlpool pump.
Press the Air On/Off button again to
stop the whirlpool pump.
Thoroughly clean and disinfect the unit as described in
the CLEANING section of the USER MAINTENANCE
INSTRUCTIONS section of this owner’s manual before its
first use and periodically thereafter.
CAUTION: Keep hair, towels, and clothing away from the
suction fitting whenever the Whirlpool equipment is On.
Never operate the equipment with the suction cover off,
doing so voids the manufacturer’s warranty--it is a safety
cover designed to eliminate the potential of hair and body
entrapment.
All Jason Integrity® Whirlpool baths are pre-plumbed at
the factory with standard equipment. Standard equipment
includes five (5) or more directional hydrotherapy jets, and
an air actuated On/Off switch.
WARNING: Before operating refer to the instructions at
the end of this owner’s manual pertaining to the risk of
fire, electric shock, or injury to persons.
FILLING AND DRAINING
Close the drain and fill the bath with water at least two (2) inches
(50mm) above the jets. The inlet temperature should not exceed
40°C (104°F) as this could damage the acrylic surface.
CAUTION: NEVER RUN THE WHIRLPOOL PUMP
WITHOUT ENOUGH WATER IN THE BATH TO COVER
THE JETS.
NOTE: If the unit fails to operate, check the breaker panel
to insure that the circuit breaker is On. Check the ground
fault circuit interrupter (GFCI) by testing and resetting it. If
the unit still fails to operate contact an authorized service
technician for repair. DO NOT ATTEMPT TO RESOLVE
THE PROBLEM.
JETS
Five or more strategically placed whirlpool jets are provided
for complete enjoyment of the bath. The jets are specially
designed for maximum whirlpool action with direction and flow
control. Changing the direction of the jets will concentrate the
massaging jet stream to the area of preference and turning
the flange of the jet will adjust the amount of flow.
PUMP
The pump provided on Integrity® Whirlpool baths is factory
tested when assembled onto the bath. The pump is designed to
incorporate high quality, long-life seals which provide superior
service. However, should the pump need service, use the
suction and discharge unions provided for easy removal.
Before starting the pump, direct the jet nozzles downward
to prevent the possibility of water splashing from the bath.
When bath is in use, turn the unit Off before draining the
water. The bath unit and its plumbing are designed to drain
after each use whether used as a hydrotherapy bath, soaking
bath, or just taking a shower.
Jason International, Inc. • 501.771.4477 Page 6 of 9
Customer Service : 800.255.5766
USER MAINTENANCE INSTRUCTIONS
HUMIDITY
SURFACE MAINTENANCE
Warning: Avoid high humidity levels in your home.
Mold, mildew, fungi and bacteria which may be harmful
to health thrive in areas with continued high humidity
levels; therefore, every precaution should be taken to
make sure your plumbing fixtures including bathtubs,
therapy baths, or showers do not become a source of
high humidity due to improper installations or leaks.
Areas with minor scratches or dull surfaces can be restored
by applying commercially available plastic polish (i.e. Novus
Plastic Polish No. 2, available at your Jason dealer), followed
by an application of acrylic paste wax. Buff the surface with a
clean soft cloth. Do not use sandpaper, steel wool, or abrasive
rubbing compounds.
To avoid having your plumbing fixtures become a source of
unwanted humidity, please make sure the following steps are
taken prior to installation.
1. Make sure the area where the bathtub or shower is
installed is well vented and allows enough ventilation and
air circulation to dry the bathroom environment within a
short time after taking a bath or shower.
If scratches are too deep to rub out, or if the damage penetrates
the acrylic surface, consult your dealer for recommendations
on surface repair.
FLUSHING / SANITIZING
Upon start-up and not to exceed 90 days thereafter, flush
the Whirlpool bath and plumbing system with Jason’s
Bath System Cleaner, available at Jason Dealers, or use an
equivalent cleaner. Follow the cleaning instructions below:
2. If your bath or shower unit is tiled-in, use units with an
integral tile flange or make sure a tile flange kit or a similar
mechanical barrier is installed to prevent shower spray,
splash, or overflow to leak behind the bathtub.
1. Close the bath drain and open the air controls.
3. Make sure the plumber properly tests your therapy bath
before it is roughed in to make sure there are no leaks and
it is installed with proper access to bath equipment.
3. Pour 16 ounces of Jason’s Bath System Cleaner into the
bath water.
4. Make sure that all the plumbing and fixtures in the bathroom
are in good working order and have no leaks.
5. Turn off the pump and drain the bath.
2. Fill the bath with warm water to a level at least 2” (5 cm)
above the highest jet.
4. Turn on the whirlpool pump for 10 minutes.
5. Do not use carpeting or other materials or furniture, which
can hold moisture in your bathroom.
6. To rinse, refill the bath with cold water, turn on the pump
for five minutes, then turn off the pump and drain the
bath.
6. Use disinfectant to clean any bathroom surfaces which
are regularly exposed to moisture.
Note: The bath can be sanitized after each bather without
harming the whirlpool bath plumbing.
7. Clean and disinfect humidifier and dehumidifiers as
recommended by the manufacturer. Replace the air filter
on the HVAC unit once a month.
REPAIR
8. Clean moldy surfaces as soon as any mold appears by using
a detergent/soapy solution and appropriate household
cleaner. Always use gloves during cleaning. Dispose of
any sponges or rags used to clean mold.
CLEANING
With minimum care, your acrylic-surfaced bath will retain its
high-luster finish for many years. For regular cleaning use
Jason Bath Cleaner or a mild NONABRASIVE liquid detergent
solution (i.e. glass cleaner) and a soft, wet cloth or sponge.
Do not run the air system with foaming cleaners or soaps.
Rinse the bath thoroughly after cleaning.
Jason International, Inc. • 501.771.4477 Refer all plumbing or electrical repair to a qualified service
technician. DO NOT ATTEMPT TO RESOLVE THE
PROBLEM. This can result in danger of electrical shock
or damage to the unit and will VOID THE WARRANTY.
Remember, when contacting your dealer or service
representative, always have your serial number, proof of
purchase, and model number. This will insure a quick response
on warranty items. The serial number can be found on the
front page of this manual or on the small card adhered to the
back of the bath just above the pump.
ALL WARRANTY REPAIRS MUST BE AUTHORIZED BY
THE MANUFACTURER BEFORE WORK IS STARTED.
Page 7 of 9
Customer Service : 800.255.5766
TROUBLE SHOOTING GUIDE
If the unit is within the warranty period, contact Jason Customer Service: 1-800-255-5766 with the bath’s Product and Serial
numbers before work is started. The serial number can be found on the front page of this manual or on the small card
adhered to the back of the bath just above the pump.
all warranty repairs must be authorized by Jason INTERNATIONAL before work is started.
FOR SERVICE, ALWAYS CONTACT THE DEALER OR AUTHORIZED SERVICE CENTER
WARNING: Always turn off power at the main electrical service panel when servicing the bath.
SYMPTOMS
Whirlpool system fails to
operate.
POSSIBLE CAUSES
RECOMMENDED ACTION
a) No power to the whirlpool unit.
a) Reset circuit breakers or replace fuses.
Check GFCI and reset if tripped.
b) Not wired correctly.
b) Make sure power supply is correctly wired
into the unit.
c) Air switch — plastic air tube
disconnected or broken.
c) Check, reconnect, or replace tubing as
necessary.
Pump operates, but no air
is injected into the water.
a) Air valve(s) closed.
a) Open air control valve(s).
b) Line is clogged.
b) Contact installer/dealer.
Pump operates, but water
is not being pumped.
a) Insufficient water level.
a) Fill bath to recommended level. Water must
be at least two (2) inches above the jets.
b) Suction or discharge blocked.
b) Remove obstruction.
c) Suction air leak. (System usually
surges.)
c) Make sure union is tight on suction side of
pump.
Pump does not manually
shut off.
a) Air switch tube disconnected or
broken.
a) Reconnect or replace plastic air tube.
Pump unions leak.
a) Unions undertightened, overtightened, a) Back off union nut, check and straighten
cracked or O-ring is not seated
O-ring, replace as necessary, retighten.
properly (possibly pinched).
HAND TIGHTEN ONLY!
Pump runs, but jets will not
operate.
Pump shuts off by itself.
a) Jets are completely or partially closed. a) Adjust jets by rotating outer flange.
a) Insufficient water
a) Make sure bath is filled to at least 2” above
the hightest jets.
Pump leaks at shaft.
a) Damaged or defective shaft seal.
a) Contact installer/dealer.
Optional LED light will not
operate.
a) Light bulb is loose in the socket.
a) Access light bulb and ensure it is properly
installed.
WARRANTY REGISTRATION: Register your product's warranty online at www.jasoninternational.com.
JASON INTERNATIONAL INC. LIMITED WARRANTY
The Company warrants the products of its own manufacture to be free from defects in workmanship and
material for a period of twelve (12) months from date of installation or eighteen (18) months from date
of manufacture, whichever comes first. Any merchandise which upon Company examination proves to
be defective under normal use and service during the warranty period will be at the Company’s option
repaired, replaced or credit issued in the amount of the invoice value of the defective merchandise. All
other types of remedies are excluded. This warranty extends only to the owner of the originally installed
merchandise. The Company is not responsible for labor or other installation costs for the repair or replacement of defective merchandise. Company reserves the right to substitute new or improved equipment on
any replacements. The repair or replacement of equipment shall be F.O.B. point of shipment.
This warranty shall not apply to any merchandise which has been subject to accident, alteration, abuse,
misuse, abrasives, corrosion and/or electrolysis, improper voltage supply, misapplication, careless
handling, improper installation, maintenance, abnormal chemical conditions, nor does this warranty
cover stains, discoloration or the fading of color due to improper use of chemicals or improperly maintained water chemistry.
This warranty shall not apply to any merchandise or parts thereof which were not manufactured by
Company. Such product or merchandise manufactured by others shall have only such warranties, in
writing, that may be extended and in force at the time by such other manufacturer or supplier.
Jason International, Inc. • 501.771.4477 To obtain warranty service, you must contact the retailer from which the merchandise was purchased
or Company’s distributor in your area. Written notice of warranty defects must be given to the company
within thirty (30) days from the occurrence thereof. Written permission must be obtained by the retailer or
distributor from the Company before any equipment claimed defective is returned for inspection.
EXCEPT AS PROVIDED HEREIN, COMPANY MAKES NO WARRANTIES EITHER EXPRESSED OR
IMPLIED, AS TO ANY MATTER WHATSOEVER INCLUDING THE CONDITION OF THE MERCHANDISE, ITS MERCHANTABILITY OR FITNESS FOR A PARTICULAR PURPOSE. ANY WARRANTIES
IMPLIED BY LAW AND NOT EFFECTIVELY EXCLUDED BY THIS WARRANTY, ARE LIMITED TO
THE DURATION AND REMEDIES OF THIS WARRANTY. IN NO EVENT SHALL THE COMPANY BE
LIABLE FOR CONSEQUENTIAL OR INCIDENTAL DAMAGES.
Some states do not allow limitations on how long an implied warranty lasts or the exclusion or limitation
of incidental or consequential damages, so the above limitations may not apply to you.
This warranty gives you specific legal rights and you may also have other rights that vary from state
to state.
Page 8 of 9
Customer Service : 800.255.5766
IMPORTANT SAFETY INSTRUCTIONS
INSTRUCTIONS PERTAINING TO THE RISK OF FIRE, ELECTRIC SHOCK, OR INJURY TO
PERSONS.
WARNING: When using this unit, basic precautions should always be followed, including the following:
This manual contains information and instructions for proper operation and maintenance of the hydrotherapy bath. Failure
to follow these instructions could result in personal injury, electrical shock, or fire.
READ AND FOLLOW ALL INSTRUCTIONS CAREFULLY
DANGER:
To reduce the risk of injury FOLLOW THESE PRECAUTIONS:
A. Do not permit children to use this product unless they are closely supervised at all times.
B. Use this unit only for its intended use as described in this manual. Do not use attachments not recommended by the
manufacturer.
C. The water in a hydrotherapy bath should never exceed 40°C (104°F). Water temperatures between 38°C (100°F)
and 40°C (104°F) are considered safe for a healthy adult. Use time should be limited to approximately 30 minutes,
followed by a shower to cool down. Longer exposures may result in hyperthermia. The symptoms of this condition
are nausea, dizziness, and fainting, and it can be fatal. Lower water temperatures are recommended for extended
use (exceeding 10 -15 minutes) and for young children.
D. Since excessive water temperatures have a high potential for causing fetal damage during the early months of pregnancy,
pregnant or possibly pregnant women should limit hydrotherapy bath water temperatures to 38°C (100°F).
E. The use of drugs or alcoholic beverages before or during hydrotherapy bath use may lead to unconsciousness with the
possibility of drowning. Never use the hydrotherapy bath while under the influence of alcohol, anticoagulants, stimulants,
antihistamines, vasoconstrictors, vasodilators, hypnotics, narcotics, or tranquilizers.
F. Persons with a medical history of heart disease, low or high blood pressure, circulatory system problems, or diabetes
should consult a physician before using a hydrotherapy bath.
G. Persons using medication should consult a physician before using a hydrotherapy bath since some medication may
induce drowsiness while other medication may affect heart rate, blood pressure, and circulation.
DANGER:
To reduce the risk of injury, enter and exit the bath slowly.
Do not operate this unit unless the suction cover is attached over the suction inlet fitting and the jet assemblies are installed.
There should be at least two (2) inches of water above the highest jet location during whirlpool bath operation. NEVER RUN
UNIT DRY.
WARNING: Never operate electrically connected devices in or near the bath. Never drop or insert any object into any opening.
This unit must be connected to a supply circuit that is protected by a GFCI. Such a device should be installed by a licensed
electrician and should be tested on a regular basis (at least monthly). To test the GFCI push the test button. The GFCI
should interrupt the power. Push the reset button and the power should be restored. If the GFCI fails to operate in this
manner, there is the possibility of an electric shock. Do not use. Disconnect the unit and have the problem corrected by a
qualified service technician.
To avoid the possibility of personal injury and discoloration of the acrylic surface, the inlet water temperature should not
exceed 40°C (104°F). The bath should be drained after each use. Each bather should start their bath with fresh water. Do
not use oil base additives in the hydrotherapy bath.
CAUTION: Do not use harsh abrasives or solvents for cleaning this unit.
Installer/owner bears all responsibility to comply with all state
and local codes when installing this product.
SAVE THESE INSTRUCTIONS
Jason International, Inc.
8328 MacArthur Drive • North Little Rock • Arkansas • 72118
www.jasoninternational.com
Jason International, Inc. • 501.771.4477 Page 9 of 9
Customer Service : 800.255.5766