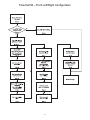
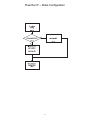
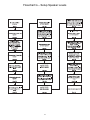
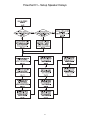
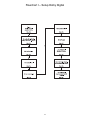
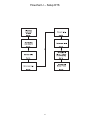
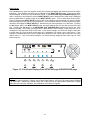
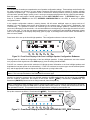
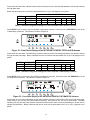
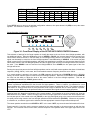
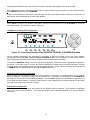
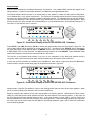
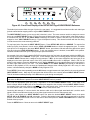
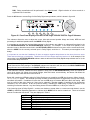
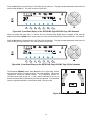
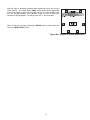
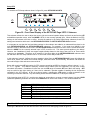
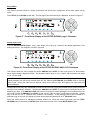
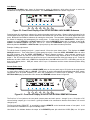
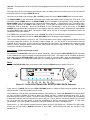
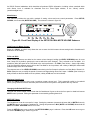
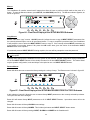
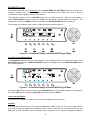
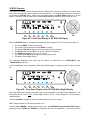
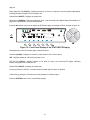
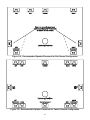
1
THETA DIGITAL
C
O
R
P
O
R
A
T
I
O
Casablanca III
Owner’s Manual
V 3.00 Rev B3
Digital Done Right
™
N
PREFACE
CONGRATULATIONS
You have just acquired the most advanced component for the control and processing of audio and video ever to
have been developed.
IMPORTANT
Save all packaging in a dry place away from fire hazards. Your Casablanca III is a precision electronic
instrument and should be properly packaged any time shipment is made. In the unlikely event that you have to
return your Casablanca III to the factory for service, or if you send it to us for updating, the original packaging
will best protect the unit from shipping damage.
In order to achieve the fullest flexibility and enjoyment from your Casablanca III, we at Theta recommend that
you read this manual in full before connecting the unit to your audio/video system.
WARNING
United Stated law prohibits disposition of these commodities to Libya, Laos, North Korea, Cambodia or Cuba
unless otherwise authorized by the United States.
NOTE:
This equipment has been tested and found to comply with the limits for a Class B digital device, pursuant to Part
15 of the FCC rules. These limits are designed to provide reasonable protection against harmful interference in
a residential installation. This equipment generates, uses and can radiate radio frequency energy and, if not
installed and used in accordance with the instructions, may cause harmful interference to radio
communications. However, there is no guarantee that interference will not occur in a particular installation. If
this equipment does cause harmful interference to radio and television reception, which can be determined by
turning the equipment off and on, the user is encouraged to try to correct the interference by one or more of the
following measures:
* Reorient or relocate the receiving antenna.
* Increase the separation between equipment and receiver.
* Connect the receiver into an outlet on a circuit different from that which the Casablanca III is connected to.
Acknowledgments
Casablanca III is manufactured under license from Dolby Laboratories. “Dolby”, “Pro Logic” and the double-D
symbol are registered trademarks of Dolby Laboratories.
Casablanca III is manufactured under license from Digital Theater Systems, Inc. U.S. Pat. No's. 5,451,942;
5,956,674; 5,974,380; 5,978,762; 6,226,616; 6,487,535 and other U.S. and world-wide patents issued and
pending. "DTS", "DTS-ES", "DTS-ES", "Neo:6" and "DTS 96/24" are trademarks of Digital Theater Systems,
Inc. Copyright 1996, 2003 Digital Theater Systems, Inc. All Rights Reserved.
Casablanca III is manufactured under license from SRS Labs, Inc. Circle Surround, SRS and
trademarks of SRS Labs, Inc
symbol are
© 2000-03 Theta Digital Corporation. All rights reserved.
Written and illustrated by Glenn Buckley.
This manual is also available for download as a PDF file at Theta Digital’s website. http://www.thetadigital.com
No part of this publication may be reproduced or transmitted in any form or by any means, electronic or
mechanical, for any purpose, without the express written permission of Theta Digital Corporation.
ii
The lightning flash with arrowhead symbol, within an equilateral
triangle, is intended to alert the user to the presence of uninsulated
“dangerous voltage” within the product’s enclosure that may be of
significant magnitude to constitute a risk of electric shock to persons.
The exclamation point within an equilateral triangle is intended to alert
the user to the presence of important operating and maintenance
(servicing) instructions in the literature accompanying the product.
WARNING
TO REDUCE THE RISK OF FIRE OR ELECTRIC SHOCK,
DO NOT EXPOSE THIS PRODUCT TO RAIN OR MOISTURE
CAUTION: TO PREVENT ELECTRIC SHOCK, DO NOT USE THE (POLARIZED) PLUG WITH AN
EXTENSION CORD, RECEPTACLE OR OTHER OUTLET UNLESS THE BLADES CAN BE FULLY
INSERTED TO PREVENT BLADE EXPOSURE.
iii
Casablanca III Identification Record
This information is for your records and for future identification of the Casablanca III. Please take a moment
to fill out all pertinent data now, and as upgrades and/or options are installed. Whenever upgrades,
inquiries and/or changes are requested, the serial number will be required.
SERIAL NUMBER
DATE PURCHASED
DEALER’S NAME
DEALER’S ADDRESS/PHONE
INSTALLED CARDS/OPTIONS
(Date of installation)
(Date of installation)
(Date of installation)
(Date of installation)
(Date of installation)
(Date of installation)
(Date of installation)
(Date of installation)
(Date of installation)
(Date of installation)
(Date of installation)
iv
SAFETY PRECAUTIONS
Please carefully read each item of the operating instructions and safety precautions before using this
product. Use extra care to follow the warnings written on the product itself and/or in the operating
instructions. Keep the operating instructions and safety precautions for future reference.
CAUTION: TO REDUCE THE RISK OF ELECTRICAL SHOCK, DO NOT REMOVE ANY OF THE COVER
PANELS.
NO USER-SERVICEABLE PARTS INSIDE.
PERSONNEL ONLY.
REFER ALL SERVICING TO QUALIFIED SERVICE
TO PREVENT FIRE OR SHOCK HAZARD, DO NOT ALLOW LIQUIDS TO SPILL OR OBJECTS TO FALL
INTO ANY OPENINGS OF THE PRODUCT.
THIS UNIT IS SUPPLIED WITH A 3 PIN GROUNDED AC PLUG. ALWAYS INSERT THE AC PLUG INTO
A GROUNDED OUTLET. DO NOT REMOVE THE GROUND PIN OR DISABLE THE GROUND FOR ANY
PURPOSE.
BEFORE MAKING ANY CONNECTIONS TO THE CASABLANCA III, FIRST TURN OFF THE POWER
AND THEN DISCONNECT THE AC POWER CORD.
WHEN INSTALLING THE CASABLANCA III IN YOUR SYSTEM, MAKE CERTAIN TO ALLOW A
MINIMUM OF 3 INCHS OF VENTILATION ON EACH SIDE OF THE UNIT. ALSO ALLOW AT LEAST 3½
INCHS OF VENTILATION SPACE ABOVE THE UNIT. IMPROPER VENTILATION OF THE UNIT MAY
CAUSE OVERHEATING, WHICH MAY DAMAGE THE UNIT AND CAUSE A FIRE. PLACE THE UNIT ON
A SOLID SURFACE ONLY. I.E. NOT ON CARPET, ETC.
DO NOT PLACE THE CASABLANCA III NEAR HEAT SOURCES SUCH AS DIRECT SUNLIGHT,
STOVES, HEAT REGISTERS, RADIATORS OR OTHER HEAT PRODUCING EQUIPMENT.
TO PREVENT DAMAGE TO THE ANALOG OUTPUT CIRCUITRY, BE CERTAIN NOT TO SHORT THE
OUTPUT SIGNAL PIN(S) TO GROUND. ENSURE THAT YOUR AUDIO OUTPUT CABLES DO NOT
HAVE ANY INTERNAL SHORTS BEFORE CONNECTING THEM TO THE CASABLANCA III.
IF REPLACEMENT OF THE AC LINE FUSE BECOMES NECESSARY, REPLACE ONLY WITH SAME
VALUE AND TYPE OF FUSE. NEVER BYPASS THE FUSE.
IF THE AC CORD BECOMES DAMAGED, DO NOT USE IT. IMMEDIATELY REPLACE IT WITH A NEW
ONE OF THE SAME OR BETTER RATING.
AFTER MARKET and THIRD PARTY MODIFICATIONS
Please note that any after market and/or third party modifications will void the warranty. In the case of
changing the feet on a unit, in order to prevent any damage (which will also not be covered under warranty),
please verify that the screws being used to secure non Casablanca III feet do not screw any deeper into the
chassis than the original ones. The original screw is 10-32 by 3/8 and goes into the chassis 1/5 inch.
v
Table of Contents
PREFACE ............................................................................................................................................................................ ii
WARNING ......................................................................................................................................................................iii
Casablanca III Identification Record................................................................................................................................ iv
SAFETY PRECAUTIONS ................................................................................................................................................v
AFTER MARKET and THIRD PARTY MODIFICATIONS ............................................................................................ v
List of Figures ................................................................................................................................................................. ix
List of Tables.................................................................................................................................................................... x
INTRODUCTION .................................................................................................................................................................1
Getting to know your Casablanca III ................................................................................................................................1
Burn In Time ................................................................................................................................................................1
IMPORTANT NOTICE .....................................................................................................................................................2
Reference Manual Conventions .......................................................................................................................................2
Glossary of Terms and Abbreviations ..............................................................................................................................3
Casablanca III Block Diagram - Input Processing Sections .............................................................................................4
Casablanca III Block Diagram – DAC, Analog & Digital Out Sections..............................................................................6
Front Panel Layout...........................................................................................................................................................9
Rear Panel Layout .........................................................................................................................................................10
Menu Maps ....................................................................................................................................................................14
Function Menus and Pages .......................................................................................................................................14
Input Select Pages .....................................................................................................................................................14
Setup Menus and Pages............................................................................................................................................15
Introduction to the User interface ...................................................................................................................................16
WARNING !! : PLEASE READ FIRST! ....................................................................................................................16
Before you begin ........................................................................................................................................................16
STEP-BY-STEP SETUP GUIDE........................................................................................................................................17
Casablanca III Overall Setup Procedure Flowchart........................................................................................................18
Step by Step Speaker Configuration ..........................................................................................................................19
Speaker Configuration & Crossovers .....................................................................................................................19
Phase Perfect.....................................................................................................................................................19
Butterworth.........................................................................................................................................................20
Linkwitz-Riley .....................................................................................................................................................20
A note on crossovers .....................................................................................................................................20
A note on home theater..................................................................................................................................20
Speaker Configuration & Crossovers – Con’t.........................................................................................................21
Speaker Levels ..........................................................................................................................................................22
Speaker Delays..........................................................................................................................................................23
Dolby Digital, DTS and Circle Surround II Setup........................................................................................................24
Remaining Setup........................................................................................................................................................25
Setup Flowcharts A-P ................................................................................................................................................26
FRONT PANEL OPERATIONS .........................................................................................................................................42
Input Select Menus ........................................................................................................................................................42
Changing Inputs and Input Select Pages ...................................................................................................................42
Selecting Mapped Input Jacks for the Currently Selected Input .................................................................................42
Search Order .............................................................................................................................................................44
MODE Function .............................................................................................................................................................45
TAPE OUT Function ......................................................................................................................................................49
Standard Tape Out Configuration ..............................................................................................................................50
Optional Upgrade Tape Out Configuration .................................................................................................................50
SETUP Function ............................................................................................................................................................51
Setup Button Password..............................................................................................................................................51
DAC Configuration .....................................................................................................................................................51
SETUP INPUT (Settings specific to each of the 12 Input Select Buttons)..................................................................52
Setup Input Page 1 ................................................................................................................................................52
Setup Speaker Configuration .............................................................................................................................52
SUB Configuration .........................................................................................................................................53
Left/Right Speaker Configuration ...................................................................................................................54
Crossovers .....................................................................................................................................................55
Center Speaker Configuration........................................................................................................................57
Left/Right Surround Speaker Configuration....................................................................................................58
Center Surround Speaker Configuration ........................................................................................................58
Side Speaker Configuration ...........................................................................................................................58
Speaker Levels ..................................................................................................................................................59
Internal Noise Generator ................................................................................................................................59
Speaker Delays..................................................................................................................................................61
Default Mode......................................................................................................................................................62
Onscreen Display (OSD) Setup .........................................................................................................................63
Status Setup...................................................................................................................................................63
VFD Brightness ..............................................................................................................................................63
Setup Input Page 2 ................................................................................................................................................64
vi
LFE Phase .........................................................................................................................................................64
Mapping Audio and Video Sources (Input Jack to INPUT SELECT button) .......................................................64
Setup Dolby Digital.............................................................................................................................................66
2-Channel Mode.............................................................................................................................................66
Compression (Night Mode) ............................................................................................................................66
Dialog Normalization ......................................................................................................................................66
Setup DTS .........................................................................................................................................................70
Setup Circle Surround II .....................................................................................................................................71
Post Process ......................................................................................................................................................72
Setup Input Page 3 ................................................................................................................................................72
Setup Miscellaneous ..........................................................................................................................................73
Naming the Current Input Select button .........................................................................................................73
Master Delay ......................................................................................................................................................73
Password for Each INPUT SELECT Button .......................................................................................................73
Center Spread....................................................................................................................................................74
Six Shooter.........................................................................................................................................................74
Setup Global ..............................................................................................................................................................75
Analog Input Levels................................................................................................................................................75
Jack Names ...........................................................................................................................................................76
Remote Power Jacks .............................................................................................................................................76
Clear Balance (Temporary Settings Control).........................................................................................................77
RS232 ....................................................................................................................................................................77
Mute/Volume ..........................................................................................................................................................78
Initial Power-On Master Volume.........................................................................................................................78
FVOL and SVOL ................................................................................................................................................78
Maximum Overall Level......................................................................................................................................78
Changing the Default MUTE Level.....................................................................................................................78
MUTE Off Trigger...............................................................................................................................................78
Cursor Type ...........................................................................................................................................................79
Displaying Mode Change Messages ......................................................................................................................79
Display Time ..........................................................................................................................................................79
Serial Number ........................................................................................................................................................79
Macros .......................................................................................................................................................................80
Copy Macros ..........................................................................................................................................................80
Restore Macros......................................................................................................................................................80
BALANCE Function........................................................................................................................................................82
Front/Rear and Left/Right Balance.............................................................................................................................82
Center and Sub Balance ............................................................................................................................................82
Shelf EQ.....................................................................................................................................................................82
Analog Input Level Override.......................................................................................................................................83
STATUS Function ..........................................................................................................................................................84
Remote Control Layout ..................................................................................................................................................87
REMOTE CONTROL OPERATIONS ................................................................................................................................88
Input Select Menus ........................................................................................................................................................88
Changing Inputs and Input Select Pages ...................................................................................................................88
Selecting Mapped Input Jacks for the Currently Selected Input .................................................................................88
Mute ...........................................................................................................................................................................88
Display .......................................................................................................................................................................88
Global Phase .............................................................................................................................................................88
STATUS Display ............................................................................................................................................................89
MODE Function .............................................................................................................................................................90
TAPE OUT Function ......................................................................................................................................................91
SETUP Function ............................................................................................................................................................92
Setup Button Password..........................................................................................................................................92
DAC Configuration .....................................................................................................................................................92
SETUP INPUT (Setting up each of the 12 Input Select Buttons) ...............................................................................93
Setup Input Page 1 ................................................................................................................................................93
Speaker Configuration .......................................................................................................................................93
Left/Right Speaker Configuration ...................................................................................................................93
Center Speaker Configuration........................................................................................................................94
Surround Speaker Configuration ....................................................................................................................95
Sub Woofer Configuration ..............................................................................................................................95
Surround Center Configuration ......................................................................................................................96
Side Speaker Configuration ...........................................................................................................................96
Speaker Levels ..................................................................................................................................................96
Speaker Delays..................................................................................................................................................97
Default Mode......................................................................................................................................................98
Onscreen Display (OSD) Setup .........................................................................................................................98
Status Setup...................................................................................................................................................98
VFD Brightness ..............................................................................................................................................99
Setup Input Page 2 ................................................................................................................................................99
vii
LFE Phase .........................................................................................................................................................99
Mapping a Source (Input Jack to INPUT SELECT button).................................................................................99
Setup Dolby Digital...........................................................................................................................................100
2-Channel Mode...........................................................................................................................................100
Compression ................................................................................................................................................100
Dialog Normalization ....................................................................................................................................101
Setup DTS .......................................................................................................................................................102
Setup Circle Surround II ...................................................................................................................................104
Post Process ....................................................................................................................................................105
Setup Input Page 3 ..............................................................................................................................................105
Setup Miscellaneous ........................................................................................................................................105
Naming the Current Input Select button .......................................................................................................105
Master Delay ....................................................................................................................................................106
Password for Each INPUT SELECT Button .....................................................................................................106
Center Spread..................................................................................................................................................106
Six Shooter.......................................................................................................................................................106
Setup Global ............................................................................................................................................................107
Analog Input Levels..............................................................................................................................................107
Jack Names .............................................................................................................................................................107
Main Power Triggers ................................................................................................................................................108
Clear Balance (Temporary Settings Control).......................................................................................................108
RS232 ..................................................................................................................................................................109
Mute/Volume ........................................................................................................................................................109
Initial Power-On Master Volume.......................................................................................................................109
FVOL and SVOL ..............................................................................................................................................109
Maximum Overall Level....................................................................................................................................110
Changing the Default MUTE Level...................................................................................................................110
MUTE Off Trigger.............................................................................................................................................110
Cursor Type .........................................................................................................................................................110
Displaying Mode Change Messages ....................................................................................................................111
Display Time ........................................................................................................................................................111
Serial Number ......................................................................................................................................................111
Macros .....................................................................................................................................................................111
Copy Macros ........................................................................................................................................................111
Restore Macros....................................................................................................................................................112
BALANCE Function......................................................................................................................................................113
Front/Rear and Left/Right Balance...........................................................................................................................113
Center and Sub Balance ..........................................................................................................................................113
Shelf EQ...................................................................................................................................................................113
Analog Input Level Override.....................................................................................................................................113
APPENDIXES ..................................................................................................................................................................114
Appendix A
Troubleshooting Guide .....................................................................................................................115
Appendix B
Wiring Diagrams and Speaker Placement Guides ...........................................................................116
Digital Out/External Volume Control Wiring Diagrams .................................................................................................119
Six Shooter Wiring Diagram .........................................................................................................................................121
Appendix C
Remote Extender Jack Technical Description and Protocol .............................................................122
Appendix D
Upgrading/Re-installing Casablanca III Software .............................................................................123
Appendix E
Specifications ...................................................................................................................................124
WARRANTY INFORMATION ..........................................................................................................................................132
viii
List of Figures
Figure 1 - Block Diagram of Input Processing Sections .......................................................................................................4
Figure 2 - Block Diagram of 8 S-Video Switching Card........................................................................................................5
Figure 3 - Block Diagram of Multi Format/6 S-Video Switching Card ...................................................................................5
Figure 4 - Block Diagram of Standard & Superior 1 DAC boards.........................................................................................6
Figure 5 - Block Diagram of Superior II DAC board .............................................................................................................7
Figure 6 - Block Diagram of Xtreme 4-Channel DAC board.................................................................................................7
Figure 7 - Block Diagram of Digital Output board, showing all options.................................................................................8
Figure 8 - Front Panel Layout ..............................................................................................................................................9
Figure 9 - Rear Panel Layout .............................................................................................................................................10
Figure 10 - All Single-Ended D/A Card Configuration Options ...........................................................................................11
Figure 11 - All Standard Balanced D/A Card Configuration Options ..................................................................................11
Figure 12 - All Superior D/A Card Options and the Digital Output card with Center Channel.............................................12
Figure 13 - All Superior II D/A Card Options ......................................................................................................................12
Figure 14 - Xtreme DAC.....................................................................................................................................................13
Figure 15 - Mode, Status, Balance, Tape Out Menus and Input Select Pages ..................................................................14
Figure 16 - Setup Menus and Pages..................................................................................................................................15
Figure 17 - Front Panel Display of the current INPUT SELECT page ................................................................................42
Figure 18 - Front Panel Display of the SETUP/INP page 2/SOURCE/AUD page ..............................................................44
Figure 19 - Front Panel Display of the MODE Page 1 Menu..............................................................................................45
Figure 20 - Front Panel Display of the MODE Page 2 Menu..............................................................................................46
Figure 21 - Front Panel Display of the MODE Page 3 Menu..............................................................................................47
Figure 22 - Front Panel Display of the TAPE OUT Menu...................................................................................................49
Figure 23 - Front Panel Display of the SETUP Menu.........................................................................................................51
Figure 24 - Front Panel Display of the SETUP/Assign Password Display..........................................................................51
Figure 25 - Front Panel Display of the SETUP/INPUT page 1 Submenu...........................................................................52
Figure 26 - Menu Map of SETUP/INP Page 1/CONFIG.....................................................................................................52
Figure 27 - Front Panel Display of the Speaker Configuration Submenu ...........................................................................53
Figure 28 - Front Panel Display of the Subs Configuration Submenu ................................................................................53
Figure 29 - Menu Map of SETUP/INP Page 1/CONFIG/LT/RT..........................................................................................54
Figure 30 - Front Panel Display of the Front Left/Right Speaker Configuration Submenu .................................................55
Figure 31 - Front Panel Display of the SETUP/INP/CONFIG/LT/RT/φPERF Submenu .....................................................55
Figure 32 - Front Panel Display of the SETUP/INP/CONFIG/LT/RT/Link-R Submenu ......................................................56
Figure 33 - Front Panel Display of the SETUP/INP/CONFIG/LT/RT/BWORTH Submenu.................................................56
Figure 34 - Front Panel Display of the SETUP/INP/CONFIG/CENTER Submenu .............................................................57
Figure 35 - Front Panel Display of the SETUP/INP/CONFIG/L-R SURRND Submenu......................................................58
Figure 36 - Front Panel Display of the SETUP/INP/LVLS/Channel Choice Submenu .......................................................59
Figure 37 - Front Panel Display of the SETUP/INP/LVLS 1-6 Submenu............................................................................59
Figure 38 - Front Panel Display of the SETUP/INP/LVLS 7-12 Submenu..........................................................................59
Figure 39 - Front Panel Display of the SETUP/INP/DELAYS 1 Submenu .........................................................................61
Figure 40 - Front Panel Display of the SETUP/INP/DELAYS 2 Submenu .........................................................................61
Figure 41 - Rear Delay Settings .........................................................................................................................................62
Figure 42 - Front Panel Display of the SETUP/INP/OSD Submenu...................................................................................63
Figure 43 - Front Panel Display of the SETUP/INP/OSD/STATUS 1 Submenu.................................................................63
Figure 44 - Menu Map of SETUP/INP Page 2....................................................................................................................64
Figure 45 - Front Panel Display of the SETUP/INP Page 2 Submenu ...............................................................................64
Figure 46 - Front Panel Display of the SETUP/INP Page 2/SOURCE/AUD Submenu ......................................................65
Figure 47 - Front Panel Display of the SETUP/INP Page 2/DOLBY DIGITAL Page 1 Submenu.......................................66
Figure 48 - Front Panel Display of the SETUP/INP Page 2/DOLBY DIGITAL Page 2 Submenu.......................................67
Figure 49a - Front Panel Display of the SETUP/INP Page 2/DOLBY Page 3 EX Submenu ..............................................68
Figure 49b - Front Panel Display of the SETUP/INP Page 2/DOLBY Page 3 PLIIx Submenu...........................................68
Figure 49c – Diagram of Panorama Effect .........................................................................................................................68
Figure 49d – Diagram of Center Width Values...................................................................................................................69
Figure 50 - Front Panel Display of the SETUP/INP Page 2/DTS 1 Submenu ....................................................................70
Figure 51 - Front Panel Display of the SETUP/INP Page 2/DTS 2 Submenu ....................................................................71
Figure 52 - Front Panel Display of the SETUP/INP Page 2/CIRCLE SURRND II Submenu..............................................71
Figure 53 - Front Panel Display of the SETUP/INP Page 2/POST PROCESS Submenu ..................................................72
Figure 54 - Menu Map of SETUP/INP Page 3....................................................................................................................72
Figure 55 - Front Panel Display of the SETUP/INP Page 3 Submenu ...............................................................................72
Figure 56 - Front Panel Display of the SETUP/INP page 3/MISC Submenu......................................................................73
Figure 57 - Front Panel Display of the SETUP/GLOBAL page 1/ Submenu ......................................................................75
Figure 58 - Front Panel Display of the SETUP/GLOBAL/ANLG LVLS Submenu...............................................................75
Figure 59 - Front Panel Display of the SETUP/GLOBAL/JACK NAMES Submenu ...........................................................76
Figure 60 - Front Panel Display of the SETUP/GLOBAL/REMPWR Submenu..................................................................76
Figure 61 - Front Panel Display of the SETUP/GLOBAL/RS232 Submenu .......................................................................77
Figure 62 - Front Panel Display of the SETUP/GLOBAL/MUTE-VOLUME Submenu........................................................78
Figure 63 - Front Panel Display of the SETUP/GLOBAL page 2 Submenu .......................................................................79
Figure 64 - Front Panel Display of the SETUP/MACROS Submenu..................................................................................80
Figure 65 - Front Panel Display of the SETUP/MACROS/RESTORE FACTORY Submenu .............................................80
ix
Figure 66 - Front Panel Display of the BALANCE Page 1 Menu........................................................................................82
Figure 67 - Front Panel Display of the BALANCE Page 2 Menu........................................................................................82
Figure 68 - Front Panel Display of the STATUS Display....................................................................................................84
Figure 69 - Front Panel Display of the STATUS/Dolby Digital Display...............................................................................84
Figure 70 - Front Panel Display of the STATUS/DTS Display............................................................................................85
Figure 71 - Remote Control Layout ....................................................................................................................................87
Figure 72 - Video Display of the INPUT SELECT Page 1 Menu ........................................................................................88
Figure 73 - Video Display of the STATUS Display .............................................................................................................89
Figure 74 - Video Display of the Dolby Digital Status Page................................................................................................89
Figure 75 - Video Display of the DTS Status Page ............................................................................................................89
Figure 77 - Video Display of the MODE Page 1 Menu .......................................................................................................90
Figure 78 - Video Display of the MODE Page 2 Menu .......................................................................................................90
Figure 79 - Video Display of the MODE Page 3 Menu .......................................................................................................90
Figure 80 - Video Display of the TAPE OUT Menu with Optional Tape Out DAC installed and set to MAIN .....................91
Figure 81 - Video Display of the TAPE OUT Menu with Optional Tape Out DAC installed and set to TAPE .....................91
Figure 82 - Video Display of the SETUP Menu ..................................................................................................................92
Figure 83 - Video Display of the SETUP Password Page ..................................................................................................92
Figure 84 - Video Display of the SETUP/INPUT Page 1 Submenu....................................................................................93
Figure 85 - Video Display of the SETUP/INPUT Page 1/SPEAKER CONFIGURATION Submenu...................................93
Figure 86 - Video Display of the SETUP/ INPUT Page 1/CONFIG/LEFT/RIGHT Configuration Submenu........................93
Figure 87 - Video Display of the SETUP/INPUT page 1/SPEAKER CONFIG/ CENTER Submenu...................................94
Figure 88 - Video Display of the SETUP/INPUT page 1/CONFIG/SURROUND CONFIGURATION Submenu.................95
Figure 89 - Video Display of the SETUP/INPUT Page 1/CONFIG/SUB CONFIGURATION Submenu .............................95
Figure 90 - Video Display of the SETUP/INPUT page 1/CONFIG/SURROUND CENTER Submenu ................................96
Figure 91 - Video Display of the SETUP/ INPUT/LEVELS 1-6 Submenu ..........................................................................96
Figure 92 - Video Display of the SETUP/INPUT/LEVELS 7-12 Submenu .........................................................................97
Figure 93 - Video Display of the SETUP/INPUT/DELAYS 1 Submenu ..............................................................................97
Figure 94 - Video Display of the SETUP/INPUT/DELAYS 2 Submenu ..............................................................................97
Figure 95 - Video Display of the SETUP/INPUT Page 3/ON-SCREEN DISPLAY Submenu .............................................98
Figure 96 - Video Display of the SETUP/INPUT/OSD/STATUS page 1 Setup Submenu ..................................................98
Figure 97 - Video Display of the SETUP/INPUT Page 2 Submenu....................................................................................99
Figure 98 - Video Display of the SETUP/INPUT Page 2/DOLBY DIGITAL Page 1 Submenu .........................................100
Figure 99 - Video Display of the SETUP/INPUT Page 2/DOLBY DIGITAL Page 2 Submenu .........................................101
Figure 100a - Video Display of the SETUP/INPUT Page 2/DOLBY DIGITAL Page 2 Submenu .....................................102
Figure 100b - Video Display of the SETUP/INPUT Page 2/DOLBY DIGITAL Page 2 Submenu .....................................102
Figure 101-102 - Video Display of the SETUP/INPUT Page 2/DTS 1 and DTS 2 Submenus..........................................102
Figure 103 - Video Display of the SETUP/INPUT Page 2/CIRCLE SURROUND Submenu ............................................104
Figure 104 - Video Display of the SETUP/INPUT Page 2/POST PROCESS Submenu...................................................105
Figure 105 - Video Display of the SETUP/INPUT Page 3 Submenu................................................................................105
Figure 106 - Video Display of the SETUP/GLOBAL Page 1 Submenu ............................................................................107
Figure 107 - Video Display of the SETUP/ANALOG INPUT LEVELS Submenu..............................................................107
Figure 108 - Video Display of the SETUP/ INPUT/JACK NAMES Submenu ...................................................................107
Figure 109 - Video Display of the SETUP/GLOBAL/REMOTE POWER Submenu..........................................................108
Figure 110 - Video Display of the SETUP/GLOBAL/RS232 Submenu.............................................................................109
Figure 111 - Video Display of the SETUP/GLOBAL/MUTE-VOLUME Submenu .............................................................109
Figure 112 - Video Display of the SETUP/GLOBAL Page 2 Submenu ............................................................................110
Figure 113 - Video Display of the SETUP/MACROS Submenu .......................................................................................111
Figure 114 - Video Display of the SETUP/MACROS/RESTORE FACTORY Submenu...................................................112
Figure 115 - Video Display of the BALANCE Page 1 Menu .............................................................................................113
Figure 116 - Video Display of the BALANCE Page 2 Menu .............................................................................................113
Figure 117 - Examples of Typical Input and Tape Out Connections ................................................................................116
Figure 118 - Recommended Output Wiring Diagram Using 12 Single-Ended channels...................................................116
Figure 119 - Recommended Speaker Placement for Six-Channel Configuration.............................................................117
Figure 120 - Recommended Speaker Placement for Twelve-Channel Configuration ......................................................117
Figure 121 - Recommended Output Wiring Diagram Using 12-channels (Six Balanced and Six Single-Ended) .............118
Figure 122 - Recommended Output Wiring Diagram Using 8 balanced Xtreme channels ...............................................118
Figure 123 - Wiring diagram for the Casablanca III Digital Output board and a 2-Channel External Volume Control unit..................119
Figure 124 - Wiring diagram for the Casablanca III Digital Output board and a 6-Channel External Volume Control unit..................120
Figure 125 - Wiring diagram for the optional Six Shooter.................................................................................................121
List of Tables
Table 1 - Glossary of Terms and Abbreviations ...................................................................................................................3
Table 2 - Available configuration settings for front L/R speaker Phase Perfect crossover. ................................................56
Table 3 - Available configuration settings for front L/R speaker Linkwitz-Riley crossover. .................................................56
Table 4 - Available configuration settings for front L/R speaker Butterworth crossover. ....................................................57
Table 5 - Source to Output Routing for Speaker Level Configuration. ...............................................................................60
Table 6 – Additional Speaker Modes for Dolby Digital Source. ..........................................................................................67
Table 7 – Additional Speaker Modes for DTS Source........................................................................................................70
Table 8 – OSD Additional Speaker Modes for Dolby Digital Source. ...............................................................................101
Table 9 – OSD Additional Speaker Modes for DTS Source. ............................................................................................103
x
INTRODUCTION
Welcome to a new world of possibilities. Casablanca III is by far the most advanced surround sound
processor/home theater controller available today. It offers the advantages of Theta’s legendary mastery in
digital signal processing and sound quality unapproachable by any other equipment.
Getting to know your Casablanca III
Despite Casablanca III’s great technical sophistication, we believe in making it as easy as possible for you to
use. We think you’ll enjoy the intuitive way the Casablanca III works. Rather than offer a frustrating
bewilderment of little used functions in constant view vying for your attention, Casablanca III is structured
systematically by function.
The “user interface” is based on simple logic. For example, when a function button is pressed, you can
make changes within its menu(s) and press the same function button again to exit that function. (The same
button that got you in gets you back out).
This Casablanca III has been put through a rigorous and unique testing procedure that insures that it will last
for many years with minimal service requirements. This procedure includes the following:
•
All assembled circuit boards are given a thorough visual inspection and are then tested in a benchreference Casablanca III.
•
The tested assembled circuit boards are installed in a new Casablanca III and the whole unit is tested
for every function and parameter.
•
The unit is put on a burn-in torture rack for 100 hours to test for any possible component failures.
•
The Casablanca III is tested on an audio analyzer for all pertinent parameters.
•
The Casablanca III is put through a final bench test wherein every possible feature, mode and
parameter is checked.
•
The unit has all remaining chassis components installed and then undergoes a complete visual
inspection, which assures that all Casablanca IIIs meet visual specifications.
•
The unit is then put through a critical listening test.
Burn In Time
This unit has a break in period of about 1 week during which continuous improvement in sound quality will be
observed. It is recommended that music be played continuously through the unit during this time to expedite
the break in period.
1
IMPORTANT NOTICE
I.
Due to the computer-based circuitry used in Theta products, it is imperative that the Casablanca III
be connected to a ground via its three wire AC power cord. It is important that the AC power outlet
which the Casablanca III is plugged into, is actually grounded. Failure to do so will severely
compromise the performance, reliability and safety of use of the Casablanca III.
II.
It is important to prevent contact with static electricity when connecting other components and cables
to the Casablanca III. When connecting cables, simply place one hand on top of the Casablanca III
and then grasp the metal “barrel” of the cable with the other hand and plug (unplug) the cable into
(from) the appropriate jack on the Casablanca III.
III.
The Casablanca III, as with all electronic equipment, is susceptible to static discharges. Resetting
the unit may be required if anomalies occur after receiving a static discharge. In this case, put the
unit in standby and turn off the rear panel power switch for 2 minutes, and then turn it on again.
IV.
Ventilation is an important issue when placing the Casablanca III in a system. Make certain that the
Casablanca III is placed in a well-ventilated area or rack unit.
V.
Please take note that some powerline conditioners defeat the AC power ground on their outlets. If
the intention is to plug the Casablanca III into a line conditioner, check with your dealer to make
certain that the particular conditioner that is intended for use DOES NOT DEFEAT THE AC
GROUND on its AC outlets.
VI.
DO NOT remove any cover panels from the Casablanca III, as there are no user serviceable
components inside. Refer servicing and updating to qualified service personnel only.
VII.
Should the Casablanca III need to be reset, it must be put in standby first via the front panel power
button. Then the rear panel power switch is to be turned off for at least 2 minutes.
VIII.
The Casablanca III can be susceptible to excessive RF. End caps on all unused inputs will improve
the sound quality and may reduce the susceptibility to RF induced anomalies.
Reference Manual Conventions
For clarity purposes, references to buttons, LEDs and display parameters will be shown in BOLD CAPITOL
letters.
All functions to be performed from, and in reference to, the front panel of the Casablanca III will be found in
the front section of this manual. All functions to be performed using the hand held remote and/or viewed on
a video monitor will be found in the back, or last part of this manual.
2
Glossary of Terms and Abbreviations
TERM
AES/EBU (Audio Engineering Society) / (European
Broadcasters Union)
Analog-to-Digital Converter
Balanced Audio Signals
Center Spread
dB
Dolby 3 Stereo
Digital-to-Analog Converter
Hz (Hertz)
IR
LFE
mS
Oversampling
Phantom Center Mode
Phantom Surround Mode
Sampling Rate
S/PDIF Interface (Sony/Phillips Digital Interface
format)
TRS
Unbalanced Audio Signals (AKA single-ended)
Xover
DEFINITION
A three wire balanced digital audio standard. This interface uses a 3-pin
XLR connector and allows for data communication between digital audio
equipment.
A device that converts analog signals into a digital format. Once
encoded, all audio is stored or processed as a series of numbers rather
than as the audio itself.
Signals that are carried on three-conductor cables (AES/EBU), with two
of the conductors carrying the same signal 180° out of phase and the
third as ground.
Balanced connections usually cost more than
unbalanced connections, but are less susceptible to picking up hum and
prevent interference with low-level signals.
A proprietary Theta Digital process whereby the front center speaker
signal can be incrementally spread evenly between the front left and right
speakers.
Decibel, a relative unit of loudness.
The Dolby 3 Stereo mode reproduces sound using only the 3 front
channels, and is intended to be used either before surround speakers are
installed, or for programs that might benefit from deriving a center
channel output, but where the quality of the surround output is
unsatisfactory.
A device that converts digital signals into an analog format.
A unit of frequency.
Infrared. A method of wireless transmission of data.
Low Frequency Effect. Commonly a discrete audio track designated for a
sub woofer.
Millisecond, or 1\1000 of a second.
The process of creating more sample points in order to more accurately
reconstruct a digitized signal for playback in the analog domain.
Redirects the center channel signal equally to the front left and right
outputs, thus creating the illusion of a center speaker. This mode is
intended for use when no center speaker is present.
Intended for use when no surround speakers are present in the system.
The surround information is added to the front channels. If the current
mode is Dolby Pro Logic, the Casablanca III will automatically decode in
Dolby 3 Stereo.
The rate at which an analog (real world) signal is converted into digital
numeric values.
A digital audio interconnection standard, developed jointly by Sony and
Phillips.
Tip, Ring, Sleeve. Names of the 3 connecting elements of a stereo phono
jack or plug.
Signals that are carried on two-conductor cables, one “hot”, or signal, and
one ground.
Abbreviation for the word ‘Crossover’.
Table 1 - Glossary of Terms and Abbreviations
3
Casablanca III Block Diagram - Input Processing Sections
Figure 1 - Block Diagram of Input Processing Sections
4
Casablanca III Block Diagram - Input Processing Sections – Con’t
8 S-VIDEO CARD
S-VIDEO INPUTS
INPUT 1
INPUT 2
INPUT 3
INPUT 4
INPUT 5
INPUT 6
INPUT 7
INPUT 8
}
TAPE OUTS
VIDEO
SWITCH
VIDEO
OVERLAY
MAIN VIDEO OUTS
Figure 2 - Block Diagram of 8 S-Video Switching Card
MULTI FORMAT/6 S-VIDEO CARD
MULTI FORMAT VIDEO INPUTS
INPUT 1
INPUT 2
INPUT 3
S-VIDEO INPUTS
INPUT 1
INPUT 2
INPUT 3
INPUT 4
INPUT 5
INPUT 6
}
}
VIDEO
SWITCH
MAIN OUT
TAPE OUT
VIDEO
SWITCH
VIDEO
OVERLAY
MAIN OUT
Figure 3 - Block Diagram of Multi Format/6 S-Video Switching Card
5
Casablanca III Block Diagram – DAC, Analog & Digital Out Sections
Figure 4 - Block Diagram of Standard & Superior 1 DAC boards
6
Casablanca III Block Diagram – DAC, Analog and Digital Out Sections – Con’t
Figure 5 - Block Diagram of Superior II DAC board
Figure 6 - Block Diagram of Xtreme 4-Channel DAC board
7
Figure 7 - Block Diagram of Digital Output board, showing all options
8
Front Panel Layout
Figure 8 - Front Panel Layout
1.
40 character by 2 row blue vacuum florescent display (VFD).
2.
DISPLAY button. Temporarily overrides the VFD brightness display setting in the SETUP/INP page 1 submenu.
3.
POWER LED. Lights when the Casablanca III is in standby mode.
4.
MAIN POWER button. After the rear panel MAIN POWER switch is turned on, press the front panel POWER button to exit
standby mode. The VFD will display the last selected INPUT SELECT menu. Pressing this button again will place the
Casablanca III into standby mode and the LED above the front panel POWER button will light.
5.
REMOTE POWER button. Activates/deactivates the REMOTE POWER jack on the rear panel.
6.
Buttons 1 through 6. Used to select a desired input on INPUT SELECT pages, or parameter to change when in a submenu.
The LED over the button lights when the button is pressed. These buttons are referred to as the INPUT SELECT buttons.
7.
MODE button. Activates the MODE select menus for the currently selected input. Allows the user to temporarily override the
default MODE for the current INPUT. Will not show modes that are automatically selected.
8.
TAPE OUT button. Used for routing audio and video INPUT signals to the TAPE OUT jacks.
9.
SET-UP button. Used for setting speaker configurations/levels/delays, analog input levels, naming inputs, setting the display &
remote power jack time-out delays, selecting between NTSC and PAL video sources and accessing additional surround
parameters, and all other SETUP functions.
10.
BALANCE button. Sets temporary speaker balance configurations, shelf EQ, and analog input levels to compensate for
different program characteristics.
11.
A-D button. Sequences through input jacks mapped (assigned) to the active INPUT SELECT button.
12.
MUTE button. Mutes/unmutes all audio outputs with the exception of the TAPE OUT jacks.
13.
ANALOG LEVEL display. Shows input level, in dB, of currently selected analog input.
14.
Dolby Pro Logic IIx, Dolby Digital and Dolby EX indicator. Lights when the Dolby Pro Logic IIx, Dolby Digital and Dolby EX
features are installed. It will go out when the display is turned off.
15.
DTS -1 indicator. Lights when DTS is installed. It will go out when the display is turned off.
16.
DTS ES, DTS Neo:6 and DTS 96/24 indicator. Lights when these DTS features are installed. It will go out when the display
is turned off.
17.
Circle Surround II Indicator. Lights when the Circle Surround II feature is installed. It will go out when the display is turned
off.
18.
LOCK light. Lights when a valid digital signal is detected on the selected input.
19.
LEVEL LEFT and RIGHT buttons. Shifts audio balance to the left and right when the BALANCE function is selected, adjusts
the master volume within submenus when the LEVEL UP/DOWN buttons are to be used for parameter value editing, used to
toggle between the 2 input select pages, shifts to the next character when editing names.
20.
LEVEL UP and DOWN buttons. Increases/decreases master volume. Also used to increment/decrement values in most edit
modes, and shifts FRONT/REAR audio balance in BALANCE submenu.
21.
1 through 6 LED indicators. Light when buttons 1 through 6 are selected.
9
Rear Panel Layout
Figure 9 - Rear Panel Layout
1.
Main Power Switch. Master power switch. Disconnects AC to all circuits. It is recommended that this be left ON
at all times during regular use, except when cables are connected/disconnected or when the unit will not be used
for an extended period of time.
2.
AC Power connector: 3 wire, IEC 320 connector with an EMI filter.
3.
RS232 DB9 and RJ45 connectors. A Casablanca upgraded to a Casablanca III has only the DB9 connector, on
the Main Digital Input board.
4.
Remote Power jack. Activated/deactivated when associated front panel or remote button is pressed/pressed
again.
5.
Main Power 1 jack. Activated/deactivated when front panel POWER button is pressed/pressed again. All Main
Power jacks can output a 12V pulse (variable duration) or continuous 12VDC.
6.
Main Power 2 jack. Activated when front panel POWER button is pressed once, plus x seconds. X represents
the time value that is stored in the SET-UP/GLOBAL/REM PWR/MTIM parameter. This jack is deactivated when
the front panel POWER button is pressed again (putting the Casablanca III in Standby mode).
7.
Main Power 3 jack. Activated when front panel POWER button is pressed once, plus two times x seconds. X
represents the time value that is stored in the SET-UP/GLOBAL/REM PWR/MTIM parameter. This jack is
deactivated when the front panel POWER button is pressed again (putting the Casablanca III in Standby mode).
8.
Remote Extender jack. An externally mounted (remote) Infrared (IR) receiver plugs into this miniature stereo
phone jack. (Its signal must be demodulated). Please refer to Appendix C on page 122 for additional
information.
9.
Power Supply Module.
10. Video Card. This optional card, necessary for on-screen display, provides six composite RCA and four S-Video
inputs, all assignable to any input select button. Video inputs are routed to the video tape output jack using the
TAPE OUT button. Only S-Video input signals can be present at the S-Video Main and/or Tape outputs.
Another option for this slot is a video card containing 8 S-Video inputs with 2 main and 2 tape outs. A third option
is a video card with 3 multi format inputs and 1 output, as well as 6 S-Video inputs with an S Main and Tape
output. On this video switching card, OSD is available only on the S-Video Main output.
11. Main Digital Input card. Six Coaxial (RCA) and two TosLink inputs are provided for digital audio signals in the
S/PDIF format at 32K, 44.1K 48K or 96KHz sampling rates. There are two open spaces provided for optional
AT&T optical input module(s). There are two RCA digital Tape Out connectors on this card whose digital source
can be selected in the TAPE OUT menu.
12. Auxiliary Digital Input card. This card provides two RCA Dolby Digital (AC-3) RF inputs, one AES/EBU
(balanced XLR) input, one BNC and one TosLink input. There is one Volume Data Out port.
13. Analog Input card. Six stereo RCA inputs are provided for line level analog output devices such as VCR,
laserdisc, CD and DAT players, phono preamplifiers, external D/A converters, tape decks, AM/FM tuners, etc.
There are two pairs of analog tape outs for recording purposes, whose source can be selected in the TAPE OUT
10
menu.
14. First Analog Output card. This slot could contain one of the following: A four-channel Xtreme quality DAC
(pictured), a six-channel standard quality single-ended D/A card (left, right, center, sub, left surround and right
surround), or a three-channel balanced card (left, right and center). A balanced card can be either standard or
superior quality. All 3-channel balanced cards also have single-ended outputs; the standard card has a plus and
minus single-ended output for each channel whereas the superior quality balanced cards are equipped with one
gold plated single-ended output jack on each channel. The Xtreme card does not have single-ended outputs.
The channel sets that can be routed to a Superior II or Xtreme card (in any DAC slot) are listed on pages 12 and
13 respectively, as well as in the specifications section of this manual.
15. Second Analog Output card. This slot could contain one of the following options: A four-channel Xtreme quality
DAC card; a three-channel standard quality balanced card, a three-channel superior quality balanced card
(pictured) or a six-channel single-ended standard quality card. If only two 3-channel balanced analog output
cards are installed, this slot would typically contain outputs for sub, left surround and right surround channels.
16. Third Analog Output card. This slot could contain either a four-channel balanced Xtreme quality card; a 3channel standard quality balanced card (pictured), a 3-channel superior quality balanced card, or a 6-channel
single-ended standard quality card.
***
A Digital Output card can be installed in any available slot. This card has 12 digital output channels and comes with or
without a center analog output channel. An optional AT&T optical output can be installed for the front left and right
channels.
Figure 10 - All Single-Ended D/A Card Configuration Options
Figure 11 - All Standard Balanced D/A Card Configuration Options
11
Figure 12 - All Superior D/A Card Options and the Digital Output card with Center Channel
Figure 13 - All Superior II D/A Card Options
12
Each Xtreme DAC card can have one of the following speaker sets (channels) assigned to them, regardless of which
DAC slot it (they) are installed to:
Front Left, Right, Center, Surround Center or Sub 5
Front Left, Right, Side Left, Right
Sub 1, Sub 2, Sub 3, Sub 4
Side Left, Right, Sub 3, Sub 4
Front Left, Right, Sub 1, Sub 2
Surround Left, Right, Sub 1, Sub 2
Surround Left, Right, Sub 2, Sub 3
Front Center, Sub 1, Sub 2, Sub 3
Front Center, Sub 1, Surround Left, Right
Front Left, Right, Surround Left, Right
Surround Left, Right, Side Left, Right
Front Left, Right, Center, Sub 1
Sub 1, Sub 2, Sub 3, Surround Center or Sub 5
Surround Left, Right, Center or Sub 5, Sub 1
Surround Left, Right, Center or Sub 5, Sub 2
Front Center, Surround Center or Sub 5, Surround Left, Right
Front Center, Surround Center or Sub 5, Side Left, Right
Sub 2, Sub 3, Sub 4, Surround Center or Sub 5
Front Left, Right, Center, Sub 2
Front Left, Right, Center, Sub 3
Front Left, Right, Center, Sub 4
Sub 2, Sub 3, Side Left, Right
Sub 2, Surround Center or Sub 5, Side Left, Right
Front Center, Surround Left, Right, Sub 2
Front Center Side Left, Right, Sub 2
Figure 14 - Xtreme DAC
Note: In figure 14, each output is shown with a number 1-4. Channel labels are available to better identify each
output.
13
Menu Maps
Function Menus and Pages
Input Select Pages
Figure 15 - Mode, Status, Balance, Tape Out Menus and Input Select Pages
14
Setup Menus and Pages
Figure 16 - Setup Menus and Pages
15
Introduction to the User interface
WARNING !! : PLEASE READ FIRST!
In the SETUP menu, the PW button allows the user to password protect the entire SET-UP function. In the
SETUP/INPUT page 3 submenu, the PW button allows the user to password protect the currently selected
input. When any PW button is selected, a prompt will be displayed asking the user if they are sure they want to
change the current password (YES or NO). If YES is selected, the current password will be displayed,
prompting the end-user to change the current password. The password does not have to be changed at this
point, the same numbers that are currently displayed can be entered, using buttons 1-6 and/or A-D. Pressing
A-D enters a zero. A password containing at least one zero is null, meaning no password. Therefore, to
remove a password, press A-D at least once.
Please note that there are no passwords programmed into the Casablanca III when it is initially shipped.
PLEASE REMEMBER and/or WRITE DOWN YOUR PASSWORDS! If it/they are forgotten, all access to
password protected areas will be denied!
The menu system within the Casablanca III consists of 1 to 3 layers, with the exception of the SET-UP menu.
Some menus have multiple pages, which can be accessed by pressing the A/D button, with the exception of the
INPUT SELECT menu, which uses the LEFT/RIGHT buttons. When a menu has additional pages associated
with it, a right or left arrow will be displayed in the bottom right corner of the VFD. Please refer to figures 15 and
16 for an overall view of all menus, submenus and menu pages.
The SETUP menu contains a number of submenus, organized by setup function. All configuration parameters
which can be stored for each INPUT SELECT button (by input). They are accessed in one of the 3
SETUP/INPUT submenus. Setup parameters that are not stored individually for each INPUT SELECT button
are accessed in the two SETUP/GLOBAL submenus. All macros can be executed via the SETUP/MACROS
submenu.
Once a parameter is selected for editing, pressing the LEVEL UP/DOWN buttons edits the parameter value,
storing it at the same time. On any page, if the LEVEL UP/DOWN buttons are not used for editing a parameter
value, they will adjust the master volume. Where the LEVEL UP/DOWN buttons are used for editing a
parameter value, the LEVEL LEFT/RIGHT buttons will adjust the master volume. An exception to this is the first
BALANCE page and the pages where input select buttons and input jacks are named. In a few cases, such as
the MODE and POST PROCESS menus, simply pressing the 1-6 buttons makes a selection.
The function buttons are defined as the MODE, TAPE OUT, SET-UP, and BALANCE buttons. To exit a
function the same function button can be pressed multiple times to exit, or another function button can be
pressed at any time.
Before you begin
With all input options installed in a Casablanca III, there are up to 32 input jacks: 6 pairs of stereo analog audio,
14 digital audio, 2 AC-3 RF, 6 composite video and 4 S-video. If the optional 8 S-Video input card is installed,
then there will be 8 S-Video inputs and no composite video inputs. If the optional Multi Format/6 S-Video board
in installed, then there will be 3 Multi format video inputs and 6 S-video inputs. Each jack can be named for the
piece of equipment plugged into it. It is recommended that this step be done first. (SETUP/GLOBAL/JACK
NAMES) or using the Crystal PC software. No OSD, or on screen menus will exist when using the 15 pin multi
format video output.
Each INPUT SELECT button can have up to 6 audio and 6 video jacks mapped, or assigned. The INPUT
SELECT button should be named for the function it will serve. There are a total of 12 INPUT SELECTs on two
pages. Pressing the LEVEL LEFT/RIGHT buttons will toggle between these two pages of 6 inputs each.
The procedure for setting up each INPUT SELECT is outlined in the Step-By-Step Setup section.
Note: The order in which input jacks are assigned to an INPUT SELECT button determines the search order.
Please refer to page 44 for additional information on source assignment (search order). When more than one
input jack is assigned to a single INPUT SELECT button, toggling the A-D button [when the INPUT SELECT
page is active in the front panel display] will select the next assigned input jack – both audio and video.
16
STEP-BY-STEP SETUP GUIDE
17
Casablanca III Overall Setup Procedure Flowchart
This flowchart shows all steps required to set up the Casablanca III in order to achieve the best possible sonic
performance and to provide the simplest operation for all users. Instructions and detailed flowcharts for each step are
contained on the following pages.
18
Step by Step Speaker Configuration
Casablanca III provides a comprehensive set of speaker configuration settings. These settings are believed to be the
most complete ever offered in a home theater component and should allow any speaker to perform optimally
regardless of speaker type. The following procedure is merely a guideline: room acoustics, speaker design/quality,
music/film type, and personal preferences all have a part in these settings.
Please note that the menu and parameter names described herein are the ones shown on the front panel VFD and not
the OSD (On Screen Display). Using the Setup menu map diagram [Figure 16] on page 15 in this manual is
recommended.
There are four major steps to setting up your Casablanca III. In recommended sequence, they are:
Speaker Configuration & Crossovers: permits proper signal routing in the Casablanca III and proper blending of
main and subwoofer signals. Enables all speakers present in the system.
Individual speaker levels: compensates for different speaker and amplifier efficiencies.
Delays: compensates for different speaker distances from the listening position.
Input Specific Setup: All parameters that are specific to an individual input select button.
Each step plays a pivotal role in the overall sonic performance and should receive equal attention and care in
adjustment.
Speaker Configuration & Crossovers
Crossovers are most commonly located in a speaker cabinet. Their purpose
is to keep energy at certain frequencies from reaching specific speaker
elements (drivers), [e.g. keeping unwanted bass energy from the tweeters
(see diagram at right).] Home theater applications use crossovers in the
surround processor to send low pass information to a subwoofer and limit the
low pass information sent to the main speakers. The purpose of this section,
SPEAKER CONFIGURATION, is to properly set up the Casablanca III’s
internal crossovers for optimal sound as well as enable all speakers in the
system.
In this manual, a Speaker Set is defined as one or more speakers that are
manipulated via a common parameter.
For example, the crossover
parameters for both the front left and right speakers are manipulated in the front left/right configuration submenu since
the desired effect for the left speaker is also appropriate for the right. The other speaker ‘sets’ in the Casablanca III
are the [surround left and right], the [side left and right], the [center] and the [center surround]. The speaker sets will
be delimited by [ ].
Full speaker configurations are stored separately for each of the 12 input select buttons. This procedure will guide the
user to set all configuration parameters for input # 1, and then copy these parameters to all other input select buttons.
In the Speaker configuration submenu, buttons 1-5 will access additional menus to setup a particular speaker or set of
speakers. Button 6 will turn on the side speakers, if configured in the system. In each speaker set’s configuration
submenu, pressing button # 5 will allow a change of the crossover type for that speaker set. There are three options
for the crossover type: "Phase Perfect"; "Butterworth"; and "Linkwitz-Riley". Each crossover type has settings that are
applicable only to that type. The Front [Left/Right], [Center], [L-R Surround] and [Center Surround] speaker
configuration submenu contains a separate setup submenu for each of the three crossover types. It is recommended
that each of the three crossover submenus be set up for each speaker. The user can then audition each crossover
type to determine which sounds best on their system.
Following is a description of each crossover type to help the user better understand the sonic advantages of each:
Phase Perfect
This is a term coined for a type of crossover wherein the low pass portion is derived from the high pass. First, a high
pass Butterworth crossover is performed. This gives two resulting signals: the high pass and the original, unaltered
signal. Then, the high pass signal is subtracted from the original input signal, resulting in the low pass signal, which is
usually routed to the subwoofer. An advantage of a Phase Perfect crossover is that if the high and low pass signals
are added together, an exact replica of the original input signal results, thus the term "phase perfect". A potentially
negative attribute of this type of crossover is that, due to phase relationships and vector mathematics, higher order
filters (12, 18, 24 dB/octave) always produce 6dB/octave low pass slopes, in terms of electrical energy sent to the
subwoofer. The high pass portion will have the expected 6, 12, 18 or 24 dB /octave slope. Due to this phenomenon,
19
this type of crossover is best suited for subwoofers that can operate linearly up to the 500 Hz range. Please consult
your dealer or subwoofer manufacturer to determine if this is suitable for your particular subwoofer. If the subwoofer is
capable of handling this range, this is potentially the best sounding of Casablanca III's crossover types.
Phase Perfect Crossover Diagram
Butterworth
This is the most common type of crossover used in home theater, speakers and outboard electronic crossovers.
Separate high and low pass slopes and crossover frequencies may be set for speaker sets [Left/Right], [Center],
[Surround Left / Surround Right] and [Center Surround]. (The [Sides] duplicate the configuration and crossover
parameters for the [L/R Surround] speakers). As with Phase Perfect and Linkwitz-Riley crossovers, it is possible to
invert the phase of the low pass for each of these speaker sets. This allows precise tailoring of the subwoofer
response to the main speaker's response. A negative attribute of this crossover type is that the high and low pass
signals have different phase shifts.
Butterworth Crossover Diagram
Linkwitz-Riley
This type of crossover, developed in 1976 by Siegfried Linkwitz and Russ Riley, eliminates some of the inherent
problems of Butterworth filters. Specifically, a Butterworth filter of 12, 18 or 24 dB/octave (or higher) slope exhibits
different phase shifts between the high and low pass outputs. A Linkwitz-Riley alignment solves this problem, as it
exhibits zero phase difference between outputs at all frequencies. Acoustically, this means that if the sound sources
are in proper time-alignment, a smoother frequency response will be realized at the listening position. The LinkwitzRiley crossover is only applicable to slopes of 12 and 24 dB/octave. A proper Linkwitz-Riley crossover with a 12dB
slope should have the low pass portion inverted. This is done internally in the Casablanca III.
Linkwitz-Riley Crossover Diagram
A note on crossovers
Casablanca III's complement of crossover options can at first appear daunting. Most surround sound processors offer
a simple selection to set their crossovers: Speaker Small or Speaker Large. These simple settings do not take into
account the huge variations in speaker design and room acoustics and more often than not results in non-optimal
performance. We offer this rich set of options with the aim of superior performance. With this in mind, following are a
few simple suggestions to make this process easier.
A note on home theater
There are a few common misconceptions about home theater and bass reproduction. Chief among them is that the
".1" or "LFE" channel contains most or all of the bass information. This is unequivocally false. The LFE channel
contains sound effects such as explosions, rumbling and the like. All other channels (left, center, right, left surround,
20
right surround) often contain an equal amount of bass. Their bass, however, tends to be more related to the
soundtrack, vocal material or localized sources such as a drum beating behind the listener. This is important to
understand when setting up crossovers in the coming section.
Another misconception is that the center channel is "fill" and is of minor importance. Again, this is false. The center
channel contains the lion's share of important information (particularly dialog) in the cinematic experience. It is critical
that the center speaker be of the highest quality possible and special attention be given to its mounting and
positioning.
***
Speaker Configuration & Crossovers – Con’t.
1) Select Input # 1.
Connect a digital source to Coaxial Input 1 jack and verify that the input jack mapping is correct, i.e if the digital source
is connected to the coax input jack # 1, press the A-D button until COAX 1 appears in the VFD above the A-D button.
2) With Input button # 1 selected:
a)
Go to the SUB CONFIG submenu.
b)
Set #SUBS to the number of sub woofers that are configured into the system.
c)
If no subwoofer is present, set #SUBS to 0. The subwoofer Full Range/Crossover setting has no
effect in this case.
Note: You will now be directed to set up crossovers as if a sub were present. There are some general rules that the
Casablanca III follows in the special case of no subwoofers:
Case 1 - The front left/right speaker configuration is set to FULL:
If the center speaker is set to "crossover" its low pass signal will be sent to the left/right channels.
If the surround left/right and or the surround center speaker configuration is set to “crossover” its low pass signal
will be sent to the front left/right speakers only if the mode is Dolby Digital or DTS.
Case 2 – The surround left/right speaker configuration is set to FULL:
If the center surround speaker is set to “crossover” its low pass signal will be sent to the left/right surround
channels.
Case 3 - The front left/right configuration setting is XOVER or FUL/LP:
Any speaker that is set to crossover will lose its low pass signal. The front center will route its low pass signal to
the front left/right speakers if the center configuration setting is XOVERLR).
3) Determine if the subwoofer needs to be sent a crossed over signal or a full range signal:
a) It is preferable to defeat the subwoofer’s internal crossover and set SUB to XOVER. The crossovers in the
Casablanca III have been engineered to be superior to any analog crossover, regardless of quality.
b) If the sub woofer’s internal crossover cannot be defeated set the SUB to FULL.
c) If the sub woofer must be sent a full range signal, set the crossover frequency on the sub woofer’s internal
crossover to match that of the speaker set that is crossed over in the Casablanca III. Example:
i) If the front left/right speaker set is crossed over to 60Hz, begin by setting the sub woofer’s internal
crossover frequency at 60Hz and in the Casablanca III, set the slope to match that of the sub
woofer’s slope when performing step # 8g. (Refer to the sub woofer’s documentation to determine
its slope).
ii) If multiple speaker sets are crossed over at different frequencies some experimentation will be
required with the crossover frequency of the sub woofer. The same applies if the slopes are set
differently for each speaker set. Begin by setting the subwoofer’s frequency and slope to match the
[front left/right] values. Experiment with the subwoofer’s crossover frequency by moving it towards
the crossover frequency of the [center], if installed.
4) Determine which speaker sets ([Front left/right], [Center], [left/right Surrounds], [center surround]) need crossovers.
a) If no speaker set is present, the CFG setting should be PHANTOM or OFF. If there are no side speakers,
the sides should be set to OFF.
b) When a speaker set is set to PHANTOM, its signal is not lost. If the front center speaker is set to
PHANTOM, the center channel signal will be routed to the front left/right speakers; if the surround center
speaker is set to PHANTOM, surround channel signals will be re-routed to the surround left/right speakers.
These re-routed signals can be adjusted in volume using the Phantom Level (PHLV) parameter. Begin
with the phantom level parameter at 0 and make fine adjustments after the setup is complete.
It is preferable that none of the speakers need a crossover, but is rarely practical. Keep in mind that with a 5.1
signal (Dolby Digital or DTS), any speaker can be confronted with a full amplitude signal at any frequency.
Generally speaking, the smaller the speaker, the more limited its bass capabilities. If a speaker set doesn't need
to be crossed over, that speaker sets’ configuration (CFG) setting should be FULL. Another possible option is Full
range with low pass (FUL/LP). With this setting, the speaker will be sent the full range signal, and a duplicate low
pass signal is sent to the subwoofer to augment its low bass performance. If all speaker sets are set to "FULL
21
RANGE" or "PHANTOM", the following section (Steps 5-9) on setting crossovers may be skipped.
5) Determine whether or not the subwoofer can handle frequencies as high as 500Hz. If literature included with the
subwoofer does not state this specification, call your dealer or subwoofer manufacturer. Commonly only top-of-theline subwoofers meet this requirement.
6) If the subwoofer does meet the above requirement, first try the "PHASE PERFECT" crossover type.
7) If the subwoofer cannot handle frequencies as high as 500Hz, first try the "LINKWITZ-RILEY" crossover type.
8) Using a 2-channel CD, do the following for each of the three speaker sets (LT/RT, CEN, SURRND):
a)
b)
c)
d)
e)
f)
Go to that speaker sets’ configuration menu.
Determine if this speaker set can handle a full range signal.
If the speaker sets’ specification is -3dB at higher than 50 Hz, set the CFG to XOVER.
If the speaker sets’ specification is -3dB at 35-50Hz, set the CFG setting to FUL/LP.
If the speaker sets’ specification is -3dB at 20 Hz, set the CFG setting to FULL.
Set the crossover frequency in the Phase Perfect submenu. If a suck-out appears (lack of bass energy),
then try increasing the setting. If the transition to the sub becomes obvious, a lower frequency is
recommended.
g) Set the crossover slope in the Phase Perfect submenu. Generally, the smaller the bass driver or the
fewer the bass drive units, the steeper the required slope. A gentler slope (6dB, 12 dB / octave) is
normally less intrusive and provides better blending of the main speakers into the sub. Some sub woofers
can sound “tubby” with too shallow of a slope. A steeper slope (18dB, 24dB / octave) can provide greater
dynamic range and clearer dialog.
h) Try both settings of low pass phase. The correct setting is the one that produces the clearest, most solid
bass.
i) Repeat steps f, g and h for the Linkwitz-Riley and Butterworth crossovers, for each speaker set. In the
Butterworth crossover submenu, it is recommended that the high crossover frequency and slope be set to
the same values as the low crossover frequency and slope.
j) Set the crossover type for each speaker set.
9) In the [Center] submenu, the center channel's low pass signal may be routed to the [front left/right] channels
instead of the usual subwoofer routing (XOVRLR). This is useful for center channels that have extremely limited
low frequency response, i.e –3dB cutoff point around 120 Hz. Using this crossover type is an excellent tool to
increase the intelligibility of dialog.
Speaker Levels
Setting up the speaker levels is best accomplished using the Casablanca III’s internal noise generator and an SPL
meter. If the meter has ‘weighting’ options, “C” is preferable.
10) With Input # 1 selected, go to the speaker levels submenu.
a) Activate the noise in the front left speaker. All speaker levels should be referenced to the front left and
right speaker levels, whose reference levels should start at 0.
b) Holding the SPL meter close in front of the user’s face, bring up the master volume (using the LEVEL
LEFT/RIGHT buttons) until the SPL meter reads 75dB.
c) Activate the noise in the front right speaker and, holding the SPL meter in the same position, adjust the
speaker level up/down until the SPL meter reads 75dB.
d) Repeat this procedure for the center speaker.
e) Activate noise in the left surround speaker. Hold the SPL meter close to the left ear, point it towards the
left surround speaker, and adjust the level until the SPL meter reads 75dB.
f) Activate noise in the right surround speaker. Holding the SPL meter close to the right ear, adjust the level
until the SPL meter reads 75dB.
g) Activate noise in the left side speaker. Holding the SPL meter close to the left ear, adjust the level until
the SPL meter reads 75dB.
h) Activate noise in the right side speaker. Holding the SPL meter close to the right ear, adjust the level until
the SPL meter reads 75dB.
i) Activate noise in the center surround speaker. Holding the SPL meter close to the left, then right ear,
adjust surround center speaker level until the SPL meter reads 75dB.
j) Activate noise in Sub1 and point the SPL meter toward the sub woofer. Adjust the SUB level until the SPL
meter reads 75dB. Note that there is greater margin for error due to the low frequency output of the sub
woofer. Listening to a familiar passage and fine tuning the sub level(s) by ear in the final adjustments will
be required.
k) Activate noise in Sub 2, if configured into the system, and point the SPL meter toward the sub woofer.
Adjust the SUB level until the SPL meter reads 75dB.
l) Activate noise in Sub 3, if configured into the system, and point the SPL meter toward the sub woofer.
22
Adjust the SUB level until the SPL meter reads 75dB.
m) Activate noise in Sub 4, if configured into the system, and point the SPL meter toward the sub woofer.
Adjust the SUB level until the SPL meter reads 75dB.
n) Activate noise in Sub 5, if configured into the system, and point the SPL meter toward the sub woofer.
Adjust the SUB level until the SPL meter reads 75dB.
o) Deactivate the noise generator with the A-D button.
Speaker Delays
11) With Input # 1 selected, go to the DELAYS submenu.
a) If the center speaker is closer to the listening position than the front left and right speakers and cannot be
brought to within the same distance of them, leave the front left and right delays at 0 and adjust the CEN
(center) delay so that its sound arrives at the listener at the same time as the front left and right speakers.
The delay value should be 1mS for each foot difference.
b) If the center speaker is farther in distance from the listening position than the front left and right speaker,
then set the CEN (center) delay to 0 and adjust the front left and right speaker delays so that their sound
arrives at the listeners at the same time as the center speaker. The delay value should be 1mS for each
foot difference. Please refer to the Delays section in this manual for additional details regarding the
speaker delay feature and methods of calculating required speaker delay times.
c) If the center speaker is equal distance from the listening position as the front left and right speaker, set the
front left and right speaker and center speaker delays at 0.
d) Using the chart and method contained in the Delays section of the Owner’s Manual, calculate the delay
times for the left and right surround speakers.
Speakers in a typical 5.1 system
e) Typically the center surround speaker is closer to the listening position than the surround left/right speakers.
In this case, it must be delayed so that the sound from all of the surround speakers reaches the listener at
the same time. Calculate the difference (distance in feet) between the center surround and one of the
left/right surround speakers, to the listening position. Add this difference to the value already set for the
left/right surround speakers and use this sum to set the delay value for the center surround speaker. (1 mS
per foot of difference).
f) Calculate the difference (distance in feet) between the left side and left front speakers. Add the difference to
the default value already set for the left side to give this speaker its new value.
g) Calculate the difference (distance in feet) between the right side and right front speakers. Add the
difference to the default value already set for the right side to give this speaker its new value.
h) Because of their low frequency properties, typically a delay in the subwoofer(s) is virtually undetectable.
This being the case, it may be appropriate to leave the subwoofer delay values set at 0. However, if any
subwoofer is closer to the listening position than the front left/right speakers, a delay value can be set for
these subs. The delay value will be the difference (in feet) between the sub itself and the front left or right
speaker, to the listening position.
23
Speakers in a typical 12-channel system
Dolby Digital, DTS and Circle Surround II Setup
The center and left/right surround speaker levels and delays can be different for Dolby Digital and DTS sources, as
well as when the Mode is Circle Surround II. There are separate SETUP submenus designed just for these modes.
When the mode is Dolby Digital, DTS, or Circle Surround, the center and surround delays will work together with
changes made in the above DLYS submenu. The values of the levels set in the Dolby Digital, DTS and Circle
Surround II Setup submenus will be added to (or subtracted from) the level values in the SETUP/INP/LVLS submenu.
12)
13)
a)
b)
c)
d)
e)
Play a Dolby Digital 5.1 movie.
Go to the Dolby Digital setup submenu – page 2.
If desired, set the center speaker delay.
If desired, set the surround delay.
Set the center speaker level and the surround speaker level to 0. Please refer to the SETUP/Dolby Digital
section in this manual for additional information regarding setting the Dolby Digital center and surround
levels.
f) If no subwoofer exists in the system, a setting of 0 will route the LFE to the remaining 5 channels. Only if
no LFE is desired should this setting be OFF. Setting the LFE at –10 [dB] may be desired for late night
viewing or if source material may overpower the sub woofer. Setting the LFE to OFF may be useful for late
night viewing, however, please note that any information in the .1 channel will be lost.
g) If the incoming signal is 5.1 and the Sides or Center Surround channels are being used, set the +SPKR
value to the process which will be used to create the additional channels. This decision will be made solely
by listening to which sounds best to the user.
h) Go to the Dolby Digital setup submenu – page 3.
i) If the incoming signal is EX flagged and the Sides or Center Surround channels are being used, set the
+SPKR value to the process which will be used to create the additional channels. This decision will be
made solely by listening to which sounds best to the user.
Remember that these values will be in effect only when the MODE is Dolby Digital and specific flags are present.
a)
b)
c)
d)
e)
f)
g)
Play a DTS encoded CD or movie.
Go to the DTS page 1 Setup submenu.
If desired, set the center speaker delay.
If desired, set the surround delays.
Set the center speaker level.
Set each surround speaker.
Set the LFE level at 0 for DTS movies, or -10 for DTS music. (The user can choose to use two separate
input select buttons, one for DTS movies and one for DTS music, all parameter values being the same
except for the LFE setting).
h) If the incoming signal is 5.1 and the Sides or Center Surround channels are being used, set the +SPKR
value to the process which will be used to create the additional channels. This decision will be made solely
by listening to which sounds best to the user.
These parameter values apply only when the MODE is DTS.
24
14)
a) Play a 2-channel CD.
b) Go to the Circle Surround II Setup submenu.
c) If desired, set the center and surround speaker delays.
d) Set the center speaker level and each surround speaker levels.
e) Set the Dialog Clarity (DCLR) ON or OFF, then set its range.
These parameter values apply only when the MODE is one of the three Circle Surround II modes.
Remaining Setup
15) Now that the speaker configuration, crossovers, levels and delays have been set up for input select button #1,
they should be copied to all input select buttons as a good starting point. Do this in the MACROS submenu when
input select # 1 is the current input.
16) Each input select button has a default mode assigned to it. The default mode for a given input select button is set
and stored in the first SETUP/INPUT page. As the user scrolls through the list of modes, there are 2 positions in
this list that are not currently used. In these positions, the word SKIP will be displayed.
a) Press input select button #1.
b) Go to the SETUP/INP – page 1 submenu.
c) Set the applicable default MODE.
d) Repeat steps b and c for each input select button.
17) An input signal is “processed” a certain way depending on which MODE is currently selected. It is possible to
further process this signal for specific applications. (For details, refer to the Post Process section of this manual).
If it is desired to further process the signal, continue with this step.
a)
b)
c)
d)
e)
f)
With Input # 1 selected, go to the Post Process submenu.
Select a Post Process.
Select Input # 2.
Go to the Post Process submenu.
Select a Post process.
Repeat steps c and d for each input select on which it is desired to have a Post Process.
18) The audio and video SOURCE pages allow the user to map up to six audio and 6 video input jacks to the currently
selected input. It is recommended that all other displayed jacks in this submenu be cleared if they are not to be
used. Please refer the Mapping Jacks and Search Order sections of this manual for additional details about
mapping input jacks to a given Input Select button.
Verify that the desired rear panel audio and video input jacks are properly mapped to each Input Select button that
is to be used.
a) Select input # 1.
b) Go to the AUDIO SOURCE submenu.
c) Map all appropriate rear panel audio input jacks.
d) Go to the VIDEO SOURCE submenu.
e) Map all appropriate video input jacks.
f) Select input # 2.
g) Repeat steps b through e for all used input select buttons.
19) All analog sources must have their input levels set in order to obtain the best signal to noise ratio as well as to
ensure that no clipping occurs.
a) Go to the ANALOG LEVELS submenu.
b) Select the first set of jacks with an analog input jack assigned to it.
c) Adjust the analog input level.
d) Repeat steps b and c for each analog source.
Make adjustments so that during the most aggressive passages, the red clip light never comes on, but the –6 or –
12 lights are on.
25
Setup Flowcharts A-P
Flowchart A – Setup Subwoofer(s)
26
Flowchart B – Front Left/Right Configuration
27
Flowchart C – Front Center Configuration
28
Flowchart D – Left/Right Surround Configuration.
29
Flowchart E – Surround Center Configuration
30
Flowchart F – Sides Configuration
31
Flowchart G – Setup Speaker Levels
32
Flowchart H – Setup Speaker Delays
33
Flowchart I – Setup Dolby Digital
34
Flowchart J – Setup DTS
35
Flowchart K – Setup Circle Surround
36
Flowchart L – Copy Input/Speaker Parameters
37
Flowchart M – Setup Default Mode
38
Flowchart N – Setup Post Process
39
Flowchart O – Map Input Jacks
40
Flowchart P – Setup Analog Input Levels
41
FRONT PANEL OPERATIONS
This section describes the functionality of each button on the Casablanca III’s front panel display only. For
remote functionality descriptions, please refer to the section entitled REMOTE CONTROL OPERATIONS
later in this manual. Descriptions for front panel buttons/functionality not covered in this section can be
found in the preceding FRONT PANEL LAYOUT section.
Input Select Menus
When the Casablanca III is first powered up via the MAIN POWER switch on the back panel, it will check all
software and hardware. It is in the default standby mode as soon as the front panel MAIN POWER LED is lit.
After pressing the MAIN button on the front panel, the front panel display will show the start-up routine and
then the current INPUT SELECT page, shown in figure 15 below. As this menu appears, the MAIN LED
turns off. This display will be on during normal operation and will change only when one of the function
buttons (or the STATUS button) is pressed.
When the Casablanca III is put into standby, the front panel display will read CHECKING DISPLAY and then
all pixels will be illuminated for approximately 10 seconds. This check prolongs the life of the display.
Changing Inputs and Input Select Pages
The INPUT NAMES shown in this figure are for example only and will most likely differ from the user’s set
up. There are two INPUT SELECT pages, giving the user a total of 12 inputs. Buttons 1 through 6 are used
to select a desired input, or audio/video source. The LED above the selected button will illuminate when
pressed. When the Casablanca III exits standby mode, the last active INPUT SELECT will be selected.
Pressing the LEVEL LEFT or RIGHT buttons switches between the two INPUT SELECT pages.
***
Figure 17 - Front Panel Display of the current INPUT SELECT page
Pressing the LEVEL UP/DOWN buttons will adjust the master volume for all speakers. A temporary bar
graph appears on the VFD and OSD as the master volume is being adjusted. This value ranges from 0 to
73, relative maximum.
The current MODE is displayed in the upper left corner. The “Additional Speakers” setting as well as the
post process selection is also displayed. The displayed mode can vary slightly, depending on what the input
signal is and which speakers are active. For example, if a center surround speaker is present and activated
when a Dolby Digital EX signal is playing, the mode may be displayed as “Dolby Digital EX” however if the
Center Surround speaker in this example were not present or turned on, then the mode would be reflected
as “Dolby Digital”. This is because EX is not applicable when the speakers are reflective of a 5.1 (or less)
system.
Selecting Mapped Input Jacks for the Currently Selected Input
Pressing the A-D button will toggle between the input jacks that are mapped to this INPUT SELECT button.
Please refer to page 44 (Search Order) for important, detailed information regarding using the A-D button.
***
The MUTE button will toggle the audio between the master volume level and MUTE level* in all speakers
42
each time it is pressed. When the mute feature is enabled, the word LEVEL in the VFD will be replaced with
the word MUTED, which will remain displayed until the mute is disabled. The MUTE feature is active in all
menus, at all times.
*Note: The factory default value for MUTE is 0, which is to say that when the MUTE button is pressed, the
output level of all channels will be completely muted (master volume = 0). The Casablanca III offers a
feature in the SETUP/GLOBAL/MUTE-VOLUME submenu whereby when the MUTE button is pressed, the
Casablanca III will mute to a user defined master volume level. Please refer to page 78 for additional
information regarding this feature.
The Casablanca III can be un-muted in two ways: pressing either the MUTE button or the LEVEL
UP/DOWN buttons. Please refer to page 78 for additional information regarding this feature.
The DISPLAY button will toggle the front panel VFD brightness between off, 1⁄4, 1⁄2, 3⁄4 and full brightness.
This feature will have no effect on the video display. When the VFD is turned off, the red logo LEDs also
turn off.
This change will be temporary and will hold only until another action is taken. To permanently set the VFD
brightness, by INPUT SELECT button, go to SET-UP/INP/VFD.
43
Search Order
The Casablanca III’s inputs can support virtually every analog and digital and video format used in today’s
technology. Up to 6 audio input jacks can be mapped to each INPUT SELECT button. These 6 input jacks
can be all digital, all analog or any combination of both. In the SETUP/INP Page 2/SOURCE/AUD page, the
order in which they are mapped to a given INPUT SELECT button determines the order each is displayed
when the A-D button is pressed when in the INPUT SELECT menu. This is called Input Search Order.
Figure 18 below shows INPUT SELECT 1 having the CD and DVD input jacks mapped to it, with the CD jack
having the highest priority (being in the first position). In this example, there are no other physical input jacks
required to be mapped to INPUT SELECT 1, therefore the jack name positions of 3-6 are blank. Pressing
the A-D button while in the INPUT SELECT page, will toggle between the CD input jack and the DVD input
jack. Pressing the A-D button in the SETUP/INP Page 2/SOURCE/AUD submenu will access the video
search order page. In this page, pressing buttons 1-6 will allow the user to assign a video input jack (1-6) to
correspond to the respective audio search order. In the above example, one would not assign a video jack
to search order # 1 since the audio search order # 1 is assigned to CD, which is not a video source. If one
wanted an unrelated video source to be viewable when listening to CDs, simply map a video source to video
search order # 1. Also in the above example, one would normally assign the DVD video input to video
search order # 2.
Figure 18 - Front Panel Display of the SETUP/INP page 2/SOURCE/AUD page
Caution: Please take special care to insert only a digital signal into a digital input jack and an analog signal
only into an analog input jack. Damage, not covered under warranty, can occur if an analog signal is applied
to a digital input. Additionally, please ensure that a video plug is not inadvertently inserted into a digital
audio jack and visa versa, otherwise, the Casablanca III will cease to respond.
44
MODE Function
Pressing the MODE button (shaded in figures 19, 20 and 21) once displays the first page of the MODE
menu. This first page consists of 6 different signal ‘processing’ modes, one of which can be selected and
temporarily applied to the currently selected input signal, when applicable. A right arrow is displayed in the
lower right corner of the VFD indicating that there is an additional MODE page. Pressing the A-D button
once will reveal the second page and once more for the third page, all consisting of additional modes.
Figure 19 shows the first MODE page, figure 20 shows the second and figure 21 shows the third.
Note: This menu allows the user to audition different modes when possible. It does not store the changed
mode. When a different INPUT SELECT button is pressed, or the Casablanca III is powered down, the
MODE will revert to its default for that INPUT SELECT button. Each INPUT SELECT button can have its
own default MODE, the default mode for each INPUT SELECT is set in the SETUP/ INPUT menu. Please
refer to page 62 (Default Mode) for information on setting the MODE for an INPUT SELECT button.
***
Figure 19 - Front Panel Display of the MODE Page 1 Menu
Press button 1 - 6 to select the desired mode. The corresponding LED above buttons 1 through 6 will
illuminate.
Each of the 6 modes shown in figure 19 are described below:
Pro Logic IIx outputs 5.1, 6.1 or 7.1 channels from 2-channel or 5.1 channel sources, incorporating the best
elements of Dolby Digital, Dolby Digital EX and Dolby Pro Logic II.
Dolby Pro Logic IIx Movie (MOVIE). Intended to be used with 2-channel TV sources and will create 5.1, 6.1
or 7.1 output channels. Movie mode is the reference decoder mode for any such surround-encoded
program.
Dolby Pro Logic IIx Music (MUSIC). The Music mode is for use with stereo recordings and provides a wide
and deep sound space. The Music mode balances the multi-channel surround sound field to content that
was not specifically encoded for surround playback. The Music Mode includes controls that allow additional
sound tailoring. These include Center Width and Panorama Mode, which are both discussed in the Setup
Dolby Digital section of this manual.
Dolby Pro Logic IIx Matrix (MMATX). This mode is intended to enhance incoming an mono signal or make a
poor incoming FM signal more listenable by forcing it into mono.
DTS Neo:6 was designed to provide a richer and more natural surround sound experience from 2-channel
sources. It outputs 5.1 or 6.1 channels. An incoming Neo:6 signal can be encoded as either Matrix or
Discrete.
DTS Neo:6 Cinema (CINE). This is intended to be used with a 5.1 or 6.1 channel source and will output 5.1
or 6.1 channels.
45
DTS Neo:6 Music (MUSIC). This mode will take an incoming 2-channel source and output 5.1 or 6.1
channels. It is intended to be used with any 2-channel source. It preserves the integrity of a stereo mix
while augmenting it with a center to anchor the image, and derive enough sound content to yield a spacious,
three dimensional listening experience. Music Mode includes a user adjustable variable called CGAIN, or
Center Gain. This is discussed in the SETUP\DTS section of this manual.
STEREO: Left and Right input signals are sent to the Left and Right front speakers. If crossed over in the
SETUP\SPKR\CONFIG menu, SUB channel(s) will be produced.
Press the A-D button to navigate to the second page of the MODE menu.
Figure 20 - Front Panel Display of the MODE Page 2 Menu
Each of the 6 modes shown in figure 20 are described below:
Circle Surround II can process an incoming mono, stereo or surround signal and output on all active
channels of the Casablanca III.
Circle Surround II Cinema (CINE): This mode is often used with an incoming signal that is Circle Surround
encoded.
Circle Surround II Music (MUSIC): This mode is intended for use with 2-channel music sources that are not
encoded. It will decode and route information to all active channels in the Casablanca III, maintaining stereo
surround left/right imaging.
Circle Surround II Mono (MMATX): This mode is intended for an incoming mono signal. A mono-to-stereo
algorithm is applied before performing the decoding. After decoding, the signal will be matrixed into all active
channels in the Casablanca III.
When using Circle Surround modes, the Dialog Clarity can be adjusted. Please refer to the SETUP\Circle
Surround section of this manual.
Matrix (MATX): The signal routed to the center speaker is equal to the left plus right input signals and the
mono signal routed to the surround speakers is equal to left minus right signals. Crossing over any
speaker(s) produces sub channel(s).
Special Matrix (SPCL MATX): A mode similar to Dolby Pro Logic with more ambience retrieval in the
surround speakers. Crossing over any speaker(s) produces a sub channel.
MONO: This mode routes the input signal to the center channel only, however, if the center channel is
crossed over, a sub channel will be produced. If the center channel is set to OFF or PHANTM in the
SETUP/ INPUT/CONFIG submenu, the input signal will be routed to the front left and right speakers.
From the second MODE page, press the A-D button to navigate to the third page of the MODE menu.
46
Figure 21 - Front Panel Display of the MODE Page 3 Menu
Analog Direct (ANLG DRCT): This mode takes the selected analog input and routes it directly to the main
Left/Right output volume controls. Since there is no surround processing in Analog Direct, the sub woofer,
EQ, phantom center channel, and crossover effects are not available. Note: If these effects are desired, use
the STEREO mode. The Analog Direct mode will route only an analog signal to the outputs.
Analog Matrix (ANLG MATX): The signal routing in this mode is the same as Analog Direct (ANLG DRCT),
(left & right analog input signals routed directly to the main outputs via the volume controls), and at the same
time the input left and right signals are routed through an analog to digital converter and matrixed in order to
derive the other channels, which include left & right surround, sides, center and center surround. These
other channels can have EQ and be crossed over (creating a SUB channel), but the front left and right
channels will carry only the direct analog signal. The Analog Matrix mode processes a 2-channel analog
input signal only.
***
The current Mode is always shown on the top left of the main Input Select menu. If the incoming signal
contains an identifying flag, a bit of information contained in the incoming digital data stream, the Casablanca
will automatically switch to that mode. An example of this would be DTS Discrete, Dolby EX, DTS Matrix,
DTS ES, DTS 96/24.
These modes are not selectable by the user since they are intended for use only when that signal type is
detected.
***
If the Casablanca III detects a flagged Dolby Digital signal on the selected digital input jack, and the MODE
is not set to DOLBY DIGITAL, the Casablanca III will display the following message on both the VFD and
OSD monitor:
**RECEIVING DOLBY DIGITAL SIGNAL**
CHANGING MODE TO DOLBY DIGITAL
and display one of the DOLBY DIGITAL modes as the current mode. Approximately 2 seconds after the
Casablanca III ceases to receive this signal (no lock), the MODE will revert back to the default mode for that
Input Select button. If the detected signal’s format is Dolby Digital 2.0, the same auto detecting message will
appear for a few seconds and the display will show DOLBY DIGITAL+ PRO LOGIC as the mode. Please
refer to page 79 to turn on or off the Mode Change message.
If the Casablanca III detects a flagged DTS signal on the selected digital input jack, and the MODE is not set
to DTS, the Casablanca III will display the following message on both the VFD and OSD:
**RECEIVING DTS SIGNAL**
CHANGING MODE TO DTS
47
and display one of the DTS modes as the current mode. Approximately 2 seconds after the Casablanca III
ceases to receive this signal (no lock), the MODE will revert back to the default mode. Please refer to page
70 for additional DTS setup options, selectable in the second page of the SETUP/INPUT submenu.
Note: The “auto-detecting” messages for Dolby Digital and DTS will not show, by default. There is a
parameter in the SETUP/GLOBAL page 2 submenu (page 79) that turns this feature on and off.
***
After selecting a temporary mode for the current input channel, pressing the MODE button once more
returns the Casablanca III to the INPUT SELECT menu. While in the MODE menu, the MASTER VOLUME
can be controlled using the LEVEL UP/DOWN buttons.
Note: If the default MODE is DOLBY DIGITAL or DTS and a non-flagged 96K signal is received, the
Casablanca III will momentarily display a message (if the MSG parameter is set to ON) indicating that it is
receiving a 96K signal and [temporarily] changing the current mode to STEREO. The user can change this
mode, after it has been changed to STEREO, by using the front panel MODE button and selecting a different
and applicable MODE. The user cannot change which MODE the Casablanca III initially changes to when
receiving a 96K signal if the default MODE for the currently selected input is either DOLBY DIGITAL or DTS.
48
TAPE OUT Function
This feature simultaneously controls the routing of signals to the analog audio, digital audio and the video
tape out jacks.
Pressing the TAPE OUT button once changes the VFD display to the TAPE OUT menu shown in figure 22.
Note: The jack names shown in this figure are for example only and will most likely differ from the user’s set
up.
***
Figure 22 - Front Panel Display of the TAPE OUT Menu
In this menu, pressing button # 1 allows the user to route any audio input jack - analog or digital - to the
analog TAPE OUT jacks. This menu is completely dynamic. When the audio source is from an analog jack,
the digital tape out jacks are disabled. This is indicated in both the OSD and VFD. Digital input sources will
be routed to both the Analog Tape Out jacks and the Digital Tape Out jacks. If RF is selected for tape out, it
is routed to the analog tape out jacks only. Analog sources will be routed only to the Analog Tape Out jacks,
disabling the Digital Tape outs. This is confirmed in the lower right corner of the VFD by the indication “DIGI
OFF” when an analog source is selected.
Button # 3 allows the user to select a video source to route to the video TAPE OUT jacks. If the optional
video board is not installed, the user’s ability to route a video source to the video tape out jacks is not shown
in the display.
The control circuitry to the video tape out jacks is common to composite, s-video and multi format video
jacks. Example: when the user routes the composite video signal from a composite input # 1 jack to the
composite video tape out jack, the s-video # 1 input simultaneously gets routed to the s-video tape out jack.
If composite video # 2 input jack is routed to the composite video tape out jack, then s-video input # 2 jack
gets routed to the s-video tape out jack, and so on.
Note: A composite video source will only be routed to the composite video TAPE OUT jack and an S-video
source can only be routed to the S-video TAPE OUT jack.
When the MAIN DACs are selected (default), this is indicated in both the VFD and OSD. If the optional tape
out DAC is not installed, the option to select it (via button # 5) is not shown.
Button # 5 allows the user to select whether the signal at the analog TAPE OUT jacks is derived from the
main output DACs or the optional tape out DAC, (if installed), by displaying MAIN or TAPE above button # 5.
The TAPE setting is only relevant if a digital source is being routed to the analog tape out. All analog inputs
are routed directly to the TAPE OUT jacks, without A/D to D/A conversion.
The ANALOG, DIGITAL and VIDEO sources can be set to INPUT. With this setting, the tape out sources
will ‘follow’ whichever input the user has currently selected. When the user changes inputs, the tape out
source simultaneously changes to the currently active input jacks.
49
When the routing is completed, press TAPE OUT again to clear the video display. While in these menus,
the MASTER VOLUME can be controlled via the LEVEL LEFT/RIGHT buttons.
CAUTION: It is not advisable to route a decoded multi-channel source (DTS/Dolby Digital) to the optional
tape out DAC as this section does not contain Dolby Digital or DTS decoding capabilities. Full scale and
potentially damaging noise will be output!
Standard Tape Out Configuration
The following guidelines apply when the tape out circuitry is in its standard configuration, i.e. the optional
tape out D/A converter has not been installed.
A source to be recorded (via the analog TAPE OUT jacks) can be selected independently of the source
currently being viewed or listened to provided that the input for the source to be recorded is ANALOG.
It is possible to record a digital source in analog, only if the source is the same as the input being watched or
listened to (or the source that is currently selected). If the desired source is multi-channel (DTS/Dolby
Digital), it is recommended that both the surrounds and center speakers be set to phantom (PHTM). This
mixes those channels’ information into the front left/right channels to ensure that all channels of information
are heard.
Optional Upgrade Tape Out Configuration
When the optional D/A converter has been installed onto the Digital Input board, one digital source can be
recorded, i.e. sent to the analog TAPE OUT jacks, at the same time as a second digital source is being
listened to on the main outputs.
50
SETUP Function
This function provides access to a series of submenus that will allow the configuration of the entire system. In this
section, each feature of the SETUP menu is discussed in detail along with a diagram of each VFD display.
Note: A complete step-by-step speaker configuration setup guide is located on page 17.
Pressing the SET-UP button once changes the front panel display to the first page of the SETUP menu, shown in
figure 23.
Figure 23 - Front Panel Display of the SETUP Menu
As indicated in figure 23, button 1 is assigned to features that are stored by input and leads to submenus on 3 pages.
Button # 2 accesses all submenus and parameters that are global (not programmable to each INPUT SELECT).
Button # 3 accesses the MACROS submenu and button # 4 allows the user to password protect all SETUP features.
Button # 5 displays the configuration of the installed DAC cards.
Setup Button Password
It is possible to password protect the entire SETUP function, or have no password at all. If a password is set here, the
user will be asked to enter the 5 digit password whenever the SETUP button is pressed. To set a password for the
SET-UP button press button # 4. The user will be asked “ARE YOU SURE YOU WANT TO ENTER A PASSWORD
FOR THIS MENU?” Choosing “YES” (the A-D button) will display the following page:
Figure 24 - Front Panel Display of the SETUP/Assign Password Display
Use buttons 1-6 to assign a password. If no password is to be used (factory default), press the A-D button five times,
entering all zeros. All zeros, or a zero anywhere in the password negates the password.
CAUTION: It is imperative that all passwords be written down. If forgotten, ALL access to the SETUP menu will be
denied. Please see the WARNING on page 16.
DAC Configuration
Pressing button # 5 allows the user to view the channels assigned to each DAC card. This is an information page only
and not an editable menu. As an example, the first page will say “LEFT FRONT CEN” if a three-channel Standard or
Superior balanced DAC card is in DAC slot # 1. Press the A-D button to view the channels assigned to the second
DAC card. Press the A-D once more for the third DAC card, if installed. Press SET-UP once to exit this menu.
The following section will discuss all menus and parameters under the INPUT button.
51
SETUP INPUT (Settings specific to each of the 12 Input Select Buttons)
Setup Input Page 1
All parameters accessed within the SETUP/INP menu are separately programmable for each of the 12 INPUT
SELECT buttons.
From the SETUP menu press button # 1 (INP). The first of three pages of the SETUP/INPUT submenus will appear,
as shown in figure 25.
Figure 25 - Front Panel Display of the SETUP/INPUT page 1 Submenu
Pressing button # 1 takes the user into a series of submenus that allow the configuration of all speakers. Button # 2
allows the user to set the speaker levels and button # 3 allows the user to set speaker delays.
Press button # 4 and use the LEVEL UP/DOWN buttons to set the default MODE for the currently selected INPUT
SELECT button.
Pressing button # 5 provides a submenu that allows the user to customize the on screen display (OSD) as well as set
up other OSD features, including the customization of the STATUS displays.
Button # 6 provides a means of setting the VFD brightness for the currently selected INPUT SELECT button.
Pressing the A-D button takes the user to page 2 of SETUP/INP.
Setup Speaker Configuration
The Speaker Configuration section utilizes the menus shown in figure 26.
Figure 26 - Menu Map of SETUP/INP Page 1/CONFIG
The configuration submenus (CONFIG) allow the user to configure the Casablanca III to reflect the audio system
52
configuration or the listener’s preference for the available speakers and their respective frequency responses.
All speaker configuration parameters are accessed by pressing button # 1 (CONFIG). This leads to a series of
submenus. The first submenu, SPEAKER CONFIG is shown below, in figure 27.
Figure 27 - Front Panel Display of the Speaker Configuration Submenu
As indicated in figure 27 above, the front left/right speaker configuration is accessed by pressing button # 1, the center
via button # 2, the left/right surrounds with button # 3, # 4 is for the sub woofer(s), # 5 for the center surround and # 6
allows the user to turn the side speakers, if any, ON or OFF. Before configuring any speakers in the system, it is
important to configure the sub woofer. First, determine whether or not a sub or subs are required or desired. Press
button # 4 to go to the SUB CONFIG submenu, shown in figure 25, and set up the sub(s). If no sub(s) is present, or is
not desired, set the number of subs (#SUBS) to 0 and disregard any crossover types at this time. Lastly, configure the
other speakers in the system via buttons 1-3 and 5-6.
Note: Information for the side channels is the same as the left/right surrounds. Therefore the configuration setting for
the surrounds also applies to the sides. Level and delay settings can be applied separately for the sides via the Levels
and Delays submenus, respectively.
SUB Configuration
Note: If the source does not contain a discrete LFE channel, no signal will be routed to the SUB output(s) unless one
or more speakers are crossed over. If the source contains a discrete LFE channel and the #SUBS is turned off (set to
0), the LFE signal will be routed equally to all speakers whose CFG is set to FULL.
Figure 28 - Front Panel Display of the Subs Configuration Submenu
Unlike most configuration submenus in the Casablanca III, this one is not dynamic. In other words, if there are 1-5
DAC channels installed that are configured as sub woofers, this submenu will show, and allow configuration editing for
all 5, except for the #SUBS parameter. In this case, should a Casablanca III be installed with only one sub channel,
this value will allow only one or zero, etc.
If the number of Subs (#SUBS) is set to 1, all low-pass portion of all crossed over speakers and the full LFE are routed
to the SUB 1 output. (Labeled SUB if there is only one sub output, LEFT FRONT SUB or SUB1 if there is more than
one sub output). If the number of SUBS is set to more than 1, any low pass signals and LFE will be routed as follows:
If the #SUBS is set to 2 they can be either L-R or F-R. If set to L-R (Front Left/Right), any LFE and the low pass
portion of any front speakers that are crossed over will be routed to the front left/right sub woofers. (The LFE is
divided by 2, added to any low pass information and distributed evenly between them). If the #SUBS is set to F-R (2
subs – 1 front and 1 rear), each sub will get half of the LFE. The low pass portion of any front speakers that are
crossed over will be routed to the front sub whereas the low pass portion of any surround speakers will be routed to
53
the rear sub woofer.
If the #SUBS is 3, the low pass portion of the front speakers that are crossed over will be routed to the 2 front subs
and the low pass from the surround speakers that are crossed over will be routed to the rear sub. LFE will be divided
by 3 and routed equally between the 3 subs, added to any low pass signal. If there are more than 3 DAC channels
assigned to subs yet the #SUBS is set to 3, the third, or rear sub will be output from the channel marked SUB 3 or
LEFT SURROUND SUB. When the #SUBS is set to 3, the first 2 will always be the FRONT LEFT and FRONT
RIGHT subs and the third will always be used for low pass signals from the surround speakers, plus some LFE.
If the #SUBS 4, each sub will get 1⁄4 of the LFE. Additionally, the low pass signal from any front speakers that are
crossed over will be routed to the front subs (SUB 1 and SUB 2) and the low pass signal from any surround speakers
that are crossed over will be routed to the surround subs (SUB 3 and SUB 4).
In this case, SUB1 = Left Front Sub, Sub2 = Right Front Sub, Sub3 = Left Surround sub and Sub4 = Right Surround
Sub.
If the #SUBS is 5, each sub will get 1/5 of the LFE. The low pass signal from the front left/right speakers, if crossed
over, will be routed to the front left and right subs. If the center speaker is crossed over, its low pass signal will be
routed to the SUB5 output. The low pass signal from any surround speakers that are crossed over will be routed to
the left/right surround subs.
If subs are present in the system, verify that the #SUBS is set to equal the number of sub woofers being used (button
# 1 in figure 28), and determine if each one needs to be sent a crossed over or a full range signal. (FULL or XOVER
in the VFD, FULL RANGE or CROSSOVER on the OSD). FULL is only required if the subwoofer contains its own
crossover that cannot be defeated. If that this is the case, it is recommended that the subwoofer manufacturer be
contacted to see if there is a possible modification to the subwoofer to defeat its crossover. The crossovers in the
Casablanca III have been engineered to be superior to any analog crossover, regardless of quality.
Left/Right Speaker Configuration
The left/right configuration section contains the submenus shown in figure 29.
Figure 29 - Menu Map of SETUP/INP Page 1/CONFIG/LT/RT
Before proceeding to configure and cross over speakers, it is important to better understand the 3 types of crossovers
in order to select the most appropriate crossover type, crossover points and slopes. A discussion about crossovers
follows.
54
Crossovers
The Casablanca III contains a comprehensive set of speaker configuration settings. These settings are believed to be
the most complete ever offered in a home theater component and should allow any speaker to perform optimally
regardless of speaker type. It is important to bear in mind that the below procedure is merely a guideline and that
room acoustics, speaker design / quality, music / movie type, and personal preference all play a part in these settings.
Each full speaker configuration is stored separately for each INPUT SELECT button. In SETUP/INP Page 1, press
button # 1 (labeled CONFIG on the VFD, SPEAKER CONFIGURATION on the OSD) to access the speaker
configuration menu.
In the speaker configuration submenu, pressing buttons 1-5 will access additional menus to setup each set of
speakers. For each speaker set there are three settings for the crossover type: "Phase Perfect", "Butterworth", and
"Linkwitz-Riley". It is possible to select one crossover type for the front left/right speakers, a different one for the
center and a third type for the surrounds. It is recommended that in the beginning, the same type be used for all until it
is time to fine tune. To help the user better understand the sonic consequences and individual advantages, please
refer to the 5 headings of the Step-By-Step Setup guide on page 19, that begin with “Phase Perfect” and end with “A
Note on Home Theater”.
***
Press button # 1 to set up the front left/right speakers. This configuration submenu is shown in figure 30.
Figure 30 - Front Panel Display of the Front Left/Right Speaker Configuration Submenu
Pressing button # 1 allows the configuration of the front left/right speakers. If these speakers are not to be crossed
over (a portion of their signal sent to the SUB output(s)), then the setting should be FULL.
FULL/LP is a crossover option which sends the full left/right channel information to the front left/right speakers and
duplicates the low pass portion in the subwoofer(s). If FULL/LP is selected, a crossover type must be selected (button
# 5), and the appropriate crossover frequencies and slopes set up using buttons 2-4.
Note: If the crossover type is Phase Perfect (φPERF) and the CFG type is set to FUL/LP, no low pass signal will be
created. This is a unique limitation of the Phase Perfect crossover type.
Should it be desired to crossover the front left/right speakers, the CFG setting (button # 1) should be set to XOVER
and the crossover frequencies and slopes in the Phase Perfect (φPERF), Linkwitz-Riley (LINK-RILEY) and
Butterworth (BWORTH) submenus be set using buttons 2, 3 and 4 respectively.
Note: It is advisable to select the same crossover frequencies and slopes in all 3 crossover type submenus (buttons 24), and then toggle the crossover TYPE (button # 5) and audition each crossover. Initially, this should be done with all
other speakers turned off. This procedure should be applied when configuring each speaker set.
Set up the crossovers as follows. Press button # 2 (φPERF). This submenu is shown in figure 31.
Figure 31 - Front Panel Display of the SETUP/INP/CONFIG/LT/RT/φPERF Submenu
55
Press button # 1 and select a Phase Perfect crossover frequency for the front left/right speakers, then button # 2 to set
the high pass slope.
Button # 3 allows the user to invert the low pass phase from 0 (+) to 180 degrees out of phase.
AVAILABLE SETTINGS
BUTTON
1
2
3
PARAMETER
FREQ
SLOPE
LPφ
40
6
-
50
12
+
63
18
80
24
100
125
160
Table 2 - Available configuration settings for front L/R speaker Phase Perfect crossover.
Press SETUP once to return to the front left/right configuration submenu. Press button # 3 (LINK-RILEY) to set up the
Linkwitz-Riley crossovers. This submenu is shown in figure 32.
Figure 32 - Front Panel Display of the SETUP/INP/CONFIG/LT/RT/Link-R Submenu
Press button # 1 and select a Linkwitz-Riley crossover frequency for the front left/right speakers, then button # 2 to set
the high and low pass slope. Button # 3 allows the user to invert the low pass phase from 0 (+) to 180 degrees out of
phase.
AVAILABLE SETTINGS
BUTTON
1
2
3
PARAMETER
FREQ
SLOPE
LPφ
40
12
-
50
24
+
63
80
100
125
160
Table 3 - Available configuration settings for front L/R speaker Linkwitz-Riley crossover.
Press SETUP once to return to the front left/right configuration submenu, then press button # 4 (BWORTH) to set up
the Butterworth crossovers. This submenu is shown in figure 33.
Figure 33 - Front Panel Display of the SETUP/INP/CONFIG/LT/RT/BWORTH Submenu
Press button # 1 and select a Butterworth high pass crossover frequency, then button # 2 to set the high pass slope.
Press button # 3 to set the low pass crossover frequency, then button # 4 to set the low pass slope. Generally
speaking, the high and low pass crossover frequencies should be the same unless compensating for unique room or
speaker characteristics. Button # 5 allows the user to invert the low pass phase from 0 (+) to 180 (-) degrees out of
phase.
56
AVAILABLE SETTINGS
BUTTON
1
2
3
4
5
PARAMETER
FR-HI
FR-HI-SLP
FR-LO
FR-LO-SLP
LPφ
40
6
40
6
-
50
12
50
12
+
63
18
63
18
80
24
80
24
100
125
160
100
125
160
Table 4 - Available configuration settings for front L/R speaker Butterworth crossover.
Press SETUP twice to return to the speaker configuration submenu, then press button # 2 (CEN) to set up the center
speaker. This submenu is shown in figure 34.
Center Speaker Configuration
Figure 34 - Front Panel Display of the SETUP/INP/CONFIG/CENTER Submenu
This submenu of settings for the Center speaker is virtually the same as the one for the front left/right speakers, with
two additional options. When the CFG setting is set to XOVER or FUL/LP, the low pass signal from the crossed over
center will be routed to the sub, if one sub exists, or front left/right subs if there are 2 in the front. This same low pass
signal can alternately be routed to the front left/right speakers if the CFG setting is XOVRLR. If the center low pass
signal is routed to the front left/right speakers, and these front speakers are crossed over, the low pass signal from the
center stays routed to the front left/right speakers and the low pass signal from the front left/right will then be routed to
the subs. If the #SUBS is set to 0 and the front left/right CFG is set to XOVER, the low pass signal of the front
left/right will be lost.
Routing the center low pass to the front left/right speakers can be useful with center speakers that have a limited bass
response (-3dB @ 100Hz). In this case, the recommended crossover frequency should be set to 160Hz.
If no center speaker is present in the system, the CFG parameter should be set to PHANTM (phantom). With this
setting, the center channel signal is routed to the front left/right speakers. When the center CFG is set to PHANTM,
the user has the ability to adjust the level of the center channel in the front left/right speakers. This can be
accomplished via button # 6 – PHLVL (phantom level).
Note: The phantom (PHTM) setting for the center speaker creates the illusion of having a center speaker when the
listener is positioned equidistant from the front left and right speakers. There is, however, no substitute for a real
center speaker as it creates a solid center image even when the listener is positioned off-axis. The phantom setting is
most useful on video sources where a more prominent center image is desirable and no center speaker is present.
On music sources, OFF may be the preferred setting as it maintains the original source’s imaging properties.
Pressing button # 1 allows the configuration of the center speaker. If this speaker is not to be crossed over, then the
CFG should be set to FULL. There is an option where the full range signal can be routed to the center speaker with
the low pass part of it also routed to the sub (FUL/LP) or the high pass signal going to the center and its crossed over
low pass portion being routed to the front left/right speakers as discussed above (XOVRLR). Whenever any speaker
is crossed over, a crossover type must be selected, and the appropriate crossover frequencies and slopes set.
The center speaker can also be set to XOVER or OFF. In the case of OFF, any center channel information will be lost.
Press button # 2, 3 and 4 to set the crossover settings for the center speaker in the same manner as with the front
left/right. The crossover menus are the same, with the exception of the speaker name in the upper right corner of the
VFD.
57
Pressing button # 5 allows the user to select the crossover type that will be applied to the center speaker.
Button # 6 allows the user to adjust the level of center channel information that is routed to the front left/right channels,
if the CONFIG parameter is set to PHANTOM.
If there are 5 subwoofers in the system, low pass signal from the center speaker will be routed only to the #5 sub. In
other words, Sub5 is dedicated to the front center speaker.
Note: A Casablanca III can have a Sub5 or a Surround Center channel.
Press SETUP to return to the speaker configuration submenu, then press button # 3 (L-R SURRND) to set up the
surround speakers. This submenu is shown in figure 35.
Left/Right Surround Speaker Configuration
Figure 35 - Front Panel Display of the SETUP/INP/CONFIG/L-R SURRND Submenu
Set the speaker configuration and crossovers, if necessary, in the same manner as with the center speaker.
Configuration choices are FULL, FULL/LP, XOVER, PHANTM and OFF. If the speakers are crossed over, LinkwitzRiley, Butterworth and Phase Perfect with all crossover points and slope options available.
The phantom (PHANTM) setting for the surround speakers should be utilized if no surround speakers are present in
the system. In this case, with 5.1 sources, the surround information is added to the front left/right channels. In Dolby
Pro Logic mode, the Casablanca III will automatically decode in Dolby 3 stereo. When the left/right surrounds are set
to PHANTM, the user can adjust their level using the PHLVL parameter.
Center Surround Speaker Configuration
Set the center surround speaker configuration and crossovers, if necessary, in the same manner as the left/right
surround speakers. The submenu options are the same as L/R. If the center surround CFG is set to PHANTM, its
information is routed to the surround left/right speakers. Use the PHLVL (phantom level) parameter to adjust the mix.
If the Center Surround speaker is crossed over and there is a rear subwoofer(s), the low pass signal from the center
surround will be routed to the rear sub woofer(s).
Side Speaker Configuration
The side speaker information is an exact replica of the left/right surround channels. In the speaker configuration
menu, they can be turned on and off. Their levels and delays can be individually adjusted in the levels and delays
submenus.
58
Speaker Levels
This submenu allows the user to set the relative level of each speaker in order to reflect the audio system speaker
configuration, room characteristics, or the listener’s preference.
The allowable relative range is
-15dB to +15dB.
Like the speaker configuration menus, the level submenu(s) will reflect the DAC channels that are installed in the
Casablanca III. If there are 6 DAC channels installed, the names of these channels will be displayed on one page of
the levels submenu. If more than 6 DAC channels are installed, a menu will appear asking the user which set of
speakers are to have their levels adjusted: 1-6 or 7-12, as shown in figure 36. In these submenus, the installed DAC
channels, or speaker names, will be displayed.
Figure 36 - Front Panel Display of the SETUP/INP/LVLS/Channel Choice Submenu
From the Input Select menu, press SETUP, input (INP) then levels (LVLS) to access the speaker levels setup
submenu shown in figure 37. If more than 6 DAC channels are installed, the user must press either button # 1 (1-6) or
# 2 (7-12).
Figure 37 - Front Panel Display of the SETUP/INP/LVLS 1-6 Submenu
If there are more than 6 DAC channels installed, pressing button # 2 on the Levels Channel Choice submenu will
produce a second levels submenu similar to the one shown in figure 38. The speaker names in this submenu will
reflect the channels present in the user’s Casablanca III.
Figure 38 - Front Panel Display of the SETUP/INP/LVLS 7-12 Submenu
In these submenus, press button(s) 1-6 to select a speaker to edit. Use the LEVEL UP/DOWN buttons to adjust each
speaker’s output level. Use the LEVEL LEFT/RIGHT buttons to adjust the master volume. If there is a level control
on the sub itself, adjust that first and then fine-tune with the Casablanca III.
Internal Noise Generator
To aid in establishing a desired system speaker level balance, the Casablanca III provides the user with the option of
routing the currently selected audio signal, an internally generated noise signal to all speakers simultaneously or to a
selected speaker.
This function is accessed via the A-D button in the SETUP/INP/LVLS submenu(s). Press buttons 1-6 to select a
speaker. Pressing the A-D button repeatedly toggles through these sources. Table 5 shows the 3 possible routings.
When the A-D button is pressed, the source name or noise type will appear in the VFD below the submenu title.
59
Press A-D Button
MODE
SOURCE USED
Selected Input
AUDIO INPUT
Once
Noise - all speakers
NOISE A
Twice
Noise - one (selected) speaker
NOISE 1
Table 5 - Source to Output Routing for Speaker Level Configuration.
When use of the noise generator is complete, press A-D to once again re-route the SOURCE to the outputs.
Note: It is recommended that levels be set relative to the Front Left and Right speakers. First adjust the Front Left and
Right level value(s) to zero dB. With the noise generator set to output to the left front speaker, adjust the master
volume. The remaining speakers can be adjusted accordingly by pressing buttons 2-6 one at a time, then pressing
LEVEL UP or LEVEL DOWN to increase or decrease each speaker’s relative level using an SPL meter, until the
desired system balance is established. Please refer to the detailed Step-by-Step Setup Guide on page 17.
60
Speaker Delays
Like the Levels submenu(s), the Delays submenu(s) are interactive. Only installed DAC channels will appear in the
Delays submenu. If there are two Delays submenus, the A-D button will toggle between them.
The Delays submenu allows the user to set a time delay for each speaker to reflect the audio system configuration,
room characteristics, or the listener’s preference. The sound from all speakers should reach the listening position at
the same time, and this submenu provides a means for achieving just that. The allowable range for the front left/right,
center and sub speaker(s) is 0 to 10 milliseconds (mS) and 15 to 31 mS for the side and surround speakers. Since
discrete sources are often recorded with surround delays, it is recommended that the surround delay setting for 5.1
sources be 15 mS less than non 5.1 sources.
Figure 39 - Front Panel Display of the SETUP/INP/DELAYS 1 Submenu
Press SETUP, input (INP) then delays (DLYS) to access the speaker delays setup submenu shown in figure 39. The
current delay settings will be displayed on the top row of the VFD. The submenu title “DELAYS” will be displayed in
the upper right corner. Delay settings apply to all MODES, however, they can be further manipulated when the MODE
is Dolby Digital, DTS or Circle Surround, via additional Setup submenus for these MODES. These additional Setup
features and respective submenus are discussed further in this section.
The first time a multi-channel audio system is set up in a room, calibration of time delay [and speaker levels] is
required in order to have the sound from each individual speaker reach the listener at the correct time.
If more than six DAC channels are installed in the Casablanca III, there will be a right arrow above the A-D button.
Press this button, and the second Delay page will be presented as shown in figure 40.
Figure 40 - Front Panel Display of the SETUP/INP/DELAYS 2 Submenu
Speaker delay is required if a speaker is closer to the listening position than the front left and right speakers. When
this is the case, the delay time should be 1mS for each foot difference.
Begin by measuring the distance (in feet) from each speaker to the listening position. Write down all of these values.
Ideally, the front left/right and center speakers will all be the same distance to the listening position. In this case, set
the front left/right and center speaker delays to 0mS. If the center speaker is closer, delay it 1mS for each foot of
difference between the center and front left/right, to the listening position. If the front left/right speakers are closer than
the center, then set the center delay at 0 and delay the front left/right speakers, again, 1mS for each foot of difference
from the listening position.
61
To determine a delay time for the surround left/right speakers, measure the
distance (in feet) from the listening position to the front left/right, then from the
listening position to the surround left and right speakers. Subtract the front left
and surround left distance from the front right and the surround right distance.
Add this number to the existing delay value of the surround left/right speakers. (1
mS/foot). The chart in figure 41 can also be used to calculate the surround
left/right delay values.
Figure 41 - Rear Delay Settings
For the surround center delay, take the difference (in feet) between the center surround speaker and the listening
position and the surround left or right to the listening position. Add this value to the existing [default] surround center
delay value (1ms per foot of difference).
To set the side speaker delays, calculate the difference (distance in feet) between the left side and left front speakers.
Add the difference to the default value already set for the left side to give this speaker its new value.
Calculate the difference (distance in feet) between the right side and right front speakers. Add the difference to the
default value already set for the right side to give this speaker its new value.
Because of the properties of low frequencies, a delay in the subwoofer(s) is virtually undetectable. This being the
case, it may be appropriate to leave the subwoofer delay values set at 0. However, if any subwoofer is closer to the
listening position than the front left/right speakers, a delay value can be set for these subs. The delay value will be the
difference (in feet) between the sub itself and the front left or right speaker, to the listening position.
Default Mode
Each INPUT SELECT button can have a different default MODE assigned to it. To assign a default MODE for a given
INPUT SELECT button, press the applicable INPUT SELECT button, SETUP/INP (input) then button # 4 (MODE).
See figure 25 on page 52. Edit this parameter to select the desired default MODE, then press SETUP twice to exit.
Repeat this procedure for each INPUT SELECT button.
Note: Pressing the front panel MODE function button allows the user to audition different modes for a given source,
when applicable. Changing modes via the MODE button does not store a mode selection.
62
Onscreen Display (OSD) Setup
The OSD setup feature allows the user to customize the on screen displays and the STATUS display.
Pressing SETUP, INP then OSD (button # 5 in figure 22) activates the OSD set up menu, shown in figure 42.
Figure 42 - Front Panel Display of the SETUP/INP/OSD Submenu
Button # 1 (COLOR) allows the user to select 7 different OSD background colors.
The OSD can be offset from the left and top edges of the screen (button #s 2 and 3 respectively) to accommodate
differences in monitors.
The configuration (CFG) feature switches the Casablanca III’s OSD to accommodate either an NTSC or PAL monitor.
When a function button is pressed, its OSD will remain on the screen until the user exits from all function menus. The
display TIME (in seconds) setting allows the user to set the amount of time (delay) that the video monitor displays the
INPUT SELECT menu, when changing inputs. (If the VFD is turned off (in the SETUP/INP Page 1 submenu button #
6 in figure 22, page 52) and any button is pressed, the VFD will revert to full brightness for the amount of seconds in
the TIME parameter). Setting the TIME value to 0 turns off the OSD for the currently selected input.
Status Setup
STATUS (button # 6) displays a 2 page submenu, which allows the user to determine which information, and its
position on the video monitor. This submenu is shown in figure 43.
Figure 43 - Front Panel Display of the SETUP/INP/OSD/STATUS 1 Submenu
The items in the two STATUS submenus are displayed in the OSD when the STATUS button on the hand-held remote
is pressed. Changing any value to 0 removes that item from the OSD. The value range is 0 through 10. 1 displays
the highest vertical position and 10 the lowest.
Press the A-D button for the second STATUS setup page to change the OSD positions of SOURCE and SRATE
(sample rate).
Note: There will be uncertain results if more than one item is displayed on the same line.
VFD Brightness
Each INPUT SELECT button can have a different VFD brightness assigned to it. Pressing button # 6 in figure 25
(page 52) allows the user to change the default brightness to OFF, ¼, ½, ¾ or FULL brightness. Changes to this
parameter are reflected the next time that INPUT SELECT button is pressed. If this value is set to OFF, pressing any
button except DISPLAY will automatically brighten the VFD to the maximum level. If the button pressed is not another
INPUT SELECT or function button, then the VFD will revert back to its default brightness in X seconds. X represents
the TIME parameter value in the SETUP/INP Page 1/OSD submenu. If the VFD is on but not set to FULL, it will
remain at the default brightness until a different INPUT SELECT button is selected. The DISPLAY button will override
the default VFD brightness setting. The Display Time feature takes precedent over the VFD brightness parameter.
See details regarding the Display Time parameter on page 79.
63
Setup Input Page 2
The SETUP/INP Page 2 section contains the submenus shown in figure 44.
Figure 44 - Menu Map of SETUP/INP Page 2
To access this page press SETUP, INP (input), then the A-D button once. Page 2 of the SETUP/INP menu is shown
in figure 45.
Figure 45 - Front Panel Display of the SETUP/INP Page 2 Submenu
LFE Phase
The LFE phase can be + (in phase) or – (180 degrees out of phase). This can be edited via button # 1 and is
applicable to the currently selected input.
Mapping Audio and Video Sources (Input Jack to INPUT SELECT button)
Pressing button # 2 accesses 2 submenus which allow the user to assign the audio and video jacks that will be active
on the currently selected INPUT SELECT button. One page is for audio jack mapping and the other one for the
combined composite, S and multi format video jack mapping. Up to six audio and six video input jacks can be mapped
to each INPUT SELECT button. The order in which they are mapped determines the search order when pressing the
A-D button from the INPUT SELECT menu.
Press the SOURCE button (button # 2) once to display the ‘Setup Audio Source’ submenu, shown in figure 46, will be
displayed.
64
Figure 46 - Front Panel Display of the SETUP/INP Page 2/SOURCE/AUD Submenu
The default jack names reflect the type of jack on the rear panel. It is suggested that all active audio and video input
jacks be named before mapping them to a given INPUT SELECT button.
The INPUT SELECT buttons can be set up with 2 theories in mind. The most common used is to assign one source
device to each INPUT SELECT button. Figure 15 on page 42 depicts this setup. Another option is that each person in
a household can use one or two INPUT SELECT button(s) for himself or herself, and have up to 6 source devices
mapped to “their” INPUT SELECT button(s). Figure 43 depicts this setup. This manual is written with the first theory
in mind since as it the most commonly practiced.
To map input jacks, first press the INPUT SELECT button. Press SETUP, INP, A-D, then SOURCE. To map the first
audio input jack, press button # 1 and use the LEVEL UP/DOWN buttons to select the appropriate jack. If another
input jack is to be assigned to the same INPUT SELECT button, press button # 2 and select the desired rear panel
input jack using the LEVEL UP/DOWN buttons. If only one mapped source is desired, choose OFF in this position.
Continue with this method for up to 6 input jacks per Input Select button.
An example of this use is for a Laserdisc/DVD/CD transport where the first jack to be assigned could be the RF-1 jack,
the second could be the COAXIAL 1 input jack. In this example, when an LD is being played, the user would press
the INPUT SELECT button that is ‘assigned’ to this transport. If RF-1 (or the name assigned to this input jack) is not
displayed in the lower right hand corner of the VFD, press the A-D button until it is displayed. When a CD is to be
played in this transport, press the A-D button once to display COAXIAL 1 (or the name assigned to this input jack) in
the lower right hand corner of the VFD. The default MODE for this INPUT SELECT jack should be that which is
desired for the playback of CDs, as when the Casablanca III detects either a Dolby Digital AC-3 RF or any 5.1 data
stream, it will automatically change the MODE to Dolby Digital or DTS.
Press SETUP 3 times then repeatedly press the A-D button to toggle between the input jacks for the currently selected
INPUT SELECT button. Map only the input jacks that will be used, to the currently selected INPUT SELECT button.
This will eliminate needless pressing of the A-D button to cycle through unused jacks.
Note: When input jacks are re-assigned and the user exits SETUP, the new input jack mappings will not be active
until either the A-D button is pressed or another INPUT SELECT button is pressed.
Next, map the appropriate video input jacks, if applicable, to the same INPUT SELECT button. In the case of the
above example where the RF-1 jack is the first audio jack mapped to the currently selected INPUT SELECT button,
the laserdisc video input jack must be mapped first in the video search order. Since the LD’s audio jack is second in
the audio search order, it must also be mapped second in the video search order.
Continuing this example, if a source device has both an audio and a video signal associated with it, and the audio
signal is third in the audio search order, then its video signal must be third in the video search order.
To map a video signal to an INPUT SELECT button, first press the desired INPUT SELECT button, then press
SETUP, INP, A-D, SOURCE and A-D once again. Press the appropriate button (1-6) which corresponds to the same
position in the audio search order menu for this source device and press the LEVEL UP/DOWN button to select the
desired video input jack.
Press the SETUP button 3 times to return to the INPUT SELECT page.
65
Setup Dolby Digital
In figure 45, button # 3 provides a three-page submenu which allows the user to set up preferences pertaining to
Dolby Digital and Dolby Pro Logic IIx, by INPUT SELECT button. The first page of this submenu is shown in figure 47.
These settings apply only when the MODE is one of the Dolby Digital processes.
Figure 47 - Front Panel Display of the SETUP/INP Page 2/DOLBY DIGITAL Page 1 Submenu
2-Channel Mode
Some Dolby Digital sources contain only two of the possible five to seven main channels. This is usually noted on the
material's cover, in the form of "Dolby Digital 2.0" or “Dolby Surround” as opposed to "Dolby Digital 5.1, 6.1 or 7.1".
Embedded in most two-channel Dolby Digital data streams is an indication of whether or not the material is Dolby
Surround encoded. There are three possibilities for this indication: Dolby Surround Encoded; Not Dolby Surround
Encoded; or No Indication.
Regardless of the indication, the user can instruct the Casablanca III to process this decoded signal in virtually any
MODE. For Dolby Surround encoded signals, press button # 1 (2CHEN – or two-channel encoded) and use the
LEVEL UP/DOWN buttons to select the MODE to be applied to Encoded 2 channel Dolby Digital signals. For a nonencoded signal, press button # 2 (2CHNEN – or 2-channel non-encoded) to select the MODE for further processing.
When a mode is applied to a two-channel Dolby Digital signal, the signal Is first Dolby Digital decoded, then the
decoded signal is further manipulated by applying the mode set in the 2CHEN or 2CHNEN parameters. If this is the
case, and the additional selected mode is MATRIX, the MODE displayed in the VFD when in the INPUT SELECT
MENU will read “DOLBY DIGITAL + MATX”. If the additional selected mode is STEREO, the MODE displayed in the
VFD when in the INPUT SELECT MENU will read “DOLBY DIGITAL + STEREO”.
If the indication is that the signal is not Dolby Surround encoded, or there is no indication, and the 2CHNEN MODE is
set to Dolby Digital, no additional surround processing will occur, resulting in a two-channel (stereo) output.
Compression (Night Mode)
Dolby Digital contains provisions for reducing the dynamic range of a Dolby Digital source. This means reducing the
loudness of the loud passages and increasing the loudness of the quiet passages. Possible reasons for reducing the
dynamic range of a source include late night listening wherein loud moments may disturb others, and making tapes for
automotive / portable use wherein quiet passages may not be heard.
Casablanca III contains three parameters to control Dolby Digital compression. Button # 3 (CMP) turns the
compression ON or OFF. Button # 4 (HCMP, or High Compression) controls the degree to which loud passages will
be reduced. Button # 5 (LCMP, or Low Compression) controls the degree to which quiet passages will be increased.
Note: Some Dolby Digital sources do not allow for compression, in which case altering these settings will have no
effect.
Dialog Normalization
Press button # 6 to set the dialog normalization value. Dolby Digital contains the useful provision for making all Dolby
Digital sources play back at the same average volume level, even though they have been recorded or mixed at very
different levels. This is done by embedding in the data stream a value that the program material will need to be
adjusted by to conform to an average dialog level established by Dolby Laboratories. It should be noted that the
relative levels of all channels are adjusted, not just the center channel. Casablanca III contains two options for this
setting: ANLG (analog) or DIGI (digital).
ANLG: Dialog normalization will be applied in the analog domain. This is the best-sounding and preferred
66
setting.
DIGI: Dialog normalization will be performed in the digital domain. Digital reduction of volume results in a
significant loss of resolution.
***
Press the A-D button to access Page 2 of the Dolby Digital set up submenu, which is shown in figure 48.
Figure 48 - Front Panel Display of the SETUP/INP Page 2/DOLBY DIGITAL Page 2 Submenu
This submenu allows the user to adjust the center, side and surround speaker delays and levels, LFE level and
processing for additional speakers when the MODE is Dolby Digital.
It is important to note that the level and delay settings in this submenu are added to or subtracted from those in the
main SETUP/INP/LEVELS and SETUP/INP/DELAYS submenus. For example: if the center level (CLVL) in this
submenu is set to –2 and the center level in the SETUP/INP/LEVELS submenu were set to +3, the overall center level,
when the MODE for the currently selected input is Dolby Digital, would be +1. This same process applies to the
delays.
It is important to note that the Casablanca III does not support negative delays based on the theory that even we at
Theta cannot make time go backwards. Therefore the sum of the delays cannot be less than 0. As an example, if the
center delay in the SETUP/INP/DELAYS submenu were set at 0 and in the Dolby Digital setup submenu set at –1, the
overall center delay would be 0.
Note: If the incoming signal is Dolby 2.0 with a surround indication bit set at surround, and the 2CHEN mode set to
Circle Surround, the delay settings in the DELAYS submenu are interactive with the ones in the CIRCLE SURROUND
setup submenu and not with those in the DOLBY DIGITAL setup submenu.
In this submenu: button # 1 offsets the center speaker’s delay [from the SETUP/INP/DELAYS]; button # 2 offsets the
center level; button # 3 offsets the surround left/right, sides and center surround delay; and button # 4 offsets the
surround left/right, sides and center surround level.
Button # 5 controls the LFE gain setting for Dolby Digital sources containing an LFE (low frequency effects) channel.
i.e. 5.1, 6.1 or 7.1 signals. This channel commonly contains sound effects such as explosions, but may also contain
soundtrack information. Casablanca III offers the user an LFE range of between OFF and -30 for this setting. OFF
may be useful for late night viewing or if there isn't a subwoofer / speaker capable of handling the low frequencies
contained in the LFE channel. 0 dB, the preferred setting, maintains the LFE setting in proper proportion to the
remaining five discrete channels. Any other setting lowers the normal LFE level, in dB, by the value set.
If the incoming signal is Dolby Digital 5.1, and the user desires to create sides or a center surround channel, use the
+SPKR (or Additional Speakers) parameter to indicate which MODE will be used to create them. There are a limited
amount of modes that can do this. They are displayed in Table 6.
VFD
DEFINITION
OFF
No additional speaker signals will be created.
THETA
Theta Proprietary Processing
DTSES
DTS ES
NEO6M
DTS NEO:6 Music
NEO6C
DTS NEO:6 Cinema
PL2MU
Dolby Pro Logic IIx Music
PL2MV
Dolby Pro Logic IIx Movie
Table 6 – Additional Speaker Modes for Dolby Digital Source.
67
Press the A-D button to access Page 3 of the Dolby Set Up submenu. This page contains parameters used when the
mode is Dolby Digital EX. This menu is shown in figure 49a.
Figure 49a - Front Panel Display of the SETUP/INP Page 2/DOLBY Page 3 EX Submenu
When the system has more than 5.1 channels and the incoming Dolby Digital signal is flagged as EX, then the
additional channels (+SPKR) can be created using one of the processes selected by pressing button # 1, or turned off.
Press the A-D button to access Page 4 of the Dolby Set Up submenu. This page contains parameters used when the
mode is Dolby Pro Logic IIx Music. This menu is shown in figure 49b.
Figure 49b - Front Panel Display of the SETUP/INP Page 2/DOLBY Page 3 PLIIx Submenu
The Panorama (PRAMA) feature, when ON (button # 1 in figure 49b), extends
the front stereo image to include the side or surround speakers. This gives a
“wraparound” effect with sidewall imaging. It is particularly effective for
recordings which have strong left - or right- channel elements in the mix, as
these are detected and accentuated by the Panorama process. The Panorama
feature is typically intended for use with Music Mode. See figure 49c
Figure 49c – Diagram of Panorama Effect
68
With Pro Logic IIx decoding, dominant center signals can come only from the
center speaker. The Center Width (CWID) control allows variable adjustment
of the center image so that it may be heard only from the center speaker; only
from the left/right speakers as a phantom image; or from all three front
speakers to varying degrees. The range is from 0 to 7. See figure 49d.
When all settings are made, pressing the SETUP button 3 times returns the
user to the INPUT SELECT menu.
Figure 49d – Diagram of Center Width Values
69
Setup DTS
To access the DTS Setup submenu shown in figure 50, press SETUP/INP/A-D/DTS.
Figure 50 - Front Panel Display of the SETUP/INP Page 2/DTS 1 Submenu
This submenu allows the user to adjust the center, side and surround speaker delays and levels as well as the LFE
and additional speaker source, when the MODE is DTS, for the currently selected input. When the Mode is not DTS,
settings in this submenu will have no effect. As with the settings in the Dolby Digital Setup submenus, these DTS
settings are interactive with those in the SETUP/INPUT/LEVELS and SETUP/INPUT/DELAYS submenus.
It is important to note that the level and delay settings in this submenu are added to or subtracted from those in the
main SETUP/INP/LEVELS and SETUP/INP/DELAYS submenus. For example: if the center level (CLVL) in this
submenu is set to –2 and the center level in the SETUP/INP/LEVELS submenu were set to +3, the overall center level,
when the MODE for the currently selected input is DTS, would be +1. This same process applies to the delays.
However, the Casablanca III does not support negative delays based on the theory that even we at Theta cannot
make time go backwards. Therefore, as an example, if the center delay in the SETUP/INP/DELAYS submenu were
set at 0 and in the DTS setup submenu set at –1, the overall center delay would be 0.
In this submenu: button # 1 offsets the center speaker’s delay [from the SETUP/INP/DELAYS]; button # 2 offsets the
center level; button # 3 offsets the surround left/right, sides and center surround delay; and button # 4 offsets the
surround left/right, sides and center surround level.
Button # 5 controls the LFE gain setting for DTS sources containing an LFE (low frequency effects) channel. i.e. 5.1,
6.1 or 7.1 signals. This channel commonly contains sound effects such as explosions, but may also contain
soundtrack information. Casablanca III offers the user an LFE range of between OFF and -30 for this setting. OFF
may be useful for late night viewing or if there isn't a subwoofer / speaker capable of handling the low frequencies
contained in the LFE channel. 0 dB, the preferred setting, maintains the LFE setting in proper proportion to the
remaining five discrete channels. Any other setting lowers the normal LFE level, in dB, by the value set.
If the incoming signal is DTS 5.1, and the user desires to create sides or a center surround channel, use the +SPKR
(Additional Speakers) parameter to indicate which MODE will be used in their creation. The modes available are:
VFD
OFF
THETA
DTSES
NEO6M
NEO6C
PL2MU
PL2MV
DEFINITION
No additional speaker signals will be created.
Theta Proprietary Processing
DTS ES
DTS NEO:6 Music
DTS NEO:6 Cinema
Dolby Pro Logic IIx Music
Dolby Pro Logic IIx Movie
Table 7 – Additional Speaker Modes for DTS Source.
Note: The +SPKR setting has no effect (is bypassed) if the mode is DTS 96/24, DTS ES Matrix or Discrete.
Pressing the A-D button once will take the user to the second DTS Setup page, shown in figure 51.
70
Figure 51 - Front Panel Display of the SETUP/INP Page 2/DTS 2 Submenu
In Cinema Mode, for Left/Right film soundtracks, sounds steered to the Center is subtracted from the Left/Right
channels. (In Music Mode, the Center is never fully subtracted from the Left/Right channels).
CGAIN is the parameter which controls the amount of subtraction. It varies between 0 and 0.5 in steps of 0.1 and the
default value is 0.2.
When CGAIN is set at 0, nothing is subtracted from the Left and Right channels. When CGAIN = 0.5, the Center
channel is subtracted from the Left and Right channels at -6dB for each channel. The signal level sent to the Center
channel is not affected by CGAIN. The CGAIN parameter will have an effect only when the mode is NEO:6 Music.
When all settings are made, press SETUP 3 times to return to the INPUT SELECT menu.
Setup Circle Surround II
To access the Circle Surround II Setup submenu shown in figure 52, press SETUP/INP/A-D/CIRCLE SURROUND.
Figure 52 - Front Panel Display of the SETUP/INP Page 2/CIRCLE SURRND II Submenu
This submenu allows the user to adjust the center, side and surround speaker delays and levels when the MODE is
Circle Cinema, Music or Mono. When the Mode is not a Circle Surround II process, the settings in this submenu will
have no effect.
It is important to note that the level and delay settings in this submenu are added to or subtracted from those in the
main SETUP/INP/LEVELS and SETUP/INP/DELAYS submenus. For example: if the center level (CLVL) in this
submenu is set to –2 and the center level in the SETUP/INP/LEVELS submenu were set to +3, the overall center level,
when the MODE for the currently selected input is DTS, would be +1. This same process applies to the delays.
However, the Casablanca III does not support negative delays based on the theory that even we at Theta cannot
make time go backwards. Therefore, as an example, if the center delay in the SETUP/INP/DELAYS submenu were
set at 0 and in the DTS setup submenu set at –1, the overall center delay would be 0.
In this submenu: button # 1 offsets the center speaker’s delay [from the SETUP/INP/DELAYS]; button # 2 offsets the
center level; button # 3 offsets the surround left/right, sides and center surround delay; and button # 4 offsets the
surround left/right, sides and center surround level.
With Circle Surround, the user also has the option to adjust the Dialog Clarity (DCLR). This parameter helps to make
the dialog more discernable, above rest of the audio track.
Use button # 5 to turn Dialog Clarity ON or OFF. Button # 6 is used to set the Clarity Level (CLRL). The range is 0-10,
where 0 is OFF.
When all settings are made, press SETUP 3 times to return to the INPUT SELECT menu.
71
Post Process
To access the Post Process submenu shown in figure 53, press SETUP/INP/A-D/POST PROC.
This submenu allows the user to select an additional process to add to the incoming signal after it has been
processed/decoded via the selected MODE. Only one post process can be selected per INPUT SELECT button.
Figure 53 - Front Panel Display of the SETUP/INP Page 2/POST PROCESS Submenu
The available post processing options are:
OFF, which applies no further processing;
Stereo Front/Rear (ST/FR), which takes signals from the front and surround lefts, adds them together and outputs
this sum equally to the front left and surround left speakers. The same applies for the right front and surround
speakers. The process varies slightly, depending on whether the MODE is matrix, stereo or mono;
Party, which takes parts of each original channel’s signal, blends them with all others and outputs this mix to all
speakers. Each speaker will have a blend of all speakers;
Center Spread (CNTR SPREAD) is a process in which the center speaker level is reduced and added to the front
left/right speakers. Press button # 5 to enable Center Spread. The level of processing is set in the SETUP/INP/page
3 submenu, under the CTRSPD parameter.
Setup Input Page 3
The SETUP/INP page 3 section contains the submenus shown in figure 54.
Figure 54 - Menu Map of SETUP/INP Page 3
Press SETUP, INP and A-D twice to enter the SETUP/INP page 3 submenu shown in figure 55.
Figure 55 - Front Panel Display of the SETUP/INP Page 3 Submenu
72
Setup Miscellaneous
Press SETUP, INP, A-D twice, MISC and button # 1 to enter the MISC submenu, shown in figure 56.
Figure 56 - Front Panel Display of the SETUP/INP page 3/MISC Submenu
Naming the Current Input Select button
This parameter sets the name (VFD and OSD) for the currently selected input. Select the input to rename. The letters
VFD will be displayed in the lower right above the A-D button, indicating that the name in the VFD is to be edited. VFD
names are limited to 4 characters. Press the LEVEL UP/DOWN button to change characters and the LEVEL
LEFT/RIGHT to change character positions. Pressing the DISPLAY button once will clear the current INPUT SELECT
name. Press the A-D button to edit the OSD name, if a video board is installed. OSD will appear in the lower right
corner of the VFD. This name can be up to 15 characters and the current character to be edited will blink on screen.
OSD names can only be edited on a monitor.
Press SETUP once to return to the SETUP/INP page 3 submenu.
Master Delay
With video processing, there can be a delay in the output of the video signal, causing the audio and video to be out of
sync. The Casablanca III allows the user to set an overall, or master, audio delay in order to re-sync the audio and the
video signals. In the SETUP/INP page 3 submenu, press button # 2 and use the LEVEL UP/DOWN buttons to adjust
the audio delay time until the video appears to be in sync with the audio. The range is 0 to 100 mS at 48KHz.
When complete, press SETUP twice to return to the INPUT SELECT menu.
Password for Each INPUT SELECT Button
Press SETUP/INP/A-D/A-D and button # 3 to set a password for the currently selected input. Entering a password
here will prompt the user to type in the password each time he/she wishes to change configuration settings for this
INPUT SELECT.
When the PW button is pressed, “ARE YOU SURE YOU WANT TO ENTER A PASSWORD FOR THIS MENU?”
appears on the VFD. Pressing NO (button # 6) reverts back to the SETUP/INP Page 3 submenu. Pressing YES (A-D
button) will display a menu allowing the user to enter a password. Use buttons 1-6 to enter a 5 digit password. A zero
in any position of the password will be seen as all zeros, or no password.
Note: PLEASE REMEMBER and/or WRITE DOWN YOUR PASSWORD! If it is forgotten, all access to password
protected areas will be denied! Please refer to page 16 for additional information on using passwords.
73
Center Spread
This is a post process activated in the POST PROCESS submenu. The range (0-15) is set in this SETUP/INP page 3
submenu. This parameter adjusts the mix between the center speaker and the front left/right speakers. The higher
the value, the more center channel level is reduced in the center speaker and added into the front left/right speakers.
If the value is 15, all of the center channel information would be routed to the front left/right speakers. In this case, it
would be the same as phantoming the center speaker.
Six Shooter
The Six Shooter is an external preamp/analog switcher that allows the 6 analog output channels of an SACD or DVDA
player to integrate with the Casablanca III. There are 3 inputs and one output on the Six Shooter. The first two inputs
are designed to receive 6 channels of analog SACD or DVDA signal. The third input receives the first 6 output
channels from the Casablanca III (L/R/C/LS/RS/S1). The output of the Six Shooter is connected to the amplifier
inputs.
The first two inputs of the Six Shooter contain high-quality analog volume controls. The volume for these two inputs is
controlled by the Casablanca III. Volume for the third input (first 6 channels of the Casablanca III) is done in the
Casablanca.
To install the Six Shooter, select the appropriate INPUT SELECT button on the Casablanca III, then press
SETUP\INP\A-D\A-D\6. Using the LEVEL UP\DOWN buttons, select the correct Six Shooter input for this INPUT
SELECT button. When the Six Shooter is installed, each INPUT SELECT button must have a value of either 1 (Input
#1 of the Six Shooter), 2 (Input #2 of the Six Shooter), or 3 (Casablanca III pass-through for all signals processed by
the Casablanca III).
1 will route the Six Shooter’s # 1 source to the amplifiers.
2 will route the Six Shooter’s # 2 source to the amplifiers.
3 will route the Casablanca III directly to the amplifiers.
Next, for each Input Select button set to either 1 or 2, go to the Audio Source menu (SET-UP/INP/A-D/SOURCE) and
set all 6 jacks to OFF.
Press SET-UP 3 times to return to the INPUT SELECT menu.
Please refer to Appendix B for a Six Shooter wiring diagram.
74
Setup Global
This function provides access to a series of submenus that will allow the configuration of the entire system (not by
input).
Press SETUP, then GLOBAL (button # 2). The first page of the Global submenu is displayed, as shown in figure 57.
Figure 57 - Front Panel Display of the SETUP/GLOBAL page 1/ Submenu
Analog Input Levels
From the SETUP/GLOBAL page 1 menu, press button # 1 to bring up a submenu that allows adjustment of the
analog input levels. This submenu is shown in figure 58.
Figure 58 - Front Panel Display of the SETUP/GLOBAL/ANLG LVLS Submenu
This function allows the user to adjust the relative ANALOG input LEVEL for each input source, for those modes
which require analog to digital conversion. The allowable relative range is +19 to -14dB in 1dB increments, then steps
to -16, -18 and -22dB.
Note: To obtain the best performance from the analog to digital conversion process, levels should be set so that the
loudest passages from the source material cause the -18, -12 and -6 dB ANALOG input LEVEL LEDs on the front
panel to light. Setting the input level too high will cause all four LEDs to light, thus clipping the input signal and
causing distortion.
Analog output levels may vary considerably for different input sources, but program material from a given input source
should be more relatively consistent. Therefore the ANALOG input LEVEL for a given source should not have to be
adjusted very often. If the ANALOG LEVEL LEDs are not lit during the loudest passages from an analog source, the
user could increase the ANALOG input LEVEL for that source in order to ensure a good signal to noise ratio. Another
way to do this is in the 2nd Balance menu, however it is temporary. If that particular source were recorded at a
particularly high or low level, the analog input level can be temporarily adjusted in the 2nd BALANCE menu
Select the analog input to be adjusted by pressing buttons 1-6. Adjust the relative input level using the LEVEL
UP/DOWN buttons, then press the SETUP button three times to return to the current INPUT SELECT page.
75
Jack Names
From the first GLOBAL page, button # 2 accesses a series of submenus, which allow the user to name the
Casablanca III’s input jacks, both audio and video. The JACK NAMES submenu is shown in figure 59.
Figure 59 - Front Panel Display of the SETUP/GLOBAL/JACK NAMES Submenu
Pressing button # 1 accesses a submenu for naming the analog audio input jacks. Button # 2 does the same for the
coaxial digital audio input jacks, whereas buttons # 3 and 4 allow the user to name all non-coaxial digital audio input
jacks. Buttons # 5 and 6 lead to submenus for naming the video jacks. The composite, S and multi-format video jacks
are linked for mapping, and subsequently for naming them. In other words, where COMPOSITE 1 video jack is
mapped, so are the S-VIDEO 1 and Multi Format 1 jack, where COMPOSITE 2 video jack is mapped, so are the SVIDEO 2 and Multi Format 2 input jacks, and so on. Since the COMPOSITE 1 input jack cannot be mapped
differently than the S-VIDEO 1 or Multi Format 1 input jacks, they also share the same jack name.
Example of editing a jack name:
To edit the name of analog input jack 1, press button # 1 from the menu shown above. This displays the NAME
ANALOG submenu. Then press button # 1 (first analog input jack). Press the LEVEL UP/DOWN buttons to select
the VFD character, then the LEVEL LEFT/RIGHT to change character positions. Once selected, pressing the
DISPLAY button once will clear the current jack name. The character being edited will blink or will have a cursor
below it. The VFD name for audio input jacks can be up to 6 characters and the video jack names up to 5. Press the
A-D button to edit the OSD name. OSD will be displayed above the A-D button in the VFD. OSD editing can only be
done on the display device. OSD jack names can be up to 15 characters and the current character position being
edited will blink.
Remote Power Jacks
The REMOTE POWER jack and three MAIN POWER jacks on the rear panel output 12V jacks can be programmed
to, output either continuous DC or a PULSE. This feature is used to automatically activate/deactivate other system
components such as power amplifiers, etc, when the Casablanca III is taken in/out of Standby. From the first
SETUP/GLOBAL page, press button # 3 to access the REMPWR submenu shown in figure 60.
Figure 60 - Front Panel Display of the SETUP/GLOBAL/REMPWR Submenu
The first four 3.5 mm jacks on the rear panel (remote power and main power 1 through 3) are +12V pulse or DC
current limiting* outputs (tip = hot, sleeve = ground) intended to be connected to devices which feature 12V control
voltage inputs.
The first jack labeled “REMOTE”, is controlled by pressing REMOTE on the hand held remote or front panel. It will
turn off when the Casablanca III is put into standby mode.
Use button # 1 to indicate whether the output of the REMOTE power jack should be 12VDC (DC) or a 12V pulse
76
(PULSE). The specification sheet for the device being triggered should contain information as to which type of signal it
requires.
The output signal of the remote power jack does not need to be delayed since its activation is by the user via either the
hand held remote or front panel REMOTE button.
Use buttons 2, 3 and 4 to set the output (DC or PULSE) for each of the three MAIN POWER jacks on the rear panel.
The MAIN POWER 1 jack is activated immediately upon exiting the standby mode (pressing the front panel or the
hand held remote POWER button), the MAIN POWER 2 jack is activated X seconds after exiting standby and the
MAIN POWER 3 jack is activated X times 2 seconds after exiting standby. X represents the time, in seconds, that is
set by pressing button # 5 – MTIM, or Main [Delay] Time. This is useful for sequencing the activation of high power
components such as amplifiers. When the Casablanca III is put into standby, it can be set to turn off the MAIN
POWER jacks simultaneously or sequenced in the opposite order they were activated. Sequencing is accomplished
by setting SEQ (button # 6) to ON. The default is OFF, which will turn off all triggers simultaneously when the
Casablanca III is put into standby.
If the TYPE for any rear panel power jack is set to PULSE, the duration (in milliseconds) of this pulse can be set by the
user. Select the A-D button and use the LEVEL UP/DOWN buttons to change the pulse duration.
*The current limiting resistor is 33 ohms, 0. 5W. This means that the more current a triggered device draws, the more
the output voltage gets reduced. The formula is: Output voltage =12 – (I x 33), where I = the current draw from the
triggered device, in Amperes. Refer to the device’s manual for this information. The Casablanca III’s maximum output
current is 100mA. Using the above formula, with a 100mA draw, the output voltage will be 8.7 volts. Most triggered
circuits have virtually no current draw.
Clear Balance (Temporary Settings Control)
Any changes in the BALANCE menus are, by default, temporary. When a different INPUT SELECT button is pressed
or the Casablanca III is put into standby, all changes will be reset to zero. This feature can be overridden by pressing
button # 4 in the first SETUP/GLOBAL page (figure 57 on page 75) and set to OFF. When this parameter is set to
OFF, all BALANCE menu settings will remain as the user changes inputs or puts the Casablanca III into standby.
RS232
In the first SETUP/GLOBAL page, press button # 5 to access the RS232 submenu shown in figure 61.
Figure 61 - Front Panel Display of the SETUP/GLOBAL/RS232 Submenu
Press button # 1 (BAUD) and use the LEVEL UP/DOWN buttons to select the Baud rate that matches that of the
RS232 controller. The factory default value is 115.2K
The Casablanca III can be set to automatically feedback to the RS232 port. Button # 2 (ECHOS) [Echo Status] allows
the user to enable or disable the output of data to the RS232 port and, if enabled, determine which level, or predetermined group of bytes, it outputs. This can be done by selecting a “Status Level”, which means if any Casablanca
III parameter changes, that level's bytes will be sent to the port. This is useful for monitoring master level, input and
the like when the user has access to both the Casablanca III and the touch-panel controller, to keep them
synchronized. If this value is OFF, no parameter change information will output to the RS232 port.
Status levels 1, 2, 3 and 4 permit increasing levels of data to be sent to the RS232 port. If RS232 is not being used,
ensure that the Echo Status (ECHOS) parameter is set to OFF. Higher settings can slow the operation of the
Casablanca III.
77
An RS232 Protocol addendum which describes all pertinent RS232 information, including values contained within
each Status Level is available for download from the Theta Digital website, in the “Library” section.
(www.thetadigital.com)
Mute/Volume
This submenu provides the user with a method of setting volume and mute control parameters. Press SETUP,
GLOBAL, then button # 6 (MUTE/VOLUME). This submenu is shown in figure 62.
Figure 62 - Front Panel Display of the SETUP/GLOBAL/MUTE-VOLUME Submenu
Initial Power-On Master Volume
Button # 1 (INILVL, or Initial Level) allows the user to store the initial master volume setting that the Casablanca III
defaults to out of standby.
FVOL and SVOL
When certain parameters are edited or the master volume changed, holding the LEVEL UP/DOWN button for more
than 5 steps will, by default, speed up the rate at which the value changes. This is referred to as Fast Mode. It is
possible to delay the speed of the Fast Mode to the user’s preference. On FVOL (Fast Volume – button # 2) a delay
of 0 (0 milliseconds between steps) will set the Fast Mode to be its quickest, and a delay of 255 (255 milliseconds
between steps) sets it to be its slowest.
The response rate of the LEVEL UP/DOWN buttons during the first 5 steps is referred to as Slow Mode. Button # 3 SVOL allows the user to modify the speed of increment changes during these first 5 steps. In SVOL (Slow Volume) a
delay of 0 will set the Slow Mode to be its quickest, a delay of 255 sets it to be its slowest.
Maximum Overall Level
Button # 4 (MAX) allows the user to set a maximum master volume level. This is especially useful in a household
where young relentless children and smart pets have access to the system or the speakers are very efficient.
Changing the Default MUTE Level
The user can set the master volume level that the Casablanca III goes to when the front panel or hand-held remote
MUTE button is pressed. Editing this parameter is accessed by pressing button # 5.
MUTE Off Trigger
The Casablanca III can be un-muted in 2 ways. Setting the parameter (accessed via button # 6) to MUTE allows only
the MUTE button to un-mute the Casablanca III. Setting this parameter to M+V (MUTE and VOLUME) allows both the
MUTE and LEVEL UP/DOWN buttons to un-mute.
Press the SETUP button once to return to the SETUP/GLOBAL page 1 submenu. Press the A-D button once to go to
the second GLOBAL page, shown in figure 63.
78
Figure 63 - Front Panel Display of the SETUP/GLOBAL page 2 Submenu
Cursor Type
When editing jack or input select names, the VFD character being edited can be indicated by blinking, a flashing
cursor below it, both, or no indication. This preference is set in the SETUP/GLOBAL page 2 submenu, button # 1.
Displaying Mode Change Messages
When the Casablanca III receives a Dolby Digital or DTS signal on the currently selected input and the MODE is not
the one required to process these signal formats, a message will briefly appear on the VFD and OSD stating that the
Casablanca III has received a certain format and is temporarily changing the MODE. This message does NOT come
up by default but can be turned on by pressing button # 2 and changing the value to ON.
Note: If the default MODE is DOLBY DIGITAL or DTS and a 96K signal is received, the Casablanca III will
momentarily display a message (if the MSG parameter is set to ON) indicating that it is receiving a 96K signal and
[temporarily] changing the current mode to STEREO. Neither Dolby Digital or DTS can process a standard 96K
signal, therefore the MODE is changed to STEREO in order to have audio output. The user can change this mode,
after it has been changed to STEREO, by using the MODE button to select a different and applicable MODE.
Display Time
The Casablanca III’s display brightness will automatically dim to 1⁄4 if no button has been pressed for X time. X is the
value, in minutes, from the DTIM (Display Time) parameter under button # 4 of the 2nd Global menu page.
Serial Number
Press button # 5 to display the serial number.
***
When all settings are complete in this submenu, press SET-UP twice to return to the INPUT SELECT menu.
79
Macros
The Casablanca III contains several useful macros that allow the user to perform multiple tasks at the press of a
button. To enter the Macros submenu, press SETUP, then MACROS (button # 3). The Macros submenu appears, as
shown in figure 64.
Figure 64 - Front Panel Display of the SETUP/MACROS Submenu
Copy Macros
Buttons 1 and 2 are “copy” macros. ALLINP (button # 1) allows the user to copy all INPUT SELECT parameters from
the currently selected input to one or all input select buttons. To copy to a specific input select button, the Casablanca
III will prompt the user to select the INPUT SELECT button to copy to. If the currently selected INPUT parameters are
to be copied to input select buttons 7-12, press the A-D button when given the choice of the destination INPUT
SELECT button to be copied to.
If a password protected INPUT SELECT is being copied to, the user will be prompted to enter that password.
Note: When copying all INPUT parameters to other INPUT SELECT buttons, the SOURCE (audio and video) settings
will not be copied.
Typically when setting up the Casablanca III in the system for the first time, speaker configuration settings established
for the first INPUT SELECT button will be virtually the same for all other INPUT SELECT buttons. This macro allows
only the speaker configuration, levels and delays to be copied to one or all INPUT SELECT buttons.
Restore Macros
Button # 3 allows the user to restore the factory settings in a variety of ways. The Restore menu is shown in figure 65.
Figure 65 - Front Panel Display of the SETUP/MACROS/RESTORE FACTORY Submenu
In this submenu, button # 1 allows the user to restore factory INPUT parameters to the currently selected input button.
The input name will not be changed.
Button # 2 will restore factory INPUT parameters to all 12 INPUT SELECT buttons. Input select names will not be
changed.
Button # 3 will restore all factory GLOBAL menu settings.
Button # 4 will restore all factory NAMES. This includes jack names and INPUT SELECT button names.
Button # 5 will restore all factory settings, INPUT, GLOBAL and NAMES to the Casablanca III.
80
Before any macro is executed the user will be asked “Are you sure you want to perform this macro?”. Press YES (A-D
button) or NO button # 6). The Casablanca III will prompt “Complete”. Press OK (A-D button) to return to the Macros
menu.
Note: If restoring factory defaults to an INPUT SELECT button that is password protected, the Casablanca III will ask
for the password by input name.
Press SETUP twice to return to the first page of the SETUP menu.
81
BALANCE Function
This function allows the user to temporarily* set the FRONT/REAR and LEFT/RIGHT balances, the center and
subwoofer speaker levels, the shelf EQ, and a relative adjustment of the analog input level, in order to
compensate for distinct program material characteristics.
*The parameter values in the two BALANCE pages are, by default, temporary. When the user presses a
different INPUT SELECT button or puts the Casablanca III into standby, changes made will revert to 0. This
feature has an override, (CLRBAL), which is accessed via the SETUP/GLOBAL submenu, button # 4.
The first page of the balance menu is shown in figure 66 and the second in figure 67.
Figure 66 - Front Panel Display of the BALANCE Page 1 Menu
Front/Rear and Left/Right Balance
The BALANCE adjustments are made with reference to the relative speaker trim levels that are stored in the
SETUP/INP/LVLS submenu. LEVEL LEFT/RIGHT adjusts the Left/Right balance and LEVEL UP/DOWN adjusts
the Front/Rear balance.
Figure 67 - Front Panel Display of the BALANCE Page 2 Menu
Pressing the A-D button once will reveal the second BALANCE page, which will allow temporary level changes to
the center (CEN) speaker, subwoofer (SUB), EQ and analog input level (ANLVL).
Center and Sub Balance
Press button # 1 to adjust the center level and button # 2 to adjust the subwoofer level.
Shelf EQ
Pressing button # 3 will allow the user to adjust the EQ setting to OFF, 1, 2, 3 or 4. This is a low pass shelf EQ
that, at 2KHz, drops by 1.5dB when the parameter value is set at 1, 3dB when set at 2, 6dB when set at 3, and
9dB when set at 4. The EQ is active in all modes and is designed to roll off excessive brightness in different
82
program material.
Analog Input Level Override
Button # 4 lets the user adjust the analog input level of the currently selected input, relative to the stored value in
the SETUP/GLOBAL/ANLG LVLS (analog levels) menu.
Press the BALANCE button twice to return to the current INPUT SELECT menu.
83
STATUS Function
This feature, accessible from the hand held remote or RS232 control device, provides the user with a ‘quick
view’ of the most pertinent current settings of the Casablanca III. It is available from any menu or submenu
by pressing the STATUS button. While viewing the Status pages, the INPUT SELECT buttons (1 - 6) are
inactive. Pressing a function button will clear the STATUS display and show the current function menu.
Figure 68 - Front Panel Display of the STATUS Display
When the STATUS display is activated, the following will always appear in the VFD, as shown in figure 68.
•
•
•
•
•
•
•
The current MODE (Default or temporary).
The currently selected input jack name (SRCE, or Source).
The analog TAPE OUT audio source to be recorded, by Input jack name.
The EQ parameter value of OFF, 1, 2, 3, or 4. (Stored or temporary).
The PHASE parameter value of + (0°) or - (180°).
The Sample Rate (SRTE) of the signal currently being received.
The Master Volume (LVL) setting.
The information displayed in the OSD may be different, as determined in the SETUP/INPUT page
1/OSD/STATUS setup menu
Press the A-D button once to display the Dolby Digital Status page, an example of which is shown in figure
69.
Figure 69 - Front Panel Display of the STATUS/Dolby Digital Display
The Dolby Digital status displays information that may be embedded in the Dolby Digital datastream. The
information can be correct only if a Dolby Digital source is active. Each parameter on the first page is
described below:
Channels (CHANS): Displays the number of main channels in the source signal.
LFE: Displays whether an LFE track is present or not.
Surround Mode (SMODE): Displays the surround mode. See SETUP/INP Page 2/DOLBY DIGTL Page 1,
parameter value of 2CHEN and 2CHNEN for Casablanca III’s use of this parameter. This can be found on
84
page 66.
Dolby Digital EX Flag (EXFLG): Displays whether or not there is a flag in the incoming Dolby Digital signal,
indicating whether the signal is EX encoded or not.
Sample Rate (SRATE): Displays the sample rate.
Dialog Norm (DIANRM): Dialog normalization value. See the Setup Dolby Digital Dialog Normalization on
page 66 for Casablanca III’s use of this parameter.
Press the A-D button once more to display the DTS Status page, an example of which is shown in figure 70.
Figure 70 - Front Panel Display of the STATUS/DTS Display
Each parameter on the DTS Status page is described below:
Channels (CHANS): Displays the number of main channels in the source signal.
LFE: Displays whether an LFE track is present or not.
DTS ES Flag (ESFLG): Displays whether or not there is a flag in the incoming DTS signal, indicating
whether the signal is ES encoded or not.
Sample Rate (SRATE): Displays the sample rate.
Frequency Extension (FQ EX): Indicates whether the 96K signal is native or doubled.
Continuously pressing the A-D button will cycle between the 3 Status pages.
Press the STATUS button once to exit the Status pages.
85
REMOTE
CONTROL
86
Remote Control Layout
1. POWER. After the rear panel MAIN POWER switch
is turned on, press this button to exit the standby
mode. Pressing POWER again will place the
Casablanca III into standby mode, turning off the VFD
and muting all audio outputs.
2. REMOTE. Activates/deactivates
POWER jack on the rear panel.
the
REMOTE
3. MUTE. Mutes all analog audio outputs except the
TAPE OUT jacks. Press again to disable muting.
4. STATUS. Displays the current status of the
Casablanca III on the VFD, and on the video monitor
if optional video card is installed and video display is
enabled.
5. INPUTS. Individual buttons which select the desired
input. Within a function’s submenu page(s), these
buttons select sub functions to edit. When pressed,
the corresponding LED on the front panel is activated;
as well as an arrow on the video monitor.
6. A-D. Sequences through input jacks assigned
(mapped) to the active INPUT SELECT button. Also
toggles between menu pages.
7. SELECT + and -. Incrementally changes the active
INPUT SELECT BUTTON.
8. LEVELS UP and DOWN. Adjusts master volume for
all speaker outputs. Also increments/decrements
parameter values in most edit modes and shifts
FRONT/REAR audio in the first BALANCE menu.
9. LEVELS LEFT and RIGHT. Shifts the audio balance
to the left or right in the first BALANCE page; used to
adjust the MASTER volume level when in most
submenus; used to change INPUT SELECT pages.
10. DISPLAY. Temporarily overrides the VFD display
brightness level.
11. PHASE. Inverts the phase (0/180°) of all speaker
outputs.
12. MODE. Activates/deactivates the MODE select
pages for currently selected input.
Figure 71 - Remote Control Layout
13. TAPE OUT. Used to route audio and video signals to the TAPE OUT jacks.
14. BALANCE. Activates the BALANCE menus allowing a temporary balance configuration to be set in order to adjust
for different program characteristics.
15. SETUP. Accesses submenus for setting speaker configurations/levels/delays, analog input levels, naming inputs,
setting the display & remote features, selecting the video type, setting options for incoming Dolby Digital, DTS and
Circle Surround signals and much more.
Note: When operating the hand-held remote control, point it at the remote sensor on the Casablanca III’s front panel.
The remote control can be used 3 to 20 feet from the Casablanca III within 30o of each side of the sensor. Exposing the
remote sensor to direct sunlight or strong light may cause faulty operation.
87
REMOTE CONTROL OPERATIONS
This section describes the functionality of the Casablanca III using the hand-held remote only. For front
panel functional descriptions, please refer to FRONT PANEL OPERATIONS on page 42. Introduction to the
User Interface section on page 16 will also be helpful. Descriptions for remote buttons/functionality not
covered in this section can be found in REMOTE CONTROL LAYOUT on page 87. Features and functional
descriptions which are common to both front panel and remote operations are covered in the FRONT
PANEL section and therefore not repeated in this section.
Important Note: There is no OSD (On-Screen Display) when using the 15-pin Multi Format video output
jack. OSD is only available when using the Composite and/or S-Video outputs on any video board. If a
video board installed, there will be OSD.
Input Select Menus
When the rear panel MAIN POWER switch is turned on, the Casablanca III identifies internal hardware and
software, then enters standby mode (the POWER LED turns on). Pressing the POWER button once will
result in the video monitor displaying a start-up routine, and then the last accessed INPUT SELECT menu
for x seconds, where x represents the time parameter value stored in the SETUP/INPUT page 1/OSD
submenu, TIME parameter. Figure 72 shows an example of this menu.
Changing Inputs and Input Select Pages
Press buttons 1 through 6 or SELECT UP/DOWN to choose a desired INPUT SELECT button. An arrow will
point to the currently selected input. The input names shown in
this figure are for example only and will most likely differ from
the user’s set up. There are two INPUT SELECT pages, giving
the user a total of 12 INPUT SELECT BUTTONS to choose
from. Press the LEVEL RIGHT button to select the INPUT
SELECT 2 menu. Press the LEVEL LEFT button to select the
INPUT SELECT 1 menu.
Pressing the LEVEL UP/DOWN buttons will adjust the master
volume for all speakers. This value ranges from 0 to 73
(relative maximum) and will be shown as a horizontal bar graph
on the video monitor for approximately 1 second after the
button is released.
Figure 72 - Video Display of the INPUT SELECT Page 1 Menu
Selecting Mapped Input Jacks for the Currently Selected Input
Pressing the A-D button will toggle between the input jacks mapped to this INPUT SELECT button. Please
refer to page 44 (Search Order) for important, detailed information regarding input mapping options.
Mute
The MUTE button will toggle the audio between the master volume level and MUTE level in all speakers
each time it is pressed. Please refer to pages 42 and 78 (Default mute level/mute off trigger) for additional
information on the MUTE feature. The MUTE feature is active in all menus.
Display
The DISPLAY button will toggle the VFD brightness between OFF 1⁄4, 1⁄2, 3⁄4 and FULL brightness. This
feature will have no effect on the video display. When the VFD is turned OFF, the red logo LEDs also turn
off.
Global Phase
Repeatedly pressing the PHASE button toggles the main audio outputs’ phase between 0 and 180 degrees,
and displays this on the monitor for approximately 1 second after being released. The PHASE parameter is
only accessible from the remote.
88
STATUS Display
This display, accessible from the hand held remote and viewed on both the video monitor display and VFD,
provides the user with a ‘quick view’ of the most pertinent current settings of the Casablanca III as well as
information about a Dolby Digital source. The status page is available from any menu or submenu simply by
pressing the STATUS button.
Figure 73 - Video Display of the STATUS Display
When the STATUS display is activated, its title is displayed in the upper left corner along with the following:
•
•
•
•
•
•
•
•
The current INPUT SELECT BUTTON NAME.
The current mapped input jack.
The MODE.
The TAPE OUT audio source.
The shelf EQ parameter value (OFF, 1, 2, 3, or 4).
The PHASE parameter value (0° or 180°)
The Sample rate (S RATE) of the currently selected source.
The MASTER VOLUME level.
Press the A-D button once to display the status of the current Dolby Digital source. Press A-D once more to
display the status of the current DTS source. These pages are shown in figures 74 and 75.
Note that a Dolby Digital or DTS source needs to be playing in order to display the correct values on these
status pages.
Figure 74 - Video Display of the
Dolby Digital Status Page
Figure 75 - Video Display of the DTS
Status Page
Please refer to page 84 for additional information pertaining to Dolby Digital and DTS Status menus.
Pressing the STATUS button once will clear the status display. Pressing a function button will clear the status
display and show that menu.
89
MODE Function
This function allows the user to audition MODEs for the currently selected input. Storing a default MODE is
done in the SETUP/INPUT page 1 submenu.
Pressing the MODE button once displays the first page of the MODE menu. This page consists of 6 different
signal processing modes, one of which can be selected and temporarily applied to the current input.
An arrow will point to the currently active mode. As indicated by the on screen instructions at the bottom of
the monitor, pressing the A-D button once will reveal a second page consisting of 6 additional modes, and
press A-D once more for the page with additional modes.
Figure 77 - Video Display of the
MODE Page 1 Menu
Figure 78 - Video Display of the
MODE Page 2 Menu
Figure 79 - Video Display of the MODE Page 3 Menu
If necessary, press the A-D button to select the page with the desired MODE, then press button 1 - 6 or
SELECT UP/DOWN to select the desired mode. An arrow will point to the mode selected. Additional
information/instructions regarding this function and the modes shown in figures 77, 78 and 79 are described
on pages 45 - 48.
Please refer to page 65 for additional information regarding Dolby Digital options, page 70 for additional
information regarding DTS, and page 71 for additional information regarding Circle Surround options.
***
After selecting a temporary mode for the current input, press the MODE button once more to clear the video
monitor. The MASTER VOLUME can be controlled using the LEVEL UP/DOWN buttons in these 3 menus.
90
TAPE OUT Function
This feature simultaneously controls the routing of signals to the audio and video tape out jacks.
Pressing the TAPE OUT button once displays the TAPE OUT menu, shown in figure 80 and 81, on the video
monitor display. The menu title “TAPE OUT” is displayed in the upper left. The INPUT NAMES shown in
this figure are for example only and will most likely differ from the users’ set up.
Figure 80 - Video Display of the TAPE
OUT Menu with Optional Tape Out DAC
installed and set to MAIN
Figure 81 - Video Display of the TAPE
OUT Menu with Optional Tape Out DAC
installed and set to TAPE
To route a signal to the appropriate TAPE OUT jack(s), press the TAPE OUT button, press button # 1. Use
the LEVEL UP/DOWN buttons to assign an audio source to the audio TAPE OUT jacks. Press button # 3 and
the LEVEL UP/DOWN buttons to assign a video input jack to the video TAPE OUT jacks.
Note: The composite, multi format and S-video circuits are completely independent. This is to say that a
composite video input signal can be output only through the composite video outputs, S-video input signals
can be output only through the S-video outputs and multi format input video signals can only be output via the
multi format video output.
This menu is dynamic. When the audio source is from an analog jack, the digital tape out jacks are disabled.
This is indicated on both the OSD and VFD. When a digital input jack is selected as the source, it is routed to
both the analog and digital tape out jacks. When the main DACs are selected (default), this is indicated in
both the VFD and OSD. If the optional tape out DAC is not installed, the option to select it (via button # 5) is
not shown.
Note: An RF input signal will be routed to the analog audio tape out jacks only.
The control circuitry to the video tape out jacks is common to both composite and s-video. Example: when the
user routes the composite video signal from a composite input # 1 jack to the composite video tape out jack,
the s-video # 1 input simultaneously gets routed to the s-video tape out jack. If composite video # 2 input jack
is routed to the composite video tape out jack, then s-video input # 2 jack gets routed to the s-video tape out
jack, and so on. There is no multi format video tape out jack so these input signals cannot be recorded.
Button # 5 allows the user to select whether the signal on the analog TAPE OUT jacks will be derived from the
main output DACs or the optional tape out DAC (if installed), by displaying MAIN or TAPE on the display. If
the optional tape out DAC has not been installed, there will be no option to edit above button # 5. This setting
is only relevant if the analog tape out source is set to a digital input jack. All analog inputs are routed directly
to the TAPE OUT jacks, without A/D to D/A conversion.
When routing is completed, press TAPE OUT to clear the video display. The MASTER VOLUME can be
controlled in this menu via the LEVEL LEFT/RIGHT buttons.
Please refer to page 49 for additional TAPE OUT features and options information.
CAUTION: It is not advisable to route a 5.1 source (DTS/AC-3) to the optional tape out DAC. This section
does not contain Dolby Digital or DTS decoding capabilities. Full scale noise will be output!
91
SETUP Function
This function provides access to a series of submenus that will allow the configuration of the entire system.
Note: A complete step-by-step speaker configuration set up guide is located on page 17.
In this section, all features of the SETUP menu are discussed along with a diagram of most video monitor displays.
Pressing the SETUP button once changes the video display to the first page of the SETUP menu shown in figure 82.
The menu title is displayed in the upper left corner with the menu page
number.
Pressing button # 1 leads to a series of submenus that allow the user
to edit parameter values that are stored by INPUT SELECT button.
Button # 2 allows the user to edit parameter values that are global.
These are parameters that are not stored by INPUT SELECT button.
Button # 3 leads to all of the macro features.
Button # 4 allows the user to attach a password to the SET-UP button.
Button # 5 displays channel assignment information for each DAC.
Figure 82 - Video Display of the SETUP Menu
As indicated in figure 82, button # 1 is assigned to features that are stored by input and leads to a series of
categorized submenus on 3 pages. Most pages, menus and features are discussed in minor detail in this section,
and in depth more on their respective pages in the FRONT PANEL OPERATIONS section.
Setup Button Password
It is possible to password protect the entire SETUP function, or have
no password at all. To set a password for the SETUP button press
button # 4, where the user will be asked “ARE YOU SURE YOU
WANT TO ENTER A PASSWORD FOR THIS MENU?” Answering
“YES” by pressing the A-D button will display the message shown in
figure 83.
Use buttons 1-6 to enter a password. After each digit is entered, the
digit moves one character to the right. If no password is to be used
(factory default), press the A-D button five times, which enters all
zeros. A zero anywhere in the password translates to no password.
Figure 83 - Video Display of the
SETUP Password Page
CAUTION: It is imperative that your new password be recorded. If forgotten, ALL access to the SETUP menu will
be denied. Please see the WARNING on page 16.
DAC Configuration
Pressing button # 5 in the SETUP menu allows the user to view the channels assigned to each DAC card. This is an
information page only and not an editable menu. As an example, the first page will say “LEFT FRONT CEN” if a
three channel Standard or Superior balanced DAC card is in position # 1. Press the A-D button to view the channels
assigned to the second DAC card, and A-D once more for the third DAC card. Press SET-UP once to exit this
menu.
The following section will discuss all menus and parameters under the INPUT button.
92
SETUP INPUT (Setting up each of the 12 Input Select Buttons)
Setup Input Page 1
All parameters accessed within the SETUP/INPUT menu are
separately programmable for each INPUT SELECT button. The first of
3 pages of the SETUP/INPUT submenu are shown in figure 84
Speaker configuration parameters are accessed by pressing button # 1
(SPEAKER CONFIG).
Figure 84 - Video Display of the SETUP/INPUT Page 1 Submenu
Speaker Configuration
The first submenu (SPEAKER CONFIG), shown in figure 85, allows the
user to configure speakers to reflect the audio system configuration or
the listener’s preference for the available speakers and their respective
frequency responses.
Figure 85 - Video Display of the SETUP/INPUT Page 1/SPEAKER CONFIGURATION Submenu
Left/Right Speaker Configuration
Pressing button # 1 (LEFT/RIGHT) in the Speaker Configuration menu allows the user to configure the front left/right
speakers via the left/right submenu shown in figure 86.
In this submenu, button # 1 allows the user to set the configuration for
the front left/right speakers.
The options are: FULL RANGE,
CROSSOVER, FULL W/LOP and OFF.
Please refer to page 52 for additional details/instructions on configuring
speakers, and page 19 for a discussion of crossovers.
Button #s 2, 3 and 4 give access to submenus which allow the
configuration for the three types of crossovers in the Casablanca III:
PHASE PERFECT, LINKWITZ-RILEY, and BUTTERWORTH.
Button # 5 allows the user to select the crossover type that will be
applicable for the front left/right speakers.
Figure 86 - Video Display of the SETUP/ INPUT Page 1/CONFIG/LEFT/RIGHT Configuration
Submenu
93
If the front left/right speakers are to be crossed over, set the front left/right crossover frequencies and slopes for all 3
crossover types (buttons 2, 3 and 4) to the same values. Please refer to page 54 for details.
After the front left/right speakers have been configured, press SETUP once to return to the
SETUP/INPUT/SPEAKER CONFIGURATION submenu, and press button # 2 (CENTER) to configure the center
speaker. The CENTER CONFIGURATION submenu is shown in figure 87.
Center Speaker Configuration
This submenu of settings is exactly the same as that for the front left/right speakers, but applies to the center
speaker. All of the same guidelines and procedures apply, with two additional options – Phantom and crossover L/R.
Pressing button # 1 allows the configuration of the center speaker. If
this speaker is not to be crossed over, no signal sent to the SUB output,
then this should be set to FULL RANGE. There is an option where the
full range signal can be routed to the center speaker and a low pass
part of it routed to the sub. If this is desired, the CONFIG setting should
be FUL/LP. (A crossover type must be selected, and the appropriate
crossover frequencies and slopes set up). The center speaker can be
crossed over with the low pass portion routed to the front Left/Right
speakers. In this case, the CONFIG parameter would be set to
XOVRLR. If no center speaker is present in the system, the CONFIG
parameter should be set to PHANTOM. With this setting, the signal for
the center channel is routed to the front Left/Right speakers. The
center speaker can also be set to OFF or CROSSOVER.
Figure 87 - Video Display of the SETUP/INPUT page 1/SPEAKER CONFIG/ CENTER Submenu
If a fifth SUB DAC channel is installed and enabled in the Casablanca III, the low pass portion of the center signal
will be routed to this output. If the CONFIG parameter is set to XOVRLR the low pass signal will be routed to the
front Left/Right subs. In all other cases the low pass portion of the center channel will be routed to the front SUB
output(s), or SUB output if there is only one SUB enabled.
Press button # 2, 3 and 4 to set the crossover settings for the center speaker.
Pressing button # 5 allows the user to select the crossover type that will be applicable for the center speaker.
Button # 6 allows the user to adjust the level (volume) of center channel information routed to the front Left/Right
speakers when the CONFIG parameter is set to PHANTOM.
Press SETUP twice to return to the speaker configuration submenu, then press button # 3 (SURROUNDS) to set up
the surround speakers. This submenu is shown in figure 88.
94
Surround Speaker Configuration
Set the speaker configuration and crossovers, if necessary, in the same
manner as the center speaker.
When the surround configuration and crossover setup are complete,
press SETUP to return to the SPEAKER CONFIGURATION submenu,
then press button # 4 to set up the sub woofer.
Figure 88 - Video Display of the SETUP/INPUT page 1/CONFIG/SURROUND CONFIGURATION
Submenu
Sub Woofer Configuration
The SUB CONFIGURATION submenu is shown in figure 89. If sub is not present, or is not desired, set the NUM of
SUBS to 0. If subwoofers are present, set the number of subs (NUM SUBS) to the number that will be used. The
number of subs available depends on the number of sub woofer DAC
channels installed in the Casablanca III. There may be 4 sub outputs
on the rear panel however the user may only have 3 sub- woofers. Set
this parameter to the actual number of subs to be used. If the number
of subs is to be set to 2, the user has the choice of [front] L-R or F-R
(front-rear).
Next, set the SUB [#] to either FULL RANGE or CROSSOVER. It is
recommended that the sub woofer’s crossover be bypassed and this
parameter be set to CROSSOVER. Please refer to page 53 for
additional information regarding sub woofer configuration.
Figure 89 - Video Display of the SETUP/INPUT Page 1/CONFIG/SUB CONFIGURATION
Submenu
Note that this menu is not dynamic. Parameters 2 through 6 will always be displayed regardless of the number of
sub DAC outputs or how many are enabled.
Press SET-UP once to return to the SPEAKER CONFIG menu. If a Center Surround DAC is installed and enabled
in the Casablanca III, press button # 5 in the SPEAKER CONFIG menu to set up this speaker. The SURROUND
CENTER configuration menu is shown in figure 90.
95
Surround Center Configuration
Set the center surround speaker configuration and crossovers in the
same manner as the other speakers. The menu options are the same
as those for the Left/Right surrounds. If the CONFIG parameter is set
to PHANTOM, its information will be routed to the surround left/right
speakers.
Figure 90 - Video Display of the SETUP/INPUT page 1/CONFIG/SURROUND CENTER Submenu
Side Speaker Configuration
If side speakers are present in the system, set this parameter to “ON”. If not, set it to “OFF (default). The side
speaker crossover information is a replica of the left/right surround channels.
Once all of the speaker sets have been configured, press SET-UP twice to return to the SETUP/INPUT page 1
submenu. When a system is being set up for the first time, the next step is to set up the speaker levels. To enter the
LEVELS menu(s), press button # 2. If returning to the main INPUT SELECT menu, press SET-UP two more times.
Speaker Levels
This submenu allows the user to set the level of each speaker to reflect the audio system speaker configuration,
room characteristics, or the listener’s preference. The relative range is -15dB to +15dB.
The level submenu(s) are interactive with the DAC channels that are installed into the Casablanca III. If there are 6
DAC channels installed and enabled, the names of these channels will be displayed on one page of the levels
submenu. If more than 6 DAC channels are installed and enabled, first a menu will appear asking the user which set
of speakers are to have their levels adjusted: 1-6 or 7-12. In both of these submenus, the installed DAC channel(s)
by speaker names, will be displayed.
From an Input Select menu, press SETUP, ACTIVE INPUT SETTINGS
then SPEAKER LEVELS to access the speaker levels setup submenu
shown in figure 91. If more than 6 DAC channels are installed, the user
must press either button # 1 (1-6) or # 2 (7-12) first.
If there are more than 6 DAC channels installed, pressing button # 2 on
the Levels channel choice submenu will produce a second levels
submenu as shown in figure 92. The speaker names in this submenu
may not match the user’s Casablanca III.
Figure 91 - Video Display of the SETUP/
INPUT/LEVELS 1-6 Submenu
96
To aid in establishing the desired system and speaker level balance,
the Casablanca III provides the user with the option of routing: (1) the
currently selected audio signal to the outputs, (2) an internally
generated noise signal to the currently selected speaker; or (3) an
internally generated noise signal to all speakers simultaneously.
Please refer to page 59 for additional information regarding the noise
generator.
Figure 92 - Video Display of the SETUP/INPUT/LEVELS 7-12 Submenu
Speaker Delays
This submenu allows the user to set a time delay for each speaker to
reflect the audio system configuration, room characteristics or
listener’s preference. The allowable range for the front left/right,
center and front sub speakers is 0 to 10 milliseconds (mS) and 15 to
31 mS for the surround speakers and subs.
Like the Levels submenu(s), the Delays submenu(s) are interactive.
For up to six DAC channels installed and enabled, one Delay submenu
will be shown, two if there are more than 6-channels installed and
enabled. Unlike the Levels menus, if there are two Delays submenus,
navigating between them is accomplished using the A-D button.
Figure 93 - Video Display of the
SETUP/INPUT/DELAYS 1 Submenu
Press SETUP, INPUT then SPEAKER DELAYS to access the delays setup submenu shown in figure 93.
The current delay settings will be displayed on the video monitor. All
delay settings apply to all MODEs. Delays can be further manipulated
when the current MODE is either Dolby Digital, DTS or Circle Surround,
via additional Setup submenus for these MODEs. Select each speaker
one at a time and adjust the individual delay according to the detailed
information and graph on page 62.
If a speaker set is turned OFF via the SPEAKER CONFIG submenu, it
will not be displayed in these submenus.
Figure 94 - Video Display of the
SETUP/INPUT/DELAYS 2 Submenu
When all speaker delays have been set, press SET-UP once to return to the SETUP/INPUT page 1 submenu, or
SET-UP three times to return to the main INPUT SELECT menu.
97
Default Mode
Each INPUT SELECT button can have a different default MODE assigned to it. To assign a default MODE for a
given INPUT SELECT button, first press the applicable INPUT SELECT button, SETUP, INPUT then button # 4
(MODE). This menu is shown on page 93. Use the LEVEL UP/DOWN buttons to edit this parameter and select the
desired default MODE. Press SETUP twice to exit. Repeat this procedure for each INPUT SELECT button.
Note: Pressing the front panel MODE function button allows the user to audition different modes for a given source,
when applicable, however changing modes via the MODE button does not store a mode selection.
Onscreen Display (OSD) Setup
Pressing SETUP, ACTIVE INPUT SETTINGS, then ON-SCREEN DISPLAY (button # 5) activates the On-Screen
(OSD) set up menu, shown in figure 95.
In this display, button # 1 (BACK COLOR) allows the user to select up to 7 different OSD background colors. Button
#s 2 and 3 (respectively) allow the OSD to be offset from the left and top edges of the screen to accommodate
differences in monitors.
The configuration (CONFIG) feature (button # 4) can switch the Casablanca III’s OSD to accommodate either an
NTSC or PAL monitor.
When a function button is pressed, its OSD will remain on the screen
until the user is no longer in any function menu. The DISPLAY TIME
(in seconds) setting (button # 5) allows the user to set the amount of
time (delay) that the video monitor displays the INPUT SELECT menu,
when changing inputs.
Button # 6 allows the user to decide which parameters will show on
the STATUS page and their placement on the screen. This feature is
discussed next.
Figure 95 - Video Display of the SETUP/INPUT Page 3/ON-SCREEN DISPLAY Submenu
Status Setup
STATUS SETUP (button # 6 in the OSD submenu) displays a submenu, which allows the user to change the
position of the Status screen text on the video monitor only. The first Status Setup submenu is shown in figure 96.
The items in the two Status submenus are displayed on the OSD when
the STATUS button on the hand held remote is pressed. Each item
has a value range between 0 and 10. Setting any value to 0 will
disable that item from being displayed in the OSD. 1 is the highest
position vertically and 10 is the lowest.
Press the A-D button to go to the second Status Setup submenu, to set
the values for SOURCE and SAMPLE RATE.
Note: It is possible to have conflicting results if more than one item is
displayed in the same position.
Figure 96 - Video Display of the SETUP/INPUT/OSD/STATUS page 1 Setup Submenu
98
Press the SETUP button twice to return to the SETUP/INPUT page 1 submenu, or 4 times to return to the main
INPUT SELECT menu.
VFD Brightness
Each INPUT SELECT button can have a different VFD brightness assigned to it. From the Input Select menu, press
SETUP, ACTIVE INPUT SETTINGS, then VFD BRIGHTNESS (button # 6). This allows the user to change the
default brightness value. The range is from OFF to FULL (brightest), in four steps. Any changes made to this
parameter will be reflected the next time that INPUT SELECT button is pressed. If this value is set to OFF, pressing
any button except DISPLAY will automatically brighten the VFD to its maximum level. The VFD will revert back to its
default brightness X seconds after the last button press. X represents the TIME parameter value in the
SETUP/ACTIVE INPUT SETTINGS page 1/OSD submenu. If the VFD is on but not set to FULL, pressing any
button other than another INPUT SELECT button will allow the VFD to remain at its default brightness. The
DISPLAY button will always override the default VFD brightness setting. The Display Time feature takes precedent
over the VFD brightness parameter. See details regarding the Display Time parameter on page 79.
Setup Input Page 2
To access this page, from the INPUT SELECT page or any function
menu, press SET-UP, ACTIVE INPUT SETTINGS, then the A-D button
once. Page 2 of the SETUP/ACTIVE INPUT SETTINGS menu is
shown in figure 97.
Figure 97 - Video Display of the
SETUP/INPUT Page 2 Submenu
LFE Phase
The default LFE PHASE for the currently selected INPUT SELECT button can be changed from + (in phase) to –
(180 degrees out of phase). This can be edited via button # 1.
Mapping a Source (Input Jack to INPUT SELECT button)
Pressing button # 2 accesses 2 submenus that allow the user to assign the input jacks active on the currently
selected INPUT SELECT button. There is one page for audio jack mapping and one for the combined video jacks.
Up to six audio and six video input jacks can be mapped to any one INPUT SELECT button. The order that they are
mapped determines the search order when pressing the A-D button in either INPUT SELECT menu.
Please refer to page 64 for additional information and examples of mapping input jacks to INPUT SELECT buttons.
99
Setup Dolby Digital
Button # 3 provides a two page submenu which allows the user to set up preferences pertaining to Dolby Digital
source material, by INPUT SELECT button. The first page of this submenu is shown in figure 98.
Figure 98 - Video Display of the SETUP/INPUT Page 2/DOLBY DIGITAL Page 1 Submenu
2-Channel Mode
Some Dolby Digital sources contain only two of the possible 7 or 8 main channels. This is sometimes noted on the
material's cover, in the form of "Dolby Digital 2.0" or “Dolby Surround” as opposed to "Dolby Digital 5.1", 7.1, etc.
Embedded in most two-channel Dolby Digital data streams is an indication of whether or not the material is Dolby
Surround encoded. There are three possibilities for this indication: Dolby Surround encoded; Not Dolby Surround
Encoded; or No Indication.
Regardless of the indication value, the user can instruct the Casablanca III to further process this decoded signal in
virtually any MODE. For Dolby Surround encoded signals, use button # 1 (2CHEN – or 2-channel encoded) to
indicate which MODE should be used to further process the incoming signal. Use button # 2 (2CHNEN – or 2
channel non-encoded) to indicate which MODE is desired for further processing, if the signal is non-encoded. When
a mode is applied to a two-channel Dolby Digital signal, the signal is first Dolby Digital decoded. This decoded signal
is manipulated by the mode selected in the 2CHEN or 2CHNEN parameters. When the additional selected mode is
MATRIX, the MODE displayed in the VFD when in the INPUT SELECT MENU will say “DOLBY DIGITAL + MATX”
If the indication is that the signal is not Dolby Surround encoded, or there is no indication, and the 2CHNEN MODE is
set to Dolby Digital, no additional surround processing will occur, producing a two-channel (stereo) output.
Compression
Dolby Digital contains provisions for reducing the dynamic range of a Dolby Digital source. This means reducing the
loudness of the loud passages and increasing the loudness of the quiet passages. Possible reasons for reducing the
dynamic range of a source include late night listening when loud moments may disturb others, and making tapes for
automotive / portable use wherein quiet passages may not be heard.
Casablanca III contains three parameters to control Dolby Digital compression. Button # 3 (COMPRESSION) simply
turns the compression ON or OFF. Button # 4 (HI COMPRESSION) controls the amount of volume by which loud
passages will be reduced. Button # 5 (LOW COMPRESSION,) controls the amount of loudness by which quiet
passages will be increased. A larger number indicates a greater amount of increase or decrease.
Note: Some Dolby Digital sources do not allow for compression, in which case altering these settings will not result
in an audible change.
100
Dialog Normalization
In the first Dolby Digital setup page, press button # 6 to set the dialog normalization value. Dolby Digital contains the
useful provision for making all Dolby Digital sources have the same perceived loudness even though they may have
been recorded or mixed at very different levels. This is done by embedding in the datastream a value that the
program material will need to be adjusted by to conform to an average dialog level established by Dolby
Laboratories. It should be noted that all channels are adjusted, not just the center channel. Casablanca III contains
two options for this setting: ANLG (analog) or DIGI (digital). Please refer to page 66 for additional information
pertaining to Dialog Normalization.
From the SETUP/ACTIVE INPUT SETTINGS Page 2/DOLBY DIGITAL submenu, press the A-D button once to
access page 2 of the Dolby Digital set up submenu, which is shown in figure 99.
This submenu allows the user to adjust the center and surround
speaker delays and levels as well as control the LFE GAIN and
additional speakers, when the mode is Dolby Digital.
All values are relative to the values set in the SETUP/INPUT/LEVELS
and DELAYS submenus. As an example, if the center speaker level in
the SETUP/INPUT/LEVELS submenu is set to +5, and in this submenu
it is set to +3, the total center level when the MODE for the currently
selected input is Dolby Digital, will be +8.
Figure 99 - Video Display of the SETUP/INPUT
Page 2/DOLBY DIGITAL Page 2 Submenu
Since discrete sources are often recorded with surround delays, it is recommended that the delay setting for 5.1
sources be 15 mS less than non 5.1 sources.
Button # 5 controls the LFE gain setting for Dolby Digital sources. Dolby Digital sources usually contain an LFE (low
frequency effects) channel. This channel commonly contains sound effects such as explosions but may also contain
soundtrack information. Casablanca III offers the user an LFE range of 0 to -30 for this setting, as well as OFF.
Please refer to page 67 for more detailed information about using this parameter.
If the incoming signal is Dolby Digital 5.1, and the user desires to create sides or a center surround channel, use the
+SPKR (Additional Speakers) parameter (button # 6) to indicate which MODE will be used in their creation. Modes
that can be used are:
VFD
DEFINITION
OFF
No additional speaker signals will be created.
THETA
Theta Proprietary Processing
DTSES
DTS ES
NEO6M
DTS NEO:6 Music
NEO6C
DTS NEO:6 Cinema
PL2MU
Dolby Pro Logic IIx Music
PL2MV
Dolby Pro Logic IIx Movie
Table 8 – Additional Speaker Modes for Dolby Digital Source.
Press the A-D button to access Page 3 of the Dolby Set Up submenu. This page contains parameters used when the
mode is Dolby Digital EX only. This menu is shown in figure 100a.
101
Press button # 1 and use the LEVEL UP/DOWN buttons to set which
mode will create the center surround or side speakers when the mode
is Dolby Digital EX.
Figure 100a - Video Display of the SETUP/INPUT
Page 2/DOLBY DIGITAL Page 2 Submenu
Press the A-D button to access Page 4 of the Dolby Set Up submenu. This page contains parameters used when the
mode is Dolby Pro Logic IIx Music and the incoming signal is 2 channel, only. This menu is shown in figure 100b.
The Panorama Mode feature, when ON (button # 1 in figure 100b), extends the front stereo image to include the
side or surround speakers. This gives a “wraparound” effect with sidewall imaging. It is particularly effective for
recordings which have strong left or right channel elements in the mix,
as these are detected and accentuated by the Panorama process. The
Panorama feature is typically intended for use with Music Mode. Refer
to figure 49b on page 68.
With Pro Logic IIx Music decoding, dominant center signals can come
only from the center speaker. The Center Width control allows
variable adjustment of the center image so that it may be heard only
from the center speaker, only from the left/right speakers as a phantom
image, or from all three front speakers to varying degrees. There will
be no effect if the center speaker is set to OFF or PHANTOM. The
range is from 0 to 7. Please refer to figure 49c on page 68 for
additional details.
Figure 100b - Video Display of the SETUP/INPUT
Page 2/DOLBY DIGITAL Page 2 Submenu
Press the SETUP button three times returns to the main INPUT SELECT page, once to return to SETUP/INP page 2.
Setup DTS
Figure 101-102 - Video Display of the SETUP/INPUT Page 2/DTS 1 and DTS 2 Submenus
102
The first submenu allows the user to adjust the center and surround speaker delays and levels as well as control the
LFE GAIN and additional speakers, when the mode is DTS.
All values are relative to the values set in the SETUP/INPUT/LEVELS and DELAYS submenus. As an example, if
the center speaker level in the SETUP/INPUT/LEVELS submenu is set to +5, and in this submenu it is set to +3, the
total center level when the MODE for the currently selected input is DTS, will be +8.
Since discrete sources are often recorded with surround delays, it is recommended that the delay setting for 5.1
sources be 15 mS less than non 5.1 sources.
Button # 5 controls the LFE gain setting for DTS sources. DTS sources usually contain an LFE (low frequency
effects) channel. This channel commonly contains sound effects such as explosions but may also contain
soundtrack information. Casablanca III offers the user an LFE range of 0 to -30 for this setting, as well as OFF.
Please refer to page 67 for more detailed information about using this parameter.
If the incoming signal is DTS 5.1, and the user desires to create sides or a center surround channel, use the +SPKR
(Additional Speakers) parameter (button # 6) to indicate which MODE will be used in their creation. Modes that can
be used are:
VFD
DEFINITION
OFF
No additional speaker signals will be created.
THETA
Theta Proprietary Processing
DTSES
DTS ES
NEO6M
DTS NEO:6 Music
NEO6C
DTS NEO:6 Cinema
PL2MU
Dolby Pro Logic IIx Music
PL2MV
Dolby Pro Logic IIx Movie
Table 9 – Additional Speaker Modes for DTS Source.
Note: The ADDL SPREAKERS setting has no effect (is bypassed) if the mode is DTS 96/24, DTS ES Matrix or
Discrete.
Pressing the A-D button once will take the user to the second DTS Setup page, shown in figure 102.
In Cinema Mode, for Stereo film soundtracks, sounds steered to the Center are subtracted from the Left/Right
channels. (In Music Mode, the Center is never fully subtracted from the Left/Right channels).
Center Gain (CEN GAIN) is the parameter which controls the amount of subtraction. It varies between 0 and 0.5 in
steps of 0.1. The default value is 0.2. When CEN GAIN is set at 0, nothing is subtracted from the left and Right
channels. When CEN GAIN = 0.5, the Center channel is subtracted from the Left and Right channels at -6dB for
each channel. The signal level sent to the Center channel is not affected by CEN GAIN.
Note: The CEN GAIN parameter will have an effect only if the mode is DTS NEO:6 Music and the incoming signal is
2 channel.
Please refer to page 70 for additional details regarding setting up DTS parameters.
Press SETUP once to return to the SETUP/ACTIVE INPUT SETTINGS page 2 menu, or three times to return to the
main INPUT SELECT page.
103
Setup Circle Surround II
Figure 103 - Video Display of the SETUP/INPUT Page 2/CIRCLE SURROUND Submenu
Press SETUP, ACTIVE INPUT SETTINGS, A-D then CIRCLE SURROUND to enter the Circle Surround setup
menu, as shown in figure 103.
This submenu allows the user to adjust the center and surround speaker delays and levels as well as control
DIALOG CLARITY and LEVEL, when the mode is Circle Surround II.
All values are relative to the values set in the SETUP/INPUT/LEVELS and DELAYS submenus. As an example, if
the center speaker level in the SETUP/INPUT/LEVELS submenu is set to +5, and in this submenu it is set to +3, the
total center level when the MODE for the currently selected input is one of Circle Surround II, will be +8.
With Circle Surround, the user also has the option to adjust the DIALOG CLARITY. This parameter is used to help
the end user discern more accurately what is being said from the rest of the audio track.
Use button # 5 to turn Dialog Clarity ON or OFF. Button # 6 is used to set the Clarity Level. The range is 0-10, with 0
being off.
Press SETUP once to return to the SETUP/ACTIVE INPUT SETTINGS page 2 menu, or three times to return to the
main INPUT SELECT page.
104
Post Process
This submenu, shown in figure 104, allows the user to select an additional process to add to the incoming signal
once it has already been processed/decoded via the selected MODE. Only one post process can be selected per
input.
The available post processing consists of:
OFF. Which applies no further processing;
Stereo Front/Rear (ST/FR): takes signals from the front and surround
lefts, adds them together and outputs this sum equally to the front left
and surround left speakers. The same applies for the right front and
surround speakers. The process varies slightly depending on whether
the MODE is stereo, mono or a matrix.
Figure 104 - Video Display of the SETUP/INPUT Page 2/POST PROCESS Submenu
Party: takes parts of each original channel’s signal, blends them with all others and outputs this mix to all speakers.
Each speaker will have a blend of all channels.
Center Spread is a process in which part of the center channel is routed to the front left/right speakers. It is enabled
in the Post Process submenu, and altered in the SETUP/ACTIVE INPUT SETTINGS/page 3 submenu, under the
CENTER SPREAD parameter.
Press SETUP once to return to the SETUP/ACTIVE INPUT SETTINGS page 2 menu, or three times to return to the
main INPUT SELECT page.
Setup Input Page 3
This is the third page of the SETUP/ACTIVE INPUT SETTINGS menu.
It allows editing of the active input name, setting a master audio delay,
setting a password for each INPUT SELECT button, enabling/disabling
Auto-Search, setting the Center Spread parameter and setting up the
optional Six Shooter. All of these features are discussed below.
Figure 105 - Video Display of the SETUP/INPUT Page 3 Submenu
Setup Miscellaneous
Press button # 1 to enter the MISC submenu.
Naming the Current Input Select button
Select the input to rename. Then press SETUP, ACTIVE INPUT SETTINGS, A-D twice, MISC and button # 1 to
name the currently selected input. The letters VFD or OSD will be displayed in the lower portion of the display. VFD
indicates that the name in the VFD is to be edited. VFD names are limited to 4 characters. Press the LEVEL
UP/DOWN button to change characters and the LEVEL LEFT/RIGHT to change character positions. Pressing the
105
DISPLAY button once will clear the current INPUT SELECT name. Press the A-D button to edit the OSD name.
OSD will appear in the lower portion of the display. The OSD name can be up to 15 characters, the current
character to be edited blinks on screen.
Press SETUP once to return to the SETUP/INP page 3 submenu.
Master Delay
When video processing occurs, there can be a delay in the output of the video signal significant enough to put the
audio and video out of sync. The Casablanca III allows the user to set an overall, or master delay on all outputs in
order to re-sync the audio with the video signal. In the SETUP/ACTIVE INPUT SETTINGS page 3 submenu, press
button # 2 and use the LEVEL UP/DOWN buttons to adjust the audio delay time until the video appears to be in sync
with the audio. The range is 0 to 100 mS at 48KHz.
When complete, press SETUP twice to return to the INPUT SELECT menu.
Password for Each INPUT SELECT Button
Press button # 3 to set a password for the currently selected input. Entering a password here will prompt the user to
type in the password each time SET-UP is selected while on this INPUT SELECT.
When the PW button is pressed, “ARE YOU SURE YOU WANT TO ENTER A PASSWORD FOR THIS MENU?”
message appears on the screen. Pressing NO (button # 6) reverts back to the SETUP/INP Page 3 submenu.
Pressing YES (A-D button) will display a screen that allows a password to be entered, with the first character
blinking. The user can use buttons 1-6 to enter a password, or elect to have no password for this INPUT SELECT
button by pressing the A-D button 5 times, which will display all zeros, indicating no password.
Note: If a zero appears in any position of the password, it will be seen as all zeros, or no password. PLEASE
REMEMBER and/or WRITE DOWN YOUR PASSWORD! If it is forgotten, all access to password protected areas
will be denied! Please refer to page 16 for additional information on using passwords.
Center Spread
This parameter adjusts the mix between the center speaker and the front left/right speakers. This effect is a post
process to all other digital signal processing and is activated in the POST PROCESS submenu. The higher the
value set in SETUP/ACTIVE INPUT SETTINGS/page 3, the more center channel information is routed to the front
left/right speakers. If the value were at its highest (15), all of the center speaker information would be routed to the
front left/right speakers, the same as phantoming the center speaker.
Six Shooter
The Six Shooter is an external device that allows the 6 analog output channels of an SACD or DVDA player to
integrate with the Casablanca III. There are 3 inputs and one output on the Six Shooter. The first two inputs are
designed to receive SACD or DVDA signals. The third input receives the first 6 output channels of the Casablanca
III. The outputs of the Six Shooter are connected to the amplifier inputs.
The first two-channels of the Six Shooter contain volume controls. The volume for these two inputs is controlled by
the Casablanca III.
When the Six shooter is used, the user first selects the appropriate INPUT SELECT button on the Casablanca III,
then press SETUP\INP\A-D\A-D\6SHOT. Using the LEVEL UP\DOWN buttons, select which Six Shooter input will
be used. For all other INPUT SELECT buttons on the Casablanca III, set this parameter to 3 so that the incoming
signal is routed from the first 6 outputs of the Casablanca III into Input # 3 of the Six Shooter (which is a bypass) and
then directed to the amplifiers.
Please refer to Appendix B for a Six Shooter wiring diagram.
106
Setup Global
This function provides access to a series of submenus that will allow
the configuration of global parameters, those not stored by input select
button.
Press SETUP, then GLOBAL (button # 2). The first page of the Global
submenu is displayed, as shown in figure 106.
Figure 106 - Video Display of the SETUP/GLOBAL Page 1 Submenu
Analog Input Levels
In the first Global menu, pressing button # 1 accesses the ANALOG INPUT LEVELS submenu, shown in figure 107.
This function allows the user to adjust the relative ANALOG input
LEVEL for each analog source. The allowable relative range is +19 to
-14dB in 1dB increments, then steps to -16, -18 and -22dB.
Select the analog input to be adjusted by pressing buttons 1-6 once.
Adjust the relative input level using the LEVEL UP/DOWN buttons.
Please refer to page 75 for additional information regarding setting the
analog input levels.
Figure 107 - Video Display of the SETUP/ANALOG
INPUT LEVELS Submenu
Jack Names
In the Global page 1 menu, pressing button # 2 accesses a series of submenus which allow the user to name the
Casablanca III’s input jacks, both audio and video. The JACK NAMES submenu is shown in figure 108.
Pressing button # 1 accesses a submenu that allows the analog audio
input jacks to be named. Button # 2 does the same for the coaxial
digital audio input jacks, button # 3 and 4 allow the user to name all
non-coaxial digital audio input jacks. Buttons # 5 and # 6 lead to
submenus that allow the naming of the video jacks.
On some versions of video card, a capitol “O” is not present in the
character set. In this case, use the zero.
Please refer to page 76 for additional details and an example of editing
an input jack name.
Figure 108 - Video Display of the SETUP/ INPUT/JACK NAMES Submenu
107
Main Power Triggers
The REMOTE POWER jack and three MAIN POWER jacks on the rear panel can be programmed to output 12V,
either continuous DC or a PULSE. This feature is used to turn on other
system components (power amplifiers, etc), from the Casablanca III
From the first SETUP/GLOBAL page, press button # 3 to access the
REMOTE POWER submenu shown in figure 109.
Use button # 1 to indicate whether the output of the REMOTE POWER
jack should be 12VDC (DC) or a 12V pulse (PULSE). The REMOTE
POWER jack is triggered only when the REMOTE button on the hand
held remote, or the front panel, is pressed. The specification sheet for
the device to be triggered should contain information as to which type of
signal it requires, and if it is a pulse, the minimum pulse duration.
Figure 109 - Video Display of the
SETUP/GLOBAL/REMOTE POWER Submenu
Buttons 2, 3 and 4 allow the setup of the three MAIN POWER jacks on the rear panel.
activated/deactivated each time the Casablanca III is put in/out of standby.
These jacks are
The MAIN POWER 1 jack is activated immediately upon exiting the standby mode (pressing the front panel or the
hand held remote POWER button), the MAIN POWER 2 jack is activated X seconds after exiting standby and the
MAIN POWER 3 jack is activated 2X after exiting standby. X represents the time, in seconds, that is set by pressing
button # 5 – MTIM, or Main [Delay] Time. This is useful for sequencing the turn on of high power components such
as amplifiers. When the Casablanca III is put into standby, all of the MAIN POWER jacks can turn off
simultaneously, or sequenced off in the opposite order that they were activated. This is accomplished by setting
SEQ (button # 6) to ON (sequenced shutdown) or OFF (simultaneous shutdown).
If any of the rear panel power jacks is set to PULSE, the duration (in milliseconds) of this pulse can be set by the
user by pressing the A-D button and using the LEVEL UP/DOWN buttons.
Please refer to page 76 for more detailed descriptions/instructions of the remote power jacks.
Press SETUP once to return to the first page of the SETUP/GLOBAL menu, or three times to return to the main
INPUT SELECT page.
Clear Balance (Temporary Settings Control)
Any changes in the BALANCE menus are, by default, temporary. When an INPUT SELECT button is pressed or the
Casablanca III is powered down/put into standby, any changes will be reset to zero. This feature has an override,
set by pressing button # 4 in the first SETUP/GLOBAL page (figure 106 on page 107). When this parameter is set to
OFF, changing inputs or powering down/going into standby will maintain all BALANCE menu settings.
108
RS232
In the first SETUP/GLOBAL page, press button # 5 to access the RS232 submenu shown in figure 110.
Press button # 1 (BAUD) and use the LEVEL UP/DOWN buttons to select the Baud rate that matches that of the
RS232 control device.
Button # 2 (ECHO STATUS) allows the user to enable or disable the
output of data to the RS232 port and if enabled, determine which
[status] level, or pre-determined group of bytes it outputs. The
Casablanca III can be set to automatically communicate all changes to
the RS232 port. This can be done by selecting ECHO STATUS. If any
Casablanca III parameter changes, that level's data will be sent to the
port. This is useful for monitoring master level, input, etc. when the
user has access to both the Casablanca III and the touch-panel
controller, to keep them synchronized. It is also useful when there is
no on-screen display and the VFD is not visible from the main listening
position. Setting this value to OFF disables any parameter change
information from being output to the RS232 port.
Figure 110 - Video Display of the SETUP/GLOBAL/RS232 Submenu
The RS232 protocol is available from Theta’s website at www.thetadigital.com.
If the RS232 feature is not being used, ensure that the ECHO STATUS parameter is set to OFF. Other settings can
slow the operation of the Casablanca III.
When all settings are complete in this submenu, press SETUP three times to return to the INPUT SELECT menu.
Mute/Volume
This submenu provides the user with a method of setting volume and mute control parameters. Press SETUP,
GLOBAL, then button # 6 (MUTE/VOLUME). This submenu is shown in figure 111.
Initial Power-On Master Volume
Button # 1 (INITIAL LEVEL) allows the user to store the initial volume
setting that the Casablanca III will default to when it comes out of
standby.
Figure 111 - Video Display of the SETUP/GLOBAL/MUTE-VOLUME Submenu
FVOL and SVOL
When certain parameters are edited or the master volume changed, holding the LEVEL UP/DOWN button for more
109
than 5 steps will, by default, speed up the rate an which the value changes. This is referred to as Fast Mode. It is
possible to set the speed of the fast mode to the users preference. In FVOL (Fast Volume – button # 2) a value of 0
will allow the Fast Mode to be its quickest (no delay between steps), and a delay of 255 mS allows it to be its
slowest.
The rate at which the LEVEL UP/DOWN buttons respond during the first 5 steps is referred to as Slow Mode. SVOL
(button # 3) allows the user to set the speed of increment changes during these first 5 steps (a higher delay time) or
increase their speed (a lower delay time setting). In SVOL (Slow Volume) a delay of 0 will allow the Slow Mode to be
its quickest, and a delay of 255 allows it to be its slowest.
Maximum Overall Level
Button # 4 (MAX) allows the user to set a maximum master volume level. This is especially useful in a household
where young relentless children and smart pets have access to the system.
Changing the Default MUTE Level
Pressing button # 5 allows the user to set the volume level of the MUTE function.
MUTE Off Trigger
Setting this parameter (accessed via button # 6) to MUTE allows only the MUTE button to un-mute the Casablanca
III. Setting this parameter to M+V (MUTE and VOLUME) allows both the MUTE and LEVEL UP/DOWN buttons to
un-mute.
Press the SETUP button once to return to the SETUP/GLOBAL page 1 submenu. Press the A-D button once to go
to the second GLOBAL page, shown in figure 112.
Cursor Type
When editing jack or input select names, the character being edited
can be indicated by a flashing cursor, the character blinking, both, or no
indication. This preference is set in the SETUP/GLOBAL page 2
submenu, button # 1.
Figure 112 - Video Display of the
SETUP/GLOBAL Page 2 Submenu
110
Displaying Mode Change Messages
As discussed in the MODE section of this manual, when the Casablanca III receives a Dolby Digital or DTS signal on
the currently selected input and the MODE is different from the incoming signal, a message will briefly appear on the
VFD and OSD stating that the Casablanca III has received a certain format and is temporarily changing the MODE.
This message is turned off by default but can be turned on. Pressing button # 2 and changing the value to ON
achieves this.
Note: If the default MODE is DOLBY DIGITAL or DTS and a 96K signal is received, the Casablanca III will
momentarily display a message (if the MSG parameter is set to ON) indicating that it is receiving a 96K signal and
[temporarily] changing the mode to STEREO. The user can then change this mode by using the front panel MODE
button and selecting a different and applicable MODE.
Display Time
The Casablanca III’s display brightness will automatically dim to 1⁄4 if no button has been pressed for X minutes. The
value set in the DTIM (Display Time) parameter under button # 4 of the SETUP/GLOBAL page 2 menu.
Serial Number
Press button # 5 to display the serial number of this Casablanca III.
***
When all settings are complete in this submenu, press SETUP twice to return to the INPUT SELECT menu, once to
return to the SETUP menu.
Macros
The Casablanca III contains several macros that allow the user to perform multiple tasks at the press of a button. To
enter the Macros submenu, press SETUP, then MACROS (button # 3). The Macros submenu appears, as shown in
figure 113.
Copy Macros
Buttons 1 and 2 are “copy” macros.
COPY ALL INPUT
PARAMETERS (button # 1) will allow the user to copy all INPUT
SELECT parameters of the currently selected input to one (ANOTHER
INPUT) or all (ALL INPUTS). If the user chooses another input they
will then be asked to choose which one, by input select name. INPUT
SELECT buttons 1-6 are displayed on the first menu, pressing A-D will
reveal INPUT SELECT buttons 7-12
Button 2 allows the user to copy only those input parameters focused
on the speaker setups such as levels, delays, crossovers, etc.
Figure 113 - Video Display of the SETUP/MACROS Submenu
Note: When copying all INPUT parameters to other INPUT SELECT buttons, the SOURCE (audio and video
mapped jacks) settings will not be copied. In virtually all cases, the jacks mapped to a given INPUT SELECT button
will not be desired on other INPUT SELECT buttons.
Please refer to page 80 for additional details regarding the Copy Macros feature.
111
Restore Macros
Button # 3 allows the user to restore the factory settings in a variety of ways. The Restore menu is shown in figure
114.
In this submenu, button # 1 allows the user to restore factory INPUT
parameters, except input the name, to the currently selected input
button.
Using button # 2 will restore factory INPUT (except for input names)
parameters to all 12 INPUT SELECT buttons.
Pressing button # 3 will restore all factory GLOBAL parameter settings.
Button # 4 will restore all factory NAMES. This includes jack names
and INPUT SELECT button names for both the VFD and OSD.
Figure 114 - Video Display of the SETUP/MACROS/RESTORE FACTORY Submenu
Button # 5 will restore all factory settings, INPUT, GLOBAL and NAMES to the Casablanca III.
Before any macro is executed the user will be asked “ARE YOU SURE YOU WANT TO PERFORM THIS
MACRO?”. When complete, press OK (A-D button).
Note: When restoring factory settings for an INPUT SELECT button that is password protected, the password will
be requested, by input name.
Press SETUP twice to return to the first page of the SETUP menu, or three times to return to the main INPUT
SELECT page.
112
BALANCE Function
This function allows the user to temporarily change the FRONT/REAR and LEFT/RIGHT balances, the center
and subwoofer speaker levels, apply the shelf EQ, and adjustment of the analog input level.
The first page of the balance menu is shown in figure 115 and the second in figure 116.
Figure 115 - Video Display of the
BALANCE Page 1 Menu
Figure 116 - Video Display of the
BALANCE Page 2 Menu
Front/Rear and Left/Right Balance
The BALANCE adjustments are made with reference to the relative speaker levels stored in the
SETUP/ACTIVE INPUT SETTINGS/LEVELS submenu. LEVEL LEFT/RIGHT adjusts the Left/Right balance
and LEVEL UP/DOWN adjusts the Front/Rear balance.
The parameter values in the two BALANCE pages are, by default, temporary. If an INPUT SELECT button
is pressed or the unit put into standby, the changes made will revert to 0. This feature has an override,
(CLEAR BALANCE), which is accessed via the SETUP/GLOBAL submenu, button # 4.
Pressing the A-D button once will reveal the second BALANCE page.
Center and Sub Balance
Press button # 1 and then use the LEVEL UP/DOWN buttonsto adjust the center level and button # 2 to
adjust the subwoofer level.
Shelf EQ
Pressing button # 3 will allow the user to adjust the EQ setting between OFF, 1, 2, 3 and 4. This is a low
pass shelf EQ that, at 2KHz, drops by 1.5dB when the parameter value is set at 1, 3dB when set at 2, 6dB
when set at 3, and 9dB when set at 4. The EQ is active in all modes and is designed to roll off excess
brightness in different program material.
Analog Input Level Override
Button # 4 lets the user adjust the analog input level of the currently selected input, relative to the stored
value in the SETUP/GLOBAL/ANALOG LEVELS menu.
Press the BALANCE button once to return to the current INPUT SELECT menu.
113
APPENDIXES
114
Appendix A
Troubleshooting Guide
If the Casablanca III should function abnormally during operation, please review the items in the following
checklist. Please be sure to thoroughly check all other connected components such as speakers, amplifiers,
input devices (CD/LD transport, VCR, TV, etc.) as well as cables.
Symptom
Possible Cause(s)
Remedy
Mute on permanently.
No power or front panel
lights and no sound.
No Lock LED.
No digital source connected.
Power cable is not inserted 100% into IEC
connector.
No “LOCK” light.
Circuit breaker is open (AC outlet or
Casablanca III).
Defective or intermittent cable.
Verify valid data at selected digital input.
Verify that source is securely connected.
Ensure that the AC cord is inserted all the way
into the Casablanca III and that the wall outlet
is active.
Check the AC outlet circuit breaker and reset,
if necessary or contact your dealer.
Verify that the digital cable is not defective by
checking the continuity, that both ends are
firmly connected. If possible, try a different
cable.
Toggle the A-D button until the jack name for
the desired source is displayed.
Verify that the source component is
functioning correctly and outputting valid
digital data.
Ensure that the output cable from the source
component is connected to its active digital
output.
Verify valid data at selected input.
In the SETUP/INPUT/LEVELS submenu,
verify that the SOURCE parameter is set to
SOURCE (A-D button).
Adjust analog input level until the red clip LED
goes off.
In the SETUP/INPUT/CONFIG submenu, set
the speaker to an appropriate parameter for
your system.
Increase analog input level as high as
possible without clipping.
Set the number of SUBs to reflect the current
speaker configuration in the SETUP/INPUT/
CONFIG submenu.
Review the MODE Function section, detailed
on pages 45 – 48 to select a MODE that
functions for both the current input signal
format as well as the desired speaker or
system configuration.
Ensure that one or more speakers are
crossed over in the SETUP/INPUT/CONFIG
submenu.
N/A.
Digital source is not selected in the search
order.
Defective source component.
Source component improperly connected.
No audio output.
No Lock LED.
NOISE SEL activated with no speakers
selected.
Distortion from analog
input.
No output from a
speaker.
Clipping.
Low output from
analog source.
No Sub Woofer.
Analog input level set too low.
an
Speaker set to OFF or PHTM (Phantom).
SUB is set to 0.
The currently selected MODE does not
support sub woofers.
No speakers are crossed over.
The current program material does not
contain an LFE track.
115
Appendix B
Wiring Diagrams and Speaker Placement Guides
This section provides example illustrations of various input and output wiring schemes as well as examples of speaker
placement in a typical room. Before making any connections, please turn off ALL audio and video devices. Unplug
those that do not have a main power switch. To avoid audible distortion and/or overall signal degradation, use high
quality audio and video signals. It is recommended that all cables be kept as short as possible for best sound quality.
Figure 117 - Examples of Typical Input and Tape Out Connections
Figure 118 - Recommended Output Wiring Diagram Using 12 Single-Ended channels
116
Figure 119 - Recommended Speaker Placement for Six-Channel Configuration
Figure 120 - Recommended Speaker Placement for Twelve-Channel Configuration
117
Figure 121 - Recommended Output Wiring Diagram Using 12-channels (Six Balanced and
Six Single-Ended)
Figure 122 - Recommended Output Wiring Diagram Using 8 balanced Xtreme channels
118
Digital Out/External Volume Control Wiring Diagrams
With the optional Digital Output Card installed, there are no additional menu features to select from. The card can be
installed in any Analog Out slot in the Casablanca III. However, if it is installed in conjunction with another D/A card
that has front left and right analog outputs on it, the Digital Out card must be positioned in the Analog Out 2 or 3 slot in
order for the Analog Direct and Analog Matrix modes to function.
Figure 123 - Wiring diagram for the Casablanca III Digital Output board and a 2-Channel External
Volume Control unit.
Connect one of the 3 Left/Right digital outputs to the input of a two-channel external Digital to Analog converter (DAC).
If a two-channel External Volume Control (EVC) unit is being utilized, connect the left/right outputs of the DAC to the
corresponding left/right inputs of the two-channel EVC. Then connect the left/right outputs of the EVC to the left/right
inputs of the front [left/right] power amp inputs.
Lastly, connect the VOL1 on the Digital output card to the VOLUME jack on the EVC. This allows the master volume
parameter from the Casablanca III to be transmitted to the EVC, thereby controlling the volume from the DAC. All
connections are shown in Figure 123, above.
Figure 115 shows the wiring diagram using one 6-channel EVC. If two EVCs are being used, connect the VOL2 on
the digital output card to the VOLUME jack on the second EVC. The second EVC must be configured to respond to
channels 7-12. This will be done at the factory. Connect the second EVC to the appropriate channels (Surround
Center/Side Left/Side Right/Sub 1-4) of the digital out card as was done with the first EVC.
In the case where the Digital Output card has the optional analog center channel output installed, connect this output
directly into the center channel power amp input.
119
Figure 124 - Wiring diagram for the Casablanca III Digital Output board and a 6-Channel External
Volume Control unit.
120
Six Shooter Wiring Diagram
Figure 125 - Wiring diagram for the optional Six Shooter
121
Appendix C
Remote Extender Jack Technical Description and Protocol
The remote extender jack on the Casablanca III rear panel serves as a direct electrical pathway to the input section of
the main microcontroller. Using this jack eliminates the need to attach an IR transmitting device to the front panel IR
receiver. This input requires a demodulated signal. **
Remote system: Phillips RC5
System address: 10 hex (00010000 binary) (5 bit system address)
6 bit button code:
Button
1
2
3
4
5
6
A/D
MUTE
MODE
TAPE OUT
SET-UP
BALANCE
DISP
PWR
UP
DOWN
REM PWR
STAT
LEFT
RIGHT
PHASE
SEL UP
SEL DOWN
EQ
Discrete OFF
Discrete ON
Code (hex)
01
02
03
04
05
06
07
08
09
0A
0B
0C
0D
0E
0F
10
11
12
13
14
15
16
17
18
19
1A
Code (binary)
00000001
00000010
00000011
00000100
00000101
00000110
00000111
00001000
00001001
00001010
00001011
00001100
00001101
00001110
00001111
00010000
00010001
00010010
00010011
00010100
00010101
00010110
00010111
00011000
00011001
00011010
Electrical Requirements:
Jack: 3.5mm stereo mini-phone
Tip: 12v current limited dc supply from Casablanca III (for phantom power)
Ring: Signal, 0-5 v peak-to-peak. (Is pulled high in Casablanca III)
Sleeve: Ground
***
**There are companies who manufacture units that strip the IR carrier from a signal. One such company is Xantech,
who makes the model 794-10. If this unit is used, a series of dipswitches need to be set on it. These settings are as
follows:
(from switch 1 to 10)
1011000101
where 1 = ON and 0 = OFF
122
Appendix D
Upgrading/Re-installing Casablanca III Software
The most dynamic parts of Casablanca III’s internal operating system and supporting files are stored in flash
memory and are therefore easily updateable via an IBM compatible PC.
To install new software into the Casablanca III, first the “Downloader” software must be installed on a local PC.
Instructions for this installation are included with the CD ROM. This software is referred to as Theta Digital
Downloader (TDD) x.xx, where x.xx is the version number. The latest version of TDD as well as the latest CB3
Flash files themselves are available from Theta Digital, through a Theta Digital authorized dealer or on the Theta
website (www.thetadigital.com).
When TDD “connects”, it will take over control of the Casablanca III. When updating it will read and store the
internal hardware configuration and user settings and then update and/or overwrite the flash files on every board.
It will then restore the hardware configuration parameters that were set at the factory as well as the user settings.
TDD can also save all user settings to the hard drive of a PC. This is a highly recommended procedure to do,
immediately after setting up the Casablanca III for the first time.
When TDD is installed onto the PC, a PDF file entitled “Guide to Using TDD” is copied to the hard drive. This
document covers the detailed information required to use TDD in all of its modes. It is recommended that this
document be read through in its entirety before using TDD.
123
Appendix E
Specifications
Digital Input Section (32KHz, 44.1KHz, 48KHz, 88.2KHz, 96KHz compatible):
Main digital input board:
Inputs:
Outputs:
10:6 coaxial (RCA), 4 optical (2 TosLink, 2 open for optional AT&T).
2 digital tape out coaxial on RCA jacks.
Auxiliary Digital Input board:
Inputs:
5: 2 AC-3 RF (RCA) for laserdisc Dolby Digital, 1 AES/EBU (XLR), 1 BNC, 1 TosLink.
Outputs:
Volume Data.
Analog Input Section:
Inputs:
Input Level:
Input Impedance:
Outputs:
Tape Output Impedance:
A/D Conversion:
6 stereo pair on RCA jacks.
200 mV rms minimum, 22v rms maximum.
10 KΩ.
2 stereo pair on RCA jacks for analog tape out.
36.5 ohms
20-bit Delta-Sigma at 48KHz; separate delta-sigma modulator and high performance decimating
digital filter.
Frequency response:
+-.2dB 20Hz - 20KHz
THD+Noise:
0.0025%
Dynamic Range:
104dB
Signal to Noise Ratio:
104dB
Input volume control:
Theta proprietary switched resistor network in the analog domain.
Automatic DC canceling circuit.
Processing (DSP) Section:
All DSP processing is 24bit with 56 bit accumulator. Some processes, such as low pass crossovers, are 48bit with 56 bit
results.
Channels Supported: Left, Right, Center, Left Surround, Right Surround, Center Surround, Left Front Sub, Right Front Sub,
Left Surround Sub, Right surround Sub, Center Sub, Left Side, Right Side.
Modes: Matrix, Special Matrix, Dolby Pro Logic, Dolby Digital, DTS, Stereo, Mono, Analog Direct,
Analog Matrix, Circle Surround (optional).
Post Processes (applied in addition to selected mode): Stereo Front/Rear, Party, Center Spread.
EQ: Four levels of high frequency roll-off (shelf-type) to compensate for overly bright sources.
Crossovers: Separate crossovers for each of the following: Front Left/Right, Front Center, Surround Left/Right, Surround
Center. Three types supported: Linkwitz-Riley, Butterworth, Phase Perfect. Crossover frequencies: 40Hz,
50Hz, 63Hz, 80Hz, 125Hz, 160Hz. Crossover slopes: 6dB, 12dB, 18dB, 24dB per octave. Butterworth
crossovers have separate adjustments for high and low pass.
Subwoofers: Up to five subwoofers supported. 1- single subwoofer, 2- left/right subwoofers, 2- front/rear subwoofers, 3left/right/surround
subwoofers,
4left/right/surround
left/surround
right
subwoofers,
5left/center/right/surround left/surround right subwoofers. Each subwoofer can be set to receive a full range
signal in case the sub has an internal crossover that cannot be defeated.
LFE: Phase adjustment (0, 180 degrees), level adjustment (0dB to -30dB, off)
Delays: Master (applies to all channels) delay for syncing with video processors, comprehensive separate delay settings
for all speakers including subwoofers.
Analog Audio Outputs: See additional pages.
Control Section:
RS232: Complete ability to control and read status of every operational parameter of unit.
IR Receiver: 3.5mm stereo phone jack (rear panel), unmodulated.
IR Receiver: Front panel IR window for hand-held remote control.
Remote Power: 4 rear panel 3.5mm mono phone jacks: +12VDC triggered (Can be set to Pulse or Continuous
DC), pulse time variable from 0 to 255 mSec. Up to 100mA each. See page 77 for more detail.
Specifications subject to change without notice.
124
Video Section (three options available):
6 composite / 4 S-Video option:
Composite Inputs:
6 (RCA jacks).
Composite Outputs: 1 main and 1 tape (RCA jacks).
S-Video Inputs:
4.
S-Video Outputs:
1 main and 1 tape.
On-screen display on main outputs (composite and S-video). On-screen display character generator completely
bypassed when not in use for maximum fidelity.
8 S-Video option:
S-Video Inputs:
S-Video Outputs:
8.
2 main and 2 tape.
On-screen display on main outputs. On-screen display character generator completely bypassed when not in use
for maximum fidelity.
3 Multi Format / 6 S-Video option:
High Resolution Multi Format Inputs:
High Resolution Multi Format Outputs:
S-Video Inputs:
6.
S-Video Outputs:
1 main and 1 tape.
3 (15 pin D type connectors).
1 Main (on 15 pin D type connector).
On-screen display on S-Video main output only. On-screen display character generator completely bypassed
when not in use for maximum fidelity.
Multi Format I/O:
-Any 3, 4, or 5 Wire Component (480i or 480p).
-HDTV (Y, Pb, Pr) (for 720p or 1080i).
- Any 3, 4, or 5 Wire RGB Output from a Video Processor / Scaler or Computer RGsB, RGB/S, RGB/H&V.
- Input Signal Types Can Be Mixed, as Long as the Display or Processor Will Accept Mixed Formats from the
Switched Output, on 1 Input.
-NO On Screen Display.
-Connectors are High Density 15 Pin D Sub (HD15) Connectors (like VGA Monitor/ Computer Connectors).
-Cables should have a bandwidth capacity of 400MHz or greater for the highest resolution.
***
Power Requirements: 117 VAC, 50-60 Hz, 120 watts with all options installed.
Dimensions:
19”W x 16”D x 7.5”H (483 x 406 x 191 mm)
Weight:
43 Lbs (19.5 Kg) Stand alone, 50 Lbs (22.7 Kg) Boxed with accessories
Environment:
Operating Temperature:
32 to 95 F (0 to 35 C)
Relative Humidity:
95% maximum without condensation
Remote Control:
Storage Temperature:
-22 to 167 F (-30 to 75 C)
1 hand-held, battery powered control unit uses 2 AAA batteries
Specifications subject to change without notice.
125
Xtreme Quality Balanced D/A Output Card
Output Options:
Slot 1-3: (One of the following, each):
Front Left, Right, Center, Surround Center or Sub 5.
Front Left, Right, Side Left, Right
Front Left, Right, Center, Sub 4
Sub 1, Sub 2, Sub 3, Sub 4
Front Left, Right, Center, Sub 3
Side Left, Right, Sub 3, Sub 4
Front Left, Right, Center, Sub 2
Front Left, Right, Sub 1, Sub 2
Side Left, Right, Sub 2, Sub 3
Surround Left, Right, Sub 1, Sub 2
Sub 2, Surround Center or Sub 5, Side Left, Right
Surround Left, Right, Sub 2, Sub 3
Front Center, Surround Left, Right, Sub 2
Front Center, Sub 1, Sub 2, Sub 3
Front Center, Side Left, Right, Sub 2
Front Center, Sub 1, Surround Left, Right
Front Left, Right, Surround Left, Right
Surround Left, Right, Side Left, Right
Front Left, Right, Center, Sub 1
Sub 1, Sub 2, Sub 3, Surround Center or Sub 5
Surround Left, Right, Center or Sub 5, Sub 1
Surround Left, Right, Center or Sub 5, Sub 2
Front Center, Surround Center or Sub 5, Surround Left, Right
Front Center, Surround Center or Sub 5, Side Left, Right
Sub 2, Sub 3, Sub 4, Surround Center or Sub 5
Each output channel has a balanced (XLR) output connector only.
D/A Conversion:
24-bit Ladder (8x oversampling – 4x @96K). Two DACs per channel (8 per board) for true differential
operation.
Volume Control:
Theta proprietary switched resistor network in the analog domain.
Digital Filter:
8x oversampling (4x @ 96K) Theta proprietary FIR filter running on Motorola 56362 DSP.
Single-Ended Output:
None
Sample Rates Supported: 32KHz, 44.1 KHz, 48 KHz, 88.1 KHz, 96 KHz.
Balanced Output Specifications:
Output Impedance:
Maximum Output Level:
Frequency Response:
THD+Noise:
Dynamic Range:
Signal to Noise Ratio:
Crosstalk:
20 Ohms.
20 Vrms balanced.
20 Hz-20 kHz, ± 0.025 dB, Ref. 1KHz.
Less than 0.0015% @ 1KHz, maximum output level.
105dB minimum, 20KHz bandwidth, Ref. 1KHZ, A-weighted.
105dB typical, idle channel, A-weighted.
-105dB Right - Left, >-120dB Center-Left @ 20KHz.
Block Diagram:
Specifications subject to change without notice.
126
Superior II Balanced D/A Output Card
Output Options:
Front Left/Right/Center.
Front Left/Right/Sub1.
Sub 1/Surround Left/ Right.
Sub 2/Surround Left/ Right.
Sub 2/Sub 3/Sub 4.
Sub 2/Sub 3/Surround Center.
Surround Center/Side Left/Right.
Sub 2/Side Left/Right.
Surround Center/Surround Left/ Right.
Front Center/Surround Left/Right.
Each output channel has a balanced (XLR) and a single-ended (RCA) output connector.
LEFT FRONT
RIGHT FRONT
24-bit Ladder (8X oversampling - 4x oversampling for 96KHz sources). Two DACs
per channel (6 per board) for true differential operation.
D/A Conversion:
Volume Control:
Theta proprietary switched resistor network in the analog domain.
Digital Filter:
Theta proprietary FIR filter running on Motorola 56362 DSP.
Single-Ended Output:
Summed from balanced signals, retains many of the advantages of the balanced
output.
CENTER
Sample Rates Supported: 32KHz, 44.1 KHz, 48 KHz, 88.1 KHz, 96 KHz.
Balanced Output Specifications:
Output Impedance:
Maximum Output Level:
Frequency Response:
THD+Noise:
Dynamic Range:
Signal to Noise Ratio:
Crosstalk:
20 Ohms.
20 Vrms.
20 Hz-20 kHz, ± 0.01 dB, Ref. 1KHz.
Less than 0.0016% @ 1KHz, maximum output level.
105dB minimum, 20KHz bandwidth, Ref. 1KHZ, A-weighted.
105dB typical, idle channel, A-weighted.
-90dB Right - Left, -120dB Center-Left @ 20KHz.
Single-Ended Output Specifications:
Output Impedance:
Maximum Output Level:
Frequency Response:
THD+Noise:
Dynamic Range:
Signal to Noise Ratio:
Crosstalk:
10 Ohms
10 Vrms
20 Hz-20 kHz, ± 0.01 dB, Ref. 1KHz.
Less than 0.0016% @ 1KHz, maximum output level.
105dB minimum, 20KHz bandwidth, Ref. 1KHZ, A-weighted.
105 typical, idle channel, A-weighted.
-90dB Right - Left, -120dB Center-Left @ 20KHz
Block Diagram:
TO TAPE
OUT BUS
24 BIT
DAC
24 BIT
DAC
1
2
3
4
5
6
7
8
9
10
11
12
DIGITAL
ROUTING
LOGIC
56362
24 BIT
DAC
DIGITAL
SIGNAL
PROCESSOR
24 BIT
DAC
ANALOG
DIRECT
LEVEL
CONTROLS
L-
TO TAPE
OUT BUS
ANALOG
DIRECT
24 BIT
DAC
R+
LEVEL
CONTROLS
R-
LEVEL
CONTROLS
24 BIT
DAC
Specifications subject to change without notice.
L+
127
SUPERIOR II
Premium Quality Balanced D/A Output Card
Output Options:
Slot 1-3: (One of the following, each):
Front Left, Right, Center, Surround Center or Sub 5.
Front Left, Right, Side Left, Right
Sub 1, Sub 2, Sub 3, Sub 4
Side Left, Right, Sub 3, Sub 4
Front Left, Right, Sub 1, Sub 2
Surround Left, Right, Sub 1, Sub 2
Front Left, Right, Center, Sub 4
Front Left, Right, Center, Sub 3
Front Left, Right, Center, Sub 2
Side Left, Right, Sub 2, Sub 3
Sub 2, Surround Center or Sub 5, Side Left,
Right
Surround Left, Right, Sub 2, Sub 3
Front Center, Surround Left, Right, Sub 2
Front Center, Sub 1, Sub 2, Sub 3
Front Center, Side Left, Right, Sub 2
Front Center, Sub 1, Surround Left, Right
Front Left, Right, Surround Left, Right
Surround Left, Right, Side Left, Right
Front Left, Right, Center, Sub 1
Sub 1, Sub 2, Sub 3, Surround Center or Sub 5
Surround Left, Right, Center or Sub 5, Sub 1
Surround Left, Right, Center or Sub 5, Sub 2
Front Center, Surround Center or Sub 5, Surround Left, Right
Front Center, Surround Center or Sub 5, Side Left, Right
Sub 2, Sub 3, Sub 4, Surround Center or Sub 5
PREMIUM
Each output channel has a balanced (XLR) output connector only.
D/A Conversion:
24-bit Ladder (8x oversampling – 4x @96K). Two DACs per channel (8 per board) for true
differential operation.
Volume Control:
Theta proprietary switched resistor network in the analog domain.
Digital Filter:
8x digital interpolation followed by 64x delta-sigma modulator
Single-Ended Output:
None
Sample Rates Supported: 32KHz, 44.1 KHz, 48 KHz, 88.1 KHz, 96 KHz, 176 KHz, 192 KHz.
Balanced Output Specifications:
Output Impedance:
50 Ohms.
Maximum Output Level: 20 Vrms balanced.
Frequency Response: 20 Hz-20 kHz, ± 0.025 dB, Ref. 1KHz.
THD+Noise: Less than 0.0015% @ 1KHz, maximum output level.
Dynamic Range:
105dB minimum, 20KHz bandwidth, Ref. 1KHZ, A-weighted.
Signal to Noise Ratio: 105dB typical, idle channel, A-weighted.
Crosstalk:
> 110dB channel to channel @ 20KHz.
127a
Superior Quality Balanced D/A Output Card
Output Options:
Slot 1:
Slot 1:
Slot 2:
Slot 2:
Slot 3:
Slot 3:
Front Left, Front Right, Center.
Front Left, Front Right, Sub 1.
Sub 1, Surround Left, Surround Right.
Center, Surround Left, Surround Right.
Sub 2, Sub 3, Sub 4.
Sub 2, Sub 3, Surround Center.
Each output channel has a balanced (XLR) and a single-ended (RCA) output connector.
D/A Conversion:
20-bit Ladder (8X oversampling). Two DACs per channel (6 per board) for true
differential operation.
Volume Control:
Theta proprietary switched resistor network in the analog domain.
Digital Filter:
8x oversampling Theta proprietary FIR filter running on Motorola 56004 DSP (1 per
channel, 3 per board). 4x oversampling for 96KHz sources.
Single-Ended Output:
Summed from balanced signals, retains many of the advantages of the balanced
output.
Sample Rates Supported: 32KHz, 44.1 KHz, 48 KHz, 88.1 KHz, 96 KHz.
Balanced Output Specifications:
Output Impedance:
Maximum Output Level:
Frequency Response:
THD+Noise:
Dynamic Range:
Signal to Noise Ratio:
Crosstalk:
20 Ohms.
20 Vrms.
20 Hz-20 kHz, ± 0.01 dB, Ref. 1KHz.
Less than 0.0016% @ 1KHz, maximum output level.
105dB minimum, 20KHz bandwidth, Ref. 1KHZ, A-weighted.
105dB typical, idle channel, A-weighted.
-90dB Right - Left, -120dB Center-Left @ 20KHz.
Single-Ended Output Specifications:
Output Impedance:
Maximum Output Level:
Frequency Response:
THD+Noise:
Dynamic Range:
Signal to Noise Ratio:
Crosstalk:
10 Ohms
10 Vrms
20 Hz-20 kHz, ± 0.01 dB, Ref. 1KHz.
Less than 0.0016% @ 1KHz, maximum output level.
105dB minimum, 20KHz bandwidth, Ref. 1KHZ, A-weighted.
105 typical, idle channel, A-weighted.
-90dB Right - Left, -120dB Center-Left @ 20KHz
Block Diagram:
Specifications subject to change without notice.
128
Standard Quality Balanced D/A Output Card
Output Options:
Slot 1:
Slot 2:
Slot 2:
Slot 2:
Slot 3:
Slot 3:
Slot 3:
Slot 3:
Front Left, Front Right, Center.
Sub 1, Surround Left, Surround Right.
Sub 2, Surround Left, Surround Right.
Surround Center, Surround Left, Surround Right.
Sub 2, Sub 3, Sub 4.
Sub 2, Sub 3, Surround Center.
Sub 3, Sub 4, Surround Center.
Surround Center, Side Left, Side Right.
Each output channel has a balanced output as well as 2 single-ended (RCA) output connectors. (+ and -)
D/A Conversion:
18 bit Delta-Sigma, one stereo DAC per channel producing plus and minus phases.
There are 3 stereo DACs per board.
Digital Filter:
8x digital interpolation filter followed by a 64x delta-sigma modulator.
Volume Control:
I.C. based, in the analog domain.
Single-Ended Outputs:
One phase of balanced outputs, not summed.
Sample Rates Supported: 32KHz, 44.1 KHz, 48 KHz.
Balanced Output Specifications:
Output Impedance:
Maximum Output Level:
Frequency Response:
THD+Noise:
Dynamic Range:
Signal to Noise Ratio:
Crosstalk:
73 Ohms
20 Vrms
20 Hz-20 kHz, ± 0.2 dB, Ref. 1KHz.
Less than 0.0032% @ 1KHz, maximum output level.
98dB minimum, 20KHz bandwidth, Ref. 1KHZ, A-weighted.
98dB typical, idle channel, A-weighted.
-110dB Right - Left, -120dB Center-Left @ 20KHz
Single-Ended Output Specifications:
Output Impedance:
Maximum Output Level:
Frequency Response:
THD+Noise:
Dynamic Range:
Signal to Noise Ratio:
Crosstalk:
36.5 Ohms
10 Vrms
20 Hz-20 kHz, ± 0.2 dB, Ref. 1KHz.
Less than 0.0040% @ 1KHz, maximum output level.
95dB minimum, 20KHz bandwidth, Ref. 1KHZ, A-weighted.
95dB typical, idle channel, A-weighted.
-110dB Right - Left, -120dB Center-Left @ 20KHz
Block Diagram:
Specifications subject to change without notice.
129
Standard Quality 6-Channel Single-Ended D/A Output Card
Outputs:
Each single-ended DAC card can be assigned one of the following output configurations:
-Front Left, Front Right, Front Center, Surround Left, Surround Right, Sub 1.
-Side Left, Side Right, Sub 2, Sub 3, Sub 4, Sub 5.
-Side Left, Side Right, Surround Center, Sub 2, Sub 3, Sub 4.
-Surround Left, Surround Right, Sub 1, Sub 2, Sub 3, Sub 4.
-Surround Left, Surround Right, Surround Center, Side Left, Side Right, Sub 1.
-Surround left, Surround right, Side left, Side right, Sub 1, Sub 2.
D/A Conversion:
18 bit Delta-Sigma, one stereo DAC per channel producing plus and minus phases.
There are 3 stereo DACs per board.
Digital Filter:
8x digital interpolation filter followed by a 64x delta-sigma modulator.
Volume Control:
I.C. based, in the analog domain.
Single-Ended Outputs:
One phase of balanced outputs, not summed.
Sample Rates Supported: 32KHz, 44.1 KHz, 48 KHz.
Output Specifications:
Output Impedance:
Maximum Output Level:
Frequency Response:
THD+Noise:
Dynamic Range:
Signal to Noise Ratio:
Crosstalk:
36.5 Ohms
10 Vrms
20 Hz-20 kHz, ± 0.2 dB, Ref. 1KHz.
Less than 0.0060% @ 1KHz, maximum output level.
95dB minimum, 20KHz bandwidth, Ref. 1KHZ, A-weighted.
95 typical, idle channel, A-weighted.
-90dB Right - Left, -120dB Center-Left @ 20KHz
Specifications subject to change without notice.
130
Superior Quality 12-Channel Digital Output Card
Outputs:
Digital Outputs: (Can be installed in any one of the 3 slots).
8: 1 AES/EBU (Balanced XLR), 1 Single-Ended (RCA), 1 Optional AT&T for Front Left/Right, and
coaxial for all other channel pairs (Center/Left Front Sub, Left/Right Surround, Right Front Sub/Left
Surround Sub, Right Surround Sub/Center Sub or Surround Center, Left Side/Right Side). 96K
compatible.
This Card can also have an analog Center Channel output. This is useful when digital outputs are
required for the front left/right channels and DAC cards used for all other outputs. The center
channel option is available only in Superior quality and has both a Balanced and Single-Ended (RCA)
output connector.
Analog Output (Optional):
Output channel has a balanced (XLR) and a single-ended (RCA) output connector.
D/A Conversion:
20-bit Ladder (8X oversampling). Two DACs per channel (6 per board) for true
differential operation.
Volume Control:
Theta proprietary switched resistor network in the analog domain.
Digital Filter:
8x oversampling Theta proprietary FIR filter running on Motorola 56004 DSP. 4x
oversampling for 96KHz sources.
Single-Ended Output:
Summed from balanced signals, retains many of the advantages of the balanced
output.
Sample Rates Supported: 32KHz, 44.1 KHz, 48 KHz, 88.1 KHz, 96 KHz.
Balanced Output Specifications:
Output Impedance:
Maximum Output Level:
Frequency Response:
THD+Noise:
Dynamic Range:
Signal to Noise Ratio:
Crosstalk:
20 Ohms
20 Vrms
20 Hz-20 kHz, ± 0.01 dB, Ref. 1KHz.
Less than 0.0016% @ 1KHz, maximum output level.
105dB minimum, 20KHz bandwidth, Ref. 1KHZ, A-weighted.
105dB typical, idle channel, A-weighted.
-90dB Right - Left, -120dB Center-Left @ 20KHz
Single-Ended Output Specifications:
Output Impedance:
Maximum Output Level:
Frequency Response:
THD+Noise:
Dynamic Range:
Signal to Noise Ratio:
Crosstalk:
Control:
10 Ohms
10 Vrms
20 Hz-20 kHz, ± 0.01 dB, Ref. 1KHz.
Less than 0.0016% @ 1KHz, maximum output level.
105dB minimum, 20KHz bandwidth, Ref. 1KHZ, A-weighted.
105dB typical, idle channel, A-weighted.
-90dB Right - Left, -120dB Center-Left @ 20KHz
2 serial digital volume control data for use with external volume control.
Block Diagram:
Please see page 7.
Specifications subject to change without notice.
131
90 DAY LIMITED WARRANTY TERMS AND CONDITIONS
(5 Year optional extended service contract)
1.
Theta Digital Corporation, henceforth referred to as Theta, warrants the product designated herein to be free of
manufacturing defects in material and workmanship, subject to the conditions set forth herein, for a period of 90 days
from the date of purchase by the original purchaser, henceforth referred to as purchaser. If the purchaser registers the
unit with Theta by mailing in the warranty card, together with a copy of the bill of sale, within 14 days of the date of
purchase, said purchaser will be registered for an extended service contract. The extended service contract extends the
90 days to a period of 5 years from the date of purchase by the original purchaser or no later than 7 years from the date
of shipment to the authorized Theta dealer, whichever comes first.
2.
CONDITIONS
This warranty is subject to the following conditions and limitations. The warranty is void and inapplicable if the product
has been used or handled other than in accordance with the instructions in the owner's manual, abused or misused,
damaged by accident or neglect or in being transported, or if the defect is due to the product being repaired or
tampered with or modified by anyone other than Theta or an authorized Theta repair center. In the unlikely event that
the unit requires service, contact Theta for an RA (Return Authorization) number. The product must be packed and
returned to Theta or an authorized Theta repair center by the customer at his or her sole expense. Theta will pay return
freight of its choice. A returned product must be accompanied by a written description of the defect, a photocopy of the
original purchase receipt, and a daytime phone number where the owner can be reached. The unaltered receipt must
clearly list model and serial number, the date of purchase, the name and address of the purchaser and authorized
dealer and the purchase price. Theta reserves the right to modify the design of any product without obligation to
purchasers of previously manufactured products and to change the prices or specifications of any product without
notice or obligation to any person. The warranty is valid only in the country in which the unit was purchased.
3.
REMEDY
In the event the above product fails to meet the warranty, and the above conditions have been met, the purchaser's
sole remedy under the limited warranty shall be to obtain an RA number and return the product to Theta or an
authorized Theta repair center where the defect will be rectified without charge for parts or labor.
4.
LIMITED TO ORIGINAL PURCHASER
This warranty is for the sole benefit of the original purchaser of the covered product and shall not be transferred to a
subsequent purchaser of the product.
5.
DURATION OF WARRANTY
This warranty expires 90 days after the date of original purchase. If Theta receives the completed warranty registration
card within 14 days of original purchase, this period is extended to the fifth anniversary of the original date of purchase
or no later that the seventh anniversary of the shipment to the authorized Theta dealer, whichever comes first.
6.
MISCELLANEOUS
ANY IMPLIED WARRANTIES RELATING TO THE ABOVE PRODUCT SHALL BE LIMITED TO THE DURATION OF
THIS WARRANTY. THE WARRANTY DOES NOT EXTEND TO ANY INCIDENTAL OR CONSEQUENTIAL COSTS
OR DAMAGES TO THE PURCHASER. Some states do not allow limitations on how long an implied warranty lasts or
an exclusion or limitation of incidental or consequential damages, so the above limitations or exclusions may not apply
to you. This warranty gives you specific legal rights, and you may also have other rights which vary from state to state.
Theta does not warrant that the operation of this product will be uninterrupted or error free. Theta is not
responsible for damage that occurs as a result of user failure to follow the instructions intended for Theta
products
7.
WARRANTOR
Inquiries regarding the above limited warranty may be sent to the following address:
THETA DIGITAL CORPORATION
5330 DERRY AVENUE, SUITE "R"
AGOURA HILLS, CA 91301
WARRANTY OUTSIDE THE USA
Theta has formal distribution in many of the countries of the free world, in each country the Theta Importer has
contractually accepted the responsibility for product warranty. Warranty service should normally be obtained from the
importing dealer or distributor from whom you obtained your product.
WARNINGS
1. To prevent fire or shock hazard, do not expose your Theta product to rain or moisture.
2. This unit contains voltages which can cause serious injury or death. Do not operate with covers removed. Refer all
servicing to your authorized Theta dealer.
3. For continued protection against fire hazard, replace fuses only with the same type and rating of fuses as specified.
132
Rev 3 00B3