1
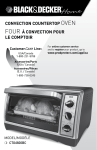
ConveCtion Countertop Oven HOrnO De ConveCCión para MostraDor Care Line: Customer USA/Canada 1-800-231-9786 Mexico 01-800 714-2503 Accessories/Parts (USA / Canada) Accesorios/Partes (EE.UU / Canadá) 1-800-738-0245 Model/Modelo ❍ CTO800 For online customer service and to register your product, go to www.prodprotect.com/applica IMPORTANT SAFEGUARDS When using electrical appliances, basic safety precautions should always be followed, including the following: ❍Read all instructions before using. ❍Do not touch hot surfaces. Use handles or knobs. ❍To protect against electrical shock do not immerse cord, plugs or appliance in water or other liquid. ❍Close supervision is necessary when any appliance is used by or near children. ❍Unplug from outlet when not in use and before cleaning. Allow to cool before putting on or taking off parts. ❍Do not operate any appliance with a damaged cord or plug, or after the appliance malfunctions or has been damaged in any manner. Return appliance to the nearest authorized service facility for examination, repair or adjustment. Or, call the appropriate toll-free number on the cover of this manual. ❍The use of accessory attachments not recommended by the appliance manufacturer may cause injuries. ❍Do not use outdoors. ❍Do not let cord hang over edge of table or counter, or touch hot surfaces. ❍Do not place on or near a hot gas or electric burner, or in a heated oven. ❍Extreme caution must be used when moving an appliance containing hot oil or other hot liquids. ❍Always attach plug to appliance first, then plug cord into the wall outlet. To disconnect, turn any control to OFF, then remove plug from wall outlet. ❍Do not use appliance for other than intended use. ❍Use extreme caution when removing tray or disposing of hot grease. ❍Oversized foods or metal utensils must not be inserted in a toaster oven, as they may create a fire or risk of electric shock. ❍A fire may occur if the toaster oven is covered or touching flammable material including curtains, draperies, walls and the like, when in operation. ❍Do not clean with metal scouring pads. Pieces can break off the pad and touch electrical parts resulting in a risk of electric shock. ❍Extreme caution should be exercised when using containers constructed of other than metal or glass. ❍Do not store any material, other than manufacturer's recommended accessories, in this oven when not in use. ❍Do not place any of the following materials in the oven: paper, cardboard, plastic and the like. ❍Do not cover crumb tray or any part of this oven with metal foil. This will cause overheating of the oven. ENGLISH Please Read and Save this Use and Care Book SAVE THESE INSTRUCTIONS. This product is for household use only. POLARIZED PLUG (120V Models Only) This appliance has a polarized plug (one blade is wider than the other). To reduce the risk of electric shock, this plug is intended to fit into a polarized outlet only one way. If the plug does not fit fully into the outlet, reverse the plug. If it still does not fit, contact a qualified electrician. Do not attempt to modify the plug in any way. ELECTRICAL CORD a) A short power-supply cord is to be provided to reduce the risk resulting from becoming entangled in or tripping over a longer cord. b)Longer extension cords are available and may be used if care is exercised in their use. c) If an extension cord is used, 1) The marked electrical rating of the cord set or extension cord should be at least as great as the electrical rating of the appliance, and 2) The cord should be arranged so that it will not drape over the countertop or tabletop where it can be pulled on by children or tripped over unintentionally. If the appliance is of the grounded type, the extension cord should be a grounding-type 3-wire cord. TAMPER-RESISTANT SCREW Warning: This appliance is equipped with a tamper-resistant screw to prevent removal of the outer cover. To reduce the risk of fire or electric shock, do not attempt to remove the outer cover. There are no user-serviceable parts inside. Repair should be done only by authorized service personnel. Note: If the power supply cord is damaged, it should be replaced by qualified personnel; in Latin America by an authorized service center. ENGLISH CONTROL PANEL Product may vary slightly from what is illustrated. Rotate then set toknob past 20 desired time Important: When making toast or using the TIMER function, always turn the knob past 20 and then turn back or forward to desired setting. 1.On indicator light †2. Bake/Broil temperature (TEMP ˚F/˚C) selector knob (Part # CTO800-01) †3.Slide rack (Part # CTO800-05) 4.Slide rack slots for bake/broil pan †5. Bake/broil pan (Part# CTO800-06) †6. Cooking FUNCTION selector knob (Part #CTO800-02) †7. 60-minute TIMER/TOAST shade selector knob (Part # CTO800-03) †8.Slide-out crumb tray (Part # CTO800-04) 9. Door handle 10.Rack slots 11.Extra-deep curved interior Note: † indicates consumer replaceable/removable parts 1.On indicator light 2. Bake/Broil temperature (TEMP ˚F/˚C) selector knob 3. Cooking FUNCTION selector knob 4. 60-minute TIMER/TOAST shade selector knob This product is for household use only. 20 knob past Rotate desired time to then set CAUTION $ "65 *0 / THIS OVEN GETS HOT. THIS OVEN GETS HOT. WHEN WHEN IN USE, ALWAYS USE OVEN IN USE, ALWAYS USE OVEN MITTS OR POT HOLDERS WHEN MITTS OR POT HOLDERS TOUCHING ANY OUTER OR INNER WHENSURFACE TOUCHING ANY OUTER OF THE OVEN. OR INNER SURFACE OF THE OVEN GETTING STARTED •Remove all packing material and any stickers. •Remove and save literature. • Please go to www.prodprotect.com/applica to register your warranty. • For additional information about your countertop oven go to www.blackanddecker.com • Wash all removable parts as instructed in Care and Cleaning section of this manual. • Wipe outside of appliance with a damp cloth; dry thoroughly. • Insert slide rack into lower rack position with the rack up (A). D IMPORTANT: This oven gets hot. When in use, always use oven mitts or potholders when touching any outer or inner surface of the oven (D). NOTE: Set oven to BAKE at 350º F and set timer to 20 minutes without any food in oven to burn off any oils used in production. The ON indicator light comes on and will remain lit during the entire baking time. During first few minutes of use you may notice smoke and a slight odor. This is normal and should cause no concern. ENGLISH How to Use SLIDE RACK POSITIONS There are 4 possible positions for the slide racks. There is an upper and a lower slot; the rack can also be inverted for 2 additional positions (E). NOTE: All 4 positions can be used when baking; when broiling because the bake/broil pan is inserted under the rack, the rack can only be placed in 2 positions: Position 2 and 4. Position 1 Use lower slots along oven walls. Insert rack using a rack-down position. Position 2 Use lower slots along oven walls. Insert rack using a rack-up position. Position 3 Use upper slots along oven walls. Insert rack using a rack-down position. Position 4 Use upper slots along oven walls. Insert rack using a rack-up position. E A • If planning to broil, insert bake/broil pan into slots under the slide rack. If planning to bake, use the bake/broil pan or other oven safe baking utensil (B). • Select a location where this unit is to be used allowing enough space for back of the unit and the wall to allow heat to flow without damage to cabinets and walls. B HELPFUL HINTS ABOUT YOUR OVEN • When the oven is turned on, the indicator light will come on and remain illuminated until the oven is turned off manually or automatically when the timer has been used. • When selecting baking time for a particular product or recipe include preheat time. • This oven has a 60 minute timer. If baking something that will take longer than 60 minutes, we suggest you use the STAY ON feature (F) (see page 8). • Metal, ovenproof glass and ceramic bake ware without lids can be used in the oven. If foods require covering use aluminum foil. F • Be sure the top of the container or food being baked or broiled is at least 1½ inches away from the upper heating elements. Rotate knob past 20 then set to desired time C • Insert crumb tray below lower heating elements (C). NOTE: Once the oven has been heated let the oven cool to room temperature before removing crumb tray. •Remove tie from cord and unwind. • Plug unit into electrical outlet. J • Use a metal, glass or ceramic baking dish without lids placed on the slide rack in either the upper or lower rack slot positions (J). NOTE: Be sure food or baking dish does not come within 1½ inches of the top heating elements. 9. The first time you use the oven, bake following the manufacturers’ or recipe directions and check for doneness at minimum suggested cooking time. ENGLISH • Turn the temperature selector knob to MIN, the cooking function selector knob to KEEP WARM and the timer/toast selector knob to OFF before inserting or removing plug from electrical outlet (G). •Do not put any container directly on the lower heating element. • To obtain the best performance from this countertop oven, do not overfill the oven. • To avoid heat loss, do not open the door too frequently. • When using foil to cover a food, tuck the edges of the foil against the sides of the baking dish or pan. • When using BAKE this oven uses convection technology. It is equipped with a fan that provides continuous circulation of hot air around the food cooking; the food is more evenly cooked and in some cases, may cook G faster. OVERVIEW OF THE FUNCTIONS IMPORTANT: This oven gets hot. When in use, always use oven mitts or potholders when touching any outer or inner surface of the oven. For best results, preheat oven for 8 to 10 minutes at desired baking temperature before baking food. BAKING • This oven bakes using Convection only. This function uses an internal fan to distribute the heat evenly. • It is not necessary to alter the baking time or temperature from those given for a recipe or package directions. • It is suggested that you check the food being cooked at the minimum baking time to avoid overcooking. 1. Insert the slide rack into the lower rack position of the oven with the rack turned up (position 2) (see page 7). You may also use the upper rack position with the rack turned down (position 3) (see page 7). 2. Turn temperature selector knob to desired temperature from 150º F to 450º F. 3. Turn cooking function selector knob to BAKE. 4. To use the TIMER function, always turn the knob past 20 and then turn back or forward to desired baking time, including preheat time. 5. Select STAY ON to bake longer than 60 minutes or to control cooking time yourself. Be sure to use a kitchen timer. NOTE: You must set the timer or select STAY ON for the oven to function. 6. The ON indicator light comes on and will remain lit during the entire baking time. 7. The heating elements will cycle on and off to maintain even heat distribution. 8. Once oven has preheated, open oven door and insert food. Close oven door. NOTE: You can bake 3 ways: • Use the bake/broil pan placed on the oven rack (H). • Slide the bake/broil pan under the slide rack and place the food directly on the slide rack. NOTE: Be sure food does not extend past the outer limits of the bake/ broil pan to prevent grease dripping onto the heating elements. 10. If using the oven timer, there will be an audible signal once the baking cycle is complete. The oven turns OFF and the light goes out. 11. If not using the oven timer, turn the oven dial to OFF once cooking cycle is complete. 12. Open the oven door. Using oven mitts or pot holders, slide the rack out to remove the cooked food. IMPORTANT: This oven gets hot. When in use, always use oven mitts or potholders when touching any outer or inner surface of the oven. 13. Turn the top control to MIN, the middle control to KEEP WARM and the bottom control to OFF before removing plug from electrical outlet. Unplug appliance when not in use. H FOOD Chicken Parts (up to 1 ½ lb.) Whole Chicken Fish fillets or steaks AMOUNT 1 to 4 pieces to fit pan Up to 3 ½ lb. 1 to 4 to fit pan TEMP./TIME 375º F. / 60 to 90 minutes 375º F. to desired doneness 400º F. for about 12 minutes PROCEDURE Chicken should register 180º F. when inserted into the breast on meat thermometer. Chicken should register 180º F. when inserted into the breast on meat thermometer. Test for doneness; fish will flake easily and should register 145º F on meat thermometer. Cookies Up to 9 Follow recipe or package directions Bake on bake/broil pan in single layer until fully baked and lightly browned. Biscuits and dinner rolls 6 to 9 to fit pan Follow recipe or package directions Bake on bake/broil pan in single layer until fully baked and lightly browned. Whole white or sweet potatoes 1 to 4 to fit in oven on rack 400º F. about 60 minutes Pierce with fork and bake until tender. Frozen snack foods Single layer in bake/broil pan Follow package directions Turn over half way through baking period, if instructed; check at minimum baking time. Frozen pizza 10 Up to 12 oz. pizza Follow package directions For even baking, rotate pizza half way through baking period, check at minimum baking time. This oven is designed to provide a broil function with the door slightly ajar. You can also select the optimum broiling temperature and slide rack position for each specific food. For best results, preheat oven with door closed at 450º F for at least 8 minutes before broiling. 1. Insert slide rack into position 1 or 3 (see Illustration E on page 7) with slide rack down. ENGLISH PERFECT BROIL™ SYSTEM BAKING GUIDE 2. Turn temperature selector knob to 350 º F to 450º F, as desired. 3. Turn cooking function selector knob to BROIL. 4. To use the TIMER, always turn the knob past 20 and then turn back or forward to desired broiling time, including 8 minute preheat time. (Select STAY ON to control cooking time yourself. Be sure to use a kitchen timer.) 5. Place food on slide rack with bake/broil pan inserted directly into the slide rack slots below the slide rack (K). NOTE: Be sure food does not extend past the outer limits of the bake/broil pan to prevent grease dripping onto the heating elements. Be sure the top of the food is at least 1½ inches from the top heating element. K 6. Insert food into oven and close door leaving it ajar at about 1¼ inch from the fully closed position. NOTE: You may also broil closing door completely. If doing this, place rack and food in position 3 making sure food is at least 1½ inches from heating elements. 7. Broil food according to recipe or package directions and check for doneness at minimum suggested broiling time. 8. If using the oven timer, there will be an audible signal once the broiling cycle is complete. The oven turns OFF and the light goes out. 9. If not using the oven timer, turn the oven to OFF once broiling cycle is complete. 10. Using oven mitts or pot holders, lower oven door to fully open position. Slide the slice rack out along with the bake/broil pan to remove the cooked food. NOTE: This oven gets hot. When in use, always use oven mitts or potholders when touching any outer or inner surface of the oven. 11. Turn the temperature selector knob to MIN, the cooking FUNCTION selector knob to KEEP WARM and the TIMER/TOAST selector knob to OFF before removing plug from electrical outlet. Unplug appliance when not in use. 11 FOOD WEIGHT BROILING TEMPERATURE APPROXIMATE COOKING TIME PROCEDURE Breaded Chicken Cutlets or Tenderloins 1 to 6 (up to 1½ lbs) 375º F 12 to 15 minutes Turn over halfway through broiling Chicken should register 180º F on meat thermometer Chicken Parts (up to 1½ lbs) 375º F 20 to 25 minutes Turn over halfway through broiling Chicken should register 180º F on meat thermometer Fish fillets, such as salmon or tilapia 1 to 3 (up to 1½ lbs) 400º F 10 to 12 minutes 145º F or flakes easily when tested with fork Broiled vegetables 6 to 8 pieces 350º F 10 to 12 minutes Turn over halfway through broiling 160º F until vegetables are tender when pierced with a fork Shell or NY strip steak 1 to 2, about 8 oz., each 450º F 18 minutes to medium Turn over halfway through broiling Internal temperature of 160º F for medium BROILING TIPS L the Rotate n set kno to des b pas ired t 20 tim e • Placing food on rack reduces calories, allows the drippings to flow into the bake/broil pan and helps to eliminate or prevent smoking from the broiler (L). • For best results, thaw frozen meat, poultry and fish before broiling. • If frozen steaks and chops are broiled allow 1½ to 2 times the broiling time as required for fresh meats. • Trim excess fat from meat and score edges to prevent curling. • Brush foods to be broiled with oil and season as desired before broiling. • Fish fillets and steaks are delicate and should be broiled directly on bake/broil pan placed on the slide rack. • There is no need to turn fish fillets during broiling. Carefully turn thick fish steaks midway through broiling cycle. • If broiler “pops” during broiling, reduce the temperature or lower the food in the oven. • Wash bake/broil pan and clean inside of oven after each use with non-abrasive cleaner and hot soapy water. Too much grease accumulation will cause smoking. 12 TOASTING BREAD It is not necessary to preheat the oven for toasting. 1. Open oven door and insert slide rack into position 2 (see illustration E on page 7); the lower slot position with rack up. 2. Place desired pieces of bread to be toasted directly on slide rack and close the door. 3. Turn temperature selector knob to BAGEL/TOAST. 4. Turn cooking function selector knob to TOAST. 5. Turn toast shade selector knob past 20 and then turn back to desired toast shade (M). NOTE: You must set the toast shade selector knob as desired for the oven to begin toasting. 6. For best results on first toasting cycle, set the toast selector knob to medium which will be midway between light and dark setting, then re-adjust for next cycle to M lighter or darker to suit your preference. 7. The ON indicator light comes on and remains on until toasting cycle is complete. 8. When toast cycle is complete, there will be an audible signal. The oven and the ON indicator light will go off. 9. Open the oven door. Using oven mitts or pot holders, slide the rack out to remove the toast. IMPORTANT: This oven gets hot. When in use, always use oven mitts or potholders when touching any outer or inner surface of the oven. 10. Turn the temperature selector knob to MIN, the cooking FUNCTION selector knob to KEEP WARM and the TIMER/TOAST selector knob to OFF before removing plug from electrical outlet. Unplug appliance when not in use. TOAST TIPS 1. You must turn the toast shade selector knob to OFF to discontinue toasting. 2. When repeating the toast cycle immediately, it is suggested that the toast shade selector knob be set to a slightly lighter setting. 3. On first toasting cycle set the toast selector knob to medium which will be midway between light and dark setting, then re-adjust for next cycle to lighter or darker to suit your preference. TOASTING BAGELS It is not necessary to preheat the oven to toast bagels. This oven is designed to toast the side facing the top of oven and to warm the side facing the bottom. 1. Follow first 3 steps for TOASTING BREAD. 2. Turn cooking function selector knob to BAGEL. 3.Turn toast shade selector knob past 20 and then turn back to BAGEL (N). NOTE: You must set the toast shade selector knob to BAGEL for the oven to begin toasting. 4.Follow directions 7 through 10 for TOASTING BREAD. KEEP WARM NOTE: This feature is designed to keep already cooked foods warm after they have been cooked. This function should be N used for short periods of time; to prevent food from drying out cover with foil. ENGLISH BROILING GUIDE USING PERFECT BROIL™ SYSTEM Rotate knob past 20 then set to desired time 13 Care and Cleaning This product contains no user serviceable parts. Refer service to qualified service personnel. CLEANING YOUR OVEN Important: Before cleaning any part, be sure the oven is off, unplugged, and cool. Always dry parts thoroughly before returning parts to oven after cleaning. 1. Clean the glass door with a sponge, soft cloth or nylon pad and sudsy warm water. Do not use a spray glass cleaner. 2. To remove the slide rack, open the door, and pull the slide rack forward and out. Wash the slide rack in sudsy warm water. To remove stubborn spots, use a polyester or nylon pad. 3. Wash the bake/broil pan in sudsy warm water. To minimize scratching, use a polyester or nylon pad. Note: We strongly recommend that the bake/broil pan and the slide rack be washed by hand with warm sudsy water, as opposed to washing it in the dishwasher. Washing these pieces in the dishwasher will cause them to discolor, but will not affect their functionality. CRUMB TRAY 1. Pull out crumb tray (P). 2.Dispose of crumbs and wipe tray with a dampened cloth, or wash in sudsy warm water. 3. Be sure to dry thoroughly before inserting the tray back into the oven. Note: We strongly recommend that the crumb tray be washed by hand with warm sudsy water, as opposed to washing it in the P dishwasher. EXTERIOR SURFACES Important: The oven top surface gets hot. Be sure the oven has cooled completely before cleaning. Wipe the top and exterior walls with a damp cloth or sponge. Dry thoroughly. ADDITIONAL TIPS FOR CLEANING THE INTERIOR OF YOUR OVEN • Heat oven to 200° F; turn countertop oven off. Place shallow glass bowl containing ½ cup ammonia on rack. Close oven door and let stand overnight. Next day, open oven, remove bowl and wipe interior of oven with moist paper towels. • To refresh air inside oven, lay strips of orange or lemon peel on slide rack. Heat countertop oven to 350° F and bake for 30 minutes. Turn oven off and let stand until oven is completely cool. Remove peel. 14 TROUBLESHOOTING PROBLEM POSSIBLE CAUSE SOLUTION Oven is not heating or stops heating. Oven is not plugged in or outlet is not working. Check that all three knobs are set to the appropriate setting and the blue light is on. Check that outlet is working. Second toasting is too dark. Toast setting selected is too dark. When doing repeated toast cycles remember to select a slightly lighter setting for the 2nd and 3rd toasting. Moisture forms on the inside of the door during toasting. The amount of moisture in the product being toasted will vary from one manufacturer to another. The moisture that forms on the door is common and usually disappears before the completion of the toasting cycle. Because the oven is a closed appliance, the moisture cannot evaporate as it would in a toaster. Food is overcooked or undercooked. Temperature and/or cook time may need to be adjusted. Since the toaster oven is much smaller than a conventional oven it may cook faster. Try lowering the temperature setting 25 degrees from the suggested setting in a recipe or label directions. Be sure to check food at minimum cooking time recommended in a recipe or on a package. There is a burnt food odor or smoking when oven is in use. There are remnants of food on the walls of the oven or in the crumb tray. Refer to the directions in Care & Cleaning in this manual. Make sure all parts of the oven are clean and free of debris. Heating elements do not seem to be on. The heating elements in the toaster oven will cycle on and off during baking. This is normal. Check toaster oven to make sure proper function is selected. On broil, only the top heating elements will be on. ENGLISH 1. Turn temperature selector knob to 150º F to 200º F. 2. Turn cooking function selector knob to KEEP WARM. 3. To use the TIMER function, always turn the knob past 20 and then turn back or forward to desired warming time, including preheat time. (Select STAY ON to control cooking time yourself. Be sure to use a kitchen timer.) 4. When cycle is complete, there will be an audible signal. The oven and the ON indicator light will go OFF. 5. Turn the temperature selector knob to MIN, the cooking FUNCTION selector knob to KEEP WARM and the TIMER/TOAST selector knob to OFF before removing plug from electrical outlet. Unplug appliance when not in use. 15 BROILED SALMON WITH ORANGE GINGER DRESSING ¼ cup mayonnaise 2 tbsp. chopped green onions 2 tsp. chopped fresh dill 1 tsp. ground ginger 1 tbsp. orange marmalade 1 lb salmon fillet 1 tbsp. olive oil ½ tsp. salt ¼ tsp. black pepper In medium bowl, combine mayonnaise, green onions, dill, ginger and marmalade. Set aside. Place salmon in bake/broil pan of oven. Brush with olive oil. Season with salt and pepper. Broil in preheated oven at 400º F. with oven door slightly ajar for 20 minutes or until fish tests done. Serve with dressing and garnish with fresh sprigs of dill, if desired. Delicious served with cooked brown and white rice and steamed asparagus. Makes about 3 servings. DATE NUT BARS 2 large eggs 1 tsp. vanilla extract ½ cup sugar ¾ cup unsifted all-purpose flour ¾ tsp. baking powder Generous dash salt ¾ cup chopped dates ½ cup chopped walnuts Confectioners’ sugar In medium bowl, combine eggs, vanilla and sugar. Beat with a hand mixer until thick, about 3 minutes. Blend in flour, baking powder and salt until fully combined. Stir in dates and walnuts. Spoon evenly into ungreased 8-inch square baking pan. Bake in preheated oven at 350º F. in upper rack position for 30 minutes until golden on top and until toothpick inserted in center comes out clean. Let cool in pan on wire rack for 20 minutes. Sprinkle generously with confectioners’ sugar and cut into squares before serving. A great after school snack or a healthy dessert. Store in an airtight container for up to a week, if they last that long. Makes about 16 servings. ENGLISH Recipes EASY CINNAMON RAISIN ROLLUPS 1 tbsp. sugar ¼ tsp. ground cinnamon Generous dash ground nutmeg 1 pkg. (8 oz.) refrigerated crescent rolls 2 tbsp. melted butter or margarine ¼ cup chopped pecans 2 tbsp. raisins Confectioners’ sugar In small bowl, combine sugar, cinnamon and nutmeg; blend well. Unroll dough and separate into 8 triangles. Brush top of each triangle with melted butter. Sprinkle evenly with sugar mixture. Top with nuts and raisins. Roll up crescents loosely. Arrange on bake/broil pan of toaster oven. Bake in preheated oven at 375º F. in upper rack position for 15 minutes until golden on top and fully baked internally. Let cool on pan on wire rack for 10 minutes. Drizzle with confectioners’ sugar frosting before serving. Delicious for a lazy mid-morning treat or an after school surprise. Makes 8 servings. 16 17 NEED HELP? ENGLISH For service, repair or any questions regarding your appliance, call the appropriate 800 number on cover of this book. Please DO NOT return the product to the place of purchase. Also, please DO NOT mail product back to manufacturer, nor bring it to a service center. You may also want to consult the website listed on the cover of this manual. Two-Year Limited Warranty (Applies only in the United States and Canada) What does it cover? • Any defect in material or workmanship provided; however, Applica’s liability will not exceed the purchase price of product. For how long? • Two years after date of purchase. What will we do to help you? • Provide you with a reasonably similar replacement product that is either new or factory refurbished. How do you get service? • Save your receipt as proof of date of sale. •Visit the online service website at www.prodprotect.com/applica, or call toll-free 1-800-231-9786, for general warranty service. • If you need parts or accessories, please call 1-800-738-0245. What does your warranty not cover? •Damage from commercial use •Damage from misuse, abuse or neglect • Products that have been modified in any way • Products used or serviced outside the country of purchase • Glass parts and other accessory items that are packed with the unit • Shipping and handling costs associated with the replacement of the unit • Consequential or incidental damages (Please note, however, that some states do not allow the exclusion or limitation of consequential or incidental damages, so this limitation may not apply to you.) How does state law relate to this warranty? • This warranty gives you specific legal rights. You may also have other rights that vary from state to state or province to province. is a trademark of The Black & Decker Corporation, Towson, Maryland, USA Made in People’s Republic of China Printed in People’s Republic of China 18 19 INSTRUCCIONES IMPORTANTES DE SEGURIDAD Cuando se utilizan aparatos eléctricos, siempre se debe respetar ciertas medidas de seguridad, incluyendo las siguientes: ❍Por favor lea todas las instrucciones. ❍No toque las superficies calientes. Use las asas o las perillas. ❍A fin de protegerse contra un choque eléctrico y lesiones a las personas, no sumerja el cable, los enchufes ni el aparato en agua ni en ningún otro líquido. ❍Todo aparato eléctrico usado en la presencia de los niños o por ellos mismos requiere la supervisión de un adulto. ❍Desconecte el aparato del tomacorriente cuando no esté en uso y antes de limpiarlo. Espere que el aparato se enfríe antes de instalarle o retirarle piezas y antes de limpiarlo. ❍No use ningún aparato eléctrico que tenga el cable o el enchufe averiado, que presente un problema de funcionamiento o que esté dañado. Acuda a un centro de servicio autorizado para que lo examinen, reparen o ajusten o llame gratis al número correspondiente en la cubierta de este manual. ❍El uso de accesorios no recomendados por el fabricante del aparato puede ocasionar incendio, choque eléctrico o lesiones a las personas. ❍No use este aparato a la intemperie. ❍No permita que el cable cuelgue del borde de la mesa o del mostrador ni que entre en contacto con superficies calientes. ❍No coloque el aparato sobre ni cerca de las hornillas de gas o eléctricas ni adentro de un horno caliente. ❍Tome mucha precaución al mover de un lugar a otro un aparato que contenga aceite u otros líquidos calientes. ❍Siempre conecte primero el cable al aparato y después, enchúfelo a al tomacorriente . Para desconectar, ajuste todo control a la posición de apagado (OFF) y después, retire el enchufe del tomacorriente. ❍Este aparato se debe usar únicamente con el fin previsto. ❍Tenga muchísimo cuidado al retirar la bandeja o al desechar la grasa caliente. ❍A fin de evitar el riesgo de incendio o choque eléctrico, jamás introduzca alimentos demasiado grandes ni utensilios de metal adentro del aparato. 20 ❍Existe el riesgo de incendio si el aparato permanece cubierto mientras se encuentra en funcionamiento o si éste llegase a entrar en contacto con cualquier material inflamable, incluyendo las cortinas y las paredes. ❍No utilice almohadillas de fibras metálicas para limpiar el aparato. Las fibras metálicas podrían entrar en contacto con las piezas eléctricas del aparato, resultando en el riesgo de un choque eléctrico. ❍Asegúrese de no colocar nada sobre el aparato mientras se encuentre en uso. Tenga mucho cuidado al utilizar recipientes que no sean de metal ni de vidrio. ❍Cuando este aparato no se encuentre en funcionamiento no se debe almacenar nada aparte de los accesorios recomendados por el fabricante. ❍No introduzca los siguientes materiales en el aparato: papel, cartón, envolturas plásticas ni materiales semejantes. ❍A fin de evitar que el aparato se sobrecaliente, no cubra la bandeja para los residuos como ninguna otra superficie del aparato con papel de aluminio. ESPAÑOL Por favor lea este instructivo antes de usar el producto. CONSERVE ESTAS INSTRUCCIONES. Este aparato eléctrico es para uso doméstico únicamente. 21 Este producto puede variar ligeramente del que aparece ilustrado. TORNILLO DE SEGURIDAD Advertencia: Este aparato cuenta con un tornillo de seguridad para evitar la remoción de la cubierta exterior del mismo. A fin de reducir el riesgo de incendio o de choque eléctrico, por favor no trate de remover la cubierta exterior. Este producto no contiene piezas reparables por el consumidor. Toda reparación se debe llevar a cabo únicamente por personal de servicio autorizado. CABLE ELÉCTRICO a)El producto se debe de proporcionar con un cable eléctrico corto (o uno separable), a fin de reducir el riesgo de tropezar o de enredarse en un cable más largo. ESPAÑOL ENCHUFE POLARIZADO (Modelos 120V solamente) Este aparato cuenta con un enchufe polarizado (un contacto es más ancho que el otro). A fin de reducir el riesgo de un choque eléctrico, este enchufe encaja en un tomacorriente polarizada en un solo sentido. Si el enchufe no entra en la toma de corriente, inviértalo y si aun así no encaja, consulte con un electricista. Por favor no trate de alterar esta medida de seguridad. Rotate then set toknob past 20 desired time b)Existen cables eléctricos más largos y separables o cables de extensión que uno puede utilizar si toma el cuidado debido. c)Si se utiliza un cable separable o de extensión, 1)El régimen nominal del cable separable o del cable de extensión debe ser, como mínimo, igual al del régimen nominal del aparato. 2) Si el aparato es de conexión a tierra, el cable de extensión debe ser un cable de tres alambres de conexión a tierra. 3) Uno debe de acomodar el cable más largo de manera que no cuelgue del mostrador o de la mesa, para evitar que un niño tire del mismo o que alguien se tropiece. Nota: Si el cordón de alimentación esta dañado, en América Latina debe sustituirse por personal calificado o por el centro de servicio autorizado. 22 1. Luz indicadora de funcionamiento (On) † 2.Selector de temperatura (TEMP ˚F/˚C) para hornear/asar (Pieza # CTO800-01) † 3.Parrilla corrediza (Pieza # CTO800-05) 4.Ranuras en la parrilla corrediza para la bandeja de hornear/asar † 5. Bandeja de hornear/asar (Pieza # CTO800-06) † 6.Selector de FUNCIÓN de cocción (Pieza # CTO800-02) † 7.Selector de reloj automático de 60 minutos/nivel de tostado TIMER/TOAST (Pieza # CTO800-03) † 8. Bandeja corrediza para migas (Pieza # CTO800-04) 9.Tirador 10.Ranuras para la parrilla 11.Interior curvo extra profundo Nota: † indica piezas reemplazables/removibles por el consumidor 23 Panel de control Como usar Este producto es solamente para uso doméstico. THIS OVEN GETS HOT. WHEN ESTE HORNO SE CALIENTA CUANDO IN USE, ALWAYS USE OVEN ESTÁ EN USO. SIEMPRE USE MITTS OR POT HOLDERS AGARRADERAS O GUANTES DE COCINA CUANDO TOQUE TODA SUPERFICIE WHEN TOUCHING ANY OUTER INTERNA O EXTERNA DEL HORNO. OR INNER SURFACE OF THE OVEN Importante: Al utilizar la función de tostar-cronómetro (TOAST/ TIMER), gire siempre el selector pasando la posición 20, y luego gírelo a la izquierda o a la derecha hasta alcanzar el nivel deseado. 1. Luz indicadora de funcionamiento (On) 2.Selector de temperatura (TEMP ˚F/˚C) para Hornear/Asar 3.Selección de Función de cocción (FUNCTION) 4.Reloj automático de 60 minutos/Selector de nivel de tostado (TIMER/TOAST) PARA COMENZAR: •Retire todo el material de empaque y cualquier calcomanía del producto. •Retire y guarde el material de lectura. • Por favor ir a www.prodprotect.com/applica para registrar su garantía. • Para información adicional acerca de su horno para mostrador, ir a www.blackanddecker.com •Lave todas las piezas removibles cómo se instruye en la sección de Cuidado y limpieza de este manual. •Limpie el exterior del aparato con un paño húmedo; séquelo bien. • Inserte la parrilla corrediza en la ranura inferior de forma que la parrilla quede para arriba (A). A B C 24 ESPAÑOL PRECAUCIÓN $ "65 *0 / • Si va a asar, coloque la bandeja de hornear/asar por debajo de la parrilla corrediza. Si desea hornear, use la bandeja de hornear/asar u otro utensilio que sea horneable (B). • Seleccione el lugar donde se va a utilizar esta unidad, dejando suficiente espacio entre la misma y la pared para que fluya el calor sin causar daños a gabinetes o paredes. • Inserte la bandeja corrediza para migas debajo de los elementos calefactores (C). NOTA: Una vez que el horno se caliente, deje que se enfríe a temperatura ambiental antes de retirar la bandeja para migas. •Retire la atadura del cable y desenróllelo. •Enchufe la unidad a un tomacorriente. 25 D POSICIONES PARA LA PARRILLA CORREDIZA La parrilla corrediza tiene 4 posibles posiciones. Hay una ranura superior y una inferior; la parrilla también se puede invertir creando 2 posiciones adicionales (E). NOTA: Las 4 posiciones se pueden utilizar al hornear; al asar, debido a que la bandeja va ubicada por debajo de la parrilla, ésta solo puede insertarse en 2 posiciones: Posición 2 y 4. Posición 1 Use la abertura de abajo a lo largo de las paredes del horno. Deslize la parrilla hacia abajo. Posición 2 Use la abertura de abajo a lo largo de las paredes del horno. Deslize la parrilla hacia arriba. Posición 3 Use la abertura de arriba a lo largo de las paredes del horno. Deslize la parrilla hacia abajo. Posición 4 Use la abertura de arriba a lo largo de las paredes del horno. Deslize la parrilla hacia arriba. E 26 COSEJOS UTILES PARA EL USO DE SU HORNO • Cuando se prende el horno, la luz de funcionamiento se enciende y permanece iluminada hasta que el horno se apaga manualmente o automáticamente, si se usa el reloj automático. • Al seleccionar el tiempo de horneado para un producto o receta en particular, incluya el tiempo de precalentamiento. •Este horno tiene un reloj automático de 60 minutos. Si va a hornear algo que demore más de 60 minutos, le sugerimos usar la función de MANTENER ENCENDIDO STAY ON (F) (ver página 28). • Puede utilizar recipientes horneables de cristal y cerámica sin tapa dentro del horno. Si los alimentos F requieren cubierta, use papel aluminio. • Asegúrese de que la parte de arriba del recipiente o de los alimentos que se estén horneando/asando, estén por lo menos a 1½ pulgadas de los elementos calefactores. • Coloque el selector de temperatura a MIN, el selector de función de cocción a KEEP WARM y el selector de reloj automático/nivel de tostado (TIMER/TOAST) a OFF antes de insertar o retirar el enchufe del tomacorriente (G). •No coloque ningún recipiente directamente sobre el elemento calefactor inferior. • Para obtener el mejor desempeño de este horno para mostrador, no sobrellene el horno. • Para evitar perdida de calor, no abra la puerta del horno con frecuencia. • Al usar papel aluminio para cubrir los alimentos, dóblelo alrededor de todo el borde de la bandeja o cacerola de hornear. G Rotate knob past 20 then set to desired time ESPAÑOL 20 knob past Rotate desired time to then set IMPORTANTE: Este horno se calienta. Cuando esté en uso, siempre use guantes o agarraderas de hornear para tocar cualquiera de sus superficies exteriores o interiores (D). NOTA: Ajuste la temperatura para HORNEAR (BAKE) a 350º F y el reloj automático a 20 minutes sin colocar alimentos dentro del horno, para quemar cualquier aceite que se haya utilizado en producción. La luz indicadora de funcionamiento (ON) se enciende y así permanece durante todo el tiempo de horneado. Durante los primeros minutos de uso, puede que usted note algún humo o mal olor. Esto es normal y no debe preocuparle. • Al HORNEAR (BAKE) este horno utiliza tecnología por convección. Está equipado con un ventilador que proporciona circulación continua de aire caliente alrededor de los alimentos que se están cocinando; los alimentos se cocinan de forma más uniforme y en algunos casos, más rápido. INFORMACIÓN GENERAL DE LAS FUNCIONES IMPORTANTE: Este horno se calienta. Cuando esté en uso, siempre use guantes o agarraderas de hornear para tocar cualquiera de sus superficies exteriores o interiores. Para obtener mejores resultados, precaliente el horno a la temperatura que desee de 8 a 10 minutos antes de hornear los alimentos. PARA HORNEAR • Al hornear esta unidad solo lo hace por convección. Esta función utiliza un ventilador interno para distribuir el calor de forma uniforme. •No es necesario alterar el tiempo de horneado o la temperatura que aparecen en las direcciones de cualquier receta o paquete. • Se sugiere que revise los alimentos que se están cocinando al tiempo mínimo de horneado para evitar que se pasen. 1.Inserte la parrilla corrediza en la posición inferior del horno con la parrilla hacia arriba (posición 2) (ver página 26). También puede utilizar la posición superior con la parrilla hacia abajo (posición 3) (ver pagina 26). 27 GUÍA PARA HORNEAR ALIMENTO CANTIDAD 28 PROCEDIMIEMTO Pollo Partes (hasta 1 ½ lb.) De 1 a 4 que quepan en la bandeja 375º F. / 60 a 90 minutos. El pollo debe registrar 180º F. cuando se le inserta un termómetro para carnes en la pechuga. Pollo entero Hasta 3 ½ lb. 375º F. hasta el término deseado. El pollo debe registrar 180º F. cuando se le inserta un termómetro para carnes en la pechuga. Filetes de pescado o carne De 1 a 4 que quepan en la bandeja 400º F. alrededor de 12 minutes. Pruebe si está hecho; el pescado se desmenuza fácilmente y debe registrar 145º F en un termómetro para carnes. Galletitas Hasta 9 Siga una receta o las instrucciones del paquete. Hornear sobre la bandeja de hornear/ asar en una sola tanda hasta que se cocinen bien y se doren ligeramente. Panecillos de desayuno y para la cena De 6 a 9 que quepan en la bandeja Siga una receta o las instrucciones del paquete. Hornear sobre la bandeja de hornear/ asar en una sola tanda hasta que se cocinen bien y se doren ligeramente. Papas blancas o batatas enteras De 1 a 4 que quepan sobre la parrilla 400º F. alrededor de 60 minutos. Pinchar con un tenedor y hornear hasta que estén suaves. Meriendas congeladas Una sola tanda en la bandeja de hornear/asar Siga las instrucciones del paquete. Déle vuelta cuando pase la mitad del tiempo de horneado, si así lo instruye; revise cuando transcurra el tiempo mínimo de horneado. Pizza congelada Una pizza hasta de 12 oz. Siga las instrucciones del paquete. Para hornear de forma uniforme, déle vuelta a la pizza cuando pase la mitad del tiempo de horneado, revísela cuando transcurra el tiempo mínimo de horneado. H • Use un plato de hornear de metal, cristal o cerámica sin tapa sobre la parrilla corrediza colocada en la ranura superior o inferior (J). NOTA: Asegure que ni los alimentos ni el plato de hornear estén a menos de 1½ pulgadas de los alimentos calefactores. 9.La primera vez que utilice el horno, siga las instrucciones para hornear del fabricante o de una receta y revise si los alimentos ya están hechos al tiempo de cocción mínimo J sugerido. 10.Si usa el reloj automático del horno, se emitirá una señal auditiva una vez que el ciclo de hornear se complete. El horno se APAGA y la luz indicadora también. 11.Si no usa el reloj automático del horno, gire el dial a OFF una vez que termine el ciclo de cocción. 12.Abra la puerta del horno. Usando guantes o agarraderas, hale la parrilla hacia afuera para retirar los alimentos cocinados. IMPORTANTE: Este horno se calienta. Cuando esté en uso, siempre use guantes o agarraderas de hornear para tocar cualquiera de sus superficies exteriores o interiores. 13.Coloque el selector de temperatura a MIN, el selector de función de cocción a KEEP WARM y el selector de reloj automático/nivel de tostado (TIMER/TOAST) a OFF antes de insertar o retirar el enchufe del tomacorriente. TEMP./ TIEMPO ESPAÑOL 2. Coloque el selector de temperatura al nivel que desee entre 150º F y 450º F. 3. Coloque el selector de función a HORNEAR (BAKE). 4. Para usar el RELÓJ AUTOMÁTICO (TIMER), siempre gire el selector hasta pasar el 20 y luego hacia atrás o hacia delante, incluyendo el tiempo de precalentamiento. 5. Seleccione la función de MANTENER CALIENTE (KEEP WARM) para hornear por más de 60 minutos o para controlar el tiempo de cocción por sí mismo. Asegúrese de utilizar un reloj automático de cocina. NOTA: Para que el horno funcione, es necesario ajustar el reloj automático o seleccionar la función de MANTENER ENCENDIDO (STAY ON). 6.La luz indicadora de FUNCIONAMIENTO (ON) se enciende y permanece iluminada durante el tiempo de horneado. 7.Los elementos calefactores se encenderán y apagarán de forma cíclica para mantener la distribución de calor uniforme. 8. Una vez que el horno se precaliente, abra la puerta e inserte los alimentos. Cierre la puerta del horno. NOTA: Usted puede hornear de 3 formas: • Use la bandeja de hornear/asar sobre la parrilla (H). •Deslice la bandeja de hornear/asar debajo de la parrilla y coloque los alimentos directamente sobre la parrilla. NOTA: Asegúrese de que los alimentos no sobrepasen los limites de la bandeja de hornear/asar para evitar que gotee grasa sobre los elementos calefactores. 29 6. Inserte los alimentos en el horno y cierre la puerta, dejando una abertura de 1¼ de pulgada sin cerrarla del todo. NOTA: Usted también puede asar cerrando la puerta completamente. De hacerlo, coloque la parrilla y los alimentos en la posición 3 asegurando que los alimentos queden por lo menos a 1½ pulgadas de los elementos calefactores. 7. Ase la comida según una receta o las instrucciones en el paquete y revise el termino al tiempo mínimo de asado. 8. Si usa el reloj automático del horno, se emitirá una señal auditiva una vez que el ciclo de hornear se complete. El horno se APAGA y la luz indicadora también. 9. Si no usa el reloj automático del horno, gire el selector a OFF una vez que termine el ciclo de asado. 10. Usando guantes de hornear o agarraderas, abra la puerta del horno completamente. Hale la parrilla hacia afuera para retirar los alimentos cocinados. NOTA: Este horno se calienta. Cuando esté en uso, siempre use guantes o agarraderas de hornear para tocar cualquiera de sus superficies exteriores o interiores. 11. Coloque el selector de arriba a MIN, el control del medio a KEEP WARM y el de abajo a OFF antes de insertar o retirar el enchufe del tomacorriente. 30 GUÍA PARA ASAR USANDO EL SISTEMA PERFECT BROIL™ ALIMENTO PESO Pollo empanizado De 1 a 6 (hasta 1½ lb.) 375º F De 12 a 15 minutos. Déle vuelta cuando transcurra la mitad del tiempo de asado. El pollo debe registrar 180º F en un termómetro de carne. Partes de pollo (Hasta 1½ lb.) 375º F De 20 a 25 minutos. Déle vuelta cuando transcurra la mitad del tiempo de asado. El pollo debe registrar 180º F en un termómetro de carne. Filetes de pescado cómo el salmón o la tilapia De 1 a 3 (hasta 1½ lb.) 400º F De 10 a 12 minutos. 145º F o se desmenuza fácilmente con un tenedor. Vegetales asados De 6 a 8 pedazos 350º F De 10 a 12 minutos. Déle vuelta cuando transcurra la mitad del tiempo de asado. 160º F hasta que los vegetales estén suaves al pincharlos con un tenedor. Bistec sin hueso 1 a 2, alrededor de 8 oz., cada uno 450º F 18 minutos para término medio Déle vuelta cuando transcurra la mitad del tiempo de asado. Temperatura interna de 160º F para término medio. Chuletas o medallones TEMPERATURA DE ASADO TIEMPOS APROXIMADO DE COCCIÓN PROCEDIMIENTO ESPAÑOL ASADO PERFECTO Este horno está diseñado para proporcionar la función de asado con la puerta ligeramente abierta. Usted también puede seleccionar la temperatura óptima de horneado y la posición de la parrilla específicos para cada alimento. Para mejores resultados, precaliente el horno a alrededor de 450º F con la puerta cerrada por lo menos 8 minutos antes de asar. 1. Inserte la parrilla en una de las posiciones del 1 al 3 (ver Ilustración E en la página 26) con la parrilla hacia abajo. 2. Gire el selector de temperatura de 350 º F a 450º F, según desee. 3. Gire el selector de función a ASAR BROIL. 4. Para usar el RELÓJ AUTOMÁTICO (TIMER), siempre gire el selector hasta pasar el 20 y luego hacia atrás o hacia delante, incluyendo el tiempo de precalentamiento (Seleccione MANTENER ENCENDIDO STAY ON para controlar el tiempo de cocción usted mismo. Asegúrese de utilizar un reloj automático de cocina.) 5. Coloque los alimentos sobre la parrilla corrediza con la bandeja de hornear/asar ubicada directamente sobre las ranuras debajo de la parrilla (K). NOTA: Asegure que los alimentos no sobresalgan de los bordes exteriores de la bandeja, para prevenir que gotee grasa sobre los elementos calefactores. Asegúrese de que la parte de arriba de los alimentos queden por lo menos a1 ½ pulgadas de los elementos calefactores. K 31 •El colocar los alimentos sobre la parrilla reduce calorías, ya que permite que el goteo de grasa caiga en la bandeja de hornear/asar y ayuda a eliminar humo del asador (L). • Para mejores resultados, descongele la carne, las aves y el pescado antes de asarlos. • Si asa bistec o costillas congeladas, permita de 1½ a 2 veces la cantidad del tiempo que requieren las carnes frescas. L • Corte el exceso de grasa de la carne y los bordes para que no se doblen. • Sazone los alimentos y únteles aceite según guste antes de asarlos. •Los filetes de pescado y de carne son delicados y los debe asar directamente sobre la bandeja de hornear/asar sobre la parrilla. •No hay necesidad de darle vuelta a los filetes de pescado cuando los ase. A los filetes de pescado gruesos, puede darle vueltas a la mitad del ciclo de asado. • Si se escucha un poquito como que algo “explota” dentro del asador, reduzca la temperatura o baje los alimentos dentro del horno. •Lave la bandeja de hornear/asar y el interior del horno con un limpiador no abrasivo y agua caliente jabonada. Mucha acumulación de grasa causará humo. PARA TOSTAR PAN No es necesario precalentar el horno para tostar. 1. Abra la puerta del horno e inserte la parrilla en la posición 2 (ver la ilustración E en la página 26); la posición inferior con la parrilla hacia arriba. 2. Coloque los pedazos de pan que desee directamente sobre la parrilla corrediza y cierre la puerta. 3. Gire el selector de temperatura a BAGEL/TOAST. 4. Gire el selector de función a TOAST. 5. Gire el selector de nivel de tostado hasta pasar el 20 y luego hacia atrás al nivel que desee (M). NOTA: Usted debe ajustar el selector de nivel de tostado según desee para que el horno comience a tostar. 6. Para obtener mejores resultados, durante el primer ciclo de tostado, coloque el selector a termino medio, entre claro y oscuro, luego reajústelo para el próximo ciclo, según su M preferencia. 7.La luz indicadora de funcionamiento (ON) se enciende y permanece iluminada hasta que el ciclo de tostado se completa. 8. Cuando el ciclo de tostado se completa, se escucha una señal auditiva. El horno y la luz indicadora de funcionamiento se apagarán. 9. Abra la puerta del horno. Usando guantes de hornear o agarraderas, hale la parrilla corrediza hacia afuera para retirar las tostadas. IMPORTANTE: Este horno se calienta. Cuando esté en uso, siempre use guantes o agarraderas de hornear para tocar cualquier superficie exterior o interior de la superficie del horno. 10. Coloque el selector de temperatura a MIN, el selector de función de cocción a MANTENER CALIENTES (KEEP WARM) y el selector de reloj automático/nivel de tostado (TIMER/TOAST) a OFF antes de insertar o retirar el enchufe del tomacorriente. Desenchufe el aparato cuando no esté en uso. the Rotate n set kno to des b pas ired t 20 tim e Rotate knob past 20 then set to desired time 32 CONSEJOS AL TOSTAR 1. Coloque el selector de nivel de tostado a OFF para dejar de tostar. 2. Al repetir el ciclo de tostado inmediatamente, se sugiere que coloque el selector de tostado a un nivel más claro. 3.Durante el primer ciclo de tostado, ubique el selector a termino medio, justo en el medio entre el nivel más claro y el más oscuro; luego reajústelo según su preferencia. PARA TOSTAR PANECILLOS No es necesario precalentar el horno para tostar panecillos. Este horno está diseñado para tostar el lado del pan que queda de cara a la parte de arriba del horno y calentar la parte que queda hacia abajo. 1. Siga los primeros pasos para TOSTAR (TOAST) (ver página 32). 2. Gire el selector de función a PANECILLO (BAGEL). 3. Gire el selector de nivel de tostado hasta pasar el 20 y luego hacia atrás a BAGEL (N). NOTA: Usted debe ajustar el selector de nivel de tostado a BAGEL para que el horno comience a tostar. 4. Siga las direcciones del 7 al 10 para TOSTAR (ver página 32). ESPAÑOL CONSEJOS AL ASAR: N MANTENER CALIENTE NOTA: Esta función está diseñada para mantener calientes los alimentos luego de estar cocinados. Esta función debe usarse por cortos periodos de tiempo; para prevenir que los alimentos se resequen cúbralos con papel aluminio. 1. Gire el selector de temperatura de150º F a 200º F. 2. Gire el selector de función a MANTENER CALIENTE (KEEP WARM). 3. Para usar el RELÓJ AUTOMÁTICO, siempre gire el selector hasta pasar el 20 y luego hacia delante o detrás al tiempo de calentamiento que desee, incluyendo el tiempo de precalentamiento. (Seleccione MANTENER ENCENDIDO (STAY ON) para controlar el tiempo usted mismo. Asegúrese de usar un reloj automático de cocina.) 4. Cuando el ciclo se complete, se escuchará una señal auditiva. El horno y la luz indicadora de funcionamiento se apagarán. 5. Coloque el selector de arriba a MIN, el control del medio a MANTENER ENCENDIDO (KEEP WARM) y el de abajo a OFF antes de insertar o retirar el enchufe del tomacorriente. Desenchufe el aparato cuando no esté en uso. 33 Este producto no contiene piezas reparables por el usuario. Consulte a personal de servicio calificado. PARA LIMPIAR SU HORNO Importante: Antes de limpiar cualquier pieza, asegúrese de que el horno esté apagado, desenchufado y frío. Siempre seque bien las piezas antes de devolverlas al horno luego de limpiarlas. 1.Limpie la puerta de cristal con una esponja, paño suave o almohadilla de nailon y agua tibia jabonada. No use limpiador de cristales en atomizador. 2. Para retirar la bandeja corrediza, abra la puerta y hale la bandeja adelante y hacia afuera. Para quitar las manchas difíciles, use una almohadilla de poliéster o nailon. 3.Lave la bandeja de hornear/asar en agua tibia jabonada. Para minimizar los rayones, use una almohadilla de poliéster o nailon. Nota: Le recomendamos que lave la bandeja de hornear/asar a mano, con agua tibia jabonada, en lugar que en la lavaplatos. El lavar estas piezas en la lavaplatos puede causar que se decoloren, aunque no afectará su funcionalidad. BANDEJA PARA MIGAS 1. Hale la bandeja para migas hacia afuera (P). 2.Deseche las migas y limpie la bandeja con un paño húmedo, o lávela en agua tibia jabonada. 3. Asegúrese de secar bien la bandeja antes de colocarla de nuevo dentro del horno. Nota: Le recomendamos que lave la bandeja para migas a mano, con agua tibia jabonada, en lugar que en la lavaplatos. GUÍA DE SOLUCIÓN DE PROBLEMAS PROBLEMA POSIBLE CAUSA El horno no calienta o para de calentar. El horno no está enchufado o el tomacorriente no sirve. Revise que todos los selectores estén ajustados correctamente y que la luz azul esté encendida. Revise si el tomacorriente funciona. El segundo ciclo de tostado sale muy oscuro. El nivel de tostado está ajustado a un nivel muy oscuro. Al repetir ciclos de tostado, recuerde seleccionar un nivel un poco más claro durante el 2do y 3er ciclos. Se acumula humedad por la parte de adentro de la puerta al tostar. La cantidad de humedad en cada producto que se tuesta varía de un fabricante a otro. La humedad que se acumula en la puerta es común y usualmente desaparece antes de que concluya el ciclo de tostado. Debido a que el horno es un aparato cerrado, la humedad no puede evaporarse cómo lo haría en una tostadora. Los alimentos están pasados o medios crudos. Necesita ajustar la temperatura y/o el tiempo de cocción. Cómo el horno de mostrador es más pequeño que un horno convencional, puede cocinar más rápido. Pruebe bajar la temperatura 25° menos del tiempo sugerido en la receta o las direcciones de la etiqueta. Asegúrese de revisar los alimentos al mínimo de tiempo recomendado en la receta o en el paquete. Hay olor a comida quemada o humo cuando el horno está en uso. Quedan restos de comida en las paredes del horno o en la bandeja para migas. Consulte las direcciones en la sección de Cuidado y limpieza de este folleto. Asegúrese de que todas las partes del horno estén limpias y no tengan desechos. Los elementos calefactores no parecen estar encendidos. Los elementos calefactores en el horno se encenderán y apagarán cíclicamente al hornear. Esto es normal. Revise el horno para asegurar que la función adecuada esté seleccionada. Al asar, solo los elemento calefactores superiores se encenderán. P SUPERFICIES EXTERIORES Importante: La superficie superior del horno se calienta. Asegúrese de que el horno se enfríe por completo antes de limpiarlo. Limpie la parte de arriba y las paredes exteriores con una esponja o un paño húmedo. Séquelas bien. CONSEJOS ADICIONALES PARA LIMPIAR EL INTERIOR DE SU HORNO • Caliente el horno a 200° F; apague el horno para mostrador. Coloque un plato llano con ½ taza de amoniaco sobre la parrilla. Cierre la puerta del horno y déjela de un día para otro. Al otro día, abra el horno, retire el recipiente y limpie el interior del horno con papel toalla húmedo. • Para refrescar el aire dentro del horno, coloque tiras de cáscara de limón o naranja sobre la parrilla. Caliente el horno para mostrador a 350° F y déjelo hornear por 30 minutos. Apague el horno y deje la cáscara dentro hasta que el mismo se enfríe. Luego retírela. 34 SOLUCIÓN ESPAÑOL Cuidado y limpieza 35 SALMÓN ASADO CON ADEREZO DE NARANJA Y GENGIBRE ¼ taza de mayonesa 2 cdas. de cebollinos picados 2 cdtas. de eneldo picado 1 cdta. jengibre molido 1 cda. mermelada de naranja 1 filete de salmón de 1 lb. 1 cda. de aceite de oliva ½ cdta. sal ¼ cdta. pimienta negra En un recipiente mediano, combine la mayonesa, los cebollinos, el eneldo, el jengibre y la mermelada. Sepárelos. Coloque el salmón en la bandeja de hornear/asar del horno. Úntele aceite de oliva. Sazone con sal y pimienta. Asar en el horno precalentado a 400º F. con la puerta del horno ligeramente abierta por 20 minutos o hasta que el pescado esté hecho. Servir con el aderezo y adornar con tallitos frescos de eneldo, si desea. Es delicioso servido con arroz blanco e integral cocinados y espárragos al vapor. Rinde alrededor de 3 porciones. 36 ROLLITOS DE CANELA Y PASAS FACILES DE HACER 1 cda. de azúcar ¼ cda. canela molida Pisco generoso de nuez moscada 1 paquete (8 oz.) rollitos crecientes refrigerados 2 cdas. mantequilla o margarina derretida ¼ taza de pacanas picadas 2 cdas. de pasas Azúcar de confitero En un recipiente pequeño, combine el azúcar, la canela y la nuez moscada; mezcle bien. Desenrolle la masa y sepárela en 8 triángulos. Úntele la mantequilla derretida a la parte de arriba de cada triangulo. Eche las pacanas y las pasas por encima. Enrolle los crecientes un poquito sueltos. Acomódelos en la bandeja de hornear/asar de su horno. Hornear dentro del horno precalentado a 375º F. en la posición de arriba de la parrilla, por 15 minutos, hasta que se doren por arriba y estén completamente cocinados por dentro. Déjelos enfriar sobre la parrilla por 10 minutos. Rociar con azúcar de confitero antes de servir. Delicioso para una merienda mañanera o una sorpresa después de la escuela. Rinde alrededor de 8 porciones. ESPAÑOL Recetas 37 38 ¿NECESITA AYUDA? Para servicio, reparaciones o preguntas relacionadas al producto, por favor llame al número del centro de servicio que se indica para el país donde usted compró su producto. NO devuélva el producto al fabricante. Llame o lleve el producto a un centro de servicio autorizado. DOS AÑOS DE GARANTÍA LIMITADA (No aplica en México, Estados Unidos o Canadá) ¿Qué cubre la garantía? •La garantía cubre cualquier defecto de materiales o de mano de obra que no haya sido generado por el uso incorrecto del producto. ¿Por cuánto tiempo es válida la garantía? • Por dos años a partir de la fecha original de compra. ¿Cómo se obtiene el servicio necesario? • Conserve el recibo original como comprobante de la fecha de compra, comuníquese con el centro de servicio de su país y haga efectiva su garantía si cumple lo indicado en el manual de instrucciones. ¿Cómo se puede obtener servicio? • Conserve el recibo original de compra. • Por favor llame al número del centro de servicio autorizado. ¿Qué aspectos no cubre esta garantía? • Los productos que han sido utilizados en condiciones distintas a las normales. • Los daños ocasionados por el mal uso, el abuso o negligencia. • Los productos que han sido alterados de alguna manera. • Los daños ocasionados por el uso comercial del producto. • Los productos utilizados o reparados fuera del país original de compra. • Las piezas de vidrio y demás accesorios empacados con el aparato. • Los gastos de tramitación y embarque asociados al reemplazo del producto. • Los daños y perjuicios indirectos o incidentales. ¿Qué relación tiene la ley estatal con esta garantía? • Esta garantía le otorga derechos legales específicos y el consumidor podría tener otros derechos que varían de una región a otra. ESPAÑOL BARRAS DE DATILES Y NUECES 2 huevos grandes 1 cda. de extracto de vainilla ½ taza de azúcar ¾ taza de harina común sin cernir ¾ cdta. levadura Poco de sal generoso ¾ taza de datiles picados ½ taza de nueces nogal Azúcar de confitero En un recipiente mediano, combine los huevos, la vainilla y el azúcar. Batir con el batidor de mano hasta que estén gruesos, alrededor de 3 minutos. Mezcle la harina, la levadura y la sal hasta que se combinen completamente. Revuelva dentro los datiles y nueces nogal. Colocar de forma uniforme dentro de una bandeja cuadrada para hornear. Precalentar y hornear a 350º F. en la posición superior de la parrilla por 30 minutos, hasta que se doren por encima y al insertarle un palillo en el centro, salga limpio. Déjelo enfriar en la bandeja sobre la parrilla por 20 minutos. Rocíe con abundante azúcar de confitero y cortar en cuadrados antes de servir. Una excelente merienda para después de la escuela o un postre saludable. Guardar en un recipiente hermético hasta por una semana ¡si es que duran ese tiempo sin comer! Rinden alrededor de 16 porciones. 39 Por favor llame al número correspondiente que aparece en la lista a continuación para solicitar que se haga efectiva la garantía y donde Ud. puede solicitar servicio, reparaciones o partes en el país donde el producto fué comprado. También puede consultarnos en el e-mail servicio@applicamail com.mx Argentina SERVICIO TECNICO CENTRAL ATTENDANCE Avda. Monroe N° 3351 Buenos Aires – Argentina Fonos:0810 – 999 - 8999 011 - 4545 - 4700 011 – 4545 – 5574 [email protected] Chile MASTER SERVICE SERVICENTER Nueva Los Leones N° 0252 Providencia Santiago – Chile Fono Servicio: (562) – 232 77 22 [email protected] Colombia PLINARES Avenida Quito # 88A-09 Bogotá, Colombia Tel. sin costo 01 800 7001870 Costa Rica Aplicaciones Electromecanicas, S.A. Calle 26 Bis y Ave. 3 San Jose, Costa Rica Tel.: (506) 257-5716 / 223-0136 Ecuador Servicio Master de Ecuador Av. 6 de Diciembre 9276 y los Alamos Tel. (593) 2281-3882 El Salvador Calle San Antonio Abad 2936 San Salvador, El Salvador Tel. (503) 2284-8374 Guatemala MacPartes SA 3ª Calle 414 Zona 9 Frente a Tecun Tel. (502) 2331-5020 / 2332-2101 Honduras ServiTotal Contigua a Telecentro Tegucigalpa, Honduras, Tel. (504) 235-6271 40 México Articulo 123 # 95 Local 109 y 112 Col. Centro, Cuauhtemoc, México, D.F. Tel. 01 800 714 2503 Nicaragua ServiTotal De semáforo de portezuelo 500 metros al sur. Managua, Nicaragua, Tel. (505) 248-7001 ESPAÑOL Póliza de Garantía (Válida sólo para México) Duración Applica Manufacturing, S. de R. L. de C.V. garantiza este producto por 2 años a partir de la fecha original de compra. ¿Qué cubre esta garantía? Esta Garantía cubre cualquier defecto que presenten las piezas, componentes y la mano de obra contenidas en este producto. Requisitos para hacer válida la garantía Para reclamar su Garantía deberá presentar al Centro de Servicio Autorizado la póliza sellada por el establecimiento en donde adquirió el producto. Si no la tiene, podrá presentar el comprobante de compra original. ¿Donde hago válida la garantía? Llame sin costo al teléfono 01 800 714 2503, para ubicar el Centro de Servicio Autorizado más cercano a su domicilio en donde usted podrá encontrar partes, componentes, consumibles y accesorios. Procedimiento para hacer válida la garantía Acuda al Centro de Servicio Autorizado con el producto con la póliza de Garantía sellada o el comprobante de compra original, ahí se reemplazará cualquier pieza o componente defectuoso sin cargo alguno para el usuario final. Esta Garantía incluye los gastos de transportación que se deriven de su cumplimiento. Excepciones Esta Garantía no será válida cuando el producto: A)Se hubiese utilizado en condiciones distintas a las normales. B)No hubiese sido operado de acuerdo con el instructivo de uso que le acompaña. C)Cuando el producto hubiese sido alterado o reparado por personas no autorizadas por Applica Manufacturing, S. de R. L. de C.V. Nota: Usted podra encontrar partes, componentes, consumibles y accesorios en los centros de servicios autorizados. Esta garantía incluyen los gastos de transportación que se deriven de sus cumplimiento dentro de sus red de servicio. Panamá Servicios Técnicos CAPRI Tumbamuerto Boulevard El Dorado Panamá 500 metros al sur. Tel. 3020-480-800 sin costo (507) 2360-236 / 159 Perú Servicio Central Fast Service Av. Angamos Este 2431 San Borja, Lima Perú Tel. (511) 2251 388 Puerto Rico Buckeye Service Jesús P. Piñero #1013 Puerto Nuevo, SJ PR 00920 Tel.: (787) 782-6175 Republica Dominicana Plaza Lama, S.A. Av, Duarte #94 Santo Domingo, República Dominicana Tel.: (809) 687-9171 Venezuela Inversiones BDR CA Av. Casanova C.C. City Market Nivel Plaza Local 153 Diagonal Hotel Melia, Caracas. Tel. (582) 324-0969 www.applicaservice.com [email protected] 41 Sello del Distribuidor: Modelo: ESPAÑOL Comercializado por: Applica Manufacturing, S. de R. L. de C.V. Presidente Mazarik No111, 1er Piso Col. Chapultepec Morales, Mexico D.F Deleg. Miguel Hidalgo CP 11570 MEXICO Servicio y Reparación aArt. 123 No. 95 Col. Centro, C.P. 06050 Deleg. Cuauhtemoc Servicio al Consumidor, Venta de Refacciones y Accesorios 01 800 714 2503 Fecha de compra: Código de fecha / Date Code es una marca registrada de The Black & Decker Corporation, Towson, Maryland, E.U. 1 500 W120 V 60 Hz CAT. NO. EHB500 TYPE 1 160 W 120 V AC ONLY 60Hz Fabricado en la República Popular de China Impreso en la República Popular de China Importado por / Imported by: Applica Americas, Inc. Av. Juan B Justo 637 Piso 10 (C1425FSA) Ciudad Autonoma de Buenos Aires Argentina C.U.I.T No. 30-69729892-0 Importado por / Imported by: 42 APPLICA MANUFACTURING, S. DE R. L. DE C. V. Presidente Mazarik No111, 1er Piso Col. Chapultepec Morales, Mexico D.F Deleg. Miguel Hidalgo CP 11570 MEXICO Teléfono: (55) 5263-9900 Del interior marque sin costo 01 (800) 714 2503 43 Copyright © 2009 Applica Consumer Products, Inc. 2009/10-26-63E/S