1
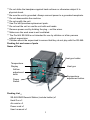
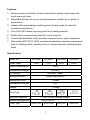
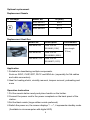
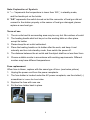
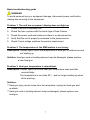
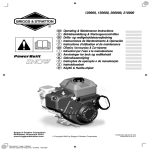
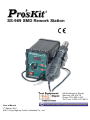
SS-969 SMD Rework Station
99 Washington Street
Melrose, MA 02176
Phone 781-665-1400
Toll Free 1-800-517-8431
User’s Manual
1st Edition, 2011
©2011 Copy Right by Prokit’s Industries Co., Ltd.
Visit us at www.TestEquipmentDepot.com
SAFETY INSTRUCTIONS
WARNING
Warnings and cautions are placed at critical points in this manual to direct the
operator’s attention to significant items. They are defined as follows:
WARNING: Failure to comply with a WARNING may result in serious injury or
death.
CAUTION: Failure to comply with a CAUTION may result in injury to the
operator, or damage to the items involved. Two examples are given below.
NOTE: A NOTE indicates a procedure or point that is important to the process
being described.
EXAMPLE: AN EXAMPLE is given to demonstrate a particular procedure,
point or process.
Be sure to comply with following WARNINGS and CAUTIONS for your safety.
WARNING
Do not change or disassemble any components related to this product, it may
cause product damaged.
When you need to replace the fuse, be sure turn off the power before
operating.
During working period, do not turn off the power suddenly, the heat gun
should be placed on the heat gun holder until cool off after power turn off,
otherwise it will damage the product。
CAUTION
When the power is ON, the temperature of the hot air and the nozzle ranges
from 100 to 450℃(212 to 842℉). To avoid injury to personnel or damage to
items in the work area, observe the following:
** Do not direct the hot air toward personnel or touch the metal parts near the
nozzle.
** Do not use the product near combustible gases or flammable materials.
** Advise those in the work area that the unit can reach very high temperatures
and should be considered potentially dangerous.
** Turn the power OFF when no longer using the Pro’sKit SS-969 or when
leaving it unattended.
** Before replacing parts or storing the unit, allow the unit to cool and then turn
the power OFF.
To prevent accidents and failures, be sure to take the following precautions:
1
** Do not strike the handpiece against hard surfaces or otherwise subject it to
physical shock.
** Be sure the unit is grounded. Always connect power to a grounded receptacle.
** Do not disassemble the machine.
** Do not modify the unit.
** Use Pro’sKit provides replacement parts.
** Do not wet the unit or use the unit with wet hands.
** Remove power cord by holding the plug – not the wires.
** Make sure the work area is well ventilated.
** The Pro’sKit SS-969 is not intended for use by children or infirm persons
without supervision.
** Children should be supervised to ensure that they do not play with the SS-969.
Packing list and name of parts
Name of Parts
Heat gun holder
Temperature
Display
Heat gun
Airflow
adjustment
knob
Temperature
adjustment button
Power
Switch
Packing List:
SS-969 SMD Rework Station (include holder) x1
Heat Gun x1
Air nozzle x 3
Power cord x1
User’s manual x1
2
Features:
1. Microprocessor-controlled, closed circuit sensor design, high power and
quick warm-up times
2. Adjustable air flow, air volume and temperature, suitable for a variety of
applications.
3. Handle with sensor design switching work & sleep mode for real-time
operation convenience.
4. Auto Cool-Off Process to prolong the life of heating element
5. Plastic shell, compact body, beautiful, small footprint.
6. Comes with brushless motor provides long service life, quiet in operation
7. Safe solder QFP, PLCC, BGA and other temperature-sensitive components.
Also for heating shrink, viscidity removal, lacquer removal, preheating and
more
Specification:
Model No.
Power Input
SS-969E
SS-969E7
SS-969B
SS-969H
110V
127V
220V
220V
Power Consumption
700W
Temperature Range
100-450℃
Air Volume
120L/min(Max)
Heating Element
Metal Heating core
Equipment noise
<45dB
Temperature Display
LED
Weight
Plug Type
1.43kgs
E
E
B
Machine Size(mm)
170x170x140 (include holder)
Overall package(mm)
280x182x170
Fuse Type
250V/10A
250V/10A
3
250V/5A
H
250V/5A
Optional replacement
Replacement Nozzle
IC Package
Model No.
ID (mm)
9SS-969-A1
Ø4.5
9SS-969-A2
Ø7.5
9SS-969-A3
Ø11.2
Replacement Heat Gun
Model No.
Description
Dimensions
5SS-969E-HG
Heat Gun for
225x60x40mm
SS-969E (110V)
(wire length
Heat Gun for
115cm)
5SS-969B-HG
SS-969B/H (220V)
5SS-969E7-HG
Heat Gun for
SS-969E7 (127V)
Application
1. Suitable for desoldering multiple components.
Such as: SOIC, CHIP, QFP, PLCC and BGA etc. (especially for flat cables
and cable connectors).
2. Ideal for heating shrink, viscidity removal, lacquer removal, preheating and
more
Operation Instruction
1.Put the rework station ready and place handle on the holder.
2.Connect the power cord to the power receptacle on the back panel of the
station.
3.Set the blast nozzle (large caliber nozzle preferred).
4.Switch the power on, the screen displays “- - -“, it represents standby mode.
(Available in microcomputer with digital LED)
4
5.Press “▲”or “▼”button as to set up the temperature.
6.Adjust the airflow knob to set up the required air volume.
7.Hold the handle, the equipment begins to heat. Adjust the knob of airflow in
order to set proper air volume, operate normally when temperature is stable.
8.Put the handle back on the holder after work, the SMD station switched from
heating mode to cooling - off mode automatically. When the temperature is
lower than 100℃, the station switching to standby mode.
9.Switch the power off and unplug the power cord if there has no operation for a
long time.
Attention
Please set up the temperature as lower as possible in high airflow volume as to
prolong heating element service life and better IC chips protection.
Setting up Temperature
1. Press “▲”or “▼”button to set up the temperature, the screen displays the
setting temperature.
2. Press “▲” once the temperature degree increase 1℃, and the screen displays
the setting temperature.
Press “▼” once the temperature degree decrease 1℃,and the screen
displays the setting temperature.
When press the “▲”or “▼” button continuously, the temperature will
increase or decrease rapidly, after the button is released, the screen
displays temperature for two seconds and displays setting temperature
or display “- - -“ for standby mode.
5
Note: Explanation of Symbols
A. “- - -“represents the temperature is lower than 100℃ in standby mode,
and the handle put on the holder.
B. “S-E” represents the switch turned on but the connector of heat gun did not
connect to the station properly or the sensor of heat gun damaged, please
replace a new heat gun.
Terms of use
1. The air outlet and its surrounding area may be very hot. Be cautious of scald.
2. The heating handle shall not be put on the working table or other place
except its holder.
3. Please keep the air outlet unblocked.
4. Place the heating handle on its holder after the work, and keep it cool
naturally and turn into standby mode, then switch the power off.
5. The distance between the air outlet and the object shall be no less than 2mm.
6. Choose suitable nozzle in accordance with working requirements. Different
nozzles may have different temperatures.
Fuse replacement
When fuse is blown, replace with the same type of fuse. (see below picture)
1. Unplug the power cord from the power receptacle.
2.
The fuse holder is located under the AC power receptacle, use the slotted (–)
screwdriver to loosen the fuse holder
3. Replace the fuse with new one
4. Put the fuse holder back in place
6
Basic troubleshooting guide
WARNING
To avoid personal injury or equipment damage, disconnect power cord before
making any servicing to the equipment.
Problem 1: The unit has no power / display does not light up.
1. Check if the unit is switched ON.
2. Check the fuse, replace with the same type of fuse if blown.
3. Check the power cord and make sure there is no disconnection.
4. Verify that the unit is properly connected to the power source.
5. Check if local voltage matches the product requirement.
Problem 2: The temperature of the SMD station is not rising.
Description: Display lights up but the temperature of heat gun is relative low and
not heating up.
Solution: heat gun cord or heating element may be damaged, please replace
a new heat gun.
Problem 3: Heat gun temperature is intermittent.
Description: Display lights up but the heat gun temperature rises and falls
uncontrollably.
The temperature is less than 50℃, and no longer heating up when
at the working。
Solution:
** Heat gun plug may be loose from the receptacle, unplug the heat gun and
re-attach
** Heat gun cord or heating element may be damaged, please replace new
heat gun.
7
©2011 Prokit’s Industries Co., LTD. All rights reserved 2011001(C)
15